Most likely, you are already familiar with the node.js platform. This platform is provided as an open-source and asynchronous backend JavaScript runtime and is in JavaScript language. One of its features is non-blocking I/O, which has turned node.js into a convenient, powerful, and high-speed environment. This article proposes to teach you the best solution to install Node.js on Linux Mint.
Best Features of Node.js
In the introduction, you got acquainted with one of the prominent features of node.js. Now, we want to introduce you to other features of this platform:
– Node.js library is in high-speed in code execution
– It is asynchronous and event-driven
– No buffering
– It is highly scalable but single Threaded
– It is released under the MIT license
Installing Node.js on Linux Mint
Before starting the Install Node.js on Linux Mint training, we recommend you choose and buy the Linux VPS Server plans provided on our website and enjoy its high quality. In this part, you will learn how to install Node.js step-by-step.
You should start the installation process by updating the system repository. Use the command below:
sudo apt update
Now you should install all the dependencies as it is necessary before the installation. Run the following command for this reason:
Now that you successfully set the node.js source repository, you are ready to install the program on Linux Mint:
sudo apt install nodejs
If you want to check the status and verify the installed version, apply the command below:
node --version
Well done! Now, you can enjoy using this platform.
Testing Node.js on Linux Mint
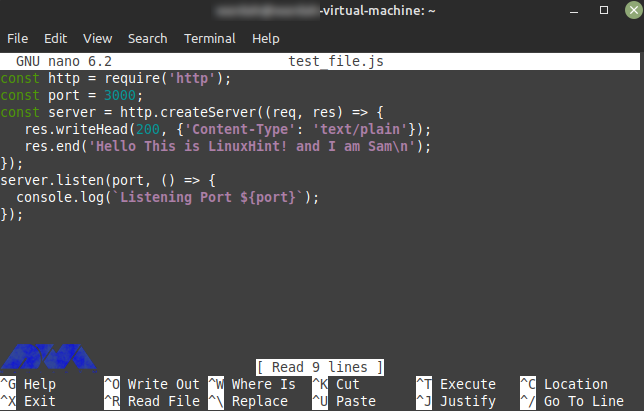
Use a nano editor or any editor you desire to create a simple JavaScript file and type a simple program:
nano test_file.js
The output should be like this:
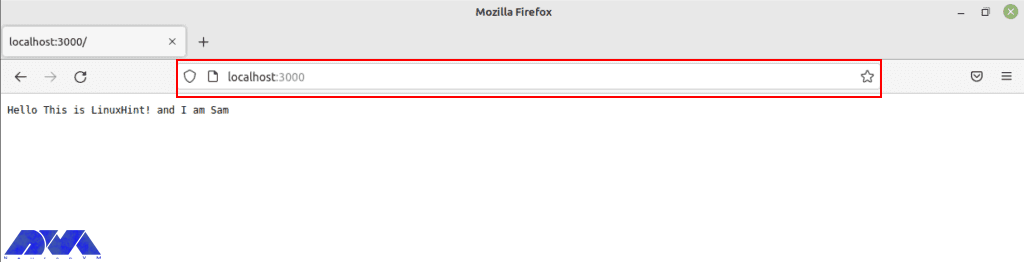
You should save this program in your editor, and if you want to see the output, open any browser. To do this, execute the following command.
Note that the local port to run a web server is 3000.
node test_file.js
The image below shows the way to verify the installation of Node.js. Type the port in the browser:
Uninstall Node.js on Linux Mint
If you don’t need Node.js anymore and you want to remove it from your system, use the mentioned command below in the terminal:
sudo apt remove nodejs
Conclusion
Here, you learned how to install Node.js on Linux Mint with an easy method. We also tried to show the way to test the program with an editor and the way to remove Node.js if you don’t need it. Install and enjoy using this Java program. If you need any help, please let us know by leaving a comment.
FAQ
Which Linux type is better for Node.js?
Ubuntu or Linux Mint are the best matches for Node.js, especially if you are a beginner.
What are the system requirements for Node.js?
A minimum of 50-100 MB of free disk space and 512 MB RAM is needed to use this program but 1 GB is recommended.
MikroTik is a Linux-based operating system known as MikroTik RouterOS, and by installing it on the dedicated RouterBOARD hardware, it turns the hardware into a network router. Mikrotik works as a firewall, private network (VPN) server, and client, forming and enhancing the quality of broadband services, use as an access point, and other features in wireless networks. After reading this post you will learn How to Install and Setup Mikrotik on Dedicated Server. Therefore, we recommend you stay with us until the end of this post.
Tutorial Install and Setup Mikrotik on Dedicated Server
In this section, we will give you a complete guide to show how you can install Mikrotik on your dedicated server. So study carefully.
Mikrotik Features
Support Second Layer Forwarding
Support OSPF and BGP and VPLS/MPLS Routing Protocols
Powerful firewall up to the seventh layer
WEP, WPA, and WPA2 encryption
Multiple Tunneling Protocols such as OpenVPN, PPTP, PPPoE, and L2TP
IPv4 and IPv6 support
Email and SMS tools
Bandwidth Test
CALEA Data Mirroring
File Fetch tool
TFTP server
RADIUS and NTP client and server
Install Mikrotik on Dedicated Server
Before starting the Install Mikrotik on Dedicated Server training, we recommend you choose and buy the Cheap Dedicated Server plans provided on our website and enjoy its high quality. The first step should be to use SSH in order to connect to a server.
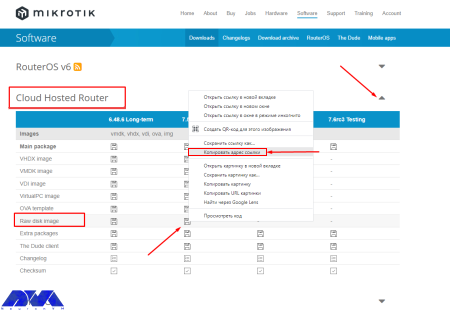
Then, refer to the software section on the official Mikrotik website. Note to download the stable distribution version or the long-term one.
As your next step, you should open cloud hosted router and copy the related link to download the raw disk image:
As you entered the server console, run the command below to download the row image to your server:
Use the following command to install the unzip tool on the server:
yum install unzip
Now use the command below to unzip the installation image:
unzip chr-7.5.img.zip
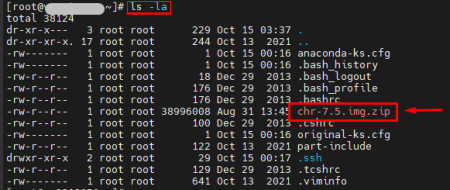
Note that the installation file name above which is unzip chr-7.5.img.zip may be different, so check your file name using the below command:
ls - her
As a result, you will see the list of necessary files:
Apply the following command if you want to find out the name of the server disk that you should install routerOS:
fdisk -l
In order to write the previously unzipped installation image, to the /dev/vda disk, use the command below:
dd if=chr-7.5.img of=/dev/vda bs=4M oflag=sync
Here, we will use an unusual way to restart the server (for example, when the disk is not available). Run the necessary commands on the server console :
echo 1 > /proc/sys/kernel/sysrq
echo b > /proc/sysrq-trigger
As you finished this part, no longer you can access the server via SSH.
Setup Mikrotik on Dedicated Server
If you want to connect to the routerOS like using SSH, win box, or web access, you should setup the network interface on the server. For this reason, use VNC to connect to the server from your personal account.
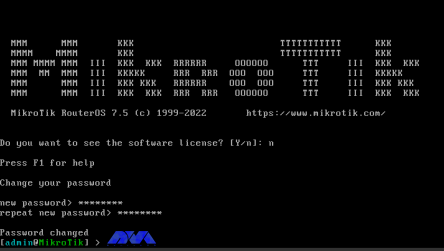
As you encounter the login prompt enter admin.
Press Enter, as you asked to insert the password. Then, RouterOS will ask you to introduce yourself with the license and request to change your password. So enter your new password and confirm that:
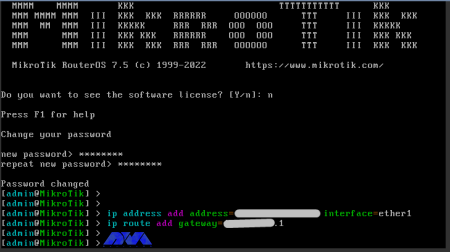
In the vmmanager server control panel you can find the IP address, mask, and gateway of the server. So, highlight the server and click on the IP Addresses button. Then, enter the command to configure the IP address in the RouterOS console:
IP address adds address=xxx.xxx.xxx.xxx/24 interface=ether1
Tip: xxx.xxx.xxx.xxx is the IP address of your server.
Now, the following is the gateway configuration command:
ip route add gateway=yyy.yyy.yyy.yyy
Tip: yyy.yyy.yyy.yyy is your server gateway:
In the end, in order to enter the RouterOS settings, use the link in your browser:
http://хх.хх.хх.хх/webfig/
Note: The link is your IP address:
Conclusion
At the beginning of the article, Mikrotik was introduced and its features were mentioned. You can install Mikrotik on a dedicated server with the help of our step-by-step tutorial.
FAQ
Is Mikrotik a Linux base operating system?
Yes, Mikrotik is a stand-alone operating system based on Linux.
Do we need to have a license for Mikrotik?
Mikrotik devices come preinstalled and they have a license. There is no need to pay any money.
Here, we will discuss VDI and RDS technologies types for virtual desktops. These two are alternative desktop virtualization and remote desktop technologies. These solutions were created to achieve desktop virtualization. VDI and RDS have their own characteristics. So, we decided to examine these technologies and presented an article including the comparison of VDI vs RDS, advantages and disadvantages to give you a clear guide and help you to decide between them.
What is VDI?
The way it works in the virtualization system VDI (Virtual Desktop Infrastructure) is in such a way that a desktop operating system is managed and controlled by a remote server. Users use this technology to log into a remote server and create a separate virtual operating system that runs for users on top of a hypervisor. When the user logs in, the connection broker connects their session to the virtual machine.
What is RDS?
Remote Desktop Services (RDS), was developed by Microsoft with the aim of making users less dependent on their local desktop. This technology was known as Terminal Services prior to 2008. RDS is very useful because it is helpful for users in accessing desktops and applications from different types of client applications and devices via Microsoft’s Remote Desktop Protocol (RDP).
What is the Difference Between VDI and RDS?
RDS and VDI offer similar functionality. With both of these technologies, users log on to a remote system, which provides users with a desktop containing all the software they need to carry out their work. You can store all files and applications remotely. Troubleshooting issues is very easy and also handles software upgrades. We suggest you choose and use the Admin RDP plans of our website.
VDI vs RDS
The experience of using RDS or VDI is almost the same for users. However, there are significant differences between the two that focus on aspects such as:
– Flexibility
– Reliability
– Maintenance
These differences make each solution compatible with different types of organizations based on the requirements.
Now, we will analyze the advantages and disadvantages of VDI and RDS.
What are the Advantages of VDI?
Here are some advantages of Virtual Desktop Infrastructure:
Improved User Experience
As VM is separated from the rest of the system, you will have no connection problems. This will cause to allocate more power to the users who really need that. For example, users who use memory-intensive software such as Photoshop can run a Windows desktop operating system instead of a Windows server with the help of virtual machines, and in this way, things go faster and easier.
The Possibility to Choose Application
If you use VDI you can have a wider range of applications to use and there will be fewer compatibility issues.
Offline Working
Offline working is supported by VDI. As a result, users can continue to work even without the Internet, so that when they come back online, data can be easily synchronized with the server.
Device Flexibility
VDI is created in a way that users can connect with their own smartphone, laptop, tablet, or desktop.
What are the Disadvantages of VDI?
These are the disadvantages of VDI:
Higher Upfront Costs
Using VDI involves a lot of costs. These costs include Hardware costs, software costs, and finally IT support costs.
IT Staff that are Dedicated
VDI server has a skilled and professional team or IT provider to set up and manage virtual machines and systems.
What are the Advantages of RDS?
Everyone on your team can log in to the same Windows server to execute the applications, and each user can have their own session. Some other advantages are:
Lower costs
RDS Includes minimal cost. Also, low costs include minimal demand for hardware costs.
Simplicity
This solution is really simple to setup and you can add new users for a split second.
Easier Maintenance
Maintenance is also easier and quicker in RDS.
What are the Disadvantages of RDS?
In the end, we will point to some disadvantages of RDS:
Limited Application Use
You can not run every application on RDS.
Connectivity Problems
To use this server you should always be online.
Limited Personalization
You can not customize the desktop or applications you use on this server.
Performance
The performance of the server may decrease if users use the system at the same time.
Which Solution Is Better; VDI or RDS?
There is no definite answer. It depends on your goal. That is if the users are more and they should use the same server and do similar tasks and applications, RDS is a better choice. Also, you will pay less. But, if you are willing to use less-common programs and your users are different with different types of work, it’s better to use VDI.
Conclusion
As mentioned here, VDI or RDS are two great solutions for you to ease your work when you want to connect to the server or systems and use different applications. We tried to compare these two (VDI vs RDS) and specify their characteristics, and also help you to make a better and clear choice. We hope you enjoy the article.
FAQ
Can we use VDI and RDS together?
Yes, this option is possible in a hybrid deployment. So, you can leverage all of the benefits of these solutions at the same time.
Which Solution is more secure; VDI or RDS?
In VDI each user has its own server so VDI offers higher security than RDS.
Viruses or malware are malicious programs that are used to destroy your system. Now, if you suspect this type of malware or viruses and shell scripts in your dedicated system, there are tools that you can access in the WHM panel and scan this malicious content. But first, you have to enter WHM. This article concentrates on the way to learn how to install Antivirus on a Linux Dedicated server.
Setup Antivirus on a Dedicated Server
As you notice, having an antivirus on your dedicated server is really essential because of your system’s security. You can use some apps for scanning viruses on the server. Before you start Installing Antivirus on Linux Dedicated Servers, you need to install Cpanel on the dedicated server first. We also suggest you use the Cheap Dedicated Server plans with instant delivery provided on our website.
When you want to install and setup antivirus on a dedicated server, you have two options:
– The first one is using ClamAV
– The second one is ImunifyMV
Let’s see how these two work.
How to Install ClamAV on a Dedicated Server
As we mentioned before, ClamAV is one of the ways to scan viruses on the dedicated server. Here, we are going to show how you can install and setup ClamAV.
First, you should log in to the WHM.
Then, Click on the Cpanel option in the WHM and search for the Cpanel menu:
Now, you can see the Manage Plugins option. Using this option, you can manage the plugins for the Cpanel account:
Here, different plugins are available for you. Click on the ClamAV option. Note that you can use this option to uninstall the plugin, too.
The installation process will take a few minutes. After the installation, the Log Entry will be produced along the process and displayed on your screen. After the successful installation, you will see the message about that:
Configure ClamAV on a Dedicated Server
Now we will show you the way to configure ClamAV on your system. Here is a step-by-step instruction to follow:
1- On WHM, search for a Feature and choose the Feature Manager. Then go to the Manage Feature List, select Just Host, and click Edit.
2- Activate Virus scanning and click the Save button.
How to Install ImunifyAV on a Dedicated Server
Another app to scan viruses on your system is ImunifyAV. Here, we will show how you can do the installation and setup in steps. Follow the instructions:
1- Use SSH or Putty to connect to your server.
2. You can download the ImunifyAV shell script from Imunify360.com/antivirus. Here is the command:
3- Execute the installation shell script using the following command:
bash imav-deploy.sh
4- Now, use the command below to update ImunifyAV:
yum update imunify-antivirus
5. Enter the WHM.
6. On the left side of the panel, select ImunifyAV.
7- Choose the right arrow button under the actions column to scan the account.
8- Now, click on Yes, Scan to confirm the user’s file, or choose Scan All to scan the entire files, and at last, Yes, Scan All to scan all Cpanel user files.
Configure ImunifyAV on a Dedicated Server
Select the Settings button with the gear icon.
Adjust Resource Consumption according to your needs.
Then, configure the background scan time or disable run scanning from the drop-down menu.
Unmark the enable sentry error reporting option and save the changes.
Conclusion
As you learned from this article, you can install and configure different apps to scan viruses and malware on your system. Here, we analyzed ClamAV and ImunifyAV. Two popular tools for scanning viruses. We hope you enjoyed the tutorial. If you have any ideas or questions please share in a comment.
FAQ
Why an antivirus is essential for a dedicated server?
It is crucial for maintaining the security of your system and also for the integrity of your data and applications. It is helpful in detecting viruses and malware.
Is it possible to install various antiviruses on a single system?
It is not recommended. It causes conflicts, performance issues, and false positives in your system.
One of the most familiar and practical VPN protocols is OpenVPN. It is famous for its security and excellent connection speed. You can use its official client for free. But there are many users who report that OpenVPN is not working on their Windows 10 PCs. If you also have problems working with this VPN, we will help you this way and show you how to fix OpenVPN errors on Windows 10.
What Is OpenVPN?
OpenVPN is a very popular open-source VPN client and VPN protocol. If your goal is to create a secure web tunnel, you can download and install an OpenVPN client for free on all popular systems and access all resources easily. But as mentioned before, you may encounter problems in each of these steps. So we recommend that you read this article carefully. To use OpenVPN, you can buy Windows VPS servers that are presented on our website with excellent quality.
OpenVPN Errors on Windows 10 and Its Solutions
Here are some of the most common OpenVPN problems and the ways to solve them:
The Error of TLS Key Negotiation Failed to Occur In 60 Seconds (TLS Error)
Various reasons should cause this problem. The main reason is that the client program is old. To be sure of this, enter the server and examine the log file on the server side. There is a strong possibility that the client application is an old version. For example 2.2. If you see such messages on the server side:
If you want to solve this problem you should upgrade it to the latest version.
Another reason can be a block in a firewall or in the ISP that somehow blocks or interferes with the TLS handshake. The next thing would be to change the settings related to the TLS minimum requirement level, but the OpenVPN client uses an old version that has incorrect instructions.
Solution:
The solution may be to install a new copy of the configuration profile.
The Error of Local or Remote Keys is not synchronized
There may be cases where the TLS key negotiated to be used for TLS encryption and decryption differs from the key used on the server side. Because when the client and the server talk to each other, they use a common TLS key that is used to encrypt and decrypt the traffic. There should be a short overlap where both the old and new keys are accepted but when the old key is expired and the new key must be used. As a result, for some reason one side doesn’t do this and there is no synchronization, so, you will see this error message.
Solution:
In this case, use an openvpn3-based client. This client could be OpenVPN Connect Client 2, update it to the latest version. So the solution is to update your access server to the latest version so that you can put the updated connection client on it. Then download and install the latest version of OpenVPN Connect Client from the Access Server section. Finally, despite the reduced security, you can change the TLS key update on the VPN page of the admin interface to get rid of these problems.
The Error of Server Poll Timeout
If you get a server poll timing error, it means that the server is not reachable on the specified port. Here the error message is quite clear: that is, there is no response at the address or port. When you see this error, check if the port is really open and the port is correct or if the port is accessible from the Internet, etc., to make an initial connection to the server to confirm. As a result of these symptoms, you will see the message “This server cannot be reached”.
Also, another mistake is that you forget to open the three ports that are required for the OpenVPN access server. These ports are TCP 443, TCP 943, and UDP 1194.
Solution:
To solve this problem, you can set a DNS name, and then configure and save it. In the next step, you need to delete the connection profile or the OpenVPN connect client program, and then download and install again and test it.
The Error of OpenVPN Doesn’t Connet
Another common issue is that Windows or Admin RDP may fail to connect to OpenVPN. As you downloaded the new version of OpenVPN, some connection and compatibility issues may encounter, or the new version may fail to create a virtual network adapter.
Solution:
Opening a VPN client can solve this problem. Go through these steps:
1- Install and run OpenVPN under an administrative account.
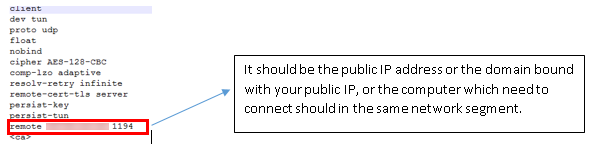
2- Analyze the settings on your computer and your router. You have to be sure that the WAN IP address is public or that the IP address to connect must be on the same network. As you export the configuration file, you can open it as txt, and recheck the IP address and port are correct or not.
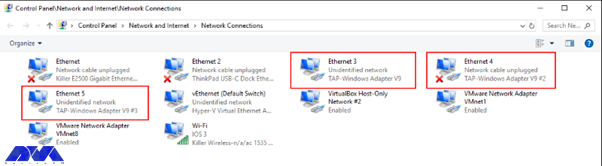
How to fix OpenVPN errors on Windows
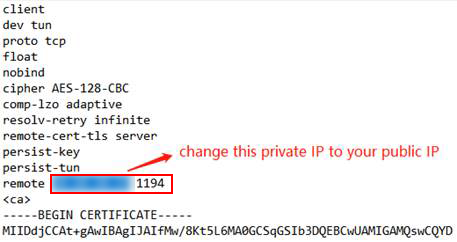
3- If there is a NAT router in front of the VPN server, note that you have done port forwarding. Then, do the update manually to the “remote IP address” in the previously exported .ovpn file. Change the previous IP address to the network’s public IP address:
4- Then, choose to activate the TAP adapter:
5- You should close the firewall and security software.
The Error of Your Session Has Expired, Please Reauthenticate
As you use a server-locked or user-locked profile, the OpenVPN Access Server works with a session token-based authentication system. Then after successful authentication, you will take a session token instead. You will be identified by the session token now. The session token is set to expire after 5 minutes of inactivity when it is not connected to the server, and will also expire after 24 hours by default. Also when the token is generated on the server, it will be locked to the VPN client’s connecting IP address.
Solution:
This action can be disabled and the timeout for the total session duration can be set. So, you should either employ an auto-login type profile or raise the session token duration.
The Error of User Account Suspended or User Is in Deny List
This error will occur for two reasons:
1- In the User Permissions table, the deny access box is activated with a check mark for the user.
2- The box of The user is authenticating with an external system because the User Permissions Required for VPN Access record box is checked, then the user’s permissions table does not exist or does not match the username of the external system.
Solution:
When you want to solve the deny access box:
Enter the admin web UI, click on User Management, then go to User Permissions.
You should click on Deny Access and remove the check mark for the username.
Save the setting and update your running server.
If you want to solve the issue with the requireduser permissions record for the VPN access box:
Go to the user permissions table and add the user if it doesn’t exist.
You should be sensitive about the spelling and case match between the access server and the authentication server.
As you see the required user permissions record for the VPN access option, uncheck the box in the user permission table.
The Error of Open Tap Device “” PATH=”” FAILED TUN or Can Not Acquire Tap Handle Event
This error message will occur when the OpenVPN Connect 3.x service stops or does not start again when you sign back into the computer. The cause of this problem is an antivirus program. Mostly, this happens for ESET Antivirus.
Solution:
To solve this problem, you can reconnect by restarting the service manually, note that the automatic connection may still encounter the problem. If you want to be sure, turn off ESET. As your problem is resolved, then you may want to open a support ticket with ESET.
The Error of OpenVPN Connect Is not Showing on Windows 10
As you click on the shortcut, nothing shows up. The OpenVPN Connect window is missing. As you tried to install and re-install you will still get the same error. There is no error message appearing. It’s a bit scary.
Solution:
The only thing to do is to delete the file called “.ovpn-connect-lockfile“. Then, go to the C:\Users\YourUserName\AppData\Local\Temp. Simply delete the .ovpn-connect-lockfile file and restart OpenVPN Connect. That’s it.
Conclusion
OpenVPN is one of the most powerful VPNs which can be used on Windows. Here, we tried to make you familiar with some of the issues and errors of using OpenVPN on Windows 10. These are some common issues with solutions. So if you encounter any of them, read this article carefully to fix OpenVPN errors on Windows and enjoy using this great VPN.
If you are going to install WordPress, you should know that you can do it without technical acknowledgment because it is very easy. The content below, will mention some of the advantages of WordPress and explain the installation process step by step. By reading this article, you will learn How to Install WordPress on DirectAdmin. Therefore, we suggest that you stay with us until the end.
Some Features of WordPress
WordPress contains lots of features and here we will mention some of them.
_ It is easy to use: Creating a website is an easy process using WordPress. Also, you can edit this platform from everywhere. WordPress is user-friendly.
_ It is mobile-responsive: Nowadays, users can access the internet from anywhere with their mobile phones. they can also control their websites through their mobile phone. This popular platform has Thousands of different themes. that is, they change the way the pages are displayed according to each user’s device.
_ It is Versatile: WordPress can help you to make your brand and website stand out. It also makes it easy to share. it has a lot of plugins to assist and customize websites better and is an open-source content management system. So consider all these options, WordPress is versatile.
Two Methods to Install WordPress on DirectAdmin
Installing WordPress is an easy process. You can use two methods for this reason. Let’s analyze these two. We recommend that you visit our VPS server plans to install and set up WordPress on DirectAdmin and enjoy the high quality of these services.
Installing WordPress on DirectAdmin Using Installatron
During the installation phase of WordPress on the Directadmin, if you use the Installatron, the installation process will be very easy. Installatron is a one-click web app installer that will make all photo galleries, stores, forums, and other top programs to be installed quickly on your desired domain name. So follow the steps below to install with the help of the installatron.
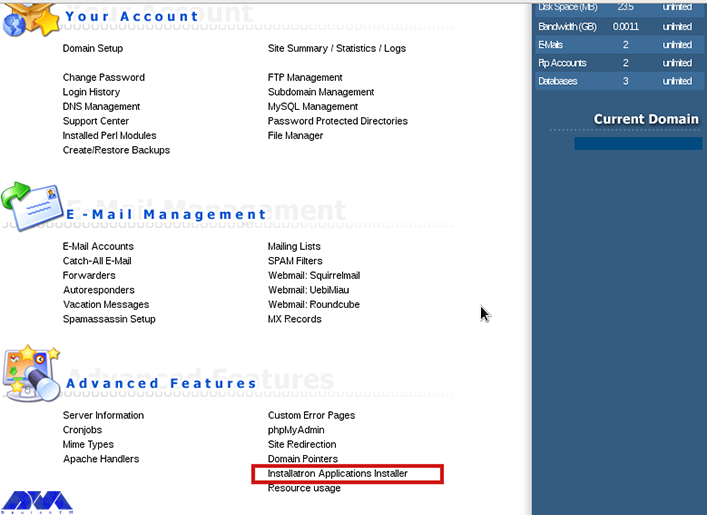
– As the first step, log in to DirectAdmin and choose the Installatron application installer:
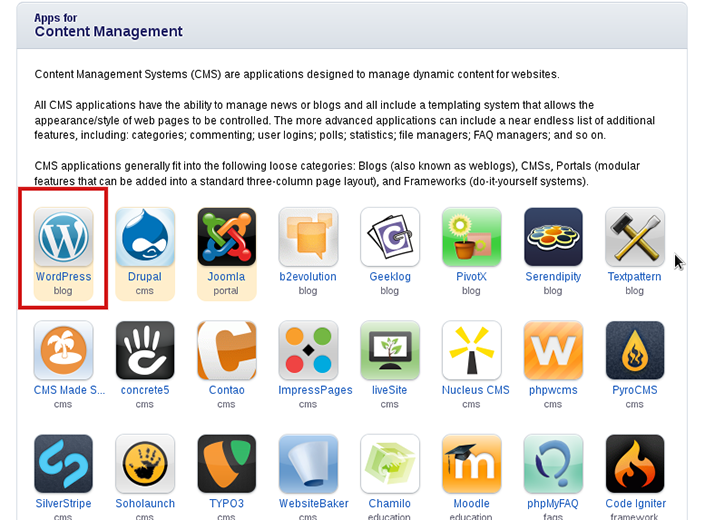
– Here, You are able to select your desired application. The application to install in this article is WordPress. Choose and press to install:
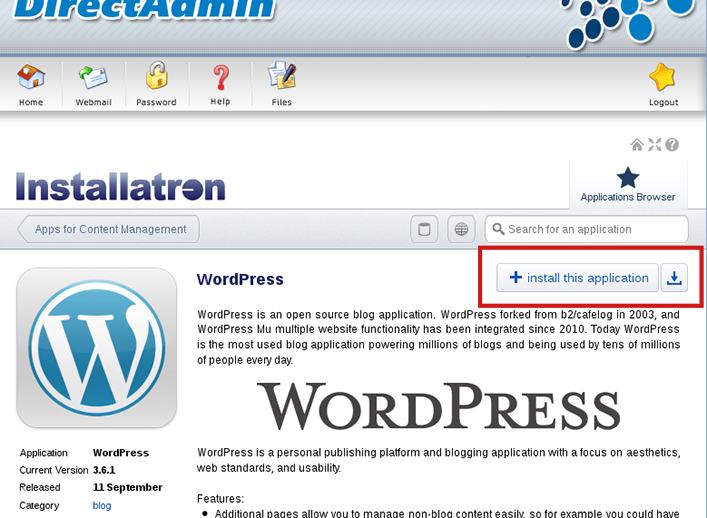
– As you open the WordPress application, press on Install this application:
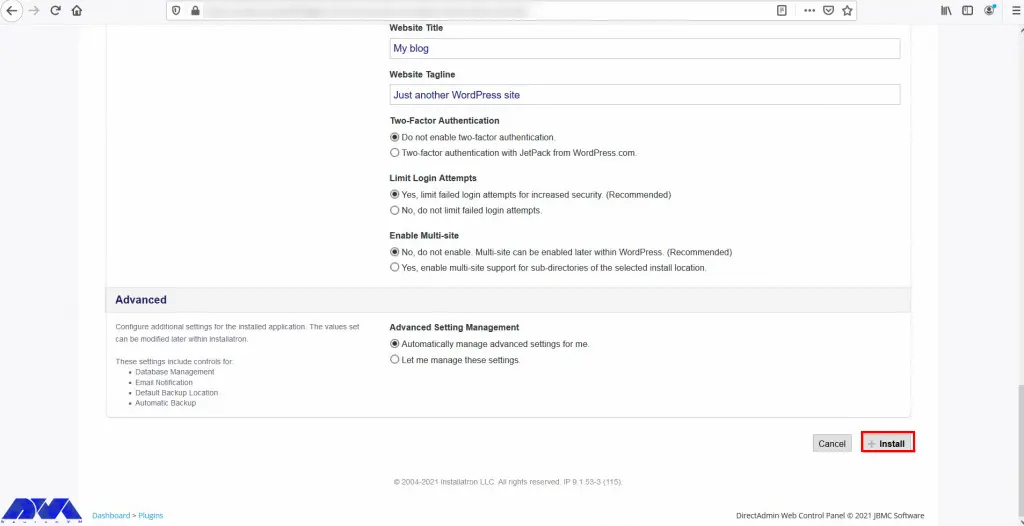
– Then, choose your Domain and determine the directory that you want to put your WordPress file in. Click on the Install button:
###
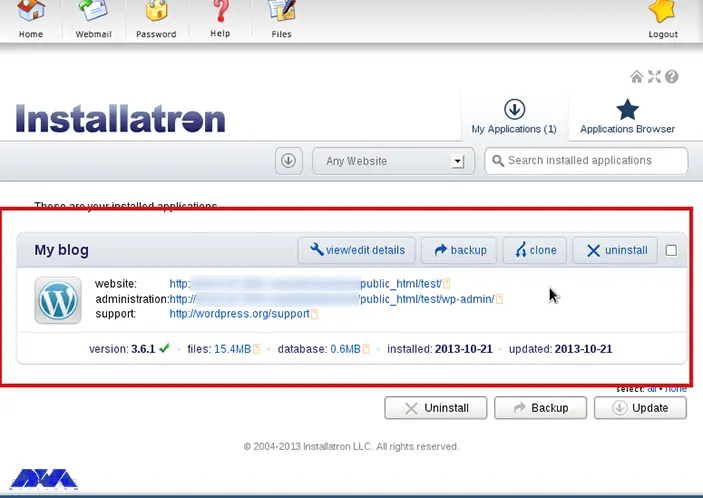
– Click on the Install button. you will start the installation process this way and you will be notified when it is finished:
– As you started the installation, it will take a few seconds for WordPress to install successfully. When it’s done, you can access the admin section of the WordPress site to customize.
Installing WordPress on DirectAdmin Manually
Here you can find the steps for installing WordPress manually:
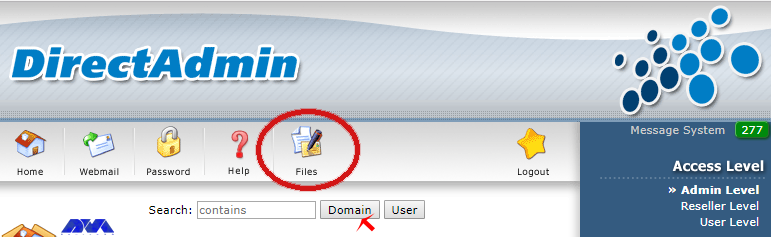
3- Now, you will see an overview of files and folders, select the Domain in which you want to install WordPress, from the files. Here, select the public_html folder:
Tip: If you want to use a subdomain, click Upload Files to Current Directory.
4- Upload the WordPress .zip file. You should select the option to Upload files to the current directory. Then, select the required file and click the option Upload Files, and click on the Click here to go back option.
5- Extract the WordPress zip file in the pubilc_html.
6- You have to move up the WordPress extracted file. Go to the public_html folder to see ‘WordPress-4.9.4.zip‘ (or the current version). select ‘Extract‘.
7- There is an overview of the content which is going to be unpacked. It is recommended not to change your directory Under Directory. Click ‘Extract’ again to start unpacking.
8- WordPress files will stop in the ‘wordpress’ folder in the .zip file. As a result, there is a new folder in your public_html folder called ‘WordPress’. So, Click to open the folder.
9- Select ‘Select’ > ‘Add to clipboard’ > ‘../ Up a Level’ to select all files and folders on WordPress.
10- Here is the option of ‘Move Clipboard Files here’ at the bottom right, click it. You will encounter a question of whether existing files may be overwritten. press ‘OK’, without all files, your WordPress site would not work. Delete the WordPress folder and the .zip file by checking them and pressing the ‘Delete’ option.
You have installed WordPress successfully on your DirectAdmin control panel.
Later, you can do the setup. Access the WordPress site via browser and enter all the required data.
At last, provide user credentials and Install WordPress.
Well done! you finished the installation and now you can enter WordPress.
Conclusion
This article helped you to learn how to install WordPress on DirectAdmin. Now you can use this content management platform and manage your website easily. WordPress with a user-friendly structure is one of the most popular assistants for users. We hope you enjoy this content. If you have any problems or ideas, just share them in the comments.
FAQ
Do we need FTP for WordPress?
Yes, it will be helpful because you can use it even when there is a problem with your WordPress site.
Is DirectAdmin better than Cpanel?
Cpanel uses more storage and disk space than DirectAdmin. On the other hand, Cpanel contains more features and functionality. Some advanced made for DirectAdmin and it provides support for more features now.
Plesk is one of the popular control panels that is used a lot. This control panel supports a great database server for Windows which is called SQL. Here, we will give good guidance for troubleshooting SQL server errors on Plesk. You may encounter different problems in different steps, so in this article, we will troubleshoot SQL Server Errors on Plesk.
What is Plesk?
If you want to get acquainted with a practical and important tool for hosting service providers, Plesk is one of the best options. Plesk is a useful tool designed to help IT professionals manage the web, email, DNS, etc through a user-friendly GUI. This control panel acts as an intermediary between the system and users. To make it clear we will give an example. When you create a website using Plesk, Plesk submits this request to a web server, and the latter adds a new virtual host to the system.
What is SQL Server?
The SQL database management system is a Microsoft server and acts as a database server that stores and retrieves data as requested by other software on the same computer or a remote computer using a client-server model. Also, Microsoft provides APIs over the Internet as a web service to access SQL Server. An RDBMS does much more than fetch data for client applications. Internal functions of this server, such as buffer management, ensure that the most accessible data is available in the fastest form of storage to speed up access.
SQL Server Errors on Plesk and their Solution
Let’s analyze some of the SQL server errors on Plesk and troubleshoot them.
It Is not Possible to Determine the TCP Port Number Used by SQL Server
When you encounter this error on the database server, it means that you are unable to connect to a SQL server remotely through Microsoft SQL server management studio. It will be shown like this:
The cause of this problem is that the SQL server is not configured to use a static port.
Then, go through the following pass: Start / All Programs / Microsoft SQL Server XXXX / SQL Server XXXX Configuration Manager. Note that xxxx is the version of the SQL server.
Here, you should extend SQL Server Network Configuration and then click Protocols for MSSQLSERVERXXXX.
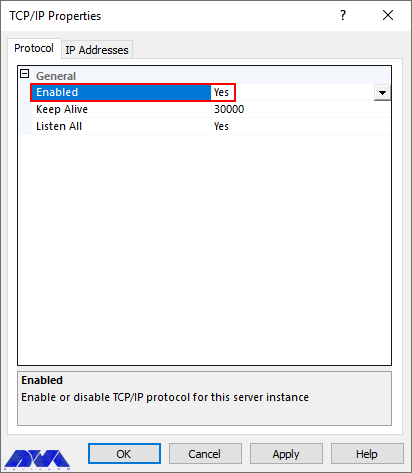
Now, you should double-click on TCP/IP. Go to the protocol tab and check if the TCP/IP protocol is Enabled:
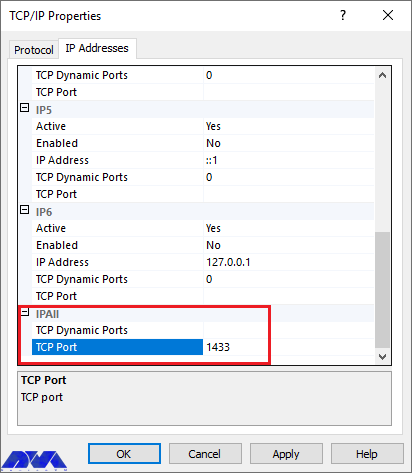
you should refer to the IP Addresses tab and scroll down the window to the IPAll section.
Determine the default MS SQL port number 1433 (or a custom port number if 1433 is already used) in the TCP Port field. Now click Ok:
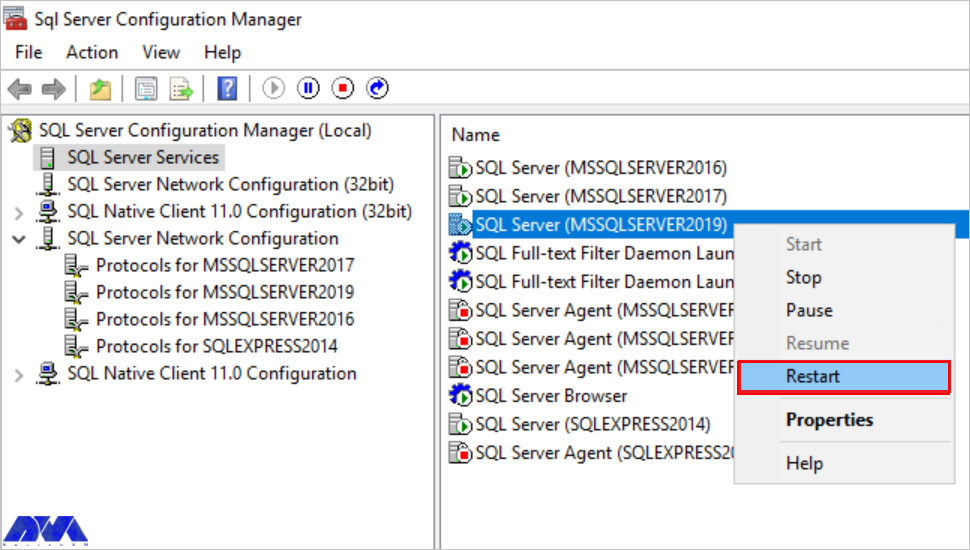
Refer to SQL Server Configuration Manager (Local) then SQL Server Services,
Right-click on SQL Server and press Restart to apply the changes.
Troubleshooting SQL Server Errors on Plesk
Now you can log in to Plesk. The last action is referring to Tools and Settings, then Database Servers, and .\MSSQLSERVERXXXX > Settings. Now, press Ok to apply settings with Plesk.
It Is not Possible to Import MySQL Database From .tmp file in Plesk
The error that occurs, for this reason, is ASCII ‘\0’. It reason is that MSSQL dump restores into the MySQL database.
Solution:
First, enter the Plesk.
Then refer to Domains and then Example.com and Database. Click Database to create an empty MSSQL database. Then select a MAAQL database server in the create step.
Press the Import dump and choose the Database dump file.
It failed to Backup or Upgrade Database on Plesk (mysqldump: unknown variable)
The reason for this error is that, in the [mysqldump] section of the MySQL configuration file, the directive is set incorrectly.
Solution:
Use SSH to log in to the server and run the command below to find the MySQL configuration file.
The error messages in the Log /var/log/mysql/error.log can be like this:
InnoDB: Error: log file ./ib_logfile0 is of different size 0 5242880 bytes
InnoDB: than specified in the .cnf file 0 536870912 bytes!
[ERROR] Plugin 'InnoDB' init function returned error.
[ERROR] Plugin 'InnoDB' registration as a STORAGE ENGINE failed.
When you want to run MySQL check, the error will be like this:
Also, you may encounter the following error after the backup process:
Warning:domain "example.com" Unable to backup database content. Database example_db. Db server .\MSSQLSERVER2014:[Cannot open database "example_db" requested by the login. The login failed. Login failed for user 'NT AUTHORITY\SYSTEM'.]
The reason for this error is encrypted procedures in the database which are not supported by Plesk. The bug ID PPPM-5693 may be reported because of that.
Solution:
Currently, the only way to avoid this is to not use encrypted procedures in MSSQL databases.
It Is not Possible to Add Remote Microsoft SQL Server for Windows
In this error, network problems cause the test connection to the database server to be failed.
It is not possible to connect to an MS SQL server by telnet or other TCP clients.
There are two reasons for this, firstly, the firewall on the MS SQL server is blocking the connection, and secondly, the remote server is not properly configured and does not accept connections.
Solution:
The remote SQL server should accept connections from non-local clients.
You must either disable Windows Firewall or configure it to accept connections to SQL Server.
If the problem persists, contact your SQL administrator to clarify access and configuration restrictions.
There is no Import Dump and Export Dump Buttons in Plesk
The reason for this problem is that the database server with the hostname or IP set has behaved like a remote server by Plesk. You have not configured remote backup settings.
Solution:
Enter Plesk and go through one of the solutions:
Use the localhost hostname to reconnect the database server instead of the server hostname in the Hostname field. you can configure Remote backup settings for the existing database server.
It Is not Possible to Create a Backup from PostgreSQL Database
This problem will occur because of the Plesk bug with ID PPPM-5078. But it can be fixed in the future.
Solution:
Use SSH to enter the server.
Then try to create a backup for /etc/psa/psa.conf file:
cp -a /etc/psa/psa.conf{,.back}
If you want to point Plesk to the new PostgreSQL database server, you should edit the /etc/psa/psa.conf/. The lines which should be changed are shown below:
You may encounter different problems when you try to connect the SQL server on Plesk. This article is prepared to show you troubleshooting SQL Server Errors on Plesk and gives practical solutions for these problems. We hope this content is useful for you. If you have any other questions or you encountered another problem in this field please share in a comment.
FAQ
Can we use an SQL server free for commercial use?
You can use SQL Express for free. It is reliable for any small business.
Is it possible to use an SQL server without a license?
No, you should license every physical operating system environment that is running SQL server software.
CDN or Content Delivery Network, is a network used by sites and programs to increase the loading speed of static elements. The way to do this is that the files are cached in CDN servers located in different areas around the world, and the CDN sends a request, then the user receives it from the nearest server. To learn how to install and configure CDN on a Dedicated Server, follow this article to the end.
Advantages of Using CDN
The benefit of using CDN is that it helps you ensure your content is delivered as quickly as possible. Some of these CDNs are located in most locations, and I transmit the desired content to your user from the nearest device. If the target company is Google or Facebook, it is good, but if you have a blog, a simple server will be enough for you.
Install and Configure CDN on Dedicated Server
Here, you can follow the needed instructions to build your own CDN. Before starting the Configure CDN on Dedicated Server steps, you need to buy a dedicated server. We recommend you choose a plan from the cheap dedicated server plans offered by our website.
Prerequisites
These are the requirements before installing CDN on a dedicated server:
– A domain or subdomain name
– At least two servers in different regions
– GeoDNS tool and a user to send requests to the domain
How to Setup CDN on a Dedicated Server
As the first step, you should register a domain name or subdomain. This process is very easy, you should just register it on any domain zone you prefer. You should rent servers in regions and countries where the target audiences are located. If your project is international, it is an easy process to select from hosting providers for a dedicated server. We selected three virtual servers from different locations. Here are the servers:
– Frankfurt, Chicago, and Singapore
Configure GeoCDN
You need a DNS server with GeoDNS functionality to ensure that clients are directing to the right servers after sending a request to our domain or subdomain. Now let’s examine how GeoDNS works: – You must get the client’s IP or the requested DNS server’s IP. These recursive servers are usually the internet provider’s DNS. – GeoDNS identifies a customer’s IP, country, or region. You must also have the GeoIP database. – GeoDNS selects the IP address from the nearest CDN depending on the client’s location.
You can build a DNS server with GeoDNS functionality yourself. But we recommended using ready-made solutions. These solutions are: Cloudflare, Zilore, Amazon, and ClouDNS
It can be said that all DNS services have a functional feature called DNS failover, which can configure activity monitoring so that if a server fails, the system will continue to operate automatically.
Note that here we will use ClouDNS for our CDN.
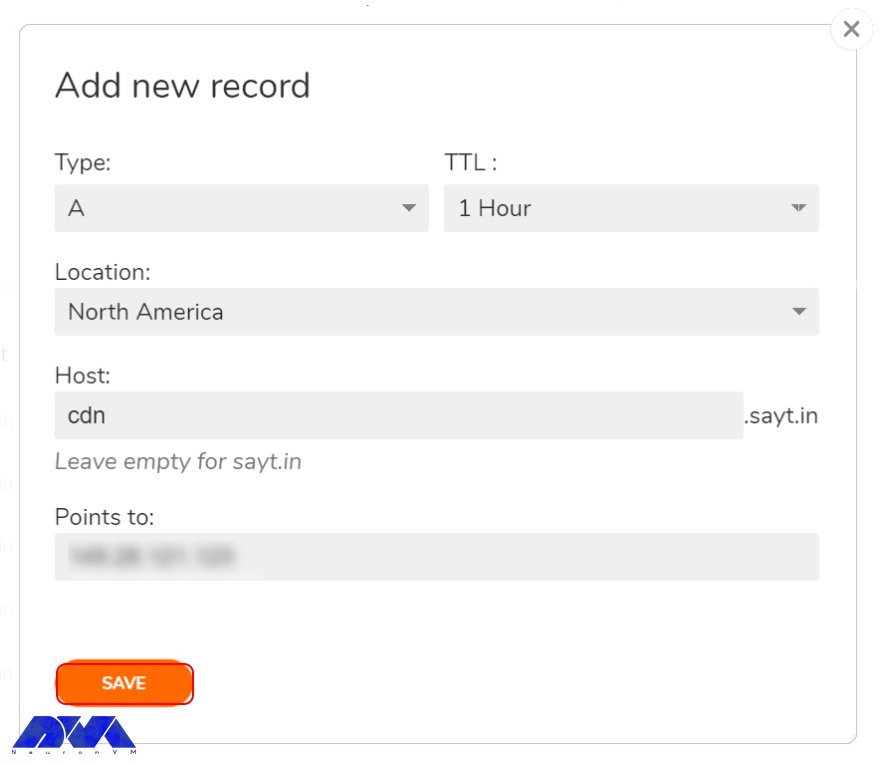
In the profile section, first, add a DNS zone and specify the domain name. If you use a subdomain don’t forget to add existing DNS records after adding the zone. Then, it’s time to create an A record for the domain or subdomain, each for the specified region. You can choose continents and countries. In the example we provide, the CDN is activating on the cdn.sayt.in domain. After adding the saty.in zone, create the first record a and redirect the NV clients to the selected server i.e. Chicago:
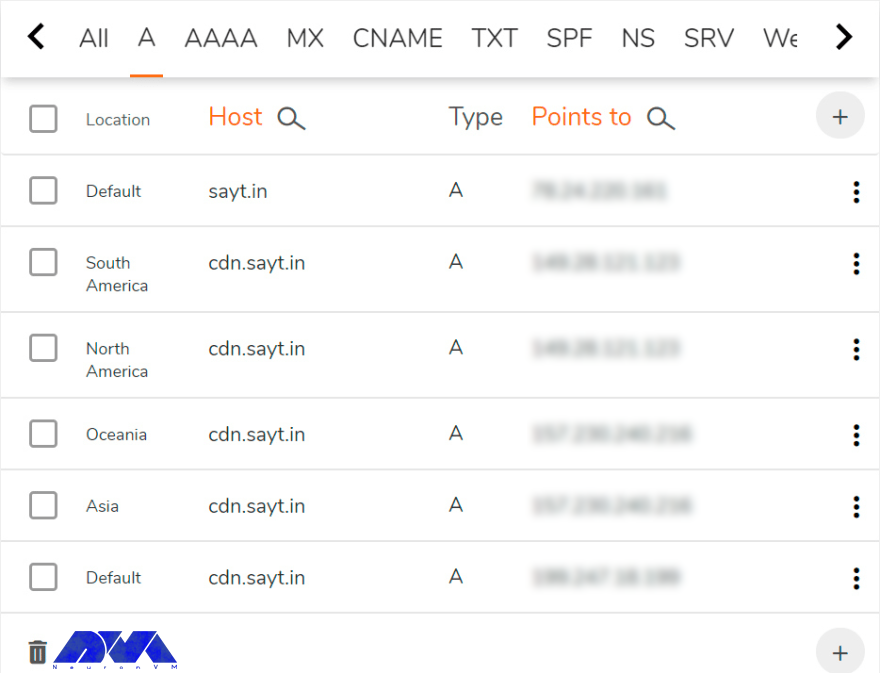
You should repeat the step to other regions. You should also create a record for the default zones. The final result is as follows:
As you can see, requests from unspecified regions from Europe, Africa, satellite Internet users, etc. in the last record should be directed to the Frankfurt server.
And this completes the initial DNS configuration. All that remains is to visit the registrar’s website. Now replace the current name servers with the ones provided by ClouDNS. While updating these servers, we adjust the servers.
Install SSL Certificate
Here, the CDN works with HTTPS. So if you have already provided SSL certificates for the domain or subdomain, upload them to all servers, for example, in the /etc/ssl/yourdomain/ directory.
If you don’t have a certificate, you can get one for free from Let’s Encrypt. We should mention that the ACME Shell script is a good option that has a user-friendly client and allows you to validate a domain or subdomain via DNS using the ClouDNS API.
We install acme.sh on only one server – the European server (123.456.**.***), and through it, the certificates are copy to all the others. Now, you should run the command below to install:
During the installation process, a CRON task is creating to automatically update the certificates.
Then, after the certificate is issued, domain verification is done by DNS with the help of API, in the next step, in the ClouDNS profile, in the Reseller API section, create a new API user and choose a password for it. Then, paste the obtained auth-id along with the password into the following file: ~/.acme.sh/dnsapi/dns_cloudns.sh (note not to be confused with dns_clouddns.sh). In this section, there are lines that you need to remove and edit:
CLOUDNS_AUTH_ID=
CLOUDNS_AUTH_PASSWORD=""
Now, we need to request SSL certificate permission for cdn.sayt.in:
If needed in the future, you can set the command to restart the automatic configuration in the parameters, after each certificate renewal.
The process of getting the certificate may take up to a few minutes, so don’t stop it. If you encountered a domain validation error, run the command again. As a result, you will find out where the certificates were downloaded from:
Since we need to specify the paths when copying the certificates to other servers, you must remember them and specify them in the server settings. Ignore the error that appears when reloading the Nginx configuration.
In setting up the SSL certificate, the only task is to copy it to the other two servers that store the certificate paths. Now create the same directories on each server and copy the certificate files:
In order to automatically renew the certificate, you need to create a daily jobCRON on both servers. The following command shows how to do this and add to CRON jobs:
scp -r root@Your_IP_Address:/root/.acme.sh/cdn.sayt.in/* /root/.acme.sh/cdn.sayt.in/ && service nginx reload
Note that you need the key to be able to access the main server remotely without entering a password. So you must create it.
Install and Configure Nginx
We will use Nginx to deliver static content. To do this, update the list of packages and then install them on all three servers:
apt update
apt install nginx
Now, use the following command instead of the default configuration:
nginx.conf
user www-data;
worker_processes auto;
pid /run/nginx.pid;
As you can see, it is a simple process. Configuring the retention time is the only issue, given the similarities between the inactive and proxy_cache_valid parameters.
If the request is not repeating within 7 days, the data will delete from the cache. If the request is repeated even just once in 7 days, the cache will be considered obsolete after 90 days and Nginx will update it from the main server when the next request is made.
By using the command below you can reload the configuration:
service nginx reload
Congratulations! CDN is ready to use.
Conclusion
Loading speed of the static element is an important issue for sites and Content Delivery Network is an effective network in this field. Here, we tried to introduce CDN and show how you can install it on a dedicated server. You can use different providers, but we preferred well-known Cloudflare CDN. We hope this article was helpful to you. We would be pleased if you share it with someone interested.
FAQ
Is CDN faster than the local one?
Of course, content delivery networks deliver faster loading speeds for readers. Also, they can store content in different formats.
Does Netflix use CDN?
Yes, it does. It can handle hardware failure more effectively.
This article has been presented to show some of the common Mariadb problems which you may encounter while using that on Cpanel. This management tool was created as a software fork of MySQL by developers who played key roles in building the original database. So let’s troubleshooting MariaDB errors on Cpanel.
What is MariaDB?
The MariaDB database was created for relational database management and is used for purposes such as data warehousing, e-commerce, reporting applications, and enterprise-level features. You can do all your work with MariaDB. This tool works on cloud databases, both large and small.
MariaDB Errors on Cpanel Control Panel
Before we start troubleshooting MariaDB errors on Cpanel, we recommend that you use our Linux VPS servers to host your website. Here, we will show you some common errors in the MariaDB management tool and will provide proper solutions for them. So keep tracking.
MariaDB can not be installed
This error will occur when you use cpanel to update from MySQL to MariaDB. The error would be like this:
The preinstall check failed. MariaDB cannot be installed. at /usr/local/cpanel/Cpanel/Yum/Install.pm line 470.
This problem can be caused by problems during the yum process. These errors in the Yum output can cause the upgrade process to fail. So what you need to do is manually enter yum using ssh or a terminal and check for such errors. [Errno 14] PYCURL ERROR 22 – “The requested URL returned an error: 404 Not Found”
This problem should solve based on the error provided by Yum. One of the specific repository errors may be as follows:
[Errno 14] PYCURL ERROR 22 - "The requested URL returned error: 404 Not Found"
Solution: In this case, you need to solve the problem of the repository or disable it. So run the following command to disable it and replace the repository name with $repositoryname:
yum-config-manager --disable $repositoryname
If you want to change “enabled=1” to “enabled=0”, you can edit the repository file in /etc/yum.repos.d folder. Then as soon as yum is fixed, you can upgrade Cpanel and WHM again.
Unsuccessful MySQL or MariaDB Installation During The Upgrade
One of the reasons for the failure of the MariaDB upgrade process can be the removal of the MariaDB or MySQL packages in the /etc/yum.conf file.
Solution: You can remove the entries from the exclude section of the /etc/yum.conf directory, these entries are the Cpanel server defaults.
We never recommend you exclude the packages using /etc/yum.conf file, because Cpanel manages MySQL and MariaDB versions.
The error of Invalid Grant String: Set Default Role 0
Updating MariaDB to version 10.2.35 may cause errors when migrating accounts via migration tool or backup restores. Also, this update causes problems in sites with older PHP versions and causes problems in the Cpanel user interface with the MySQL database.
A similar error for transfers and restore can be like this:
The "Mysql" restore module failed because of an error: Invalid grant string: SET DEFAULT ROLE 0 FOR 'testuser'@'10.1.1.3'
Solution: AUTOFIXER has been released since 2020 to address this error. So next time nightly repairs will be done automatically. So, if you encounter such problems, you can use the automatic Autofixer script to run as root:
/scripts/autorepair fix_mariadb_show_grants_roles
If it doesn’t work, please try to restart the SQL service.
Users who have done the previous solution related to downgrading MariaDB. Be sure to open MariaDB to ensure that the appropriate updates are received:
yum versionlock clear404
Then run
/scripts/upcp
MariaDB Crashing Error
The latest Mariadb update caused this database to crash when starting with WHM and Cpanel servers.
The website may crash when running the following versions of MariaDB:
10.1.42 10.2.28 10.4.9 10.3.19
Then you will see the following error on the startup of your system:
InnoDB: Failing assertion:table->can_be_evicted
You can manually downgrade MariaDB usage of WHM and Cpanel While MariaDB is working on your problem itself. Use the command below:
This content was prepared to show some important issues about troubleshooting MariaDB errors on Cpanel. MariaDB is an open-source useful database. Facebook, Wikipedia, Google, and so on are among the users of this database. We hope you enjoy the article. If you have any questions or ideas, please leave a comment.