Admin RDP is a term that refers to the use of Remote Desktop Protocol (RDP) to access and control a computer with administrative privileges. RDP is a protocol that allows a user to interact with another computer’s graphical user interface over a network connection. Admin RDP can use for various purposes, such as managing servers, troubleshooting problems, performing maintenance tasks, or running applications that require high. In the rest of this post, stay with us as we explain Unleashing the Power of Admin RDP to you.
Advantages of using Admin RDP
Nowadays, the term Admin RDP has become very popular among network professionals. Using this service allows users to do their work easily by accessing their desired location. Some of the most important advantages of Admin RDP are:
- Admin RDP has a dedicated IP.
- It has dedicated resources. These resources include CPU, RAM, and Storage.
- Full access to the server is possible.
- Installation of any program is possible.
- RDP security is covered by yourself.
- You can change the RDP port.
- It is possible to add multiple RDP users.
- It is possible to choose a custom operating system.
- Created by virtualization technology.
- There is access to the server administrator.
- Hardware can be upgraded.

Understanding performance optimization for Admin RDP
Optimizing performance for Admin RDP is a topic that involves various factors and settings that can affect the speed and quality of your remote desktop sessions. Depending on network conditions, hardware specifications, and application requirements, you may need to adjust some parameters to achieve the best performance.
It is interesting to note that using a modern RDP client supports the latest protocols and features such as RemoteFX, UDP transport, and adaptive graphics. Then you can try the new Remote Desktop client from the Microsoft Windows 10 Store, which is designed to work with Windows Virtual Desktop and offers better performance than the standard Remote Desktop Client.
Another important and interesting point is that you will be able to compress the data transfer between the client and the server by using Configure compression for RemoteFX. This can help reduce network bandwidth consumption and improve the responsiveness of your sessions. You can choose memory, network bandwidth, or a balance of both.
We recommend adjusting the programs you run on the server to make them more suitable for remote desktop sessions. For example, you can reduce the resolution, color depth, or frame rate of graphics-intensive programs, or disable some features that aren’t necessary for your tasks. In other words, it is better to adjust the visual effects and display settings on the server to reduce the graphic complexity and improve the rendering speed of your sessions. You can use the System Properties dialog box to select the Adjust for best performance option, which disables most animations, shadows, and transparency effects on the server.
Choosing the right Windows distribution for your VPS
Choosing the right Windows distribution for your server is a decision that depends on a variety of factors, including your budget, performance requirements, security needs, and compatibility with other software and hardware. There are different editions and versions of Windows Server that offer different features and capabilities. Some of the most common are:
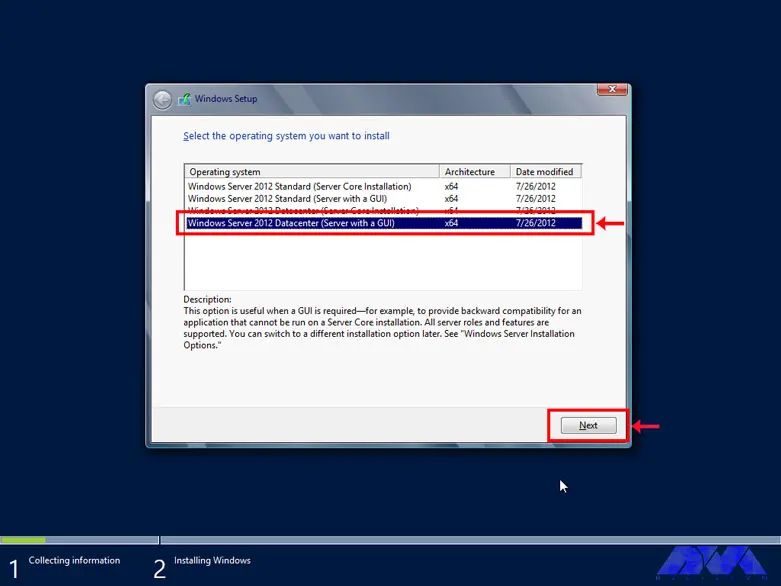
1) Windows Server 2012 R2: This is the older version of Windows Server that was released in October 2013. Windows Server 2012 R2 enhanced the virtualization, storage, networking, and management capabilities of the server platform. It also added new features such as Work Folders, Storage Tiering, Desired State Configuration, and Workplace Join. Windows Server 2012 R2 is available in four editions: Essentials, Foundation, Standard, and Datacenter.
2) Windows Server 2016: This version of Windows Server was released in September 2016. It introduced new features such as Nano Server, Storage Spaces Direct, Shielded Virtual Machines, and Windows Server Containers. It also improves the security, scalability, and reliability of the server platform. Windows Server 2016 comes in three editions: Essentials, Standard and Datacenter.
3) Windows Server 2019: This version of Windows Server was released in October 2018. It offers improved security, hybrid cloud integration, container support, and faster innovation for applications. It also supports Linux workloads and has a new Windows admin center for managing servers. Windows Server 2019 comes in four editions: Essentials, Standard, Datacenter, and Hyper-V Server.
4) Windows Server 2022: Windows Server 2022 has provided new and advanced features for users in the field of virtualization, network, storage, user experience, cloud computing, automation, etc. Simply put, Windows Server 2022 will help you make your company’s IT operations much easier and at a whole new level while reducing costs. In the 2022 version, the Microsoft Edge browser has replaced the old browser in the Windows Server version.
Steps to secure your Admin RDP
Securing Admin RDP is a very important step to protect your computer and data from unauthorized access. There are several steps you can take to secure your admin RDP, such as:
1) Enable Network Level Authentication (NLA) in your RDP settings. This requires the user to authenticate before establishing a remote connection, which can prevent man-in-the-middle attacks.
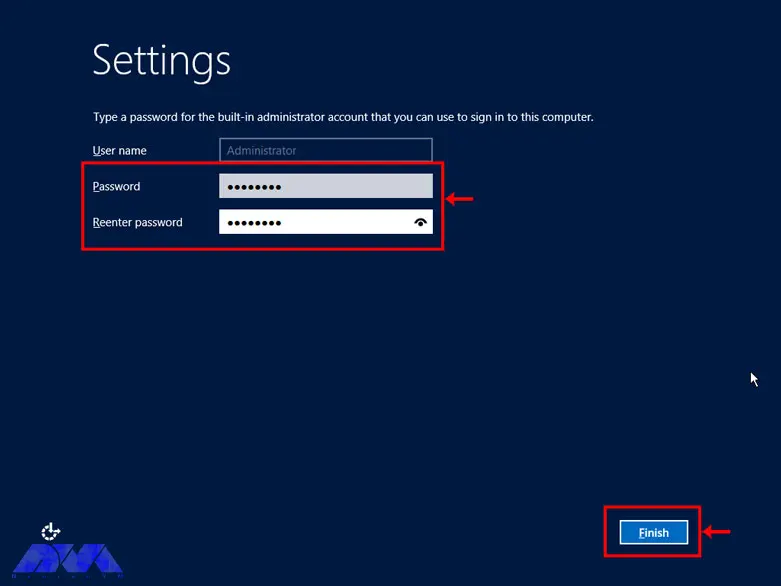
2) Use a strong and complex password for your account and change it regularly. You can also use a password manager to store and generate your passwords securely.
3) Encrypt your RDP connection with SSL/TLS. This method ensures that the data transferred between the client and the server is protected from eavesdropping and manipulation.
4) Change the default RDP port from 3389 to a random port number. This makes it more difficult for attackers to scan and find your RDP service on the network.
5) Use a firewall to restrict access to your RDP port and only allow connections from trusted IP addresses or networks. You can also use a gateway service to create a secure tunnel for your RDP traffic.
6) Use the privileged access management (PAM) solution to manage your administrator credentials and access policies. It allows you to store your passwords in an encrypted vault, give access only when needed, and monitor and inspect your RDP sessions.
Hardening your Admin RDP for enhanced security
RDP is a convenient way to access and manage remote systems, but it can also pose security risks if not configured properly. Here are some tips and resources to help you secure your RDP connections.
The first step is to use the latest version of RDP and Windows. Older versions of RDP may have vulnerabilities that can be exploited by attackers. Make sure you have the latest updates and security patches for your Windows operating system and your RDP client and server.
The next step is to enable SSL/TLS encryption for RDP. This prevents your RDP traffic from being intercepted or tampered with. You can use the Microsoft Remote Desktop Services gateway to encrypt RDP connections using SSL/TLS.
Restrict RDP access with Windows Firewall. You can use Windows Firewall to prevent unauthorized hosts and networks from accessing your system through RDP. You can also specify which ports and protocols are allowed for RDP.
Use multi-factor authentication (MFA) for RDP. MFA adds an extra layer of security by requiring a second factor, such as a code or biometric, to verify your identity before granting RDP access. You can use Windows Hello for Business or other third-party solutions to enable MFA for RDP.
Finally, you can configure session security and auditing policies for RDP. You can use Group Policy or Local Security Policy to set various options for RDP sessions, such as encryption level, idle time, clipboard redirection, and printer redirection. You can also enable auditing and logging of RDP events to monitor and track remote access activities.
Optimizing your Admin RDP for speed and efficiency
RDP can consume a lot of network bandwidth and affect the performance of your applications. Here are some tips and resources to help you improve your RDP experience. Configure transport protocols for RDP. RDP can use both TCP and UDP protocols to send and receive data over the network. TCP is more reliable but slower, while UDP is faster but less reliable. You can choose the protocol to use for your RDP sessions based on your network conditions and requirements.
On the other hand, you can set up applications to host remote desktop sessions. If you use the Remote Desktop Session Host (RD Session Host) server to host multiple remote sessions, we recommend that you optimize the programs that run on the server. You can use Group Policy or Local Security Policy to set various options for applications, such as process priority, CPU affinity, memory allocation, and more.
We recommend customizing visual settings for your remote meetings based on your connection speed and preferences. You can enable or disable features like desktop background, font smoothing, menu animations, window dragging, etc. These properties can affect the amount of data transferred over RDP and the responsiveness of your applications.
Monitoring and managing your Admin RDP
To monitor remote client activity and status, you can use the Remote Access Management Console on the Remote Access Server. This console allows you to view the list of users connected to the server, connection details, and resource usage. You can also use Windows PowerShell commands to get the same information.
To secure your Admin RDP, you must use the latest version of RDP and Windows, enable SSL/TLS encryption, restrict access with Windows Firewall, use multi-factor authentication, and configure security policies and session auditing. These measures help you prevent unauthorized access, data interception, and malicious attacks.
Troubleshooting common issues with Admin RDP
Here are some of the most common problems and how to troubleshoot them.
1) Disconnecting from the remote computer: One of the most common problems experienced when trying to use the Remote Desktop Protocol (RDP) is disconnecting from the remote computer. This error can be caused by a variety of factors, including a dropped or unstable user connection, server settings, or authentication issues. To fix this problem, you can try the following steps:
Solution:
- Check your network connection and make sure it is stable and reliable. You can use a tool like ping or trace to test the connection between the client and your host computer.
- Check the server settings and make sure that RDP is enabled and configured correctly. You can use Remote Access Management Console or Windows PowerShell commands to check and change RDP settings on the server.
- Check your authentication credentials and make sure they are correct and valid. If your credentials have expired or been blocked, you may need to reset your password or use a different account.
2) Unable to log into the remote computer: One of the most common errors encountered when using Remote Desktop Protocol (RDP) is the “Unable to Log You On” error. This can be due to a variety of issues such as incorrect credentials, server connection issues, or an expired password. To fix this problem, follow the steps below:
Solution:
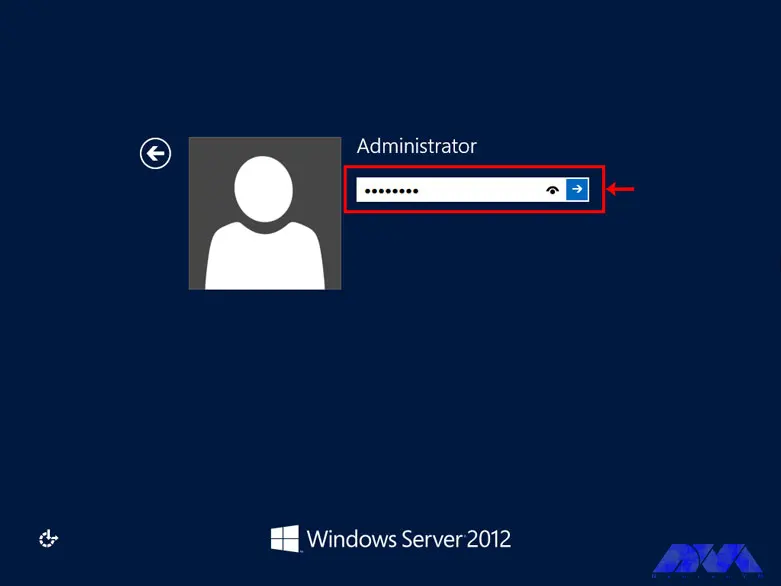
- Verify that you have entered the correct username and password for the remote computer. Make sure you use the domain name or IP address of the remote computer, not the local one.
- Verify that the remote computer is online and accessible. You can use a tool like ping or trace to test the connection between the client and your host computer.
- Check that your password has not expired or been changed. If your password is no longer valid, you may need to change your password on the remote computer or use a different account.
3) Remote Desktop cannot find the computer: The most common reason for this problem is that the Remote Desktop Protocol is not enable on the server. Other possible reasons for this error include an incorrect IP address or hostname of the remote computer, network connectivity issues, port blocking, and more. To solve this problem, you can try the following steps:
Solution:
- Enable RDP on the server using the System Properties dialog box or Windows PowerShell commands. You can also check and change the RDP status in the registry editor.
- Make sure you entered the correct IP address or hostname of the remote computer. You can use a tool like nslookup or ipconfig to find the IP address or hostname of the remote computer.
- Check your network connection and firewall settings and make sure they are not blocking RDP traffic. You may need to open port 3389 on your firewall or router to allow RDP communication.
Conclusion and final thoughts
Admin RDP is a powerful and convenient feature that allows you to remotely access and manage other computers on your network. However, it also has some security and performance challenges that require proper configuration and optimization. In this article, we’ve provided you with tips on how to harden, optimize, monitor, and troubleshoot RDP Admin. If you have any questions about different parts of this article, you can ask us in the comments section.