Author: Jannson Miller

  • The Ultimate Guide to Finding the Best Canada RDP Provider

    The Ultimate Guide to Finding the Best Canada RDP Provider

    In today’s digital age, Remote Desktop Protocol (RDP) solutions have become increasingly essential for individuals and businesses alike. Whether you need to access your work computer remotely or require a hosting solution for your website or other applications, choosing the right and the Best Canada RDP provider is vital. This article aims to provide a comprehensive guide to help you navigate the key factors to consider when finding the best Canada RDP provider.

    What is RDP? Benefits of using RDP services

    RDP stands for Remote Desktop Protocol. It is a proprietary protocol developed by Microsoft that allows users to connect and access a computer remotely over a network.

    Benefits of using RDP services

    The benefits of using RDP services include:

    – Remote Access: RDP allows users to access and control their computer from anywhere in the world as long as they have an internet connection. This is particularly useful for remote workers, IT professionals, and individuals who need to access their computer while traveling.

    – Collaboration: RDP enables collaboration by allowing multiple users to connect to and work on the same computer simultaneously. This is beneficial for team projects where multiple individuals need to access and edit files or software.

    – Efficient Resource Utilization: RDP services utilize the computer’s resources, such as processing power and storage, rather than relying on the user’s device. This enables the user to access and run resource-intensive applications and software without overloading their own device.

    – Enhanced Security: RDP services provide secure connections by encrypting the data transmitted between the local and remote computer. Additionally, RDP allows users to configure access permissions and restrict certain functionalities, ensuring better security and control over the remote computer.

    – Centralized Management: RDP services allow administrators to centrally manage and monitor multiple computers or servers from a single location. This simplifies IT management and troubleshooting tasks, as administrators can quickly access and resolve issues on remote computers.

    The benefits of using RDP services

    Key Considerations in Selecting a Canada RDP Provider

    When selecting a Canada RDP provider, key considerations include the provider’s reliability, network speed, data security measures, customer support availability, and pricing plans. These factors ensure a smooth and secure remote desktop experience for users. In the following, we will explain some of these things to you.

    Server reliability and uptime

    When choosing the best RDP provider, server reliability and uptime are crucial factors to consider. A reliable RDP provider ensures that their servers are stable and perform consistently without frequent breakdowns or disruptions.

    High uptime guarantees the availability of the service, meaning you can access your remote desktop whenever you need it, maximizing productivity. Selecting a provider with excellent server reliability and consistently high uptime helps ensure a smooth and uninterrupted remote desktop experience.

    Network performance and speed

    When assessing the network performance and speed of a potential RDP provider, it is crucial to consider factors such as latency, bandwidth, and reliability. A dependable RDP provider should prioritize low latency, ensuring quick and responsive remote connections without delays. High bandwidth availability is also essential for seamless data transfer and smooth streaming.

    A reliable network infrastructure with minimal downtime is fundamental for uninterrupted remote work or access to resources. These considerations guarantee optimal network performance, enhancing the overall user experience.

    Data security and privacy measures

    The data security and privacy measures become crucial. It is important to select a provider that ensures robust encryption protocols such as SSL/TLS, uses two-factor authentication, and implements regular security audits. These providers should have strict access controls, data backups, and secure data centers with advanced firewalls and intrusion detection systems.

    Their privacy policy should be transparent, guaranteeing the protection of user data and prohibiting the sharing of information with third parties.

    Key Considerations in Selecting a Canada RDP Provider

    Scalability and flexibility of RDP plans

    RDP plans offer exceptional scalability and flexibility when selecting the best provider. Scalability allows users to easily upgrade or downgrade their resources based on their specific needs, ensuring efficient allocation of resources and cost-effectiveness.

    RDP plans accommodate different user requirements, such as high-performance computing, data storage, or intensive applications, with customizable options. This flexibility enables users to tailor their RDP experience to their unique preferences, ensuring a seamless and efficient remote desktop solution.

    Customer support and assistance

    A reliable RDP provider should have a dedicated customer support team that is readily available to assist potential users in selecting the right RDP plan that suits their specific needs and requirements. Their support should be prompt, knowledgeable, and willing to address any queries or concerns raised by customers.

    The customer support team should have a firm understanding of the features and benefits of different RDP plans offered by the provider. They should be able to explain these features clearly to customers, helping them make an informed decision.

    In addition to providing assistance in plan selection, the customer support team should also guide customers through the setup and installation process. They should provide clear instructions and troubleshooting tips, ensuring a smooth and hassle-free experience for the users.

    Furthermore, a good RDP provider should offer ongoing customer support throughout the subscription duration. They should be available to address any technical issues, provide updates and patches, and handle any other concerns or questions that may arise.

    Why we Recommend you to Buy Canada RDP from NeuronVM?

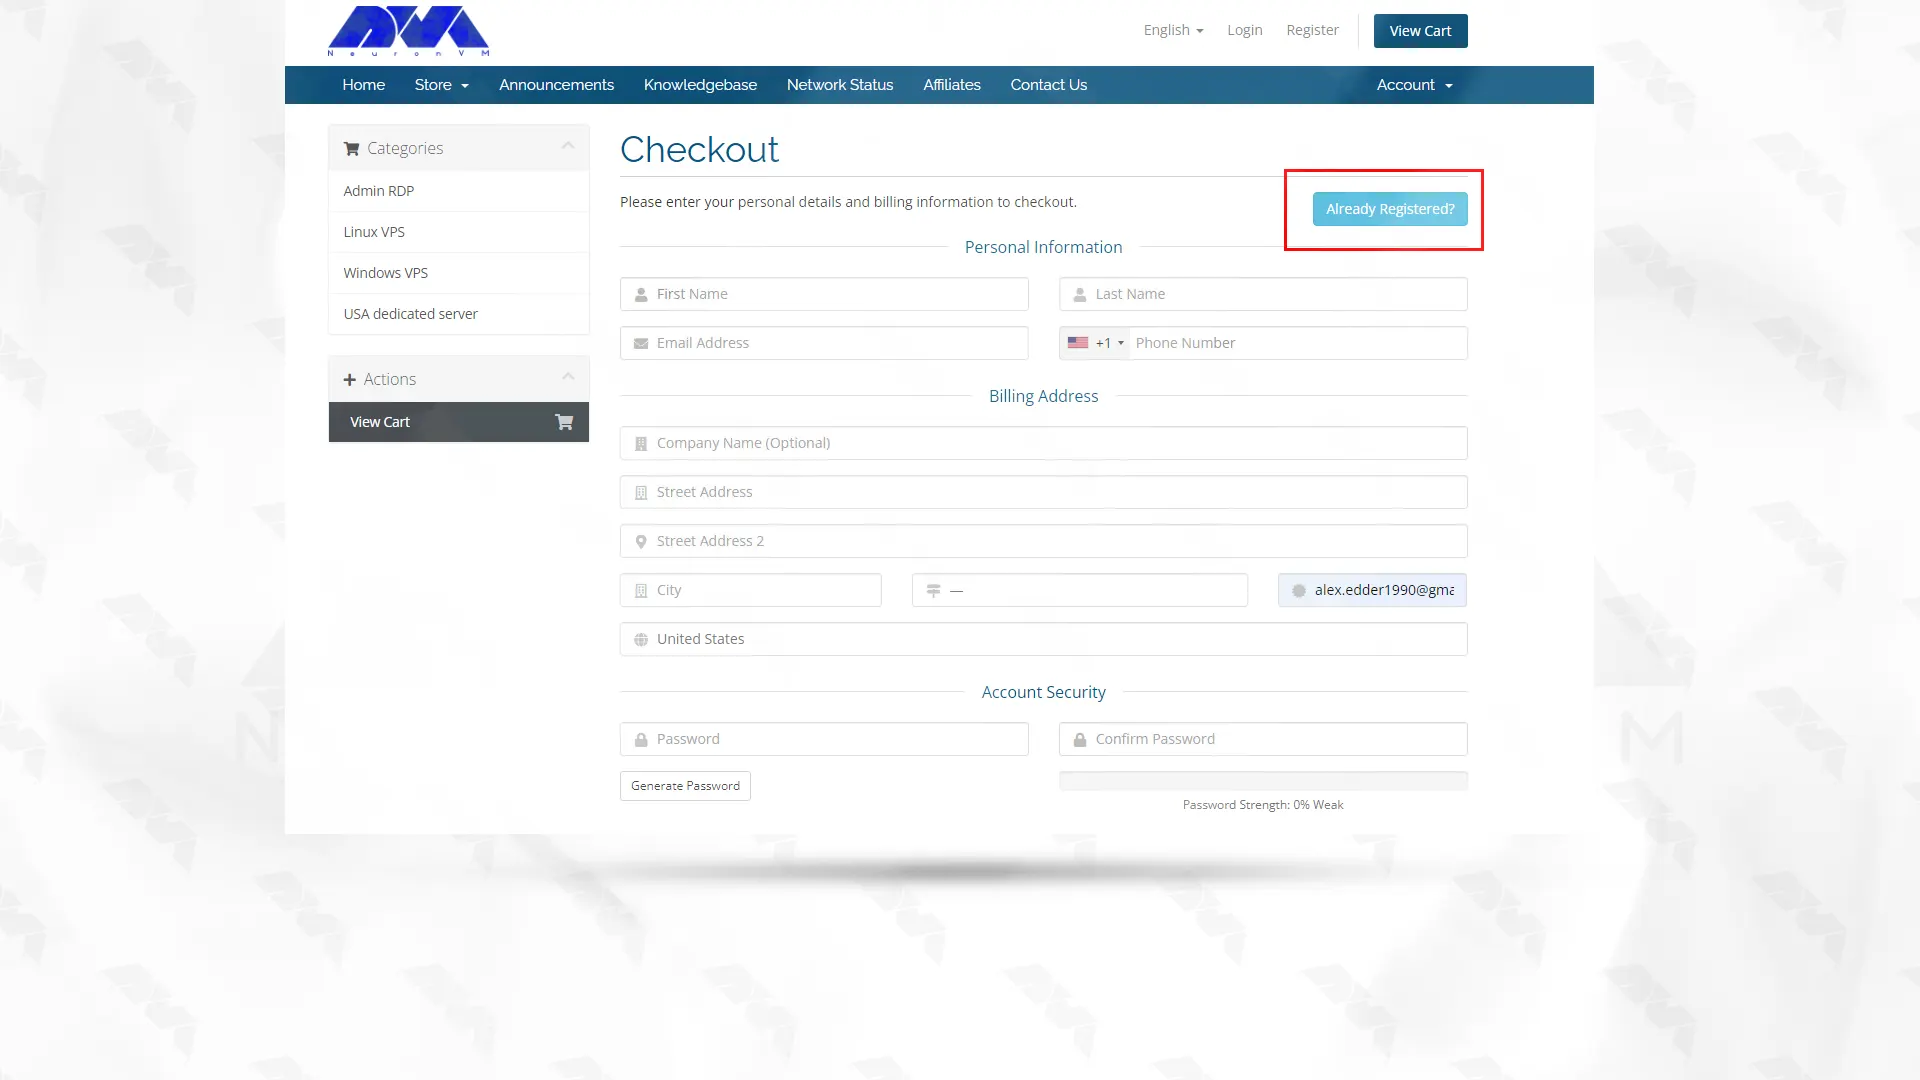
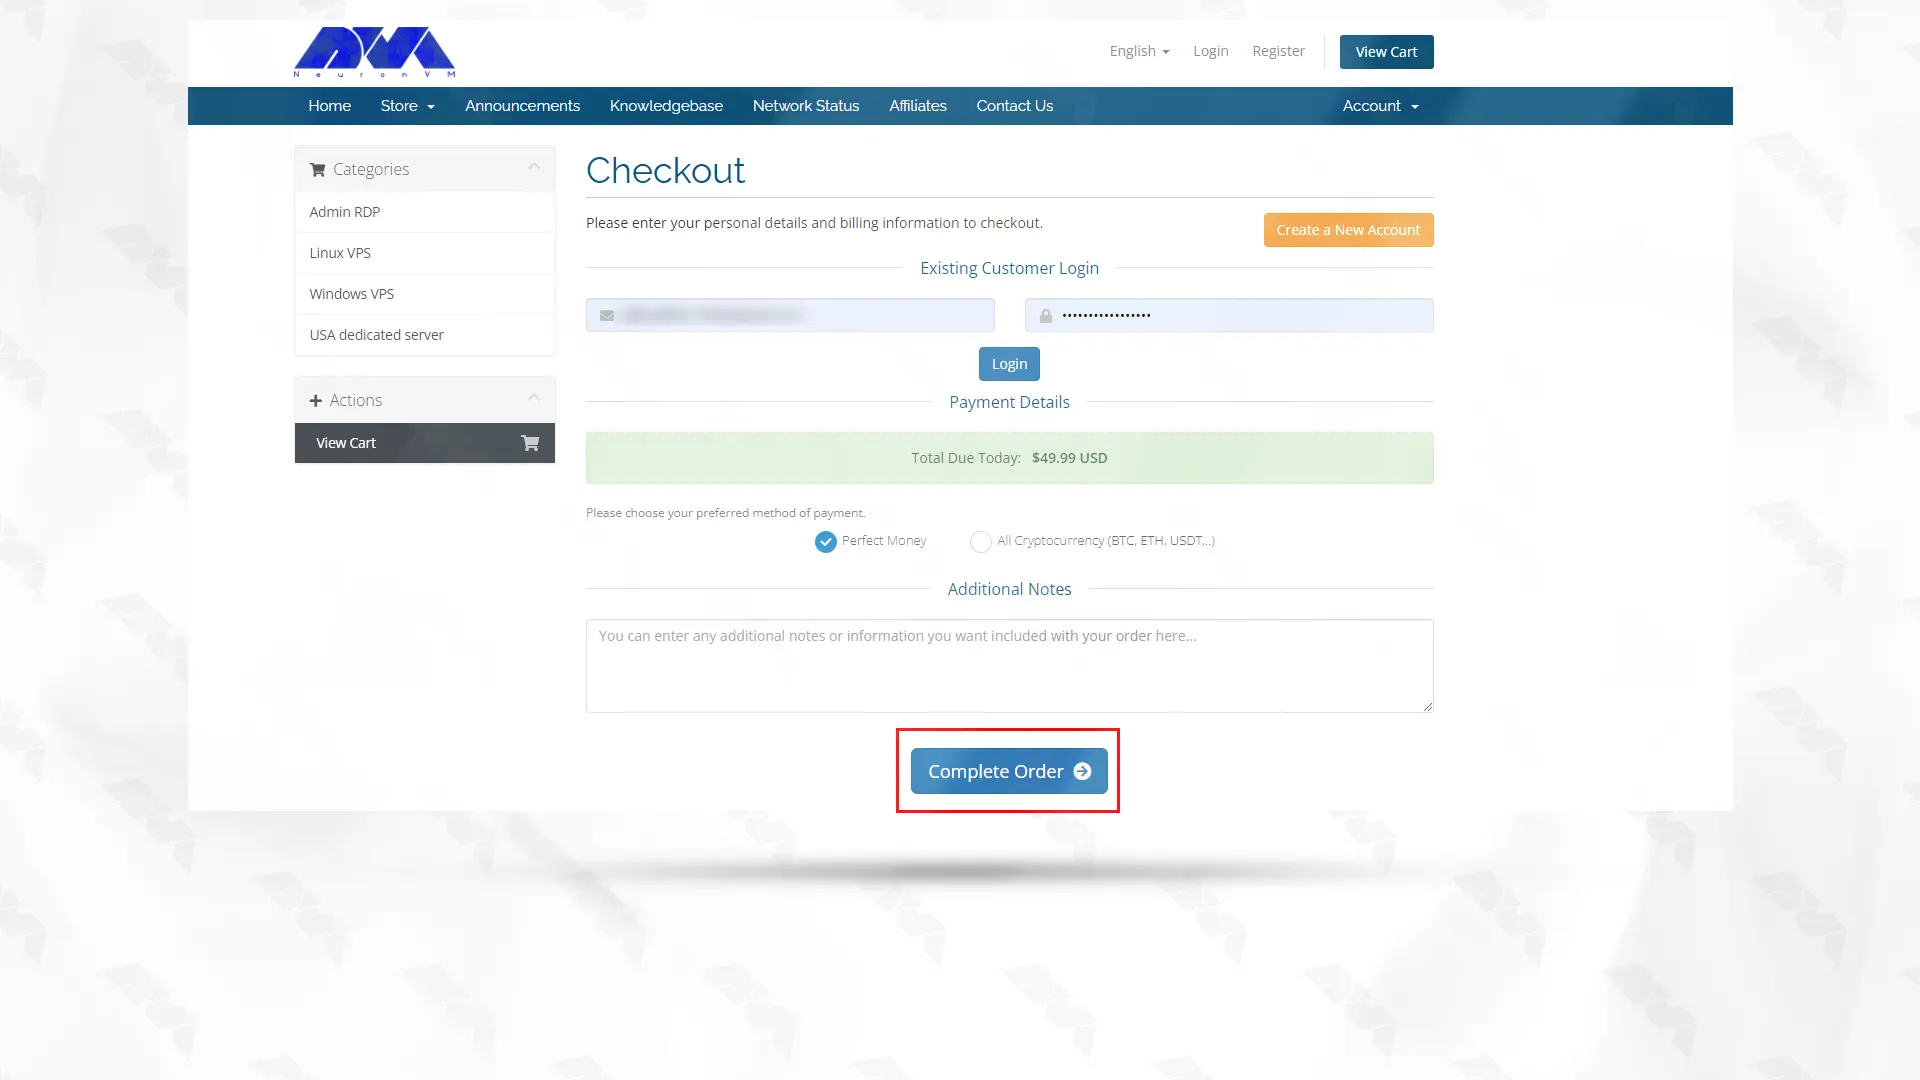
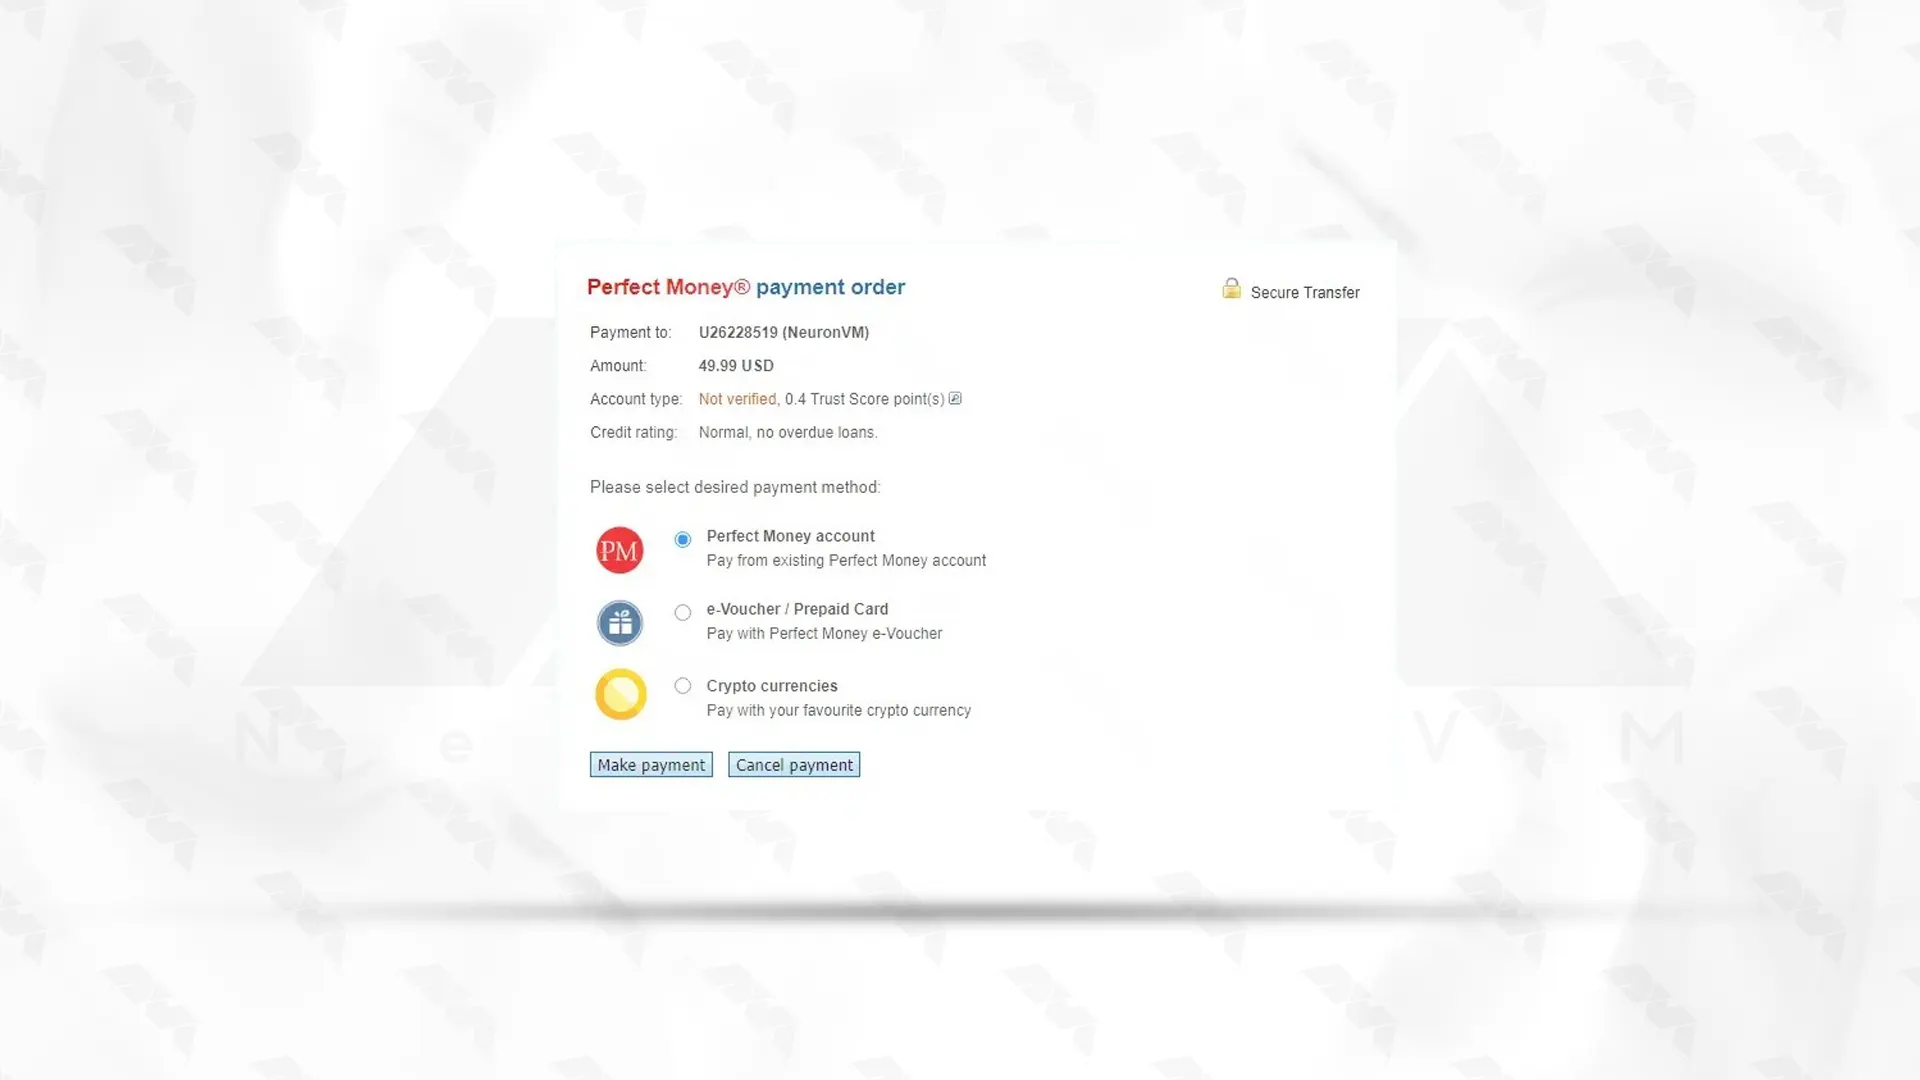
    Canada RDP Provider would provide a brief overview of the best RDP service providers in Canada. It would highlight the features offered by these providers, such as high-performance servers, secure connections, affordable plans, and reliable customer support. We recommend buying Canada RDP from NeuronVM for several reasons:

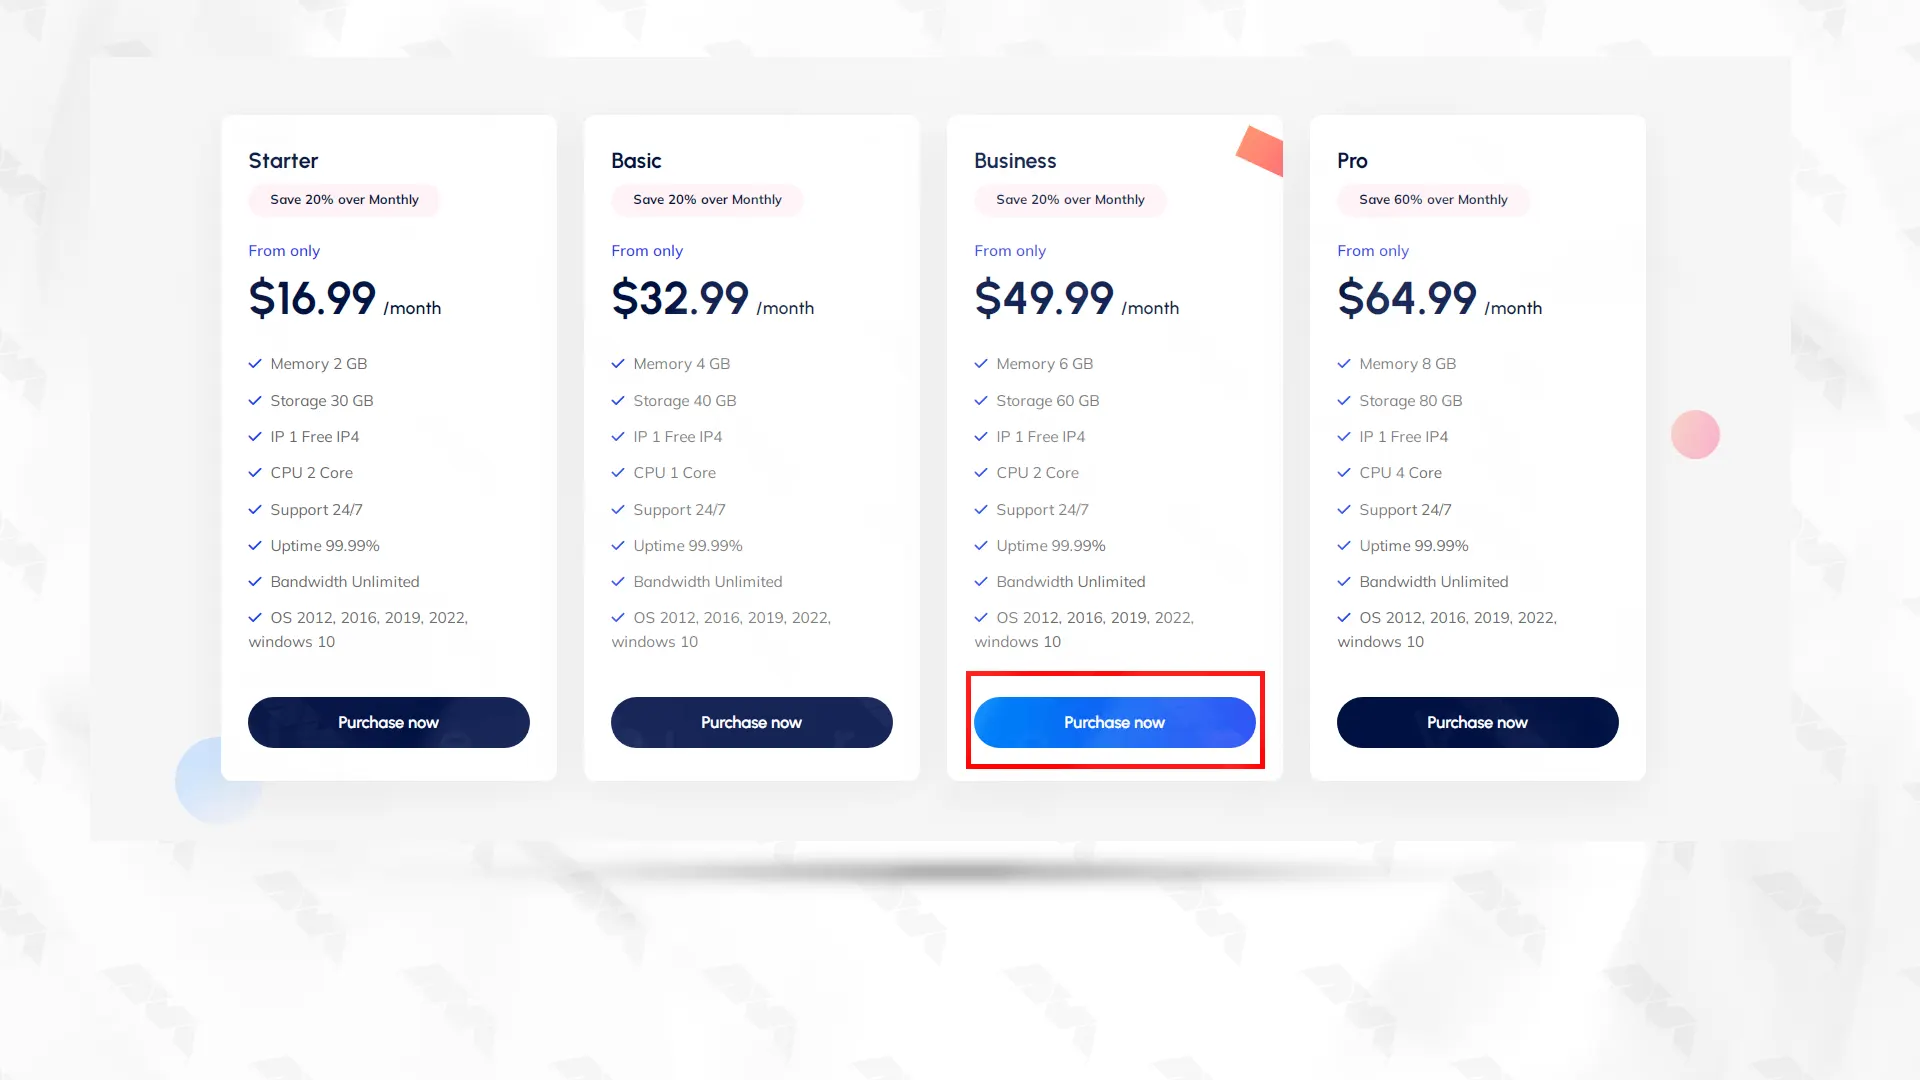
    1. Affordable prices:

    NeuronVM offers competitive pricing for their Canada RDP plans, making it a cost-effective solution for individuals or businesses.

    2. Reliable performance:

    Their RDP servers are built with high-performance hardware, ensuring a smooth and efficient experience for users. You can expect fast and reliable connections without any significant downtime.

    3. Data security:

    NeuronVM takes data security seriously. They employ robust security measures to protect your sensitive information and ensure confidentiality.
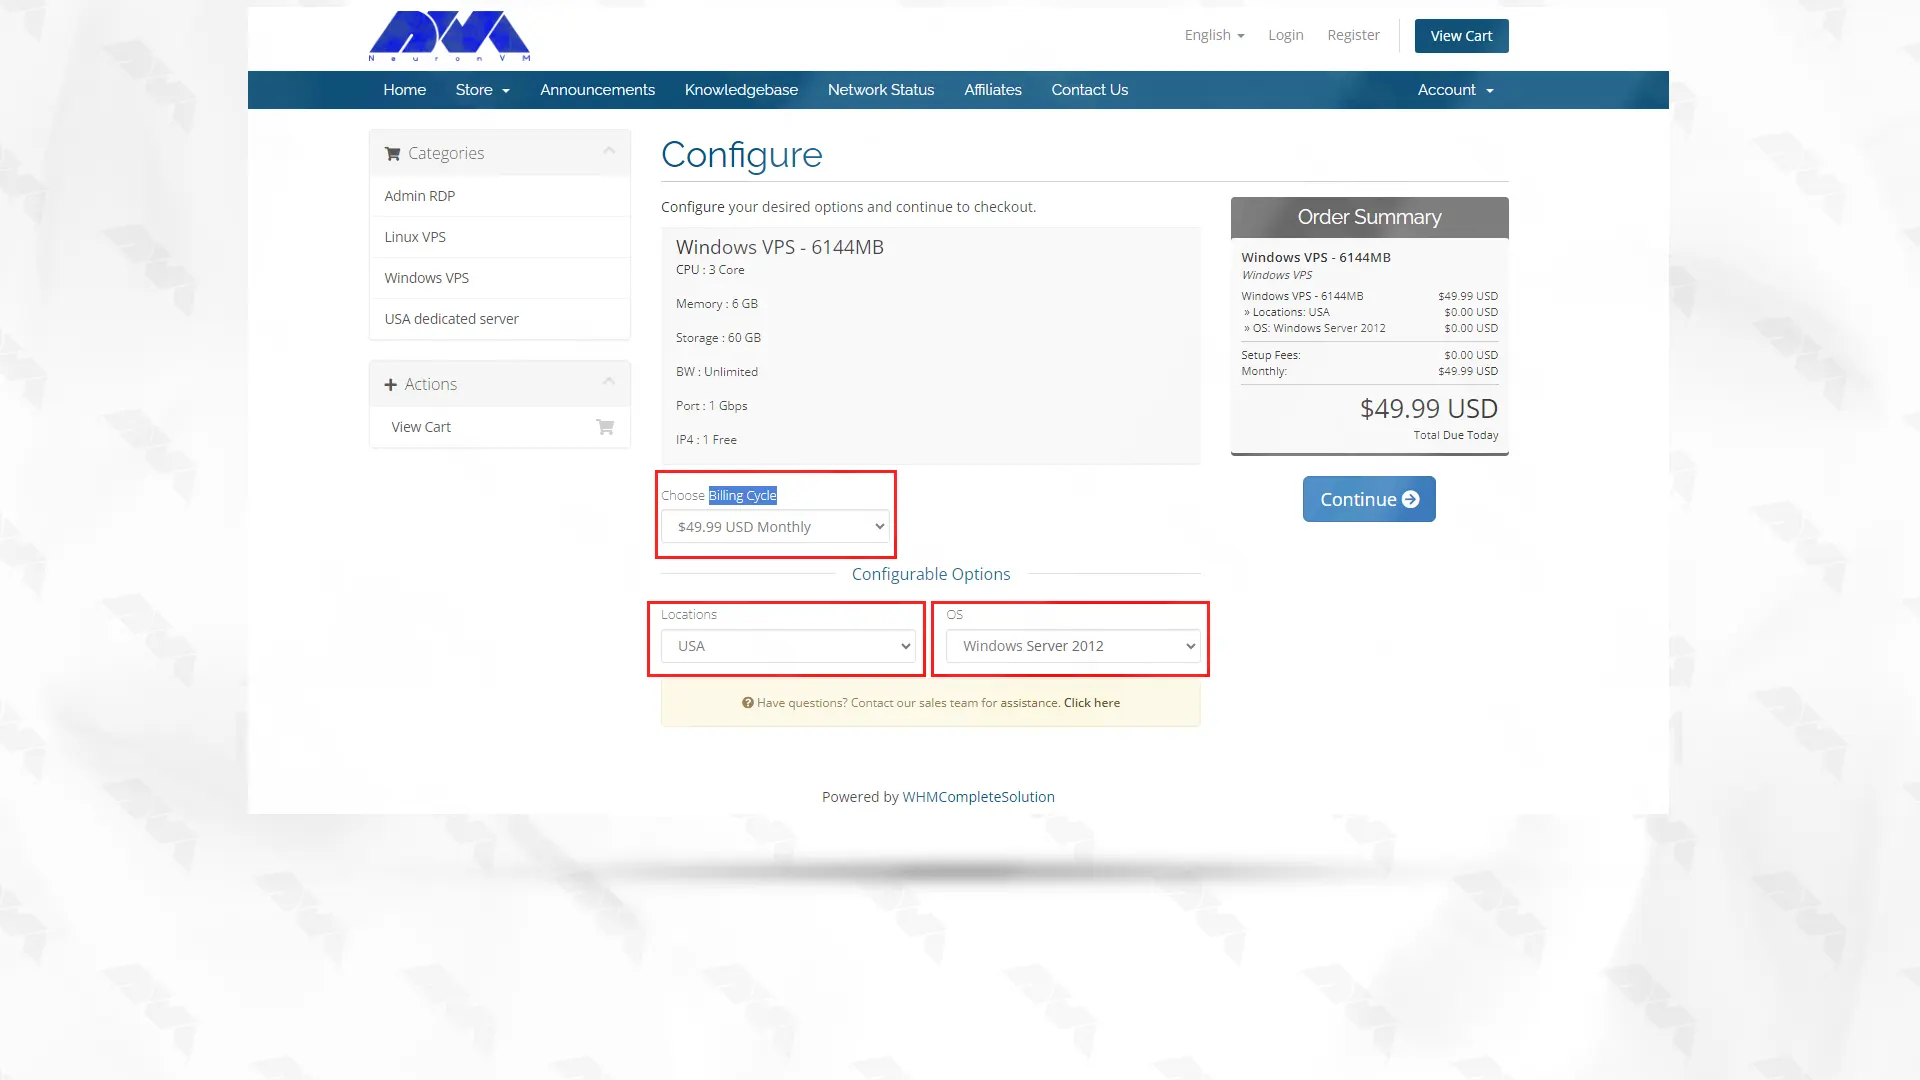
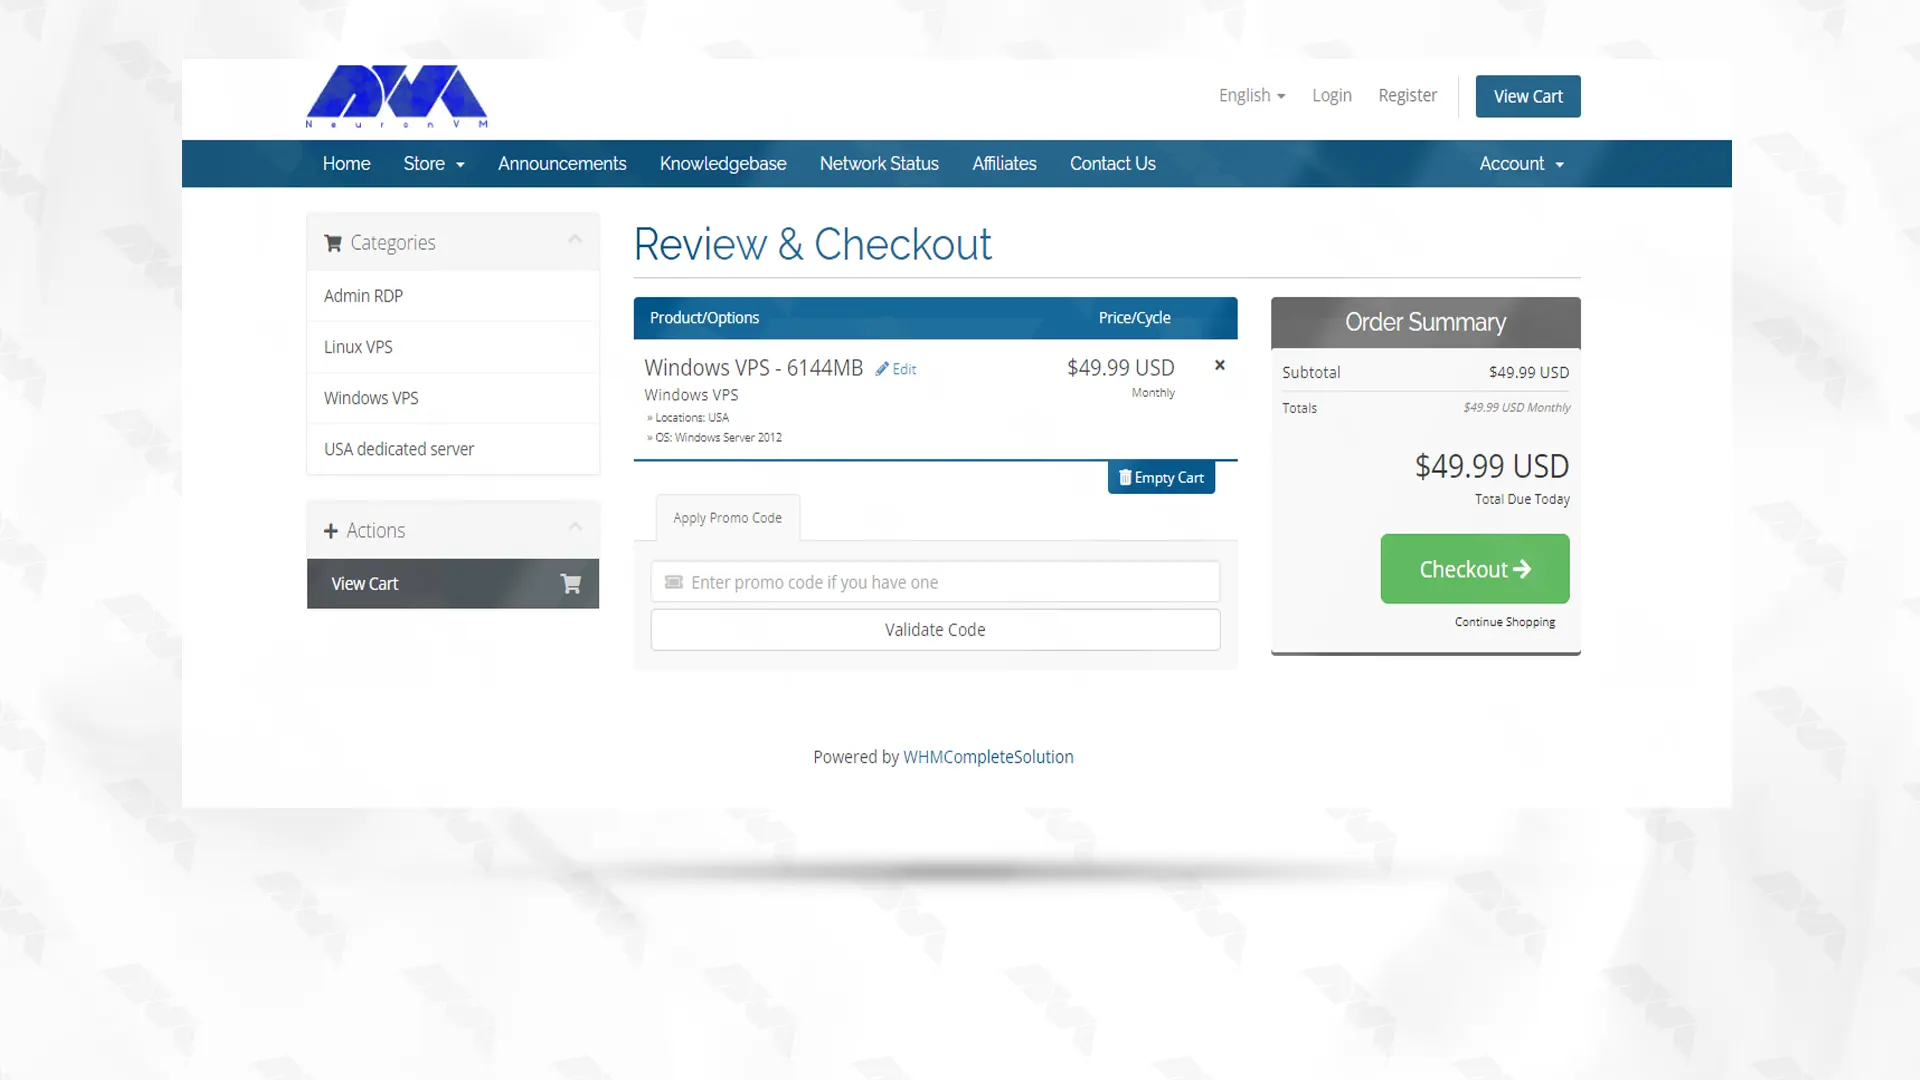
    4. Flexible plans:

    NeuronVM offers a variety of plans with different specifications and pricing options, giving you the flexibility to choose the one that best fits your requirements and budget.

    5. 24/7 customer support:

    They provide round-the-clock customer support, so you can reach out to them anytime you encounter any issues or have questions about their services.

    NeuronVM.com offers a reliable and affordable solution for anyone looking to buy Canada RDP, making it a recommended option for individuals or businesses in need of remote access to Canadian servers.

    Conclusion

    Choosing the best Canada RDP provider requires careful consideration of your requirements, network performance, security measures, pricing plans, and customer support. By following the comprehensive guideline outlined above, you can find a reliable RDP provider that meets your remote access needs, enhances productivity, and ensures a smooth and secure computing experience.

  • The Ultimate Guide to Get Free RDP

    The Ultimate Guide to Get Free RDP

    Remote Desktop Protocol (RDP) allows users to access their computer or server from anywhere in the world. With the rising demand for remote work, the concept of Free RDP has gained popularity. This article reviews the benefits of free RDP and describes the terms and conditions for receiving free remote desktop services from NeuronVM for one month.

    Get Free RDP for a week

    NeuronVM provides free RDP to all users from the USA location. To get this server, it is enough to send a ticket after registering on the site and declare your request to get free RDP and use this free server for one week. only this!

    If you want to use USA free RDP for one month, you must read the next part of this article and fulfil the mentioned conditions.

    Do not worry, you do not have a difficult task ahead.

    Let’s go! 🚀✨🏃🏼‍♀️🏃🏻

    Conditions for Receiving USA Free RDP for One Month from NeuronVM

    While free remote desktop services can be beneficial, you should know that getting USA free RDP for one month comes with certain conditions. Below are some common conditions to get free USA RDP for a period of one month: 😮

    1. Follow NeuronVM on Twitter, Facebook and Instagram

    Conditions for Receiving USA Free RDP

    The first condition to get free remote desktop is to follow our page (NeuronVM) on Twitter, Facebook and Instagram.

    Unlock the Power of Technology with NeuronVM: Connect, Innovate, and Transform! 💥💻

    👥 Join NeuronVM social networks and stay in the loop with the insightful articles, and exclusive behind-the-scenes sneak peeks! 💡

    🐦 A. Follow us on Twitter for quick updates, real-time discussions, and engaging polls! 📣🗣️

    📖 B. Like our Facebook page to dive into in-depth tech articles, expert opinions, and helpful tutorials! 📚📰

    📸 C. Tap that follow button on Instagram to feast your eyes on stunning visuals, exciting product launches, and exclusive event highlights! 📸🌐

    Follow NeuronVM’s social networks, and introduce it to your friends.

    Then, send us your documents via ticket and get one month’s free USA RDP from us! 🚀🌟

    2. Subscribe to the NeuronVM Youtube Channel

    🎬 Subscribe to NeuronVM YouTube channel and discover the ultimate solution for all your needs. 🎥

    📣 Introduce NeuronVM to your friends and give yourself the chance to experience the power of Free Remote Desktop. Forget about limitations and embrace a seamless USA RDP server experience like never before.

    You also have the opportunity to become a sponsor for our informative and entertaining videos. Show your support and unlock even greater benefits! 👌

    Conditions for Receiving USA Free RDP - neueonvm

    🔴 Join the NeuronVM youtube channel today and discover the key to unlocking a world of possibilities. Say goodbye to laggy RDP servers and say hello to the smoothest RDP experience imaginable. ▶️

    🚀Subscribe now, introduce NeuronVM to your friends, or even become a sponsor, and enjoy Free RDP for one month. 🏆🌟

  • The Hidden Gem of Minecraft: Unraveling the Hypixel IP Address

    The Hidden Gem of Minecraft: Unraveling the Hypixel IP Address

    Minecraft has been a sensation in the gaming world for its endless possibilities and creative gameplay. Among various popular servers, Hypixel stands out as a hidden gem waiting to be explored. Unraveling the Hypixel IP address can unlock a whole new level of excitement and adventures. In this comprehensive guide, we will delve into the details of Hypixel, its IP address, and how to connect to this incredible Minecraft server.

    What is Hypixel?

    Hypixel is a multiplayer online gaming server for the video game Minecraft. It is one of the largest and most popular Minecraft servers in the world, known for its variety of game modes and community-driven content. The server was created by Simon Collins-Laflamme and Philippe Touchette in April 2013 and has since gained a massive player base.

    hypixel ip address minecraft

    Unique Features of Hypixel

    1. Game Modes and Minigames:

    Hypixel offers a wide range of game modes and minigames within Minecraft. These include popular modes like Skyblock, Bed Wars, SkyWars, Arcade Games, UHC (Ultra Hardcore), and many more.

    2. Custom Content:

    Hypixel features a plethora of custom-made content created by the server’s development team and community members. This includes custom maps, quests, items, and game mechanics that enhance the gameplay experience and keep players engaged.

    Unique Features of Hypixel

    3. Competitive Gameplay:

    Hypixel offers competitive multiplayer modes where players can compete against each other and climb the leaderboard. This competitive aspect adds an extra level of excitement and skill-based challenges for players who enjoy testing their abilities against others.

    4. Support for Large Player Base:

    Hypixel is designed to accommodate a large number of players simultaneously, offering a highly scalable infrastructure to handle the server’s massive player base. This ensures that players can connect and enjoy the server without experiencing significant lag or connection issues.

    5. Social Features:

    Hypixel promotes a social and interactive gameplay experience. Players can chat with each other, join guilds, participate in forums and events, and engage in cooperative or competitive gameplay with friends and other players from around the world.

    Hypixel IP Address: The Key to Adventure

    Finding the IP address of a specific server, such as Hypixel, can sometimes vary based on the server setup. However, there are a few common methods to find the Hypixel IP address:

    Hypixel IP Address The Key to Adventure

    – Hypixel Website: Visit the official Hypixel website and look for their server IP or connect address. This information is often displayed prominently on the website homepage or in the server details page.

    – Minecraft Server Lists: Various Minecraft server lists such as Minecrafthub or Minecraftservers feature Hypixel as one of the top servers. These websites usually provide server information including the IP address. Simply search for Hypixel on these server lists and find the IP address listed.

    – Online Communities and Forums: Engaging with the Minecraft community on platforms like Reddit, Discord, or Minecraft-specific forums can lead to the discovery of the Hypixel IP address. Community members often share server details, including the IP address, to help others join and play.

    Remember, it is important to ensure the IP address you find is from a legitimate and trusted source. Be cautious of any sources claiming to provide the official Hypixel IP address if they are not directly from the Hypixel website or verified by reliable community sources.

    Important Rules and Guidelines

    Once you have the Hypixel IP address and decide to join the server, it’s essential to familiarize yourself with the server’s rules and guidelines. Hypixel, like any other server, has rules in place to ensure a fair and enjoyable experience for all players. Some important rules and guidelines on Hypixel may include:

    Important Rules and Guidelines

    No cheating or hacking: Hypixel strictly prohibits the use of any client modifications or hacks that give unfair advantages. This includes x-ray texture packs, aimbots, or any form of hacks.

    Respect other players: Treat other players with respect and avoid any form of harassment, discrimination, or bullying. This includes using inappropriate language, targeting specific players, or spamming.

    No griefing or stealing: Avoid intentionally damaging or disrupting other players’ creations and stealing their items. Respect others’ property and gameplay experiences.

    Don’t advertise or share personal information: Avoid sharing personal information about yourself or others. Advertising or promoting external servers, websites, or products is generally not allowed.

    Follow the staff’s instructions: Hypixel has a team of staff members responsible for maintaining order in the server. Follow their instructions, cooperate with them, and report any issues or rule violations you observe.

    How to Connect to Hypixel

    To connect to Hypixel, the popular Minecraft server, follow these step-by-step instructions:

    How to Connect to Hypixel

    Step1. Open the Minecraft Java Edition launcher on your computer.

    Step2. Log in with your Minecraft account credentials.

    Step3. Once logged in, click on the “Play” button to open the Minecraft game.

    Step4. In the Minecraft main menu, click on “Multiplayer” to access the multiplayer server list.

    Step5. Click on the “Add Server” button to add a new server to your list.

    Step6. In the “Server Name” field, enter a name for the Hypixel server (e.g., Hypixel).

    Step7. In the “Server Address” field, enter the IP address`.

    Step8. Click on “Done” to add the Hypixel server to your server list.

    Step9. Once the server is added, click on it in the multiplayer server list and click on the “Join Server” button.

    Minecraft will start connecting to the Hypixel server. Wait for the connection to be established.

    Frequently Asked Questions (FAQs)

    Can I join Hypixel with a cracked Minecraft account?

    No, Hypixel does not allow players with cracked accounts to join their server. You must have a legitimate Minecraft account to access Hypixel.

    Is Hypixel free to play?

    Yes, Hypixel is a free-to-play server. However, there may be additional features or perks that can be unlocked through in-game purchases.

    Are there any age restrictions to join Hypixel?

    No, there are no specific age restrictions to join Hypixel. However, Hypixel does have rules in place to ensure a safe and welcoming environment for all players.

    Can I play on Hypixel through Minecraft: Bedrock Edition?

    No, Hypixel is only available on the Java Edition of Minecraft. It is not compatible with Minecraft: Bedrock Edition, which includes platforms such as Xbox, PlayStation, and mobile devices.

    Conclusion

    The Hypixel IP Address has remained a well-kept secret, elevating the server to the status of a hidden gem in the Minecraft community. The mysterious nature of its location adds to the allure and intrigue of the server, making it a must-visit for avid gamers. Unravelling this address allows players to access the Hypixel server, a renowned and highly popular Minecraft server with a multitude of game modes and features. By gaining access to Hypixel, players can experience the best of Minecraft PvP, minigames, and creativity. The Hypixel IP address is a must-know for any Minecraft enthusiast seeking an unforgettable gaming experience.

  • The Ultimate Guide to Creating a Foolproof Backup on Ubuntu Server

    The Ultimate Guide to Creating a Foolproof Backup on Ubuntu Server

    Foolproof Backup refers to a backup system or strategy that is designed to be highly reliable and virtually error-free, making it almost impossible for data to be lost or corrupted. It typically involves the use of multiple backup techniques and redundant systems to ensure that data is securely stored and can be easily recovered in the event of hardware failures, human errors, or other disasters. This is a useful post that most Ubuntu users are looking for. Therefore, we suggest you not to waste time and start with the Creating a Foolproof Backup on Ubuntu Server guide.

    What is Foolproof Backup?

    A foolproof backup system often includes features such as automated backups that run on a regular basis, encryption to protect data from unauthorized access, off-site storage to guard against physical damage or theft, versioning to preserve different versions of files, and verification mechanisms to ensure the integrity and accuracy of the backups.

    foolproof backup on ubuntu server

    The goal of a foolproof backup is to provide users with peace of mind, knowing that their data is properly safeguarded and can be restored quickly and efficiently when needed. We also suggest you to choose and use one of the Linux VPS server plans with Ubuntu distribution provided on our website to back up your Ubuntu server.

    Step by Step Guide to Creating a Foolproof Backup on Ubuntu Server

    Creating a foolproof backup system is essential to protect your data and ensure business continuity. Here is a step-by-step guide to creating a foolproof backup on Ubuntu Server.

    Step1: Identify critical data:

    Begin by identifying the critical data you want to back up. This could include important documents, databases, configuration files, and any other data that is essential for your server’s operation.

    Step2: Choose a backup location:

    Decide where you want to store your backups. It is recommended to choose a separate physical location or external storage device to prevent data loss due to physical damage or system failures.

    Step3: Install backup software:

    Ubuntu Server offers various backup software options. One popular choice is rsync, a command-line utility that allows efficient syncing of files between servers.

    You can install rsync using the following command:

    sudo apt install rsync

    In order to launch rsync as a service on Ubuntu, you need to create the /etc/rsyncd.conf file and then copy /lib/systemd/system/rsync.service to /etc/systemd/system/rsync.service.

    After doing this, finally restart rsync using the following commands:

    sudo nano /etc/rsyncd.conf
    sudo cp /lib/systemd/system/rsync.service /etc/systemd/system/rsync.service
    sudo systemctl restart rsync

    Step4: Create a backup script:

    Create a shell script that automates the backup process. This script should include the necessary rsync commands to transfer data from the server to the backup location. For example, you could use the following script:

    #!/bin/bash
    rsync -avz --delete /path/to/source/ /path/to/backup/

    Replace “/path/to/source” with the directory or file you want to back up and “/path/to/backup” with the backup destination you prepared. The -avz options enable archive mode (preserving permissions, ownership, and timestamps), verbose output, and compression.

    Save this script as “backup.sh” in an easily accessible location, such as /usr/local/bin/.

    chmod +x backup.sh

    Test the backup script Before running the backup script:

    ./backup.sh

    Step5: Setup a cron job:

    Use cron to schedule regular backups automatically. Open the cron configuration file using the command:

    sudo crontab -e

    Add the following line to run the backup script daily at midnight:

    0 0 * * * /usr/local/bin/backup.sh

    Or, you can add a new line at the end of the file with the following syntax:

    * * * /path/to/backup.sh

    This example will run the backup script every minute.

    Save the file and exit the editor. The backup script will now be executed at the specified time.

    backup on ubuntu server

    Modify the backup script to redirect the output to a log file by adding the following line to the script:

    rsync -avz --delete /path/to/source /path/to/destination > /path/to/backup.log 2>&1

    Replace “/path/to/backup.log” with the file path where you want to save the log file

    Troubleshooting Common Issues of Backup on Ubuntu Server

    Here are some troubleshooting steps for backup issues on Ubuntu Server:

    1. Check the backup software or tool being used

    2. Verify backup settings

    3. Check for sufficient disk space

    4. Verify permissions

    5. Check for errors in backup logs

    6. Test backup and restore

    7. Check system resources

    8. Update packages and software

    9. Network connectivity

    10. Consider alternative backup solutions

    Conclusion

    In conclusion, creating a foolproof backup on Ubuntu Server is essential for ensuring data security and minimizing the risk of data loss. By following a systematic approach and utilizing appropriate backup tools, users can effectively backup their data and restore it when needed, enhancing the overall reliability of their server.

  • Exploring Windows VPS: A Cost-Effective Alternative to Dedicated Servers

    Exploring Windows VPS: A Cost-Effective Alternative to Dedicated Servers

    Windows VPS is a hosting server that operates on the Windows operating system, allowing users to remotely access a virtualized environment. By providing a dedicated portion of a physical server, cost-effective Windows VPS offers a dependable and budget-friendly solution for website hosting, application management, and diverse workloads. Moreover, it combines the advantages of virtual server technology with the familiarity and compatibility of the Windows operating system.

    Advantages of Windows VPS server

    The advantages of using a Windows VPS server include:

    1. Affordability: Windows VPS servers are cost-effective comparing to dedicated servers, yet still provide sufficient resources for hosting websites or running applications.

    2. Flexible scalability: Windows VPS servers can easily scale resources to match your needs. Through virtualization technology, you can adjust allocated resources such as CPU, RAM, and storage as needed.

    3. User-friendly interface: Windows operating system is familiar to many users, making server management and configuration easier. It also supports a wide range of software and applications and provides a user-friendly interface.

    buy windows vps

    4. Enhanced security: Windows VPS servers offer strong security features including built-in firewalls, regular security updates, and advanced encryption. You can also configure additional security measures to ensure the safety of your data.

    5. Remote accessibility: With a Windows VPS server, you can manage and access your server remotely from anywhere using Remote Desktop Connection. This provides convenience for server management.

    6. Reliable technical support: Windows VPS servers often provide reliable technical support to quickly resolve issues and ensure smooth server operations with minimal downtime.

    7. Customization options: Windows VPS servers allow customization of the server environment to meet specific needs. You can install and configure software, set up custom security measures, and optimize server performance according to your requirements.

    Application and functionality of Windows VPS server

    Here are several applications and functions of a Windows VPS server:

    1. Website Hosting: A Windows VPS server is suitable for hosting websites and web applications. It provides a flexible and reliable platform capable of handling high volumes of traffic. It supports popular web development technologies such as ASP.NET, PHP, and Microsoft SQL Server.

    2. Remote Desktop Access: Users can remotely access their virtual machine on a Windows VPS server using the Remote Desktop Protocol (RDP). This allows them to utilize Windows-based applications, access files, and carry out administrative tasks from any location with an internet connection.

    3. Virtual Desktop Infrastructure (VDI): Windows VPS servers can be utilized to establish virtual desktops for multiple users. This is beneficial for organizations aiming to deliver a consistent user experience across various devices and locations. Each user obtains their own virtual machine with independent resources and access to Windows desktop applications.

    cost effective windows vps applications

    4. Application Hosting: Windows VPS servers are frequently employed for hosting specific applications that require a Windows environment. For instance, businesses may use a Windows VPS to operate Microsoft Exchange Server for email services, Microsoft SharePoint for collaboration, or Microsoft Dynamics for customer relationship management.

    5. Development and Testing: Developers and software testers can employ a Windows VPS server for their development and testing environments. It provides a separate space where they can develop, debug, and test software without impacting their local systems. The server can be easily configured with different software versions and environments as needed.

    6. Data Backup and Storage: Windows VPS servers can be utilized for data backup and storage purposes. Users can upload their files, documents, and system backups to the server to ensure data redundancy and availability. The server can also be configured as a network storage location accessible by multiple users.

    The Best Alternative to a Dedicated Server

    Determining the best alternative to a dedicated server involves considering several factors, and the suitability of a Windows VPS depends on specific needs and requirements. Here are some factors to keep in mind:

    The first option is cost: In comparison to a dedicated server, a Windows VPS is typically more cost-effective. Sharing resources among multiple users significantly reduces the overall cost, making it an appealing option for budget-conscious individuals or businesses.

    The second option is scalability: A Windows VPS provides greater scalability options than a dedicated server. Upgrading or scaling resources like CPU, RAM, and storage is easier with a VPS, while doing so with a dedicated server can be complex and time-consuming.

    The third option is performance: Although a dedicated server generally offers better performance, modern Windows VPS offerings utilize high-performance hardware such as solid-state drives (SSD) and powerful processors. This ensures optimal performance for most applications and workloads.

    The fourth option is control and customization: Dedicated servers offer complete control and customization options, but a Windows VPS also provides admin privileges, allowing users to install and configure software according to their needs. However, some limitations may still apply due to shared infrastructure.

    The fifth option is support and management: Setting up, maintaining, and troubleshooting dedicated servers typically require extensive technical knowledge. Windows VPS providers often offer managed services, including server setup, regular backups, security updates, and technical support, making it a more user-friendly choice.

    How to Buy an Affordable Windows VPS server from NeuronVM

    To Buy an Affordable Windows VPS server from NeuronVM, just follow the steps below.

    Step 1: Go to the NeuronVM website and click Buy Windows VPS from the Buy VPS menu:

    buy windows vps from neuronvm

    Step 2: On the Windows VPS page, scroll down a little and select the plan you need and then click on Purchase now:

    choose your desired windows vps plan

    The next step is configuration. Determine the Billing Cycle, location and operating system you want and click on continue:

    windows vps config section

    In the next step, after checking your chosen plan, if you have a discount code, type it and click Validate Code. Then click Checkout:

    get windows vps

    Fill the required fields with your information to register. If you have already registered, click on Already Registered. Then type your email address and password to enter the user account and login. On the next page, choose one of the payment methods and click on Complete Order:

    register on neuronvm

    ***

    login to neuronvm

    By clicking on Make payment in Perfect Money payment method and entering Member ID and password, your purchase will be completed successfully:

    buy perfect money vps

    Note that in the shortest time and after a few minutes, the information about your purchased service will be sent to you via email.

    Conclusion

    In conclusion, cost-effective Windows VPS solutions offer a budget-friendly option for individuals and businesses seeking reliable and scalable hosting services. With affordable pricing and a wide range of features, these VPS plans provide excellent value for money while ensuring high performance and flexibility.

  • How a Dedicated Server Handles High Traffic?

    How a Dedicated Server Handles High Traffic?

    The ability to handle high traffic is crucial for any online business, website, or application. With the constant growth of internet usage, ensuring that your platform can handle a surge in visitors is a top priority. This is where a dedicated server comes into play. Handling high traffic can become a nightmare for many. Here, we’ll talk about how a dedicated server handles high traffic. We will delve into the importance of high traffic handling, the benefits of using a dedicated server, how dedicated servers handle high traffic, load balancing techniques, and finally, guide you on choosing the right dedicated server provider for effective high traffic handling.

    Dedicated Server Handling the Traffic

    Understanding the Importance of High Traffic Handling

    For any online platform, the ability to accommodate high traffic volumes is vital for success. When your website or application experiences a surge in visitors, it should still maintain quick loading times, reliability, and efficiency. A seamless user experience is crucial, as high bounce rates due to slow loading times can significantly impact your business or website’s credibility. Ensuring that your dedicated server can handle high traffic is essential for user satisfaction and overall success.

    The ability to handle high traffic is crucial for any online business, website, or application. With the constant growth of internet usage, ensuring that your platform can handle a surge in visitors is a top priority.

    The Benefits of Using Dedicated Servers

    A dedicated server stands out among other hosting options when it comes to handling high traffic. Unlike shared hosting, where multiple websites share the same server resources, a dedicated server provides you with exclusive resources, including processing power, storage, and memory. This ensures that your platform can handle high traffic with ease without being affected by the activities or resource usage of other websites.

    The Benefits of Using Dedicated Servers

    Moreover, dedicated servers offer enhanced security, customization options, and scalability, making them an ideal choice for handling high traffic.

    The ways that Dedicated Server Handles High Traffic

    A dedicated server is specifically designed to handle high-traffic loads. With powerful hardware and top-notch infrastructure, it can efficiently process requests and deliver content to numerous users simultaneously. The exceptional processing power of dedicated servers enables them to handle heavy workloads, processing large volumes of data quickly and effectively.

    The ways that Dedicated Server Handles High Traffic

    Additionally, dedicated servers employ robust network connectivity to ensure seamless communication between the server and the users accessing the platform, resulting in fast response times and minimal latency.

    Load Balancing Techniques for High Traffic Handling

    To further optimize high-traffic handling, dedicated servers utilize load balancing techniques. Load balancing distributes traffic across multiple servers, preventing overload on a single machine by dividing the load among several interconnected servers. This not only ensures efficient resource utilization but also minimizes the risk of downtime due to server overload.

    Load Balancing Techniques for High Traffic Handling

    Load balancing techniques such as round-robin, weighted round-robin, or IP hash ensure that each server within the dedicated server cluster handles traffic evenly, maximizing performance and reliability.

    Choosing the Right Dedicated Server Provider for High Traffic Handling

    Selecting the right dedicated server provider is crucial for effective high-traffic handling. NeuronVM, a leading dedicated server provider, offers a wide range of solutions specifically optimized for handling high-traffic loads. With NeuronVM’s cutting-edge infrastructure, powerful hardware, and superior network connectivity, your dedicated server will effortlessly handle high traffic without compromising performance or user experience. By partnering with NeuronVM, your platform can stay ahead of the competition, ensuring that your dedicated server handles high traffic effectively.

    Final Words

    In an increasingly digital world, ensuring that your online platform can handle high traffic has become a key factor in the success of any business or website. A dedicated server offers the ideal solution for high-traffic handling, providing exclusive resources, enhanced security, and scalability. By choosing the right provider, such as NeuronVM, you can guarantee that your dedicated server handles high traffic effectively, offering a seamless user experience and ensuring your online presence remains stable, reliable, and scalable. Don’t let high traffic become a limitation; leverage the power and efficiency of a dedicated server to unlock your platform’s full potential.

  • How to Migrate from Shared Hosting to Linux VPS

    How to Migrate from Shared Hosting to Linux VPS

    Migrating from shared hosting to a Linux VPS offers increased control, scalability, and performance. With a VPS, you have dedicated resources, root access, and the ability to customize your server environment. It’s a seamless transition that empowers you to meet your growing website or application requirements efficiently. Join us in this comprehensive article to teach you How to Migrate from Shared Hosting to Linux VPS after explaining the disadvantages of shared hosting.

    Limitations of Shared Hosting

    1. Limited resources: Shared hosting plans typically have limited server resources such as CPU, RAM, and disk space. This means that if one website on the server experiences a surge in traffic or uses up a lot of resources, it can slow down or even crash other websites on the same server.

    2. Performance issues: Since you are sharing resources with multiple websites, the performance of your website can be affected by the activities and traffic of other websites on the same server. If any of the other websites are using up a lot of resources, it can result in slower loading times and decreased overall performance for your website.

    3. Security vulnerabilities: Shared hosting can be more vulnerable to security breaches compared to other hosting types. Since multiple websites are hosted on the same server, if one website gets hacked or infected with malware, it can potentially affect other websites as well.

    4. Limited customization options: Shared hosting providers often have restrictions on what you can install or modify on the server. This can limit your ability to customize your website or use certain software and applications.

    5. Lack of control: With shared hosting, you have limited control over server settings and configurations.

    shared hosting limitations

    Benefits of Upgrading to a Linux VPS

    There are several benefits to upgrading from shared hosting to a Linux VPS. These include:

    1. Increased Performance: A VPS provides dedicated resources and processing power, resulting in improved performance and faster loading times for your website. This is particularly beneficial if your website experiences high traffic or resource-intensive applications.

    2. Enhanced Security: Shared hosting means your website is hosted on the same server as multiple other websites. This can pose security risks as a compromised website on the same server can potentially affect other websites. With a Linux VPS, you have enhanced security since your website is isolated from others, reducing the risk of malicious activities.

    3. Customizability and Control: With a VPS, you have complete control and root access to your server. This allows you to customize your server environment according to your specific needs, install any software or applications you require, and configure server settings as per your preferences.

    4. Scalability: A VPS provides scalability, meaning you can easily upgrade or downgrade your resources as needed. This allows you to scale your server’s capacity based on your website’s traffic and resource requirements, ensuring optimal performance at all times.

    5. Better Reliability: Shared hosting can be affected by other websites on the same server, leading to potential downtime or performance issues. With a Linux VPS, your website operates independently, reducing the risk of such disruptions. Additionally, VPS hosting usually comes with guaranteed uptime and reliable support.

    linux vps

    Preparing for Migration from Shared Hosting to Linux VPS

    Migrating from shared hosting to a Linux VPS can provide you with more control, flexibility, and improved performance for your website or application. Here are some steps to help you prepare for the migration.

    By following these steps, you can effectively prepare for the migration from shared hosting to a Linux VPS. Remember to take regular backups of your data throughout the process to avoid any potential data loss. Stay with us.

    Step 1: Choose a Linux VPS Provider

    Research and select a reliable Linux VPS provider that meets your needs in terms of server resources, pricing, server location, and customer support.

    One of the most popular providers is NeuronVM. Once you have chosen a provider, sign up for an account and create a new VPS instance.

    Select the Linux distribution of your choice (such as Ubuntu, CentOS, or Debian) and configure the server according to your requirements, including server size, storage, and networking options.

    Step 2: Backing Up your Website Files and Databases

    Backup your website files:

    To back up your website files and databases on shared hosting, you can follow these steps:

    – Access your hosting control panel (usually cPanel) provided by your hosting provider.

    – Look for the “Backup” or “File Manager” option and click on it.

    – Select the directory or folder where your website files are stored (usually public_html or www).

    – Once the compression is complete, download the backup file to your local computer.

    Backing Up your Website Files and Databases - migrate from shared hosting to linux vps

    Backup your databases:

    – Locate the “Backup” or “phpMyAdmin” option in your hosting control panel.

    – Click on “phpMyAdmin” to access your database management tool.

    – Select the database you want to back up from the list on the left-hand side.

    – Click on the “Export” option at the top.

    – Choose the export method as “Quick” or “Custom“.

    – Click on the “Go” or “Export” button to export the database as an SQL file.

    – Download the SQL backup file to your local computer.

    Step 3: Transfer and Configure Your Website Files

    It’s time to transfer the archives to the Linux VPS. This can be easily accomplished through a secure SSH connection. All you need is the location of your file backup and the destination on the server. Your commands should resemble the following:

    To transfer the file backup:

    Use the command below:

    scp ~/Downloads/backup_db.sql.gz username@server_ip_address:

    To transfer the wp-content.zip file:

    Use the command below:

    scp ~/Downloads/wp-content.zip username@server_ip_address

    Alternatively, you can also utilize your FTP client for this task.

    Transfer and Configure Your Website Files - migrate from shared hosting to linux vps

    For a convenient database restore, navigate to the control panel’s phpMyAdmin section. From there, select “New Database” and then choose “Import“. This will enable you to select the database archive from your local machine and upload it to the server.

    Step 4: Test and Verify

    Before updating your DNS records, it’s essential to thoroughly test your website on the new Linux VPS. Ensure that all your website’s functionalities work correctly, and no errors or broken links are present. You can modify your computer’s hosts file to simulate DNS changes and access your website on the VPS directly by entering its IP address in your browser. Once satisfied with the testing phase, update your domain’s DNS records to point to the IP address of your new VPS.

    Troubleshooting Common Migration Issues

    When migrate from shared hosting to Linux VPS, there are several common issues that can arise. Here are some troubleshooting tips to address these issues:

    1. Domain name resolution:

    Check if the domain name is properly resolving to the VPS’s IP address. Ensure that the DNS records are accurately configured, and wait for the changes to propagate.

    2. File permissions:

    Permissions may differ between shared hosting and VPS environments. Use the ‘chmod’ command to set the correct permissions for files and directories. Typically, ‘755’ for directories and ‘644’ for files are appropriate.

    3. Database connection issues:

    Verify if the database credentials are correctly updated in the configuration files of your website/application. Ensure that the database server is accessible from the VPS and that firewall rules are not blocking the connection.

    4. PHP version compatibility:

    Check if the PHP version on the VPS is compatible with your website/application. Update the PHP version if necessary and ensure all required PHP extensions are installed.

    5. Missing libraries or dependencies:

    Install any missing libraries or dependencies required for your website/application to function correctly. Refer to the official documentation or contact the software developers for specific instructions.

    6. Insufficient resources:

    If your website/application is experiencing frequent crashes or performance issues, consider checking resource utilization. Increase the allocated resources (e.g., RAM, CPU) if needed to ensure sufficient capacity.

    7. Configuration file discrepancies:

    Compare the configuration files between the shared hosting environment and VPS. Look for any differences or missing configurations that could affect the functionality of your website/application.

    8. SSL certificate configuration:

    If you had an SSL certificate on your shared hosting, ensure that it is properly configured on the VPS. Update the SSL configuration to point to the correct certificate files and restart the web server.

    Conclusion

    In summary, migrate from shared hosting to Linux VPS provides greater control, scalability, and resource allocation. It allows for more customization, improved website performance, and enhanced security. Overall, the switch allows businesses to optimize their online presence and better meet their specific needs.

  • A Clever Guide to Installing Linux Mint from a USB Drive

    A Clever Guide to Installing Linux Mint from a USB Drive

    Linux Mint, a free and open-source operating system, is built upon the Linux kernel and the Ubuntu operating system. It has been specifically developed to be accessible and intuitive for Linux beginners. Linux Mint features various desktop environments such as Cinnamon, MATE, and Xfce, ensuring diverse user experiences to meet individual preferences. Additionally, it comes with pre-installed applications for web browsing, document editing, and multimedia playback among other functionalities. The primary objective of Linux Mint is to deliver a dependable, robust, and high-performing operating system for personal computers. In the continuation of this article, learn the best installation method with the tutorial on Installing Linux Mint from a USB Drive.

    Prerequisites

    The prerequisites to install Linux Mint are:

    1. A computer with at least:

    – 1 GHz CPU

    – 1 GB of RAM (Recommended: 2 GB or more)

    – 20 GB of free disk space (Recommended: 40 GB or more)

    – A USB of at least 4 GB in size.

    2. A stable internet connection (recommended for downloading updates during installation)

    How to Install Linux Mint from a USB Drive

    Before we start the installation process, we recommend you to visit the Linux VPS server plans offered on our website and use them if you wish.

    To install Linux Mint from a USB drive, follow the steps below:

    Step1: Download the Linux Mint ISO file from the official website. Make sure to choose the correct architecture and edition for your system:

    how to install linux mint

    Step2: Insert a USB drive with at least 4GB of storage into your computer.

    Step3: Download and install a utility called “Rufus” from the official website. Rufus is used to create a bootable USB drive:

    download rufus

    Step4: Open Rufus and select your USB drive from the “Device” drop-down menu.

    Under the “Boot selection” section, click on the “Select” button and locate the Linux Mint ISO file you downloaded earlier:

    Leave the other settings as default unless you have specific requirements.

    Click on the “Start” button to begin creating the bootable USB drive. Rufus will erase all data on the USB drive before copying the Linux Mint ISO file onto it:

    download rufus and using it to install linux mint

    Tip: Once Rufus finishes creating the bootable USB drive, safely remove the USB drive from your computer.

    Step5: Restart your computer and access the boot menu. The key to access the boot menu may vary between computers, but it is typically F12, F10, or Esc.

    Step6: Select the USB drive from the boot menu to boot into the Linux Mint live environment.

    Step7: Click on Start Linux Mint 21.1 Cinnamon 64-bit as shown below:

    Select-Linux-Mint to install

    Step8: Once inside the live environment, double-click on the “Install Linux Mint” icon on the desktop:

    install-linux-mint-from-live-usb

    Step9: Follow the on-screen instructions to choose the language, keyboard layout, and installation options:

    keyboard layout selection on linux mint

    *

    install codecs on linux mint

    **

    erase disk and install mint - installing linux mint from usb drive

    ***

    timezone selection linux mint - installing linux mint from usb drive

    Tip: When prompted, select the option to install Linux Mint alongside your existing operating system or choose the custom partitioning option if you want to manually partition your hard drive.

    Step 10: Set a username and password for your Linux Mint installation:

    create user while installing linux mint- installing linux mint from usb drive

    Wait for the installation process to finish.

    linux mint welcome screen - installing linux mint from usb drive

    Congratulations, you have successfully installed Linux Mint from a USB drive!

    Linux Mint Installation Troubleshooting

    If you are experiencing issues while installing Linux Mint, here are some troubleshooting steps you can try:

    1- Check your hardware compatibility

    2- Check the installation media

    3- Try a different installation method

    4- Disable Secure Boot

    5- Check the BIOS/UEFI settings

    6- Try different installation options

    7- Check for hardware issues

    8- Update firmware and drivers

    If you encounter any problem while installing Linux Mint, ask us about it in the comments section below this post.

    Conclusion

    In conclusion, installing Linux Mint from a USB drive is a straightforward and convenient process. It allows users to take advantage of the benefits of Linux Mint without altering their existing operating system. With its user-friendly interface and abundance of features, Linux Mint is an excellent choice for both beginners and experienced users.

  • The Ultimate Guide to Installing Metasploit on Ubuntu

    The Ultimate Guide to Installing Metasploit on Ubuntu

    Metasploit is an open-source penetration testing framework designed to help cybersecurity professionals identify vulnerabilities, assess security measures, and simulate cyber attacks. It provides a wide range of tools and resources for executing various types of exploits, payloads, and post-exploitation activities. Metasploit contains a vast collection of known exploits, payloads, and modules that can be used to target and test the security of computer systems, networks, and applications. It offers a command-line interface as well as a graphical user interface (Metasploit Framework Community Edition) to facilitate the management and execution of its capabilities. In this guide, we will provide a step-by-step tutorial on installing Metasploit on an Ubuntu operating system.

    Requirements

    Before we proceed with the installation, ensure that you have the following:

    – A Linux VPS running Ubuntu (preferably the latest version)

    – An active internet connection

    – Sufficient storage space

    installing metasploit on ubuntu

    Step 1: Update and Upgrade Ubuntu

    To ensure that your system is up-to-date, open the terminal and execute the following commands:

    sudo apt update
    sudo apt upgrade

    Step 2: Install Necessary Dependencies

    Metasploit requires certain dependencies to function correctly. Install them by running the following command:

    sudo apt install build-essential libreadline-dev libssl-dev libpq5 libpq-dev libreadline5 libsqlite3-dev libpcap-dev git

    Step 3: Configure PostgreSQL Database

    Metasploit uses PostgreSQL as its database backend.

    First, you should run the following command to install PostgreSQL:

    sudo apt install postgresql postgresql-contrib

    Start PostgreSQL as follows:

    sudo service postgresql start

    Now you need to enable PostgreSQL by running the following command:

    sudo update-rc.d postgresql enable

    Finally, you need to configure PostgreSQL using the following two commands:

    sudo -u postgres createuser msf -P -S -R -D
    sudo -u postgres createdb -O msf msf

    Step 4: Install Ruby and RVM

    Metasploit Framework is written in Ruby and requires the Ruby Version Manager (RVM) to manage Ruby versions. Execute the following commands to install Ruby using RVM:

    gpg2 --keyserver hkp://pool.sks-keyservers.net --recv-keys 409B6B1796C275462A1703113804BB82D39DC0E3 7D2BAF1CF37B13E2069D6956105BD0E739499BDB
    curl -L https://get.rvm.io | bash -s stable
    source ~/.rvm/scripts/rvm
    echo "source ~/.rvm/scripts/rvm" >> ~/.bashrc
    source ~/.bashrc
    RUBYVERSION=$(wget https://raw.githubusercontent.com/rapid7/metasploit-framework/master/.ruby-version -q -O - )
    rvm install $RUBYVERSION
    rvm use $RUBYVERSION --default
    ruby -v

    Tip: Close and reopen the terminal to ensure RVM is loaded properly.

    Step 5: Install Metasploit Framework

    Now, you should run the following command to download the Metasploit stable version installer:

    wget http://downloads.metasploit.com/data/releases/metasploit-latest-linux-x64-installer.run

    Now you need to run the installer file by executing the command you see:

    ./metasploit-latest-linux-x64-installer.run

    By executing the above command, the Metasploit welcome window will be displayed for you. Click on Forward:

    metasploit framework install

    ***

    metasploit framework complete install

    Wait for the installation to complete successfully.

    Open one of your favorite browsers and access it using the following address.

    As you can see in the picture below, it is necessary to fill the necessary fields with the required information. Then click on Create Account:

    https://localhost:3790

    metasploit framework web ui

    Finally, to access the Metasploit console from the command line, you can run the following command:

    msfconsole
    run metasploit on ubuntu gui

    If the Metasploit console launches without any errors, congratulations! You have successfully installed Metasploit on Ubuntu.

    Conclusion

    In this guide, we covered the step-by-step process of installing Metasploit on an Ubuntu operating system. By following these instructions carefully, you can begin utilizing the powerful features of Metasploit to enhance your security testing capabilities. Remember to use Metasploit ethically and responsibly, respecting the privacy and security of others.