Tag: Linux Tutorials

  • Top way to Install Node.js on Kali Linux

    Top way to Install Node.js on Kali Linux

    Nowadays, JavaScript is present in different places, and various things are done with it. Although JavaScript is considering to be the core of the web along with HTML and CSS. This high-level and interpretive language is also using as part of the web in creating mobile applications, computer games, desktop programs, etc. Since a long time ago, one of the dreams of JavaScript programmers was to be able to run their codes on the server side, except for the user’s browser. One of the environments that allows programmers to run their JavaScript code on the server side is Node.js. By following this tutorial, you will learn How to Install Node.js on Kali Linux.

    Introducing Kali Linux

    Kali Linux is a Linux distribution based on Debian. This operating system is specifically used for tasks such as network analysis and penetration testing. The presence of many tools installed by default on this distribution has made Kali a Swiss army knife for hackers.

    Kali Linux, formerly known as Backtrack, claims to be more focused on testing tools than previous versions and has removed unnecessary tools, unlike Backtrack, which had different tools for different purposes.

    This operating system is mainly used for advanced penetration testing and security checks. Kali has several hundred tools designed to perform various tasks related to information security such as penetration testing, security research and reverse engineering.

    What is Node.js?

    Node.js is a server-side platform based on the Google Chrome JavaScript engine (V8 Engine). Node.js provides everything you need to run a program written in JavaScript. Mr. Ryan Dahl introduced Node.js in 2009 to show that JavaScript is more powerful than just being used for front-end dynamic web pages. In fact, with the help of Node.js, the JavaScript programming language is executed in the server environment instead of in the browser. Node.js allows you to easily and simply write scalable and large networked applications.

    JavaScript has been evolving since 1995. Although this language did not have a successful presence on the server side until a long time ago, the efforts made by the programmers faded from the minds of other developers over time. Until the introduction of Node.js in 2009, the tide turned and over time JavaScript was used more and more on the server side.

    Features of Node.js

    – High efficiency and flexibility

    – Node.js is cross-platform

    – Ability to combine with microservices

    – The possibility of creating single-page programs (SPA)

    – Ability to build RTA programs

    – The ability to create a chat room

    – The possibility of making online games under the web browser

    How to Install Node.js on Kali Linux

    Before starting the process of installing Node.js on Kali Linux, we suggest you visit the Linux VPS server plans provided on our website, and don’t miss the exceptional opportunity to have a powerful and high-speed server.

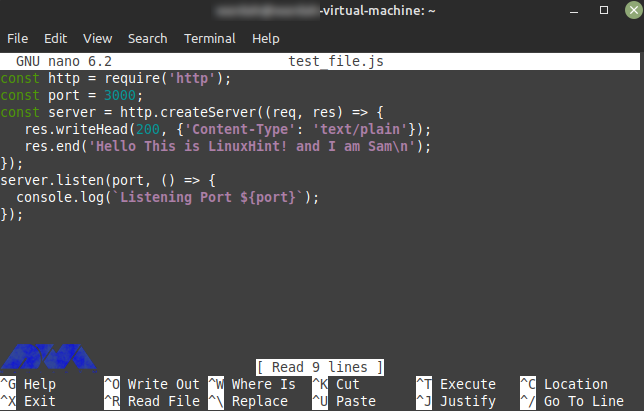
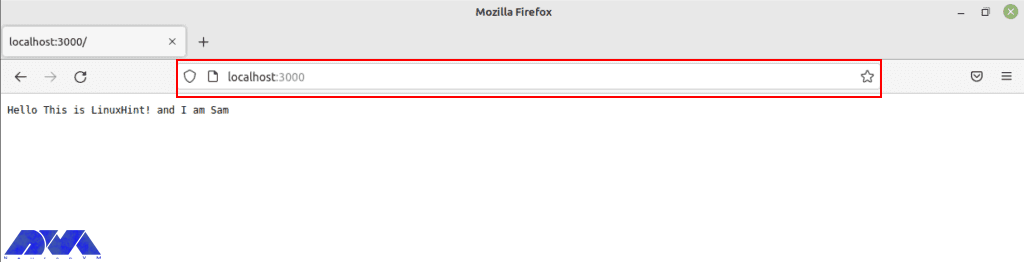
    In the first step, it is necessary to install all the required tools by running the following command:

    sudo apt-get install python g++ make check install fakeroot

    Now you need to create the tmp dir with the help of the following command:

    src=$(mktemp -d)

    Then you need to move to:

    cd $src

    At this stage, you can download the latest version of Node.js by running the following command:

    wget -N http://nodejs.org/dist/node-latest.tar.gz

    If you want to use NodeJS LTS 10, you can use the following command:

    wget -N https://nodejs.org/dist/v10.16.3/node-v10.16.3.tar.gz

    Extract the downloaded file with the help of the following command:

    tar xzvf node-latest.tar.gz

    You can also extract the NodeJS LTS 10 version by running the following command:

    tar xzvf node-v10.16.3.tar.gz

    It’s time to go to the directory of the extracted file by running the following command:

    ls
    cd <directory_name_you_know_from_ls_command>/

    As:

    cd node-v10.16.3/

    Run the configuration file using the following command:

    ./configure

    Now the important thing is that you create the .deb for Node using the following command:

    sudo fakeroot checkinstall -y --install=no --pkgversion $(echo $(pwd) | sed -n -re's/.+node-v(.+)$/\1/p') make -j$(( $(nproc)+1)) install

    Finally, it is necessary to replace [node_*] with the name of the .deb package generated in the previous step in the following command:

    sudo dpkg -i node_*

    Conclusion

    Node js is not only in the field of web applications. It can be used in various projects of Rest APIs, Operating Systems, Robotics, and Microcontrollers, and finally, it’s flourishing to build advanced applications such as drones. In this article, we tried to teach you How to Install Node.js on Kali Linux fully and step by step. If you have any questions in this field, you can send them to us in the comments section.

  • The Best Solution to Install Node.js on Linux Mint

    The Best Solution to Install Node.js on Linux Mint

    Most likely, you are already familiar with the node.js platform. This platform is provided as an open-source and asynchronous backend JavaScript runtime and is in JavaScript language. One of its features is non-blocking I/O, which has turned node.js into a convenient, powerful, and high-speed environment. This article proposes to teach you the best solution to install Node.js on Linux Mint.

    Best Features of Node.js

    In the introduction, you got acquainted with one of the prominent features of node.js. Now, we want to introduce you to other features of this platform:

    Node.js library is in high-speed in code execution

    – It is asynchronous and event-driven

    – No buffering

    – It is highly scalable but single Threaded

    – It is released under the MIT license

    Installing Node.js on Linux Mint

    Before starting the Install Node.js on Linux Mint training, we recommend you choose and buy the Linux VPS Server plans provided on our website and enjoy its high quality. In this part, you will learn how to install Node.js step-by-step.

    You should start the installation process by updating the system repository. Use the command below:

    sudo apt update

    Now you should install all the dependencies as it is necessary before the installation. Run the following command for this reason:

    sudo apt install software-properties-common apt-transport-https ca-certificates gnupg2 curl build-essential

    Next, After installing dependencies, you should get the non-source repository in your system by the command below:

    curl -sL https://deb.nodesource.com/setup_18.x | sudo -E bash -

    Now that you successfully set the node.js source repository, you are ready to install the program on Linux Mint:

    sudo apt install nodejs

    If you want to check the status and verify the installed version, apply the command below:

    node --version 

    Well done! Now, you can enjoy using this platform.

    Testing Node.js on Linux Mint

    Use a nano editor or any editor you desire to create a simple JavaScript file and type a simple program:

    nano test_file.js

    The output should be like this:

    testing Node.js on Linux mint

    You should save this program in your editor, and if you want to see the output, open any browser. To do this, execute the following command.

    Note that the local port to run a web server is 3000.

    node test_file.js

    The image below shows the way to verify the installation of Node.js. Type the port in the browser:

    verifying nodejs installation on browser

    Uninstall Node.js on Linux Mint

    If you don’t need Node.js anymore and you want to remove it from your system, use the mentioned command below in the terminal:

    sudo apt remove nodejs

    Conclusion

    Here, you learned how to install Node.js on Linux Mint with an easy method. We also tried to show the way to test the program with an editor and the way to remove Node.js if you don’t need it. Install and enjoy using this Java program. If you need any help, please let us know by leaving a comment.

    FAQ

    Which Linux type is better for Node.js?

    Ubuntu or Linux Mint are the best matches for Node.js, especially if you are a beginner.

    What are the system requirements for Node.js?

    A minimum of 50-100 MB of free disk space and 512 MB RAM is needed to use this program but 1 GB is recommended.

  • How to Install and Setup Mikrotik on Dedicated Server

    How to Install and Setup Mikrotik on Dedicated Server

    MikroTik is a Linux-based operating system known as MikroTik RouterOS, and by installing it on the dedicated RouterBOARD hardware, it turns the hardware into a network router. Mikrotik works as a firewall, private network (VPN) server, and client, forming and enhancing the quality of broadband services, use as an access point, and other features in wireless networks. After reading this post you will learn How to Install and Setup Mikrotik on Dedicated Server. Therefore, we recommend you stay with us until the end of this post.

    Tutorial Install and Setup Mikrotik on Dedicated Server

    In this section, we will give you a complete guide to show how you can install Mikrotik on your dedicated server. So study carefully.

    Mikrotik Features

    • Support Second Layer Forwarding
    • Support OSPF and BGP and VPLS/MPLS Routing Protocols
    • Powerful firewall up to the seventh layer
    • WEP, WPA, and WPA2 encryption
    • Multiple Tunneling Protocols such as OpenVPN, PPTP, PPPoE, and L2TP
    • IPv4 and IPv6 support
    • Email and SMS tools
    • Bandwidth Test
    • CALEA Data Mirroring
    • File Fetch tool
    • TFTP server
    • RADIUS and NTP client and server

    Install Mikrotik on Dedicated Server

    Before starting the Install Mikrotik on Dedicated Server training, we recommend you choose and buy the Cheap Dedicated Server plans provided on our website and enjoy its high quality. The first step should be to use SSH in order to connect to a server.

    Then, refer to the software section on the official Mikrotik website. Note to download the stable distribution version or the long-term one.

    As your next step, you should open cloud hosted router and copy the related link to download the raw disk image:

    Install Mikrotik on Dedicated Server

    As you entered the server console, run the command below to download the row image to your server:

    wget https://download.mikrotik.com/routeros/7.5/chr-7.5.img.zip

    Use the following command to install the unzip tool on the server:

    yum install unzip

    Now use the command below to unzip the installation image:

    unzip chr-7.5.img.zip

    Note that the installation file name above which is unzip chr-7.5.img.zip may be different, so check your file name using the below command:

    ls - her 

    As a result, you will see the list of necessary files:

    list of necessary installation files on server

    Apply the following command if you want to find out the name of the server disk that you should install routerOS:

    fdisk -l

    In order to write the previously unzipped installation image, to the /dev/vda disk, use the command below:

    dd if=chr-7.5.img of=/dev/vda bs=4M oflag=sync

    Here, we will use an unusual way to restart the server (for example, when the disk is not available). Run the necessary commands on the server console :

    echo 1 > /proc/sys/kernel/sysrq
    echo b > /proc/sysrq-trigger

    As you finished this part, no longer you can access the server via SSH.

    Setup Mikrotik on Dedicated Server

    If you want to connect to the routerOS like using SSH, win box, or web access, you should setup the network interface on the server. For this reason, use VNC to connect to the server from your personal account.

    As you encounter the login prompt enter admin.

    VNC connection

    Press Enter, as you asked to insert the password. Then, RouterOS will ask you to introduce yourself with the license and request to change your password. So enter your new password and confirm that:

    change password on routerOS - Install and Setup Mikrotik on Dedicated Server

    In the vmmanager server control panel you can find the IP address, mask, and gateway of the server. So, highlight the server and click on the IP Addresses button. Then, enter the command to configure the IP address in the RouterOS console:

    IP address adds address=xxx.xxx.xxx.xxx/24 interface=ether1

    Tip: xxx.xxx.xxx.xxx is the IP address of your server.

    Now, the following is the gateway configuration command:

    ip route add gateway=yyy.yyy.yyy.yyy

    Tip: yyy.yyy.yyy.yyy is your server gateway:

    setup server gateway on routerOS - Install and Setup Mikrotik on Dedicated Server

    In the end, in order to enter the RouterOS settings, use the link in your browser:

    http://хх.хх.хх.хх/webfig/

    Note: The link is your IP address:

    Conclusion

    At the beginning of the article, Mikrotik was introduced and its features were mentioned. You can install Mikrotik on a dedicated server with the help of our step-by-step tutorial.

    FAQ

    Is Mikrotik a Linux base operating system?

    Yes, Mikrotik is a stand-alone operating system based on Linux.

    Do we need to have a license for Mikrotik?

    Mikrotik devices come preinstalled and they have a license. There is no need to pay any money.

  • How to Install Antivirus on Linux Dedicated Servers

    How to Install Antivirus on Linux Dedicated Servers

    Viruses or malware are malicious programs that are used to destroy your system. Now, if you suspect this type of malware or viruses and shell scripts in your dedicated system, there are tools that you can access in the WHM panel and scan this malicious content. But first, you have to enter WHM. This article concentrates on the way to learn how to install Antivirus on a Linux Dedicated server.

    Setup Antivirus on a Dedicated Server

    As you notice, having an antivirus on your dedicated server is really essential because of your system’s security. You can use some apps for scanning viruses on the server. Before you start Installing Antivirus on Linux Dedicated Servers, you need to install Cpanel on the dedicated server first. We also suggest you use the Cheap Dedicated Server plans with instant delivery provided on our website.

    When you want to install and setup antivirus on a dedicated server, you have two options:

    – The first one is using ClamAV

    – The second one is ImunifyMV

    Let’s see how these two work.

    How to Install ClamAV on a Dedicated Server

    As we mentioned before, ClamAV is one of the ways to scan viruses on the dedicated server. Here, we are going to show how you can install and setup ClamAV.

    First, you should log in to the WHM.

    Then, Click on the Cpanel option in the WHM and search for the Cpanel menu:

    Now, you can see the Manage Plugins option. Using this option, you can manage the plugins for the Cpanel account:

    manage plugins option on Cpanel

    Here, different plugins are available for you. Click on the ClamAV option. Note that you can use this option to uninstall the plugin, too.

    Install ClamAV on Cpanel

    The installation process will take a few minutes. After the installation, the Log Entry will be produced along the process and displayed on your screen. After the successful installation, you will see the message about that:

    Installation process of ClamAV - install Antivirus on a Linux Dedicated server

    Configure ClamAV on a Dedicated Server

    Now we will show you the way to configure ClamAV on your system. Here is a step-by-step instruction to follow:

    1- On WHM, search for a Feature and choose the Feature Manager. Then go to the Manage Feature List, select Just Host, and click Edit.

    2- Activate Virus scanning and click the Save button.

    clamav scanner configuration - install Antivirus on a Linux Dedicated server

    How to Install ImunifyAV on a Dedicated Server

    Another app to scan viruses on your system is ImunifyAV. Here, we will show how you can do the installation and setup in steps. Follow the instructions:

    1- Use SSH or Putty to connect to your server.

    2. You can download the ImunifyAV shell script from Imunify360.com/antivirus. Here is the command:

    wget https://repo.imunify360.cloudlinux.com/defence360/imav-deploy.sh

    3- Execute the installation shell script using the following command:

    bash imav-deploy.sh

    4- Now, use the command below to update ImunifyAV:

    yum update imunify-antivirus

    5. Enter the WHM.

    6. On the left side of the panel, select ImunifyAV.

    7- Choose the right arrow button under the actions column to scan the account.

    8- Now, click on Yes, Scan to confirm the user’s file, or choose Scan All to scan the entire files, and at last, Yes, Scan All to scan all Cpanel user files.

    ImunifyAV dashboard - install Antivirus on a Linux Dedicated server

    Configure ImunifyAV on a Dedicated Server

    Select the Settings button with the gear icon.

    Adjust Resource Consumption according to your needs.

    Then, configure the background scan time or disable run scanning from the drop-down menu.

    Unmark the enable sentry error reporting option and save the changes.

    ImunifyAV setting

    Conclusion

    As you learned from this article, you can install and configure different apps to scan viruses and malware on your system. Here, we analyzed ClamAV and ImunifyAV. Two popular tools for scanning viruses. We hope you enjoyed the tutorial. If you have any ideas or questions please share in a comment.

    FAQ

    Why an antivirus is essential for a dedicated server?

    It is crucial for maintaining the security of your system and also for the integrity of your data and applications. It is helpful in detecting viruses and malware.

    Is it possible to install various antiviruses on a single system?

    It is not recommended. It causes conflicts, performance issues, and false positives in your system.

  • Tutorial how to install Cowsay Linux Command

    Tutorial how to install Cowsay Linux Command

    Cowsay is a program that can generate ASCII art pictures of a cow with a message. Also generate images using pre-made images of other animals, such as Tux the Penguin, the mascot of Linux. You can fully learn how to install Cowsay Linux Command after reading this article. Therefore, we suggest you to stay with us until the end.

    Introduction to Cowsay

    Cowsay is written in Perl. It also includes programs called Cow Thinking where cows have thought bubbles instead of speech bubbles. There are .cow files for Cowsay, which are able to generate different types of “cows”, with different types of “eyes”, etc. Used in IRC, desktop screenshots, and software documentation, this is more or less a term in hacker culture. If you want to prevent interpolation, you should reduplicate any backslashes.. Also, at-signs (”@”) must be backslashed because that is what Perl 5 expects.

    Cowsay Features

    Cowsay has the ability to show a customizable massage through a Cow image. It comes with various options to help to customize the Cow image and speech bubble and let the user use different types of speech bubbles like a Cow head, a speech bubble with a border, or a Think bubble. It provides quick information and debug information.

    Installing Cowsay Linux Command

    Before starting the installation process, we suggest that if you have not yet purchased a VPS server or if you are dissatisfied with its quality, purchase and use the Linux VPS server plans provided on our website.

    You can install cowsay using the following command:

    sudo dnf install cowsay

    After running the command, call it with cowsay and then your message:

    fortune | cowsay

    Cowsay has been shipped with a few changes to the name cow files, which are usually found in /usr/share/cowsay. Use the -l flag after cowsay to see the cow file options available on the system. Also use the -f flag:

    cowsay -f dragon "Run for cover, I feel a sneeze coming on."

    As you installed Cowsay, when you run a playbook you will get your output from a series of cows. For example, run the playbook using the following command:

    - hosts:
        - localhost
      tasks:
        - action: ping

    After executing the command of the playbook, the following items will be displayed to you:

    ansible-playbook playbook.yml

    Cowsay is accessible under the GPLv3 license and you can find the Perl source code on GitHub. There are also versions floating in other languages, see the rest of the sections for other variants. There is one in R, for example. Implementing a version in your language of choice might even be a fun thing to learn programming.

    Conclusion

    We have explained the steps required for installation in order. When working with Linux, playing with Cowsay is an option. This tool also allows you to create different exploratory art and define which message and state of mind they should convey. In this article, you learned how to install Cowsay Linux Command. We hope you find this article useful. You can Share your comments with us via the form below.

    FAQ

    Are there any additional packages for Cowsay?

    No, it doesn’t have any additional dependencies.

  • Tutorial Encrypt and Decrypt with PGP on Ubuntu 20.04

    Tutorial Encrypt and Decrypt with PGP on Ubuntu 20.04

    PGP is used to encrypt and decrypt data. Methods such as hashing, public key encryption, and data compression are used in PGP encryption. In the continuation of this comprehensive article, you will learn how to Encrypt and Decrypt with PGP on Ubuntu 20.04. Therefore, we recommend that you stay with us until the end.

    Introduction to PGP

    GPG or GnuPG, which is a free PGP-based signature and encryption software, uses it to export and import public and private keys, and to encrypt and decrypt data. GPG key pairs include two types of keys: private and public keys. Use the public key to encrypt the data, and the encrypted data will be decrypted using the recipient’s secret or private key.

    Prerequisites

    The process of encrypting and decrypting files with PGP involves a few simple steps. First, the sender must issue your public key and send it to the recipient. Second, the receiver enters the public key into its key. The recipient can then encrypt any file using the sender’s public key. Also, the recipient decrypts the shared file using his private key.

    To start at the beginning Create two pairs of GPG keys for the purpose of display for two people in two separate systems (Linda and Dominique). Now, issue the public key and then enter it into another system.

    We also recommend you use Linux VPS server plans available on our website to Encrypt and Decrypt with PGP on Ubuntu 20.04.

    Encrypt and Decrypt with PGP on Ubuntu 20.04

    How to Export Public Key with GPG

    Before sending your public key to a reporter, you must first issue it using the GPG command. In the GPG command, an additional argument is specified to identify the public key that will be the user ID, and the “-a” or “-armor” option is added to generate the output of the export file in ASCII format. In the “GPG” command. To export a specific public key, first list the GPG keys generated on the system and select the key you want to export.

    To do this, use the following “GPG” command:

    gpg --list-keys

    For example, to issue the public key “Linda“, note the “uid” user ID from the list:

    How to Export Public key with GPG

    Now add the “-export” option to the GPG command to export the “Linda” public key. Here, the “-a” option is used to create an ASCII display of the public key, and the redirect operator “>” is used to redirect the output of the GPG command to the “public.key” file:

    gpg --export -a Linda > public.key

    The “.key” extension indicates that there is encrypted content inside the specified file.

    If the output is error-free, it declares that the “public.key” file is ready for export. To check its content, run the following “cat” command:

    cat public.key

    “public.key” saves the ASCII display of Linda’s public key as follows:

    How to export public key with GPG

    #####

    How to export public key with GPG

    In this step, you created the “public.key” file that contains the ASCII display of the public key “Linda”. Now, share the file with another system user so that the “new user” can enter the GPG key into their key.

    How to Enter a Public Key with GPG

    With the GPG command, inserting a public key into a key is simply exporting them. Decrypt incoming encrypted files, documents, or emails by entering the sender’s public key. Before entering “public.key”, list the keys in the new user key:

    gpg --list-keys

    “Neuronvm” now has a pair of GPG keys for “Dominique” uid, which can be seen in the following output:

    How to Export Public key with GPG

    To enter Linda’s “public.key”, run the “gpg” command with the “import” option:

    gpg --import public.key

    The following output indicates that the public key “Linda” has been entered correctly:

    Encrypt and Decrypt with PGP on Ubuntu

    List the “Neuronvm” public key to confirm the specified operation:

    gpg --list-public-keys

    The successfully entered Linda public key can be seen in the image below:

    How to enter a public key with GPG

    How to Edit the key trust Value with GPG

    After entering Linda’s public key into the “Neuronvm” key, enter the amount of trust that is unknown at this point:

    gpg --list-keys

    How to Editing the key trust Value with GPG

    Enter the following GPG command to edit Linda’s public key trust value:

    gpg --edit-key linda public.key

    How to editing the key trust value with GPG

    Type “trust” and hit “Enter” to check the trust menu options:

    gpg> trust

    Then enter “5” to make sure you “finally” trust Linda’s public key:

    Encrypt and Decrypt with PGP on Ubuntu

    Exit GPG edit by typing “quit” and pressing “Enter“:

    gpg> quit

    How to edit the key trust value with GPG

    Now list the “gpg” keys again and check the trust value of the “linda” key:

    gpg --list-keys

    How to editing the key trust value with GPG

    How To Encrypt Files with GPG 

    In the “Neuronvm” system there is a file called “encryptfile1.txt” which is encrypted with the public gpg key of Linda. Before moving on to the encryption procedure, check the content in the specified file:

    How To encrypt file with GPG 

    To encrypt a file using the gpg command, enter the following command:

    gpg -e -u [Sender_uid] -r [Receiver_uid] [Filename]

    The “-u” option is now used to specify the sender uid and the “-r” option for the receiver. The secret key of the sender and the public key of the receiver is used to encrypt the file. Now enter the following command to encrypt “encryptfile1.txt” with the individual secret key and Linda’s public key:

    gpg -e -u Dominique-r linda encryptfile1.txt

    How To encrypt file with GPG 

    If the output is error-free, it means that an encrypted file has been successfully registered. To confirm this step, browse the contents of the current directory:

    ls

    The following output indicates that “encrypt file1.txt.gpg” was created for the file of your choice:

    Encrypt and Decrypt with PGP on Ubuntu

    Check the contents of “encryptfile1.txt.gpg” by running the “cat” command:

    cat encryptfile1.txt.gpg

    The encrypted content “encryptfile1.txt.gpg” in the terminal is shown as follows:

    How To encrypt file with GPG 

    Share the encrypted file with the recipient via email or another method.

    How To Decrypt Files with GPG

    The “-d” option is added to the “gpg” command to decrypt the encrypted file. Share “encryptfile1.txt.gpg” with the “Neuronvm” user who owns the Linda GPG key pair. Now to decrypt the received file, type the following command:

    gpg -d encryptfile1.txt.gpg

    Decrypt Files with GPG

    You are prompted to enter “Passphrase” to unlock Linda’s secret key. Enter the password in the input field and click the “OK” button:

    Encrypt and Decrypt with PGP on Ubuntu

    After entering the correct password, the specified file is decrypted and its contents are displayed in the terminal as follows:

    Encrypt and Decrypt with PGP on Ubuntu

    Conclusion

    PGP encryption is used by companies to exchange data such as files, documents, and emails over the Internet. Also, Protects important information from being misused through email attacks. Public and private GPG keys are used to encrypt and decrypt files. Without the GPG key, no one can decrypt the data. In this tutorial, you learned how to encrypt and decrypt with PGP on Ubuntu 20.04. We hope you find this tutorial useful. Share your comments with us via the form below.

    FAQ

    How many keys are needed in the PGP encryption and decryption process?

    There should be two different keys for encrypting and decrypting each file, and also, two more keys to sign and verify each file.

    Is it possible to break PGP encryption?

    It is almost impossible to hack or break PGP encryption.

  • Tutorial Install and Access Plex Media Server on Debian 11

    Tutorial Install and Access Plex Media Server on Debian 11

    Plex is a free media server that lets you organize your music, videos, and TV shows into a user interface. The purpose of this tutorial is to teach you How to Install and Access Plex Media Server on Debian 11. Therefore, we recommend you stay with us until the end of this article.

    Introduction to Plex Media

    Plex is versatile; media can be accessed and shared using a client app such as a mobile app, Roku, etc. Plex Media runs on a variety of platforms that may run on a single desktop computer. The most obvious examples are Windows and Mac. It should be noted that Plex also supports Linux, FreeBSD, and several NAS platforms. You’ll find Plex apps for most platforms and smart TV boxes like Apple TV, Chromecast, and Fire TV, as well as consoles like Xbox One and PlayStation 4.

    Features of Plex Media

    – Supports cloud sync and encrypted connections with multiple accounts.

    – You can also easily select and share what you want.

    – It has a media optimizer and supports video streaming from one device to another.

    – It supports voice fingerprinting and automatic photo tagging and encrypted connections with multiple accounts.

    Prerequisites 

    – A Linux VPS with Debian OS

    – Update Debian packages to the latest version

    How to Install Plex Media Server on Debian 11

    First, before starting the installation process, update the Debian package using the following command:

    sudo apt update
    sudo apt upgrade -y

    Also, install the required packages with the help of the following command:

    sudo apt install apt-transport-https curl vim wget -y

    Plex Repository on Debian 11

    The available repository provides Plex packages. To install Plex on Debian 11, add the repository to your system. Add the Plex repository using the following command:

    echo "deb https://downloads.plex.tv/repo/deb public main" | sudo tee /etc/apt/sources.list.d/plexmediaserver.list

    Enter the required GPG keys for the repository using the following command:

    curl https://downloads.plex.tv/plex-keys/PlexSign.key | sudo apt-key add -

    Installing Plex Media Server on Debian 11

    After the repository is added, continue the steps in order and install the latest version of Plex on Debian 11 and also update the APT package list using the following command:

    sudo apt update

    Now create the added Plex repository and then install the Plex media server using the following command:

    sudo apt install plexmediaserver

    After finishing the installation process, the Plex service will start automatically. Verify the item using the command:

    systemctl status plexmediaserver

    Use the following command to get started:

    sudo systemctl start plexmediaserver

    Now enable the service to run automatically at system boot using the following command:

    sudo systemctl enable plexmediaserver

    How to Configure the Apache Reverse Proxy for Plex

    Now, the Plex dashboard can be accessed using the URL http://localhost:32400/web. Configure a reverse proxy to access Plex remotely. Also, secure it with HTTPS. Install the Apache web server on Debian, Debian 11 with the following command:

    sudo apt install apache2 -y

    After you finish installing Apache, create a virtual host file for Plex:

    sudo vim /etc/apache2/sites-available/plex.conf

    In the desired file, add the following commands:

    <VirtualHost *:80>
    ServerName plex.neuronvm.com
    ErrorDocument 404 /404.html
    
    #HTTP proxy
    ProxyPreserveHost On
    ProxyPass / http://localhost:32400/
    ProxyPassReverse / http://localhost:32400/
    
    #Websocket proxy
    <Location /:/websockets/notifications>
    ProxyPass wss://localhost:32400/:/websockets/notifications
    ProxyPassReverse wss://localhost:32400/:/websockets/notifications
    </Location>
    </VirtualHost>

    Now save the file, then activate the site and proxy module using the following command:

    sudo a2enmod proxy_http
    sudo a2enmod rewrite
    sudo a2ensite plex.conf

    Move the Assumption Apache Conf to a backup file using the following command:

    sudo mv /etc/apache2/sites-enabled/000-default.conf /etc/apache2/sites-enabled/000-default.conf.bak

    Now restart Apache using the following command:

    sudo systemctl restart apache2

    How to Access Plex Web UI on Debian 11

    You can also access the plex at this stage using the URL http://IP_address/web or http://domain_name/web:

    Install-and-Configure-Plex-Media-Server-on-Debian

    Login to Plex using the preferred methods then go to the page that explains what Plex is and how it works:

    How Plex Works

    Now configure Plex as follows, starting by setting the server name:

    Install-and-Configure-Plex-Media-Server-on-Debian

    Now launch the media library. This step allows you to add media lists if you have already imported them. Click on Add Library and proceed as follows:

    Install and Access Plex Media Server on Debian

    Select the Library type, then search for media in your local storage and add it:

    Install and Access Plex Media Server on Debian

    With the media library configured, proceed to the next step and finish setting up the server:

    plex server setup

    The Plex dashboard will now be displayed as below:

    Install and Access Plex Media Server on Debian

    Go ahead and watch live TV, movies, podcasts, and listen to music. For example, while watching live TV, you have to select the live TV channel from the list provided:

    Access Plex Web UI

    Now click More to view the local storage files and your media server will appear with the libraries added. Also, more libraries can be added here:

    Access Plex Web UI

    Then add settings like language, interface, plugins, etc. for Plex in the settings tab:

    Setup a Plex Client

    How to Setup a Plex Client on Debian 11

    Plex client can be installed on multiple platforms such as Android, Mac, Apple TV, Windows, etc. Client applications are provided on the Plex Applications page. Also, using an Android client, you can play media libraries. Added view of watched channels in your account. You can now sign in to your Plex account. Now choose how to sign in to your Plex account as below:

    sign up plex

    Select how to sign in to your Plex account as shown in the image:

    sign up plex-2

    Now if you have more than one Plex server, go ahead and select the server you want to connect to:

    Setup a Plex Client

    Now optimize the navigation in the Plex client, then go to the Plex dashboard as below:

    Setup a Plex Client

    Also in the More section, you can view media from the Plex server media library as below:

    Setup a Plex Client

    Conclusion

    With the Plex media server running on Debian 11, you can easily store digital media like music, video, photos, etc., and access them anywhere on the Internet. In this article, you learned how to Install and Access Plex Media Server on Debian 11. We hope this educational article was useful for you. Share your comments with us through the form below.

    FAQ

    Which one is better; Plex or Netflix?

    Netflix is produced to manage TV shows and movies and is not a free app, plex puts you in charge of finding all the stuff to watch. The exception is just ad-supported content.

    What is Plex used for?

    It is software that is used to store, locate and access all of your media in one place.

  • How To Install CloudLinux on Centos 7

    How To Install CloudLinux on Centos 7

    If you are one of the online businesses that provide hosting services to your customers, you may encounter various problems in your field such as performance, source leaks, or security issues. All these issues are recovered by the CloudLinux operating system that is used for the shared hosting environment. So, we will show you how to install CloudLinux on CentOS 7.

    What is CloudLinux Operating System?

    As mentioned, CloudLinux is an operating system for commercial use and can replace CentOS. The system uses LVE kernel-level technology, allowing you to manage CPU and memory on a per-tenant basis. Some of the benefits that CloudLinux Offers are advanced resource management, performance optimization, and advanced security, which are specially provided for Multi-client hosting environments. This improved performance enables data centers to provide better customer support.

    install cloudlinux on centos 7

    Installing CloudLinux on CentOS 7

    To set up and use the CloudLinux operating system, we suggest you purchase from the Linux VPS plans provided on our website and then apply the continuation of this tutorial on our high-speed servers.

    According to the usual procedure, you should start the installation by updating the operating system. This important step must be done because CentOS security comes first and security is sent at the CentOS upgrade. So follow the command to upgrade the operating system:

    yum -y update && shutdown -r now

    The next part is to register a CloudLinux user key. It is a commercial product, So you will need to purchase the correct number of keys depending on your needs.

    You will get the installer as a runnable script, So fetch the script before the execution:

    wget https://repo.cloudlinux.com/cloudlinux/sources/cln/cldeploy

    Then, you should run the script you have just retrieved:

    sh cldeploy -k # if you have activation key

    Or you can execute it as follow:

    sh cldeploy -i # if you have IP based license

    As you complete the process, reboot your server. As a result, various CloudLinux services will be running and all the kernel modules and modifications will be active:

    reboot

    That’s it. Now you have CloudLinux installed on your CentOS system.

    Conclusion

    CloudLinux is a great way to upgrade your hosting. So, we tried to introduce a way to install it on the CentOS operating system. It was easy and will takes just a few minutes to install. If you enjoyed this article please share it with those who may also be interested.

    FAQ

    What are the benefits of using CloudLinux?

    This OS is useful to improve server stability, enhance security, and allocate and control resources.

    Is it possible to install CloudLinux on an existing CentOS server?

    Yes, it is possible. However, it is better to perform a clean installation of CloudLinux to avoid potential problems and conflicts.

  • Tutorial Install CWP on Centos 8

    Tutorial Install CWP on Centos 8

    CWP, or CentOS Web Panel, is a control panel for web hosting on Linux and is a free alternative to Cpanel. This tutorial has been prepared to introduce you to the Tutorial Install CWP on CentOS 8. Its easy-to-use interface and several other features make it a good choice for beginners. The reason for the ease of using this control panel is that you don’t need to access the server with SSH for every task.

    What Is CWP?

    As we mentioned in the introduction, Control Web Panel is a management tool that is generally created on unmanaged VPS for users who are interested in working with the command line. If you need to get more information about CWP you can refer to A Full Introduction to CWP.

    Some Points to Mention Before CWP Installation

    There are some critical points that you should consider before the installation process of CWP:

    – It is not possible to remove it after the installation.

    – If you want to remove CWP from your Linux VPS, you should reinstall the server.

    – Your hostname should be different from the other names on any domain on your server.

    – The installation should be on the newly installed operating system without any configuration changes.

    – The dynamic, Sticky, or internal IP addresses are not supported.

    Steps to Install CWP on CentOS 8

    Now let’s find out how we can install CWP on CentOS 8. Follow the instructions below to have a successful installation process.

    The first step is to prepare the server by installing the EPEL repository on CentOS 8:

    sudo dnf install epel-release

    Use the command below to install the required packages like wget to install CWP:

    sudo dnf install wget -y

    The next step is to update your server using the following command:

    sudo dnf update -y

    You should reboot your system to make the changes applied:

    reboot

    Now the system is completely ready to install CWP. So, use the cd command to change the directory /usr/local/src by this command:

    sudo wget http://dl1.centos-webpanel.com/files/cwp-el8-latest

    Here, you should run the command below to install the downloaded shell script:

    sudo sh cwp-el8-latest

    Now you have successfully installed CWP on your CentOS system. Reboot the server again to apply changes:

    reboot

    Also, you can use the command below to automatically reboot the system after the installation:

    sudo sh cwp-el8-latest -r yes

    Configuring CWP on CentOS 8

    In the configuration section, your first step is to access the web panel user interface by giving the IP address and port number 2030.

    http://server_IP_address:2030/

    You can check the server’s IP by opening the terminal of your system on which you installed CWP. Use the following command:

    ip a

    Her, you can access the admin control panel using your IP address. Use the root username and password to login to the CWP:

    CWP login page

    You can see the dashboard here:

    cwp dashboard - install cwp on centos 8

    If you can log in to the dashboard easily, it shows that your installation is successful.

    You should do a couple of instructions, to prepare the domain for domain hosting. On the dashboard, you should refer to DNS Functions part and choose Edit Name Server IPs:

    configuring cwp on centos

    You should add nameserver 1 and 2 with related IP addresses and click on Save Changes Button:

    Then go to the CWP Settings and select Edit Settings to determine the shared IP address:

    cwp settings - install cwp on centos 8

    Go to the Packages part and choose to Add a Package:

    add packages on cwp

    In the end, you will see a pop-up window to add a package, insert the needed values and click on Create button:

    add packages on cwp-2

    Go to the User Accounts and click on the New Account, to create an account and fill in the necessary information:

    create account on cwp

    As the final step, add a domain. Click on Domains and then Add Domain by providing the name of the domain and pressing Create button:

    add domian on cwp

    Conclusion

    CWP is a practical control panel for web hosting with an intuitive interface and great features to manage servers. So, we decided to analyze it and show the way to install CWP on CentOS 8. We also presented all the instructions to configure this management tool.

    FAQ

    What is required before CWP installation?

    A minimum of 2 GB RAM and a 64-bit operating system. Although we recommend using 4 GB RAM.

    Which port is used by CWP on CentOS?

    The console access ports are 2030 (without SSL) and 2031 (with SSL).