



People may want to delete their Instagram accounts for a variety of reasons, such as privacy concerns, the addictive nature of social media, a desire to reduce screen time, or to protect their mental health. Additionally, a change in life circumstances or personal preferences can also make someone decide that deleting their Instagram account is the right choice for them. So this is a personal decision. So we are going to teach you about deleting your Instagram account. Keep reading.
If you need to delete your Instagram account, you should know that it will not be possible to return the account and there is no point in regretting it. So think carefully. Instagram has created another option for you to deactivate your account for as long as you want without deleting it.

But if your decision is final, you can restore your account after deletion within 30 days. Now we want to explain how to delete the Instagram account in 3 easy steps. Follow the steps below carefully. It should be noted that if you want to use Instagram in a desktop environment, use the high-speed Windows VPS server offered on our website.
Before permanently deleting your Instagram account, you may want to backup your data. This includes saving your photos, videos, and other important content. You can do this by requesting to download your data from Instagram. To do this:
1- Open the Instagram app or visit the Instagram website.
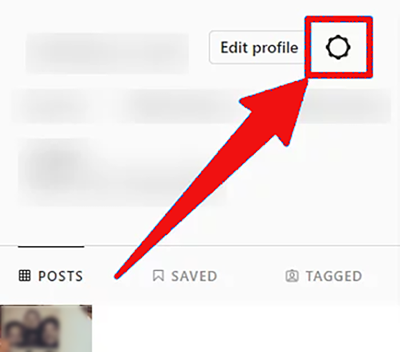
2- Go to your profile and click the three horizontal lines in the top right corner (or the gear icon on your profile page):
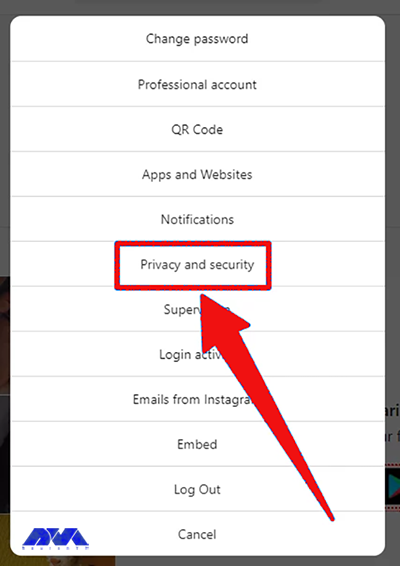
3- Select Settings. Scroll down and choose the Privacy and Security option:
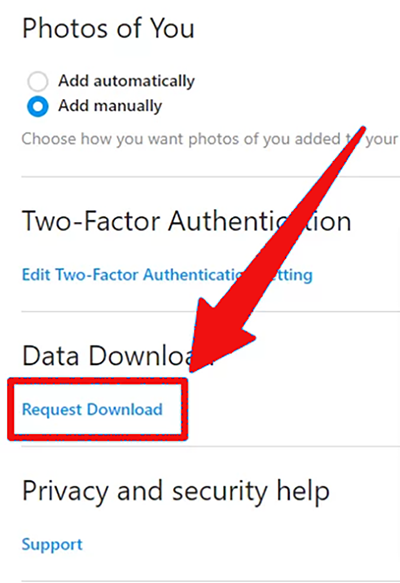
4- In the Data and History section, select Download Data. Follow the on-screen instructions to request a download of your data:
If you want to delete your Instagram and you don’t have access to your app or you are an Android user, you can use any browser for this. You can use browsers such as Safari or Chrome. So, follow these steps:
1- Open a web browser and go to the Instagram official page, then follow the pass below:
https://www.instagram.com/accounts/remove/request/permanent/
Tip: If you’re not already signed in, sign in to the account you want to delete.
2- Instagram will ask you to provide a reason for deleting your account from the drop-down menu. Re-enter your Instagram password to confirm your identity. At last, Click on Permanently delete my account.
3- Finally, you should confirm the deletion.
Finally, delete your account permanently by clicking the Delete @username option at the bottom of the screen as indicated.
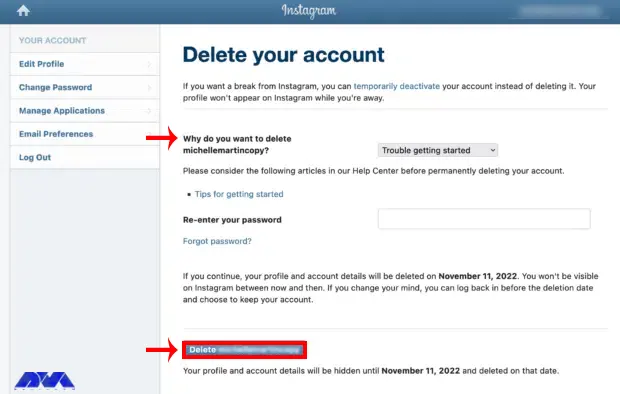
After completing the above steps, Instagram will give you a final warning that your account will be permanently deleted along with all your photos, comments, and other data. If you are sure you want to continue, click OK or Yes to confirm.
Tip: Make sure that the username matches the account you want to delete. If not, go to logout on the right side of the page and log in with the correct account.
Here are common issues and their solutions when trying to delete an Instagram account:
1- Deactivation Instead of Deletion
Solution:
Instagram offers two options – deactivation temporarily disables your account, while deletion permanently removes it. Make sure you’re choosing the right option.
2- 30 days waiting period
Solution:
After you request to delete your Instagram account, there’s a 30-day grace period during which you can reactivate your account. Be patient; it might take a few days for the deletion process to be initiated.
3- Third-Party Apps Issues
Solution:
Ensure that you’ve revoked access to any third-party apps or services that were linked to your Instagram account. Sometimes, these can interfere with the deletion process.
Also, If you encounter issues while trying to delete your Instagram account, contacting Instagram’s support through their Help Center or support channels is often the best way to resolve specific problems.
Deleting an Instagram account is a serious decision because it will not be possible to return it. So it is necessary to consider all the pros and cons before doing this. Don’t forget to make a backup. Analyze the results and choose the right position for you. We hope this tutorial was helpful for you. If you have any other questions related to this topic, please share.
How useful was this post?
Click on a star to rate it!
Average rating 0 / 5. Vote count: 0
No votes so far! Be the first to rate this post.
 Tags
Tags
A Dedicated Server is a specialized web hosting service that is specifically allocated to one custom...


 Tags
Tags

BlackArch Linux is a powerful and comprehensive penetration testing and security research operating ...


 Tags
Tags
What is your opinion about this Blog?


