Author: Terri person

  • Unleashing Your Artistic Potential with Linux Mint

    Unleashing Your Artistic Potential with Linux Mint

    Linux Mint is a different operating system among Linux distributions. If you are looking for an operating system with easy application that is compatible and reliable, it is better to choose Linux Mint. By choosing this operating system instead of a paid operating system like Windows, you can save money and get rid of the difficulties of the command line. This is where it can be said that Linux Mint is an ideal option for all users, from beginners to advanced, or those who migrate from Windows and unleash their artistic potential.

    5 Main Reasons to Choose Linux Mint

    We can say Linux Mint is popular for several reasons which we will examine for you. After studying all these you may have a much more positive idea about Linux Mint and Migrating to Linux VPS or operating system.

    Reason 1: Linux Mint is Free With Easy installation

    One of the most important features of Linux Mint is its free and open-source. So you don’t need to pay to download it. Also, installing this operating system is very straightforward and easy. You just need to download the ISO file, put it on a USB or DVD, and then run it.
    Meanwhile, there is a graphical manager to guide you through the installation process. Then you can use this operating system without any hassle.

    Linux Mint Is Free With Easy installation

    The update process is also very easy in Linux Mint. Once you have the latest update available, you can follow the instructions for a seamless update in order. Also, the layout of your interface is very similar to Windows. In general, Linux versions are similar to the Windows operating system, but Linux Mint has gone one step further.

    Reason 2: Linux Mint Supporters All Hardware

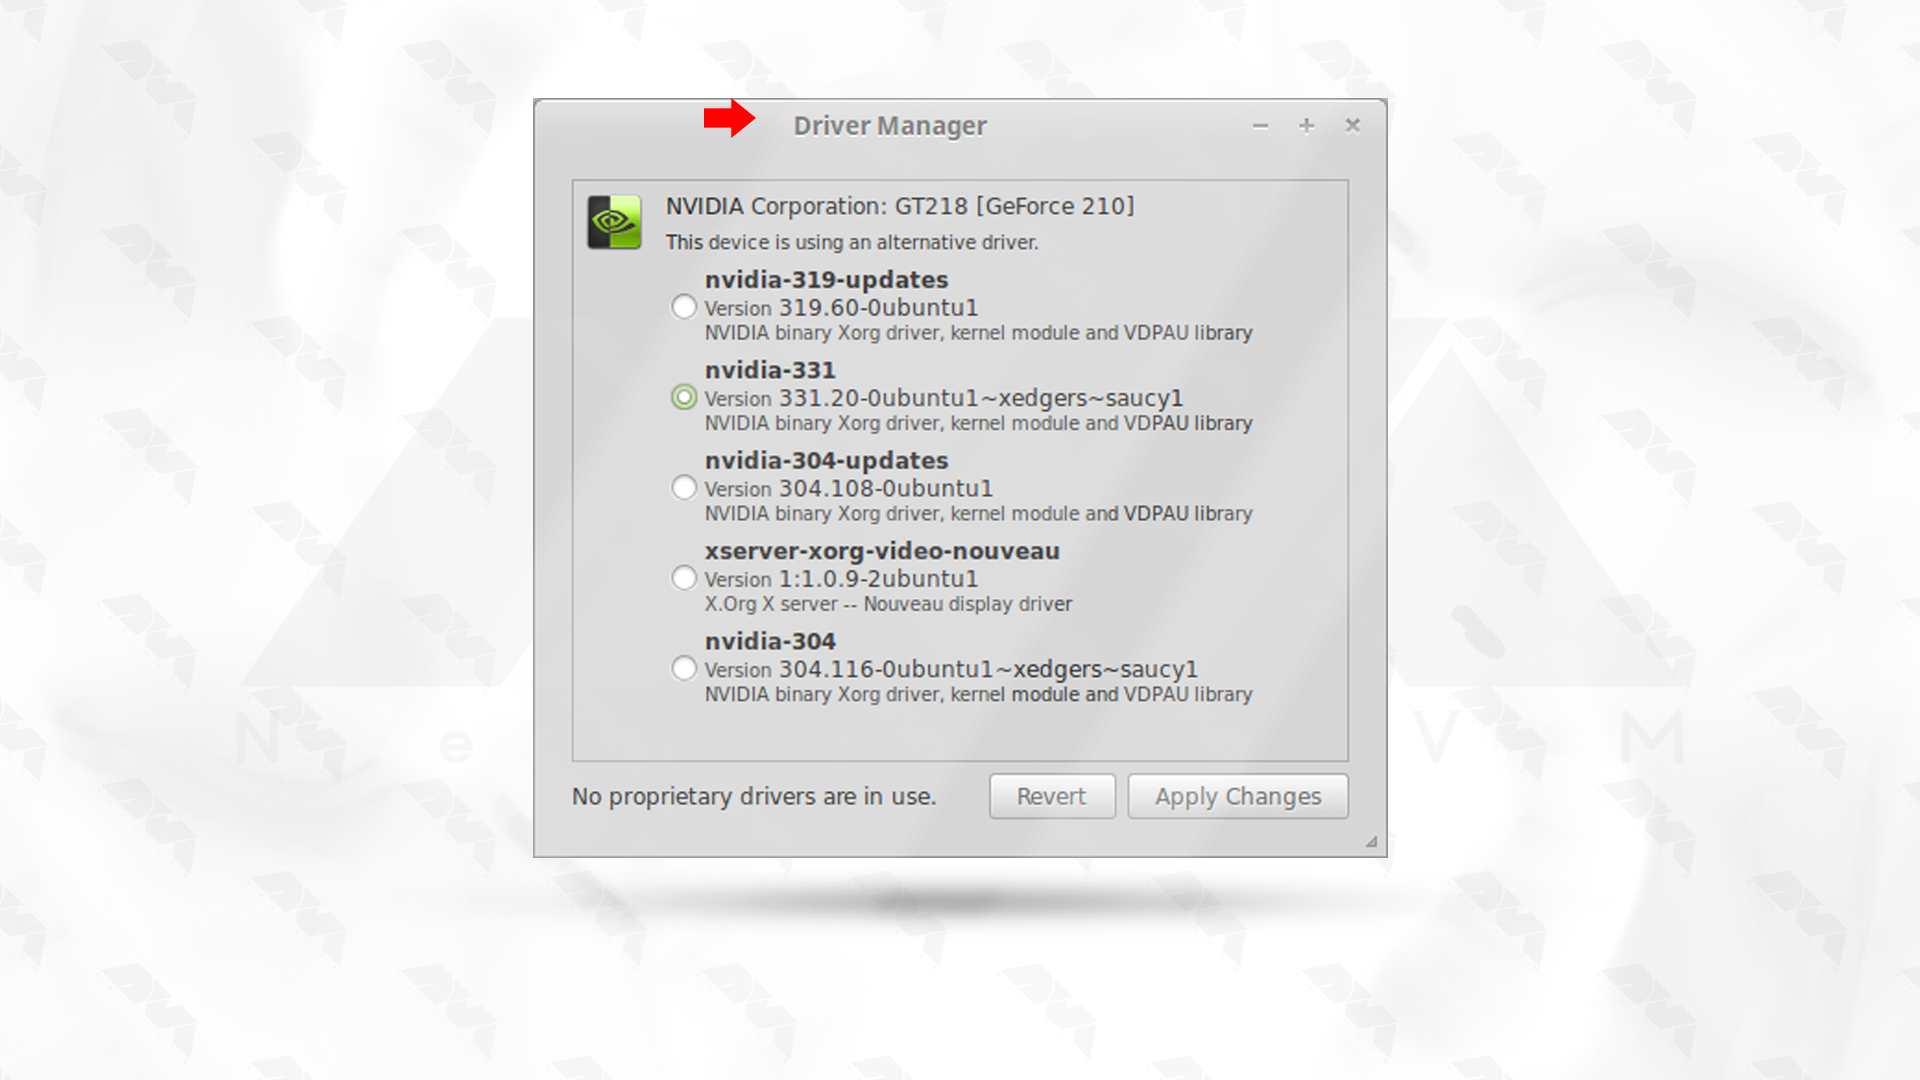
    Since Linux Mint is based on the latest versions of Ubuntu, it is equipped with the latest hardware support for all peripherals. So just plug in your device which is very simple as it will be detected automatically with the help of pre-built drivers. As a result, all popular devices such as GPU, CPU, cameras, mobile phones, wireless keyboard or mouse, webcams, etc. work well on Mint.

    Also, if you are in a situation where you need to use specific drivers, the driver manager will tell you to install them based on your hardware. Therefore, you no longer need to install the device drivers you want.

    Linux Mint Supporters All Hardware

    Reason 3: Using App Instead Of Command Line

    When it comes to Linux, some distributors expect you to use the terminal, but the majority only use the terminal for essential tasks such as installing or uninstalling software. So for essential functions, a graphical program is better. For example, if GNOME users are trying to change their theme or install a font and change their device, they prefer to use the terminal command.

    linux-mint-Using App Instead Of Command Line

    The Linux Mint system is presenting graphically. Of course, Linux users gradually get using to the command line, but choosing this platform will make your work easier, just like Windows users who never open the command line. Because it is much easier to configure and manage the system with a graphical interface.

    Reason 4: Linux Mint Is Really Fast and secure

    Linux Mint has three different versions, including Mate, Xfce, and Cinnamon. The cinnamon version is also more popular than the others. If it is the first time that you are in a Linux environment or you have migrated from Windows to this operating system, it is better to use the D’archin version.

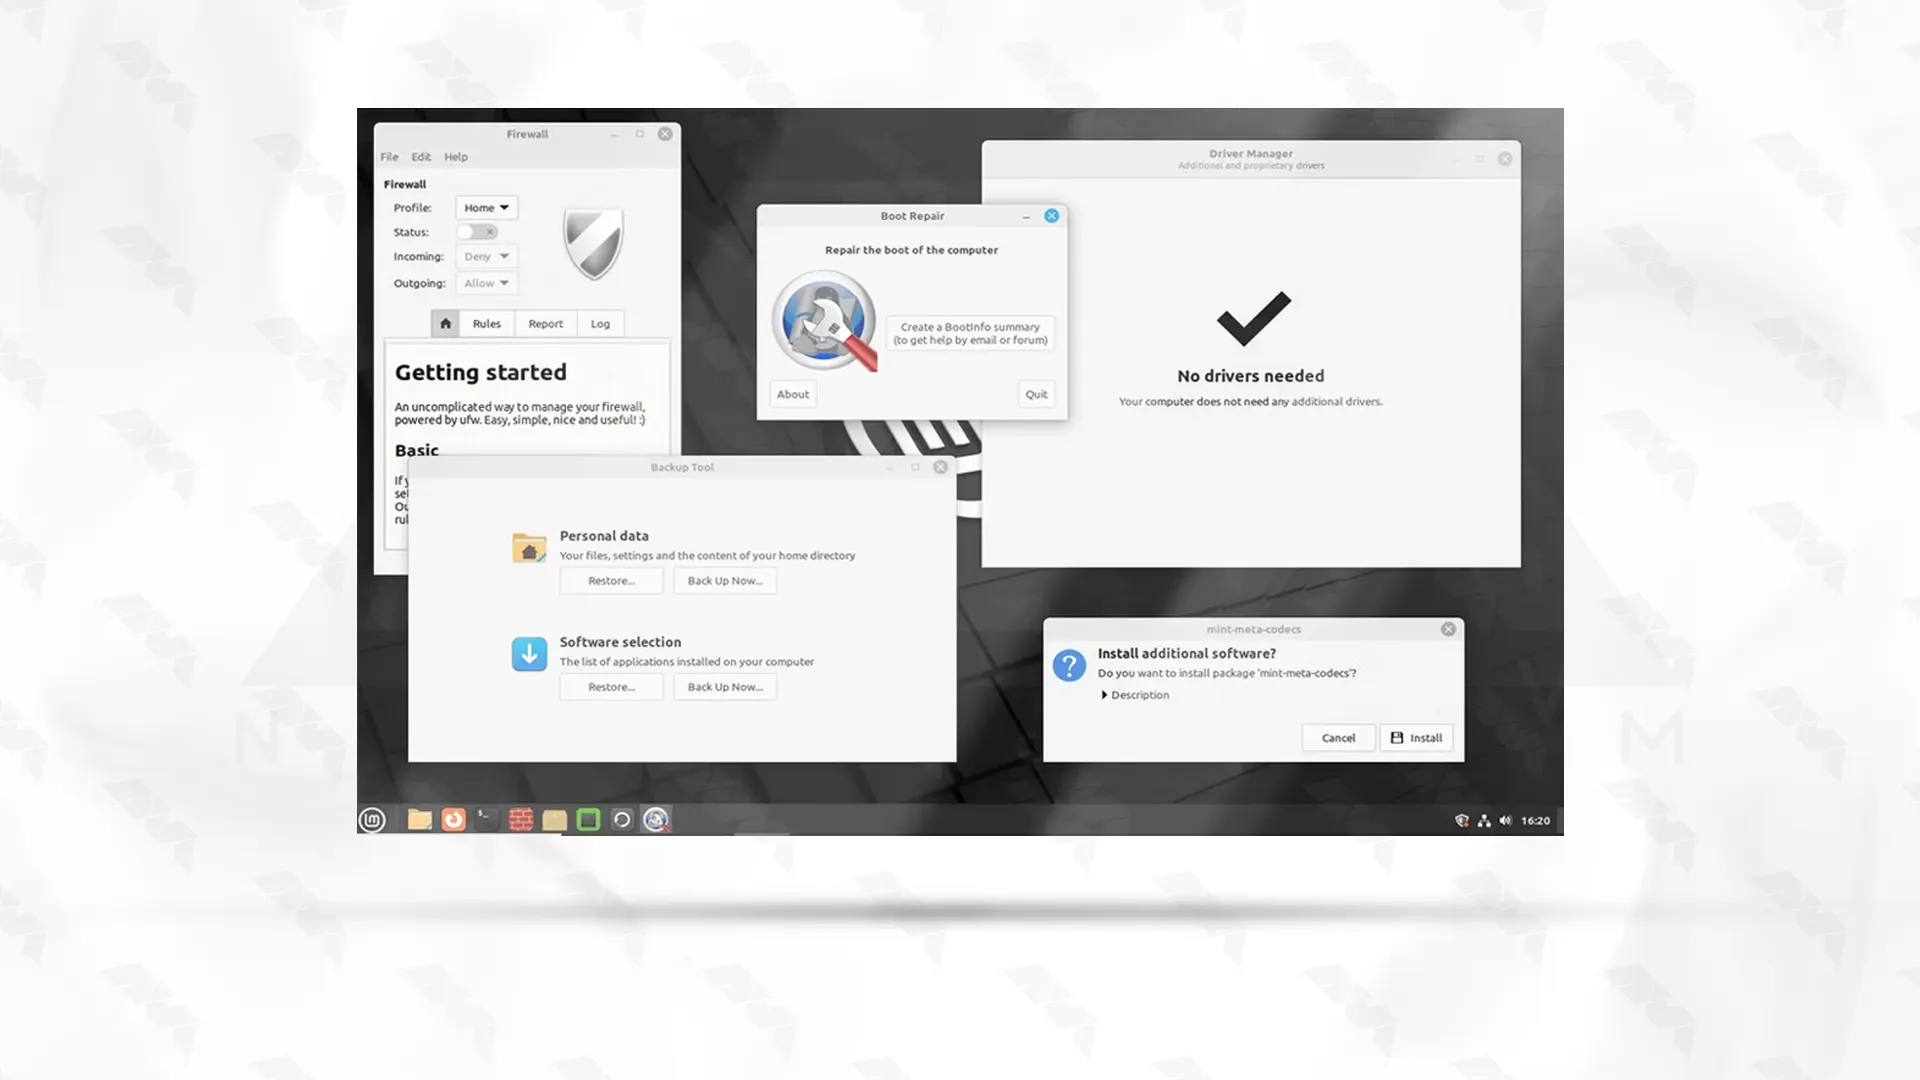
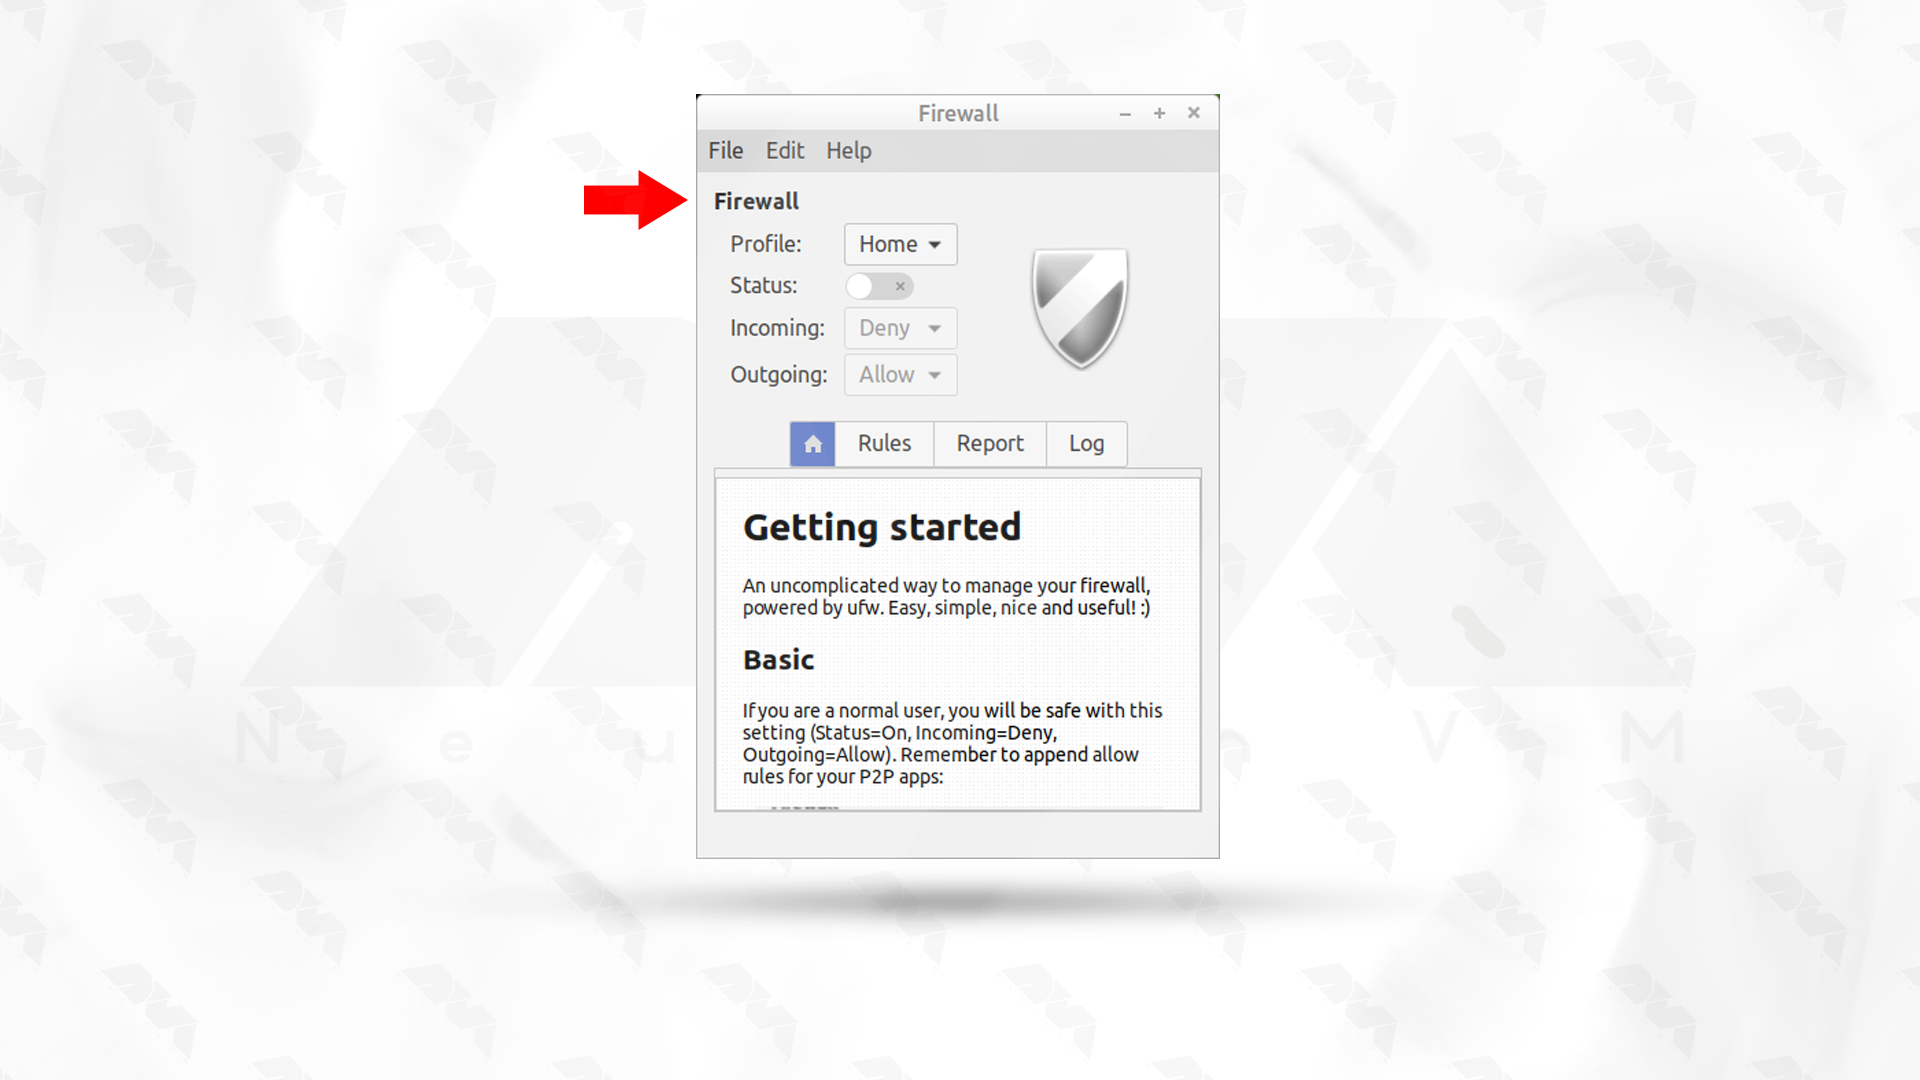
    Another feature of Mint is its speed. You can easily use this platform to update both new and old hardware because it works very fast. On the other hand, Linux Mint’s secure system makes you not worry about viruses or malware because they don’t work in Linux. There is also a built-in firewall that protects you from various Internet attacks, and there is no need to pay again for firewall protection, like a Windows system.

    Linux Mint Is Really Fast and secure

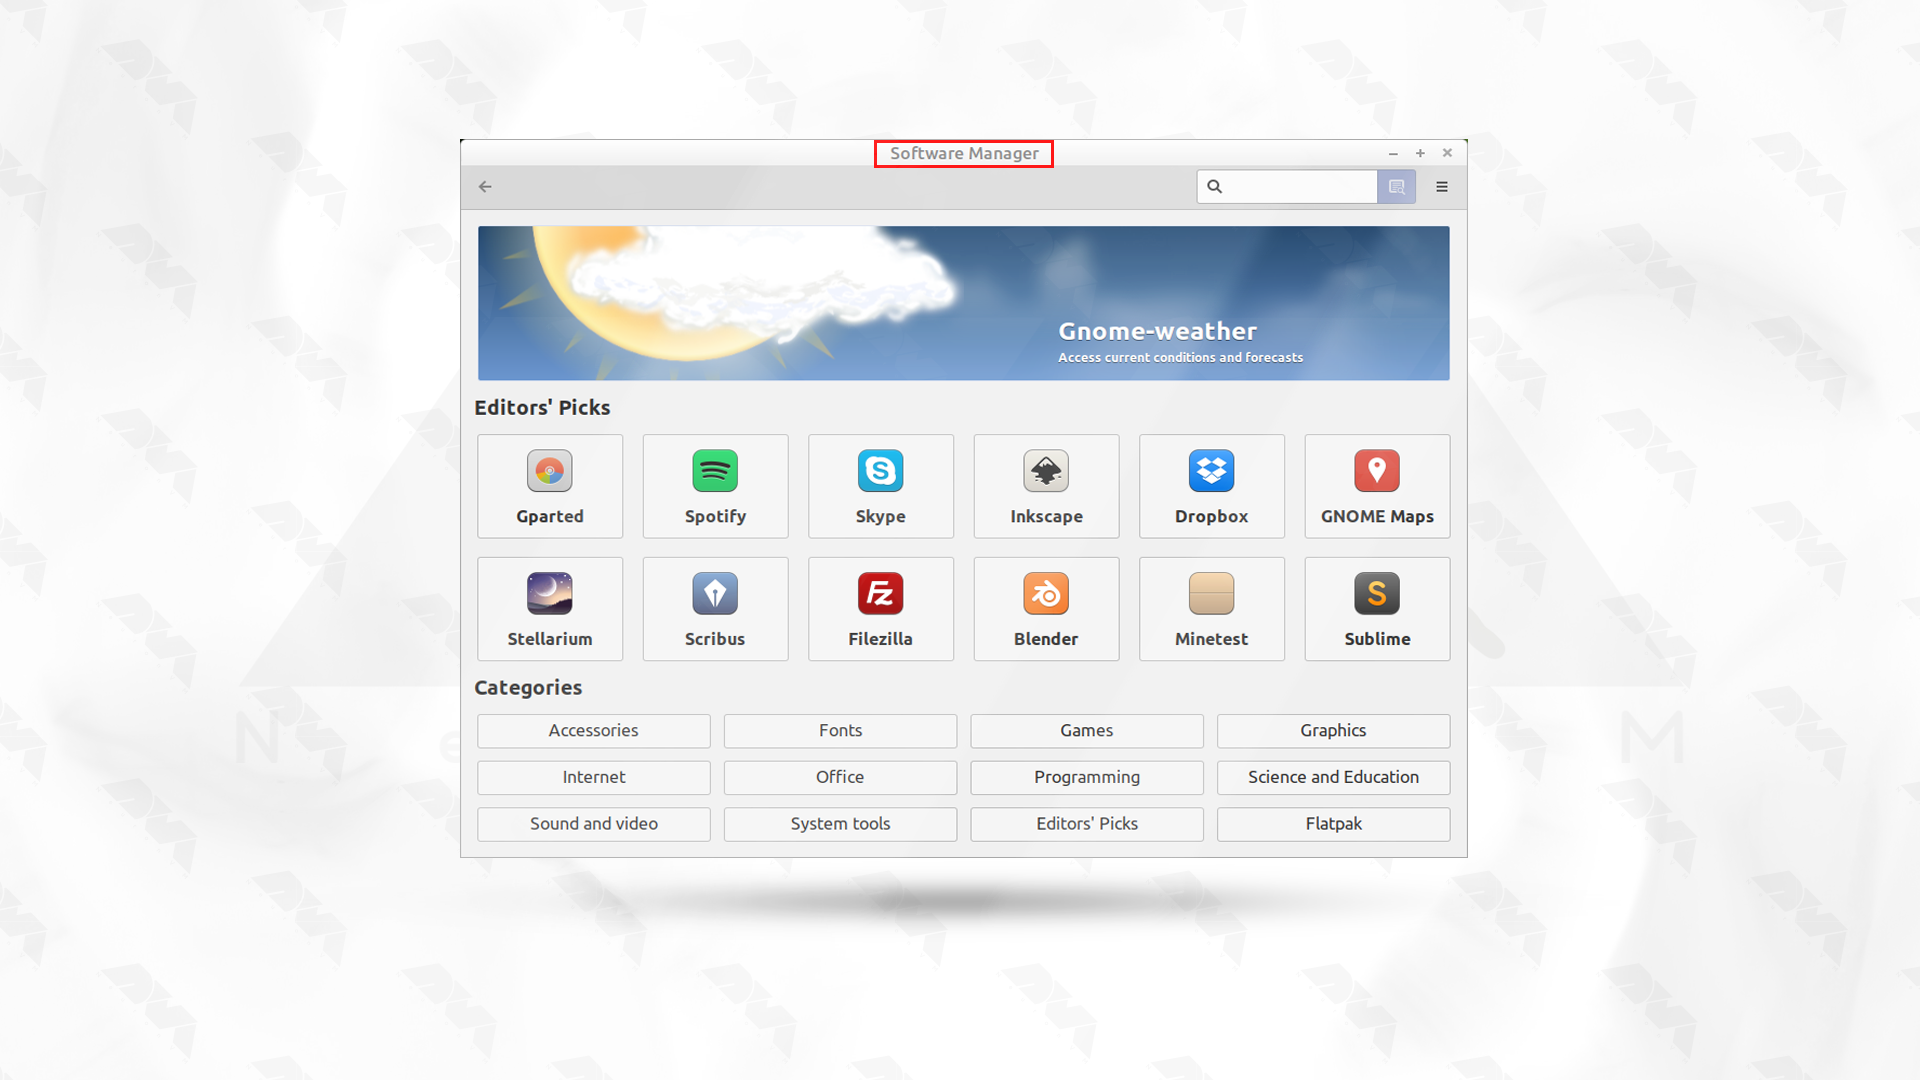
    Reason 5: Easy Software Installation and management

    Since Linux Mint comes with a graphical tool for managing tools and software, you can easily search for the applications you want. The ease of installation is so much easier that only a click of a button is enough for this. In this way, it will be possible for you to install your programs in the Linux environment without the command line.

    Easy Software Installation and management

    Conclusion

    Here we have tried to clarify some points about the popular Linux Mint operating system so that you know that even in the Linux operating system you have the possibility to benefit from a graphical user interface environment. Now that you have realized how easily you can manage your Linux system with this wonderful operating system, we hope you will make a wise decision and be prepared for your first step towards entering the world of Linux.

  • The Best Dedicated Server Providers on the Market

    The Best Dedicated Server Providers on the Market

    Dedicated servers that are growing, help you host your site on your own server and are significantly more advanced and powerful than shared hosting. Among the features that lead to the superiority of end servers, we can mention fast processors, high memory of GB to TB, data transfer, and extensive storage. These features will have a great impact on the optimization of your site. Of course, it should be noted that providing dedicated servers is not cheap, but it is worth spending. In this section, we will try to collect the best dedicated server providers on the market for you.

    A Brief Understanding about Dedicated Servers

    A dedicated server refers to a physical computer that is exclusively used by an individual, organization, or application. Unlike shared hosting, where multiple users share resources on the same server, a dedicated server provides exclusive access to all of its resources (such as processing power, memory, and storage) to a single user or entity. This exclusivity ensures better performance, control, and security.

    Managing a dedicated server requires a certain level of technical expertise. Users should be familiar with server administration, security practices, and troubleshooting to make the most of a dedicated server hosting arrangement.

    7 Best Dedicated Server Providers 2023

    If you have a large online business, corporate website hosting, or a custom project, you should look for a dedicated server. Because a powerful project must be managed with a server that provides you with sufficient resources and necessary security measures. In this section, we will review the top 8 dedicated servers.

    1) NeuronVM

    neuronvm

    Another one of the best dedicated server hosting in the market is NeuronVM, which is advancing and becoming known with reasonable costs compared to the services provided. Also, by choosing Nero, you can have your own dedicated server with fully dedicated resources, full security, and high speed.

    Different Features of NeuronVM:

    The features of Neron’s dedicated server include 24-hour support and the possibility of paying with digital currencies. Also, the amount of RAM from 16 to 128 GB is also available for different applications. Notably, if you need additional storage space, more RAM, or increased processing power, our dedicated servers can easily meet your needs.

    2) InterServer

    interserver

    InterServer is a web hosting provider that offers various hosting services, including dedicated hosting. This hosting offers the cheapest dedicated server hosting on the list. Interserver offers various programs and ideas about customization. You can use 11 different designs and customize each of them according to your needs.

    Different Features of Interserver:

    Server resources vary depending on the application you are considering. You can offer 1 to 2 TB of SSD storage and 15 to 118 GB of RAM. You can also configure your server as desired.

    3) HostGator

    hostgator

    If you are looking for a set of web solutions that are very flexible, HostGator hosting is a good option for you. This hosting provider includes full and semi-managed options, Windows, and Linux operating systems with extensive server resources.

    Different Features of HostGator:

    You can get different resources depending on your plan. The core provided in this hosting is between 4 and 8 cores. Also, 1 TB hard disk and 1 TB of SSD memory along with 8 to 30 GB of RAM are features of HostGator. You will have the option to choose between SSD or HDD storage in the mid-level plan:

    4) DreamHost

    dreamhost

    One of the reasons why DreamHost is known is its low-cost and resource-rich shared hosting plans. On the other hand, it also provides users with managed and powerful dedicated hosting services. This hosting has 9 different plans, all of which include full root access, 100% uptime, and unlimited bandwidth.

    Different Features of DreamHost:

    If we want to mention the features of Dreamhost, we can say that it has 3 standard plans of Intel Xeon 4-Core 8-Thread system with 1 TB of HDD memory. The amount of RAM also varies from 4 to 16 GB. You can choose your resources between 16GB and 64GB RAM, 2TB HDD, and 240GB storage:

    5) Liquid Web

    liquidweb

    If you want to work professionally, Liquid Web hosting is already in the field of advanced VPS servers and dedicated servers. Fast, secure, and reliable hosting for large and heavy projects or enterprise websites will be effective with this powerful provider.

    Different features of Liquid Web:

    The features of Liquid Web resources include 4-32F core, 16-64GB RAM, high storage capacity from 240-480GB, and 5-8TB bandwidth based on user needs. These features make it possible to host medium to large websites without running out of resources. Another unique feature of Liquid Web is the ownership of all its data centres, which are spread across Arizona, Michigan and Amsterdam:

    6) BlueHost

    bluehost

    One of the best options for dedicated hosting, especially for users who are looking for unmanaged hosting, is BlueHost. This company offers Linux-dedicated server hosting specifically. Among its positive results, we can mention the provision of a free cPanel with root access in all programs.

    Different Features of BlueHost:

    The features of this dedicated server hosting will vary based on the plan you choose. These devices have 4 to 8 cores, up to 2 TB of HDD memory and 8 to 30 GB of RAM. The bandwidth is unlimited and comes without SSL:

    7) InMotion Hosting

    inmotionhosting

    If you want to have a dedicated Linux server managed with cPanel, Inmotion Hosting will be a good choice for you. This hosting is also useful for those who wish to purchase a bare metal server. If you keep your host hardware up to date, you will have better performance, smart routing technology, and high-quality security features.

    Different Features of Inmotion Hosting:

    Features of Inmotion Hosting managed and unmanaged servers include software configuration options. The plans of this hosting have 4 to 32 cores, 1 TB SSD, and 2 to 2×3.2 NVME hard drives. RAM options are also between 16 GB and 512 GB ddr4 RAM:

    Comparison of the Best Dedicated Server Providers

    In this section, a list of reliable and well-known dedicated server providers will be reviewed. This list will help you choose your server provider with a better mindset and a wiser decision:

    *******Server UptimeNumber of CPU CoreRAMPrice
    NeuronVM99.9%4*32GBFrom $160.99 per month
    InterServer100%2*15GBFrom $70.00 per month
    HostGator99.9%4*8GBFrom $89.98 per month
    DreamHost100%4*4GBFrom $149.00 per month
    Liquid Web100%4*16GBFrom $75.00 per month
    BlueHost100%2*8GBFrom $89.98 per month
    InMotion Hosting99.9%4*16GBFrom $89.99 per month
    Best Dedicated Server Providers in 2023

    The Key Factors to Consider Dedicated Server

    Dedicated servers can be used in various fields and you should pay attention to choose the right server for your field of activity. In the previous section, we reviewed the comparison table of the top 8 dedicated servers for you, now after the required reviews, we will tell you what field each of these servers is used for:

    • NeuronVM _ Is the best for hosting in every field.
    • InterServer – This is great if you are looking for the best cheap dedicated hosting.
    • HostGator – Is suitable for fully and semi-managed server hosting.
    • DreamHost – With DreamHost, you can have highly configured managed servers.
    • Liquid Web – This one is the best dedicated hosting in every field.
    • Bluehost – This server is proper for unmanaged server hosting.
    • InMotion Hosting – This one is perfect for resource-rich unmanaged solutions.

    Conclusion

    This article was prepared to give a list of the best and latest dedicated servers provided worldwide. We tried to explain about each hosting provider and some important features of them. Also, a comparison table was shown to make it easy to choose and purchase the best and most suitable dedicated hosting for users. So read carefully and make your choice.

  • The Best Guide for Installing Linux via USB

    The Best Guide for Installing Linux via USB

    Have you ever faced a situation where you want to use another system that is not yours but has your own settings? This is possible with Linux distributions. That is, you can use your customized Linux operating system on any other device, and this will only be possible with the help of a USB drive. So, let’s use the simple steps of this post to learn how to installing Linux via USB drive.

    Requirements to Install Linux via USB

    In order to be able to install Linux distros with a USB drive, you must provide the following items:

    • Choosing one of the Linux operating system distributions, for example, a simple and user-friendly distribution such as Linux Mint
    • Unetbootin program
    • A USB drive

    Here we suggest you to use the various Linux VPS server plans provided for you on the NeuronVM website.

    How to Install Linux Via USB

    An important thing to always note is that there are many tools for creating a bootable horse drive. Since different operating systems are used by users, we decided to install the steps with a software called Unetbootin, which is as follows:

    Step 1: Creating a Bootable USB Drive

    First of all, you should download a program to create a bootable live USB drive. You will follow a simple instructions for that:

    1- Put your USB device in and find the corresponding drive section.

    2- Now open the related program.

    3- Mark the Diskimage radio button.

    4- Choose your Diskimage.

    5- Now choose the correct drive name for the USB drive.

    6- Click the OK button to confirm the changes and see the magic.

    Use unetbootin to install Linux

    ***

    Use unetbootin to install Linux

    Step 2: Run USB for Linux

    Now you are ready to install the preferred operating system via USB on your device.

    In the next step, you need to go to BIOS and set it to read from USB when running. Note that this section is different for each device. After the app reboot is enabled by connecting the USB, you will see the image below. Now select the default mode and take it easy.

    Run USB for Linux

    Step 3: Install Linux

    Now you can see the loaded file on the main page. You will see an icon that looks like a disk. Click on it and wait for your Linux installation.

    inatalling Linux distro via usb

    Note that the system will ask you questions during installation so that the desired settings can be made correctly. Now restart the system to apply the changes. So simple!

    Tip: The distribution we are considering is Linux Mint.

    Troubleshooting Issues about Installing Linux Via USB

    Installing Linux via USB is a common and convenient method. However, like any installation process, it can sometimes encounter issues. Here are some common problems and solutions:

    1- The USB drive is not bootable.

    Solution:

    Ensure that you have created a bootable USB drive using a reliable tool like Rufus, UNetbootin, or the dd command (Linux). Double-check that the ISO image is compatible and not corrupted.

    2- The computer doesn’t recognize the USB drive as a bootable device.

    Solution:

    Access the BIOS/UEFI settings during startup (usually by pressing a key like F2, F10, F12, or Del), and check that the USB drive is set as the primary boot device. Also, make sure that the system is set to boot in UEFI or Legacy mode, depending on your USB drive and system compatibility.

    3- Wi-Fi not working after installation.

    Solution:

    Ensure that your wireless card is supported. If necessary, use a wired connection during installation. After installation, update your system and install the appropriate drivers for your wireless card.

    4- The installation process couldn’t be completed successfully.

    Solution:

    Check the error messages displayed during installation for clues. You may need to restart the installation process, ensuring that you follow the steps carefully.

    Conclusion

    Installing Linux distributions with a USB drive is an easy and straightforward way. I hope that by going through these steps, you will be able to install the distribution you want on any device and configure it as you wish. Thank you for your attention to this article. You can share with others if necessary.

  • Mastering Network Reconnaissance with Nmap on Kali Linux

    Mastering Network Reconnaissance with Nmap on Kali Linux

    Nmap is one of the most useful tools for network administrators or security analysts because they need to have a thorough understanding of the devices and services running on a Kali network. This tool is very useful for network exploration and security auditing. So let’s see how to install and work with Nemap on Kali Linux.

    What is Nmap?

    Nmap is a well-known and practical tool for exploring the network, which is also widely used in terms of security. You can use this tool to discover hosts and services in computer networks or scan vulnerabilities and ports. It is worth noting that Nmap can be used for free on Linux OS or Linux VPS, Windows OS or VPS, and Mac.

    Some of the remarkable features of this tool are the ability to scan large networks and detect open ports, operating systems, and other network services. Network vulnerabilities can be weak passwords, misconfigured services, or outdated software.

    what is nmap

    Note: You can benefit from the features of this great tool on NeuronVM‘s Linux servers.

    How to Start Nmap on Kali Linux?

    You can use the following command to start and scan your network. This is the basic command:

    nmap [Scan Type] [Options] [Targets]

    How to Work With Nmap? (Scan Types)

    You can use various ways to scan the network using Nmap. We will examine these scan Types for you:

    TCP Connect Scan (-sT):

    Completes a full TCP connection to each specified port, providing reliable results but easily detectable.

    SYN Stealth Scan (-sS):

    Initiates a SYN scan by sending SYN packets to target ports, without completing the full connection, making it less detectable.

    UDP Scan (-sU):

    Scans for open UDP ports, commonly used for services like DNS and DHCP, provide insight into potential vulnerabilities.

    ACK Scan (-sA):

    Sends ACK packets to target ports to determine firewall rules, useful for understanding network filtering.

    FIN Scan (-sF):

    Sends FIN packets to target ports, aiming to identify open ports by observing how they respond to unexpected connection termination requests.

    Xmas Tree Scan (-sX):

    Sets the FIN, PSH, and URG flags in the TCP header, used to identify firewall behavior based on how it handles unusual flag combinations.

    Null Scan (-sN):

    Sends null packets (with no TCP flags set) to target ports, useful for identifying firewall configurations.

    Idle Scan (-sI):

    Utilizes an idle system as a “zombie host” to perform scans more discreetly and reduce the chance of detection.

    Version Detection (-sV):

    Attempts to determine service and version information on open ports, providing details about the software running on the target.

    OS Fingerprinting (-O):

    Tries to identify the operating system of the target by analyzing subtle differences in how the system responds to certain packets.

    Nmap Scan Options

    In this section, we will mention a number of Nmap options that can use to customize the scan. These options are:

    nmap scan options

    -p: To determine which ports to scan.

    -sV: To identify the version of services running on the target host.

    -o: To specify running operating system on the target host.

    -v: Used to increase the verbosity of output on Nmap.

    Some Examples of Nmap Usage on Kali Linux

    These are some examples to show the way of scanning via Nmap:

    • For Ping Scan

    the command below will scan the 192.168.1.0/24 network and give the list of online and responsive hosts:

    nmap -sP 192.168.1.0/24
    • For UPD Scan

    This command can use for scanning target host for example (192.168.1.1) and give the list of UPD services on open ports:

    nmap -sU 192.168.1.1
    • For Custom Port Scan

    You can use this one for scanning port 80 on the target host 192.168.1.1 and informing you whether the port is open or closed:

    nmap -p 80 192.168.1.1

    Some Advance Options Of Nmap on Kali Linux

    In addition to these basic functional features, Nmap offers advanced tools and scripts that can be used to perform more comprehensive scans. Here we will mention some of them:

    Ability to scan scripts

    There is a large library of scripts available in Nmap that you can use to identify potential vulnerabilities on a target host. These scripts can use in combination with other types of scans to perform a comprehensive security analysis of a network.

    The Possibility of Stealth Scanning

    You can use Nmap for stealth scans. This is designed to prevent detection by firewalls or intrusion detection systems. Techniques like fragmented packet scanning or idle scanning are used here.

    Operating System Fingerprint

    Using this option will help you detect operating systems running on a target host by analyzing responses to different packets sent to the device.

    Conclusion

    These are some commonly used Nmap scan types, options, and advanced features each serving different purposes in network reconnaissance. Now, having a better understanding of Nmap and learning how to use it, you can ensure its security by monitoring your network. Always ensure you have permission before scanning any network.

  • Harnessing the Power of Windows VPS for AI Applications

    Harnessing the Power of Windows VPS for AI Applications

    When considering a Windows VPS for AI applications, it’s important to evaluate your specific needs, such as processing power, storage, and any dependencies your AI software may have, to ensure the chosen proper Windows hosting solution meets your needs. Windows VPS offers several benefits for AI applications. So let’s analyze them and use the power of Windows VPS for AI applications.

    Supercharged Computing Power

    In the digital age, the source of any successful investment that works online is its hosting solution. Windows VPS hosting is considered a powerful choice with unique features such as dedicated resources, customizable options, and strong hardware.

    windows VPS advantages for AI

    The impact of supercharged computing power, especially when hosted on Virtual Private Servers (VPS), on AI applications is significant and multifaceted.

    The supercharged computing power provided by VPS enhances the capabilities of AI applications, enabling faster processing, more complex models, real-time capabilities, and increased accessibility for a wide range of users and organizations. However, careful consideration of security and scalability is crucial for realizing the full potential of VPS in the context of AI.

    NeuronVM is one of the most reliable and powerful providers of Windows VPS. So, move and purchase a VPS service to enjoy artificial intelligence and ease your work.

    Enhanced Security and Privacy

    Windows VPS providers often implement strong security measures that help protect your AI applications and data from potential threats.

    VPS servers generally provide strong security and protection measures for users’ data and resources. It is also possible to provide compliance certificates on these servers, which is important for businesses in regulated industries.

    Therefore, the security of these servers provides users with confidence and the use of artificial intelligence can be done safely.

    Cost-Effectiveness and Scalability

    One of the beauties of working with Windows VPS is its flexible environment, which can be easily expanded or reduced according to your needs. This advantage is very significant for artificial intelligence applications because these applications have different computational requirements.

    wiwndows VPS advantages for AI

    So, Windows VPS allows you to easily scale your computing resources as needed and meet the computing needs of different AI applications. Also, VPS hosting is often more affordable than maintaining physical servers, especially for small to medium AI projects. You can choose a hosting plan that fits your specific resource needs.

    Seamless Integration with Windows Ecosystem

    Seamless integration with the Windows VPS ecosystem can offer several benefits for AI applications, but developers should carefully assess the specific needs and considerations of their applications to make informed decisions. It’s essential to strike a balance between leveraging the advantages of the Windows environment and addressing any challenges that may arise during development and deployment.

    Also, integration with Windows services and APIs (Application Programming Interfaces) can provide AI applications with additional functionalities, such as accessing file systems, databases, and other Windows-specific features. This can enhance the overall capabilities of the AI application.

    The Windows ecosystem offers a variety of development tools and frameworks that can facilitate the development and deployment of AI applications. Familiar tools such as Visual Studio and support for popular AI frameworks can streamline the development process.

    Accessibility and Remote Collaboration

    You can access your resources from anywhere by purchasing Windows VPS and an internet connection. In this way, it becomes easier to manage and monitor artificial intelligence programs. Even if you don’t have a physical presence in the data center. With a Windows VPS, you can remotely access your AI environment from anywhere, facilitating convenient management and monitoring of your applications.

    Conclusion

    Artificial intelligence, which is advancing rapidly, has attracted the attention of many users and has a lot of use. Considering the factors mentioned in this post, we can conclude that Windows VPS is a wonderful host for AI programs. So, by purchasing a Windows virtual server, benefit from this professional and practical assistant without any problems. Contact us with a comment, if you have any questions.

  • Mastering the Art of Changing Your IP Address on Ubuntu 22.04

    Mastering the Art of Changing Your IP Address on Ubuntu 22.04

    After successfully installing Ubuntu 22.04, your network interface will by default assign an IP address using a DHCP server. A wired network and Wi-Fi network are also activated. The network manager in Ubuntu is Netplan. You can also configure the network interface with IPv4 addresses. This article represents the way of changing your IP address on Ubuntu. You can use two methods to change your IP address. So, keep studying carefully.

    Two Simple Methods to Change the IP Address on Ubuntu 22.04

    This section will give you two different methods of configuring and changing IP addresses. Desktop users can use any one of these methods, but server users that have CLI can access and use only the second method to configure and make changes.

    Prerequisites

    • Installed and up-to-date Ubuntu 22.04 on Linux VPS or OS
    • Sudo admin rights

    Method 1: Change Static IP Address on Ubuntu Via GUI

    If you are using the desktop version of Ubuntu, you must know that there is a graphical interface for configuration. So you can follow the steps mentioned in this section above to easily change your IP address.

    First, Click on the Network Icon in the right corner of your. Choose the Wired connection menu and Click the Wired settings:

    network section on ubuntu

    You will encounter a dialog box. Click Network in the sidebar. You will see the Wired section. Click on the Gear Icon to open a new Wired dialog box:

    Wired setting on ubuntu

    Now, you will see the IPv4 tab. Set the method to Manual and input a valid IP address, Netmask, and Gateway. Now to confirm the changes click the Apply button:

    IPv4 section on ubuntu - Changing IP address on ubuntu

    At the final step, disable and again enable the Wired Icon to apply changes:

    Wired Icon on Ubuntu - Changing IP address on ubuntu

    That’s it! You successfully changed the Ubuntu 22.04 IP address.

    Method 2: Change Static IP Address Via CLI

    If you are using a server, you should know that server versions are installed without a graphical interface. So, you need to configure your IP address using the command line. The Ubuntu distribution uses Netplan as a network manager for this. To do this, follow the steps below.

    In the first step, you need to find the name of the network interface in the system. This name may vary based on the type of installation and system hardware. Use the following command:

    sudo ip a

    As a result of the executed command, you will see that the name of the system network interface is eth0. Of course, this name can be different from your system.

    Now, create or edit the network configuration file in the /etc/netplan folder. Use your favorite text editor and create the configuration file:

    sudo vi /etc/netplan/01-netcfg.yaml

    You must use the YAML template and configure the network as follows:

    network:
        version: 2
        renderer: networkd
        ethernets:
            eth0:
                addresses:
                    - 192.168.1.212/24
                nameservers:
                    addresses: [8.8.8.8, 8.8.4.4]
                routes:
                    - to: default
                      via: 192.168.1.2

    As you can see in the above configuration, the interpretation of the available items is as follows:

    – eth0: Network Interface Name

    – addresses: Use for configuring IPv4 address on the interface. You have to be sure to define CIDR. (Here you can add multiple addresses)

    – nameservers: Where you can set the nameserver. (8.8.8.8 and 8.8.4.4 are defaults Google nameservers)

    – routes: To set the Gateway on your system.

    Make sure that the IP gateway address is entered correctly and that v4 belongs to the system network.

    Finally, execute the following command to apply the changes:

    sudo netplan apply

    Well done! Passing these steps, you could change your static IP address on Ubuntu 22.04.

    Troubleshooting Some Issues about Changing Ubuntu IP address

    1- Changing the IP address may temporarily disrupt network connectivity.

    Solution:

    Ensure you have physical or remote access to the machine. Schedule the change during a maintenance window to minimize impact.

    2- Manually configuring the IP address with incorrect settings can lead to network issues.

    Solution:

    Double-check the configuration settings, including IP address, subnet mask, gateway, and DNS. Update the /etc/network/interfaces or /etc/netplan configuration files accordingly.

    3- Changing the IP address may affect existing firewall rules.

    Solution:

    Update firewall rules to reflect the new IP address. Adjust settings in UFW or other firewall management tools accordingly.

    Conclusion

    As you can see in the instructions of this tutorial, there are two different ways to change the IP address, both of which we have mentioned. Now you can safely and without confusion change your IP with the necessary configuration. Please send your queries or feedback in the comment section below.

  • The Ultimate Guide to Install Mysql on Debian

    The Ultimate Guide to Install Mysql on Debian

    One of the best relational database systems available for free and open-source to store data is MySQL. This database provides data in table format and with two versions of community server or enterprise server. The source code is the same in both versions, but Enterprise is not free. It is provided in a special way and has the ability to add other plugins. Developers and those with online businesses use MySQL to store data in electronic websites, content management systems, and more. This guide will examine how to install MySQL on Debian.

    Prerequisites

    Here are some requirements before installing MySQL on Debian on Linux VPS or operating systems:

    • An up-to-date Debian distribution
    • Root access or an account with sudo privileges

    4 Simple Steps to Install MySQL on Debian

    Follow the instructions below to have a successful and hassle-free installation process for MySQL on Debian.

    Step 1. Adding MySQL Dev APT Repository

    You can find MySQL packages on the official MySQL dev apt repository:

    sudo apt update && sudo apt -y  install wget
    wget https://repo.mysql.com//mysql-apt-config_0.8.26-1_all.deb
    sudo dpkg -i mysql-apt-config_0.8.26-1_all.deb

    You should press OK and agree to configure MySQL repositories. Also, you will encounter a prompt that asks you to confirm the addition of MySQL repositories as default. Press OK:

    add MySQL repository

    Finally, press Enter/OK to confirm the version installation.

    Tip: If the version of Debian is 12, select the Bullseye repository and then add this:

    echo "deb http://security.debian.org/debian-security bullseye-security main" | sudo tee /etc/apt/sources.list.d/bullseye-security.list

    Step 2. Installing MySQL Packages

    Now that you have added the repository, use the following command to install MySQL on Debian. The first command will update the repository:

    sudo apt update
    sudo apt install mysql-server

    Provide a password, cause you will be asked to give a root password:

    provide password for MySQL

    To confirm the new password, you have to re-enter it:

    root password confirmation - Install Mysql on Debian

    Finally, you must select the authentication plugin and click OK to complete the installation of MySQL on Debian:

    select authentication plugin - Install Mysql on Debian

    Use the apt-policy command to check the version installed:

    apt policy mysql-server
    mysql-server:
      Installed: 8.0.34-1debian11
      Candidate: 8.0.34-1debian11
      Version table:
     *** 8.0.34-1debian11 500
            500 http://repo.mysql.com/apt/debian bullseye/mysql-8.0 amd64 Packages
            100 /var/lib/dpkg/status

    After following the steps above, the MySQL database should start by default. To know the status of the service, you can use the following command:

    systemctl status mysql 
    ● mysql.service - MySQL Community Server
         Loaded: loaded (/lib/systemd/system/mysql.service; enabled; vendor preset: enabled)
         Active: active (running) since Wed 2023-09-27 14:10:16 UTC; 22s ago
           Docs: man:mysqld(8)
                 http://dev.mysql.com/doc/refman/en/using-systemd.html
        Process: 26431 ExecStartPre=/usr/share/mysql-8.0/mysql-systemd-start pre (code=exited, status=0/SUCCESS)
       Main PID: 26590 (mysqld)
         Status: "Server is operational"
          Tasks: 38 (limit: 2340)
         Memory: 358.2M
            CPU: 1.831s
         CGroup: /system.slice/mysql.service
                 └─26590 /usr/sbin/mysqld
    
    Sep 27 14:10:15 debian11 systemd[1]: Starting MySQL Community Server...
    Sep 27 14:10:16 debian11 systemd[1]: Started MySQL Community Server.

    Step 3: Testing the MySQL Installation

    To check if the MySQL service is working correctly, you can test it.

    You should login as the root user and enter the password you created before:

    mysql -u root -p 
    Enter password: 
    Welcome to the MySQL monitor.  Commands end with ; or \g.
    Welcome to the MySQL monitor.  Commands end with ; or \g.
    Your MySQL connection id is 8
    Server version: 8.0.34 MySQL Community Server - GPL
    
    Copyright (c) 2000, 2023, Oracle and/or its affiliates.
    
    Oracle is a registered trademark of Oracle Corporation and/or its
    affiliates. Other names may be trademarks of their respective
    owners.
    
    Type 'help;' or '\h' for help. Type '\c' to clear the current input statement.
    
    mysql> SELECT VERSION();
    +-----------+
    | VERSION() |
    +-----------+
    | 8.0.34    |
    +-----------+
    1 row in set (0.00 sec)

    In this section, you can create a database and user but just for testing:

    CREATE USER 'test_user'@'localhost' IDENTIFIED BY "Jek1oleiboafei4eeghu";
    CREATE DATABASE test_db;
    GRANT ALL PRIVILEGES ON test_db.* TO 'test_user'@'localhost';
    FLUSH PRIVILEGES;
    QUIT

    Now that you have a test user, try to access the database console:

    mysql -u test_user -p 
    ...
    Type 'help;' or '\h' for help. Type '\c' to clear the current input statement.
    
    mysql> SHOW DATABASES;
    +--------------------+
    | Database           |
    +--------------------+
    | information_schema |
    | test_db            |
    +--------------------+
    2 rows in set (0.01 sec)
    
    mysql> QUIT

    If your login is approved, and you are able to use the assigned database. It means your installation has been successful. Now log in as root again and drop the test database:

    mysql> DROP DATABASE test_db;
    Query OK, 0 rows affected (0.11 sec)
    
    mysql> DROP USER 'test_user'@'localhost';
    Query OK, 0 rows affected (0.11 sec)
    
    mysql> SELECT USER FROM mysql.user;
    +------------------+
    | USER             |
    +------------------+
    | mysql.infoschema |
    | mysql.session    |
    | mysql.sys        |
    | root             |
    +------------------+
    4 rows in set (0.00 sec)
    
    mysql> QUIT
    Bye

    Conclusion

    MySQL is a great database to use on different online platforms. One of the advantages of this technology is that you can use it for free. Here we tried to give you a straightforward guide to teach you how to install it on different versions of the Debian operating system. Follow the steps and enjoy using this useful database. let us know if you encounter any problems with this tutorial.

  • The Ultimate Guide to Install VSCode on Ubuntu 20.04

    The Ultimate Guide to Install VSCode on Ubuntu 20.04

    This article is presented to review visual studio code or VSCode. This tool is a powerful open-source code editor created by Microsoft. Strong VSCode support includes built-in debugging, syntax highlighting, built-in git control, code completion, code refactoring and snippets, and an integrated terminal. This tool can be used on most important platforms such as Windows, Linux, and Mac. We will also try to teach you how to install VSCode on Ubuntu 20.04.

    Prerequisites

    Here are the requirements to install VSCode on Ubuntu 20.04

    • An up-to-date Ubuntu system on Linux VPS
    • A powerful network connection
    • A root account or sudo privileges

    3 Easy Methods to Install VSCode on Ubuntu 20.04

    There are different methods to install VSCode on Ubuntu. We will examine all of them for you, but you can choose the proper one according to your desire. Here are the methods:

    • Via Snap
    • Via APT
    • Via Graphical User Interface/GUI

    Method 1: Installing Visual Studio Code Via Snap

    Open the Ubuntu terminal and run the necessary command to install the snap package. This package contains VSCode with required dependencies. These snap packages are containerized applications.

    sudo snap install --classic code

    To check the program version, use the command below:

    code --version 

    Method 2: Installing Visual Studio Code Via APT

    You can use the apt package manager to install VSCode on your Ubuntu server, so follow the instructions below carefully.

    1- First you should update your system’s repository using the following command:

    sudo apt update

    2- For a successful operation, you should install the required package dependencies. Now execute the command below:

    sudo apt install software-properties-common apt-transport-https wget -y

    This command will install all the dependencies automatically.

    3- It is important to verify the package integrity, so import the GPG key provided by Microsoft. You should use the following command:

    wget -q https://packages.microsoft.com/keys/microsoft.asc -O- | sudo apt-key add -

    4- To add the Visual Studio Code repository to your system, you can execute the following command:

    sudo add-apt-repository "deb [arch=amd64] https://packages.microsoft.com/repos/vscode stable main"

    5- It is time to install the VSCode after enabling the repository:

    sudo apt install code

    6- Run the following command to verify VSCode installation:

    code --version

    Tip: If you install the VSCode successfully, you will see the program version.

    Method 3: Installing VSCode Using the GUI

    In this section, we will give step-by-step instructions to install VSCode by Ubuntu software center.

    1- First of all open the Ubuntu software center. Click on the Show Applications button and open the software center application:

     Ubuntu software center

    Tip: The show application option opens the application drop-down menu and shows the installed application icons.

    2- Now you should press the search button and type VSCode. Now if you want to open the app page, select Code:

    search for VScode on ubuntu

    3- You can see the Visual Code app icon here. Click the Install button. It will be asked to insert an administrative password and start the installation process:

    install VS code

    Starting VSCode on Ubuntu

    After a successful installation, you can start the program. On the Ubuntu terminal click on the show applications icon and locate the Visual Studio code in your app list:

    VScode on Ubuntu terminal

    Click to open the program. Now you can customize the appearance of the program according to your taste. For example, program extensions you need for programming languages, etc.

    customize VScode

    Troubleshooting Issues Of VSCode on Ubuntu

    Here are some common problems with Visual Studio Code on Ubuntu:

    1- If you install VSCode using Snap, it might not have access to certain resources like USB devices.

    Solution:

    Install it using the .deb package or use the following command to enable the necessary permissions:

    sudo snap connect :removable-media

    2- Sometimes, you might encounter dependency issues when installing VSCode.

    Solution:

    Ensure that you have the required dependencies installed. Run the following commands:

    sudo apt update sudo apt install -y libx11-xcb1 libasound2

    3- If you’re getting a “404 Not Found” error when updating the package list, the repository might be deprecated.

    Solution:

    Check the official VSCode documentation for the latest instructions on adding the repository.

    Conclusion

    Visual Studio Code is one of the helpful editors to use on platforms like Linux and Windows. This article was prepared to show the way of installing VSCode via three different methods. Then you learned how to start it on your terminal. Install and enjoy the program. Happy coding!

  • The Ultimate Guide to Install GNOME on Debian

    The Ultimate Guide to Install GNOME on Debian

    One of the best desktop environments to use in Linux is Gnome. This platform is also the default GUI for Linux distributions such as Fedora, Debian, or Ubuntu. So it is very useful. There may have been a time when you have chosen a headless system or a server for your work and now you want to use a graphical interface. So read this article carefully because you can get a user interface in your Linux system with two different methods and make your work easier. The focus of this post is how to install Gnome on Debian.

    Prerequisites

    Here are the requirements to have a successful installation process of Gnome on Debian:

    • An up-to-date Debian distro on Linux VPS
    • Root access or an account with sudo privileges

    2 Practical Methods to Install Gnome on Debian

    As we mentioned before, there are two different ways to install Gnome on Debian. These methods are Tasksel and apt.

    Apt is a default package manager and most of you are familiar with that. but what about Tasksel? Tasksel is a practical tool and gives you the opportunity to install different desktop environments on your system. Let’s analyze and see how we can install Gnome using These tools.

    Method 1: Install Gnome Using Tasksel

    Tsksel is a great tool with easy instructions to install Gnome on Debian. It doesn’t require technical knowledge. So, just run it and choose the proper desktop environment. The advantage of Tasksel is that you can choose multiple desktops at the same time. Now, let’s start the process.

    Tasksel is installed by default on Debian, so there is no need to install it. But if for some reason you don’t have it in your system, you can use the following command and install it:

    sudo apt install tasksel

    As you installed Tasksell, the next step is to run it on your Debian system. This command will launch Tasksel directly:

    sudo tasksel

    Another way to install Gnome with Tasksel is by using the following command:

    sudo tasksel install desktop gnome-desktop

    This will install GNOME and all its dependencies. Of course, the download and installation stage takes a little time, so you have to be patient. After installation, type the following commands to restart the system and apply the changes:

    sudo reboot

    Now you will see the Tasksel panel and the list of desktop environments:

    tasksel panel

    Here, you can select the Gnome desktop environment. You can use the arrow keys to scroll between the options of the Tasksel list. You should use the spacebar key to select Gnome and press OK button:

    choose desktop environment

    Now the installation of Gnome will start:

    installing Gnome on debian

    Then use the following command to reboot your system after the installation:

    sudo reboot now

    You will enter the Login screen, so choose Gnome from the upper right icon:

    select Gnome on debian

    Login to Gnome as shown below:

    login Gnome

    Tip: In this section, we have used Lightdm display manager, which also works with gnome. But for better support and performance, you can use gdm3, which is the default display manager for gnome.

    Now you can setup Gnome installation.

    Method 2: Install Gnome Using APT

    Using the apt command to install gnome is very easy and straightforward. Debian has the GNOME packages in its repositories, so just run the following command as sudo to install it.

    Updating the System

    Before the installation using apt, it is recommended to update your system:

    sudo apt update

    Install Gnome Via APT

    Now you can go to the installation stage and install GNOME in your Debian system by applying the following command:

    sudo apt install gnome

    After installation, reboot your system:

    sudo reboot

    It’s time to authenticate and insert a password. After entering your password, press Enter:

    authentication of Gnome on debian

    Press the Y to continue the installation. The installation will start immediately:

    Gnome installation via apt

    Tip: You should keep the terminal open during the installation process. Closing it will interrupt the installation.

    Troubleshooting Issues About Gnome on Debian

    Installing GNOME on Debian is generally a straightforward process, but issues can sometimes arise. Here are some common problems and solutions:

    1- The GNOME installation might not be complete, leading to missing components or features.

    Solution:

    Ensure that you install the gnome package along with the gnome-core package for a minimal installation. You can use the following command:

    sudo apt-get install gnome gnome-core

    2- Problems with graphics drivers can cause issues with GNOME.

    Solution:

    Ensure that your graphics drivers are correctly installed and configured. You can use the lspci command to identify your graphics card and then install the appropriate drivers.

    3- Dependency issues or problems with the Debian repositories can lead to incomplete installations.

    Solution:

    Update your package repositories and upgrade your system before attempting to install Gnome:

    sudo apt-get update sudo apt-get upgrade

    Conclusion

    In this post, we discussed the two main methods for installing GNOME on Debian. As you can see, the installation process is very easy. Gnome is a desktop environment that can be used on Linux distros and will help you understand and manage your operating system or server. We hope this content was helpful to you. Happy coding!