

Phpmyadmin is used in the production and development environment by developers and system administrators, considering the nature of data that is used to create and manage, Phpmyadmin is a critical component for security. This cross-platform PHP-based web application is free and open-source. Here you will learn securing PhpMyAdmin using step-by-step instructions.
Securing PhpMyAdmin is essential for protecting your MySQL databases and sensitive data. Here are the step-by-step instructions to secure PhpMyAdmin effectively.
Attention: We have implemented all the installation processes in the Linux VPS with Ubuntu distribution.
Tip: Change the root username to a difficult one or disable the root login.
To configure and enable PhpMyAdmin to work with Apache 2, follow the step-by-step instructions here.
In the default Apache 2 configuration section, include the PhpMyAdmin configuration file. You can do it by editing the configuration file found in this directory:
vim /etc/apache2/apache2.conf
Then add the following command to the /etc/apache2/apache2.conf file, in order to include the PhpMyAdmin configuration:
Include /etc/phpmyadmin/apache2.conf
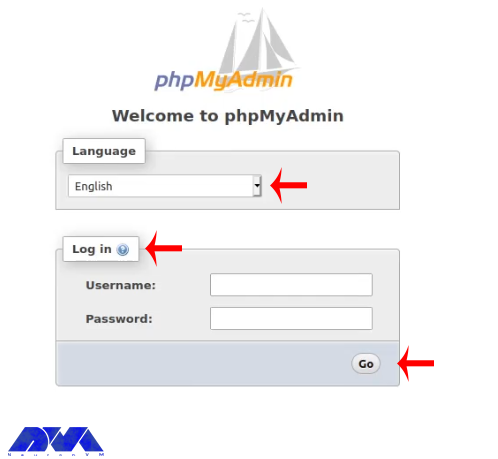
Now that you have saved the file, you must restart Apache 2 and access PhpMyAdmin from your browser with the address entered in this section see the greeting page of Phpmyadmin:
https:///<SERVER IP>/phpmyadmin

Now you have PhpMyAdmin working on your system. So, login with the created user:
To secure PhpMyAdmin you need to change the alias of the default directory that is used to access the application. That is, any user can access phpmy admin by obtaining the server URL, which is as follows: https:///<SERVER IP/DOMAIN>/phpmyadmin.
This is considered a security threat because hackers can easily find out about the domain name and can obtain it without restriction.
To prevent this, we can do the following:
Attacks can be reduced by up to 80% by changing the default directory alias. You can do this by renaming the /etc/phpmyadmin/apache.conf file. You must use a text editor to perform these actions.
To change the default name and make it difficult to guess the name, go through this way:
# phpMyAdmin default Apache configuration
Alias /phpmyadmin /usr/share/phpmyadmin

<Directory /usr/share/phpmyadmin>
   Options SymLinksIfOwnerMatch
   DirectoryIndex index.php
As you can see in the Image, it is better to use a random string generator to create an extension for the alias, or you can use another agnostic directory name, although this may be guessed by attackers.
# phpMyAdmin default Apache configuration
Alias /phpmyadmin-n543rdsol /usr/share/phpmyadmin

<Directory /usr/share/phpmyadmin>
    Options SymLinksIfOwnerMatch
    DirectoryIndex index.php
Now that you have changed the alias, restart Apache 2 for the changes to take effect. Finally, your alias name has been changed.
It is also possible to use the Apache 2 authentication function to integrate username and password authentication form. This form is configured to protect the PhpMyAdmin directory/URL. You can do this using the methods in the following section.
In the first step, allowoverride should be added in the directory configuration section of the PhpMyAdmin apache2 file. This file is found in the directory /etc/phpmyadmin/apache.conf and allows us to override the Apache 2 configuration in the .htaccess file:
vim /etc/phpmyadmin/apache.conf
****
# phpMyAdmin default Apache configuration
Alias /phpmyadmin-nh543rdsol /usr/share/phpmyadmin

<Directory /usr/share/phpmyadmin>
    Options SymLinksIfOwnerMatch
    DirectoryIndex index.php
    AllowOverride All
Apache 2 authentication can be done by creating .htaccess configuration in the default Phpmyadmin directory on i. You can then configure the authentication according to the following list:
AuthType Basic
AuthName "Stay Away"
AuthUserFile /etc/phpmyadmin/.htpasswd
Require valid-user
Now you can create a new username and password. As can be seen above, the .htaccess file contains credentials and is stored in the /etc/phpmyadmin/ directory.
We will use the .htpasswd tool to create a username and password. note that the username should be hard to guess.
sudo htpasswd -c /etc/phpmyadmin/.htpasswd
Now you should specify your password. Then reboot Apache 2 to apply configuration and activate your authentication.
You can try to access to PhpMyAdmin directory in your browser and test the authentication.

This will be a great deterrent to attackers because you are adding a second layer of security called two-factor authentication and securing your PhpMyAdmin.
You can secure PhpMyAdmin by restricting this application access to a specific IP or a set of IPs. To do this, follow the steps below:
You can do the configuration from the /etc/phpmyadmin/apache.conf file under the configuration directory. You can do the necessary configuration as described in this section to give access to a specific IP and take precautions to replace the IP with other IPs.
Alias /phpmyadmin-nh543rdsol /usr/share/phpmyadmin

<Directory /usr/share/phpmyadmin>
    Options SymLinksIfOwnerMatch
    DirectoryIndex index.php
    AllowOverride All
    # limit libapache2-mod-php to files and directories necessary by pma
    <IfModule mod_php7.c>
       php_admin_value upload_tmp_dir /var/lib/phpmyadmin/tmp
       php_admin_value open_basedir /usr/share/phpmyadmin/:/etc/phpmyadmin/:/var/lib/phpmyadmin/:/usr/share/php/php-gettext/:/usr/share/php/php-php-gettext/:/usr/share/javascript/:/usr/share/php/tcpdf/:/usr/share/doc/phpmyadmin/:/usr/share/php/phpseclib/:/usr/share/php/PhpMyAdmin/:/usr/share/php/Symfony/:/usr/share/php/Twig/:/usr/share/php/Twig-Extensions/:/usr/share/php/ReCaptcha/:/usr/share/php/Psr/Container/:/usr/share/php/Psr/Cache/:/usr/share/php/Psr/Log/:/usr/share/php/Psr/SimpleCache/
</IfModule>
Order Deny,Allow
Deny from All
Allow from 192.168.1.1
As you add your IP address configuration, restart Apache 2 to confirm the changes. As a result, if an unknown or unspecified IP intended to enter the program, it will encounter the following response:

By following these best practices, you can significantly enhance the security of your PhpMyAdmin installation and protect your MySQL databases from unauthorized access and potential threats. Regularly review and update your security measures to stay ahead of new vulnerabilities and threats. Stay tuned to get more tutorials and good guidance from our website.
How useful was this post?
Click on a star to rate it!
Average rating 0 / 5. Vote count: 0
No votes so far! Be the first to rate this post.
 Tags
Tags

If you are worried about the penetration of viruses, malware, exploits, or shell scripts into your s...


 Tags
Tags

If we want to make the concept of DNS more understandable for you, it should be said that DNS works ...


 Tags
Tags
What is your opinion about this Blog?


