
What is your suggestion to boost the performance of your server? This article has been prepared to examine how to optimize MongoDB on your Debian server and boost your performance. This database’s work depends on how it uses the underlying resources, and its task is to store data on disk and memory. MongoDB uses a CPU for its performance and a network for communication with users or clients. So, let’s go deeper and examine this issue from different aspects.
Understanding the performance bottlenecks in MongoDB
When performance issues appear, it indicates that the database is running at full capacity, so it’s time to add extra capacity to the system database. Especially, since the working program of the system must be located in the physical memory. Of course, performance problems may be temporary and related to high traffic load. Here, are some common issues with the performance of MongoDB:
– It is possible that the high network delay between applications and MongoDB servers will cause a delay in data recovery and updating.
– If the profiles are misused, it can severely affect the performance of the query, so you need to create the appropriate profiles for administrators.
– As mentioned before, the performance of MongoDB completely depends on the underlying hardware. So if the RAM is insufficient or the disks are slow or the processor is weak, they will cause problems.
– Poorly designed queries that do not use indexes effectively can cause significant performance degradation.
– If the replication is done slowly, it may affect the data access among the members of the replica set and lead to an increase in the read latency.
– The mechanism that MongoDB uses to maintain data integrity is the locking mechanism. Excessive lock contention may reduce concurrency and cause performance problems.
– In sharding, the wrong choice of shard key or unbalanced distribution of data among shards may cause uneven distribution of queries and performance loss.
Analyzing Server Hardware Requirements for MongoDB
Note that the following requirements are crucial before you start to use MongoDB on your server:
– A Linux VPS Server with Debian OS
– A minimum of 10 GB of free disk space and also extra necessary space to hold MongoDB data.
– A minimum of 4 GB RAM
– A proper network connection
– 64-bit architecture
Optimizing MongoDB configuration parameters
If you need to optimize MongoDB configuration parameters, you can follow the following settings:

Optimize MongoDB on Your Debian Server
Locking Performance
Databases receive different data from users and these operations are not sequentially. In a way, one user may access data while the other is in the middle of updating. these may cause conflict. To solve this problem, the concept of locks for locking documents and collections was introduced by databases. By initiation of the lock, no other user can read or modify your data until the lock is released.
MongoDB provides valuable metrics to help you check whether the lock is degrading your database performance. the related commands are:
db.serverStatus().globalLock
db.serverStatus().locks
Using these parameters, you can examine the request that created the lock and take the necessary action to improve MongoDB performance.
MongoDB Logging
Mongodb entry is in the log path settings and is located in the /var/log/mongodb/mongod.log directory. You can also find the MongoDB configuration file in /etc/mongod.conf.
In order to change the verbosity of a component, the following query is helpful:
db.setLogLevel(2, "query")
Run the following command to clear the log file before doing profiling:
db.runCommand({ logRotate : 1 });
WieredTiger Cache
Wieredtiger is the storage engine that was created after mmapv1 and you need to replace this storage engine with mmapv1 which is deprecated. Also, when it comes to concurrent management and performance, the second option is a better choice.
Note that the cache size is important to ensure the correct performance of Wiredtiger. So you should check if you need to change its default size or not. In order to store the entire working set of the application in the cache, it must be large enough.
Now, to check the cache usage status, apply the following command:
db.serverStatus().wiredTiger.cache
You will encounter a large amount of data but you should consider three of them:
– For the maximum size of the cache => wiredTiger.cache.maximum bytes configured
– For the size of the data currently stored in the cache => wiredTiger.cache.bytes currently in the cache
– And for the size of the dirty data => wiredTiger.cache.tracked dirty bytes in the cache
By finding out the size of the parameters used, you will know whether you should increase the size of the cache or not. If the applications are read-heavy, you can use wiredTiger.cache.bytes read into cache parameter.
Free Performance Monitoring
MongoDB has a free performance monitoring feature for parallel collections and standalone instances in the cloud. When you enable this feature by configuration, the data that has been checked will be sent to the cloud service. There is only one command for this configuration and then you are provided with a web address so that you can access the performance statistics. To enable free monitoring, run the following command:
db.enableFreeMonitoring()
As you get the URL in your output, paste it on the web browser and monitor performance statistics after a single MongoDB command. As a result, the dashboard will show the necessary metrics:
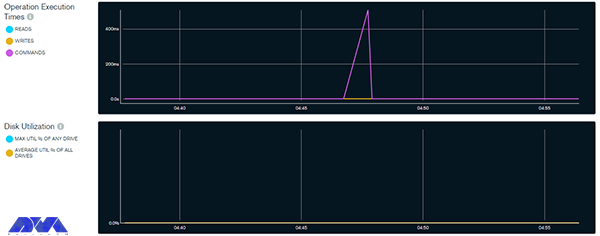
Optimize MongoDB on Your Debian Server
Use the command below to disable this feature:
db.disableFreeMonitoring()
Indexing strategies for improved query performance
One of the crucial aspects of database management systems that can significantly impact query performance is indexing. By creating appropriate indexes on the columns frequently used in queries, you can speed up data retrieval and improve overall system efficiency. Here are some indexing strategies for improved query performance:
– Using the ESR rule which means Equility, Sort, and Range
– Creating indexes for supporting queries:
– Sorting query results by using indexes:
– Using component indexing
– Avoiding over-indexing
– Ensuring indexes fit in RAM
– Creating queries to ensure selectivity
– And etc.
Utilizing replica sets and sharding for scalability
If we want to understand the concept of sharding more, it should be said that it is a form of scaling known as horizontal scaling or downscaling. The reason is that additional nodes are introduced for load sharing. Limitless scalability is provided with this horizontal scaling to manage large data volumes and excessive workloads. You can access infinite scalability using sharding, but in practice, you will scale proportionally to the number of servers you add. The possibility of having each additional piece increases storage and operational space, so the server can store more data.
A replica set in a MongoDB database refers to a group of MongoDB instances or servers that store the same data. Here the instance acts as the master node that handles all write operations. This is while other nodes act as secondary nodes and repeat the data from the primary node. In the meantime, if the primary node is unreachable, it will automatically go to one of the secondary nodes.
When you combine replica sets and sharding in MongoDB, you create a highly available and horizontally scalable database architecture.
Monitoring and troubleshooting MongoDB performance issues
Monitoring and troubleshooting MongoDB performance issues are crucial to maintaining a healthy and efficient database. MongoDB is a famous database, but like all platforms, it may contain some problems. Here are troubleshooting and how to do monitoring MongoDB issues:
– You can use monitoring tools to obtain information about the performance of the MongoDB instance. One of these tools is (MMS) or MongoDB cloud manager, which can be used to track and analyze various performance metrics. Also, you can use third-party monitoring solutions.
– Establish baseline performance metrics during normal operations. This will help you identify deviations when problems occur.
– Pay attention to server-level metrics such as CPU usage, memory usage, disk I/O, and network activity. Resource bottlenecks can affect database performance.
– Monitor the lock percentage to identify potential contention issues. Long-running or blocked operations can lead to performance bottlenecks.
– Review your MongoDB configuration settings and adjust them based on your hardware capabilities and workload needs.
– If your database grows and reaches its hardware limits, consider sharding to distribute data across multiple servers.
– Keep your MongoDB version up to date to take advantage of performance improvements and bug fixes.
– Monitor the health of your server’s hardware components (such as disks, and RAID controllers) to identify potential problems.
– Regularly run benchmark tests to measure database performance under simulated real-world conditions.
Note that troubleshooting the performance problems of this database may require a combination of the above steps or some trial and error. So before applying changes to production systems, test the changes in a controlled environment and be sure to make a backup before making changes.
Best practices for backing up and restoring MongoDB databases
Back up and restoring MongoDB databases is important to ensure data integrity and disaster recovery. In this part, we will try to show some best practices to follow:
– Use automation tools or scripts to perform backups automatically. This helps avoid human errors and ensures consistency in the backup process.
– Maintain multiple copies of backups in different locations, such as on different servers or in cloud storage. This ensures that if one backup fails, you have another copy available for restoration.
– Versioning Backups: Consider versioning your backups to track changes over time. This can be helpful if you need to restore a specific point-in-time snapshot.
– MongoDB provides built-in tools like Mongodump and mongorestore for backing up and restoring data. These tools are efficient and straightforward to use.
– Set up monitoring and alerts for backup jobs to ensure they run as expected. Monitoring can also help you identify any anomalies in the backup process.
– Back up the system databases like admin, local, and config. These databases contain essential metadata and configuration information for the MongoDB cluster.
– Keep your backup files secure and restricted to authorized personnel only. Encryption of backup files is recommended, especially if they are stored in external storage or cloud services.
– Schedule regular backups of your MongoDB databases. The frequency of backups may depend on the volume of data and how frequently it changes. Daily backups are generally recommended for most scenarios.
When taking backups, ensure that data is in a consistent state by using the –oplog option with mongodump. This includes the database and any related data.
Performance optimization tools and techniques for MongoDB
You can use different tools and techniques to improve performance in MongoDB we will mention some of them for you:
– Sharding
– Replica set
– Avoiding a huge number of indexes
– Using projections
– Journaling
– Batch operations
-Using appropriate data types
Conclusion and final thoughts
MongoDB is one of the most well-known and practical databases used to gather and store data. It is a flexible and non-relational documentation database. This article was prepared to give a full and comprehensive guide about MongoDB and tried to examine some aspects to boost performance and optimize MongoDB on the Debian operating system. We will be pleased if you share your ideas and questions on this field.
FAQ
Definitely. This database is great for large-data
Regarding storing unstructured data, it should be said that MongoDB works much faster than SQL. So depending on the type of data you collect, you may benefit significantly from this.


