Tag: Linux Tutorials

  • The Ultimate Guide to Install VSCode on Ubuntu 20.04

    The Ultimate Guide to Install VSCode on Ubuntu 20.04

    This article is presented to review visual studio code or VSCode. This tool is a powerful open-source code editor created by Microsoft. Strong VSCode support includes built-in debugging, syntax highlighting, built-in git control, code completion, code refactoring and snippets, and an integrated terminal. This tool can be used on most important platforms such as Windows, Linux, and Mac. We will also try to teach you how to install VSCode on Ubuntu 20.04.

    Prerequisites

    Here are the requirements to install VSCode on Ubuntu 20.04

    • An up-to-date Ubuntu system on Linux VPS
    • A powerful network connection
    • A root account or sudo privileges

    3 Easy Methods to Install VSCode on Ubuntu 20.04

    There are different methods to install VSCode on Ubuntu. We will examine all of them for you, but you can choose the proper one according to your desire. Here are the methods:

    • Via Snap
    • Via APT
    • Via Graphical User Interface/GUI

    Method 1: Installing Visual Studio Code Via Snap

    Open the Ubuntu terminal and run the necessary command to install the snap package. This package contains VSCode with required dependencies. These snap packages are containerized applications.

    sudo snap install --classic code

    To check the program version, use the command below:

    code --version 

    Method 2: Installing Visual Studio Code Via APT

    You can use the apt package manager to install VSCode on your Ubuntu server, so follow the instructions below carefully.

    1- First you should update your system’s repository using the following command:

    sudo apt update

    2- For a successful operation, you should install the required package dependencies. Now execute the command below:

    sudo apt install software-properties-common apt-transport-https wget -y

    This command will install all the dependencies automatically.

    3- It is important to verify the package integrity, so import the GPG key provided by Microsoft. You should use the following command:

    wget -q https://packages.microsoft.com/keys/microsoft.asc -O- | sudo apt-key add -

    4- To add the Visual Studio Code repository to your system, you can execute the following command:

    sudo add-apt-repository "deb [arch=amd64] https://packages.microsoft.com/repos/vscode stable main"

    5- It is time to install the VSCode after enabling the repository:

    sudo apt install code

    6- Run the following command to verify VSCode installation:

    code --version

    Tip: If you install the VSCode successfully, you will see the program version.

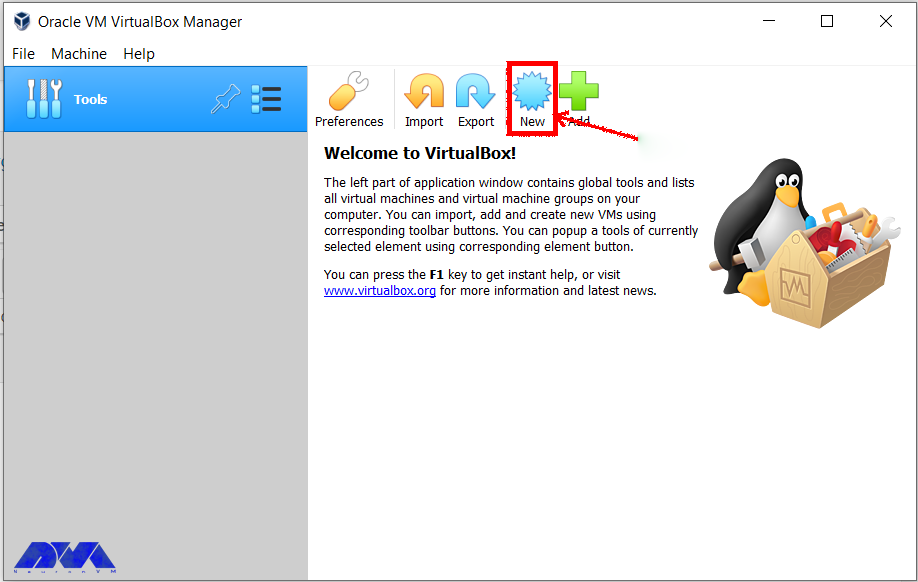
    Method 3: Installing VSCode Using the GUI

    In this section, we will give step-by-step instructions to install VSCode by Ubuntu software center.

    1- First of all open the Ubuntu software center. Click on the Show Applications button and open the software center application:

     Ubuntu software center

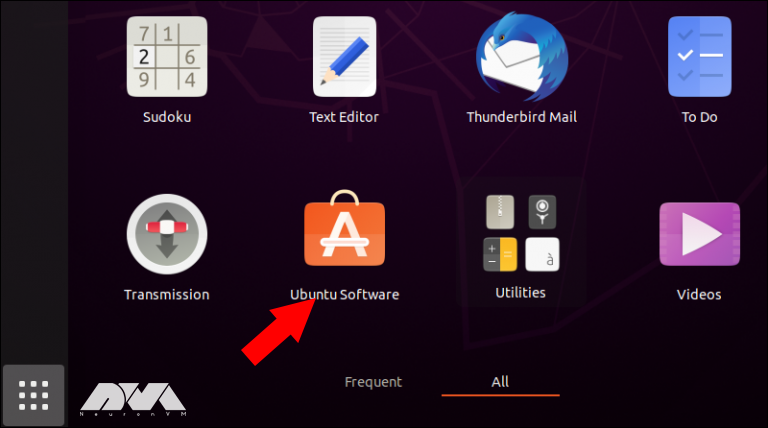
    Tip: The show application option opens the application drop-down menu and shows the installed application icons.

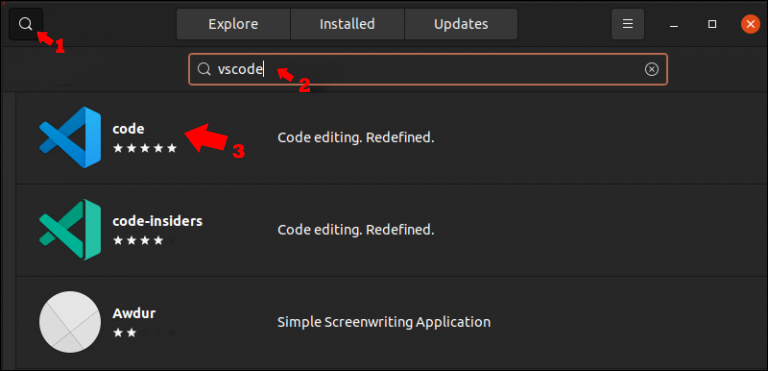
    2- Now you should press the search button and type VSCode. Now if you want to open the app page, select Code:

    search for VScode on ubuntu

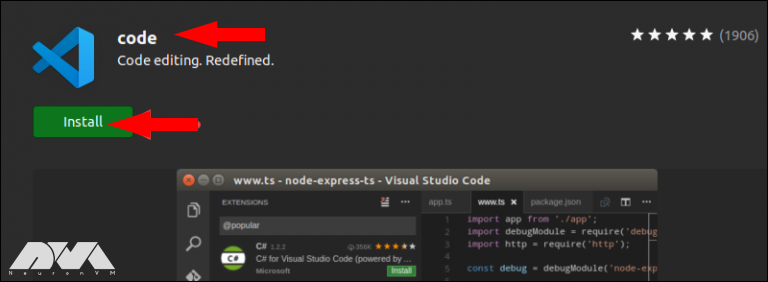
    3- You can see the Visual Code app icon here. Click the Install button. It will be asked to insert an administrative password and start the installation process:

    install VS code

    Starting VSCode on Ubuntu

    After a successful installation, you can start the program. On the Ubuntu terminal click on the show applications icon and locate the Visual Studio code in your app list:

    VScode on Ubuntu terminal

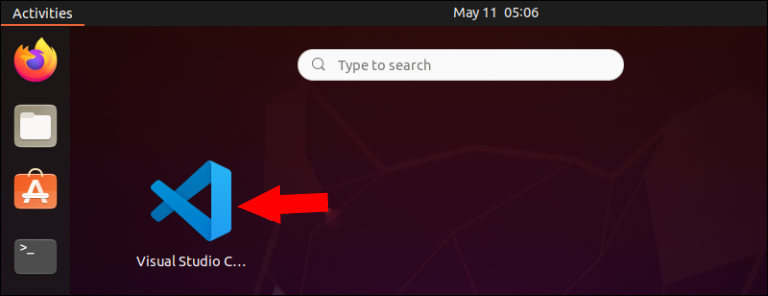
    Click to open the program. Now you can customize the appearance of the program according to your taste. For example, program extensions you need for programming languages, etc.

    customize VScode

    Troubleshooting Issues Of VSCode on Ubuntu

    Here are some common problems with Visual Studio Code on Ubuntu:

    1- If you install VSCode using Snap, it might not have access to certain resources like USB devices.

    Solution:

    Install it using the .deb package or use the following command to enable the necessary permissions:

    sudo snap connect :removable-media

    2- Sometimes, you might encounter dependency issues when installing VSCode.

    Solution:

    Ensure that you have the required dependencies installed. Run the following commands:

    sudo apt update sudo apt install -y libx11-xcb1 libasound2

    3- If you’re getting a “404 Not Found” error when updating the package list, the repository might be deprecated.

    Solution:

    Check the official VSCode documentation for the latest instructions on adding the repository.

    Conclusion

    Visual Studio Code is one of the helpful editors to use on platforms like Linux and Windows. This article was prepared to show the way of installing VSCode via three different methods. Then you learned how to start it on your terminal. Install and enjoy the program. Happy coding!

  • The Ultimate Guide to Install GNOME on Debian

    The Ultimate Guide to Install GNOME on Debian

    One of the best desktop environments to use in Linux is Gnome. This platform is also the default GUI for Linux distributions such as Fedora, Debian, or Ubuntu. So it is very useful. There may have been a time when you have chosen a headless system or a server for your work and now you want to use a graphical interface. So read this article carefully because you can get a user interface in your Linux system with two different methods and make your work easier. The focus of this post is how to install Gnome on Debian.

    Prerequisites

    Here are the requirements to have a successful installation process of Gnome on Debian:

    • An up-to-date Debian distro on Linux VPS
    • Root access or an account with sudo privileges

    2 Practical Methods to Install Gnome on Debian

    As we mentioned before, there are two different ways to install Gnome on Debian. These methods are Tasksel and apt.

    Apt is a default package manager and most of you are familiar with that. but what about Tasksel? Tasksel is a practical tool and gives you the opportunity to install different desktop environments on your system. Let’s analyze and see how we can install Gnome using These tools.

    Method 1: Install Gnome Using Tasksel

    Tsksel is a great tool with easy instructions to install Gnome on Debian. It doesn’t require technical knowledge. So, just run it and choose the proper desktop environment. The advantage of Tasksel is that you can choose multiple desktops at the same time. Now, let’s start the process.

    Tasksel is installed by default on Debian, so there is no need to install it. But if for some reason you don’t have it in your system, you can use the following command and install it:

    sudo apt install tasksel

    As you installed Tasksell, the next step is to run it on your Debian system. This command will launch Tasksel directly:

    sudo tasksel

    Another way to install Gnome with Tasksel is by using the following command:

    sudo tasksel install desktop gnome-desktop

    This will install GNOME and all its dependencies. Of course, the download and installation stage takes a little time, so you have to be patient. After installation, type the following commands to restart the system and apply the changes:

    sudo reboot

    Now you will see the Tasksel panel and the list of desktop environments:

    tasksel panel

    Here, you can select the Gnome desktop environment. You can use the arrow keys to scroll between the options of the Tasksel list. You should use the spacebar key to select Gnome and press OK button:

    choose desktop environment

    Now the installation of Gnome will start:

    installing Gnome on debian

    Then use the following command to reboot your system after the installation:

    sudo reboot now

    You will enter the Login screen, so choose Gnome from the upper right icon:

    select Gnome on debian

    Login to Gnome as shown below:

    login Gnome

    Tip: In this section, we have used Lightdm display manager, which also works with gnome. But for better support and performance, you can use gdm3, which is the default display manager for gnome.

    Now you can setup Gnome installation.

    Method 2: Install Gnome Using APT

    Using the apt command to install gnome is very easy and straightforward. Debian has the GNOME packages in its repositories, so just run the following command as sudo to install it.

    Updating the System

    Before the installation using apt, it is recommended to update your system:

    sudo apt update

    Install Gnome Via APT

    Now you can go to the installation stage and install GNOME in your Debian system by applying the following command:

    sudo apt install gnome

    After installation, reboot your system:

    sudo reboot

    It’s time to authenticate and insert a password. After entering your password, press Enter:

    authentication of Gnome on debian

    Press the Y to continue the installation. The installation will start immediately:

    Gnome installation via apt

    Tip: You should keep the terminal open during the installation process. Closing it will interrupt the installation.

    Troubleshooting Issues About Gnome on Debian

    Installing GNOME on Debian is generally a straightforward process, but issues can sometimes arise. Here are some common problems and solutions:

    1- The GNOME installation might not be complete, leading to missing components or features.

    Solution:

    Ensure that you install the gnome package along with the gnome-core package for a minimal installation. You can use the following command:

    sudo apt-get install gnome gnome-core

    2- Problems with graphics drivers can cause issues with GNOME.

    Solution:

    Ensure that your graphics drivers are correctly installed and configured. You can use the lspci command to identify your graphics card and then install the appropriate drivers.

    3- Dependency issues or problems with the Debian repositories can lead to incomplete installations.

    Solution:

    Update your package repositories and upgrade your system before attempting to install Gnome:

    sudo apt-get update sudo apt-get upgrade

    Conclusion

    In this post, we discussed the two main methods for installing GNOME on Debian. As you can see, the installation process is very easy. Gnome is a desktop environment that can be used on Linux distros and will help you understand and manage your operating system or server. We hope this content was helpful to you. Happy coding!

  • The Ultimate Guide to Change IP Address on CentOS

    The Ultimate Guide to Change IP Address on CentOS

    If you intend to change and configure your IP address in the CentOS system, you should know that the IP configuration in CentOS is done automatically. So, to change your IP in CentOS, you have to do it manually. This article examines how to change the IP address with possible methods. So apply the below steps carefully to achieve your desired result.

    Prerequisites

    If you want to change the IP address on CentOS distribution you have to prepare some requirements like:

    • Up-to-date CentOS distribution in Linux VPS
    • A user with root access

    3 Simple Methods to Change IP Address on CentOS

    You can configure and change your IP address using a number of options or methods available in this article. So, keep studying:

    change IP address on centos

    Method 1: Change IP Address on CentOS Via Network Configuration File

    First, run the following command to determine the name of your network adapter:

    sudo lshw -class network -short

    Now use a suitable text editor to open the configuration file of your network adapter and replace x with the name of your network adapter:

    nano /etc/sysconfig/network-scripts/ifcfg-ethX

    As you can see below, you should configure the variables in the file:

    DEVICE=eth0
    NAME=eth0
    Type=Ethernet
    IPADDR=192.168.1.20
    NETMASK=255.255.255.0
    GATEWAY=192.168.1.1
    DNS1=192.168.1.1
    DNS2=8.8.4.4
    ONBOOT=yes
    BOOTPROTO=none
    USERCTL=no
    PEERDNS=yes

    Below are the most common configuration parameters with explanation:

    BOOTPROTO= none, bootp or dhcp
    IPADDR=
    DEVICE=<name> –> where <name> is the name of the physical device.
    DNS{1,2}=<address> –> where <address> is a name server address to be placed in /etc/resolv.conf
    GATEWAY=
    MACADDR=<MAC-address> –> Where <MAC-address> is the hardware address of the Ethernet device in the form AA:BB:CC:DD:EE:F
    NETMASK=
    
    ONBOOT=<answer> –> Where <answer> is one of the following:
    yes — This device should be activated at boot-time.
    no — This device should not be activated at boot-time.
    
    PEERDNS=
    yes – Modify /etc/resolv.conf if the DNS directive is set. If using DHCP, then yes is the default.
    no – Do not modify /etc/resolv.conf.
    
    USERCTL=
    yes  – Non-root users are allowed to control this device.
    no – Non-root users are not allowed to control this device.

    If you have the network manager service and run it, you must configure it so that the network manager does not manage this interface (eth0). You can do this by adding the following line:

    NM_CONTROLLED=no

    Use the command below to stop the network manager service:

    sudo systemctl stop NetworkManager

    Save the changes, shutdown, and bring back the interface:

    sudo ifdown eth0 && sudo ifup ethX

    Now stop the network manager service using the following command:

    sudo systemctl stop NetworkManager

    Go through this command to check the current adapter setting:

    ip addr show

    Method 2: Change IP Address on CentOS Via IP and ifconfig commands

    Note that the ifconfig command is deprecated, but it is still part of the net-tools package and can be installed with this command:

    changing-IP-via-ifconfig
    yum -y install iproute

    For more clarification, we will show both iptools and ifconfig commands.

    If you want to show IP address-related information, use the following command:

    ifconfig
    ip addr

    Then to bring up or down an interface, use the command below:

    sudo ifconfig ethX down
    sudo ip link set dev ethX down

    You can set the static IP using ip or ifconfig commands. be careful, because changes made with these two are not persistent against reboots.

    sudo ifconfig ethX 192.168.1.100 netmask 255.255.255.0
    sudo ip addr add 192.168.1.100/24 dev ethX

    To clear the IP information, run the following command:

    sudo ifconfig ethX del 192.168.1.100
    sudo ip addr del 192.168.1.100/24 dev ethX

    For destinations without static routes defined, you set the default route using ip and ifconfig commands:

    sudo route add default gw 192.168.1.1
    sudo ip route add default via 192.168.1.1

    Method 3: Change IP Address on CentOS Via Network Manager

    The network manager service is used for CentOS management and for dynamic configuration and control of network devices. This service can also be used to keep active connections available.

    You can remove the network manager, but if you just want to disable and then remove it, use the command below:

    systemctl disable NetworkManager
    systemctl remove NetworkManager

    In this section, we will mention commands so that you can use the network manager service using them.

    First, you should check the status of the network manager using these commands:

    systemctl status NetworkManager
    sudo systemctl start NetworkManager

    To bring network interfaces up and down use the network manager with the commands below:

    sudo nmcli connection down ethX
    sudo nmcli connection up ethX

    Configuring A Static IP Via Network Manager

    change IP on centos

    Use this command to list the current connections:

    nmcli con show

    Enter UUID or network name from step 1 to delete connections:

    nmcli con delete eth0

    By running the command below, you can create a network using ethx:

    nmcli con add type ethernet ifname ethX con-name ethx \ autoconnect yes ip4 192.168.1.100 gw4 192.168.1.1

    Now you need to configure DNS. You have to do the network settings manually:

    nmcli con mod ethX ipv4.method manual 
    nmcli con mod ethX ipv4.dns "8.8.8.8 8.8.4.4"

    Use this command to restart the network:

    sudo nmcli con down ethX && sudo nmcli con up eth0

    Running the following command, helps you to view the connection ethx:

    nmcli con show ethX

    Troubleshooting Issues About Change IP Address on CentOS

    Here are some problems with changing IP address CentOS:

    1- Lost connection after IP changes.

    Solution:

    If you lose connection to the server after changing the IP, it could be due to an incorrect configuration. Revert the changes and check for typos or mistakes.

    2- Incorrect Syntax in Configuration File

    Solution:

    Ensure that the syntax in the configuration file is correct. A small typo can cause issues.

    3- There may be firewall problems

    Solution:

    Update firewall rules to allow traffic to the new IP address. Use the firewall-cmd or iptables command to configure firewall settings.

    Conclusion

    As mentioned in this article, IP is configured automatically and the service used to manage CentOS is called network manager. But if you need to change your IP, you have to do it manually. We also tried to show you how to change and configure the IP in three different ways. So follow the steps carefully and if you have any questions, contact us in the comments section.

  • Mastering Traceroute on CentOS: A Clever How-to Guide

    Mastering Traceroute on CentOS: A Clever How-to Guide

    Traceroute, is a computer network diagnostic tool that tracks the path of network packets from a source to a destination. It helps identify the route taken by packets as they travel across the internet or any IP-based network. Traceroute also provides information about the time taken for each hop (intermediate network node) that the packets encounter on their journey and reveals potential network issues or congestions. This information is useful in troubleshooting network problems and determining the exact location or point of failure in a network connection. In the rest of this article, you will learn how to master and work with Traceroute on CentOS intelligently and step by step.

    Recommended service:

    Buy Linux VPS
    Bitcoin VPS

    Traceroute Options and Flags

    Some common options and flags used with the traceroute command are:

    -I: Use ICMP echo requests instead of UDP datagrams. This is useful for systems that block UDP packets.

    -T: Use TCP SYN packets instead of UDP datagrams. This is useful for systems that block UDP or ICMP packets.

    -4: Use IPv4 addresses only.

    -6: Use IPv6 addresses only.

    -n: Do not resolve IP addresses to their hostnames.

    -w <timeout>: Set the timeout value in milliseconds for each probe. Default is 5 seconds.

    -q <probes>: Set the number of probes per hop. Default is 3 probes.

    -m <max_ttl>: Set the maximum number of hops to reach the destination. Default is 30 hops.

    -f <first_ttl>: Set the initial time-to-live (TTL) value for the first probe. Default is 1.

    -p <port>: Set the destination port number for the UDP or TCP probe packets. Default is 33434 for UDP and 80 for TCP.

    traceroute on centos

    Prerequisites for Traceroute on CentOS

    To use Traceroute on CentOS, you must have the following prerequisites:

    – A Linux VPS Server that runs CentOS.

    – Root access to install and run the required packages.

    – A working internet connection.

    Installing Traceroute on CentOS: Step-by-Step Guide

    Step1: At the first step, you should update your CentOS system using the following commands:

    sudo yum clean all
    sudo yum update

    Step2: Now you can install Traceroute on CentOS easily and using the below command:

    sudo yum install traceroute

    Step3: Once the installation is complete, you can use the Traceroute utility on CentOS by opening the terminal and running the traceroute command followed by the target host or IP address. For example:

    traceroute google.com

    This command will display a list of IP addresses, indicating the path that packets take from your computer to the target host or IP address. To discover more usage, showcase the help for essential command-line options:

    traceroute --help

    Conclusion

    In conclusion, Traceroute on CentOS is a useful network troubleshooting tool that allows users to track the path of their internet packets. It helps identify network bottlenecks, latency issues, and determine the effectiveness of network routing. With its ability to display hop-by-hop information, Traceroute on CentOS is an essential tool for network administrators and users.

  • Setting Up phpMyAdmin on Debian: A Comprehensive Guide

    Setting Up phpMyAdmin on Debian: A Comprehensive Guide

    phpMyAdmin is a widely-used open-source tool for managing MySQL databases through a web interface. As one of the most popular database management tools, phpMyAdmin provides a user-friendly interface to handle various database tasks. This comprehensive guide will walk you through the process of setting up phpMyAdmin on Debian, ensuring you have a smooth and hassle-free experience in managing your MySQL databases. For applying all of these steps, we recommend you to get a Linux VPS with Debian OS and get going.

    What is phpMyAdmin?

    phpMyAdmin is a free and open-source web-based application written in PHP, specifically designed to handle the administration and management of MySQL and MariaDB databases. It allows users to interact with their databases through a user-friendly graphical interface, eliminating the need to manually input queries through the command line.

    Some of the uses of phpMyAdmin include:

    1. Database administration: phpMyAdmin provides a comprehensive set of tools for managing databases, including creating, modifying, and deleting databases, tables, fields, and indexes.
    2. Data manipulation: Users can easily perform operations like inserting, updating, and deleting data from the database tables. It offers an intuitive interface to interact with the data and make changes.
    3. Query execution: phpMyAdmin allows users to execute SQL queries directly within the application. This makes it a valuable tool for database developers and administrators to write and test queries without relying solely on command line interfaces.
    4. Database import and export: phpMyAdmin supports importing and exporting databases in various formats, such as SQL, CSV, XML, etc. This feature enables users to move data between different databases or backup and restore their database contents.
    5. User management: It offers functionalities to manage user privileges and permissions, allowing administrators to create and manage multiple users with different levels of access to the database.
    6. Database maintenance: phpMyAdmin provides tools to optimize and repair database tables, allowing users to improve their database performance and maintain data integrity.
    phpMyAdmin on Debian

    Overall, phpMyAdmin simplifies the management and administration of MySQL and MariaDB databases, making it easier for users to perform various database-related tasks without extensive knowledge of SQL or command line interfaces.

    Installing the Required Packages

    Before we can set up phpMyAdmin on Debian, we need to make sure that the necessary packages are installed. The first step is to update the package lists using the following command:

    sudo apt update

    Once the package lists are updated, we can proceed to install phpMyAdmin and other required packages by executing the command:

    sudo apt install phpmyadmin php-mbstring php-gettext php-mcrypt

    During the installation process, you will be prompted to choose the web server that should handle phpMyAdmin. Select the appropriate web server (such as Apache or Nginx) and click “Ok.”

    Requirements to install phpMyAdmin

    Configuring phpMyAdmin on Debian

    After installing the required packages, you need to configure phpMyAdmin to work properly. By default, Debian does not enable the phpMyAdmin Apache configuration, so we need to enable it manually. Run the following command to enable the configuration:

    sudo phpenmod mbstring

    Next, we need to add the phpMyAdmin Apache configuration to the Apache configuration file. Execute the command below:

    sudo ln -s /etc/phpmyadmin/apache.conf /etc/apache2/conf-available/phpmyadmin.conf

    Once you created the symlink, we can enable the configuration by running:

    sudo a2enconf phpmyadmin

    Finally, restart the Apache web server to apply the changes:

    sudo systemctl restart apache2
    Configuring phpMyAdmin on Debian

    Practical Guide to Setting Up phpMyAdmin on Debian

    Now that you installed and configured phpMyAdmin, we can access it through a web browser. Open your favorite browser and enter your server’s IP address or domain name, followed by “/phpmyadmin” (for example, http://your-server-ip/phpmyadmin). You will be presented with the phpMyAdmin login screen.

    Practical guide to setting up phpMyAdmin

    Enter the MySQL username and password to log in to phpMyAdmin. Once logged in, you can start managing your databases, creating new tables, running queries, and performing various database operations through the intuitive web interface offered by phpMyAdmin.

    Conclusion

    By following this comprehensive guide, you have successfully setup phpMyAdmin on Debian, allowing you to efficiently manage your MySQL databases through a web interface. Now you can take advantage of phpMyAdmin’s powerful features to simplify your database management tasks and streamline your workflow. Whether you are a beginner or an experienced user, phpMyAdmin on Debian is an excellent tool to enhance your database administration capabilities.

  • Unveiling the Battle of Titans: Kali Linux vs Arch Linux

    Unveiling the Battle of Titans: Kali Linux vs Arch Linux

    The battle between Kali Linux and Arch Linux is a showdown between two powerhouses. Kali Linux, known for its penetration testing capabilities, is favored by cybersecurity professionals. Arch Linux, on the other hand, boasts a minimalistic approach and offers a highly customizable experience. In this article, you will clearly see the result of the comparison between Kali Linux vs Arch Linux.

    The Origin Story

    Kali Linux and Arch Linux are two popular Linux distributions that emerged from different origins and serve distinct purposes. Before we start and introduce and compare these two distributions for you, we suggest you to test and use the Linux VPS server plans provided on our website.

    Kali Linux vs Arch Linux

    Kali Linux, formerly known as Backtrack, was initially developed by Mati Aharoni and Devon Kearns of Offensive Security as a specialized distribution for penetration testing and digital forensics. It was first released in 2006 and became popular within the security testing community due to its vast array of pre-installed security tools and utilities. Kali Linux is designed for ethical hacking and security auditing, providing a robust platform for professionals and enthusiasts in the cybersecurity field.

    On the other hand, Arch Linux was created by Judd Vinet in 2002 as a minimalist and lightweight distribution focused on simplicity, customization, and flexibility. Arch Linux follows a rolling release model, which means that users have access to the latest software updates without the need for reinstalling the entire operating system. Its philosophy of “Keep It Simple, Stupid” (KISS) appeals to advanced Linux users who prefer to build their systems from the ground up and have complete control over every aspect of their installation.

    Although Kali Linux and Arch Linux have different goals, they both share an open-source foundation and have vibrant communities supporting their development. Both distributions enjoy active user bases and periodically receive updates and bug fixes to ensure their security and functionality.

    Kali Linux vs Arch Linux: Usability and User Experience

    First of all, it should be noted that Kali Linux and Arch Linux both have different focuses, so their usability and user experience may vary.

    Kali Linux comes pre-installed with a wide range of security and hacking tools, making it ideal for experienced security professionals. However, for a mainstream user who only requires general computing tasks, Kali Linux may not be the most user-friendly option. It requires a high level of technical knowledge and may not provide a seamless out-of-the-box experience.

    On the other hand, Arch Linux is highly customizable distribution that follows a “do-it-yourself” philosophy. Arch Linux provides a more hands-on experience, allowing users to configure and optimize their system according to their specific needs. While this level of customizability can be empowering for experienced users, it may not be the best choice for beginners or those who prefer a more plug-and-play experience.

    Kali Linux vs Arch Linux Usability and User Experience

    In terms of user experience, Kali Linux is focused on a specific niche and provides specialized tools for penetration testing and security assessments. Its user interface is tailored to these tasks, with an emphasis on efficiency and accessibility to security tools. However, for day-to-day tasks like web browsing, multimedia, or gaming, the user experience may not be as polished or optimized.

    Arch Linux, on the other hand, provides a minimal and lightweight base system, allowing users to customize and install their preferred desktop environment, applications, and utilities. This flexibility offers a more tailored and user-friendly experience, but it also requires a higher degree of technical expertise to set up and maintain.

    Package Management Systems

    Kali Linux uses the Advanced Packaging Tool (APT) package management system. APT is known for its ease of use and powerful features. It allows users to install, upgrade, and remove software packages easily using simple commands like apt-get. APT also provides extensive dependency management, which ensures that all required libraries and dependencies are installed along with the requested package. Kali Linux also provides its own repositories with a wide range of security and hacking-related tools.

    Package Management Systems

    On the other hand, Arch Linux uses its own package manager called Pacman. Pacman is a lightweight and flexible package management system designed specifically for Arch Linux. It follows a minimalist approach and aims to provide a simple and efficient package installation process. Pacman uses a rolling release model, which means that packages are constantly updated to their latest versions. It also has a built-in package build system called the Arch Build System (ABS), which allows users to easily create and install custom packages.

    In summary, both APT and Pacman have their own strengths and are suited for different types of users. APT is often preferred for its user-friendly interface and extensive package repositories, while Pacman is favored for its simplicity and rolling release model.

    Community Support and Philosophies

    Community Support:

    Kali Linux: Kali Linux has a large and active community support base due to its popularity among the cybersecurity community. It has a dedicated forum, IRC channel, and various online communities where users can seek help, share knowledge, and discuss topics related to Kali Linux tools and usage.

    Arch Linux: Arch Linux also has a strong and active community support system. It has an official forum, IRC channels, and a Wiki page. The Arch Linux community is known for its helpfulness, but it is more focused on user self-sufficiency and encourages users to find solutions on their own by providing extensive documentation.

    Community Support and Philosophies

    Philosophies:

    Kali Linux: Kali Linux is geared towards penetration testing, security auditing, and digital forensics. It is designed to provide a comprehensive toolkit of specialized tools for cybersecurity professionals. Kali Linux follows a philosophy of “hack responsibly” and promotes ethical hacking and education in the field of cybersecurity.

    Arch Linux: Arch Linux follows a minimalist and do-it-yourself (DIY) philosophy. It aims to provide a lightweight and minimal base system that allows to build customized Linux environment according to preferences. Arch Linux focuses on simplicity, user-centricity, and providing the latest bleeding-edge software packages.

    Kali Linux has a massive community support base with a focus on cybersecurity, hacking, and forensics, while Arch Linux has an active community that emphasizes self-sufficiency and encourages users to build their customized Linux systems. Choose Kali Linux if you specifically need cybersecurity tools, and choose Arch Linux if you prefer a minimal base system with extensive customization options.

    General Overview: Kali Linux vs Arch Linux

    In the table below, we have generally compared Kali Linux and Arch Linux. Note that this table provides an overview and may not cover all aspects of each distribution. It is always recommended to research and evaluate specific needs before choosing a Linux distribution.

    FeaturesKali LinuxArch Linux
    PurposePenetration testingCustomizable environment
    Target audienceSecurity professionalsAdvanced Linux users
    Ease of useIntermediateAdvanced
    Package managerAptPacman
    Number of packagesExtensiveMinimal
    Rolling releaseNoYes
    StabilityStableRolling release
    Community supportExcellentActive and knowledgeable
    DocumentationComprehensiveExtensive and detailed
    CustomizationLimitedHighly customizable
    Hardware supportWide rangeVaries
    InstallationFull installation imageMinimal installation image
    Default desktop environmentGnomeNone
    Security featuresExtensiveLimited
    Update frequencyPeriodicallyContinuously
    Use casesPenetration testing, digital forensicsGeneral-purpose use

    Final Words

    In conclusion, both Kali Linux and Arch Linux offer powerful features and flexibility for different purposes. Kali Linux is designed for penetration testing and security auditing, while Arch Linux is a minimalistic and customizable distribution suitable for advanced users. In this article, we tried to fully compare Kali Linux and Arch Linux, but if you still have any doubts or questions about this, ask us in the comments section.

  • The Art of Ubuntu Server Monitoring: Best Practices and Tools

    The Art of Ubuntu Server Monitoring: Best Practices and Tools

    A system monitoring tool, also known as monitoring software or system monitor, is a type of software or application used to observe, manage, and collect data about the performance and behaviour of a computer system or network. These tools are essential for IT professionals and system administrators to ensure that systems are running efficiently, identify and address issues, and gather data for analysis and reporting. Here we will introduce the best Ubuntu server monitoring tools, keep reading.

    The Best System Monitoring Tools for Ubuntu

    Whether you are a regular user or a system administrator, maintaining the smoothness of the computer and network infrastructure is very important. So to monitor your system, especially Linux OS or Linux VPS, you need to use a monitoring tool to monitor all system activities such as CPU performance, and memory code, Monitor the network, and track the status of other connected devices.

    7 Best Ubuntu Server Monitoring Tools

    Let’s find out the Ubuntu server monitoring tools

    Htop

    Htop is an interactive system monitoring tool for Linux operating systems. It is similar to the traditional top command but provides a more user-friendly and dynamic interface for monitoring system resources and processes.

    Htop allows you to view and manage system metrics in real-time, making it easier to identify and diagnose performance issues on your system. This is suitable for consoles and terminals, that’s why it supports text mode.

    Htop has many features that are used in FreeBSD, macOS, and OpenBSD Linux. This tool provides information such as working time, tasks, and load average. You can also change the color settings in the user interface to suit your needs. Htop supports real-time signals and custom scripts.

    Htop Monitoring Tool

    Stacer

    Stacer is an open-source tool used for system monitoring and optimization. System administrators can easily manage system resources and tasks with this tool. Its wonderful user interface and modern structure make you feel comfortable using it.

    Stacer has many tools that help manage start-up programs and clean essential package caches, program logs, crash logs, cache, and garbage in the system cleaner tab. You can start or stop high-speed services, also, remove programs that you no longer need.

    You can see the network activity for the last 60 seconds in the CPU, RAM, disk, and average CPU resource tab. It helps you have an apt repository that can be used to remove, enable, and disable any repository. Those using Ubuntu can take advantage of this to edit closed repositories.

    Stacer monitoring tool

    Glances

    Another monitoring tool for Ubuntu is Glances, which is written in Python and is cross-platform. This tool adjusts automatically depending on the size of the terminal and displays all the information in a single window. It shows all the necessary information as much as possible.

    You can use glances in client/server mode and monitor the system through the web or terminal. As a result, having all the necessary information at once is one of the positive points of this tool. Other features of Glances include the use of a web interface for remote monitoring.

    Tip: Using this tool for Linux running low-end programs may be a bit difficult because more CPU resources are required.

    glances

    BashTOP

    It can be said that another interesting and reliable tool for monitoring the Ubuntu system is Bashtop. This tool displays usage statistics of processors, disks, memory, network, and other resources. This tool is perfect for desktop and computer users. But it doesn’t work much for system administrators because it won’t satisfy their demands.

    Also if we want to compare it with Htop it is a bit slower. Bashtop is easy to use and has a beautiful and perfect user interface.

    bashtop

    Vtop

    Vtop is provided as a free and open-source tool that is responsible for monitoring the system of Ubuntu and other Linux distributions. This tool allows you to monitor and manage the system at the same time. It is especially useful for system administrators, developers, and anyone interested in monitoring system performance in a more user-friendly and interactive way.

    More specifically, Vtop is a command-line tool and interactive system monitoring tool that allows users to view real-time statistics and information about the performance of their computer or server. It’s similar to the popular top tool that provides a dynamic view of system processes and resource usage, but Vtop adds some extra features and a more user-friendly interface.

    Vtop monitoring tool - ubuntu server monitoring tools

    Atop

    If we want to introduce an advanced interactive system and process monitor for you, Atop is certainly one of the best that displays the load on Linux and Bubuntu systems. You can view the most important hardware resources such as CPU, disk, network, or memory. Or for a more detailed and longer review, record the use of resources permanently.

    In other words, It provides detailed insights into system resource usage and process-level information, making it a valuable tool for system administrators and those interested in monitoring and troubleshooting system performance.

    atop monitoring tool - ubuntu server monitoring tools

    Gotop

    Gotop is a system monitoring and resource usage visualization tool for the command line and is graphical. It is designed to provide real-time information about system resource consumption, such as CPU usage, memory usage, and processes, in an easy-to-read and interactive format.

    Gotop is typically used by system administrators and users who prefer command-line interfaces for monitoring their system’s performance. Unlike Atop and Vtop, Gotop doesn’t use node.js and is written in the Go language.

    Gotop - ubuntu server monitoring tools

    The Best Practices to Use Ubuntu Monitoring Tools

    Monitoring your Ubuntu system is crucial to ensure its performance, stability, and security. Ubuntu provides various tools and practices for effective system monitoring. Here are some best practices for using Ubuntu monitoring tools:

    1- For more comprehensive monitoring, you can also consider tools like Prometheus, Grafana, Zabbix, and Nagios. Choose the tools that best suit your monitoring needs.

    2- Ensure that your Ubuntu system is up-to-date. Regularly run sudo apt update and sudo apt upgrade to keep your system and monitoring tools current.

    3- Tools like Iftop and Nload can help you monitor network traffic and bandwidth usage. Consider netstat and ss for examining network connections.

    4- Use tools like df and du to monitor disk space. You can also set up alerts for low disk space using monitoring solutions like Nagios.

    5- If you’re running specific services or applications, setup monitoring for those using tools like Prometheus with exporters or application-specific monitoring agents.

    6- Employ tools like fail2ban to monitor and protect against unauthorized access attempts. Tools like Logwatch can also help you keep an eye on security-related events.

    7- Write custom scripts to monitor specific parameters or services and set up alerts through email, SMS, or other notification methods when thresholds are breached.

    8- Consider centralizing your logs using tools like the ELK stack or similar solutions. Centralized logs make it easier to search, analyze, and correlate information.

    9- Document your monitoring setup, including the tools you use, configurations, alert thresholds, and procedures to follow when alerts are triggered.

    10- Regularly review your monitoring configuration and make adjustments as necessary.

    Effective system monitoring is an ongoing process. Regularly assess your system’s performance, adjust your monitoring tools and practices as needed, and ensure that you are always ready to respond to potential issues.

    Conclusion

    The tools described in this section are the best Ubuntu server monitoring tools that can be used for Linux systems, especially Ubuntu. There are other tools available in this regard, but the mentioned items have been tested and as a result, the necessary reviews have been provided for you. We hope that the above information was useful for you and helped you make the right choice. Thanks for your cooperation.

  • Seamless Virtualization: Install Ubuntu on VirtualBox

    Seamless Virtualization: Install Ubuntu on VirtualBox

    The impact of the virtual machine in the system is such that it abstracts the computer hardware such as CPU, memory, disk drives, network interface card, etc. For example, consider a virtual machine. A virtual machine can be created for many purposes. This system will share the underlying hardware, but the operating environments or operating systems will be different and separate. After this brief explanation, let’s check how to install Ubuntu on a VirtualBox.

    How to Download and Install Ubuntu on VirtualBox

    To install Ubuntu on VirtualBox, you should have downloaded the ISO file for Ubuntu. You can find all the versions of Ubuntu on the Ubuntu Official Website.

    As you found the related Ubuntu file and Download it, you can install Ubuntu on your VirtualBox using the instructions below. It should be noted that you can use Linux VPS servers that are offered cheaply and with high performance on our website to use Ubuntu.

    20 Easy Steps to Install Ubuntu on VirtualBox

    1- Start by opening the VirtualBox and clicking on the New button:

    start virtualbox to install ubuntu

    2- Choose a name for VirtualBox and select the location for the installation file:

    choosing name for virtualbox

    3- Determine the RAM size for your Virtual Machine:

    determine RAM on virtualbox

    4- Now it’s time to create a Virtual hard disk to store files:

    virtual hard disk

    5- Choose the hard disk, VDI is recommended:

    choosing hard disk

    6- You can choose any of the physical storage types. It is better to choose a Dynamically allocated disk that is selected by default:

    choosing physical storage

    7- Determine your disk size and choose a destination folder to install:

    choosing name for virtualbox

    8- Now that you created the disk, boot your virtual machine and start the installation process:

    booting virtual machine

    9- If you can’t detect the installation disc automatically, browse to the file location and install the ISO file for Ubuntu:

    install Ubuntu ISO file

    10- Continue the installation file and wait for the next options:

    starting installation of Ubuntu

    11- Here you will see two options. Click on the Install Ubuntu option:

    Tip: This section might be different for other Ubuntu versions.

    install Ubuntu

    12- Check the defaults if they are compatible, click on the Continue button and proceed:

    keyboard layout on Ubuntu

    13- The default installation tab is Normal installation which is recommended, so select the type of installation. Note that if there is no need for all the features you can choose Minimal installation:

    Ubuntu installation type

    14- Now it is time to install Ubuntu, Click on the Install Now button and go on with the installation. Do not care about the Erase disk option. It is effective inside the virtual machine, these options will be intact outside the VirtualBox.

    Ubuntu installation type

    15- Now press the Continue button and carry on by writing changes on disk:

    setting time zone

    16- In this section, To setup the time zone, you should select the proper location:

    choosing location for Ubuntu

    17- It is time to select a name for your system and then a password to secure login:

    setting password for Ubuntu

    18- Wait to finish the installation process:

    finishing installation of Ubuntu - Install Ubuntu on VirtualBox

    19- Great! Now that you finished the installation, reboot the virtual machine:

    rebooting Ubuntu system - Install Ubuntu on VirtualBox

    Well done! Now that you have completed the installation successfully, you can use Ubuntu along with Windows:

    How to Run Ubuntu Along with Windows

    After the installation part, you are ready to run and use Ubuntu on your operating system.

    Note: If your operating system is not suitable for the full-screen mode of your Ubuntu and you can not fit the screen by maximizing, go through the settings below to solve this problem:

    – Click on the Devices button and then Insert Guest Addition CD image

    – Now you can see the Desk icon on the taskbar. Choose this icon and open the disk:

    running Ubuntu - Install Ubuntu on VirtualBox

    – You should Write Right-click inside the folder and choose open in the terminal. Run the command below:

    sudo apt update
    sudo apt upgrade

    – You will be prompted to insert the password. Enter it and wait for the completion:

    Authentication section

    – Now run the command below:

    ./autorun.sh

    – It’s time for the authentication. You will be asked for the password, and after checking the password, you will encounter a new terminal. Enter Yes.

    virtualbox guest

    Now you can start Ubuntu and run in full-screen mode.

    Ubuntu welcome page

    Troubleshooting Some Common Issues of Ubuntu on VirtualBox

    You may encounter various issues when setting up or using Ubuntu on VirtualBox. So, here are some common issues and their solutions:

    1- Ubuntu may not display the correct screen resolution.

    Solution:

    Install the VirtualBox Guest Additions. After booting your Ubuntu VM, go to “Devices” in the VirtualBox menu and select “Insert Guest Additions CD image.” This will allow for better integration and automatic adjustment of the screen resolution.

    2- The virtual machine can’t connect to the internet.

    Solution:

    Ensure that the VM network adapter is set to “NAT” or “Bridged” mode in the VirtualBox settings. Also, check if the network cable is connecting within the VM settings.

    3- Ubuntu runs slowly or lags in VirtualBox.

    Solution:

    • Increase the allocated RAM and CPU cores to the VM.
    • Enable 3D acceleration in the VM settings (if supported by your host system and VirtualBox version).
    • Use an SSD for your host machine if possible, as it can significantly improve performance.

    4- The sound doesn’t work in the VM.

    Solutions:

    Make sure you have installed the VirtualBox Guest Additions. You may also need to check sound settings within Ubuntu and VirtualBox.

    Conclusion

    Running Ubuntu in VirtualBox is a popular way to explore and use the Linux operating system within a virtualized environment. Studying this educational article, you now have Ubuntu installed on VirtualBox. You can use Ubuntu within the virtual machine just like you would on a physical computer. If you have any ideas about this issue please share. Happy coding!

  • The Great Linux Rivalry: Debian vs Ubuntu

    The Great Linux Rivalry: Debian vs Ubuntu

    The world of Linux is vast and diverse, with numerous distributions catering to different preferences and needs. Among these, Debian and Ubuntu stand out as two of the most popular choices. Both Debian and Ubuntu share a common ancestry, but they have distinct characteristics and qualities that fuel the never-ending debate of “Debian vs Ubuntu.” In this article, we will delve into the intricacies of these two operating systems, examining their origins, usability, package management, and community support to shed light on the great Linux rivalry.

    By the way, you can get a Linux VPS today with the distribution of your choice and start your Linux journey.

    The Origin Story

    The Origin Story Debian and Ubuntu both trace their roots back to the Linux operating system, but their paths diverge in terms of their origins. Debian, founded in 1993 by Ian Murdock, was one of the pioneering Linux distributions. Its primary aim was to create a stable and reliable operating system by adhering to rigorous quality standards.

    Debian’s commitment to the principles of free software, emphasizing the importance of open-source code and community collaboration, has been a defining feature. As a result, it has built a strong reputation among developers and users who value stability, security, and the ability to customize their Linux environment extensively.

    Understanding the origins of Debian and Ubuntu sheds light on the ongoing Debian vs Ubuntu debate. While both distributions share a common heritage, they have evolved to serve different user needs.

    On the other hand, Ubuntu emerged in 2004 as a Debian-based distribution, with Mark Shuttleworth leading its development. Ubuntu aimed to bring the power of Linux to a broader audience by prioritizing user-friendliness and ease of installation. Unlike Debian, which had a reputation for being more suitable for experienced users, Ubuntu targeted newcomers to Linux with its intuitive interface and straightforward installation process.

    This focus on accessibility helped Ubuntu gain popularity rapidly, especially among home users, students, and those transitioning from other operating systems.

    Debian vs Ubuntu Origin Story

    Debian vs Ubuntu: Usability and User Experience

    One of the key factors that differentiates Debian and Ubuntu is their approach to usability and user experience. Debian emphasizes stability and reliability over ease of use, making it an ideal choice for experienced users and server environments.

    On the contrary, Ubuntu places great importance on providing a user-friendly interface, intuitive installation process, and comprehensive device compatibility, catering to a broader audience, including newcomers to the Linux ecosystem. This variance in usability often leads to divergent opinions among Linux enthusiasts evaluating Debian vs Ubuntu.

    Debian vs Ubuntu: Usability and User Experience

    Package Management Systems

    Another critical aspect that sets Debian and Ubuntu apart is their package management systems. Debian utilizes its advanced package management tool, Advanced Package Tool (APT), along with Debian packages (DEB). APT ensures effective dependency resolution, seamless updates, and a vast repository of software packages.

    Ubuntu leverages the same APT system but evolves it further with its own graphical front-end package manager called Ubuntu Software Center. Moreover, Ubuntu also introduced Snap packages, allowing for enhanced software distribution with stronger isolation.

    The differences in packaging systems between Debian and Ubuntu can greatly influence the software installation and management experiences for users on each platform.

    Package Management Systems

    Community Support and Philosophies

    In the world of open-source software, community support plays a vital role, and Debian and Ubuntu boast vibrant and dedicated communities.

    Debian, with its focus on stability and free software principles, has built a devoted community centered around openness and transparency.

    Ubuntu, with its emphasis on user-friendliness, attracts users seeking a more polished and accessible experience.

    Both distributions benefit from active communities that provide extensive documentation, support forums, and constant development efforts, contributing to the longevity and success of Debian and Ubuntu.

    Community Support Debian and Ubuntu

    General Overview: Debian vs Ubuntu

    Here’s a quick comparison between these two popular Linux distributions:

    FeaturesDebianUbuntu
    Target AudienceExperienced users, developers, and server administratorsGeneral desktop and server users
    Release CycleStable and conservative release cycle with longer intervals between major updatesSix-month release cycle with a focus on the latest software packages
    Package ManagementUses apt package manager with .deb packagesAlso uses apt package manager with .deb packages
    Snap PackagesDoes not natively support Snap packages by defaultSupports Snap packages for easy software installation
    Desktop EnvironmentOffers a wide range of desktop environments and window managersUses GNOME as the default desktop environment, but provides several other options
    Commercial SupportProvides community support and professional support through third-party companiesOffers professional support through Canonical Ltd, the company behind Ubuntu
    PopularityHighly respected in the open-source community with a strong focus on stabilityOne of the most popular Linux distributions for desktop and server usage

    Final Words

    While the Debian vs Ubuntu rivalry sparks lively debates among Linux enthusiasts, the reality is that both distributions offer valuable and distinct experiences. Debian’s stability and principles are favored by those seeking control and reliability. On the other hand, Ubuntu appeals to a broader audience, with its user-friendly interface and ease of use. Ultimately, choosing between Debian and Ubuntu boils down to personal preferences, and the desired balance between stability and convenience. Regardless of which camp one aligns with, both Debian and Ubuntu serve as powerful representatives of the Linux ecosystem, pushing the boundaries of open-source software.

    FAQ

    Q: Which operating system is more up-to-date in terms of software packages?

    A: Generally, Ubuntu tends to have more up-to-date software packages compared to Debian. Ubuntu’s release cycle is more frequent, allowing for quicker updates. Debian, on the other hand, follows a more conservative approach to ensure stability.

    Q: Which operating system has better community support? Debian or Ubuntu?

    A: Both Debian and Ubuntu have strong and active communities. Although Ubuntu’s community support is often considered more extensive and user-friendly due to its larger user base and focus on a user-friendly experience. Debian also has an active community, particularly among experienced users and developers.

    Q: Can software developed Debian run on the Ubuntu and vise versa?

    A: Yes, software developed for Debian can generally run on Ubuntu without issues since Ubuntu is based on Debian. However, compatibility issues may arise in some cases when dealing with very specific system configurations or software packages.

    Q: Is Debian or Ubuntu recommended for servers?

    A: Debian is considered the go-to choice for servers due to its stability, extensive software repositories, and long-term support options. Its robust security updates and conservative nature make it reliable for critical server environments. Ubuntu also offers server editions with similar features, but Debian’s reputation makes it a popular choice among server administrators.