


Drupal is a powerful CMS that offers a wide range of features and flexibility for building websites and web applications. In this article, we will explore the reasons why Drupal is a popular choice among developers and provide a step-by-step guide to Setup Drupal on Debian-based operating system.
Drupal is a free and open-source content management system (CMS) that allows users to create and manage digital content for websites. Generally, It provides a platform for building, organizing, and publishing a variety of content, including text, images, videos, and more.
This CMS combines flexibility, scalability, security, and community support. So, it is suitable for a wide range of websites, from simple blogs to complex enterprise solutions. Its features and capabilities make it a popular choice for individuals and organizations looking to create and manage digital content effectively.

There are several advantages to using Drupal as your content management system. Here are some key advantages:
Drupal is known for its flexibility and extensive customization options. In fact, it provides a modular architecture that allows you to add or remove functionality as needed. So, you can choose from thousands of contributed modules and themes to enhance and customize your website according to your specific requirements.
Drupal is highly scalable and can handle websites of all sizes, from small personal blogs to large enterprise-level applications. Its robust architecture can efficiently handle high traffic loads and large amounts of content without sacrificing performance.
Drupal offers a powerful content management system that allows you to create, edit, and organize content easily. It provides features such as content versioning, content moderation, workflow management, and granular access control, making content management a breeze.
Drupal has built-in support for creating multilingual websites. You can easily create and manage content in multiple languages, enabling you to reach a global audience and enhance user experience for international visitors.
Drupal has a strong focus on security and has a dedicated security team that actively monitors and addresses security vulnerabilities. Regular security updates are released to ensure that your website remains secure. Additionally, Drupal’s robust permission and access control system allows you to manage user roles and permissions effectively.
Drupal can seamlessly integrate with other systems and technologies. It provides APIs and integration modules that allow you to connect your website with external services, databases, and third-party applications. This enables you to create powerful and integrated web solutions.
Drupal provides built-in features and modules that help optimize your website for search engines. It allows you to create search engine-friendly URLs, manage metadata, generate XML sitemaps, and implement other SEO best practices to improve your website’s visibility in search engine rankings.
Drupal is a dynamic and evolving platform. The Drupal community actively contributes to its development, releasing regular updates and new features. This ensures that Drupal stays up-to-date with the latest web technologies and trends.
Now, let’s dive into the step-by-step guide to installing Drupal on Debian. Follow these instructions to get started. We recommend you to use a Cheap Linux VPS server or a Cheap Windows VPS server that is offered in various plans on our website to set up your own website using Drupal.

Before installing Drupal, it is recommended to update the system packages on your Debian-based operating system. Open the terminal and run the following commands:
sudo apt update
sudo apt upgrade
Before you can setup Drupal on Debian, it’s important to have a functional web server and a database server in place. So, we will focus on setting up Apache, PHP, and MariaDB. To install these components, just run the command below:
sudo apt install apache2 mariadb-server mariadb-client php libapache2-mod-php php-cli php-fpm php-json php-common php-mysql php-zip php-gd php-intl php-mbstring php-curl php-xml php-pear php-tidy php-soap php-bcmath php-xmlrpc
Next, it is important to implement essential security measures on the database installation. This can be achieved by executing the provided security script that comes bundled with the MariaDB package:
sudo mysql_secure_installation
After executing the script, a series of questions will be prompted, allowing you to enable certain basic security options. To proceed with enabling these options, simply answer yes (y).
In this step, create a database that Drupal will utilize for storing data during and after the installation process. Firstly, log in to the MariaDB database server as shown below:
sudo mysql -u root -p
Once you have successfully logged into the MariaDB shell, proceed with creating a database called “drupal_db” using the following command:
MariaDB [(none)]> create DATABASE drupal_db;
Next, let’s proceed with creating a database user and granting them full access to the Drupal database. Once you have logged in to the MariaDB shell, create a database user with a strong password by executing the command below:
CREATE USER 'drupal_user'@'localhost' IDENTIFIED BY 'your_strong_password';
Replace ‘drupal_user‘ with the desired username for the Drupal user and ‘your_strong_password’ with a strong password of your choice.
Grant the user full access to the Drupal database with the following command:
GRANT ALL PRIVILEGES ON drupal_db.* TO 'drupal_user'@'localhost';
Make sure to replace ‘drupal_db‘ with the actual name of the Drupal database you created earlier.
To apply the changes and refresh the privileges, run:
FLUSH PRIVILEGES;
EXIT;
Download Drupal’s compressed file from Drupal’s Official site using the command below:
sudo wget https://www.drupal.org/download-latest/tar.gz -O drupal.tar.gz
Once the download is complete, extract the contents of the downloaded file in your current directory with the following command:
sudo tar -xvf drupal.tar.gz
Move the extracted Drupal folder to the /var/www/html path with the following command:
sudo mv drupal-9.0.7 /var/www/html/drupal
To verify the successful move, you can list the contents of the /var/www/html/drupal directory as shown below:
ls -l /var/www/html/drupal
To make Drupal accessible to the public, you can modify the directory permissions. Change the ownership of the Drupal directory to the www-data user and group:
sudo chown -R www-data:www-data /var/www/html/drupal/
Set the appropriate permissions for the Drupal directory to allow read and execute access for the owner, group, and others:
sudo chmod -R 755 /var/www/html/drupal/
After completing the download, you can extract the contents of the downloaded file in your current directory using the command below:
sudo tar -xvf drupal.tar.gz
Move the extracted Drupal folder to the /var/www/html path by running the following command:
sudo mv drupal-9.0.7 /var/www/html/drupal
Display the contents of the /var/www/html/drupal directory to confirm the successful move as shown below:
ls -l /var/www/html/drupal
To configure Drupal to be accessible on the frontend, you should create a custom Apache virtual host file dedicated to serving Drupal’s site. To do so, create the file using the vim text editor:
sudo vim /etc/apache2/sites-available/drupal.conf
Press Enter to launch the file in the vim editor.
Copy and paste the specific content provided for the virtual host file:
<VirtualHost *:80>
ServerAdmin [email protected]
ServerName exampleurl.com
DocumentRoot /var/www/html/[name of the created database]
<Directory /var/www/html/[name of the created database]>
Options Indexes FollowSymLinks
AllowOverride All
Require all granted
</Directory>
ErrorLog /var/log/apache2/drupal_error.log
CustomLog /var/log/apache2/drupal_access.log combined
</VirtualHost>
Save the changes and exit the vim editor.
To transition from displaying the Apache Welcome page to serving the Drupal site, you need to enable Drupal’s virtual host. To achieve this, enable Drupal’s virtual host with the command below:
sudo a2ensite drupal.conf
Now enable the rewrite module for Apache:
sudo a2enmod rewrite
To apply the changes, restart the Apache webserver:
sudo systemctl restart apache2
If you have a UFW firewall running, open the HTTP port by executing the following commands:
sudo ufw allow 80/tcp
sudo ufw reload
To access Drupal from the browser, open your preferred web browser. Then browse your server’s IP address as shown:
http://your-server-ip/
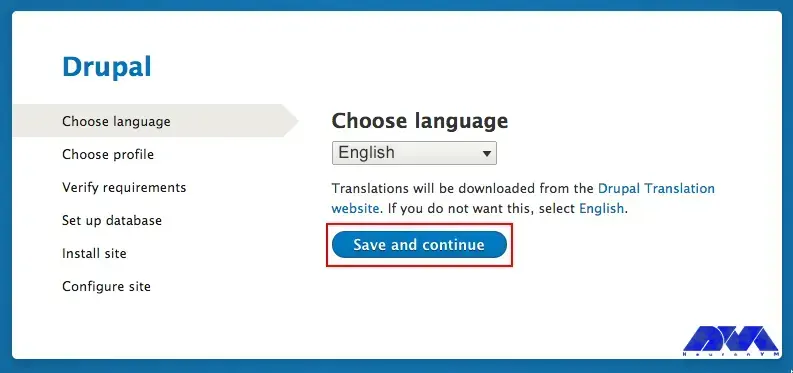
During the setup process, the installer will guide you through a series of steps. On the initial page, you will need to select your preferred language. Simply choose the language you desire and click on the ”Save and Continue” button to proceed:
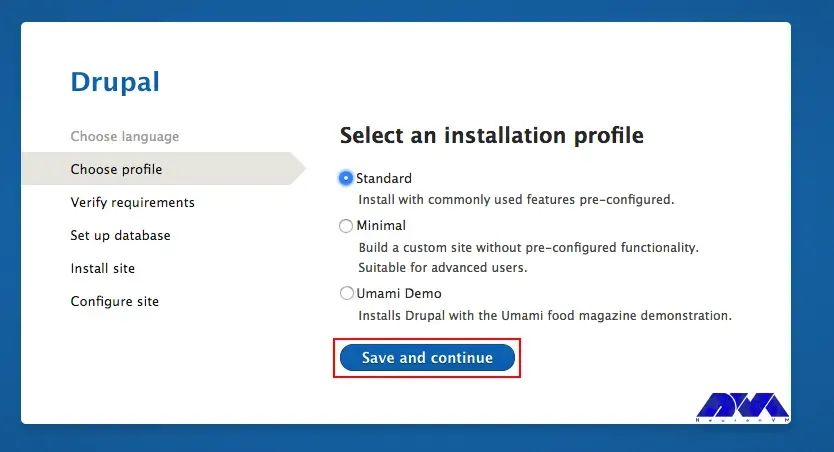
You have the option to choose from three installation profiles to install Drupal. However, we will proceed with the ”Standard” profile:
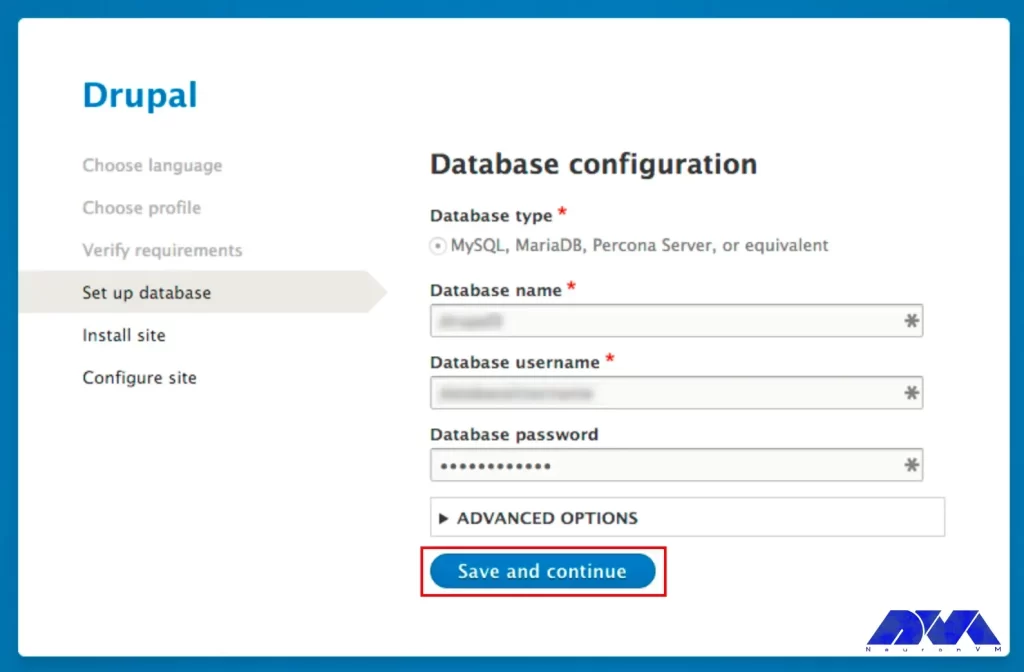
Moving on to the next step, please provide the necessary database details for Drupal as mentioned earlier, and then click on the ”Save and Continue” button:
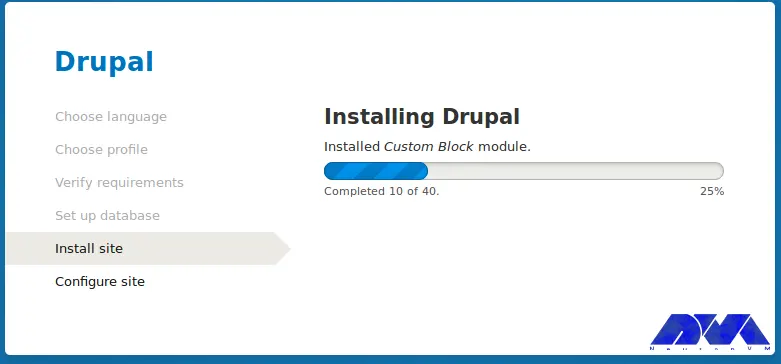
Once you initiate the installation process, Drupal’s installer will begin installing all the necessary files and database modules:
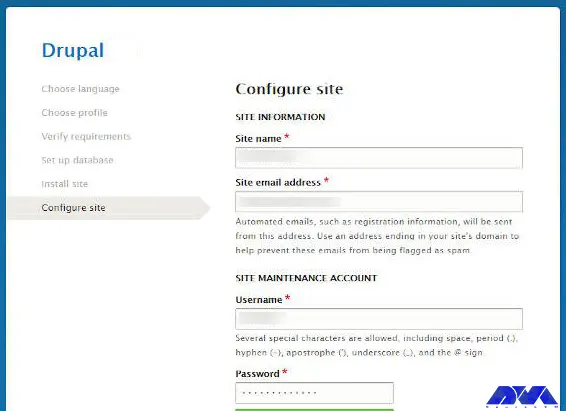
After the installation is successfully completed, you will need to provide essential details about your site, including the site name, site address, timezone, and location, among others. It is important to ensure that you fill in all the required information accurately:
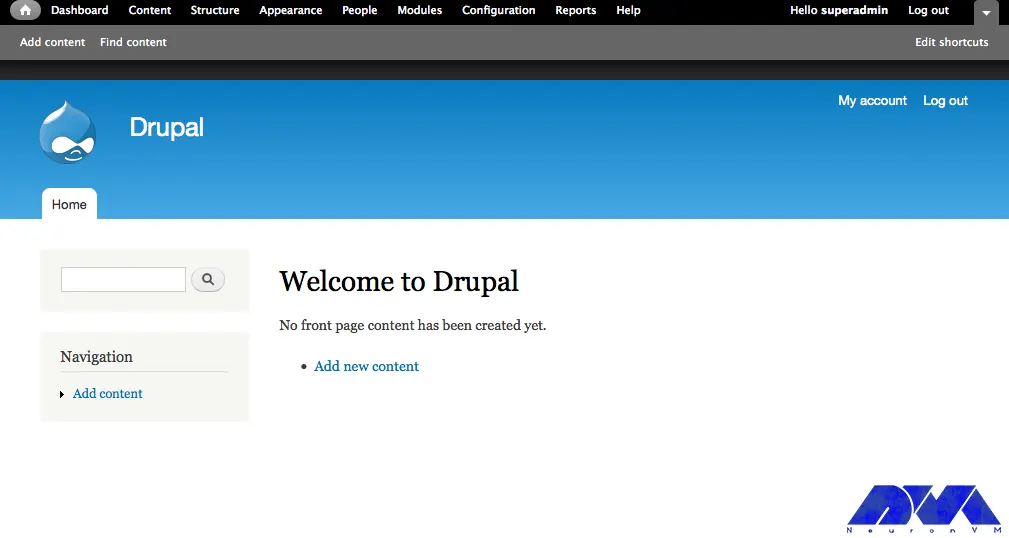
Finally, the default Drupal dashboard appears as follows:
Installing Drupal can sometimes be a challenging task, especially when encountering various issues along the way.
Allowed memory size of n bytes exhausted If you come across the “Allowed memory size exhausted” error, it means that Drupal requires more memory than what is currently allocated.
To resolve this, you can add an extra line to Drupal’s configuration files, increasing the memory limit and allowing Drupal to function properly.
When the installation script fails to connect to the database server, it’s crucial to verify the accuracy of the provided username, password, and hostname.
Double-check these credentials to ensure they are correct and allow for a successful database connection.
During the installation process, the script needs permission to create the ‘files’ and ‘private’ directories within the sites/default folder.
Ensure that the necessary permissions are granted to the script so that it can create these directories seamlessly.
To complete the installation, the script requires write permissions for the configuration files, specifically settings.php.
Grant the necessary permissions to allow the script to write to these files and proceed with the installation process.
Encountering a blank page, also known as the “White Screen of Death,” can be perplexing. This issue can occur due to various reasons.
It’s recommended to check for any error logs, verify the server’s resource allocation, and review the PHP configuration to identify the root cause of the problem and resolve it accordingly.
“Your PHP configuration only supports the SQLite database type” on the database configuration page during install Drupal 7 relies on the PHP Data Object (PDO) extension, which must be enabled or compiled into PHP.
If you encounter this error, check your PHP configuration for the presence of the “pdo_mysql” extension. Follow the instructions provided to enable it and proceed with the installation.
If you have the Xdebug PHP extension installed on your server, you might encounter this error.
To resolve it, modify the Xdebug configuration file by changing or creating the parameter “xdebug.max_nesting_level” to a higher value than the default. Don’t forget to restart Apache for the changes to take effect.
Drupal is a robust and versatile content management system that offers numerous benefits for creating and managing websites. Its flexibility, scalability, and customization options make it suitable for websites of any size or complexity. With a strong emphasis on security, Drupal ensures the protection of your website and data. By following the step-by-step guide, you can easily setup Drupal on Debian server and begin building your website with confidence.
How useful was this post?
Click on a star to rate it!
Average rating 0 / 5. Vote count: 0
No votes so far! Be the first to rate this post.
 Tags
Tags

In continuation of our tutorials, In this guide, you will learn how to easily install an FTP server ...


 Tags
Tags
In this tutorial, we will show you how to Install and Setup CSF Firewall on Debian 10 or 9 step by s...


 Tags
Tags
What is your opinion about this Blog?


