


RainLoop is a webmail application that allows you to access your external mail server from a web server. This article is presented to show How to Install RainLoop on Debian 11. Rainlop is an alternative program to web email programs like Squirrelmail and Roundcube and supports two-step authentication, so it’s highly secure.
RainLoop is a free, web-based, open-source, and web-based email application written in PHP and is an alternative to other web-based email applications such as RoundCube and SquirrelMail. RainLoop is a simple, modern solution, powerful and flexible. It is interesting to know that RainLoop email has an internal storage mechanism that improves the overall performance of the application while reducing the load on the web server and email server, supports two-step authentication with SMTP and IMAP, and can be done with Facebook.
– Sieve scripts
– Direct access to the email server
– Administrative panel for configuring main options
– Modern user interface
– Integrating with Facebook, Google, Twitter, and Dropbox
– Autocomplete email addresses
– Minimalistic resources requirements
– Manage folders list
– Drag and drop option for emails and attachments
– Simple installation and update
– The configurable multi-level caching system
– Keyboard shortcuts support
– Additional identities
– Extend the functionality with plugins installed via the admin panel
– Perfect rendering of complex HTML mails
– Ability to add multiple accounts to the primary account
1) PHP and PHP-required packages
2) Nginx
3) MariaDB
4) A non-root user account with sudo access
5) A Linux VPS with a Debian 11 server
It’s better to check your Debian version with the help of the following command:
lsb_release -ds
Now update your system by entering the following command:
apt update
apt upgrade -y
Then you should install the necessary packages by running the following command:
apt install -y sudo dirmngr wget curl vim
You can create a non-root user account with sudo access by executing the following command:
adduser lindaevanty --gecos "Linda Evanty"
usermod -aG sudo lindaevanty
su - lindaevanty
Tip: Remember to replace your username with “lindaevanty”.
Now you should setup the timezone by executing the following command:
sudo dpkg-reconfigure tzdata
In this step, you should download and install PHP and the necessary extensions by entering the following command:
sudo apt install -y php7.0 php7.0-cli php7.0-fpm php7.0-curl php7.0-json php7.0-mbstring php7.0-mysql php7.0-pgsql php7.0-sqlite3 php7.0-common php7.0-xml
To check the PHP version just run the following command:
php --version
In this step, you can install MariaDB by executing the following command:
sudo apt install -y mariadb-server
To check the MariaDB version just enter the following command:
mysql --version
You can run the following command to improve the security of the MariaDB installation:
sudo mysql_secure_installation
Then you should log into MariaDB as the root user by entering the following command:
sudo mysql -u root -p
# Enter password:
Now you should create a MariaDB database by executing the following command:
CREATE DATABASE dbname;
Then you need to create a MariaDB user. To do this just enter the following command:
CREATE USER 'username'@'localhost' IDENTIFIED BY 'password';
GRANT ALL ON 'dbname'.*TO 'username'@'localhost';
FLUSH PRIVILEGES;
EXIT;
Next, you need to install Nginx using the following command:
sudo apt install -y nginx
You can check the Nginx version by executing the following command:
sudo nginx -v
Now you should configure Nginx for RainLoop. To do this first enter the following command:
sudo vim /etc/nginx/sites-available/rainloop.conf
And then enter the following configuration:
server {

  listen 80;

  server_name example.com;
  root /var/www/rainloop;

  index index.php;

  location / {
    try_files $uri $uri/ /index.php?$query_string;
  }

  location ~ \.php$ {
    fastcgi_index index.php;
    fastcgi_split_path_info ^(.+\.php)(.*)$;
    fastcgi_keep_conn on;
    include fastcgi_params;
    fastcgi_pass unix:/var/run/php/php7.0-fpm.sock;
    fastcgi_param SCRIPT_FILENAME $document_root$fastcgi_script_name;
  }

  location ~ /\.ht {
    deny all;
  }

  location ^~ /data {
     deny all;
  }

}
Now you need to activate the new rainloop.conf configuration. To do this link the file to the sites-enabled directory:
sudo ln -s /etc/nginx/sites-available/rainloop.conf /etc/nginx/sites-enabled
You can test the configuration with the help of the following command:
sudo nginx -t
Finally, reload Nginx with the following command:
sudo systemctl reload nginx.service
You need to create a document root directory before downloading Rainloop:
sudo mkdir -p /var/www/rainloop
Then you should change the ownership of the /var/www/rainloop directory to your name as shown below:
sudo chown -R lindaevanty:lindaevanty /var/www/rainloop
If you do not have the unzip app, you can install it with the following command:
sudo apt install -y unzip
Now it’s time to download Rainloop. To do this, just run the following command:
cd /var/www/rainloop
wget http://www.rainloop.net/repository/webmail/rainloop-latest.zip
Then you should unzip it with the following command:
unzip rainloop-latest.zip -d /var/www/rainloop
rm rainloop-latest.zip
Finally, you have to change the ownership of the /var/www/rainloop directory to www-data:
sudo chown -R www-data:www-data /var/www/rainloop
First, you need to open your web browser and access the RainLoop Dashboard using the following URL:
http://rainloop.example.com/?admin
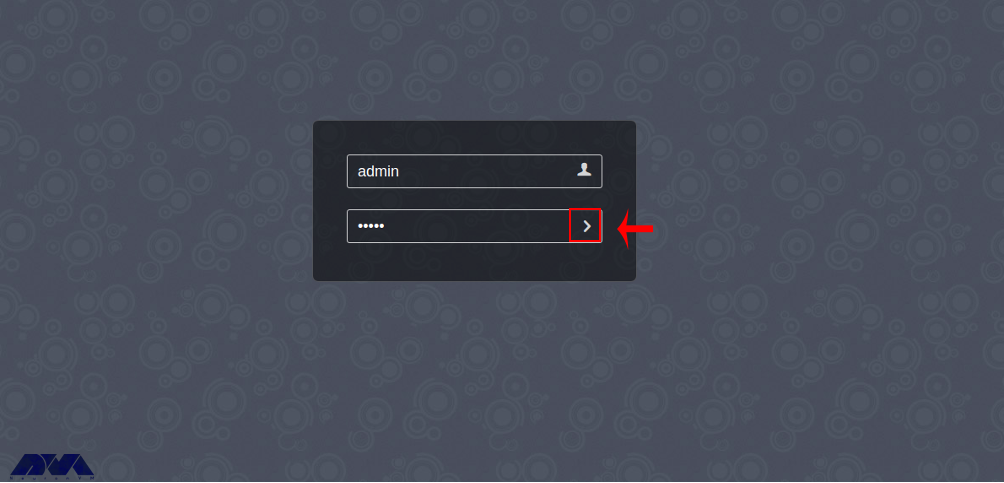
Then you should enter the default username admin and password 12345 and click on the “>” button. You should see the following screen:
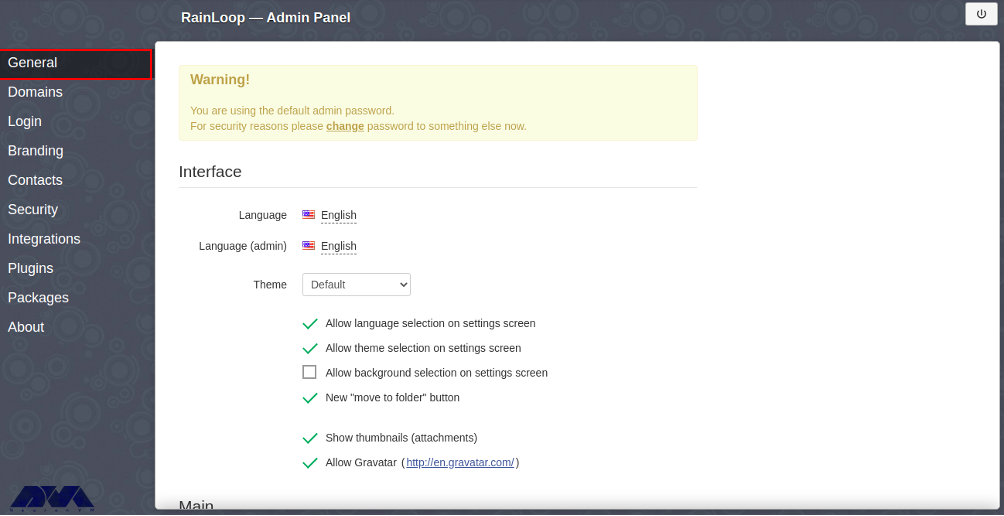
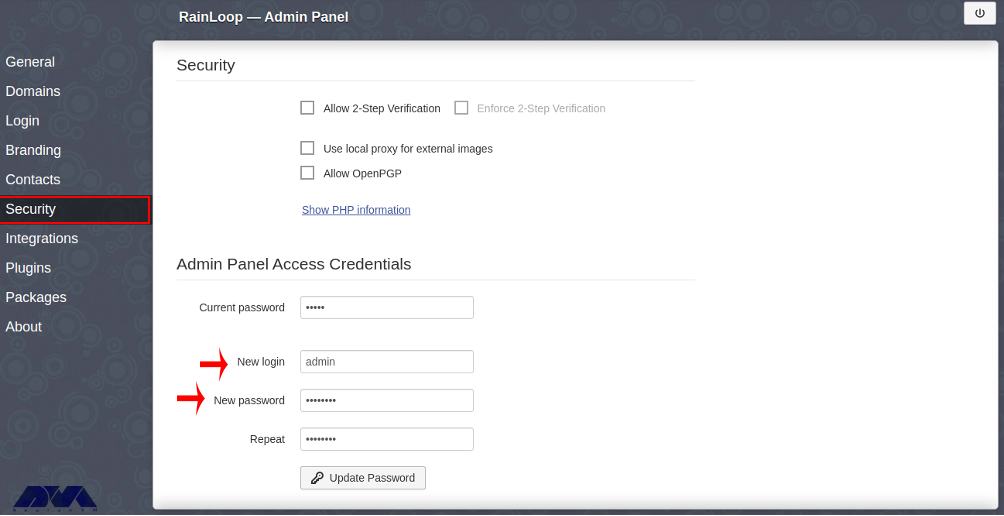
You can change the default admin password by clicking the Change Password button. After entering the new password, click the Update Password button to change the password:
This article taught you how to install RainLoop on Debian 11. After installing RainLoop with the help of this article, you can add your email server from the RainLoop web interface and access your email through a web browser.
Refer to the Rianloop documentation and community support.
You can use a maximum of 1 GB file size limit set by Nginx.
How useful was this post?
Click on a star to rate it!
Average rating 0 / 5. Vote count: 0
No votes so far! Be the first to rate this post.
 Tags
Tags
Hastebin is the easiest way to save notes and snippets and a web app with basic Pastebin functionali...


 Tags
Tags

The world of Linux is vast and diverse, with numerous distributions catering to different preference...


 Tags
Tags
What is your opinion about this Blog?


