Author: Linda Evanty

  • The Best Practice Guide for Trading on VPS

    The Best Practice Guide for Trading on VPS

    In recent years, virtual private servers (VPS) have become increasingly popular among traders in the financial markets. A VPS offers many advantages for traders, including high-speed and reliable internet connectivity, uninterrupted trading operations, and the ability to run automated trading strategies 24/7. However, to make the most of trading on VPS, it is essential to follow certain best practices. Let’s discuss the best practices for trading on VPS.

    Trading on VPS

    Trading is a dynamic and ever-evolving practice that involves buying and selling financial instruments to capitalize on market movements. It is a fundamental activity in the financial markets, attracting individuals, institutions, and algorithmic trading systems alike.

    Trading on VPS refers to conducting trading activities using a VPS. A VPS is a virtual machine that runs its own copy of an operating system, allowing users to have full control over the server’s resources. We advise you to use Windows VPS servers offered on our website for trading and tell us your opinion about the high quality of our servers.

    The Best Practice Guide for Trading on VPS

    Exploring the Powerful Features of Trading on a VPS

    Trading on a VPS can provide traders with several powerful features that can enhance their trading experience. Here are some of the key benefits and features of trading on a VPS:

    Enhanced Reliability and Uptime

    One of the most significant advantages of trading on VPS is the enhanced reliability it provides. VPS servers are hosted in state-of-the-art data centers with redundant power supply and internet connectivity, ensuring maximum uptime. NeuronVM VPS servers are built on cutting-edge technology, ensuring maximum uptime and seamless trading operations.

    With redundant power supply, high-speed internet connectivity, and state-of-the-art infrastructure, you can trade with confidence, knowing that your trading platform will remain online 24/7.

    Enhanced Execution Speed

    In the world of trading, speed is crucial. VPS hosting enables traders to achieve ultra-low latency and lightning-fast execution speeds. By leveraging high-speed internet connections and powerful server infrastructure, NeuronVM VPS allows for quick order placement and execution.

    This is particularly advantageous for high-frequency traders and those who rely on split-second decisions. With faster execution speeds, traders can capitalize on market opportunities and potentially increase their profitability.

    Robust Security Measures

    Security is a paramount concern for traders, given the sensitive nature of financial transactions. NeuronVM VPS servers prioritize the security of your trading operations, employing advanced security measures to safeguard your data and transactions.

    With NeuronVM’s secure infrastructure, you can trade with peace of mind, knowing that your confidential information is protected from unauthorized access.

    Flexibility and Scalability

    NeuronVM VPS servers offer traders unmatched flexibility and scalability. Whether you are an individual trader or a financial institution, NeuronVM provides customizable VPS hosting plans to meet your specific requirements.

    You can easily scale up or down your resources based on your trading needs, ensuring optimal performance and cost-effectiveness.

    Remote Accessibility

    Trading on VPS eliminates the constraints of being tied to a specific location. With NeuronVM’s VPS servers, you can access your trading platform from anywhere in the world, as long as you have an internet connection.

    Whether at home, in the office, or on the go, you can monitor your trades, execute orders, and adjust strategies in real-time.

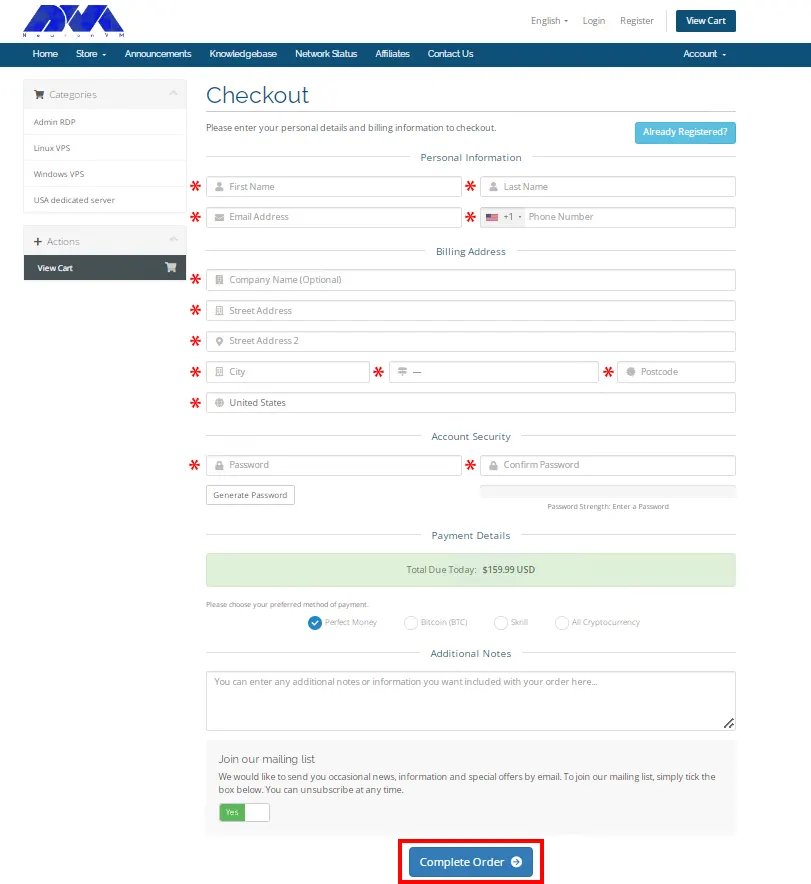
    Choose a Reliable VPS Provider

    The first and most crucial step in trading on a VPS is to select a reliable VPS provider. Look for a provider that offers low latency connections, high uptime, and excellent customer support. Ensure that the VPS provider has data centers located in regions close to the financial markets you trade in, as this reduces latency and improves trade execution speed.

    The Best Practice Guide for Trading on VPS2

    NeuronVM offers VPS hosting specifically designed for trading purposes. They provide low-latency servers located in major financial hubs around the world, ensuring fast and reliable connection speeds. Also, our website offers high uptime guarantees and robust security measures to protect your trading activities.

    Optimize Network Connectivity

    Network connectivity plays a crucial role in trading. To ensure a smooth trading experience, we recommend you optimize your VPS’s network connectivity. Here are a few different ways to do this:

    • Choose a Reliable Internet Service Provider (ISP): To ensure smooth trading operations, start by selecting a reliable Internet Service Provider (ISP) that offers low latency and high-speed internet connections. A stable and fast internet connection is essential for real-time data transmission and rapid execution of trades.
    • Optimize Router Placement: The placement of your router plays a significant role in network performance. To maximize connectivity, position your router in a central location, away from obstructions such as walls or furniture. This allows for better signal distribution throughout your trading area.
    • Use a Wired Connection for VPS: Wired connections offer lower latency and higher speeds, reducing the chances of data packet loss during transmission. By directly connecting your computer to the router via an Ethernet cable, you can ensure a stable and reliable network connection for trading on your VPS.
    • Regularly Monitor and Optimize Network Settings: Ensure that your VPS is configured to prioritize trading applications, allocating sufficient bandwidth to them. You can also consider implementing Quality of Service (QoS) settings on your router to prioritize trading data over other internet activities, preventing potential delays or interruptions.

    Install Reliable Trading Software

    When trading on a VPS, it is essential to install reliable and trusted trading software. Choose a platform compatible with your trading strategy that provides features like real-time market data, advanced charting tools, and order execution capabilities.

    1) Research and Choose Trusted Trading Software: Look for software that is specifically designed for trading and has a proven track record of reliability and performance.

    Read reviews, seek recommendations from fellow traders, and consider the software’s features, user interface, and compatibility with your trading strategy. Some of the best trading software out there are MetaTrader 4 & 5, cTrader, NinjaTrader, TradeStation, and Interactive Brokers Trader Workstation.

    2) Ensure Compatibility and Optimal Configuration: Check the software’s system requirements and ensure that your VPS meets or exceeds them. Additionally, consider the optimal configuration settings recommended by the software provider.

    Adjusting settings such as memory allocation, CPU usage, and network protocols can enhance the performance and stability of the trading software on your VPS.

    3) Regularly Update and Maintain Your Trading Software: Keep track of software updates provided by the vendor and install them promptly. Updates often include bug fixes, feature enhancements, and security patches that can improve the trading experience and protect your VPS from potential vulnerabilities.

    It’s important to note that the best trading software for you will depend on your specific trading goals, strategies, and preferences. It’s recommended to explore and evaluate different platforms, considering factors such as ease of use, available features, reliability, and customer support before deciding.

    Maintain Proper Security Measures

    Security is paramount when trading on a VPS. Implement robust security measures to protect your trading activities and sensitive information. Use strong and unique passwords for your VPS login and trading platform accounts. Regularly update your antivirus software, firewall, and operating system to prevent any potential security breaches.

    Maintain Proper Security Measures

    Backup Trading Data

    It is crucial to regularly backup your trading data to avoid any loss in the event of hardware or software failures. Setup automated backups of your trading platform settings, indicators, templates, and trade history. Consider storing the backups on external storage devices or cloud-based solutions for added security.

    Monitor System Performance

    Keep a close eye on your VPS’s performance to ensure optimal trading conditions. Monitor the CPU and memory usage, network latency, and disk space utilization. If you notice any performance issues, investigate the cause and take the necessary steps to resolve them.

    Regularly restart your VPS to clear any accumulated resources and maintain optimal performance.

    Backup Trading Data

    Final Thoughts

    Trading on a VPS can greatly enhance your trading experience by providing high-speed and reliable connectivity, uninterrupted trading operations, and the ability to run automated strategies. By following the best practices mentioned in this guide, you can maximize the benefits of trading on a VPS and improve your overall trading performance.

  • Tutorial Create VPN Connection on RDP 2016

    Tutorial Create VPN Connection on RDP 2016

    Using a VPN (Virtual Private Network) means you’ll leave no trace of yourself on the Internet for the ISP or anyone else. Instead of connecting directly to a crowded and insecure Internet space, a VPN connects you to a private Internet network that is limited to you. A VPN chooses your location based on IP, where it does not belong to you at all. In this way, you can ensure your security in the Internet space. Another use of a VPN is to remotely run a company’s employees to the office’s private network, even if they are not physically present in the office. Due to the importance of VPN, we decided to teach you in this article about the Tutorial Create VPN Connection on RDP 2016.

    Introduction to VPN and its benefits

    Using a VPN can be beneficial for you in two different ways. Firstly, activating it allows you to access the internet from another country through VPN hosting servers, which can be useful for accessing content that is not available in your country of residence. Secondly, and most importantly, using a VPN encrypts all your traffic data over the internet, providing you with enhanced security.

    By connecting to VPN servers, you are provided with an encrypted connection with trusted links, and you can use the Internet normally and without any restrictions. Keep in mind that using a VPN slows down download and upload speed. That’s because when using a VPN data transfer speed reduces.

    How to Create VPN Connection on RDP 2016

    Before starting the training on how to create a VPN account, we recommend you choose and buy the plan you need from the cheap Admin RDP plans provided on our website. The first step is to type PowerShell in the Windows Start menu and right-click on Run as Administrator and open it in Administrative mode.

    Administrative mode

    By running the following command, you will install the Windows Update module for PowerShell:

    Install-Module PSWindowsUpdate

    If you are asked to confirm, you can press Y and enter.

    Then run the following command to get a list of the latest updates:

    Get-WindowsUpdate

    Finally, run the following command to install the updates.

    Install-WindowsUpdate
    Powershell Custom Config

    After the updates are installed, run the following command to restart the computer:

    Restart-Computer

    How to Install a Remote Access Role

    To install the Remote access feature with Direct Access and VPN (RAS) and Routing with the management tools, you must first open PowerShell in administrative mode again and then enter the following commands:

    Install-WindowsFeature RemoteAccess
    
    Install-WindowsFeature DirectAccess-VPN -IncludeManagementTools
    
    Install-WindowsFeature Routing -IncludeManagementTools
    How to Install a Remote Access Role

    How to Configure Routing and Remote Access

    First, open the Server Manager in your RDP 2016 and click on Routing and Remote Access from the Tools section.

    How to Configure Routing and Remote Access

    In this step, you must right-click on the local server and click on Configure and Enable Routing and Remote Access.

    Configure and Enable Routing and Remote Access

    Because the routing and access configuration is done manually, select the Custom Configuration button here and click Next.

    Powershell Custom Config

    Now you must select the VPN and NAT boxes and click Next.

    how to select the VPN and NAT

    Finally, click Finish. Then click on Start Service after seeing the instruction to start Routing and Remote Access Services.

    start Routing and Remote Access Services

    How to Configure VPN Properties

    Now it’s time to configure VPN. First, right-click on your local server and then click Properties.

    how to configure VPN - Create VPN connection on rdp

    Now you need to go to the Security tab and mark the check box of Allow custom IPSec policy for L2TP/IKEv2 connection, insert a very long PSK (Pre-shared key). Remember to write down the PSK as the PSK must be shared with any user who connects to the server. You can use any tool to generate a random key.

    Allow custom IPSec policy for L2TP/IKEv2 connection

    In this step, you have to go to the IPv4 section and select the Static address pool option from the IPv4 address assignment section and click Add. After the pop-up window opens, enter the IP address ranges. You must put the starting address and ending address of the IP address range you want users to assign.

    Static address pool in vpn connection settings

    Now click OK to save the address range and finally click OK again to save the changes. Click OK if you receive the “you need to restart the Routing and Remote Access for changes to apply” warning.

    How to Create VPN User

    In the Start menu, type, and then open the Computer Management window. Open the Local Users and Groups window on the left, right-click Users, and then click New User.

    Computer Management window - Create VPN connection on rdp

    In the New User prompt, you must enter a username, full name, and strong password, Uncheck the “User must change password at next logon” box and then click Create.

    Computer Management window - Create VPN connection on rdp

    After creating the user, if you return to the computer management interface, you can find a new user in the list of users. To view the list of users in the Computer Management section, right-click Users and click Properties.

    Computer Management window - Create VPN connection on rdp

    In the VPN users properties section, go to the Dial-in tab. Then select the Allow access option from the Network Access Permission settings. Finally, click OK to save the properties.

    Computer Management window - Create VPN connection on rdp

    Finally, the L2TP/IPSec VPN server can accept connections.

    To connect to VPN Clients you must share the PSK and Windows username and password with the user who wishes to connect to the remote VPN server.

    Conclusion

    Creating a VPN connection on RDP 2016 is a simple and effective way to enhance security and privacy when accessing remote servers or networks. By following the step-by-step tutorial provided, users can establish a secure connection and ensure that their data remains encrypted and protected. Implementing a VPN not only safeguards sensitive information but also provides a seamless and efficient remote working experience. With the increasing importance of remote access, understanding how to create a VPN connection on RDP 2016 is a valuable skill for any user or organization.

  • How to Install Screen Reader on Admin RDP

    How to Install Screen Reader on Admin RDP

    Using screen readers can play a key role in interacting with computer devices for the blind, visually impaired, and even the illiterate. Nevertheless, even those who possess unimpaired vision and reading abilities can reap the advantages of utilizing this software to convert textual content into audio. By employing the Screen Reader, one can effortlessly analyze and transform content into either synthesized human speech or content that is compatible with Braille displays. The primary emphasis of this article centers around the process of install Screen Reader on Admin RDP. Please continue reading for further instructions.

    Introduction to Screen Reader

    The Screen Reader software is designed to cater to a wide range of needs, supporting popular applications including web browsers, email clients, web chat programs, office suite applications, and virtual servers on Windows Server. Furthermore, its text-to-speech engine is equipped to handle over 80 languages, ensuring a comprehensive user experience. Not only does it announce the text formatting details such as font name, size, writing style, and even spelling errors, but it also goes the extra mile by automatically vocalizing the text beneath the mouse cursor. And if that wasn’t enough, it even provides auditory feedback to indicate the precise position of the mouse upon the user’s request.

    Install Screen Reader on Admin RDP

    To ensure a successful installation of Screen Reader to Admin RDP, follow the following steps:

    1. Begin by typing “Remote Desktop” in the WIN field and hitting Enter.

    2. In the resulting window, proceed to enter the IP address of your server and click on the Connect button.

    3. If you have recently installed VPS, after logging in, you will gain access to your desktop, which will display all available icons on your Windows server.

    4. Now, in order to enable sound, press WIN+R to open the run dialog. This is necessary because the sound is disabled by default in the Windows server.

    5. In the Run dialog, type “cmd” and press Enter. By following these steps, you will successfully install Screen Reader to Admin RDP.

    run window

    In this step, you have to type the following command and then press Enter.

    net start audiosrv
    install screen reader on rdp

    It’s important to keep in mind that the previously mentioned methods do not automatically start the audio service during Windows startup. To address this, follow the steps provided below.

    How to enable the narrator on Admin RDP

    To activate Windows Narrator, revisit the Remote Desktop on Windows guide. Microsoft Windows Narrator is a program available on Windows Server that facilitates screen reading for individuals with visual impairments. Typically, blind users navigate using keyboard inputs rather than a mouse. They rely on keystrokes like ALT+TAB to switch between open windows.

    First Method:

    The first way to enable Microsoft Windows Narrator is simple. If you use Windows Server 2012 or 2016, you should turn on Narrator by pressing CTRL+WIN+ALT at the same time.

    Because this method does not always work, you can use the following method to enable Microsoft Windows Narrator.

    Second Method:

    Now you have to press WIN+R again to open the run dialog. Then you should type narrator into the run dialog, and then press Enter. You will only hear the sound of the Narrator speaking if your sound is on.

    narrator setting from run windows

    *

    narrator settings - Install Screen Reader on Admin RDP

    If you plan to permanently use the screen reader on your server, you will need to configure the audio service to start automatically. We need the audio service to start automatically when the server starts up because for a blind user, using audio is the only way to communicate with the system.

    Now you should open the run dialog again and type services.msc and press enter.

    setup Screen Reader - Install Screen Reader on Admin RDP

    Upon executing the steps, you will come across a prompt that states: “You are in a tree view.” To navigate through the services, simply press the TAB key and utilize the arrow keys.

    Install Screen Reader on Admin RDP

    You should continue pressing w until you hear the Windows audio services and then press Enter. If the setting is configured as manual, you can modify it by pressing the up and down arrow keys. After hearing ”automatic”, press Enter. Now you can close the dialog box.

    Conclusion

    In this article, we explained the importance of a screen reader for blind people and also enumerated its features. Using this article, you can easily install and setup Screen Reader on Admin Remote Desktop.

  • How to Change Password on RDP 2016

    How to Change Password on RDP 2016

    This tutorial presents the way to Change Password on RDP 2016, 2012, and 2019 step by step. One of the security measures after purchasing an Admin RDP VPS server is changing its password. You may want to change the password on your Windows server for security reasons. Changing the Windows server password is not difficult; you can change your password on Windows servers with a few simple steps. Join us for How to Change Password on RDP 2016.

    Importance of changing RDP 2016 password

    Because AD Administrator is a very powerful user for Active Directory and you can restrict or open features to other users and computers, install or remove programs, and you can turn off any member computer using Admin. So you need to keep the AD Administrator user in a safe place.

    You may also sometimes need to change the Administrator password or other users that connect to the server via a Remote Desktop Connection. You may want to do this for added security.

    Changing your password is essential because when you use Windows as a server, you must use secure passwords so that you do not have security problems and no one can hack your server. It should be noted that you can change your RDP 2016 password at any time.

    First method: Change Password on RDP 2016

    You can change the passwords of the domain users by using the following method. The first step is to log in to the Domain Controller and open the Server Manager.

    In the next step, you have to click Tools from the Server Manager and then click Active Directory Users and Computers.

    Active Directory Users and Computers

    After opening Active Directory Users and Computers, go to the AD container where the user is. Now you need to right-click on the user and click Reset Password.

    how to reset password from active directory

    In this field, you must type the password in the New password field. Then type the same password in the password confirmation field. To not force the user to change the password when they log in, the box next to “User must change the password on the next login” must be unchecked. To unlock a locked account, you should check the unlock the user’s account box.
    Finally, click on OK.

    how to Change Password on RDP 2016

    How to Change RDP 2016 password through the control panel

    First, type “user accounts” in the search field from the Start menu of your Windows server. Then click on it.

    user accounts

    After opening the User Accounts window, click on the Manage another account option as shown below.

    manage another account on windows server

    Note: This operation must be done with users who have admin access.

    On the opened page, the list of users on your server can be seen. By default, the Administrator user is the entire server with full access.

    Please click on the desired username.

    change rdp password using control panel

    After selecting the desired user in the open window, click on Change the password.

    how to change rdp password using control panel

    In the Current password field, enter the current server password. Then you must consider a new server password in the New Password section. Enter the new password again in the Confirm new password field.

    Finally, click on Change password.

    tutorial-change-rdp-2016-password-using-control-panel-8

    Now the password of RDP 2016 has changed and you can use your new password in the subsequent logins. Be sure to use strong passwords and change your password at short intervals.

    Second method: Changing the password in RDP 2016 through server settings

    First, log in to the server directly or using Remote Desktop before starting.

    Changing the password in RDP 2016 through server settings

    Then press the Windows key+i or enter the settings section through the Windows menu.

    windows setting

    Go to the Accounts section and open the Sign-in options.

    account sign-in for windows

    Then go to the Password section and click on Change.

    change password on rdp

    Now enter the current password and click Next.

    insert new password on rdp

    Then enter and confirm the new password.

    rdp password

    The password has now been successfully changed.

    Conclusion

    As we mentioned above, this article was prepared to teach you how to change the password on RDP 2016 using two methods. Password and authentication are some of the most critical issues for the security of your system. So after purchasing an Admin RDP, it is better to change the account password and make your server more secure. If you have any other questions or ideas please share.

  • How to Install and Setup Mikrotik on Dedicated Server

    How to Install and Setup Mikrotik on Dedicated Server

    MikroTik is a Linux-based operating system known as MikroTik RouterOS, and by installing it on the dedicated RouterBOARD hardware, it turns the hardware into a network router. Mikrotik works as a firewall, private network (VPN) server, and client, forming and enhancing the quality of broadband services, use as an access point, and other features in wireless networks. After reading this post you will learn How to Install and Setup Mikrotik on Dedicated Server. Therefore, we recommend you stay with us until the end of this post.

    Tutorial Install and Setup Mikrotik on Dedicated Server

    In this section, we will give you a complete guide to show how you can install Mikrotik on your dedicated server. So study carefully.

    Mikrotik Features

    • Support Second Layer Forwarding
    • Support OSPF and BGP and VPLS/MPLS Routing Protocols
    • Powerful firewall up to the seventh layer
    • WEP, WPA, and WPA2 encryption
    • Multiple Tunneling Protocols such as OpenVPN, PPTP, PPPoE, and L2TP
    • IPv4 and IPv6 support
    • Email and SMS tools
    • Bandwidth Test
    • CALEA Data Mirroring
    • File Fetch tool
    • TFTP server
    • RADIUS and NTP client and server

    Install Mikrotik on Dedicated Server

    Before starting the Install Mikrotik on Dedicated Server training, we recommend you choose and buy the Cheap Dedicated Server plans provided on our website and enjoy its high quality. The first step should be to use SSH in order to connect to a server.

    Then, refer to the software section on the official Mikrotik website. Note to download the stable distribution version or the long-term one.

    As your next step, you should open cloud hosted router and copy the related link to download the raw disk image:

    Install Mikrotik on Dedicated Server

    As you entered the server console, run the command below to download the row image to your server:

    wget https://download.mikrotik.com/routeros/7.5/chr-7.5.img.zip

    Use the following command to install the unzip tool on the server:

    yum install unzip

    Now use the command below to unzip the installation image:

    unzip chr-7.5.img.zip

    Note that the installation file name above which is unzip chr-7.5.img.zip may be different, so check your file name using the below command:

    ls - her 

    As a result, you will see the list of necessary files:

    list of necessary installation files on server

    Apply the following command if you want to find out the name of the server disk that you should install routerOS:

    fdisk -l

    In order to write the previously unzipped installation image, to the /dev/vda disk, use the command below:

    dd if=chr-7.5.img of=/dev/vda bs=4M oflag=sync

    Here, we will use an unusual way to restart the server (for example, when the disk is not available). Run the necessary commands on the server console :

    echo 1 > /proc/sys/kernel/sysrq
    echo b > /proc/sysrq-trigger

    As you finished this part, no longer you can access the server via SSH.

    Setup Mikrotik on Dedicated Server

    If you want to connect to the routerOS like using SSH, win box, or web access, you should setup the network interface on the server. For this reason, use VNC to connect to the server from your personal account.

    As you encounter the login prompt enter admin.

    VNC connection

    Press Enter, as you asked to insert the password. Then, RouterOS will ask you to introduce yourself with the license and request to change your password. So enter your new password and confirm that:

    change password on routerOS - Install and Setup Mikrotik on Dedicated Server

    In the vmmanager server control panel you can find the IP address, mask, and gateway of the server. So, highlight the server and click on the IP Addresses button. Then, enter the command to configure the IP address in the RouterOS console:

    IP address adds address=xxx.xxx.xxx.xxx/24 interface=ether1

    Tip: xxx.xxx.xxx.xxx is the IP address of your server.

    Now, the following is the gateway configuration command:

    ip route add gateway=yyy.yyy.yyy.yyy

    Tip: yyy.yyy.yyy.yyy is your server gateway:

    setup server gateway on routerOS - Install and Setup Mikrotik on Dedicated Server

    In the end, in order to enter the RouterOS settings, use the link in your browser:

    http://хх.хх.хх.хх/webfig/

    Note: The link is your IP address:

    Conclusion

    At the beginning of the article, Mikrotik was introduced and its features were mentioned. You can install Mikrotik on a dedicated server with the help of our step-by-step tutorial.

    FAQ

    Is Mikrotik a Linux base operating system?

    Yes, Mikrotik is a stand-alone operating system based on Linux.

    Do we need to have a license for Mikrotik?

    Mikrotik devices come preinstalled and they have a license. There is no need to pay any money.

  • Tutorial how to install Cowsay Linux Command

    Tutorial how to install Cowsay Linux Command

    Cowsay is a program that can generate ASCII art pictures of a cow with a message. Also generate images using pre-made images of other animals, such as Tux the Penguin, the mascot of Linux. You can fully learn how to install Cowsay Linux Command after reading this article. Therefore, we suggest you to stay with us until the end.

    Introduction to Cowsay

    Cowsay is written in Perl. It also includes programs called Cow Thinking where cows have thought bubbles instead of speech bubbles. There are .cow files for Cowsay, which are able to generate different types of “cows”, with different types of “eyes”, etc. Used in IRC, desktop screenshots, and software documentation, this is more or less a term in hacker culture. If you want to prevent interpolation, you should reduplicate any backslashes.. Also, at-signs (”@”) must be backslashed because that is what Perl 5 expects.

    Cowsay Features

    Cowsay has the ability to show a customizable massage through a Cow image. It comes with various options to help to customize the Cow image and speech bubble and let the user use different types of speech bubbles like a Cow head, a speech bubble with a border, or a Think bubble. It provides quick information and debug information.

    Installing Cowsay Linux Command

    Before starting the installation process, we suggest that if you have not yet purchased a VPS server or if you are dissatisfied with its quality, purchase and use the Linux VPS server plans provided on our website.

    You can install cowsay using the following command:

    sudo dnf install cowsay

    After running the command, call it with cowsay and then your message:

    fortune | cowsay

    Cowsay has been shipped with a few changes to the name cow files, which are usually found in /usr/share/cowsay. Use the -l flag after cowsay to see the cow file options available on the system. Also use the -f flag:

    cowsay -f dragon "Run for cover, I feel a sneeze coming on."

    As you installed Cowsay, when you run a playbook you will get your output from a series of cows. For example, run the playbook using the following command:

    - hosts:
        - localhost
      tasks:
        - action: ping

    After executing the command of the playbook, the following items will be displayed to you:

    ansible-playbook playbook.yml

    Cowsay is accessible under the GPLv3 license and you can find the Perl source code on GitHub. There are also versions floating in other languages, see the rest of the sections for other variants. There is one in R, for example. Implementing a version in your language of choice might even be a fun thing to learn programming.

    Conclusion

    We have explained the steps required for installation in order. When working with Linux, playing with Cowsay is an option. This tool also allows you to create different exploratory art and define which message and state of mind they should convey. In this article, you learned how to install Cowsay Linux Command. We hope you find this article useful. You can Share your comments with us via the form below.

    FAQ

    Are there any additional packages for Cowsay?

    No, it doesn’t have any additional dependencies.

  • Tutorial Encrypt and Decrypt with PGP on Ubuntu 20.04

    Tutorial Encrypt and Decrypt with PGP on Ubuntu 20.04

    PGP is used to encrypt and decrypt data. Methods such as hashing, public key encryption, and data compression are used in PGP encryption. In the continuation of this comprehensive article, you will learn how to Encrypt and Decrypt with PGP on Ubuntu 20.04. Therefore, we recommend that you stay with us until the end.

    Introduction to PGP

    GPG or GnuPG, which is a free PGP-based signature and encryption software, uses it to export and import public and private keys, and to encrypt and decrypt data. GPG key pairs include two types of keys: private and public keys. Use the public key to encrypt the data, and the encrypted data will be decrypted using the recipient’s secret or private key.

    Prerequisites

    The process of encrypting and decrypting files with PGP involves a few simple steps. First, the sender must issue your public key and send it to the recipient. Second, the receiver enters the public key into its key. The recipient can then encrypt any file using the sender’s public key. Also, the recipient decrypts the shared file using his private key.

    To start at the beginning Create two pairs of GPG keys for the purpose of display for two people in two separate systems (Linda and Dominique). Now, issue the public key and then enter it into another system.

    We also recommend you use Linux VPS server plans available on our website to Encrypt and Decrypt with PGP on Ubuntu 20.04.

    Encrypt and Decrypt with PGP on Ubuntu 20.04

    How to Export Public Key with GPG

    Before sending your public key to a reporter, you must first issue it using the GPG command. In the GPG command, an additional argument is specified to identify the public key that will be the user ID, and the “-a” or “-armor” option is added to generate the output of the export file in ASCII format. In the “GPG” command. To export a specific public key, first list the GPG keys generated on the system and select the key you want to export.

    To do this, use the following “GPG” command:

    gpg --list-keys

    For example, to issue the public key “Linda“, note the “uid” user ID from the list:

    How to Export Public key with GPG

    Now add the “-export” option to the GPG command to export the “Linda” public key. Here, the “-a” option is used to create an ASCII display of the public key, and the redirect operator “>” is used to redirect the output of the GPG command to the “public.key” file:

    gpg --export -a Linda > public.key

    The “.key” extension indicates that there is encrypted content inside the specified file.

    If the output is error-free, it declares that the “public.key” file is ready for export. To check its content, run the following “cat” command:

    cat public.key

    “public.key” saves the ASCII display of Linda’s public key as follows:

    How to export public key with GPG

    #####

    How to export public key with GPG

    In this step, you created the “public.key” file that contains the ASCII display of the public key “Linda”. Now, share the file with another system user so that the “new user” can enter the GPG key into their key.

    How to Enter a Public Key with GPG

    With the GPG command, inserting a public key into a key is simply exporting them. Decrypt incoming encrypted files, documents, or emails by entering the sender’s public key. Before entering “public.key”, list the keys in the new user key:

    gpg --list-keys

    “Neuronvm” now has a pair of GPG keys for “Dominique” uid, which can be seen in the following output:

    How to Export Public key with GPG

    To enter Linda’s “public.key”, run the “gpg” command with the “import” option:

    gpg --import public.key

    The following output indicates that the public key “Linda” has been entered correctly:

    Encrypt and Decrypt with PGP on Ubuntu

    List the “Neuronvm” public key to confirm the specified operation:

    gpg --list-public-keys

    The successfully entered Linda public key can be seen in the image below:

    How to enter a public key with GPG

    How to Edit the key trust Value with GPG

    After entering Linda’s public key into the “Neuronvm” key, enter the amount of trust that is unknown at this point:

    gpg --list-keys

    How to Editing the key trust Value with GPG

    Enter the following GPG command to edit Linda’s public key trust value:

    gpg --edit-key linda public.key

    How to editing the key trust value with GPG

    Type “trust” and hit “Enter” to check the trust menu options:

    gpg> trust

    Then enter “5” to make sure you “finally” trust Linda’s public key:

    Encrypt and Decrypt with PGP on Ubuntu

    Exit GPG edit by typing “quit” and pressing “Enter“:

    gpg> quit

    How to edit the key trust value with GPG

    Now list the “gpg” keys again and check the trust value of the “linda” key:

    gpg --list-keys

    How to editing the key trust value with GPG

    How To Encrypt Files with GPG 

    In the “Neuronvm” system there is a file called “encryptfile1.txt” which is encrypted with the public gpg key of Linda. Before moving on to the encryption procedure, check the content in the specified file:

    How To encrypt file with GPG 

    To encrypt a file using the gpg command, enter the following command:

    gpg -e -u [Sender_uid] -r [Receiver_uid] [Filename]

    The “-u” option is now used to specify the sender uid and the “-r” option for the receiver. The secret key of the sender and the public key of the receiver is used to encrypt the file. Now enter the following command to encrypt “encryptfile1.txt” with the individual secret key and Linda’s public key:

    gpg -e -u Dominique-r linda encryptfile1.txt

    How To encrypt file with GPG 

    If the output is error-free, it means that an encrypted file has been successfully registered. To confirm this step, browse the contents of the current directory:

    ls

    The following output indicates that “encrypt file1.txt.gpg” was created for the file of your choice:

    Encrypt and Decrypt with PGP on Ubuntu

    Check the contents of “encryptfile1.txt.gpg” by running the “cat” command:

    cat encryptfile1.txt.gpg

    The encrypted content “encryptfile1.txt.gpg” in the terminal is shown as follows:

    How To encrypt file with GPG 

    Share the encrypted file with the recipient via email or another method.

    How To Decrypt Files with GPG

    The “-d” option is added to the “gpg” command to decrypt the encrypted file. Share “encryptfile1.txt.gpg” with the “Neuronvm” user who owns the Linda GPG key pair. Now to decrypt the received file, type the following command:

    gpg -d encryptfile1.txt.gpg

    Decrypt Files with GPG

    You are prompted to enter “Passphrase” to unlock Linda’s secret key. Enter the password in the input field and click the “OK” button:

    Encrypt and Decrypt with PGP on Ubuntu

    After entering the correct password, the specified file is decrypted and its contents are displayed in the terminal as follows:

    Encrypt and Decrypt with PGP on Ubuntu

    Conclusion

    PGP encryption is used by companies to exchange data such as files, documents, and emails over the Internet. Also, Protects important information from being misused through email attacks. Public and private GPG keys are used to encrypt and decrypt files. Without the GPG key, no one can decrypt the data. In this tutorial, you learned how to encrypt and decrypt with PGP on Ubuntu 20.04. We hope you find this tutorial useful. Share your comments with us via the form below.

    FAQ

    How many keys are needed in the PGP encryption and decryption process?

    There should be two different keys for encrypting and decrypting each file, and also, two more keys to sign and verify each file.

    Is it possible to break PGP encryption?

    It is almost impossible to hack or break PGP encryption.

  • Tutorial Install and Access Plex Media Server on Debian 11

    Tutorial Install and Access Plex Media Server on Debian 11

    Plex is a free media server that lets you organize your music, videos, and TV shows into a user interface. The purpose of this tutorial is to teach you How to Install and Access Plex Media Server on Debian 11. Therefore, we recommend you stay with us until the end of this article.

    Introduction to Plex Media

    Plex is versatile; media can be accessed and shared using a client app such as a mobile app, Roku, etc. Plex Media runs on a variety of platforms that may run on a single desktop computer. The most obvious examples are Windows and Mac. It should be noted that Plex also supports Linux, FreeBSD, and several NAS platforms. You’ll find Plex apps for most platforms and smart TV boxes like Apple TV, Chromecast, and Fire TV, as well as consoles like Xbox One and PlayStation 4.

    Features of Plex Media

    – Supports cloud sync and encrypted connections with multiple accounts.

    – You can also easily select and share what you want.

    – It has a media optimizer and supports video streaming from one device to another.

    – It supports voice fingerprinting and automatic photo tagging and encrypted connections with multiple accounts.

    Prerequisites 

    – A Linux VPS with Debian OS

    – Update Debian packages to the latest version

    How to Install Plex Media Server on Debian 11

    First, before starting the installation process, update the Debian package using the following command:

    sudo apt update
    sudo apt upgrade -y

    Also, install the required packages with the help of the following command:

    sudo apt install apt-transport-https curl vim wget -y

    Plex Repository on Debian 11

    The available repository provides Plex packages. To install Plex on Debian 11, add the repository to your system. Add the Plex repository using the following command:

    echo "deb https://downloads.plex.tv/repo/deb public main" | sudo tee /etc/apt/sources.list.d/plexmediaserver.list

    Enter the required GPG keys for the repository using the following command:

    curl https://downloads.plex.tv/plex-keys/PlexSign.key | sudo apt-key add -

    Installing Plex Media Server on Debian 11

    After the repository is added, continue the steps in order and install the latest version of Plex on Debian 11 and also update the APT package list using the following command:

    sudo apt update

    Now create the added Plex repository and then install the Plex media server using the following command:

    sudo apt install plexmediaserver

    After finishing the installation process, the Plex service will start automatically. Verify the item using the command:

    systemctl status plexmediaserver

    Use the following command to get started:

    sudo systemctl start plexmediaserver

    Now enable the service to run automatically at system boot using the following command:

    sudo systemctl enable plexmediaserver

    How to Configure the Apache Reverse Proxy for Plex

    Now, the Plex dashboard can be accessed using the URL http://localhost:32400/web. Configure a reverse proxy to access Plex remotely. Also, secure it with HTTPS. Install the Apache web server on Debian, Debian 11 with the following command:

    sudo apt install apache2 -y

    After you finish installing Apache, create a virtual host file for Plex:

    sudo vim /etc/apache2/sites-available/plex.conf

    In the desired file, add the following commands:

    <VirtualHost *:80>
    ServerName plex.neuronvm.com
    ErrorDocument 404 /404.html
    
    #HTTP proxy
    ProxyPreserveHost On
    ProxyPass / http://localhost:32400/
    ProxyPassReverse / http://localhost:32400/
    
    #Websocket proxy
    <Location /:/websockets/notifications>
    ProxyPass wss://localhost:32400/:/websockets/notifications
    ProxyPassReverse wss://localhost:32400/:/websockets/notifications
    </Location>
    </VirtualHost>

    Now save the file, then activate the site and proxy module using the following command:

    sudo a2enmod proxy_http
    sudo a2enmod rewrite
    sudo a2ensite plex.conf

    Move the Assumption Apache Conf to a backup file using the following command:

    sudo mv /etc/apache2/sites-enabled/000-default.conf /etc/apache2/sites-enabled/000-default.conf.bak

    Now restart Apache using the following command:

    sudo systemctl restart apache2

    How to Access Plex Web UI on Debian 11

    You can also access the plex at this stage using the URL http://IP_address/web or http://domain_name/web:

    Install-and-Configure-Plex-Media-Server-on-Debian

    Login to Plex using the preferred methods then go to the page that explains what Plex is and how it works:

    How Plex Works

    Now configure Plex as follows, starting by setting the server name:

    Install-and-Configure-Plex-Media-Server-on-Debian

    Now launch the media library. This step allows you to add media lists if you have already imported them. Click on Add Library and proceed as follows:

    Install and Access Plex Media Server on Debian

    Select the Library type, then search for media in your local storage and add it:

    Install and Access Plex Media Server on Debian

    With the media library configured, proceed to the next step and finish setting up the server:

    plex server setup

    The Plex dashboard will now be displayed as below:

    Install and Access Plex Media Server on Debian

    Go ahead and watch live TV, movies, podcasts, and listen to music. For example, while watching live TV, you have to select the live TV channel from the list provided:

    Access Plex Web UI

    Now click More to view the local storage files and your media server will appear with the libraries added. Also, more libraries can be added here:

    Access Plex Web UI

    Then add settings like language, interface, plugins, etc. for Plex in the settings tab:

    Setup a Plex Client

    How to Setup a Plex Client on Debian 11

    Plex client can be installed on multiple platforms such as Android, Mac, Apple TV, Windows, etc. Client applications are provided on the Plex Applications page. Also, using an Android client, you can play media libraries. Added view of watched channels in your account. You can now sign in to your Plex account. Now choose how to sign in to your Plex account as below:

    sign up plex

    Select how to sign in to your Plex account as shown in the image:

    sign up plex-2

    Now if you have more than one Plex server, go ahead and select the server you want to connect to:

    Setup a Plex Client

    Now optimize the navigation in the Plex client, then go to the Plex dashboard as below:

    Setup a Plex Client

    Also in the More section, you can view media from the Plex server media library as below:

    Setup a Plex Client

    Conclusion

    With the Plex media server running on Debian 11, you can easily store digital media like music, video, photos, etc., and access them anywhere on the Internet. In this article, you learned how to Install and Access Plex Media Server on Debian 11. We hope this educational article was useful for you. Share your comments with us through the form below.

    FAQ

    Which one is better; Plex or Netflix?

    Netflix is produced to manage TV shows and movies and is not a free app, plex puts you in charge of finding all the stuff to watch. The exception is just ad-supported content.

    What is Plex used for?

    It is software that is used to store, locate and access all of your media in one place.

  • What is VMware?

    What is VMware?

    VMware is a virtualization software vendor based in Palo Alto, California, founded in 1998 and now a subsidiary of Dell Technologies. Also, bases its virtualization technologies on the ESX/ESXi metal hypervisor in the x86 architecture. In this comprehensive article, we will explain to you what is VMware. 

    A Brief Explanation of VMware

    VMware products now include virtualization, network and security management tools, data center software, and storage software, and VMware vSphere is a server virtualization platform for implementing and managing large-scale VM infrastructures. Desktop products include VMware Workstation, VMware Fusion, and VMware Player.

    VMware’s server software line includes VMware ESX Server, VMware ESXi Server, and VMware Server. Since 2004, VMware has been working as a partner of SUSE Alliance, and supporters the Linux system in VMware software, and supports Linux on VMware software, on-premises, or in the cloud. Also, apart from providing a reliable data center virtualization solution, SUSE, and VMware have partnered to provide cloud solutions for both private and public clouds. SUSE Linux Enterprise Server is currently certified and supported on the latest version of vSphere.

    You can visit the Windows VPS server plans offered on our website and then run VMware on it.

    Introduction of VMware products

    Currently, VMware products include virtualization, network and security management tools, data center software, and storage software.

    Cloud infrastructure and Data Center

    VMware vSphere is VMware’s suite of virtualization products, known as VMware Infrastructure before 2009, and includes:

    – ESXi

    – vCenter Server

    – vSphere Client

    – vMotion

    vSphere is available in three versions: Standard, Enterprise Plus, and Platinum. In addition, there are two three-server kits for small and medium businesses called vSphere Essentials and Essentials Plus. Also with VMware Cloud on AWS, customers can run a cluster of vSphere hosts with vSAN and NSX in an Amazon data center and manage their workloads with VMware’s famous tools and skills.

    Introduction to Network and Security Tools

    In the rest of the article, we will introduce VMware tools.

    VMware NSX

    It provides virtual networking and security software and was created when VMware acquired Nicera in 2012. NSX allows the administrator to virtualize network components. It also enables them to develop, extend, and configure virtual networks and switches through software rather than hardware.

    In this network, a software layer is placed on top of the hypervisor to allow the administrator to divide a physical network into several virtual networks. With the latest version of this product, the NSX-T data center, network virtualization can be added to both ESXi and KVM as hypervisors and bare-metal servers, and containerized workloads can be virtualized and protected in a Kubernetes cluster.

    The NSX-T data center now offers network performance virtualization, which enables functions such as firewalls, load balancers, and VPNs to be implemented within the virtualization software stack.

    VMware vRealize Network Insight

    VMware vRealize Network Insight is a network operations management tool that enables admins to schedule micro-partitioning and monitor the health of VMware NSX. VRealize Network Insight also relies on technology from VMware’s 2016 acquisition of Arkin. VRealize Network Insight collects information from NSX Manager and displays errors in its user interface to help troubleshoot an NSX environment.

    Understanding the SDDC platform

    VMware Cloud Foundation

    It is an integrated software stack that brings together vSphere, VMware vSAN, and VMware NSX into a single platform through SDDC Manager, and an administrator can deploy the software package on-premise as a private cloud or as a service in a public cloud. Run, the administrator can also instantly provision an application for network or storage.

    Storage and availability Training

    VMware vSAN

    It is now a software-based storage feature built into the ESXi hypervisor and integrated with vSphere that aggregates disk space from multiple ESXi hosts and allocates it through intelligent policies, such as protection limits, thin provisioning, and clean-up coding. It also combined with vSphere High Availability to increase compute and storage availability.

    VMware Site Recovery Manager (SRM)

    A disaster recovery management product that allows administrators to create recovery plans that run automatically in the event of a disaster and allows administrators to automatically configure failover and failback of virtual machines, as well as SRM with NSX Integrated to protect network and security policies on migrated VMs.

    VMware vCloud NFV

    Network functions virtualization platform that allows a service provider to run network functions as virtualized applications from different vendors. It also offers the benefits of virtualization and the cloud for a communications service provider that previously relied on hardware.

    Getting to Know the Cloud Management Platform

    vRealize Suite

    There is now a group of software that allows users to create and manage hybrid clouds, and the vRealize suite includes vRealize Operations for monitoring, vRealize Log Insight for centralized logging, vRealize Automation for data center automation, and vRealize Business for Cloud for management. It is a cost.

    VMware Tanzu

    VMware Tanzu allows customers to build containerized applications, run enterprise Kubernetes, and manage Kubernetes for developers and IT. Also, with the help of the software package, an administrator can deploy and manage VMs on multiple hypervisors or cloud platforms from a single management console.

    Introduction of Virtual Desktop Infrastructure

    VMware Horizon

    Here, VMware Horizon allows organizations to run Windows desktops in the data center or in the VMware Cloud on AWS, eliminating the need to place and manage entire desktops in the workplace, as well as management and security for the environment. Centralizes the user and integrates with VMware App Volume and Dynamic Environment Manager products for application delivery and Windows desktop management.

    Organizational Mobility and digital workspace Management Departments

    Workspace ONE

    The Workspace ONE suite includes VMware AirWatch, Horizon Air, and Identity Manager, which allow administrators to manage mobile devices and cloud-hosted virtual desktops and applications from a single management platform. Cloud or on-premise control.

    Identity Manager

    It enables SSO access to any application from any device based on established policies and is an identity-as-a-service product that provides single sign-on (SSO) capabilities for web, cloud, and mobile applications.

    VMware AirWatch

    VMware AirWatch is also an enterprise mobility management (EMM) software platform, where administrators are empowered to deploy and manage mobile devices, applications, and data.

    Personal Desktop

    VMware Workstation

    It is the first product offered by a software company that allows users to create and run on a Windows or Linux desktop or laptop, and VMs run concurrently with the physical machine. In fact, each virtual machine runs its own operating system such as Windows or Linux, and this allows users to simultaneously run Windows on a Linux machine with the native operating system installed, or vice versa.

    VMware Fusion

    Currently, VMware Fusion is software like VMware Workstation that virtualizes Windows or Linux operating systems on Mac computers.

    Advantages and necessity of using VMware Products

    – Better provision of applications and resources and simple data center management

    – Increasing efficiency along with the agility of data center systems

    – Security based on a zero-trust model and more secure than container systems like Kubernetes

    Disadvantages of VMware Products

    – Suitability of Hyper-V and Xen Hypervisor alternatives and high licensing costs

    – Lack of support and  the existence of various bugs when used alongside Oracle products and hardware compatibility issues

    Introducing Alternative Virtual Machines

    Other VMware vSphere hypervisors

    – Linux KVM

    – Microsoft Hyper-V

    – Red Hat Virtualization

    – Proxmox VE

    – Virtuozzo

    – Citrix XenServer

    – Oracle VM server

    VMware Workstation alternatives for Personal Desktop use

    – VirtualBox

    – QEMU

    – bhyve

    – Parallels

    Introducing the top 27 tools for VMware Administrators

    As-Built Report

    As Built Report is an open-source configuration documentation framework that generates and builds documents in XML, Text, HTML, and MS Word formats using Windows PowerShell and PScribo. It is also used to easily run and generate reports against the IT environment, allowing contributors to easily create new reports for any vendor and IT technology with RESTful API and/or Windows PowerShell support.

    As-Built Report - vcenter server

    Cross vCenter Workload Migration Utility

    It is now a tool to easily move virtual machines between vCenter Servers through the Cross-vCenter vMotion feature using a GUI. Also automatically fills this inventory for ease of management and enables batch migration of multiple virtual machines in parallel. It then implements a REST API to automate migration tasks.

    Cross vCenter Workload Migration Utility

    ESXTOP

    A powerful command-line tool is included with vSphere to help administrators identify and fix performance issues in real-time, and then provide information about the resource management of the vSphere environment with details on disk, CPU, network, and memory usage. Displays real-time.

    ESXTOP

    Vmware Git

    Git is an open-source version control system created by Linux developer Mr. Linus Torvalds in 2005. In fact, this system has thousands of contributors, a large community base for support, and is also compatible with several IDEs and operating systems, including VMware.

    HCI Bench

    Here, HCI Bench aims to accelerate customer POC performance testing through a controlled and consistent method by fully automating the end-to-end process of setting up test virtual machines, setting workloads, collecting test results, and collecting valuable data for troubleshooting. Also, the Hyperconverged Infrastructure Benchmark, defined as HCI Bench, is an automated wrapper for the open-source VDbench benchmark tool that simplifies automated testing on HCI clusters.

    Hyper

    A cross-platform, customizable, open-source terminal program built on modern web standards and aiming to be the simplest and most powerful of its kind.

    Hyper-Linux-Terminal-App-4

    IOInsight

    It is a virtual appliance that comes with VMware. Allows users to understand the storage I/O behavior of their virtual machine. It also has a web-based user interface through which users can select a VMDK to monitor and display the results to make better choices about tuning performance and storage capacity.

    VMware-IOInsight-Tool

    Linux VSM

    There is now an improved port of Linux Software Manager for VMware, which allows users to log into My VMware and access download information, then view the subsets of downloads that VSM allows. Also, Linux VSM is designed to be smarter than the version of VSM for macOS and Linux, for example, instead of breaking operations, it also ignores missing files.

    vRealize Log Insight

    A virtual tool that administrators can use to view, manage, and analyze Syslog data, and then gain the ability to troubleshoot vSphere and perform compliance and security checks.

    vRealize Log Insight

    mRemoteNG

    Remote Connection Manager is a multi-protocol and tabbed resource created as a fork of mRemote with new features and bug fixes. In fact, the software supports Virtual Network Computing (VNC), SSH, rlogin, HTTP[S], Citrix Independent Computing Architecture (ICA), and Remote Desktop/Terminal Server (RDP).

    mRemoteNG

    pgAdmin

    It is one of the most popular feature-rich tools for managing PostgreSQL and its derivative databases. One of its most important features is its availability of Windows, macOS, and Linux extensive online documentation. It also has a powerful search tool for syntax highlighting, multiple deployment models, and support for most PostgreSQL server-side encryptions, among other features of pgAdmin.

    pgAdmin

    Pocli

    It is a Python-based tool that provides a lightweight command-line client for ownCloud for basic file operations such as uploading, downloading, and directory management. Pocli was also motivated by the lack of a tool to quickly upload or download files on computers without The GUI working.

    Postman

    In fact, Postman is free for individuals and small teams but also offers monthly subscriptions with advanced features for teams of up to 50 users and enterprise solutions. Currently, the HTTP client is very suitable for testing web services and was created to simplify the process of developing, testing, and documenting APIs by allowing users to create simple and complex HTTP requests quickly.

    PowerCLI

    Here this command-line tool is built on Windows PowerShell to provide more than 600 cmdlets to manage not only vSphere and VMware but also vCloud, vSAN, VMware Site Recovery Manager, NSX-T, VMware HCX, and more. It is also a powerful program for automating and managing VMware vSphere settings and is able to work with any VMware product.

    PowerCLI

    RVTools

    With over a million downloads, RVTools excels at displaying information about your virtual environment’s CD drive, snapshots, ESX hosts, VM cores, data stores, health checks, license information, resources, and more. Use it to update. It is actually a .NET application that uses the VI SDK to display critical data about your virtual environments and is compatible with several technologies including VirtualCenter Appliance, ESX Server 4i, ESX Server 4.x, ESX Server 3i, VirtualCenter 2.5 It interacts. You can also update your VMTools to the latest version. It is free to download and use after subscribing to the Veeam mailing list, which provides subscribers with excellent VMware product offerings.

    RVTools

    vCenter Converter

    It is one of the tools to convert local and remote physical machines to virtual machines without any downtime and also has a centralized console to manage multiple simultaneous conversions both locally and remotely.

    vCheck

    vCheck is actually an HTML framework script designed to work with PowerShell to schedule automated tasks to send you the information in a readable format via email. If there is enough space, you will not get any information about the storage disk space. It is now a smart script and sends you vital information. It also removes unnecessary details.

    vCheck

    vDocumentation

    vDocumentation, maintained by Ariel and Edgar Sanchez, provides a set of PowerCLI scripts created by the PowerShell community to give users with infrastructure documentation of vSphere environments in CSV or Excel formats.

    vDocumentation

    VMware API Explorer

    This platform helps you browse, search, and inspect APIs on every major VMware platform except vRealize, NSX, vCloud Suite, and vSphere. Also use the explorer for easy access to SDKs and code samples, among other resources, specific to selected APIs.

    VMware Capacity Planner

    The tool allows managers to analyze, predict and plan the required capacity of their virtual desktop environment or data centers.

    VMware Health Analyzer

    This tool helps evaluate VMware environments based on standard practices. It is also used by VMware partners and solution providers. Currently available only to customers with access to Partner Central and VMware employees.

    VMware OS Optimization Tool

    Its top features include customizable templates across multiple systems that you can use to optimize VMware OS, manage templates, optimize history and rollback, and perform remote and local analytics. Currently, this is a VMware operating system optimization tool that allows administrators to optimize Windows 7 to 10 systems for use with VMware Horizon View.

    VMware OS Optimization Tool - what is VMware

    VMware Project Onyx

    Project Onyx monitors the network communication between vSphere Client and vCenter Server and translates it into executable PowerShell code that can be turned into a reusable script or function. It’s also a tool for generating code based on mouse clicks made in the vSphere client and aims to make it easy to visualize what’s going on under the hood to speed up script development.

    VMware Skyline

    It has automated support technology that aims to improve the overall reliability of VMware environments and increase team productivity by helping customers avoid potential problems.

    VMware vRealize Orchestrator

    The tool has an extensive library of plugins on the VMware Solution Exchange for third-party solutions and extends its features. Currently one of the most potent VMware management tools, it allows users to create workflows that automate multiple daily tasks using a drag-and-drop graphical interface.

    WinSSHterm

    A production-ready SSH client tool for Windows combines WinSCP, PuTTY/KiTTY, and VcXsrv into one tabbed solution. It also features the use of a master password, template variables, eye-friendly terminal colors, and keyboard shortcuts.

    WinSSHterm - what is VMware

    Runecast

    This tool empowers users to perform proactive troubleshooting, analyze specific patterns in reports, and implement VMware SDDC best practices without sacrificing speed and simplicity. In fact, Runecast is the real-time security and compliance analyzer for BSI security audits.

    WinSSHterm - what is VMware

    Conclusion

    VMware is known as a cloud operating system or a virtual data center platform. It also enables IT departments to place application workloads on the most cost-effective computing resources available. It offers applications for desktops as well as servers and VMware desktop software with Linux, Microsoft Windows, and Mac. OS X is compatible. In this educational article, you learned What is VMware? Also got acquainted with many of its tools. We hope this educational article was useful for you. Share your comments with us through the form below.

    FAQ

    Can we use WMvare for free?

    Yes, you can use the free version for non-commercial, personal, and home usage.