Author: Linda Evanty

  • What is RedHat?

    What is RedHat?

    RedHat is a software company that combines open-source Linux operating system components with related applications into distribution packages that customers order. In this comprehensive article, we will tell you what is RedHat and introduce you to it completely.

    Introduction To RedHat and its products

    RedHat offers open-source software used by DevOps engineers and businesses, including operating system platforms, storage, middleware, and management products, as well as training, support, and consulting services. Dell, IBM, and Oracle also support the RedHat platform and open-source application community.

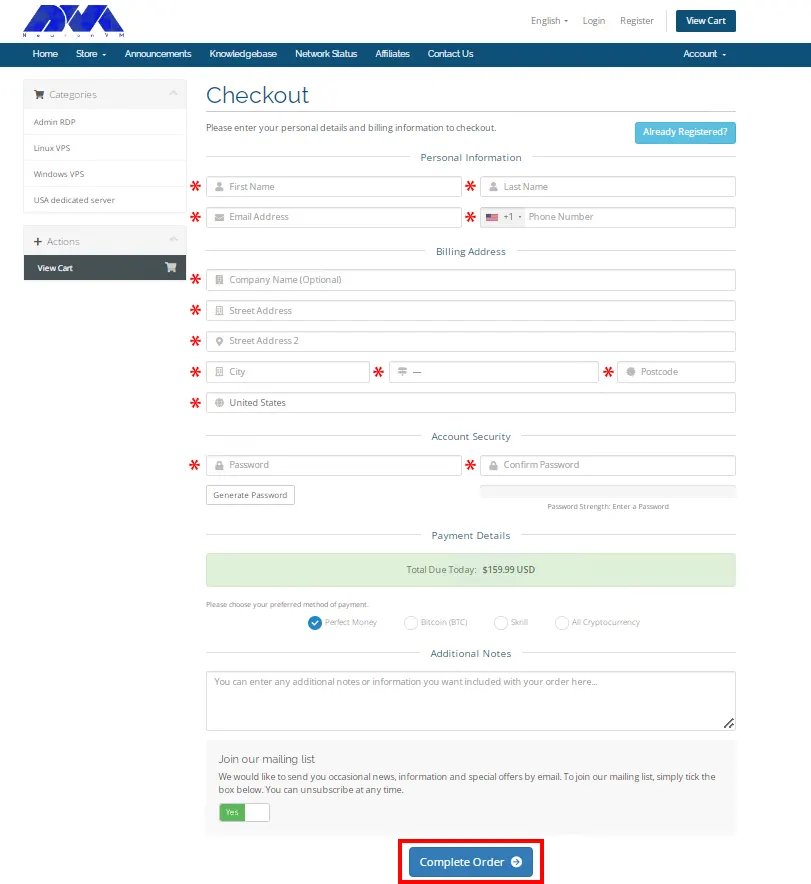
    Note that to order a Linux VPS server, you can visit NeuronVM’s popular and cheap plans.

    a- RedHat Linux open-source products include, but are not limited to:

    b- RedHat Package Manager (RPM) program for installing, removing, and managing software in Linux.

    c- RedHat Ansible is an open-source IT configuration management (CM) developer tool and IT automation platform.

    d- RedHat Atomic Host is a variant of RedHat Enterprise Linux optimized for hosting containerized application platforms.

    e- RedHat CloudForms is a virtual machine and container management product based on VMware, RedHat Virtualization, Microsoft Azure, OpenStack, AWS EC2, Google Cloud, and RedHat OpenShift.

    f- RedHat Enterprise Linux (RHEL) is a Linux operating system distribution developed for the commercial market that provides centralized certificate management and cloud security updates.

    g- RedHat’s OpenShift Container Platform is a cloud computing and microservice container platform used in conjunction with Kubernetes to provide traffic and identity management, telemetry, and policy enforcement.

    h- RedHat Virtualization (RHV) is an enterprise-class virtualization platform.

    i- RedHat Enterprise Linux environments, Satellite is part of RedHat’s four-piece system management tool suite for enterprise IT, which also includes Ansible, CloudForms, and the RedHat Insights service.

    What are RedHat services?

    what is redhat

    Application services

    1- RedHat fuse

    2- RedHat Fuse Online

    3- RedHat JBoss Enterprise Application Platform (JBoss EAP)

    4- RedHat JBoss web server

    5- RedHat AMQ

    6- RedHat 3scale API Management

    7- RedHat Data Network

    8- RedHat CodeReady Studio

    9- RedHat Decision Manager

    10- RedHat Process Automation Manager

    Cloud Computing

    1- RedHat Certificate System

    2- RedHat Directory Server

    3- RedHat Quay

    Data services

    1- RedHat Gluster Storage

    2- RedHat Ceph Storage

    3- RedHat OpenShift Data Foundation

    Management

    1- RedHat Smart Management

    2- RedHat Insights

    3- RedHat Advanced Cluster Management for Kubernetes

    4- RedHat Advanced Cluster Security for Kubernetes

    RedHat Services

    1- RedHat Open Innovation Labs

    2- RedHat training and certification

    3- RedHat Consulting

    Data Services and Cloud Computing

    – RedHat Hyperconverged Infrastructure (RHHI)

    Advantages of choosing RedHat for Business

    A large number of active Internet servers are currently supported by solutions developed by RedHat. In the public mind, the North Carolina-based organization is best known for its RedHat Enterprise Linux operating system.

    Redhat Secure Design

    RedHat and RedHat Enterprise Linux are widely recognized and admired for their highly secure engineering. Currently, this Linux distribution, which runs on IBM servers, has even reached the Common Criteria certification, the highest level of security certification in the world, which is allowed for use in government organizations. There are several reasons why the RedHat products have achieved such an advanced level of security.

    Enterprise Linux does not require the use of third-party tools that can be dangerous to fix security flaws. It is also inherent in the transparency of open-source products, and the constant scrutiny they undergo from many independent parties makes it very difficult for malicious actors to create problems.

    RedHat Open APIs

    RedHat maintains a policy of providing open application programming interfaces and provides its customers with flexible tools to create the solutions they need. Open APIs also mean the freedom to build to your specifications.

    RedHat Thorough Product Testing

    RedHat has a policy of testing new hardware before entering the market. Currently, the company uses its various relationships with hardware manufacturers to ensure the performance of its products and those that have been available to consumers for years.

    RedHat Cyber ​​Security Quick Response

    Currently, the RedHat security response team is actively tracking vulnerabilities to resolve them quickly. The team also has a track record of fixing more than 98% of critical vulnerabilities within a day of discovery, and the secret to this rapid response can be attributed to RedHat’s close working relationships with its partners, cybersecurity organizations, and the larger open source community. searched.

    RedHat Legal Protection

    RedHat’s open-source assurance program provides some important legal protections to its subscribers. Under this program, RedHat agrees to replace or modify the disputed portion of the Software while enabling Customer to continue using the Software without interruption. In addition, if another party sues for the alleged infringement, the customer will be provided with an attorney at RedHat’s expense.

    RedHat Cutting-Edge Philosophy

    RedHat has all the qualities to continue striving for innovation rather than settling for stagnation. The company maintains relationships with a large circle of hardware and software vendors, as well as a number of standard-setting industry organizations, ensuring that the company can respond quickly to technology and business trends. RedHat was a founding member and sponsor of the Advanced Message Queuing Protocol (AMQP) working group, which promotes this widely accepted open messaging protocol standard.

    RedHat Scalability

    When we talk about scalability, we refer to the capacity of a platform or application to handle increased operational needs without compromising its performance. A properly scalable platform is invaluable in our fast-moving technological society. A company can also easily experience a sudden increase in activity that it does not anticipate. Unless equipped for such a contingency, the system may be affected by this increase and have potentially harmful effects on the Company’s dealings with customers and vendors. RedHat Enterprise Linux is designed to provide maximum scalability to meet the fluid operational needs of the enterprise sector.

    RedHat Support

    RedHat’s technical support team is available 24/7 to provide the help and solutions you need to keep everything running smoothly. Currently, each of their support engineers holds a RedHat Certified Engineer certification or has years of relevant industry experience. You can also get the answer you need whenever you need it. In addition, RedHat has a policy of supporting its products not only around the clock but also over a long period of time and is committed to supporting the original versions of its software for up to ten years. It also guarantees full version compatibility.

     RedHat Reasonable Cost

    Currently, RedHat software and services operate on a subscription model, and the result is that it allows the company to avoid many support costs often associated with software hardware of this type. As a RedHat Subscription customer, you will not incur licensing, upgrade, or user access fees.

    RedHat Flexible Subscription Options

    RedHat gives its customers a lot of freedom with their subscriptions, which can be easily moved from one server to another, even from a physical server to a virtual server. Subscriptions are also not tied to any specific software version, thus giving customers more options in managing their workloads.

    RedHat Effective Training Options

    Any platform or app can be more trouble than it’s worth if the user can’t effectively use the training options. Also, in our fast-paced, high-tech world, it’s important to be able to find solutions immediately.

    Conclusion

    RedHat is an innovative open-source solution that anyone dealing with proper server operating systems or cloud applications will come across RedHat sooner or later. It identifies both the American software company and Linux distributions with the same name. RedHat symbolizes RedHat’s commitment as an agent in action for open-source in the digital world. In this Tutorial, you learned What is RedHat? We hope this article was useful for you.

  • What is Colocation?

    What is Colocation?

    Colocation is a data center where a business can rent space for servers and other computing hardware. Colo also provides the building, cooling, power, bandwidth, and physical security, while the client provides the server and storage. After reading this article, you will learn What is Colocation and introduce the meaning of Colocation.

    What is Colocation?

    Colocation refers to several aspects of this type of data center. This term refers to the fact that servers and other equipment from many different companies are located in a “simultaneous” data center. This hardware is usually owned by the company itself and is simply maintained by data center staff.

    A company can also place its equipment in different locations and may have servers in three or four different data centers. This is important for companies with a large geographic footprint. They also want to make sure their computer systems are close to their physical offices.

    what is colocation

    A business may choose to colocate rather than build its own data center, but one of the main drivers is the Capex (capital expenditure) associated with building, maintaining, and updating a large data center. Colocation may be an ideal solution, but this organization can also have negative aspects, as well as distance can lead to increased travel costs, when equipment must be operated manually, colocation customers can enter into contracts. They lock in long-term which may expose them to price increases if prices fall.

    We recommend that you view our Cheap Dedicated Server plans and purchase from NeuronVM if you want to buy a dedicated server.

    Introduction to Colocation features

    Colocation providers have their way of doing things and these features vary from one colocation hosting company to another. Some of the features are:

    – Physical security and physical durability

    – Guaranteed reliability and interconnectivity

    – Extra internet connection and extra power

    – Compliance with various regulations and on-site technical support

    Benefits of Colocation

    Currently, businesses can benefit from several benefits by using sharing services. We have explained some of these benefits below:

    – Lower cost of renting space in a colocation center than building or expanding a data center

    – Possibility of using server hardware and storage according to customers’ own choice

    – It follows strict physical security protocols and protects against cyber attacks

    – Provision of technical support services by co-located facilities

    – Availability of additional data center space usually as needed

    Understanding buildings and facilities

    There are differences between colocation data centers, some of these differences are related to the way the data center is built. Others are more related to the operational efficiency of the data center. Also, a data center offers its tenants an SLA that guarantees a certain amount of availability. Data center uptime is usually expressed as:

    Row 1. Non-redundant electricity, grid connection, and cooling
    Row 2. At least some extra for cooling and power
    Row 3. Resistance to 72-hour power outages
    Row 4. Resistance to 96-hour power outages

    Currently, data centers typically express their efficiency through a rating called Power Consumption Effectiveness (PUE). This score shows how much power the data center uses. Also, data centers with a good PUE score are more environmentally friendly and generally charge less electricity to their tenants. Disaster-proof data centers, for example in hurricane-prone areas, are often rated to withstand 150 mph winds.

    Colocation Security

    Now that security is of utmost importance for cloud providers, good security is also essential for colocation providers. The providers make every effort to ensure the physical security of their data centers. Some colocation providers also erect fences in the data center as a way to isolate their tenant’s hardware. Each fence has a locking gate so that tenants can only access their data center hardware, and security is enforced by requiring tenants to pass multiple security checkpoints before accessing data center hardware.

    Colocation Pricing

    Each colocation provider has a different pricing model. Some tenants bill themselves based on the amount of rack space they use, and other providers rent data center space by square meters. The pricing model is not the only factor that determines the overall cost of renting space in a residential center. Here are some other factors that can affect the total cost:

    – Bandwidth usage and power consumption

    – Geographical location and required electricity distribution unit

    – Technical support incidents and support contract

    Difference between Colocation and Public Cloud

    There are currently differences between a colocation data center and a public cloud provider, even though both allow businesses to run workloads in a remote data center. Colocation centers provide businesses with physical data center space and electrical, cooling, and network connectivity facilities. It is the tenant’s responsibility to provide their hardware such as servers, storage, and support infrastructure. Also, cloud providers use their hardware. Tenants run workloads on the cloud provider’s hardware, which resides in the cloud data center. The cloud provider then bills the tenant for the computing, storage, network, and other resources consumed by the workload.

    Colocation Data Center Vendors

    There are numerous sellers both in the US and around the world. Some are small boutique vendors that only operate one or two data centers. Others are huge, multinational providers with multiple data centers and tens of millions of square feet of leased data center space.

    Some of the largest and best-known colocation vendors are listed below:

    – CoreSite

    – Cyxtera Technologies Inc

    – Digital Property Trust

    – Equinix Inc

    Conclusion

    A colocation data center is often referred to as a colo. It is a large data center that rents rack space for servers or other network equipment to third parties. This is a very important service used by businesses that may not have the resources to maintain their own data center and want to reap all the benefits. We hope you find this article useful.

    FAQ

    How can we use colocation?

    You can rent a secure part in a data center with electricity cooling equipment and connectivity. Also fully control your properties in that sector.

    How many colocation types are excited?

    There are three types of colocation, retail, wholesale, and hybrid cloud-based colocation.

  • Tutorial Install MetaTrader on VPS

    Tutorial Install MetaTrader on VPS

    After reading this article, you will fully learn how to install Metatrader on VPS. MetaTrader is a trading platform developed by MetaQuotes in 2005. It is usually associating with forex trading. MetaTrader using to trade a range of markets including Forex, indices, digital currencies, and commodities via CFD.

    Introduction To MetaTrader

    MT is very popular because it is customizable to your individual business preferences. It can use to automate transactions using algorithms. MetaTrader also opens and closes trades on your behalf according to a list of set parameters. MQL4 is based on the popular C++, and its flexibility helps to create the following features:

    – User-friendly and flexible

    –  Safe, fast, and responsive

    –  Expert Advisors (EAs) and Custom Indicators

    –  Scripts and libraries

    MetaTrader 4: Works on macOS and Linux. With MetaTrader 4, which includes 3 execution modes, 2 market orders, 4 pending orders, 2 stop orders, and one final stop, you will experience flexible and comfortable trading. Forex is a global currency trading market that surpasses all financial markets in terms of trading volume.

    Forex Trading: It is done through 24-hour global information networks. To record information and perform automating transactions, you need a reliable computer with a very fast internet connection to connect to the internet 24/7. You can also do all your transactions faster than your computer with a VPS because it is significantly faster in transferring orders, reducing latency and slippage.

    How To Install MetaTrader on VPS

    Before starting the installation, we recommend that you choose and purchase your favorite plan from the Windows VPS server plans placed in NeuronVM. Then install Metatrader on it according to the instruction below and enjoy the result.

    First, before starting, type the “Remote Desktop Connection” in the start menu, then click on it. Then type your desired server IP and username, and password. Finally, click on “Connect“.

    remote desktop connection

    After entering the VPS server environment, Now you should open the browser and go to the Metatrader website and then download the Metatrader software. There are several ways to download MetaTrader4 that are describing below.

    Since the MT4 broker version is usually pre-configured with broker trading servers, go to your broker’s website and log in to your client area to find the MT4 installation file. Then the installation link will be sent to your email:

    how to download metatrader

    Drag the download button by scrolling down, then click the download file:

    download metatrader - how to download mt4

    Click Run on MT4 to continue the installation process:

    how to run mt4

    Install some examples of the MT4 platform on VPS, now it’s time to configure the settings. Click on the desired settings.

    After installing multiple MT4 platforms on a VPS, consider individual folders to use for each platform. You can add -1 to the MT4 platform you are installing on paths (1 and 2), and also increase the index by only -1 for each new platform. Unique folder Once you have edited the paths, click Next (3), and then, the installation will start:

    metatrader setp steps - install metatrader on vps

    Click Finish when the installation is complete:

    installing metatrader on vps

    After completing the above steps on a regular basis, the MT4 platform will install and run 24/7 on your VPS:

    metatrader platform

    This is the MT4 configuration method for running in portable mode. Also, run MT4 on VPS in the so-called “portable” mode. If you do this, MT4 will store all your data in the folder where MT4 is installed. To see the location of the Data platform MT4 folder, click on the file (1) and then open Date Folder (2). Folder to place Experts Advisors and Indicators:

    monitoring the trades using Mt4 platform - install metatrader on vps

    In the image below, the data folder path is different from where MT4 is installed by default:

    path-to-the-Data-Folder-Mt4

    Now go to Portable mode, and exit the MT4 platform. Then, find the shortcut in MT4, right-click, and select Properties. The current target route is as follows:

    “C:\Program Files\MetaTrader -2\terminal64.exe”

    mt4_portable_step

    Add a space /portable to change it. The end of the modified route should be as follows. Click OK to save the settings:

    “C:\Program Files\MetaTrader -2\terminal64.exe” /portable

    mt4_portable_step_install metatrader on windows vps

    Check it out. The data folder is now in the MT4 installation folder:

    step by step install metatrader on vps

    Conclusion

    In this article, you learned How To Install MetaTrader on VPS. You are now ready to use the powerful MetaTrader 4 trading system, which allows you to implement strategies of any complexity. We hope this tutorial was useful for you. Share your questions with us in the comments section.

  • Tutorial Configure ModSecurity for Apache on Ubuntu

    Tutorial Configure ModSecurity for Apache on Ubuntu

    Apache Web Server is a modular web server that can have flexibility, power, and high performance on all different platforms and environments. The modularity of this web server means that most of the key features in it are designed in the form of modules that can be enabled or unenabled during compilation or even during execution, and using this allows a webmaster to configure the Apache webserver. ModSecurity is one of the Apache Web Server modules. After reading this article, you will fully understand how to Configure ModSecurity for Apache on Ubuntu.

    What is ModSecurity?

    ModSecurity is an open-source web-based firewall software that can work as a reverse proxy and is supporting by Apache, Nginx, and IIS web servers. Web application firewalls are using to create an external security layer that increases the level of protection, detecting and preventing attacks before they reach web applications.

    ModSecurity is also one of the Apache web server modules that prevent the execution of dangerous web scripts and also adds intrusion detection and prevention features to the web server. It is basically similar to IDS used to analyze network traffic. Contains a set of core rules that include various rules for website scripting, malicious user agents, SQL injection, Trojans, sessions, and other exploits.

    modsecurity.

    ModSecurity features against attacks

    – HTTP Protection: Violation of HTTP protocol and locally defined usage policy detection

    – Protection against common web attacks: Identify common attacks against web applications

    – Automatic detection: bots, crawlers, scanners, and other malicious activities

    – Trojan protection: detection of Trojan access

    – Hide Error Messages: Hide error messages sent by the server

    Introducing Apache Web Server

    Apache is free and open-source software that runs on 67% of all web servers in the world. This software has high speed, reliability, and high security and can customize using plugins and modules to meet the needs of all users in all environments. WordPress hosts use Apache as web server software. Apache web server was originally developed for Linux and Unix operating systems, which was later adapted to work with other systems including Windows and Mac. The difference in using Apache in different operating systems is the type of directory path and installation steps.

    Prerequisites

    – A Linux VPS plan that runs the Ubuntu OS

    – A non-root user who can perform sudo tasks

    How to Configure ModSecurity for Apache on Ubuntu

    First, you should update the Ubuntu package by entering the following command:

    sudo apt-get update

    Now you can install Apache by executing the following command:

    sudo apt-get install Apache2

    Next, you have to press Y and then Enter. Also, the ModSecurity module for Apache is available in the default Ubuntu repository. You should just execute the following command to install it:

    sudo apt install libapache2-mod-security2

    Enter the following command to enable ModSecurity:

    sudo a2enmod security2

    To make the changes take effect, just restart Apache with the following command:

    sudo systemctl restart apache2

    Now you should find the following line in the /etc/apache2/mods-enabled/security2.conf configuration file:

    IncludeOptional /etc/modsecurity/*.conf

    Apache includes all *.conf files in the folder written in the following command. To do this, you need to rename the Modsecurity.conf file:

    sudo mv /etc/modsecurity/modsecurity.conf-recommended /etc/modsecurity/modsecurity.conf

    Then in this step, you should edit the above file with your desired command-line text editor:

    sudo nano /etc/modsecurity/modsecurity.conf

    Now you need to find the following line:

    SecRuleEngine DetectionOnly

    Configuration allows ModSecurity to log HTTP transactions but takes no action when the attack is detecting. ModSecurity detects and blocks web attacks by entering the following command:

    SecRuleEngine On

    The following line tells ModSecurity what information should be included in the audit report. You should find it:

    SecAuditLogParts ABDEFHIJZ

    The default settings should changed as follows:

    SecAuditLogParts ABCEFHJKZ

    Finally, save and close the file. You should restart Apache to apply the changes by entering the following command:

    sudo systemctl restart apache2

    ModSecurity can protect your web applications by setting rules to detect and block malicious agents. Also, install existing rule sets and get start quickly. There are several free rules for ModSecurity. The OWASP Core Rule Set (CRS) is a standard set of rules using with ModSecurity.

    The OWASP Core Rule Set is free, community-maintained, and the most widely used rule set that provides the default configuration sold for ModSecurity. It can be integrated with the Honeypot project and contains rules that help stop command attack vectors, including SQL injection (SQLi), cross-site scripting (XSS), and many others that can be used to detect bots and Identification of scanners used. Adjusted through wide exposure to have very few false positives.

    By installing ModSecurity from the default Ubuntu repository, the modsecurity-crs package is also installing, which includes the OWASP core rule set version 3.x. You can download the latest CRS OWASP from GitHub, and execute the following command:

    wget https://github.com/coreruleset/coreruleset/archive/v3.3.0.tar.gz

    Then you should extract the file with the following command:

    tar xvf v3.3.0.tar.gz

    Now you need to create a directory to store CRS files. To do this, enter the following command:

    sudo mkdir /etc/apache2/modsecurity-crs/

    Then you need to move the extracted directory to the desired folder in the following command:

    sudo mv coreruleset-3.3.0/ /etc/apache2/modsecurity-crs/

    Navigate to that directory by entering the following command:

    cd/etc/apache2/modsecurity-crs/coreruleset-3.3.0/

    Then Remember to rename the crs-setup.conf.example file:

    sudo mv crs-setup.conf.example crs-setup.conf

    Now you need to edit the desired file with the following command:

    sudo nano /etc/apache2/mods-enabled/security2.conf

    The following line loads the default CRS files. You should find it:

    IncludeOptional /usr/share/modsecurity-crs/*.load

    Now change the above line as shown below:

    IncludeOptional /etc/apache2/modsecurity-crs/coreruleset-3.3.0/crs-setup.conf
    IncludeOptional /etc/apache2/modsecurity-crs/coreruleset-3.3.0/rules/*.conf

    Remember to save the file and close it. Then test the Apache configuration by executing the following command:

    sudo apache2ctl -t

    Finally, restart Apache with the following command:

    sudo systemctl restart apache2

    How To Test the ModSecurity Configuration on Ubuntu

    In the last step, you should test that ModSecurity can detect and block suspicious HTTP traffic. To do this you need to edit the default virtual host file with the following command:

    sudo nano /etc/apache2/sites-available/000-default.conf

    Now In this step, create a blocking rule that blocks access to a specific URL when accessing a web browser. You should append these lines at the end before closing the ‘Virtualhost’ tag. To do this, enter the following command:

    SecRuleEngine On
    SecRule ARGS:testparam "@contains test" "id:254,deny,status:403,msg:'Test Successful'"

    Now you need to set the “id” and “msg” tags to any desired value. Then you should restart the Apache webserver to apply the changes to the host configuration file by executing the following command:

    sudo systemctl restart apache2

    You need to visit the URL shown ?testparam=test at the end:

    http://server-ip/?testparam=test

    If you get a “403 Forbidden error“, it indicates that access to the resource is blocked. In this step, you should check the error logs by entering the following command. This will confirm that the client is blocked:

    cat /var/log/apache2/error.log | grep "Test successful"

    Conclusion

    ModSecurity is using to detect and block unwanted traffic. In this article, you learned how to configure ModSecurity for Apache on Ubuntu. By following our step-by-step tutorial, you can easily install and configure it on your Ubuntu system. We hope this educational article was useful for you. Share your comments with us through the form below.

    FAQ

    What is the role of Modsecurity?

    Mode security is a vital piece of PCI DSS compliance and helps to shield your site against external threats.

    How we can check if Modesecurity is Enabled?

    If you installed Modesecurity, you can find it under your plugins.

  • How to Buy Instant Dedicated Server from NeuronVM

    How to Buy Instant Dedicated Server from NeuronVM

    A Dedicated Server is a specialized web hosting service that is specifically allocated to one customer. By utilizing a dedicated server, you have full access to all resources without having to share them with other users. This tutorial is going to teach you How to Buy Instant Dedicated Server from NeuronVM.

    NeuronVM Dedicated Servers

    NeuronVM provides cheap dedicated servers from all over the world. we have tried to use the best data centers in the world. If you need high speed and security, NeuronVM dedicated servers are your main need. Some of the features of dedicated servers are the possibility of providing many IPs, very high quality, high speed, complete security of servers, and a variety of locations.

    Get an Instant Dedicated Server from NeuronVM

    Now let’s see how to buy an Instant Dedicated Server from NeuronVM. Follow the steps below.

    First, navigate to the official NeuronVM website, and from the Dedicated Servers section in the main menu, click on Instant Dedicated Server:

    buy instant dedicated server

    On the page that opens, scroll down to see Instant Dedicated Server plans.

    Choose your desired plan and click on Buy Now:

    The Shopping Cart page will appear you can choose Billing Cycle, and Configurable Options, and fill in the options to configure your server.

    Billing Cycle payments are provided Monthly, Quarterly, Semi-Annually, and Annually.

    In the Configure Server section, you should fill in the fields related to Hostname, root password, and NS Prefixes.

    The Configurable Options section allows you to choose your Operating System, Additional IPs, and location.

    Now, configure your desired options and click on Continue:

    Review your checkout and click on Continue again:

    Now enter your personal details and billing information to Register on our website and click on Checkout:

    Complete your payment and that’s all. After successful payment, the service information you want will be sent to you as soon as possible.

    Conclusion

    In this article, we taught you how to buy instant dedicated server from NeuronVM. If you encounter any problems during the purchase process, please let us know in the comments section.

  • How to Install and Setup cPanel on Dedicated Server

    How to Install and Setup cPanel on Dedicated Server

    In this article, we are going to teach you How to Install and Setup cPanel on Dedicated Server. When you get a server, you need a control panel to use it better. cPanel is one of the most widely used options for various control panels. NeuronVM offers a cheap Dedicated Server, which is the best choice.

    Tutorial Setup cPanel on Dedicated Server

    In the rest of the article, we will first give you a definition of cPanel. Then we will mention the prerequisites for installing cPanel on a dedicated server. After that, we will explain to you how to connect to the server. Finally, we will teach you how to Install cPanel on Dedicated Server.

    What is cPanel?

    cPanel is one of the most popular control panels that simplify website and server management. You can publish websites, manage domains, organize web files, create email accounts, and more using cPanel. It has two interfaces, a user interface called cPanel and a server management interface called Web Host Manager (WHM). This interface allows users to manage their website and also supplies hosting providers with tools to manage the server.

    Prerequisites to installing cPanel on Dedicated Server

    Before installing cPanel, you should prepare the following prerequisites:

    –> Connecting to the Server

    –> Checking your Operating System Configuration

    –> Buy a cPanel license

    How to Connect to the Server

    You can connect to a server through SSH and PuTTY. If you want to connect to a server through SSH remote control, you should open a command line and run the following command:

    root@IP_Address

    And then enter the root password of your server.

    But if you want to connect to a server using PuTTY, first go to the PuTTY website and download and install the client. Then open the client, enter the IP address of your server in the Sessions menu, click Open, and enter the root password of your server.

    Installing cPanel on a Dedicated Server

    Now it’s time to learn how to install cPanel on a dedicated server. To do this, first open the home directory with the following command:

    cd /home

    Next, download the latest installation files from the cPanel’s servers using the command below:

    curl -o latest -L https://securedownloads.cpanel.net/latest

    Then open and run the installation files by entering the following command:

    sh latest

    Activate the cPanel license using the command below:

    /usr/local/cpanel/cpkeyclt

    That’s all about installing cPanel on a dedicated server.

    Conclusion

    cPanel is one of the most popular control panels. In this tutorial, we introduced you to cPanel and taught you how to install and setup cPanel on a Dedicated Server. You can ask your questions in the comments section.