If we want to make the concept of DNS more understandable for you, it should be said that DNS works like a phone book on the Internet. Also, you should know that Setting up DNS involves making changes to your network configuration, so ensure you understand the implications of these changes. This article is made to show you a step-by-step guide to setup DNS in MikroTik 7.10.
What Is a DNS Server and Why Is It Used?
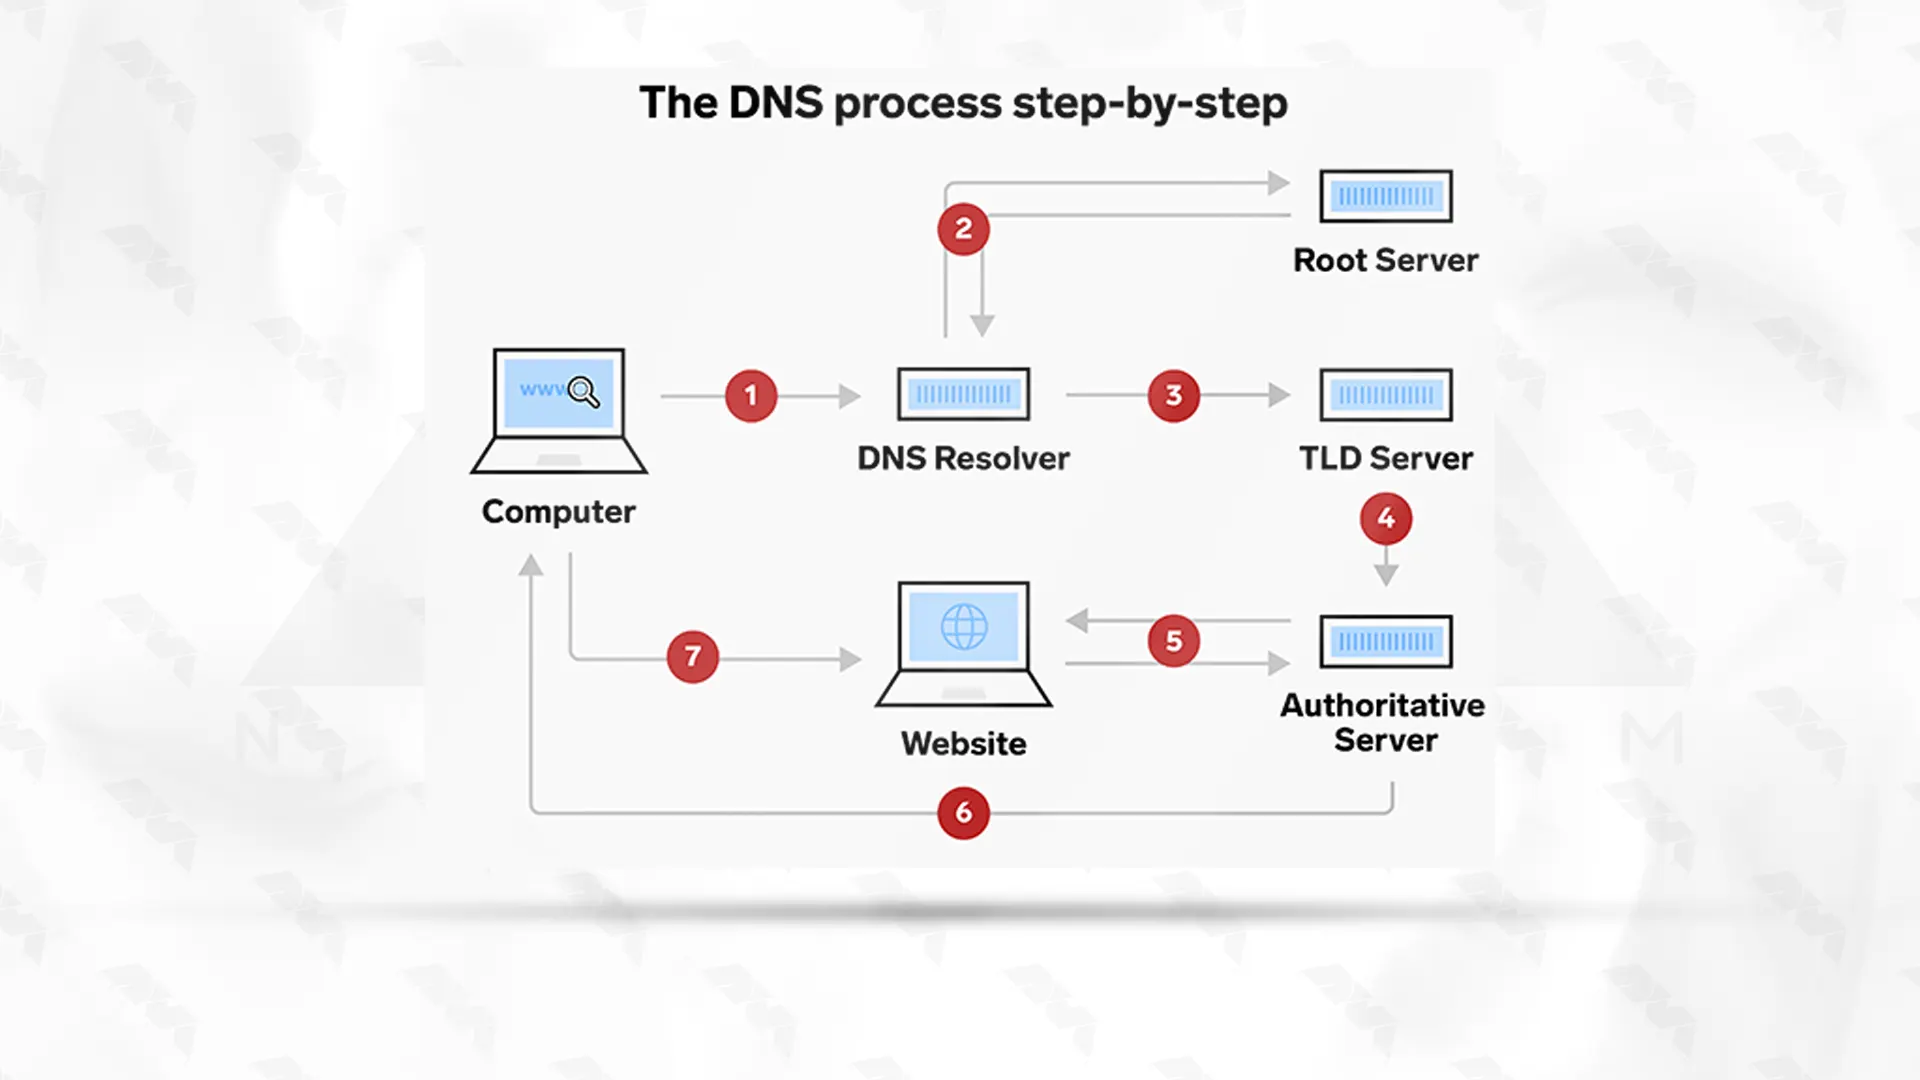
A DNS server, which stands for “Domain Name System” server, is a critical component of the internet infrastructure that translates human-friendly domain names (like www.example.com) into the IP addresses that computers use to identify and communicate with each other on a network.
If you have a MikroTik router with a DNS feature enabled, you can set it as a DNS server for clients that are compatible with DNS. It should also be said that the MikroTik router can be specified as the primary DNS server with DHCP-server settings. In this way, when remote requests are enabled, this router will respond to TCP and UDP DNS requests on port 53.
Pros and Cons of DNS Servers
Domain Name System (DNS) servers play a critical role in translating human-readable domain names (like www.example.com) into IP addresses that computers use to locate and communicate with each other on the internet. Here are the pros and cons of DNS servers:
Pros of DNS Server
- Many organizations operate multiple DNS servers in different locations, providing redundancy in case one server fails. This redundancy helps ensure that users can still access websites even if some servers are unavailable.
- DNS servers can be configured to distribute incoming traffic across multiple servers, helping to balance the load and prevent any single server from becoming overwhelmed. This enhances the overall performance and availability of online services.
- DNS servers enable quick and efficient translation of domain names into IP addresses. This process is crucial for ensuring smooth internet browsing and communication.
- DNS servers often cache previous lookups, reducing the need to repeatedly query authoritative DNS servers for the same domain. This caching mechanism speeds up subsequent requests for the same domain, contributing to faster internet access.
- DNS can handle a large number of queries, making it scalable for the growth of the internet.
- DNS servers can be use to filter out malicious or inappropriate content, acting as a basic form of web filtering. They can also be configured to block access to known malicious websites, enhancing security.
Cons of DNS Server
- DNS queries can reveal users’ browsing habits and the websites they visit. Some DNS services and ISPs may track or log this information, raising privacy concerns.
- When DNS records are updated or changed, it takes time for these changes to propagate throughout the DNS system. During this propagation period, users may experience inconsistent access to the updated services.
- While DNS-based content filtering can be effective to a certain extent, it’s not as comprehensive as more advanced content filtering solutions. Some inappropriate or malicious content may still bypass DNS-based filters.
- Managing DNS servers can be complex, especially for organizations with large networks. Configuring and maintaining DNS records correctly requires technical expertise.
- If a DNS server experiences an outage or becomes compromised, it can disrupt access to websites and online services that rely on that DNS server. Redundancy and backup systems are important to mitigate this risk.
- DNS servers are susceptible to various attacks, such as DNS spoofing, cache poisoning, and distributed denial of service (DDoS) attacks. Proper security measures, such as DNSSEC (DNS Security Extensions), are necessary to mitigate these risks.
Prerequisite
Before you start to setup DNS in MikroTik system, you should prepare some requirements. Here are the important requirements for Setting up MikroTik:
– A MikroTik VPS
– Using a static IP
– Having access to the MikroTik router
– An account with administrative privileges
Choosing the Best Plan for MikroTik VPS
Choosing the best plan for a MikroTik Virtual Private Server (VPS) depends on your specific requirements and the intended usage of the VPS. MikroTik RouterOS is a powerful operating system that can run on various hardware platforms, including VPS instances.
Here are some factors to consider when selecting a plan:
– Security: Choose a VPS provider with strong security measures, including firewalls, intrusion detection, and regular updates.
– Cost: Compare the features and pricing of different VPS plans to find the best balance between your requirements and your budget.
– Support and Expertise: Ensure the VPS provider offers good customer support, especially if you’re new to managing VPS instances
– Network Latency and Uptime: Choose a VPS provider with good network latency and uptime.
– Scalability: If your network is expected to grow over time, consider a VPS provider that allows you to easily upgrade your resources or migrate to a more powerful plan.
– Location: Choose a VPS server location that is geographically close to your target audience or your primary network location.
– Bandwidth: Ensure that the plan’s bandwidth aligns with your anticipated traffic volume.
– Storage: RouterOS itself doesn’t require much storage space, but consider any additional applications or data you might store on the VPS.
– RAM: Ensure your VPS plan has enough RAM to accommodate your requirements. A minimum of 512MB to 1GB is usually recommending, but more is better if you’re running resource-intensive tasks.
– CPU: Look for a VPS plan with a modern, multi-core CPU for better performance.
– Required resources: The resource requirements of your MikroTik VPS depend on the size of your network and the services you intend to run. Consider factors such as the number of users, the complexity of your network configuration, and the services (firewall, VPN, routing, etc.) you plan to use.
You can choose the MikroTik VPS plan you need from among the plans presented on the NeuronVM website and use it with confidence.
Setting Up DNS Server on MikroTik: A Comprehensive Guide
In this section, we will try to show how you can setup DNS in MikroTik by providing a short guide:
1- Access the RouterOS web interface
First you should access the RouterOS web interface by opening the Web browser or Winbox and entering your MikroTik IP address. Log in with your administrator credentials.
2- Basic Configuration Part
Now you will enter the basic configuration part:
– In the left menu go to the IP and then DNS and Open the settings tab.
Now, you can configure the DNS servers your router will use for external DNS resolution. You can use your ISP’s DNS servers or public DNS servers like Google’s (8.8.8.8 and 8.8.4.4).
3- Setup the DNS Server
After the configuration, it is time to setup DNS in MikroTik:
– In the IP menu, go to DNS, and click on the Static tab.
– Click on the “+” button to add a new DNS entry.
– Enter the DNS name (e.g. myserver.local) and the corresponding IP address of the server.
4- DNS Cache Configuration
To provide domain name resolution you will need a MikroTik caching DNS, but you should configure it on MikroTik Router. Let’s find out how to configure the DNS service:
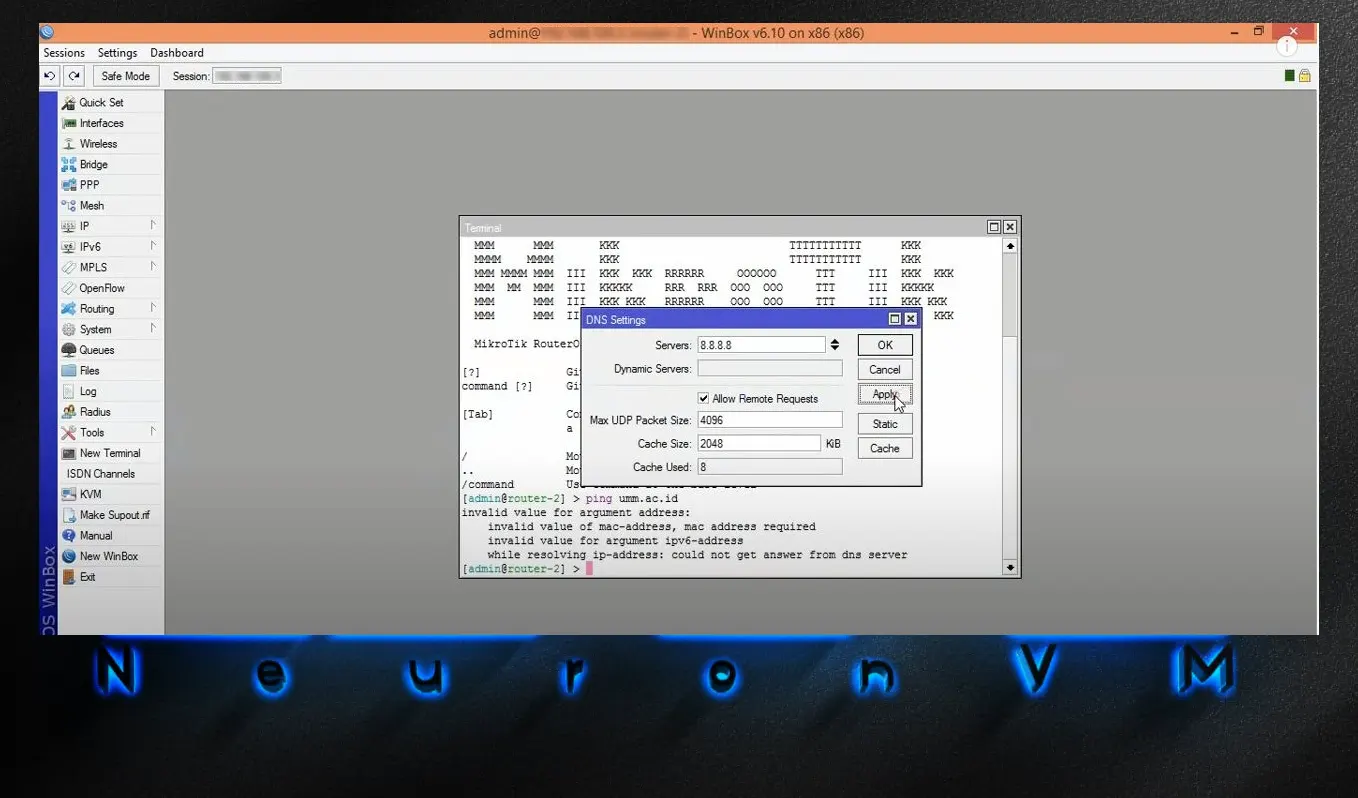
- Go to IP > DNS menu. You will see the DNS Setting window.
- Insert your DNS server IP or Google Public DNS IP (4.2.2.4 and 8.8.8.8) in your server input box.
- Click the Allow Remote Request checkbox.
- You can change the cache size if you desire.
- At last, click Apply and OK.

5- Static DNS Entry
Put static DNS entry in MikroTik cache DNS:
– In the DNS setting window, click on the Static button.
– Click on + and a new static window entry will appear.
– Insert your hostname and then the IP address of the host.
– Press Apply and then OK.
6- Firewall Rules
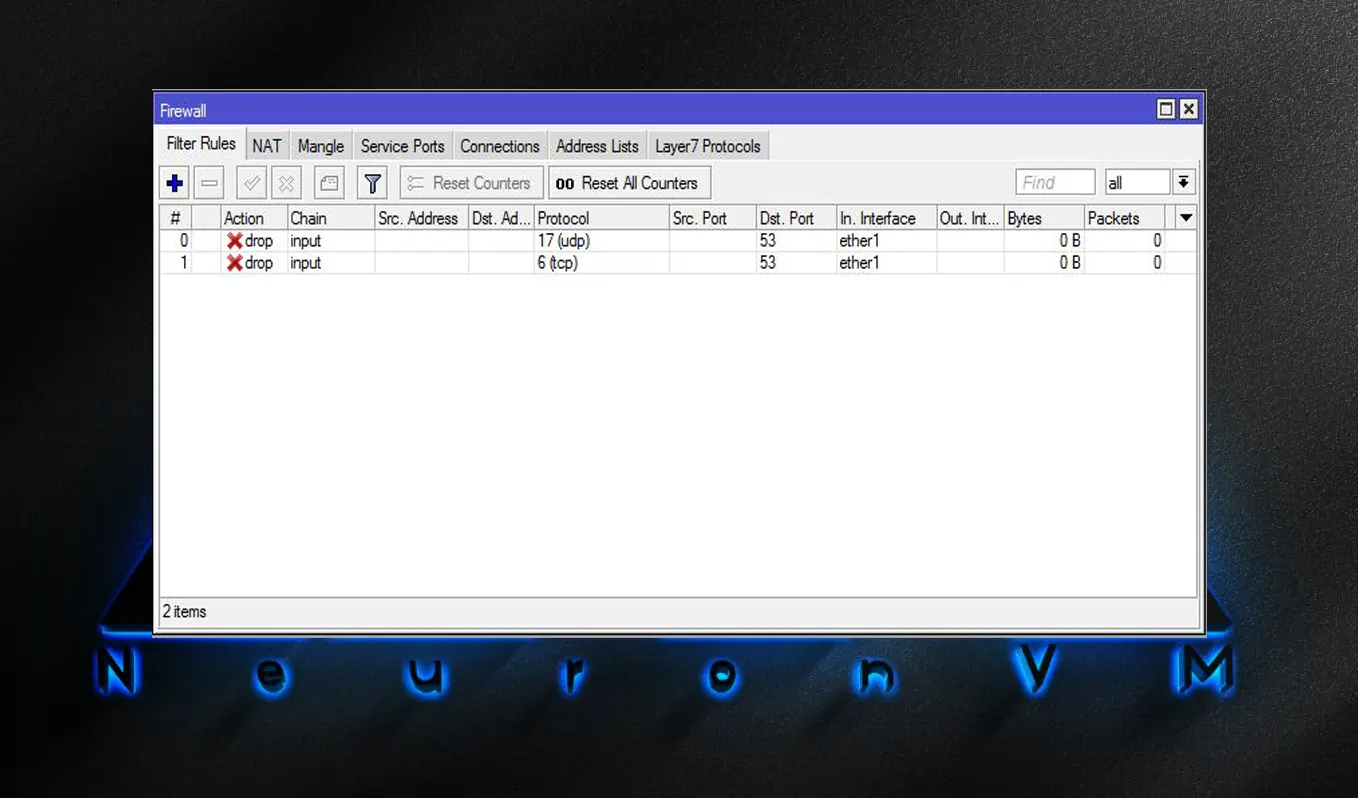
– If you want to allow DNS traffic to and from your router, you might need to configure appropriate firewall rules.
– In the IP menu, go to Firewall.
Create rules to allow incoming DNS traffic (UDP port 53) and outgoing DNS traffic (UDP port 53).
7- Testing DNS Server
You can test your DNS setup using the Tools menu and selecting Ping or Traceroute. Use domain names you’ve configured in your DNS server to see if they resolve correctly.
Conclusion
As you learned how to setup DNS in MikroTik, now you can configure your MikroTik cache DNS, and at last change MikroTik to your DNS server without any problem. Note that DNS is an essential part of your computer network and you can imagine web communication without DNS. So read this article carefully and feel free to insert any comment or discuss this issue.
Leave a Reply