


CDN or Content Delivery Network, is a network used by sites and programs to increase the loading speed of static elements. The way to do this is that the files are cached in CDN servers located in different areas around the world, and the CDN sends a request, then the user receives it from the nearest server. To learn how to install and configure CDN on a Dedicated Server, follow this article to the end.
The benefit of using CDN is that it helps you ensure your content is delivered as quickly as possible. Some of these CDNs are located in most locations, and I transmit the desired content to your user from the nearest device. If the target company is Google or Facebook, it is good, but if you have a blog, a simple server will be enough for you.
Here, you can follow the needed instructions to build your own CDN. Before starting the Configure CDN on Dedicated Server steps, you need to buy a dedicated server. We recommend you choose a plan from the cheap dedicated server plans offered by our website.
These are the requirements before installing CDN on a dedicated server:
– A domain or subdomain name
– At least two servers in different regions
– GeoDNS tool and a user to send requests to the domain
As the first step, you should register a domain name or subdomain. This process is very easy, you should just register it on any domain zone you prefer. You should rent servers in regions and countries where the target audiences are located. If your project is international, it is an easy process to select from hosting providers for a dedicated server. We selected three virtual servers from different locations. Here are the servers:
– Frankfurt, Chicago, and Singapore
You need a DNS server with GeoDNS functionality to ensure that clients are directing to the right servers after sending a request to our domain or subdomain.
Now let’s examine how GeoDNS works:
– You must get the client’s IP or the requested DNS server’s IP. These recursive servers are usually the internet provider’s DNS.
– GeoDNS identifies a customer’s IP, country, or region. You must also have the GeoIP database.
– GeoDNS selects the IP address from the nearest CDN depending on the client’s location.
You can build a DNS server with GeoDNS functionality yourself. But we recommended using ready-made solutions. These solutions are: Cloudflare, Zilore, Amazon, and ClouDNS
It can be said that all DNS services have a functional feature called DNS failover, which can configure activity monitoring so that if a server fails, the system will continue to operate automatically.
Note that here we will use ClouDNS for our CDN.
In the profile section, first, add a DNS zone and specify the domain name. If you use a subdomain don’t forget to add existing DNS records after adding the zone.
Then, it’s time to create an A record for the domain or subdomain, each for the specified region. You can choose continents and countries.
In the example we provide, the CDN is activating on the cdn.sayt.in domain. After adding the saty.in zone, create the first record a and redirect the NV clients to the selected server i.e. Chicago:
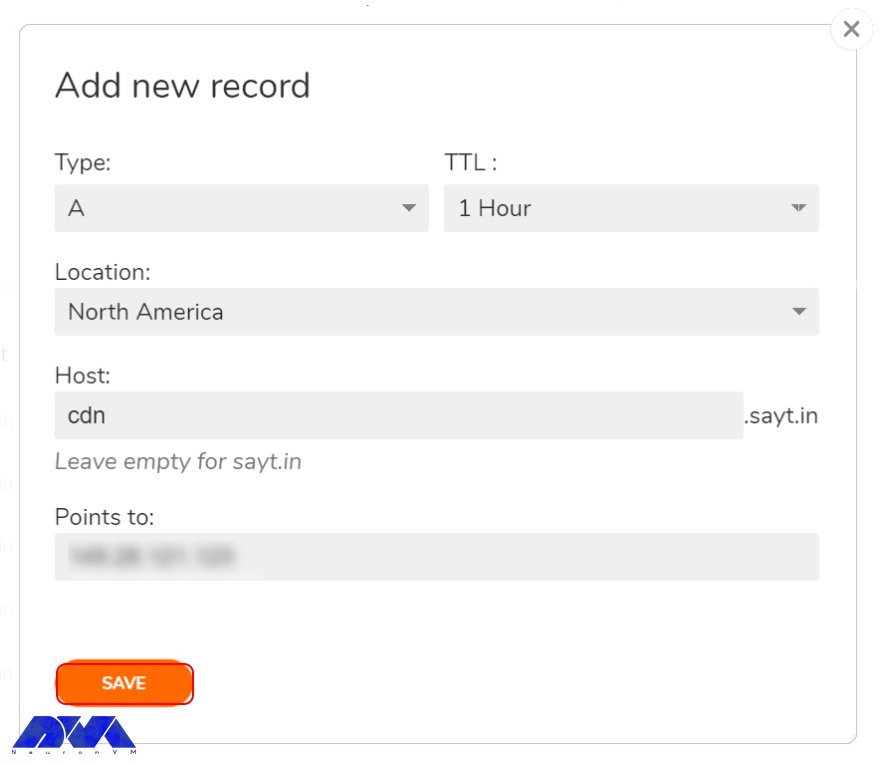
You should repeat the step to other regions. You should also create a record for the default zones. The final result is as follows:
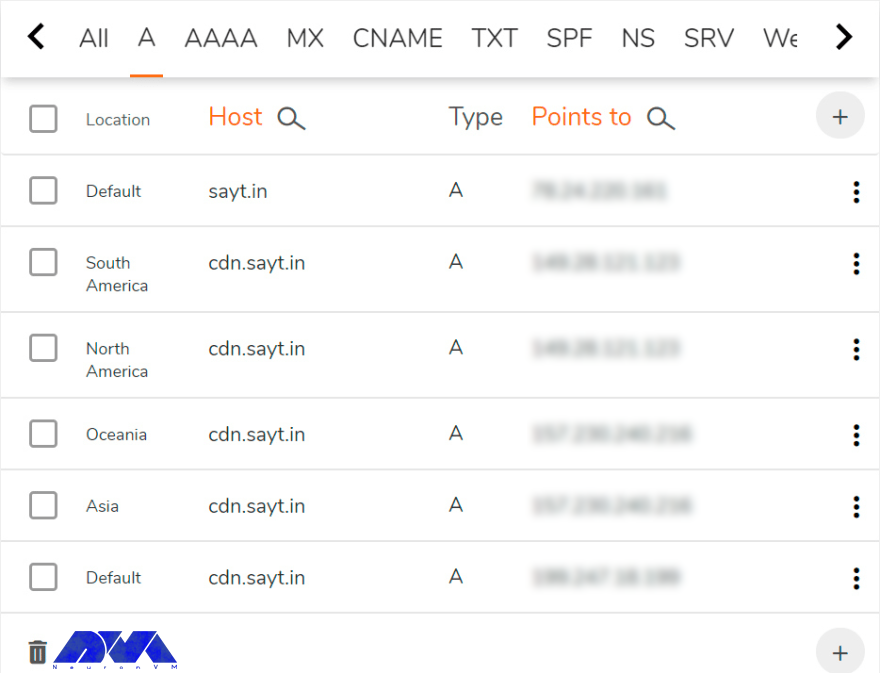
As you can see, requests from unspecified regions from Europe, Africa, satellite Internet users, etc. in the last record should be directed to the Frankfurt server.
And this completes the initial DNS configuration. All that remains is to visit the registrar’s website. Now replace the current name servers with the ones provided by ClouDNS. While updating these servers, we adjust the servers.
Here, the CDN works with HTTPS. So if you have already provided SSL certificates for the domain or subdomain, upload them to all servers, for example, in the /etc/ssl/yourdomain/ directory.
If you don’t have a certificate, you can get one for free from Let’s Encrypt. We should mention that the ACME Shell script is a good option that has a user-friendly client and allows you to validate a domain or subdomain via DNS using the ClouDNS API.
We install acme.sh on only one server – the European server (123.456.**.***), and through it, the certificates are copy to all the others. Now, you should run the command below to install:
wget -O - https://get.acme.sh | bash; source ~/.bashrc
During the installation process, a CRON task is creating to automatically update the certificates.
Then, after the certificate is issued, domain verification is done by DNS with the help of API, in the next step, in the ClouDNS profile, in the Reseller API section, create a new API user and choose a password for it. Then, paste the obtained auth-id along with the password into the following file: ~/.acme.sh/dnsapi/dns_cloudns.sh (note not to be confused with dns_clouddns.sh). In this section, there are lines that you need to remove and edit:
CLOUDNS_AUTH_ID=
CLOUDNS_AUTH_PASSWORD=""
Now, we need to request SSL certificate permission for cdn.sayt.in:
acme.sh --issue --dns dns_cloudns -d cdn.sayt.in --reloadcmd "service nginx reload"
If needed in the future, you can set the command to restart the automatic configuration in the parameters, after each certificate renewal.
The process of getting the certificate may take up to a few minutes, so don’t stop it. If you encountered a domain validation error, run the command again. As a result, you will find out where the certificates were downloaded from:

Since we need to specify the paths when copying the certificates to other servers, you must remember them and specify them in the server settings. Ignore the error that appears when reloading the Nginx configuration.
In setting up the SSL certificate, the only task is to copy it to the other two servers that store the certificate paths. Now create the same directories on each server and copy the certificate files:
mkdir -p /root/.acme.sh/cdn.sayt.in/
scp -r root@Your_IP_Address:/root/.acme.sh/cdn.sayt.in/* /root/.acme.sh/cdn.sayt.in/
In order to automatically renew the certificate, you need to create a daily jobCRON on both servers. The following command shows how to do this and add to CRON jobs:
scp -r root@Your_IP_Address:/root/.acme.sh/cdn.sayt.in/* /root/.acme.sh/cdn.sayt.in/ && service nginx reload
Note that you need the key to be able to access the main server remotely without entering a password. So you must create it.
We will use Nginx to deliver static content. To do this, update the list of packages and then install them on all three servers:
apt update
apt install nginx
Now, use the following command instead of the default configuration:
nginx.conf
user www-data;
worker_processes auto;
pid /run/nginx.pid;
events {
worker_connections 4096;
multi_accept on;
}
http {
sendfile on;
tcp_nopush on;
tcp_nodelay on;
types_hash_max_size 2048;
include /etc/nginx/mime.types;
default_type application/octet-stream;

access_log off;
error_log /var/log/nginx/error.log;

gzip on;
gzip_disable "msie6";
gzip_comp_level 6;
gzip_proxied any;
gzip_vary on;
gzip_types text/plain application/javascript text/javascript text/css application/json application/xml text/xml application/rss+xml;
gunzip on;

proxy_temp_path    /var/cache/tmp;
proxy_cache_path   /var/cache/cdn levels=1:2 keys_zone=cdn:64m max_size=20g inactive=7d;
proxy_cache_bypass $http_x_update;
server {
listen 443 ssl;
server_name cdn.sayt.in;
ssl_certificate /root/.acme.sh/cdn.sayt.in/cdn.sayt.in.cer;
ssl_certificate_key /root/.acme.sh/cdn.sayt.in/cdn.sayt.in.key;
location / {
proxy_cache cdn;
proxy_cache_key $uri$is_args$args;
proxy_cache_valid 90d;
proxy_pass https://sayt.in;
Then, in the config file, you should edit these parts:
– SSL_certificate and ssl_certificate_key
– Max_size
– Inactive
– Proxy_cache_valid
– Proxy_pass
As you can see, it is a simple process. Configuring the retention time is the only issue, given the similarities between the inactive and proxy_cache_valid parameters.
If the request is not repeating within 7 days, the data will delete from the cache.
If the request is repeated even just once in 7 days, the cache will be considered obsolete after 90 days and Nginx will update it from the main server when the next request is made.
By using the command below you can reload the configuration:
service nginx reload
Congratulations! CDN is ready to use.
Loading speed of the static element is an important issue for sites and Content Delivery Network is an effective network in this field. Here, we tried to introduce CDN and show how you can install it on a dedicated server. You can use different providers, but we preferred well-known Cloudflare CDN. We hope this article was helpful to you. We would be pleased if you share it with someone interested.
Of course, content delivery networks deliver faster loading speeds for readers. Also, they can store content in different formats.
Yes, it does. It can handle hardware failure more effectively.
How useful was this post?
Click on a star to rate it!
Average rating 0 / 5. Vote count: 0
No votes so far! Be the first to rate this post.
 Tags
Tags
After reading this article, you will be completely familiar with Create a FTP Account with SSH on De...


 Tags
Tags
If we want to make the concept of DNS more understandable for you, it should be said that DNS works ...


 Tags
Tags
What is your opinion about this Blog?


