Blog

  • Boost Your Windows Server Security with OpenSSH: Here’s How to Install It

    Boost Your Windows Server Security with OpenSSH: Here’s How to Install It

    OpenSSH is a tool that allows you to securely connect to a remote server using the SSH protocol. This tool encrypts all traffic between client and server to prevent eavesdropping, connection hijacking, and other attacks. Stay with us until the end of this post to teach you how to Boost Your Windows Server Security with OpenSSH.

    Why use OpenSSH for Windows server security?

    Some of the reasons to use OpenSSH are:

    1) Free and open-source: You can review, modify, and distribute the source code under a BSD-style license.

    2) Extensive support: integrates into multiple operating systems such as Microsoft Windows, macOS, Linux, and BSD.

    3) Development and Improvement: It is continuously developed and improved by the OpenBSD team and the user community, who follow a policy of producing clean and audited code.

    It is based on the original free version of SSH by Tatu Ylonen, which was the first to replace the insecure authentication of .rhosts with public key authentication. It offers various features and options such as tunneling, authentication methods, configuration options, X11 forwarding, SCP, SFTP, and more.

    Installing OpenSSH on a Windows Server

    Before we teach you how to install OpenSSH, we recommend you choose and use the Windows VPS server plans provided on our site. Installing OpenSSH on Windows Server is easy. To do this, you need to follow the steps below.

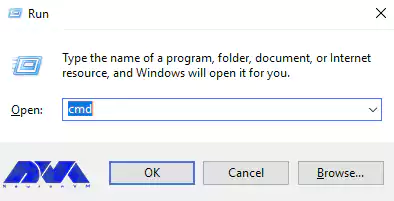
    1) From the search section in the start menu, type PowerShell and run it.

    2) Now you can install OpenSSH Server by running the following command in PowerShell:

    Add-WindowsCapability -Online -Name OpenSSH.Server

    Also, to install OpenSSH Client, you need to run the following command:

    Add-WindowsCapability -Online -Name OpenSSH.Client

    Configuring OpenSSH for Windows Server

    In this section, we are going to show you the OpenSSH configuration steps. You can make the desired changes by running the following command in PowerShell:

    start-process notepad C:\Programdata\ssh\sshd_config

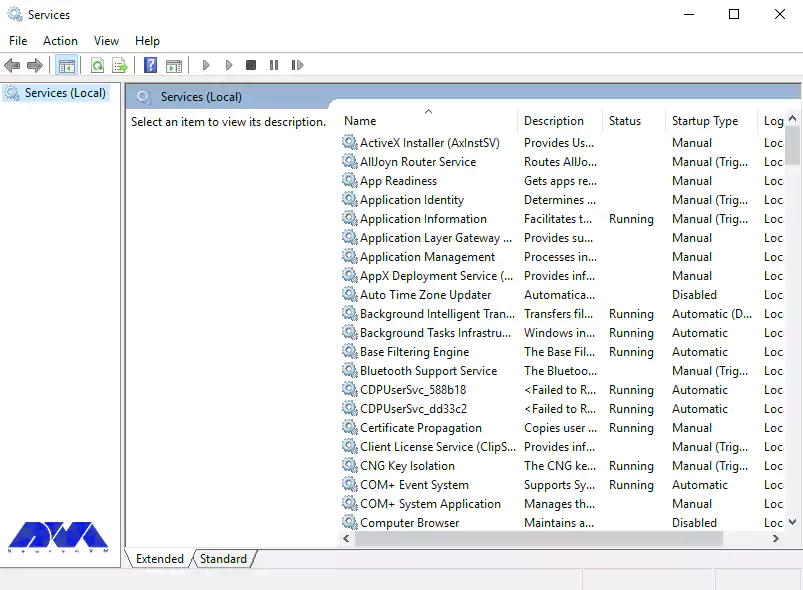
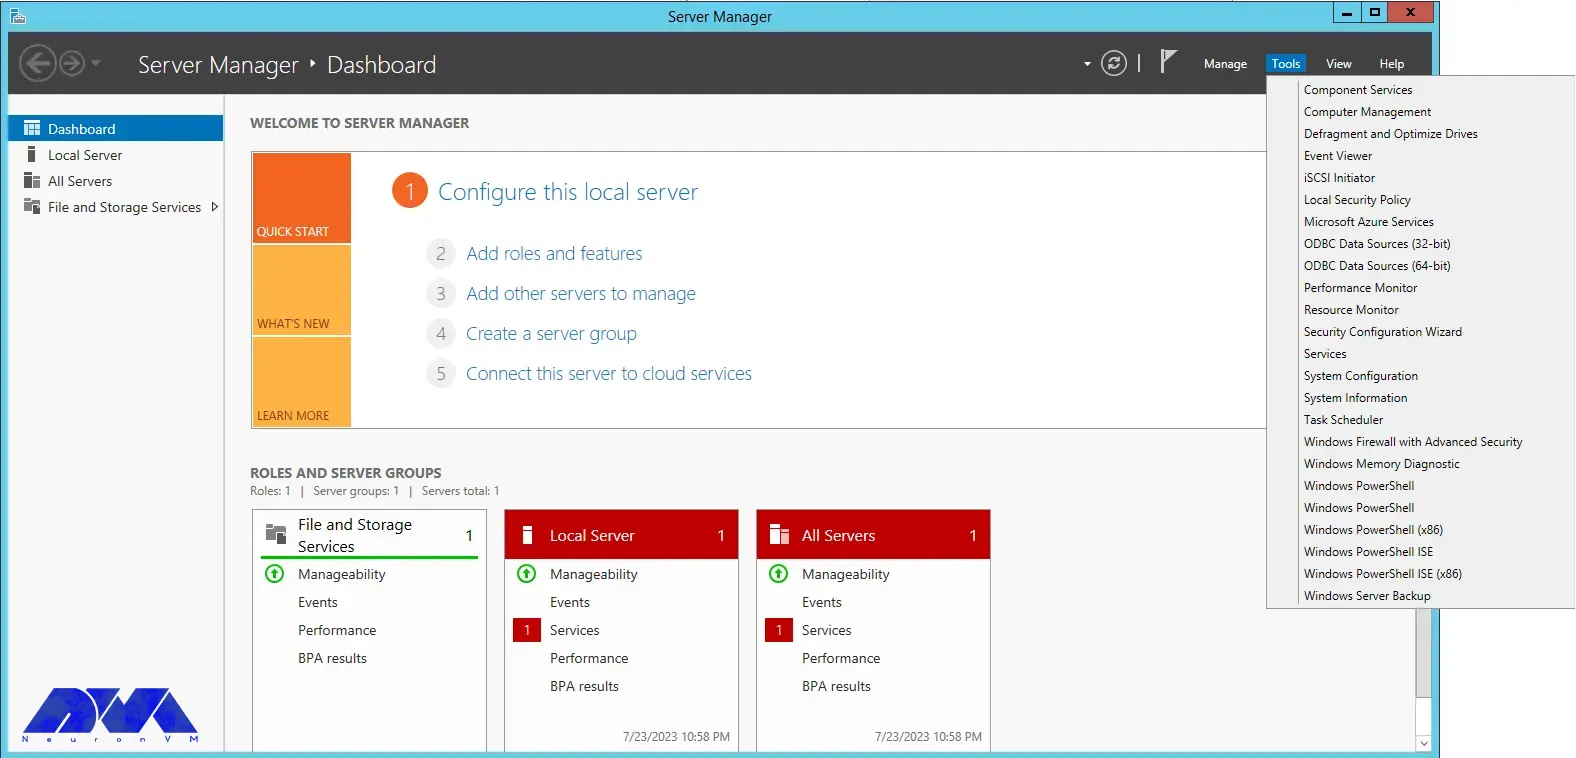
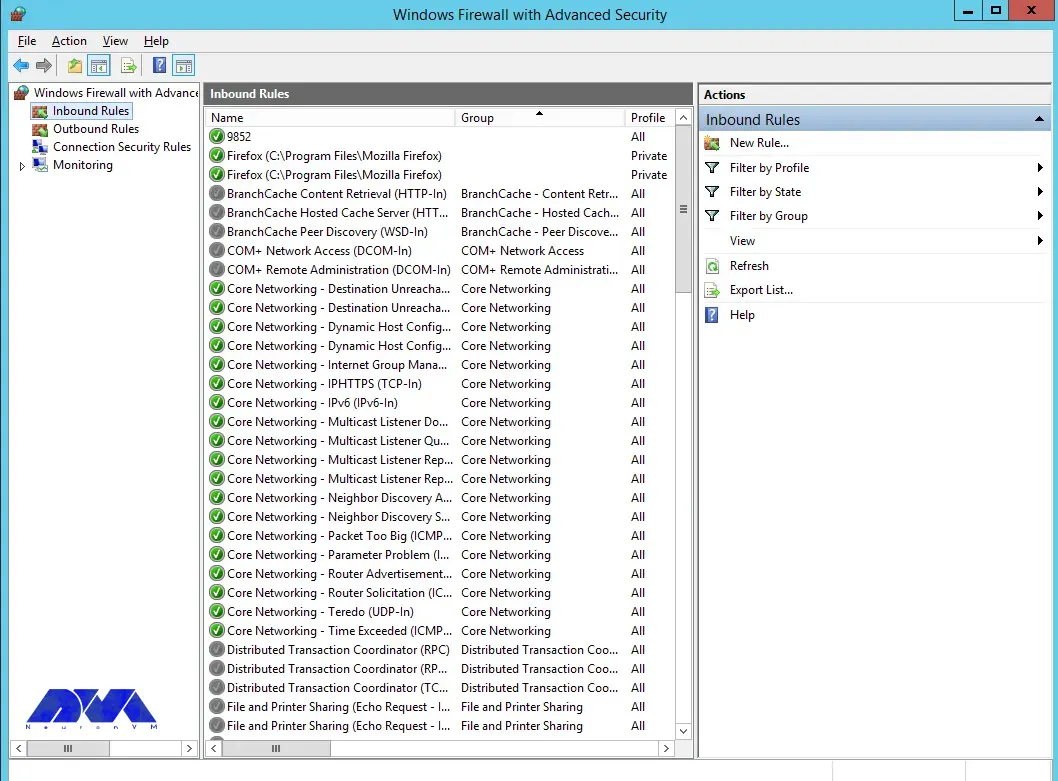
    To configure the firewall, it is necessary to run Server Manager from the start menu.

    Then select “Windows Firewall with Advanced Security” from the Tools menu:

    Windows Firewall with Advanced Security

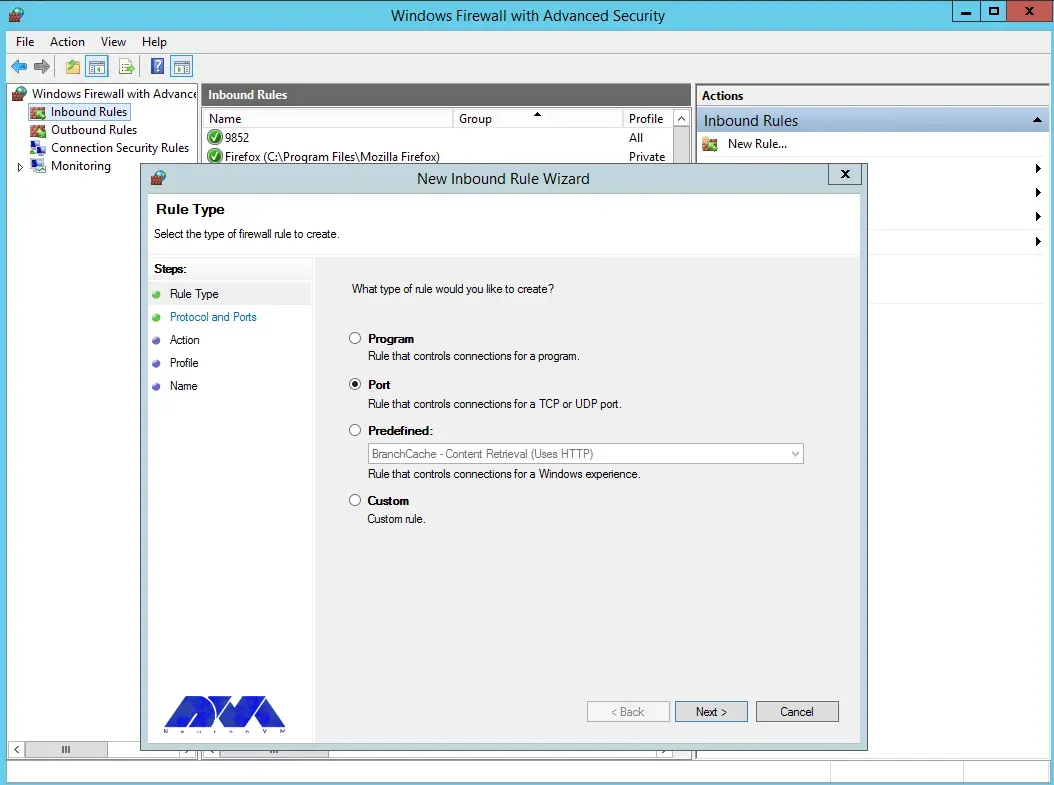
    You can select the New Rule option from the Inbound Rules section:

    Inbound Rules section in firewall

    Select the port and then click Next:

    firewall settings on windows server

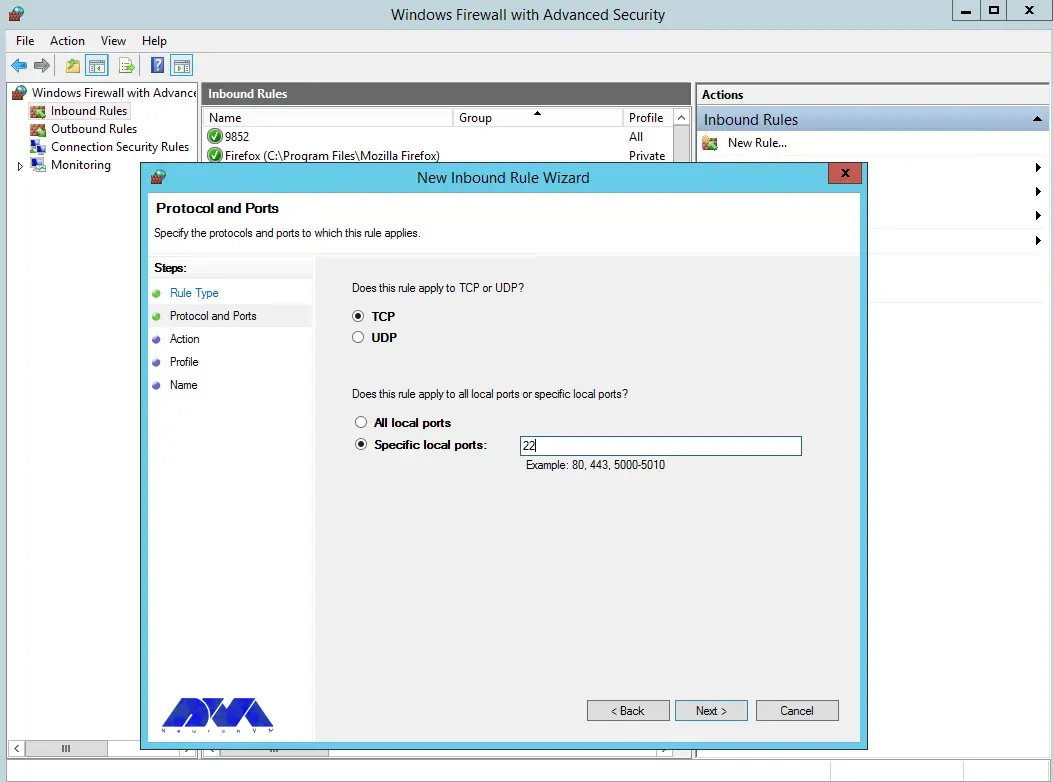
    Select TCP as shown in the image below, then type port 22 and click Next:

    new inbound rule wizard

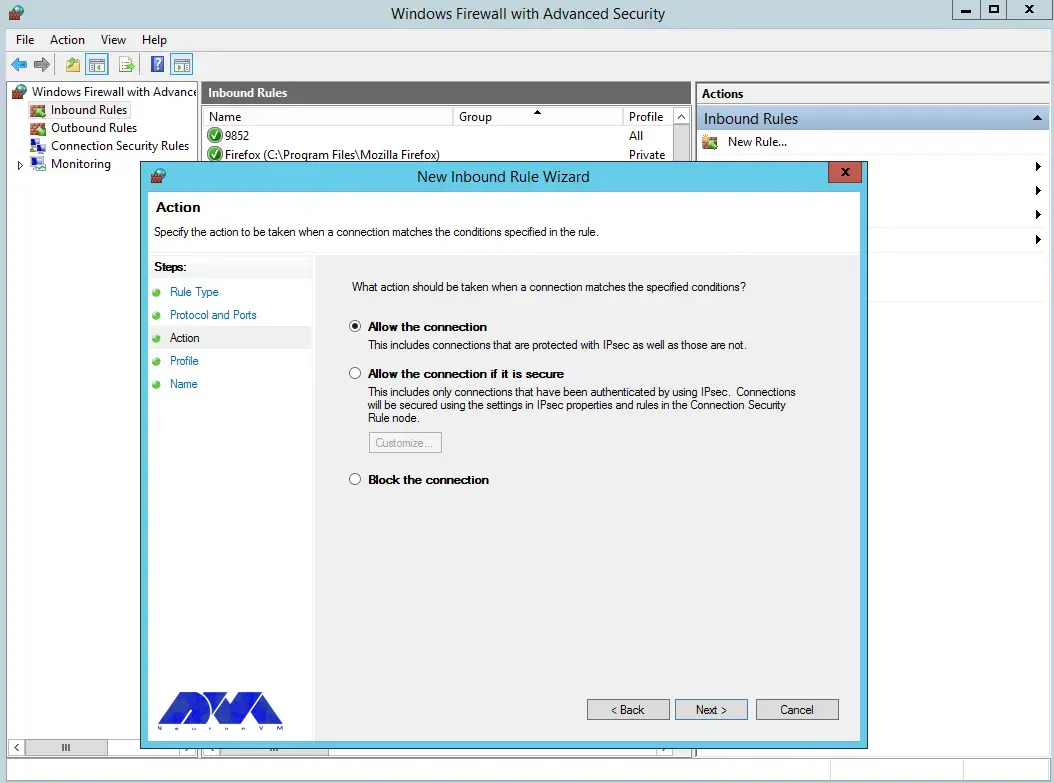
    Next, you need to allow the connection:

    how to allow the connections on firewall

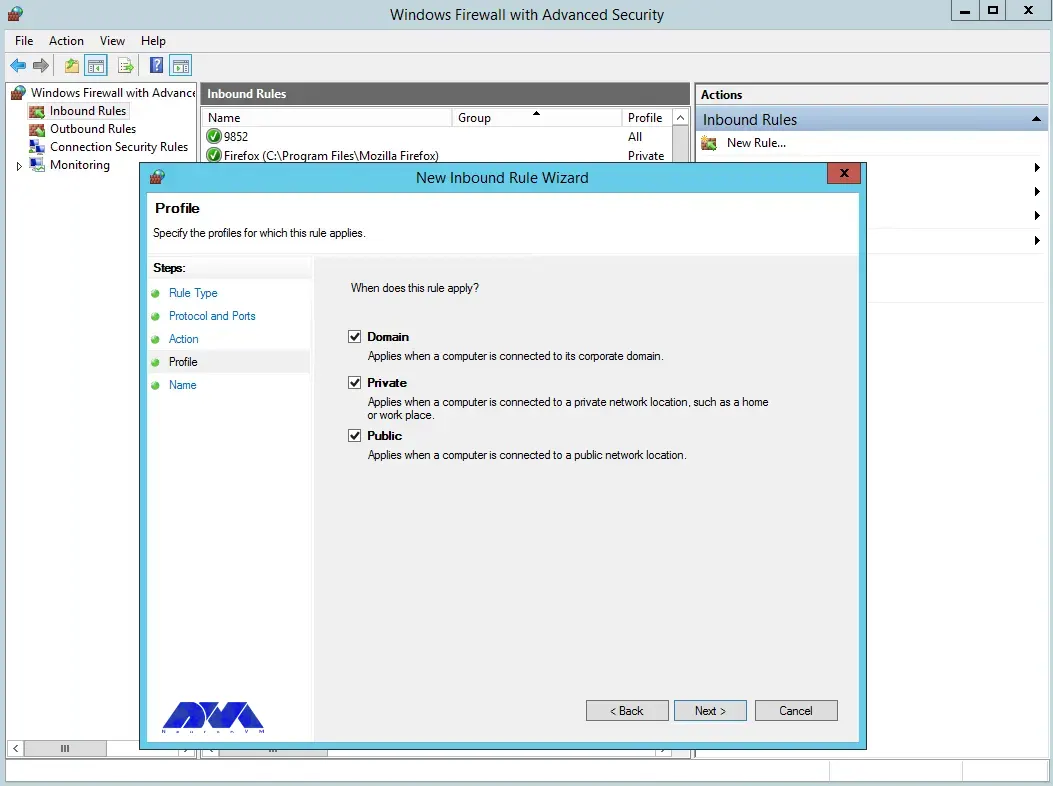
    You can also assign the rule to server profiles and set a custom name for easy identification from the list of firewall rules:

    Configuring OpenSSH for Windows Server

    In the final step, you can complete the firewall configuration steps by clicking Finish:

    Configuring firewall for OpenSSH

    Using OpenSSH for secure remote access

    With the help of the OpenSSH tool, you can securely connect to remote machines using SSH protocol. This tool will help you log in to the shell, copy files, enable key-based authentication, mount remote file systems, and more. Note that to use OpenSSH, you must install it on both the client and server machines.

    Advanced OpenSSH security features

    As mentioned in the previous sections, OpenSSH is a tool that allows you to securely connect to a remote server using the SSH protocol. OpenSSH encrypts all traffic between client and server to prevent possible attacks.

    To take advantage of the advanced security features of OpenSSH, it is necessary to perform the following steps:

    1) You can install OpenSSH on client and server machines using Windows settings or package manager.

    2) To configure OpenSSH, open the file /etc/ssh/sshd_config and make the following settings:

    PasswordAuthentication no
    PermitRootLogin no

    3) Using a public and private key pair, you need to generate SSH keys on the client machine by running the ssh-keygen command.

    4) Copy the public key to the server machine by running the ssh-copy-id command. Note that you can log in without a password by adding the public key to the ~/.ssh/authorized_keys file.

    Troubleshooting OpenSSH installation and configuration issues

    In this section, we are going to review and troubleshoot OpenSSH installation and configuration issues.

    1) Remote Hostname Identification Error:

    The first error we are going to troubleshoot is Remote Hostname Identification Error. You may receive the following error:

    REMOTE HOST IDENTIFICATION HAS CHANGED

    Or when an SSH host cannot connect using a specific network address, the following error may occur:

    error output
    ssh: Could not resolve hostname example.co: Name or service not known

    Solution:

    • Check the correctness of the hostname.
    • Check if the hostname error can be resolved using the ping command.
    • Use the IP address as a trusted solution by using ssh [email protected] instead of ssh [email protected] if you have a DNS problem.

    2) Connection Timeout:

    This error means that the user’s attempt to connect to a server has encountered the server’s refusal to load results within the specified time interval. Note that running the following command ssh [email protected] in OpenSSH may cause this error:

    Error output
    ssh: connect to host 111.111.111.111 port 22: connection timed out

    Solution:

    • Ensure the correctness of the IP address
    • Checking the possibility of connecting the SSH port with the network
    • Check that the firewall rules are not set to default.

    3) Connection failure

    An important point is that connection failure is different from timeout. Connection failure means that your request reaches the SSH port, but the host refuses to receive the request.

    Error output
    ssh: connect to host 111.111.111.111 port 22: connection refused

    Solution:

    • Ensure correct IP
    • Ensuring that the SSH port can be connected by the network
    • Check that the firewall rules are not set to default.

    Best practices for using OpenSSH on Windows Server

    In this section, we intend to teach you the Best practices for using OpenSSH on Windows Server.

    1) Limit ssh access of users:

    Given that all system users can log in via SSH using their password or public key, they have full access to system tools, including compilers and programming languages. This can open some network ports for some users. You can limit user access to allow only root, Jonnson, and Terri users by adding the following command to sshd_config file:

    AllowUsers Jonnson Terri

    To allow access to all users except a limited number of them, add the following command:

    DenyUsers root Linda Thomas Michael

    2) Disable empty passwords:

    You can disable all password-based logins. Therefore, it is necessary to allow only public key-based logins by adding the following commands:

    AuthenticationMethods publickey
    PubkeyAuthentication yes

    3) Disable root user login:

    In this section, we want to tell you how to disable the root user login. First, you need to make sure that the normal user can log in as root. For example, let the user Jannson log in as root using the sudo command:

    On a Debian/Ubuntu:

    sudo adduser Jonnson sudo
    id Jonnson

    On a CentOS/RHEL/Fedora:

    sudo usermod -aG wheel Jonnson
    id Jonnson

    Now you can test sudo access and disable root login for ssh by running the following commands:

    sudo -i
    sudo /etc/init.d/sshd status
    sudo systemctl status httpd

    Finally, disable root login by adding the following line to sshd_config:

    PermitRootLogin no
    ChallengeResponseAuthentication no
    PasswordAuthentication no
    UsePAM no

    4) Disable password-based login:

    To disable password-based login, you should add the following commands to the sshd_config file:

    AuthenticationMethods publickey
    PubkeyAuthentication yes

    5) Use SSH public key-based login:

    For public key-based authentication, it is necessary to generate the key pair in the first step using the following commands:

    ssh-keygen -t key_type -b bits -C "comment"
    ssh-keygen -t ed25519 -C "Login to production cluster at xyz corp"
    ssh-keygen -t rsa -b 4096 -f ~/.ssh/id_rsa_aws_$(date +%Y-%m-%d) -C "AWS key for abc corp clients"

    Finally, install the public key using the following commands:

    ssh-copy-id -i /path/to/public-key-file user@host
    ssh-copy-id user@remote-server-ip-or-dns-name
    ssh-copy-id jannson@rhel7-aws-server

    Check that ssh key-based login works for you by running the following command:

    ssh jannson@rhel7-aws-server

    Alternatives to OpenSSH for Windows Server security

    In this section, we intend to tell you the best alternatives to OpenSSH for Windows Server security in 2023. These alternatives are:

    1) SecureCRT: SecureCRT is software for terminal access to network devices and servers. This software can be used for Windows, Mac, and Linux operating systems. In addition, it provides a suitable environment for professional work with terminals along with increasing productivity, advanced management of sessions, and saving time by not doing repetitive tasks!

    2) Mobaaxterm: MobaXterm software is the best toolbox for remote computing. This program on the Windows operating system offers many functions designed for programmers, webmasters, IT managers, and almost all users who need to do their remote work in an easier way.

    3) PuTTY: PuTTY software is a terminal emulator and file transfer program developed as free software for Windows. But it has also been ported to other operating systems. This program supports several different protocols including Serial, SSH, Telnet, Raw, and rlogin.

    4) Remmina:

    Remmina software is one of the useful tools for connecting to remote machines through the network. This software has the ability to support several protocols, which have a plug-in for each of them. The protocols that Remmina software supports are as follows:

    • RDP (Remote Desktop Protocol)
    • VNC (Virtual Network Protocol)
    • Telnet
    • SSH
    • NX
    • XDMCP

    5) mRemoteNG: mRemoteNG is a multi-tab remote connection manager. This tool is also a central tool for managing communications to remote systems. mRemoteNG has many features including the ability to manage multiple types of connections. In addition to RDP, this tool also supports other protocols including VNC, ICA, SSH, Telnet, RAW, Rlogin, and HTTP/S.

    The tab feature is perfect for when you have multiple sessions open and need to move between them. Other features of this software include simplicity in organizing communications, saving password information for automatic login, importing from Active Directory, full-screen mode, ability to group folders.

    Conclusion and next steps

    OpenSSH is the SSH service protocol. OpenSSH is recommended for remote login, backup, remote file transfer via scp or sftp, and much more. SSH is the best way to keep confidential and complete information and data exchanged between two networks and systems. However, its main advantage is server authentication through the use of public key encryption.

  • Experience Lightning-Fast Website Loading with Varnish Cache on AlmaLinux

    Experience Lightning-Fast Website Loading with Varnish Cache on AlmaLinux

    Varnish Cache technology increases performance by keeping duplicate web pages in memory. In effect, when a user searches for a web page, it receives a cached copy, bypassing the time-consuming process of waiting for the original web server to recreate the page. This function provides better control over the performance of your website and allows for more fine-tuning for the main results. Because Varnish Cache is open source and user-friendly, it is used by millions of websites worldwide to increase performance. In this post, we will tell you how you can Experience Lightning-Fast Website Loading with Varnish Cache on AlmaLinux.

    What is Varnish Cache?

    Varnish Cache is an open-source web application accelerator that helps optimize web pages for faster loading. It does this by storing copies of web pages in memory. When a user requests a web page, it retrieves the cached version instead of waiting for the original web server to generate the page from scratch.

    This reduces server load and page load times, making websites more responsive and improving user experience. Varnish also allows you to control how pages are stored in your cache using HTTP cache control headers. Using these, you can specify when the cached version of a page should expire before Varnish sends it back to the origin server to be regenerated.

    This gives you more control over the performance of your website and allows you to fine-tune it even more for optimal results. Because it’s open-source and relatively easy to use, millions of websites around the web now use Varnish Cache to improve performance.

    Experience Lightning-Fast Website Loading with Varnish Cache on AlmaLinux2

    Benefits of using Varnish Cache on AlmaLinux

    Varnish Cache on AlmaLinux offers several significant benefits that enhance the performance and user experience of a website:

    1- Faster Content Delivery: Varnish Cache stores a copy of the most commonly accessed pages on your website in memory. This reduces the need for frequent requests to your server, resulting in significantly faster delivery of content to end users.

    2- Reducing Server Load: Because Varnish Cache serves content from its own cache instead of relying on the server to regenerate content for each request, it significantly reduces server load and increases the overall performance of your website.

    3- Scalability: Cache Varnish can help your website handle increased traffic more easily by serving cached content to a large number of concurrent users. This feature makes it a great tool for scalability.

    4- Ability to Customize: Varnish Cache uses a flexible programming language called VCL. This allows you to create specific storage rules and policies tailored to your website’s needs.

    5- Increasing Accessibility: In cases where the backend server is down or unreachable, Varnish Cache can serve the old version of the content from its cache. As a result, the availability and uptime of your site will increase.

    6- Edge Side Includes (ESI) support: Cache Varnish supports ESI. A technology that allows you to cache different parts of a web page separately. This feature is especially useful for websites with dynamic content.

    7- GeoIP support: With Varnish, you can serve localized content using GeoIP extensions to identify users’ geographic locations.

    These benefits make Varnish Cache an invaluable tool on AlmaLinux for anyone looking to increase the performance, scalability, and reliability of their web server.

    Installing Varnish Cache on AlmaLinux

    Before we start teaching how to install Varnish Cache on AlmaLinux, it is necessary to have a Linux VPS server with the AlmaLinux operating system.

    In the first step, you must log in to the server using the following command through SSH as the root user:

    ssh root@IP_ADDRESS -p PORT_NUMBER

    Update the packages on the server with the help of the following command:

    dnf update -y

    Disable the default Varnish repo by running the following command:

    dnf module disable varnish

    Now you need to install the EPEL repository:

    dnf install epel-release -y

    Then you can install the Varnish repo using the following command:

    curl -s https://packagecloud.io/install/repositories/varnishcache/varnish70/script.rpm.sh | bash -

    Finally, you can install Varnish on Almalinux using the following command:

    dnf install varnish -y

    After the successful installation of Varnish, you should now verify the version of Varnish by running the following command:

    rpm -qi varnish

    You can start and enable Varnish using the following commands and view the installation status:

    sudo systemctl start varnish
    sudo systemctl enable varnish
    sudo systemctl status varnish

    Configuring Varnish Cache for your website

    In this section, we will teach how to configure the varnish cache on AlmaLinux. In order for Varnish to listen on port 80, you need to open the configuration file using a text editor:

    nano /usr/lib/systemd/system/varnish.service

    Now you can change the default port 6081 to port 80 using the following command:

    ExecStart=/usr/sbin/varnishd -a :80 -a localhost:8443,PROXY -p feature=+http2 -f /etc/varnish/default.vcl -s malloc,2g

    After saving the configuration file and exiting it, you can now reload the systemd daemon by running the following command:

    sudo systemctl daemon-reload

    Finally, to apply the changes, restart Varnish with the help of the following command:

    sudo systemctl restart varnish

    To configure Nginx to work with Varnish, you need to first install the Nginx package:

    sudo dnf install nginx

    Then you need to run the Nginx configuration file using a text editor:

    nano /etc/nginx/nginx.conf

    Change the listening port to 8080 as follows:

    .....
    server {
            listen       8080 default_server;
            listen       [::]:8080 default_server;
            server_name  _;
            root         /usr/share/nginx/html;
    .....

    After saving the configuration file, restart Nginx to apply the changes:

    sudo systemctl restart nginx

    In the final step, it is necessary to open access to the HTTP service in the firewall:

    sudo firewall-cmd --zone=public --permanent --add-service=http

    Also, reload the firewall settings to apply the new changes:

    sudo firewall-cmd --reload

    Testing website performance with Varnish Cache

    In this section, we are going to check the performance of cache varnish using wrk. Note that wrk is a modern tool written in C language and used to measure HTTP. This tool can be used to load test web servers with many requests per second. To install wrk, it is necessary to first install some build tools for C and git using the following command:

    sudo apt-get install build-essential libssl-dev git unzip -y

    In the next step, you can clone the git repository for wrk in the wrk directory by running the following command:

    git clone https://github.com/wg/wrk.git work

    Now you can easily change to that new directory:

    cd wrk

    After changing to the new directory, it’s time to build the wrk executable with the make command:

    make

    Copy wrk to the corresponding folder as in the command below. By doing this you will be able to access it from anywhere in your directory structure:

    sudo cp wrk /usr/local/bin

    You can use wrk to test Apache responsiveness:

    wrk -t2 -c1000 -d30s --latency http://server_ip/

    The meaning of the parameters in the above command is as follows:

    • -t2: Run two threads.
    • -c1000: Keep 1000 HTTP connections open.
    • -d30s: Run the test for 30 seconds.
    • –latency: Print latency statistics.

    The output of the above command will be as follows:

    output
    Running 30s test @ http://your_ip_address/
      2 threads and 1000 connections
      Thread Stats   Avg      Stdev     Max   +/- Stdev
        Latency    44.45ms  104.50ms   1.74s    91.20%
        Req/Sec     8.29k     1.07k   12.40k    71.00%
      Latency Distribution
         50%   11.59ms
         75%   22.73ms
         90%  116.16ms
         99%  494.90ms
      494677 requests in 30.04s, 5.15GB read
      Socket errors: connect 0, read 8369, write 0, timeout 69
    Requests/sec:  16465.85
    Transfer/sec:    175.45MB

    Now it’s time to run the same test for the Varnish server by running the following command:

    wrk -t2 -c1000 -d30s --latency http://server_ip:8080/

    The output of the above command will be as follows:

    output
    Running 30s test @ http://server_ip:8080/
      2 threads and 1000 connections
      Thread Stats   Avg      Stdev     Max   +/- Stdev
        Latency    14.41ms   13.70ms 602.49ms   90.05%
        Req/Sec     6.67k   401.10     8.74k    83.33%
      Latency Distribution
         50%   13.03ms
         75%   17.69ms
         90%   24.72ms
         99%   58.22ms
      398346 requests in 30.06s, 4.18GB read
      Socket errors: connect 0, read 19, write 0, timeout 0
    Requests/sec:  13253.60
    Transfer/sec:    142.48MB

    Troubleshooting common issues

    In some cases, the varnish may show incorrect behavior. In other words, it doesn’t behave the way you want it to. There are a few places you can check to troubleshoot these, including:

    • varnishlog
    • /var/log/syslog
    • /var/log/messages

    In the following, we will introduce you to the basic troubleshooting method in Varnish.

    1) Varnish won’t Start

    Sometimes the varnish may not start. There are many reasons for not starting Varnish. Start Varnish in debug mode with the following command:

    varnishd -f /usr/local/etc/varnish/default.vcl -s malloc,1G -T 127.0.0.1: 2000 -a 0.0.0.0:8080 -d

    The output of the above command will be as follows:

    Using old SHMFILE
    Platform: Linux,2.6.32-21-generic,i686,-smalloc,-hcritbit
    200 193
    -----------------------------
    Varnish Cache CLI.
    -----------------------------
    Type 'help' for command list.
    Type 'quit' to close CLI session.
    Type 'start' to launch worker process.

    Now you can tell the main process to start the cache by running the command:

    start
    bind(): Address already in use
    300 22
    Could not open sockets

    2) Varnish is Crashing (panics)

    The next thing is that when the varnish wears off, the child’s processing may be damaged. Note that when Varnish encounters this, the save process will be disabled in a controlled manner. It should be noted that this failure may be due to incorrect configuration. You can check the status of panic messages by running the following command:

    panic.show

    The output of the above command may be as follows:

    Assert error in ESI_Deliver(), cache_esi_deliver.c line 354:
      Condition(i == Z_OK || i == Z_STREAM_END) not true.
    thread = (cache-worker)
    ident = Linux,2.6.32-28-generic,x86_64,-sfile,-smalloc,-hcritbit,epoll
    Backtrace:
      0x42cbe8: pan_ic+b8
      0x41f778: ESI_Deliver+438
      0x42f838: RES_WriteObj+248
      0x416a70: cnt_deliver+230
      0x4178fd: CNT_Session+31d
      (..)

    3) Varnish is Crashing (segfaults)

    The next error you may encounter is Varnish crashing (segfaults). In other words, Varnish may encounter a segmentation fault. When this event is registered by the child process, the core is unloaded and the child process is restarted. But to debug a segfault, you need to provide some data.

    First, you need to make sure you have installed Varnish with debug symbols. After that, you need to make sure that kernel dump is allowed in the main shell:

    ulimit -c unlimited

    Open the kernel with gdb and issue the following command. By doing this you will get a stack trace of the thread that caused the segfault error:

    bt

    4) Varnish gives me Guru Meditation

    To fix this problem, it is necessary to first find the corresponding log entries in varnishlog. Since it can be difficult to trace the entries, you can set varnishlog to log all your 503 errors using the following command:

     $ varnishlog -q 'RespStatus == 503' -g request

    To get varnishlog to process the entire shared memory log, just run the following command:

    $ varnishlog -d -q 'RespStatus == 503' -g request

    Best practices for using Varnish Cache on AlmaLinux

    To get the most out of Varnish Cache in AlmaLinux, it’s important to follow best practices. Some key best practices include:

    1) Fine-tune the Varnish configuration: Experiment with different TTL values and URL patterns to find the optimal configuration for your website.

    2) Monitor website performance: Regularly monitor website performance using tools like GTmetrix or Pingdom.

    3) Keep Varnish Cache up-to-date: Update Varnish Cache regularly to make sure you’re using the latest version with the latest features and bug fixes.

    Alternatives to Varnish Cache

    10 alternatives to Varnish Cache are:

    1) ApacheBooster

    2) Squid-Cache

    3) Speed Kit

    4) WampServer

    5) W3 Total Cache

    6) Amazon DynamoDB Accelerator (DAX)

    7) TwicPics

    8) F5 NGINX

    9) F5 NGINX Plus

    10) Varnish Software

    Conclusion

    As you read in this article, Varnish Cache is a powerful open-source web application accelerator that is widely used to increase the speed and performance of websites. By storing cached versions of web pages, it significantly reduces server load and improves page load times. Customization through its configuration language allows tailored storage rules based on specific website needs. Due to the use of Varnish cache and its importance, in this article, we tried to teach you how to Lightning-Fast Website Loading with Varnish Cache on AlmaLinux.

  • The Great Linux Debate: Comparing CentOS and Ubuntu

    The Great Linux Debate: Comparing CentOS and Ubuntu

    Choosing an operating system for your server can be a really confusing task due to the huge list of options available. Especially if you want to use your own server with a Linux distribution. There are many choices, but none are as popular as Ubuntu or CentOS. Whether you’re a pro or a beginner, it usually comes down to choosing between the two options. It is safe to say that there is no direct decision. In the post you will read, the comparison of CentOS and Ubuntu will be done using different parameters.

    What is Linux?

    The Unix operating system was developed and expanded in 1971 by the American Telephone and Telegraph Company. This operating system was expensive and not all people could easily use it. Therefore, the Linux system, which is very similar to Unix and its sub-branches, was chosen as a successor.

    In 1991 Torvalds Linux created the Linux kernel. Linux operating system is supported by many companies. Among the most important tasks of the Linux kernel, the following can be mentioned:

    • Data storage: Data storage is done in memory that works with random access, in permanent memory, or virtual file system.
    • Access to the computer network
    • Timing
    • Using input and output tools such as a mouse, keyboard, webcam, and USB flash drive
    • Security: This security can include the security of resources as well as users and different user groups.

    Types of Linux distribution (distro) is an operating system that is made of a software package based on the Linux kernel and often a package management system. Linux users usually get their operating system by downloading one of the Linux distributions. A typical Linux distribution includes the Linux kernel, GNU tools and libraries, additional software, documentation, a window system, a window manager, and a desktop environment.

    To know more about Linux software, you should know its famous distributions. The following distributions are among the most famous:

    • Debian
    • Cloud Linux
    • CentOS
    • AlmaLinux
    • Rocky Linux
    • Ubuntu
    • Mint
    • Kali Linux
    • OpenSUSE

    In the rest of this article, we will do a full review of CentOS and Ubuntu distributions and compare them in terms of security, stability, ease of use, and package management.

    centos vs ubuntu

    What is CentOS?

    The CentOS operating system (Community Enterprise Operating System) is a server operating system. CentOS is a free distribution of Linux supported by communities and there is no need to pay for it. CentOS is based on the Enterprise version, which is known as the server version of the RedHat Linux distribution. The versions of CentOS that enter the market are basically the mirror version of the versions introduced in Red Hat Enterprise Linux. By choosing this popular distribution, there is no need to pay exorbitant fees to buy Enterprise products.

    In most organizations, RHEL is used as the main server, and CentOS is used as a backup and redundant server. This issue will cause other organizations not to need to hire several system administrators, and only by hiring a system administrator who has mastered RHEL, the organization’s CentOS management will be done.

    From the perspective of architecture, this distribution has the ability to support x86, x64, and i386 architectures and even PowerPCs. CentOS also supports GNOME and KDE desktops and this operating system can be used as a server and workstation.

    Advantages of CentOS:

    This operating system is chosen by many users and organizations for several reasons. Some of the important advantages of CentOS are:

    • Open-Source
    • Establishment in the industry
    • Long term support
    • Active community
    • Stability

    What is Ubuntu?

    Ubuntu is a popular free and open-source Linux-based operating system that you can use on your PC or Linux VPS server. It’s a massive project that helps millions of people worldwide run machines built with free and open-source software on various devices.

    Linux comes in many shapes and sizes, with Ubuntu being the most popular version on desktops and laptops. Note that when we say Ubuntu is free, we don’t mean that it costs only; Rather, unlike most proprietary software (such as Windows and macOS), free and open-source software allows you to edit its code and install and distribute as many copies as you like. You don’t pay to use it; So, so not only is Ubuntu free to download; But you can use it as you want.

    Advantages of Ubuntu:

    There are many reasons to use Ubuntu, but here are the most important ones:

    • This program is free and open source.
    • It is easy to install and test. In fact, you don’t need to be an expert to install it.
    • It is beautiful and user-friendly.
    • It’s stable and fast, typically loading in less than a minute on modern computers.
    • It does not have any important viruses and is immune to harmful Windows viruses.
    • is up to date; Because Canonical releases new versions every 6 months and provides regular updates for free.
    • It is supported and you can get all the backups and guidance you need from the global FOSS community and Canonical.
    • Among the different versions of the Linux operating system, Ubuntu has the most support.

    The differences between CentOS and Ubuntu

    CentOS and Ubuntu are both popular operating systems for web servers in the software operations market. CentOS is basically built on the Linux framework and Linux distribution to provide a free and supported computing platform. Ubuntu is also basically an open-source distribution of Linux and it is considered one of the popular cloud operating systems it runs in most cases and places such as desktop and cloud environments and almost everything related to the Internet.

    In the rest of this article, we will compare Ubuntu and CentOS in terms of security, stability, ease of use, and package management.

    CentOS vs. Ubuntu: Security

    Ubuntu is updated frequently. A new version is published every six months. Ubuntu offers LTS (Long Term Support) releases every two years, supported for five years. These different versions allow users to choose whether they want the “latest and greatest” or the “tried-and-true”. Due to frequent updates, Ubuntu often includes newer software in newer versions. This feature can be fun to play with new features and technologies but can conflict with existing software and configurations.

    CentOS is rarely updated. This is partly because the CentOS development team is smaller. It is also due to extensive testing on each component before release. CentOS versions are supported for ten years from the release date and include security and compatibility updates. However, a slow release cycle means a lack of access to software updates. If they have failed to release these updates to the main repository, you can either install the updates manually.

    CentOS, on the other hand, is based on the Linux framework and is therefore very secure and protected through 3 layers of security. Ubuntu also has good security layers, but sometimes it may be prone to web threats due to frequent updates.

    Regardless of the differences between CentOS and Ubuntu, both are secure with regular updates.

    CentOS vs. Ubuntu: Stability

    The stability of an operating system means that its bugs are fixed quickly. Stability is one of the most important things that affect the performance of servers because an error can lead to the loss of information or server down. This in itself is considered an irreparable disaster, which is associated with a large financial burden. CentOS operating system consists of a strong kernel so its stability is guaranteed and it is better than other Linux distributions.

    One of the reasons that makes Ubuntu suitable for beginners is its stability. You may have heard that if you use Linux, you should be well aware of how to manually fix things and use the command line. This is definitely not the case with Ubuntu. Stability is the main reason why Ubuntu is the first choice of operating system for beginners. Once you’re done with the installation process, all you have to do is keep the packages up-to-date on your system, nothing else. Since packages are tested before being included in the official repositories, you can be sure that your system won’t crash when you install new software. Ubuntu is stable enough to run on servers where uptime and performance are a priority.

    CentOS vs. Ubuntu: Ease of Use

    Ubuntu has gone a long way in designing its system to be user-friendly. The graphical interface is intuitive and easy to manage with useful functionality. Running applications from the command line is simple. But on the other hand, CentOS is more suitable for users with more expertise in this field.

    CentOS is primarily based on Red Hat Linux and is more difficult to learn than Ubuntu due to its smaller community and less documentation. In Ubuntu, it is easier to learn due to the support of more communities and the large number of tutorials and books on the market and the Internet.

    CentOS vs. Ubuntu: Package Management

    A software package is an archive of compiled binary files, resources needed to build the software, and scripts to install and run the software. A package also includes a list of packages in the form of dependencies that must be installed on the system to run the desired software. While the features and facilities of this package manager are very similar in different Linux distributions, the format of packages, tools, and commands are different.

    In Ubuntu, the package format is deb. APT (Advanced Packaging Tool) provides commands for various tasks with packages, including installing, updating, removing, and finding packages in repositories. APT commands act as front-end and high-level commands for the low-level dpkg tool. dpkg can be used to install package files that are on the system. You can also use the apt-get and apt-cache commands (the older version of the apt command) to manage packages in most Debian-based distributions.

    CentOS uses rpm format packages. In CentOS, the yum tool is used to manage the packages in the repositories as well as the packages on the system. The low-level rpm tool can also be used to install the package files that are on the system. In recent versions, the dnf command is used instead of yum.

    Which is better for your needs: CentOS or Ubuntu?

    In this section, in general, by providing several different parameters, including the origin, purpose, support model, how to install programs and application communities, we will give you the opportunity to decide which is better for your needs depending on your needs.

    CentOS and Ubuntu are both Linux operating systems, but they are based on different Linux distributions. Next, we explore the key differences between CentOS and Ubuntu.

    1) Origin: CentOS is developed from Red Hat’s commercial operating system. For this reason, CentOS is commonly used as a commercial-grade Linux distribution. While Ubuntu is developed from the roots of Debian and is known as a Linux distribution based on the Debian family.

    2) Purpose: CentOS is primarily designed for server environments and business and enterprise uses. Ubuntu is often considered a general purpose, desktop distribution and is suitable for everyday use, servers, and desktop systems.

    3) Support model: CentOS typically uses a long-term support model. This means that released versions of CentOS will be updated and supported for a long time. In contrast, Ubuntu comes with two standard versions, namely LTS (Long-Term Support) and regular (non-LTS) versions. LTS versions receive security updates and support for five years, while non-LTS versions receive support for about nine months.

    CentOS consists of a set of Red Hat software, including the Apache web service, MySQL, and Python programming language. On the other hand, Ubuntu uses software such as LibreOffice, Evolution e-mail program, and Firefox browser.

    4) How to install applications: CentOS uses the YUM (Yellowdog Updater Modified) package manager, while Ubuntu uses the APT (Advanced Package Tool) package manager. These two package managers work with differences in syntax and functionality.

    5) User Communities: Both CentOS and Ubuntu have strong and active user communities. However, the Ubuntu user community is much larger and more active, and there are more discussions about Ubuntu. This means more resources, online tutorials, and community support from users.

    Ultimately, choosing between CentOS and Ubuntu depends on your needs, preferences, and uses. If you need a stable and reliable operating system for servers and business use, CentOS is a good choice. If you need a desktop Linux distribution for daily use and development of software and games, Ubuntu can be a good option. Also, if you’re looking for a larger user community and the most training and support resources, Ubuntu might be the best option. However, to choose between CentOS and Ubuntu, it is better to consider your personal needs, skills, and experience and determine the best option for you by testing and experimenting with both distributions.

    Conclusion

    To conclude this comparison of CentOS and Ubuntu, both are famous and one of the best Linux distributions that have their own advantages and disadvantages. Choosing one is easy if you consider your needs and are willing to do some work. The purpose of this article was to compare CentOS and Ubuntu and provide an overview of the differences between these two Linux distributions to facilitate the decision-making process.

  • DNS or FTP: Which One is the Backbone of Your Website’s Functionality?

    DNS or FTP: Which One is the Backbone of Your Website’s Functionality?

    DNS servers or Domain Name Server is responsible for converting URLs and domain names into IP addresses so that computers can understand and use them. On the other hand, we have FTP or File Transfer Protocol which is a standard network protocol used for transferring files from one host to another over a TCP-based network. We will present this tutorial to give a full explanation of DNS and FTP and also find out which one is the backbone of your website’s functionality.

    Understanding DNS (Domain Name System)

    It is very important to know the concept of DNS and its functionality. If a user tries to enter a website from a personal computer, laptop, or tablet using the internet, the user should use DNS. So, understanding the usage of DNS is very important:

    DNS role

    Browsers and other Internet activities rely on DNS to provide the information needed to connect users to remote hosts as quickly as possible. DNS mapping is distributed across the Internet in a chain of authorities. ISPs, access companies, as well as governments, universities, and other organizations typically have dedicated ranges of IP addresses and an assigned domain name. They also run DNS servers to manage the mapping of those names to those addresses. Most URLs are built around the domain name of the web server responsible for receiving client requests. Before we start and deal with the main issue, we recommend you use the cheap dedicated server plans of our website to setup DNS.

    Importance of DNS in Website Functionality

    DNS is a critical component of website functionality. Without DNS, users would have to remember the IP address of every website they want to visit, which would be impractical. DNS allows users to access websites using user-friendly domain names, making it easier to navigate the internet. In addition, DNS helps to distribute traffic to different servers, ensuring that the load is evenly balanced and the website remains accessible even under heavy traffic.

    DNS Configuration Process

    Configuring DNS can be a complex process, but most web hosting providers offer tools and guides to make it easier. The first step is to choose a DNS provider. It can be either your web hosting provider or a third-party provider like Cloudflare or Google DNS. Once you’ve chosen a provider, you’ll need to set up your DNS records. These records include information about your domain name, IP address, and other settings. This process can vary depending on your web hosting provider and the type of DNS records you need to setup.

    One common issue with DNS configuration is DNS propagation, which refers to the time it takes for DNS changes to take effect. This can be frustrating for website owners who need to make changes quickly. Note that it’s important to be patient and allow time for the changes to propagate. Another common issue is DNS caching, which can cause outdated information to be displayed. Clearing your DNS cache can help resolve this issue.

    Common DNS Problems and How to Troubleshoot Them

    Even with proper configuration, DNS issues can still occur. One common issue is DNS resolution failure, which occurs when a DNS server is unable to resolve a domain name. The reason may be a variety of factors, including incorrect DNS records, network connectivity issues, or DNS server errors. To troubleshoot this issue, start by checking your DNS records to ensure they are correct. You can also try using a different DNS server or contacting your web hosting provider for assistance.

    Another common issue is DNS hijacking. This problem occurs when a malicious actor redirects traffic from a legitimate website to a fake website. This can be difficult to detect, but there are tools available to help identify and prevent DNS hijacking. It’s also important to keep your DNS records secure and to use strong passwords to prevent unauthorized access.

    Understanding FTP (File Transfer Protocol)

    Understanding FTP (File Transfer Protocol)

    FTP, or File Transfer Protocol, is another critical component of website functionality. It is used to transfer files between computers and servers, allowing website owners to upload and manage their website files. FTP works by using a client-server model, where the client (usually a web developer or website owner) connects to the server using a username and password and then transfers files between the two computers. The importance of FTP in website functionality cannot be overstated. Without FTP, website owners would need to manually upload and manage their website files, which would be a time-consuming and error-prone process. FTP also allows website owners to easily make changes to their website files, ensuring that their website stays up-to-date and secure.

    Importance of FTP in Website Functionality

    FTP is an essential component of website functionality, as it allows website owners to upload and update content on websites. Without FTP, website owners would need to manually upload files to their servers, which would be time-consuming and prone to errors. FTP makes it easy to update content and ensure that the website is always up-to-date.

    FTP Configuration Process

    Configuring FTP is typically done through a web hosting control panel or FTP client software. The first step is to create an FTP account, which includes a username and password that the client will use to connect to the server. Once the account is created, the client can then connect to the server using an FTP client like FileZilla or Cyberduck. From there, they can transfer files between their computer and the server.

    One common issue with FTP configuration is connection errors, which can be caused by incorrect login credentials or firewall settings. To troubleshoot this issue, double-check your login credentials and ensure that your firewall is not blocking FTP traffic. Another common issue is file transfer errors. It can be caused by file permissions or file size limits. To troubleshoot this issue, ensure that your file permissions are properly configured and your FTP client is set up to handle large file transfers.

    Common FTP Issues and How to Troubleshoot Them

    Even with proper configuration, FTP issues can still occur. One common issue is FTP connection timeouts, which occur when the client is unable to connect to the server. This can be caused by network connectivity issues or server errors. To troubleshoot this issue, try connecting to the server from a different network or contacting your web hosting provider for assistance.

    Another common issue is FTP data transfer errors, which occur when files are transferred incompletely or with errors. This can be caused by a variety of factors, including file size limits, file permissions, or network connectivity issues. To troubleshoot this issue, ensure that your file permissions are properly configured and that your FTP client is set up to handle large file transfers.

    DNS vs FTP: Which one is the backbone of your website’s functionality?

    Both DNS and FTP are critical components of website functionality, but they serve different purposes. DNS is responsible for translating domain names into IP addresses, allowing users to access websites using human-readable names. FTP, on the other hand, is used to transfer files between computers and servers, allowing website owners to upload and manage their website files.

    While both DNS and FTP are important, DNS is arguably the more critical component. Without DNS, users would be unable to access your website, regardless of how well it’s configured. FTP, on the other hand, is important for website management but does not directly impact user experience. That being said, both DNS and FTP are essential to ensuring that your website runs smoothly and efficiently.

    Conclusion

    In conclusion, DNS and FTP are both critical components of website functionality. DNS is responsible for translating domain names into IP addresses. While FTP is used to transfer files between your computer and your website’s server. Both are essential for ensuring that your website runs smoothly and remains accessible to users. While configuring DNS and FTP can be a complex process, website owners need to understand how they work and how to troubleshoot common issues. Whether you’re a seasoned webmaster or a newbie to the world of website management, understanding DNS and FTP is essential for the success of your website.

    FAQ

    What is the exact role of DNS?

    It turns domain names into IP addresses and allows browsers to find websites and other resources.

    Is there any need for IP in FTP?

    FTP client and internet connection are needed for using FTP. Aso you will need to know the FTP server’s IP addresses or hostname.

  • How to Install Screen Reader on Admin RDP

    How to Install Screen Reader on Admin RDP

    Using screen readers can play a key role in interacting with computer devices for the blind, visually impaired, and even the illiterate. Nevertheless, even those who possess unimpaired vision and reading abilities can reap the advantages of utilizing this software to convert textual content into audio. By employing the Screen Reader, one can effortlessly analyze and transform content into either synthesized human speech or content that is compatible with Braille displays. The primary emphasis of this article centers around the process of install Screen Reader on Admin RDP. Please continue reading for further instructions.

    Introduction to Screen Reader

    The Screen Reader software is designed to cater to a wide range of needs, supporting popular applications including web browsers, email clients, web chat programs, office suite applications, and virtual servers on Windows Server. Furthermore, its text-to-speech engine is equipped to handle over 80 languages, ensuring a comprehensive user experience. Not only does it announce the text formatting details such as font name, size, writing style, and even spelling errors, but it also goes the extra mile by automatically vocalizing the text beneath the mouse cursor. And if that wasn’t enough, it even provides auditory feedback to indicate the precise position of the mouse upon the user’s request.

    Install Screen Reader on Admin RDP

    To ensure a successful installation of Screen Reader to Admin RDP, follow the following steps:

    1. Begin by typing “Remote Desktop” in the WIN field and hitting Enter.

    2. In the resulting window, proceed to enter the IP address of your server and click on the Connect button.

    3. If you have recently installed VPS, after logging in, you will gain access to your desktop, which will display all available icons on your Windows server.

    4. Now, in order to enable sound, press WIN+R to open the run dialog. This is necessary because the sound is disabled by default in the Windows server.

    5. In the Run dialog, type “cmd” and press Enter. By following these steps, you will successfully install Screen Reader to Admin RDP.

    run window

    In this step, you have to type the following command and then press Enter.

    net start audiosrv
    install screen reader on rdp

    It’s important to keep in mind that the previously mentioned methods do not automatically start the audio service during Windows startup. To address this, follow the steps provided below.

    How to enable the narrator on Admin RDP

    To activate Windows Narrator, revisit the Remote Desktop on Windows guide. Microsoft Windows Narrator is a program available on Windows Server that facilitates screen reading for individuals with visual impairments. Typically, blind users navigate using keyboard inputs rather than a mouse. They rely on keystrokes like ALT+TAB to switch between open windows.

    First Method:

    The first way to enable Microsoft Windows Narrator is simple. If you use Windows Server 2012 or 2016, you should turn on Narrator by pressing CTRL+WIN+ALT at the same time.

    Because this method does not always work, you can use the following method to enable Microsoft Windows Narrator.

    Second Method:

    Now you have to press WIN+R again to open the run dialog. Then you should type narrator into the run dialog, and then press Enter. You will only hear the sound of the Narrator speaking if your sound is on.

    narrator setting from run windows

    *

    narrator settings - Install Screen Reader on Admin RDP

    If you plan to permanently use the screen reader on your server, you will need to configure the audio service to start automatically. We need the audio service to start automatically when the server starts up because for a blind user, using audio is the only way to communicate with the system.

    Now you should open the run dialog again and type services.msc and press enter.

    setup Screen Reader - Install Screen Reader on Admin RDP

    Upon executing the steps, you will come across a prompt that states: “You are in a tree view.” To navigate through the services, simply press the TAB key and utilize the arrow keys.

    Install Screen Reader on Admin RDP

    You should continue pressing w until you hear the Windows audio services and then press Enter. If the setting is configured as manual, you can modify it by pressing the up and down arrow keys. After hearing ”automatic”, press Enter. Now you can close the dialog box.

    Conclusion

    In this article, we explained the importance of a screen reader for blind people and also enumerated its features. Using this article, you can easily install and setup Screen Reader on Admin Remote Desktop.

  • Wireshark: An Excellent Network Protocol Analyzer in Kali Linux

    Wireshark: An Excellent Network Protocol Analyzer in Kali Linux

    Today, we’re diving into the world of network protocol analysis with Wireshark in Kali Linux. Wireshark is an awesome open-source tool that captures and analyzes network traffic. It helps you understand how different protocols work and ensures the security and efficiency of your network. Let’s explore the power of Wireshark and how it can make your network troubleshooting a breeze!

    Introduction to Kali Linux and its features

    If you are a bit familiar with what’s going on in the IT world, you probably know that Kali Linux is a powerful and versatile operating system widely used for ethical hacking, penetration testing, and digital forensics. It is specifically designed for security professionals and enthusiasts, providing a wide range of tools and utilities for testing and assessing the security of computer systems. With its user-friendly interface and extensive collection of pre-installed software, Kali Linux allows users to identify vulnerabilities, simulate attacks, and enhance the overall security posture of their systems.

    There are many key tools that come with Kali Linux that makes the experience of using this OS a pure delight. Wireshark is one of these awesome tools that is used by experts to troubleshoot network issues, analyze and develop software and communication protocol. We recommend you use the Linux VPS server plans prepared for you on our website in line with this tutorial.

    What is Wireshark and how does it work?

    So, imagine you’re someone who’s really into the tech world, and you’re trying to solve a mystery in the digital world. Well, Wireshark is one of the best tools in Kali Linux that you can use to see what’s really happening behind the scenes. It’s a super cool network protocol analyzer that lets you peek into the communication between devices on a network.

    Now, here’s the cool part: Wireshark works by capturing and analyzing the packets of data that flow through a network. It’s like listening in on all the conversations happening between devices. You can think of these packets as tiny envelopes containing information, like who’s sending it, where it’s going, and what it contains. This tool sniffs out these packets and displays them in a user-friendly interface, showing you the core details of each conversation.

    But there’s more! Wireshark doesn’t just show you the packets; it also decodes the data, so you can understand what’s actually being said. It can dissect various network protocols like HTTP, TCP, and DNS, and display the contents of each packet in a readable format. This helps you troubleshoot network issues, analyze network performance, and even detect potential security threats. With Wireshark, you become the Sherlock Holmes of the digital world, solving mysteries one packet at a time.

    What is Wireshark and how does it work?

    How to Install Wireshark on Kali Linux

    So let’s see how you can install this awesome tool on your Kali machine. Here’s a short instruction for you:

    1. Open the terminal on your Kali Linux system. You can do this by clicking on the terminal icon in the taskbar or by pressing Ctrl+Alt+T.

    2. You can update your package lists by executing the command below:

    sudo apt update

    3. Once the update is complete, you can install Wireshark by running the following command:

    sudo apt install wireshark

    4. During the installation process, you’ll be prompted to configure Wireshark to allow non-superusers to capture packets. Press the ‘Tab‘ key to select ‘Yes‘ and hit ‘Enter’ to continue.

    5. After the installation is complete, you may need to add yourself to the ‘wireshark’ group to be able to capture packets without running Wireshark with superuser privileges. Run the following command:

    sudo usermod -aG wireshark your_username

    Replace ‘your_username‘ with your actual username.

    6. Finally, log out and log back in for the group changes to take effect.

    That’s it! You’ve successfully installed Wireshark on Kali Linux. You can now launch it by searching for it in the applications menu or by running the ‘wireshark’ command in the terminal. Remember to use this tool responsibly and adhere to ethical guidelines when capturing and analyzing network traffic.

    Network protocol analysis using Wireshark

    Network protocol analysis using Wireshark is a powerful technique that allows for in-depth examination and troubleshooting of network traffic. Wireshark, a widely-used network packet analyzer, captures and displays network packets, enabling users to analyze various protocols such as TCP, UDP, HTTP, and more.

    By examining packet headers and contents, it helps identify potential issues, bottlenecks, or anomalies within the network. Wireshark provides valuable insights into network behavior, helping network administrators and analysts understand the flow of data, detect potential security threats, and optimize network performance. Its user-friendly interface, extensive filtering options, and robust analysis capabilities make it an essential tool for network troubleshooting, performance tuning, and ensuring the smooth operation of networks.

    Network protocol analysis using Wireshark

    Troubleshooting Wireshark Issues in Kali Linux

    Like any other tool we use, Wireshark is not free of trouble. Don’t worry though, we got your back! Here are five common issues that users face when using Wireshark and a brief explanation on how to solve the issue.

    Issue: Wireshark not capturing packets

    Troubleshooting:

    • Verify that you have sufficient privileges to capture packets by running Wireshark with root/administrator privileges using the “sudo” command.
    • Check if the network interface you are trying to capture is correctly selected in Wireshark’s interface list.
    • Ensure that no other applications or services are already using the network interface, as this may conflict with Wireshark’s packet capturing.

    Issue: No network interfaces are listed in Wireshark

    Troubleshooting:

    • Check if the necessary drivers for your network interfaces are installed. Use the “lsmod” command to verify if the required kernel modules are loaded.
    • Ensure that the network interface is properly connected and recognized by the operating system. Use the “ifconfig” command to check the interface status.
    • Restart the network-manager service or the entire system to refresh the network interfaces list in Wireshark.

    Issue: Wireshark displays only local traffic

    Troubleshooting:

    • Confirm that your network interface is set to promiscuous mode, allowing it to capture all network traffic. Go to “Capture Options” in Wireshark and check the “Enable promiscuous mode” box.
    • Verify that your network interface is connected to a network with active traffic. If you are testing on a local network, ensure that other devices are generating network traffic.

    Issue: Wireshark captures packets but shows them as encrypted or unreadable

    Troubleshooting:

    • Check if the captured packets are encrypted using protocols like SSL/TLS. In such cases, you may need to configure Wireshark to decrypt the traffic by providing the necessary encryption keys or certificates.
    • Ensure that you have the required decryption plugins installed in Wireshark to handle specific encryption protocols. Install any missing plugins or update the existing ones.

    Issue: Wireshark crashes or becomes unresponsive

    Troubleshooting:

    • Ensure that you are using the latest version of Wireshark and that it is compatible with your Kali Linux distribution. Update Wireshark if necessary.
    • Disable unnecessary protocols and dissectors in Wireshark’s preferences to reduce the processing load.
    • Check if your system has enough resources (CPU, memory) to handle the packet capturing and analysis. Close any other resource-intensive applications running concurrently.

    Remember to consult the Wireshark documentation or community forums for more specific troubleshooting steps if needed.

    what is wireshark

    Conclusion

    In conclusion, Wireshark is an excellent network protocol analyzer in Kali Linux. It offers a user-friendly interface, powerful features, and extensive protocol support, making it a valuable tool for network administrators, security professionals, and anyone interested in analyzing and troubleshooting network traffic. Wireshark’s ability to capture, dissect, and analyze network packets in real time provides valuable insights into network performance, security vulnerabilities, and potential threats. Its availability in Kali Linux further enhances its functionality and usefulness for network monitoring and analysis. Overall, Wireshark is a reliable and indispensable tool for network analysis in Kali Linux.

  • How Netdata is Revolutionizing Monitoring on Rocky Linux

    How Netdata is Revolutionizing Monitoring on Rocky Linux

    If you are looking for an open-source and real-time server monitoring tool, Netdata is definitely a good choice that offers hundreds of tools to monitor servers, CPU, system processes, memory usage, disk usage, IPv4 and IPv6 networks, a firewall, and more. Netdata works in such a way that it uses collectors to help you collect metrics from your favorite programs and services, and you can view them in interactive and simultaneous graphs. Here we will examine how Netdata is revolutionizing monitoring on Rocky Linux.

    Traditional Monitoring vs. Netdata Monitoring

    Traditional system monitoring involves collecting performance data from servers and network devices and analyzing that data to identify issues. This process can be time-consuming and prone to errors, and it often fails to provide the level of real-time insight that businesses need to stay ahead of potential problems. Netdata, on the other hand, provides real-time monitoring of system metrics, with dashboards and alerts that allow organizations to quickly detect and respond to issues as they arise.

    Netdata’s approach to monitoring is significantly different from traditional methods. Rather than collecting data at set intervals, Netdata continuously monitors system metrics, providing real-time insights into system performance. This approach allows businesses to detect and address issues faster than ever before, minimizing downtime and improving overall system performance.

    Benefits of Using Netdata on Rocky Linux

    Here we will show you some benefits of using the Netdata monitoring tool on Rocky Linux:

    Scalability

    Storing distributed data as close to the edge as possible has made Netdata incredibly scalable. Whether in bare-metal servers or containers, cloud deployments, and IoT devices, Netdata offers lightweight operations, high fidelity, protected privacy, and even good scalability at a fraction of the cost.

    Open-Source

    Netdata is provided as an open-source program. This means that the entire software and the main building block of the ecosystem (the Netdata agent) is distributed as open-source under the GPL-v3+ license. This tool collects thousands of hardware and software metrics from physical and virtual systems that we call nodes. Also, these criteria are organized in an easy-to-use interface.

    Enjoyable Monitoring

    Monitoring with Netdata is fun because it doesn’t force you to have a deep understanding of each metric and spend a lot of time configuring monitoring. The tool itself collects, stores, queries, sets alerts, visualizes, and even trains machine learning models for everything. This makes it easier to understand the metrics when you are reviewing your infrastructure and applications or trying to troubleshoot application problems.

    Cost Effective

    The database you install on your system is the Netdata agent. Cloud Netdata is also such that it integrates all agents into a large distributed database. It uses memory, CPU, and disk resources that can be stored and accessed in your production systems in the current state. Each Netdata installation can scale to millions of benchmarks per second, even when you need centralized points to provide higher data access. These things make this tool affordable.

    Features of Netdata Monitoring

    Netdata includes lots of significant features which you can not ignore. These features are:

    – Netdata is an easy-to-use and easy and fast setup with full automation.

    – It has more than 1000 Plugins and Integrations.

    – Real-time and high-fidelity and low latency are other features of Netdata.

    – It is equipped with powerful visualizations and dashboards.

    – There are powerful notifications and alerts.

    – It is flexible and scalable.

    – Netdata provides high Security and Privacy.

    How to install Netdata on Rocky Linux

    As mentioned, Netdata is a real-time server monitoring tool that collects real-time data such as CPU, RAM, SWAP usage, bandwidth, etc. We suggest you choose from the Linux VPS servers offered on our website to use the Rocky Linux operating system. Now we will show how to install this applicable tool on Rocky Linux:

    The first step is to update your system to the latest version, so use the following command:

    dnf update

    Then you should run this command to install EPEL repositories:

    dnf install epel-release -y

    The next step is to install the necessary packages for Netdata. Here is the related command:

    wget -O /tmp/netdata-kickstart.sh https://my-netdata.io/kickstart.sh && sh /tmp/netdata-kickstart.sh

    Tip: If the script prompts you to enter before installing each package, you must type y or yes and accept the package being installed.

    As you finished the installation, start and enable Netdata to boot or reboot automatically and verify the status of the application:

    systemctl start netdata
    systemctl enable netdata
    systemctl status netdata

    It is time to configure the firewall on Netdata. The default port for Netdata is 19999. Enable ports in the firewall to use Netdata from your browser:

    firewall-cmd --permanent --add-port=19999/tcp
    firewall-cmd --reload

    Use the URL below on the browser to access the Netdata dashboard:

    http://<your IP address>:19999/
    netdata dashboard

    Configuring Netdata for optimal performance

    Use the configuration file to configure and modify Netdata. This configuration file is located at the at /etc/netdata/netdata.conf directory. You can find this setting by referring to the following URL in your browser:

    https://netdata.example.com/netdata.conf

    The default configuration will be enough to get started. You can use the desired text editor like Nano to make changes to the configuration options based on your requirements. At last, you have to restart the Netdata service using the following command to apply the changes:

    sudo systemctl restart netdata

    Real-time monitoring with Netdata

    Netdata agent searches hundreds of standard applications and groups them by purpose. These applications are supported through aggregators. Now for better understanding suppose you want to monitor MySQL database using Netdata. The NetData agent knows that it should look for processes with the string MYSQL along with a few others and put them in the SQL group. After this process, the SQL group is changed to one dimension in all process-specific graphs. Process and group settings are done by two special and powerful collectors.

    apps.plugin: This plugin monitors the Linux process tree every moment, like fax top or ps, and collects resource usage information on each running process. Then adds a layer of meaningful visualization automatically on top of these metrics and makes charts for each application.

    ebpf.plugin: This plugin collects Berkeley Packet Filter or ebpf in Netdata which monitors Linux kernel-level metrics for file descriptors, process management, or virtual file system IO and then passes processes-specific metrics to apps.plugin in order to monitor. This aggregator aggregates metrics at event frequency. This is more accurate than the standard Netdata detail per second.

    Advanced monitoring with Netdata plugins

    Netdata includes a comprehensive set of built-in plugins, but there are also several advanced monitoring plugins to improve its performance, here we will mention some of the best ones:

    – Redis: Monitor status by reading the server response to the INFO ALL command from any number of database instances.

    – Elasticsearch: With this plugin, you can collect dozens of search engine performance metrics from local nodes and local indexes, including cluster health and statistics.

    – Solr: This plugin helps to collect application search requests, search errors, update requests, and error statistics.

    – Apache: Apache web server performance metrics can be collected with this plugin through an automated server health endpoint.

    – MongoDB: This can be used to collect server, database, replication and sharing performance, and health metrics.

    – Nginx: Monitor web server status information by collecting metrics via the ngx_http_stub_status_module.

    – MySQL: This widely used plugin collects global database, replication, and statistics for each user.

    Netdata vs. other monitoring tools

    Netdata is not the only monitoring tool available, but it is one of the most powerful and feature-rich. Here are some of the key differences between Netdata and other monitoring tools:

    – Real-time monitoring: Netdata provides real-time monitoring of system metrics, allowing businesses to quickly detect and address issues as they arise.

    – Highly customizable dashboard: Netdata’s dashboard is highly customizable, allowing businesses to track the metrics that matter most to them. This can help businesses stay on top of potential problems and improve overall system performance.

    – Advanced analytics and troubleshooting tools: Netdata provides a range of advanced analytics and troubleshooting tools, including the ability to analyze historical data and identify trends over time.

    – Plugin architecture: Netdata’s plugin architecture allows businesses to extend its monitoring capabilities beyond the built-in metrics, providing a more comprehensive view of their systems and applications.

    Conclusion

    If you are interested in Monitoring tools, you should know that Netdata is one of the best. So we focused on this amazing tool to give a clear understanding of Netdata and give a full explanation about its benefits, features and also show how you can install and configure it on Rocky Linux. You can also figure out some differences between Netdata and other monitoring tools. We hope this tutorial was helpful enough for you.

    FAQ

    What is the related command to uninstall Netdata?

    Use the following commands:

    wget -O /tmp/netdata-kickstart.sh https://my-netdata.io/kickstart.sh && sh /tmp/netdata-kickstart.sh –uninstall.

    curl https://my-netdata.io/kickstart.sh > /tmp/netdata-kickstart.sh && sh /tmp/netdata-kickstart.sh –uninstall.

    Is it possible to extend Netdata’s functionality with plugins?

    Yes, you can use plugins because Netdata architecture supports plugins and allows you to extend functionality.

  • VPN vs RDP: Which One Offers Better Security for Your Remote Workforce?

    VPN vs RDP: Which One Offers Better Security for Your Remote Workforce?

    Since the creation of the Internet, the priority was to send packets without defects and damage, and for this reason, the Internet space is an inherently insecure space. All the programs you use on the Internet, such as e-mail, web, messaging systems, etc., are built according to global standards, but it is still not possible to talk about their security with certainty. For this reason and due to the importance of security, in this article we are going to compare VPN vs RDP. We will also tell you Which One Offers Better Security for Your Remote Workforce?

    Understanding the Risks of Remote Work

    Nowadays, remote working has become a very popular and common method all over the world. Especially now that companies are allowing their employees to do their jobs remotely. But on the other hand, the rise of remote work has created a new range of challenges for businesses that want to keep their sensitive information safe.

    Among the risks that users may face when working remotely are:

    • Email fraud and phishing
    • Cyber attacks on Remote work infrastructure
    • Increased attack levels
    • Weak passwords
    • Webcam Hacking
    • Insecure Connections
    • Lack of awareness of cyber security
    • Lack of monitoring

    As more employees work outside the traditional office environment, companies must find new ways to manage and monitor access to data. After reading this article, you can choose and buy the plan you want from the high-quality and high-speed Admin RDP plans provided on our website. You can also contact our experts if you need support.

    What is VPN and how does it work?

    A VPN or virtual private network is one of the best tools to protect your internet privacy. A VPN encrypts your connection, hides your IP address, and keeps you private while browsing the web, shopping, and banking online. While virtual private networks were once a new technology solution, they are now an essential tool.

    Using a VPN, all your data traffic is sent through an encrypted virtual tunnel. This encryption prevents hackers and profiteers from accessing your organizational information. A VPN establishes a point-to-point connection between your device and the global Internet and allows a user to access another computer from their PC using tunneling protocols. In order to protect your organization’s data and prevent information from being tracked in transit, traffic is often encrypted with network encryption protocols such as SSH or IPsec.

    what is vpn

    VPN vs RDP

    Enterprise VPNs are now used by various businesses. Encryption increases security and privacy. Encryption is a method of converting plain text into a set of unreadable codes. A key or decryptor converts codes into readable information. When you use a VPN, only your device and the VPN provider contain the decryption key, and if someone tries to spy on you, they will only see a series of characters.

    Note that instead of sending your internet traffic (eg online searches, uploads, and downloads) directly to your ISP, a VPN first routes your traffic through a VPN server. That way, when your data is finally transmitted to the Internet, it will appear to come from the VPN server, not your personal device. Without a VPN, your IP address is visible on the web. It is interesting to know that VPN as an intermediary hides your IP address by redirecting traffic.

    What is RDP and how does it work?

    Remote Desktop Protocol (RDP) is a widely used software that allows you to connect to your Windows server in another location. Using this protocol, you can connect to your Windows server, open files, and use them, just like you use your system. Finally, the RDP protocol puts your Windows system and server under your complete control remotely, so that you can use it without any problems.

    In the following, we intend to describe the use of the RDP protocol:

    • Image transfer between the user’s computer and the Windows server
    • The ability to transfer sound from a Windows server to a computer
    • Encrypt all information exchanged between you and the server
    • The ability to access all computer files inside the server using the File System Redirection system
    • Having access to the printer and any system connected to the server

    To understand how RDP works over the internet, consider a drone. You can control your drone by pressing buttons and through radio waves. The use of multi-user remote desktop protocol (RDP) also has almost the same process; Sending your mouse movements and keyboard keys to the desired Windows server. with the difference that this work is done on the internet and not with radio waves. The Windows server desktop appears on the computer screen as if you were sitting behind the main server.

    rdp-remote-desktop-protocol

    VPN vs RDP

    A remote desktop creates a separate path between you and the RDP server over the Internet, where data is sent and received. Mouse movements, keyboard keys, server screen information, and all other required information are sent in this channel with the help of TCP/IP protocol. Also, the RDP connection encrypts all the information between the user and the server so that the user and the remote desktop can experience a secure connection.

    VPN vs RDP: Key Differences

    RDP is a service that allows you to host your website in a virtual environment, while VPN is a user-centric tool that allows you to browse various websites safely and securely. Probably the only thing that an RDP and a VPN have in common is the virtualization aspect of each service.

    RDP is a type of web hosting service. This means it gives you a personal space on the online server to keep your data safe and secure. This will help you to host your website better to get more traffic. While a VPN is a virtual private network that hides your real IP address from hackers and spammers. This makes all your data unreadable so no one can track your online activities. This significantly helps to maintain your privacy and security.

    In the rest of this article, we will discuss the key differences between RDP and VPN and examine each one thoroughly.

    Security Features of VPN

    VPNs use a variety of different protocols. Older protocols, such as PPP and PPTP, are considered less secure. Note that VPN security, like other security programs such as antiviruses, may sometimes malfunction and fail to function fully. VPNs protect your IP and internet history, but they cannot prevent outsiders from attacking your system.

    Using a VPN alone cannot protect you from Trojans, viruses, bots, or other malware. It is better to use an antivirus on your system. This is because once malware gets into your system, it can steal your data, whether you have a VPN or not. For this reason, do not forget to use antivirus. Of course, when your VPN has a problem, you are definitely at risk. For this reason, be sure to use a reliable VPN provider so that you are at less risk.

    Here are some types of security protocols:

    • IP Security Protocol (IP Sec)
    • Layer Two Tunneling Protocol (L2TP)
    • SSL and TLS protocols
    • Point-to-Point Tunneling Protocol (PPTP)
    • SSH protocol (Secure Shell)
    • Secure Socket Tunneling Protocol (SSTP)
    • Internet Key Exchange, Version 2 Protocol (IKEv2)
    • OpenVPN

    Security Features of RDP

    remote desktop provides users with various security settings such as 128-bit encryption and NLA; So you won’t necessarily need a VPN. Of course, due to its high popularity and the existence of Remote Desktop in most modern versions of Windows, this software has become the main target of many hackers. To solve this problem, in recent years, Microsoft has defined several security updates for the RDP protocol. Because of this, an RDP connection can be very secure. However, remember that it is the responsibility of admins and technical support to ensure security patches are installed, and remote users only have access to the hardware resources they need to do their jobs.

    Pros and Cons of VPN

    Geolocation Spoofing: With a VPN, it appears as if your connection to the Internet is coming from a different location. This issue allows users to remove the restrictions of their country regarding access to some specific sites or the restrictions of the sites themselves due to geographical location.

    High Security: Since the communication goes through the encrypted tunnel, no one but the VPN provider can know about it. These encrypted communications prevent data collection by ISPs, hackers, and other malicious and spying agents. If the site you are looking for uses HTTPS, the VPN server will not be able to see the content of your request and will only be informed of the website you have visited.

    Better Privacy: Because your ISP prevents your activity from being tracked, the websites you visit also cannot identify your geographic location.

    Cost and Variety: With a little effort, you can create your own VPN. Also, there are many providers that provide access to servers in hundreds of countries. Some of these providers offer mobile and desktop apps, while others simply require you to connect to a server through open-source software.

    Lower Speed: A VPN connection is often slower than a regular connection. This makes sense once you put at least one extra step between your device and websites. For example, if you’re in the UK and using an Australian server, not only should you expect some lag, but the server’s download and upload speeds will also slow down.

    Legal Issues: Some countries have banned the use of VPNs and identify users by implementing methods such as Deep Packet Inspection. In these countries, trying to hide internet traffic can lead to legal issues.

    Pros and Cons of RDP

    If we want to tell you about the benefits of RDP, we must mention the following:

    • Exclusivity of processor resources, main memory, and information storage space
    • The possibility of dedicated remote management
    • Ability to install desired software
    • The ability to upgrade resources in the shortest possible time
    • Having a dedicated IP
    • Ability to manage the server such as turning off or turning on the server by accessing the server control panel
    • Ability to quickly troubleshoot and transfer information to another RDP machine

    Among the disadvantages of RDP, we can mention the dependence on the network and the need to have a powerful RDS.

    Need Powerful RDS: If there is a need to use RDP on a large scale, a powerful Remote Desktop Service (RDS) is needed to monitor all RDP connections.

    Requires a powerful network: A reliable network connection is required for the client computer to successfully connect to the host computer. Otherwise, the entire Remote Desktop service may fail.

    By connecting to a remote PC, the destination computer is locked for local use and the local user cannot use the system at the same time or see what the remote person is doing.

    Choosing the Right Solution for Your Remote Workforce

    All in all, both services are very valuable for businesses. RDP increases website performance, while VPN increases the security of your data. If your business is growing, an RDP may be right for you. This type of hosting has a high level of customization, which is suitable for those who need to use specific software or programs. In addition, you can do almost everything over an RDP on a dedicated server, but at a lower cost.

    On the other hand, a VPN is very useful for those who travel a lot, work remotely, or hold client meetings in public places. No matter where your destination is, it hides your IP address and provides you with a secure network. For any job where data security is critical, it’s best to invest in a VPN.

    Conclusion

    Both RDP and VPN services have their uses in the business world, and many online companies choose to use one or both services. RDP is a premium hosting option for businesses that need speed to scale and maintain a website with consistently high traffic. For those who work remotely or travel a lot, a VPN can also be a useful solution. In fact, both technologies can be valuable additions to your online toolbox.

  • Why Linux VPS Hosting is Perfect for Developers

    Why Linux VPS Hosting is Perfect for Developers

    If your website traffic is high or you expect to experience high traffic on the website in the future, then be sure to get information about Linux VPS and learn about its benefits. Also, if you want to have more control over your web hosting server, Linux virtual server will be the best option for you. We will examine why Linux VPS hosting is perfect for developers.

    What is Linux VPS Hosting?

    When it comes to Linux hosting, it means using a Linux operating system as the base server for your web hosting. The most important functional component in running programs on any device, especially servers, is the operating system. A host is a link that allows all hardware on a server to communicate with and respond to application requests.

    An operating system is so essential even for single-user systems and more importantly web servers. Because web servers need to manage all the hardware for multiple users.

    Benefits of Linux VPS Hosting for Developers

    One of the most affordable web solutions on the market is Linux VPS. Here, we will try to introduce some benefits of Linux VPS hosting that can be significant and effective in your choice. Let’s consider some of them:

    Benefits of Linux VPS Hosting for Developers

    Flexibility and Customization Options

    Linux offers web hosting administrators unprecedented flexibility because of the design philosophy with which it was built. The highly adaptable nature of this server means that it can fit into almost any environment imaginable. The concept of building blocks in Linux is what makes it so powerful in this regard. Linux is made up of several distinct areas that generally work together.

    The related areas in Linux VPS are Kernal, Bootloader, Daemons, Shell, Package Managers and Packages, and Desktop Environment. These items are working together to make a Linux distribution. This is the point that flexibility in Linux comes from.

    Cost-Effective Solution

    In general, Linux virtual servers or VPS are more expensive than shared hosting, but their cost is cheaper than dedicated hosting. On our website, a high-performance VPS is not significantly more expensive than shared hosting plans. If we want to mention the advantages of VPS over shared hosting, you will understand why VPS is worth a lot. Especially if you want managed VPS hosting.

    Regarding Linux virtual servers, we should mention that since their operating system is open source and free, as a result, there is no need to pay a monthly license fee. The virtual server means that the prices are adjusted according to the needs of the customers.

    Enhanced Security Measures

    Whatever server you use, Linux or Windows, your server is only as secure as you configure it to be. Fortunately, Linux leads the way in this regard and offers many options that you can work with to make it much harder to break into. Of course, this goes back to how Linux is designed. Of course, you must have managers who are professional enough and give you the necessary knowledge to secure the server.

    The ability of Linux allows users to activate only the services they need and helps to reduce possible vulnerabilities. Any program, service, or open port is a potential weakness through which attackers can use it to infiltrate or attack the server. If you configure Linux properly and tightly enough, attacks have no chance of success. These items are accompanied by the usual defense of most web servers such as scanning and detection of malware.

    Reliable Performance and Scalability

    When your website has high traffic, it means that the server has to do more work and use more resources. Another advantage of Linux VPS servers is that they are scalable so that you can meet the needs of your server and consider a significant amount of resources if needed to ensure stability. This type of fluctuation generally stops a shared server. Linux provides a significant amount of utilities to perform various tasks, one of the most powerful of which is the shell. Finally, if your site suddenly needs more resources, Linux VPS hosts can increase these resources quickly and easily.

    Access to a Wide Range of Development Tools and Technologies

    Shared hosting offers limited control to website owners, so they can’t install whatever tools or technology they want on their environment. But VPS hosts are not like that. Users who use Linux VPS hosting use a wider range of services. For example, if you do not want to use the email functionality on your server, you can turn off or remove programs such as BIND or the webmail program. The Neuronvm website provides root access to VPS for its users, and in this way, you can make any changes, access tools, or delete them.

    Conclusion

    By using virtual private servers, you can manage your website without slowing down and causing damage. Note that the use of VPS hosting is increasing day by day and the demand for it has increased too. So, this article tried to be a helpful guide to introduce you to Linux VPS hosting and some benefits of that for developers.

    FAQ

    What can be the difference between Linux VPS and Windows VPS?

    The flexibility in Linux VPS hosting is more than Windows VPS. The reason is that it is cheaper and easier to add processing resources on Linux. In selecting CMS Linux supports more choices.