

One of the best relational database systems available for free and open-source to store data is MySQL. This database provides data in table format and with two versions of community server or enterprise server. The source code is the same in both versions, but Enterprise is not free. It is provided in a special way and has the ability to add other plugins. Developers and those with online businesses use MySQL to store data in electronic websites, content management systems, and more. This guide will examine how to install MySQL on Debian.
Here are some requirements before installing MySQL on Debian on Linux VPS or operating systems:
Follow the instructions below to have a successful and hassle-free installation process for MySQL on Debian.
You can find MySQL packages on the official MySQL dev apt repository:
sudo apt update && sudo apt -y  install wget
wget https://repo.mysql.com//mysql-apt-config_0.8.26-1_all.deb
sudo dpkg -i mysql-apt-config_0.8.26-1_all.deb
You should press OK and agree to configure MySQL repositories. Also, you will encounter a prompt that asks you to confirm the addition of MySQL repositories as default. Press OK:

Finally, press Enter/OK to confirm the version installation.
Tip: If the version of Debian is 12, select the Bullseye repository and then add this:
echo "deb http://security.debian.org/debian-security bullseye-security main" | sudo tee /etc/apt/sources.list.d/bullseye-security.list
Now that you have added the repository, use the following command to install MySQL on Debian. The first command will update the repository:
sudo apt update
sudo apt install mysql-server
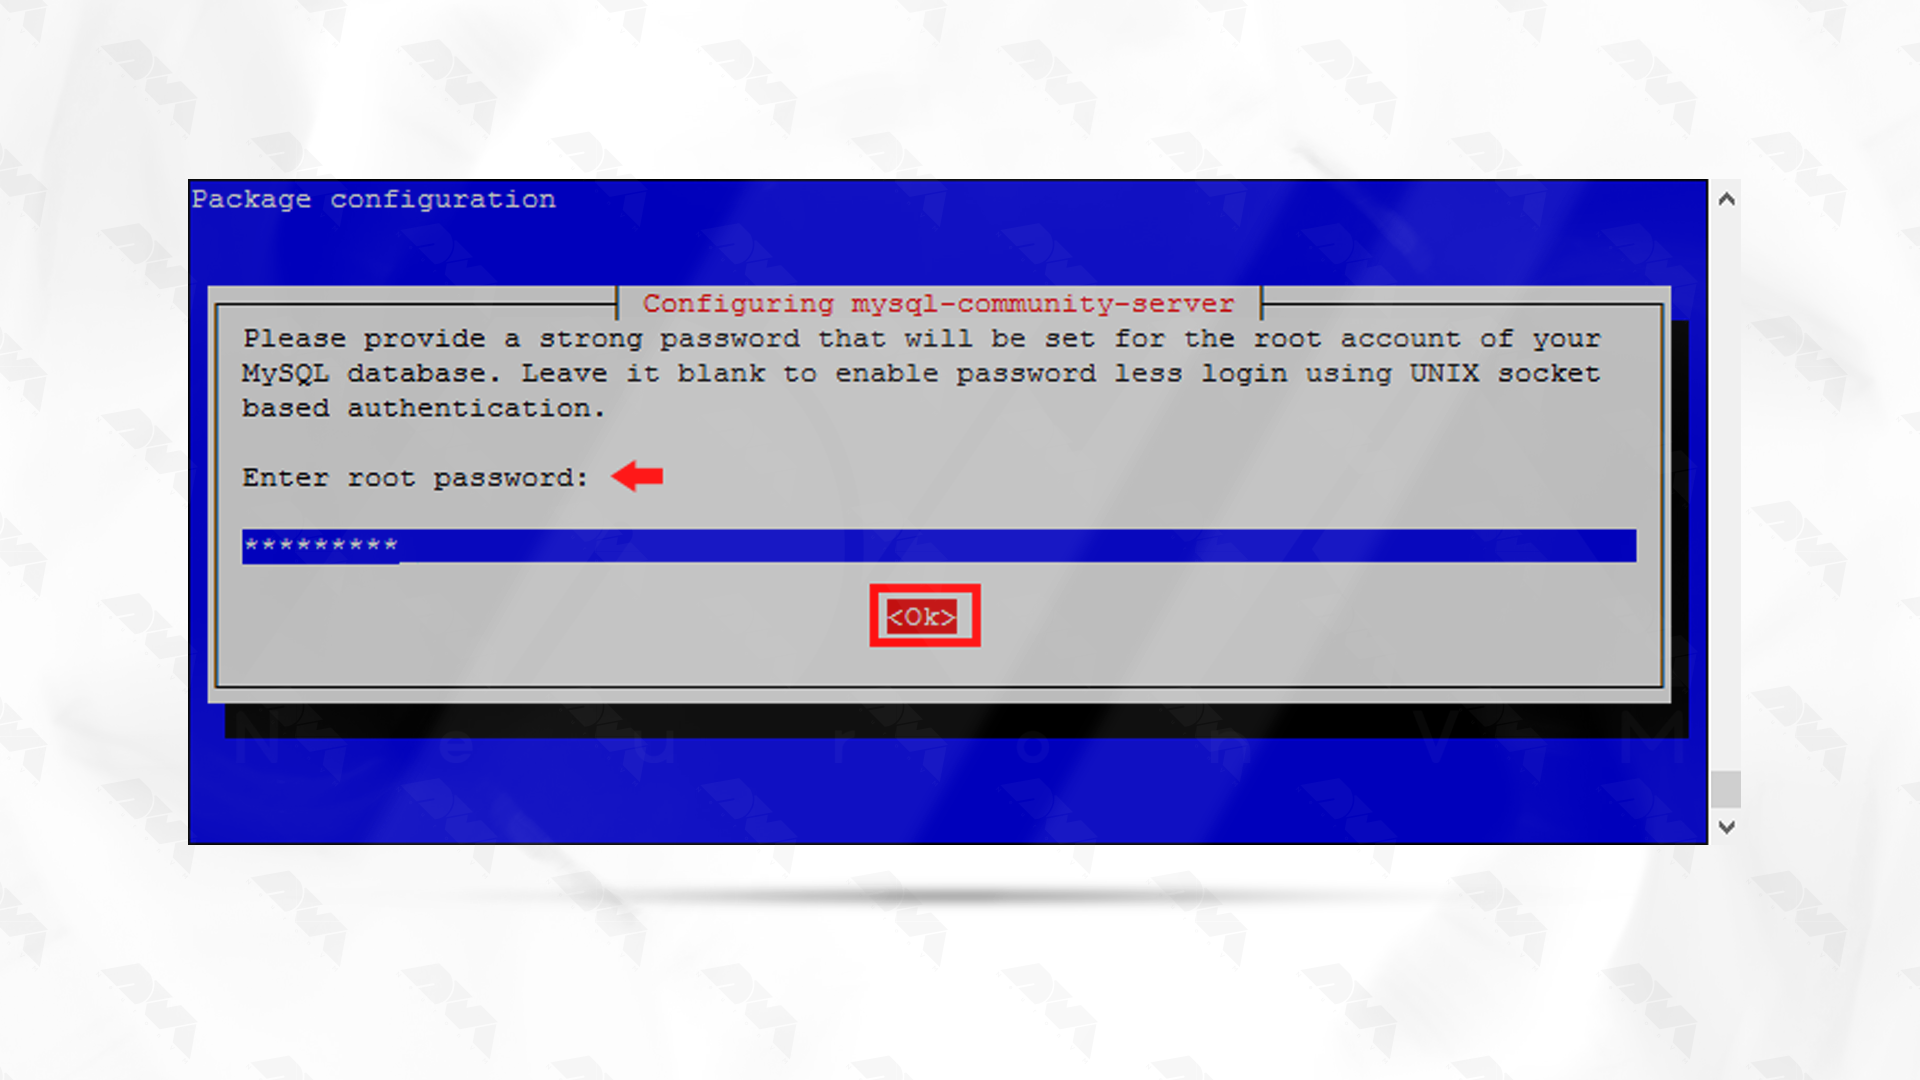
Provide a password, cause you will be asked to give a root password:

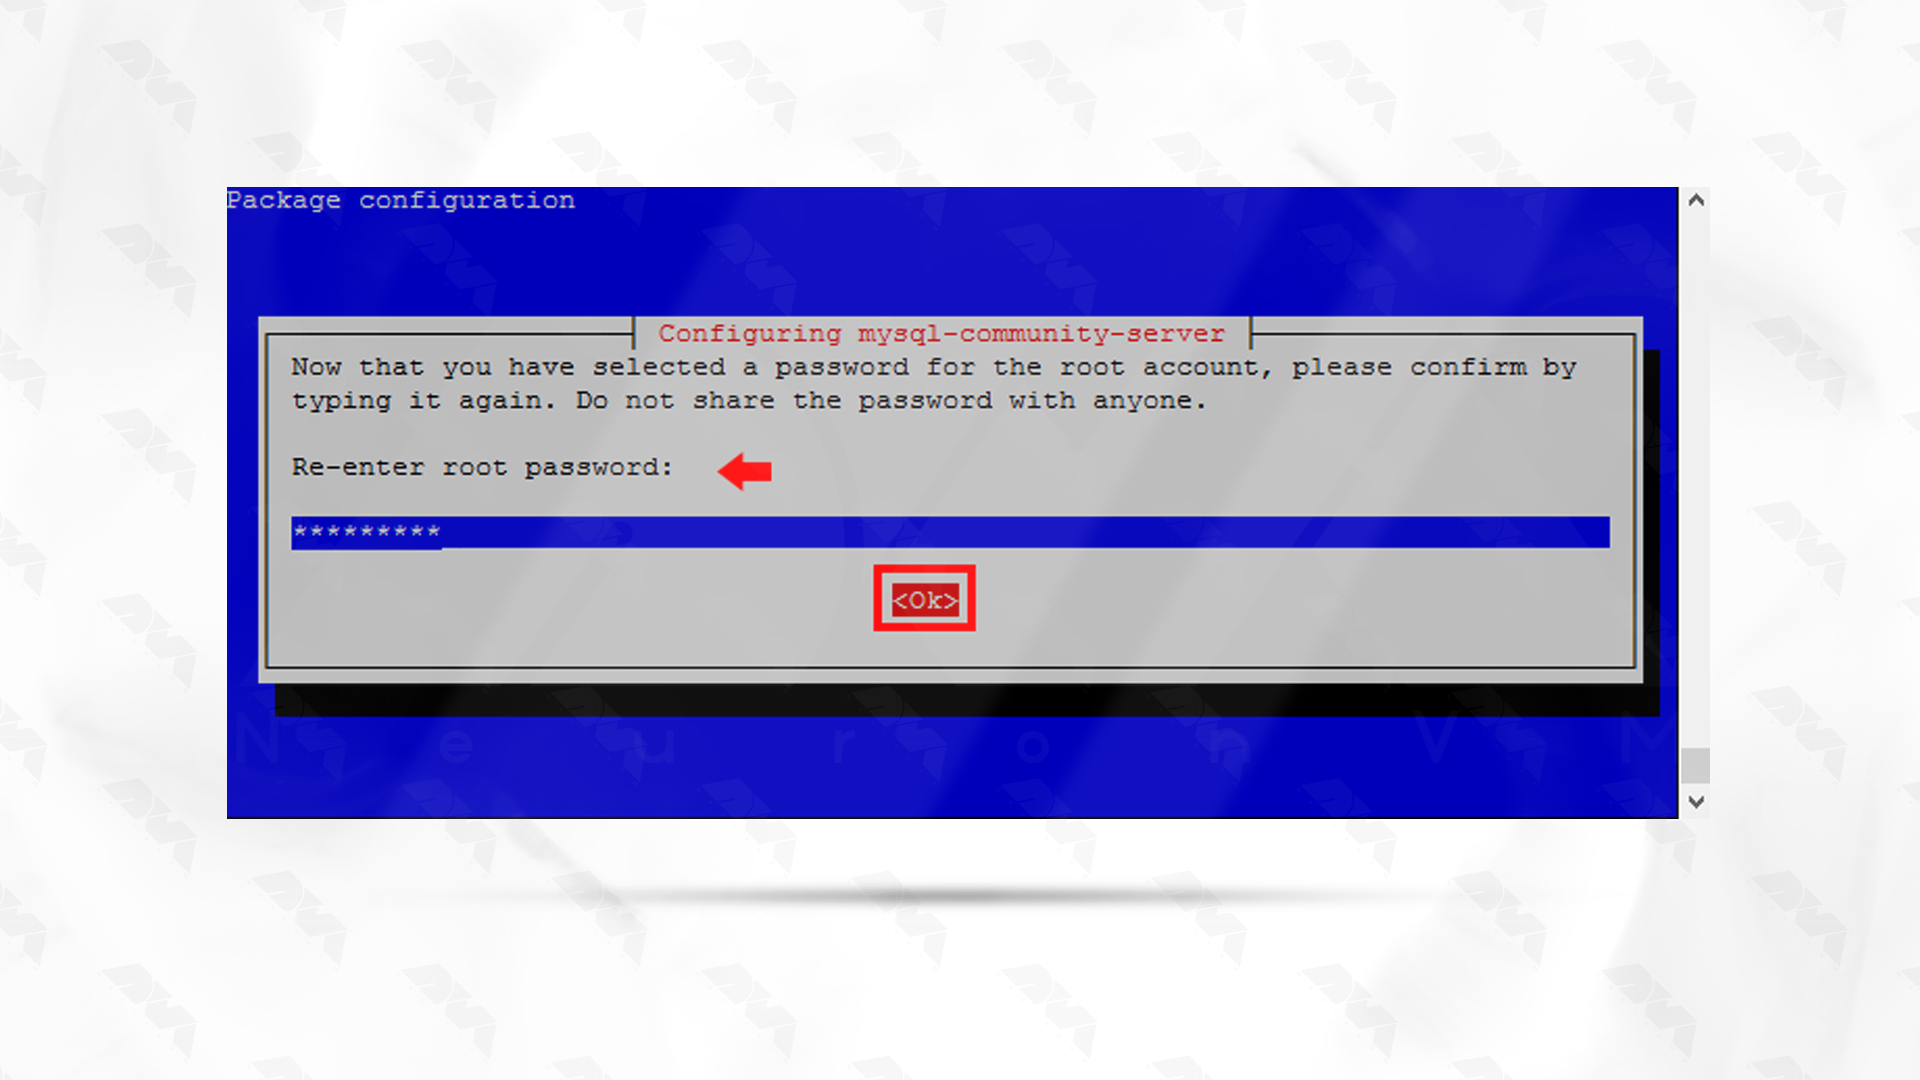
To confirm the new password, you have to re-enter it:

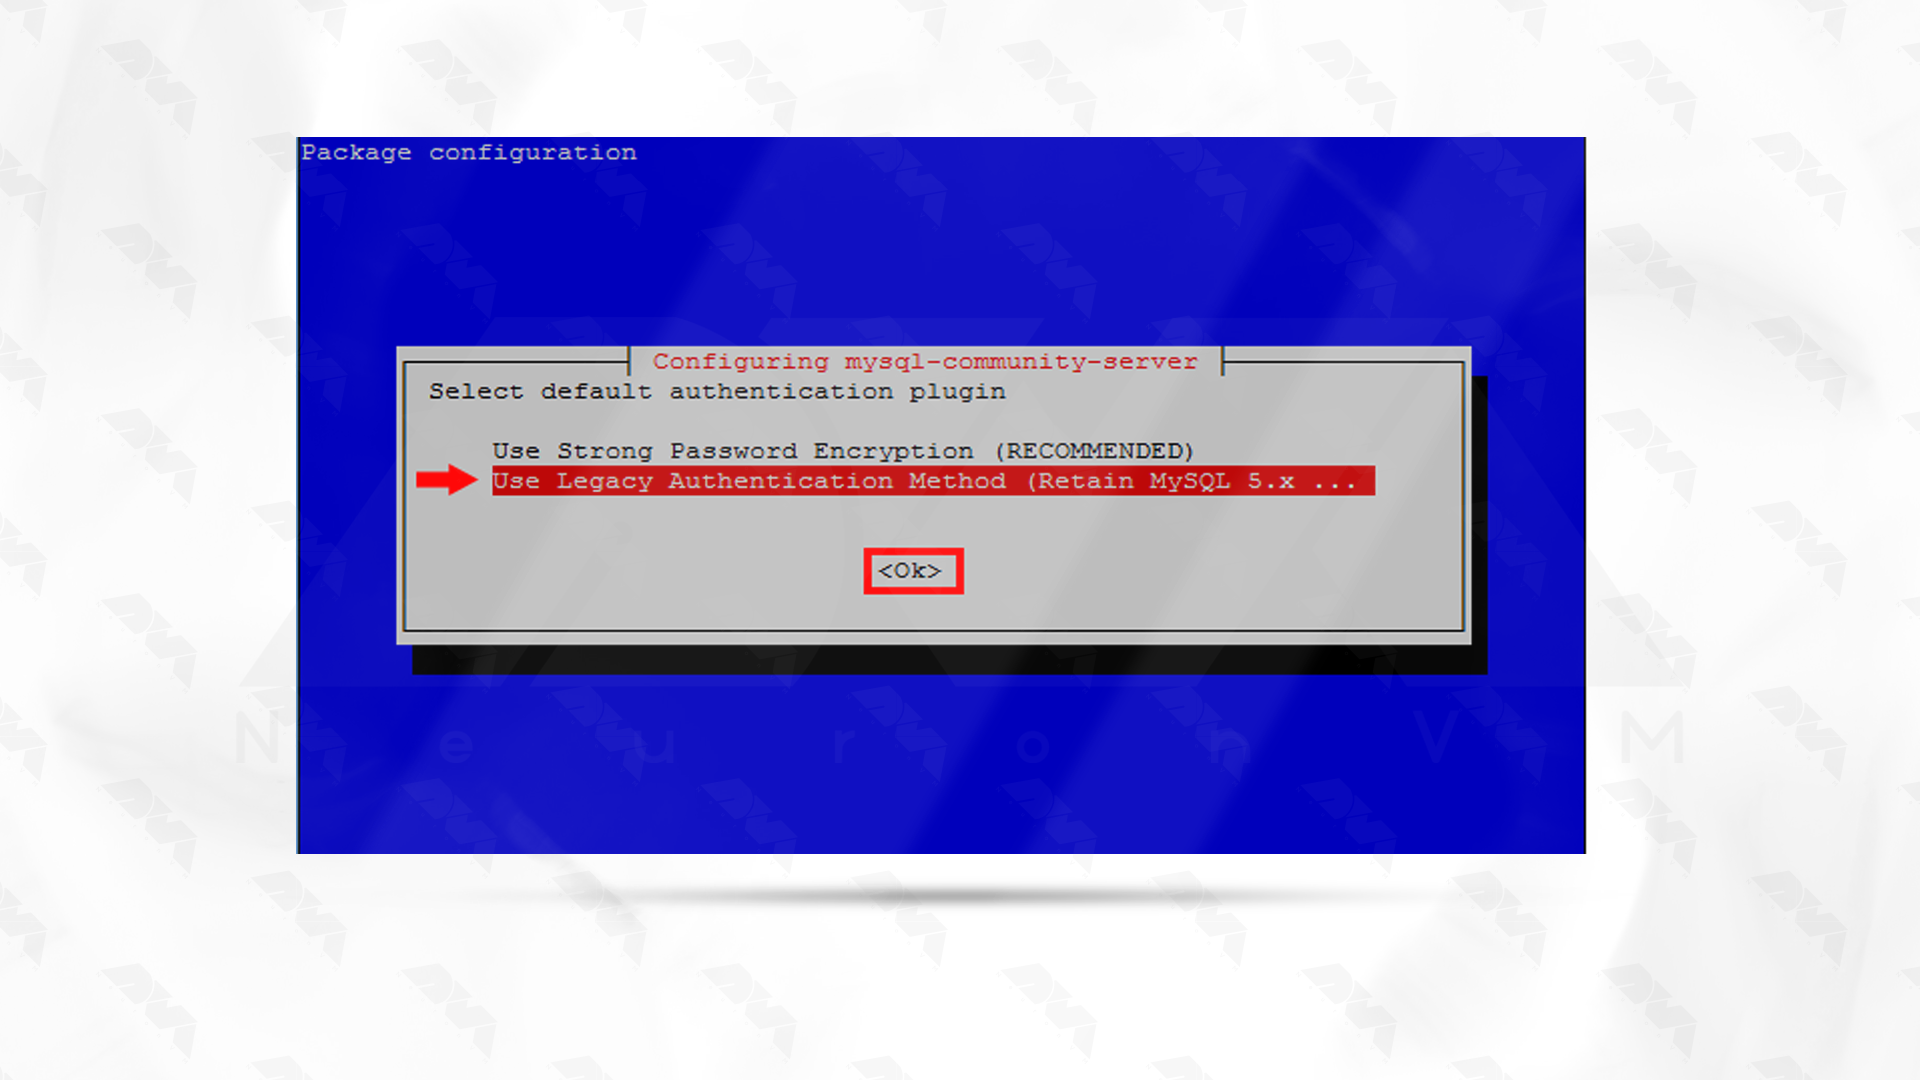
Finally, you must select the authentication plugin and click OK to complete the installation of MySQL on Debian:

Use the apt-policy command to check the version installed:
apt policy mysql-server
mysql-server:
  Installed: 8.0.34-1debian11
  Candidate: 8.0.34-1debian11
  Version table:
 *** 8.0.34-1debian11 500
        500 http://repo.mysql.com/apt/debian bullseye/mysql-8.0 amd64 Packages
        100 /var/lib/dpkg/status
After following the steps above, the MySQL database should start by default. To know the status of the service, you can use the following command:
systemctl status mysql
● mysql.service - MySQL Community Server
     Loaded: loaded (/lib/systemd/system/mysql.service; enabled; vendor preset: enabled)
     Active: active (running) since Wed 2023-09-27 14:10:16 UTC; 22s ago
       Docs: man:mysqld(8)
             http://dev.mysql.com/doc/refman/en/using-systemd.html
    Process: 26431 ExecStartPre=/usr/share/mysql-8.0/mysql-systemd-start pre (code=exited, status=0/SUCCESS)
   Main PID: 26590 (mysqld)
     Status: "Server is operational"
      Tasks: 38 (limit: 2340)
     Memory: 358.2M
        CPU: 1.831s
     CGroup: /system.slice/mysql.service
             └─26590 /usr/sbin/mysqld

Sep 27 14:10:15 debian11 systemd[1]: Starting MySQL Community Server...
Sep 27 14:10:16 debian11 systemd[1]: Started MySQL Community Server.
To check if the MySQL service is working correctly, you can test it.
You should login as the root user and enter the password you created before:
mysql -u root -p
Enter password:
Welcome to the MySQL monitor.  Commands end with ; or \g.
Welcome to the MySQL monitor.  Commands end with ; or \g.
Your MySQL connection id is 8
Server version: 8.0.34 MySQL Community Server - GPL

Copyright (c) 2000, 2023, Oracle and/or its affiliates.

Oracle is a registered trademark of Oracle Corporation and/or its
affiliates. Other names may be trademarks of their respective
owners.

Type 'help;' or '\h' for help. Type '\c' to clear the current input statement.

mysql> SELECT VERSION();
+-----------+
| VERSION() |
+-----------+
| 8.0.34    |
+-----------+
1 row in set (0.00 sec)
In this section, you can create a database and user but just for testing:
CREATE USER 'test_user'@'localhost' IDENTIFIED BY "Jek1oleiboafei4eeghu";
CREATE DATABASE test_db;
GRANT ALL PRIVILEGES ON test_db.* TO 'test_user'@'localhost';
FLUSH PRIVILEGES;
QUIT
Now that you have a test user, try to access the database console:
mysql -u test_user -p
...
Type 'help;' or '\h' for help. Type '\c' to clear the current input statement.

mysql> SHOW DATABASES;
+--------------------+
| Database           |
+--------------------+
| information_schema |
| test_db            |
+--------------------+
2 rows in set (0.01 sec)

mysql> QUIT
If your login is approved, and you are able to use the assigned database. It means your installation has been successful. Now log in as root again and drop the test database:
mysql> DROP DATABASE test_db;
Query OK, 0 rows affected (0.11 sec)

mysql> DROP USER 'test_user'@'localhost';
Query OK, 0 rows affected (0.11 sec)

mysql> SELECT USER FROM mysql.user;
+------------------+
| USER             |
+------------------+
| mysql.infoschema |
| mysql.session    |
| mysql.sys        |
| root             |
+------------------+
4 rows in set (0.00 sec)

mysql> QUIT
Bye
MySQL is a great database to use on different online platforms. One of the advantages of this technology is that you can use it for free. Here we tried to give you a straightforward guide to teach you how to install it on different versions of the Debian operating system. Follow the steps and enjoy using this useful database. let us know if you encounter any problems with this tutorial.
How useful was this post?
Click on a star to rate it!
Average rating 0 / 5. Vote count: 0
No votes so far! Be the first to rate this post.
 Tags
Tags

MariaDB is a popular database and enables you to meet all your workload. MariaDB platform contains m...


 Tags
Tags

Did you know that you can have your own DNS server to manage name resolution for domain names instea...


 Tags
Tags
What is your opinion about this Blog?


