

Asterisk offers voicemail services with listing, voice control, interactive voice answering, and call queuing. The software supports three-way calling, Caller ID services, ADSI, IAX, SIP, H.323 (as client and server), MGCP (call management only), and SCP/Skinny. Asterisk does not require any additional hardware to communicate over IP-based voice, although it is expected to implement dummy hardware as a non-moving scheduling mechanism as a standard driver. In this article, we will teach you How to Install Asterisk VoIP Server on Ubuntu.
Asterisk is a complete software PBX structure running on Linux, BSD, Windows, and OSX platforms. You can see and purchase our Linux VPS packages. Provides all the features of a PBX and more. Asterisk performs voice operations on the IP platform in four protocols. Works with almost all telephone equipment based on telephone standards and using inexpensive equipment. Asterisk provides functionalities like call routing, call control, call recording, conferencing, and integration with various other systems and services. It uses its own scripting language called Asterisk Dialplan, which allows users to define call flows and interactions.
Asterisk supports a range of hardware for internal communication through analog and digital telephone equipment, most of which is hardware manufactured by Asterisk’s sponsor, Digium. Digium has T1 and E1 interfaces for internal communication of PRI lines and channels. In addition, there are FXS and FXO analog cards for small cases. Finally, there are standalone devices that perform a wide range of tasks, such as providing FXS and FXO ports that easily connect to the LAN and register with Asterisk as an existing device.
In this section, be accompanied by us to teach how to Install Asterisk VoIP Server on Ubuntu step by step. It should be noted that all software packages are available in the official Ubuntu package repository.
In the first step, enter the following command to update the APT package repository cache:
sudo apt update
Now to install Asterisk VoIP Server you need to run the following command:
sudo apt install asterisk asterisk-dahdi
To continue, first press Y and then Enter. In this case, Asterisk is installed.
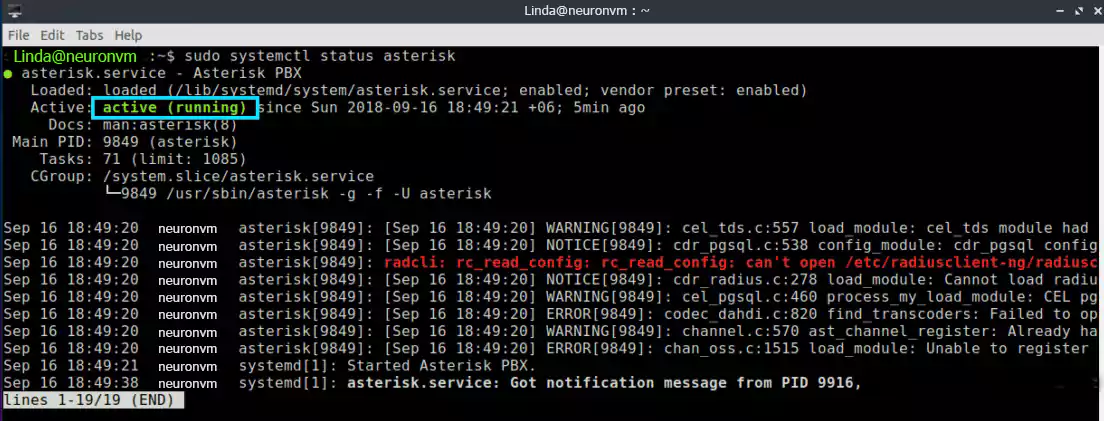
Enter the following command to check if the Asterisk service is running:
sudo systemctl status asterisk
Asterisk is running as shown below:

If the Asterisk service is not running, enter the following command to start it:
sudo systemctl start asterisk
Use the following command to stop the Asterisk service:
sudo systemctl stop asterisk
If you change the asterisk configuration files, you must restart the service by entering the following command to apply the changes:
sudo systemctl restart asterisk
The Asterisk configuration files are in /etc/asterisk according to the following command:
ls /etc/asterisk
To configure Asterisk as a VoIP server, you must first go to /etc/asterisk by entering the following command:
cd /etc/asterisk
By entering the following command, a backup copy of the sip.conf file will be made:
sudo cp sip.conf sip.conf.backup
By entering the following command, a backup of the extensions.conf file will be made:
sudo cp extensions.conf extensions.conf.backup
To remove all existing lines from the sip.conf file, just run the following command:
echo | sudo tee sip.conf
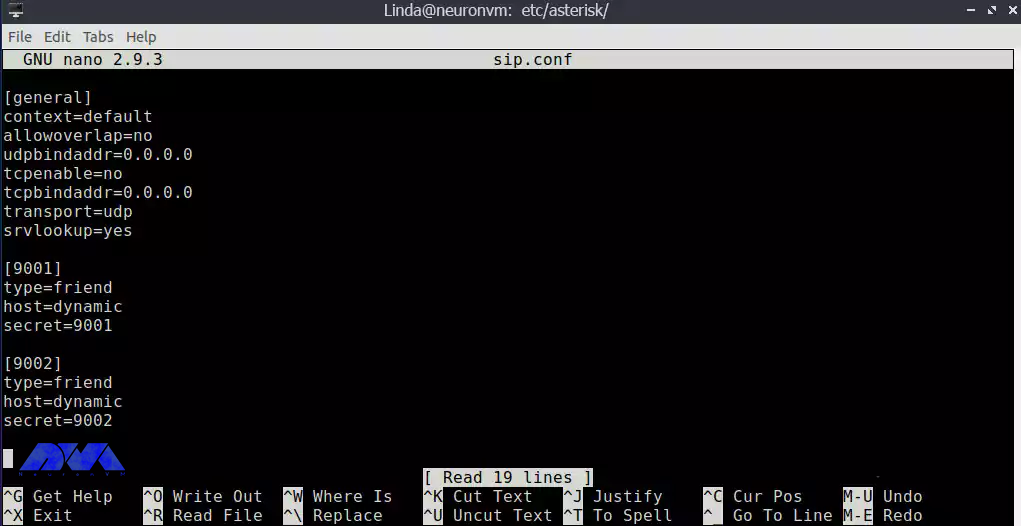
Running the following command will open the sip.conf file with the nano text editor:
sudo nano sip.conf
Before saving the file, add the following lines to the sip.conf file:

Enter the following command to delete the lines in the extensions.conf file:
echo | sudo tee extensions.conf
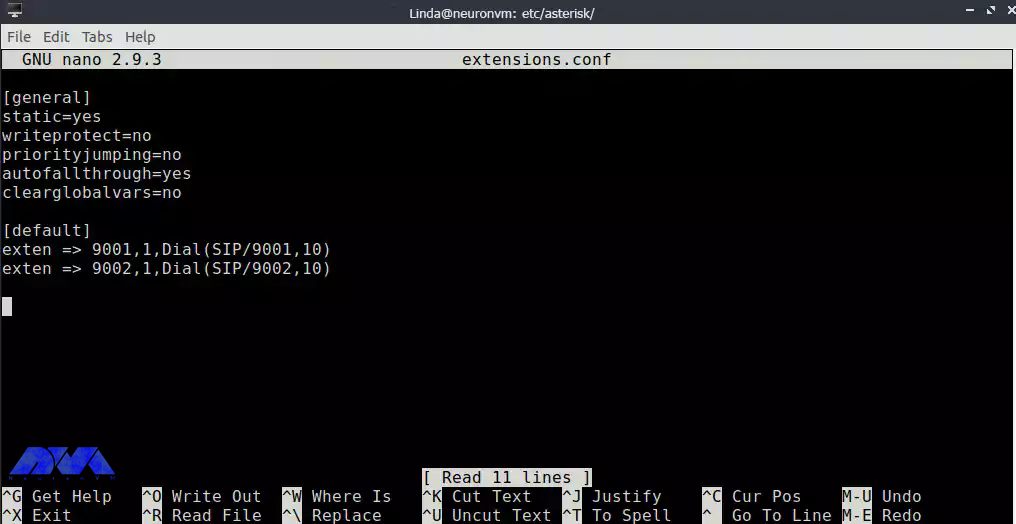
Executing the following command opens the extensions.conf file with the nano text editor:
sudo nano extensions.conf
Here, too, add the following lines before saving the extensions.conf file:

Now you need to restart Asterisk:
sudo systemctl restart asterisk
Enter the following command to check whether the Asterisk service is running:
sudo systemctl status asterisk
Asterisk is running as shown below:

You can check the IP address of your Asterisk VoIP server by entering the following command:
ip a
You should write down your IP address so that you do not encounter any problems when you want to connect to your Asterisk server from your Android phone.
Asterisk is introduced completely and its uses are explained here. Now you know, how to install Asterisk VoIP Server on Ubuntu, If you are planning to install Asterisk, you can easily do so through this tutorial. Depending on your use case and requirements, you might need to configure SIP trunks, create extensions, set up dial plans, and integrate other services. So now you have a clear vision of Asteriks. For any idea or question, leave a comment.
How useful was this post?
Click on a star to rate it!
Average rating 0 / 5. Vote count: 0
No votes so far! Be the first to rate this post.
 Tags
Tags

Gnome is a desktop environment written for open-source applications and stands for GNU Network Objec...


 Tags
Tags

If you plan to use Android apps on Windows or Linux, Remix OS Player can meet your needs best. In ge...


 Tags
Tags
What is your opinion about this Blog?


