

After successfully installing Ubuntu 22.04, your network interface will by default assign an IP address using a DHCP server. A wired network and Wi-Fi network are also activated. The network manager in Ubuntu is Netplan. You can also configure the network interface with IPv4 addresses. This article represents the way of changing your IP address on Ubuntu. You can use two methods to change your IP address. So, keep studying carefully.
This section will give you two different methods of configuring and changing IP addresses. Desktop users can use any one of these methods, but server users that have CLI can access and use only the second method to configure and make changes.
If you are using the desktop version of Ubuntu, you must know that there is a graphical interface for configuration. So you can follow the steps mentioned in this section above to easily change your IP address.
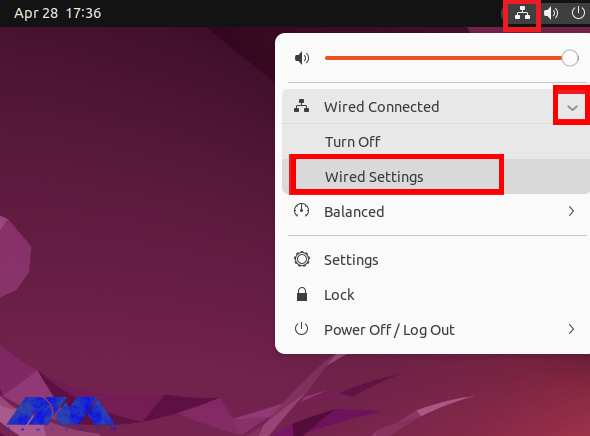
First, Click on the Network Icon in the right corner of your. Choose the Wired connection menu and Click the Wired settings:

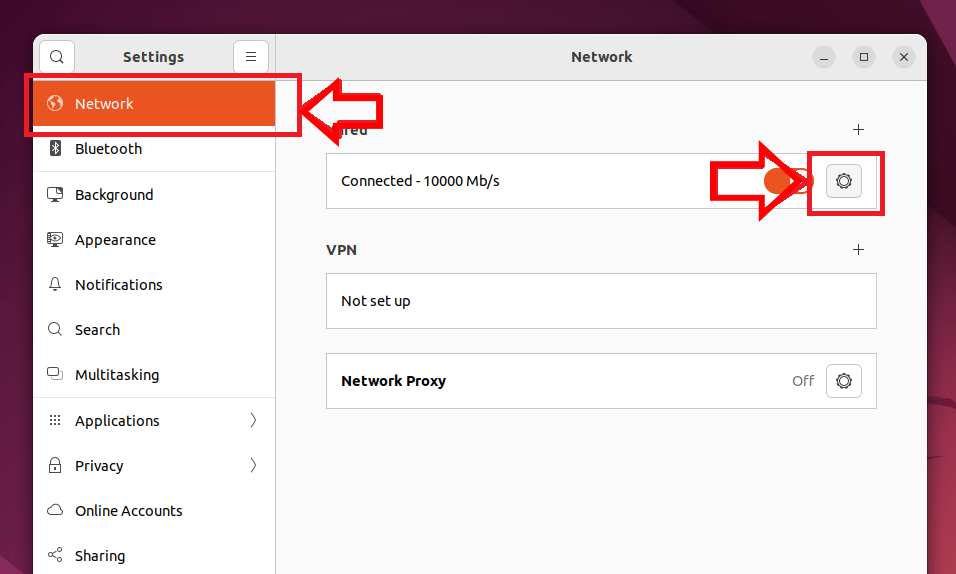
You will encounter a dialog box. Click Network in the sidebar. You will see the Wired section. Click on the Gear Icon to open a new Wired dialog box:

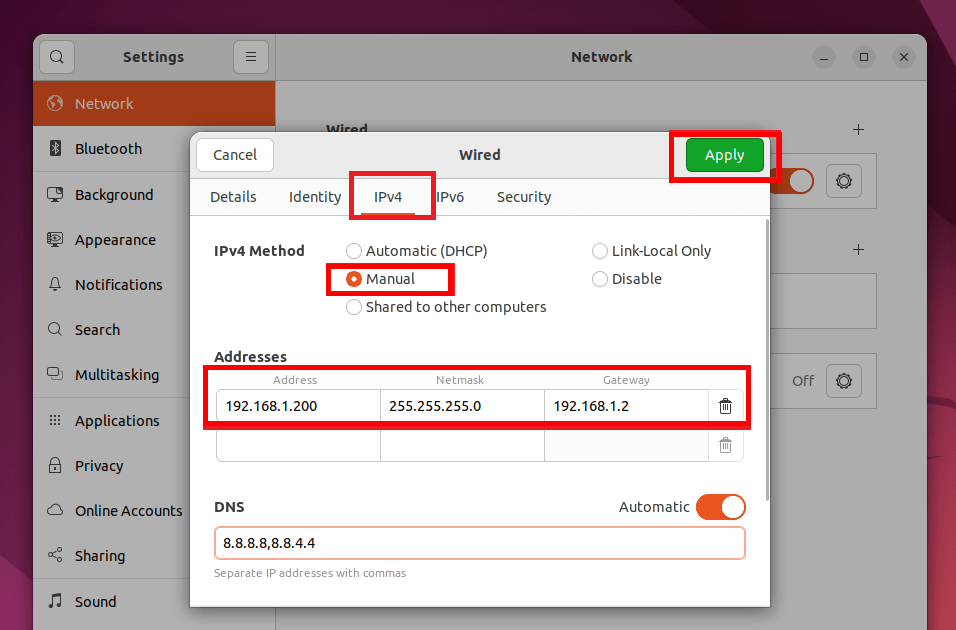
Now, you will see the IPv4 tab. Set the method to Manual and input a valid IP address, Netmask, and Gateway. Now to confirm the changes click the Apply button:

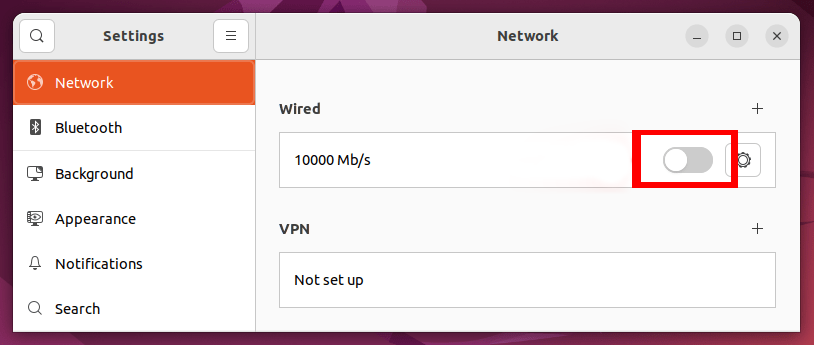
At the final step, disable and again enable the Wired Icon to apply changes:

That’s it! You successfully changed the Ubuntu 22.04 IP address.
If you are using a server, you should know that server versions are installed without a graphical interface. So, you need to configure your IP address using the command line. The Ubuntu distribution uses Netplan as a network manager for this. To do this, follow the steps below.
In the first step, you need to find the name of the network interface in the system. This name may vary based on the type of installation and system hardware. Use the following command:
sudo ip a
As a result of the executed command, you will see that the name of the system network interface is eth0. Of course, this name can be different from your system.
Now, create or edit the network configuration file in the /etc/netplan folder. Use your favorite text editor and create the configuration file:
sudo vi /etc/netplan/01-netcfg.yaml
You must use the YAML template and configure the network as follows:
network:
    version: 2
    renderer: networkd
    ethernets:
        eth0:
            addresses:
                - 192.168.1.212/24
            nameservers:
                addresses: [8.8.8.8, 8.8.4.4]
            routes:
                - to: default
                  via: 192.168.1.2
As you can see in the above configuration, the interpretation of the available items is as follows:
– eth0: Network Interface Name
– addresses: Use for configuring IPv4 address on the interface. You have to be sure to define CIDR. (Here you can add multiple addresses)
– nameservers: Where you can set the nameserver. (8.8.8.8 and 8.8.4.4 are defaults Google nameservers)
– routes: To set the Gateway on your system.
Make sure that the IP gateway address is entered correctly and that v4 belongs to the system network.
Finally, execute the following command to apply the changes:
sudo netplan apply
Well done! Passing these steps, you could change your static IP address on Ubuntu 22.04.
1- Changing the IP address may temporarily disrupt network connectivity.
Solution:
Ensure you have physical or remote access to the machine. Schedule the change during a maintenance window to minimize impact.
2- Manually configuring the IP address with incorrect settings can lead to network issues.
Solution:
Double-check the configuration settings, including IP address, subnet mask, gateway, and DNS. Update the /etc/network/interfaces or /etc/netplan configuration files accordingly.
3- Changing the IP address may affect existing firewall rules.
Solution:
Update firewall rules to reflect the new IP address. Adjust settings in UFW or other firewall management tools accordingly.
As you can see in the instructions of this tutorial, there are two different ways to change the IP address, both of which we have mentioned. Now you can safely and without confusion change your IP with the necessary configuration. Please send your queries or feedback in the comment section below.
How useful was this post?
Click on a star to rate it!
Average rating 0 / 5. Vote count: 0
No votes so far! Be the first to rate this post.
 Tags
Tags

If you aim to install Xubuntu on VirtualBox, you are on the right pass. In this context, we will int...


 Tags
Tags

This article will help you to install Xubuntu on Vmware workstation. We recommend Xubuntu because of...


 Tags
Tags
What is your opinion about this Blog?


