When it comes to web server technology, Apache and Litespeed are two popular options that often make the list. Apache, an open-source web server software, has been the go-to choice for many webmasters for decades. On the other hand, Litespeed, a commercial server software, has gained significant popularity in recent years due to its high performance and efficiency. In this infographic post, we will compare Apache vs Litespeed in terms of their performance, features, and other things to determine which one is the better choice for your website. By examining the strengths and weaknesses of each server, we aim to provide you with valuable insights to make an informed decision in choosing between Apache and Litespeed for your web hosting needs.
Apache vs Litespeed Overview
Apache, known for its stability and versatility, has remained a stalwart in the world of web servers since its inception. With a wide range of modules and extensive community support, Apache offers a comprehensive solution for various web hosting requirements. However, as websites become more dynamic and handle heavy traffic loads, Apache’s processing speed can sometimes lag behind, resulting in longer page load times and reduced server performance. This is where Litespeed emerges as a strong contender in the Apache vs Litespeed debate. Litespeed is designed to tackle the performance limitations of Apache, exhibiting significantly faster response times and better scalability. Additionally, Litespeed incorporates advanced caching mechanisms and efficient resource utilization, allowing it to handle larger volumes of concurrent connections and requests with ease.
In conclusion, the Apache vs Litespeed debate revolves around balancing stability, community support, and cost-effectiveness against superior performance and scalability. While Apache remains the trusted choice for its versatility and extensive plugin ecosystem, Litespeed’s focus on speed and efficiency renders it an appealing alternative, especially for high-traffic websites.
Remember you can always buy a reliable server from NeuronVM and test the things we discuss in our post in a safe environment.
If you want to get the most out of Windows 10 VPS, you have to optimize its performance, security, and Usability. Also, the most important point about a Windows 10 VPS is that it should be a reliable, and efficient tool that supports your specific goals and requirements. It is cheaper than a dedicated server with a user-friendly and strong virtualize. Also, Windows 10 VPS is a good choice for you because you will have server resources exclusively. Here we will focus to get the best of Windows 10 VPS and buy it with bitcoin (BTC).
Why Windows 10 VPS is the Best Choice?
While Windows 10 VPS can be an excellent choice for certain use cases, it may not be the best option for everyone. You can use this server when your workflow or applications require Windows-specific software that is not available or easily adaptable to other operating systems, then a Windows 10 VPS is a natural choice.
It ensures compatibility and seamless operation of such software. Also, Businesses and organizations that rely on Microsoft Active Directory for user management, authentication, and group policies may find Windows 10 VPS to be the best choice due to its seamless integration with these services.
Windows 10 VPS allows you to stay up to date with the latest Windows security patches and updates using Windows Update. It ensures the security and stability of your server.
It’s essential to consider the following factors when determining if a Windows 10 VPS is the best choice for you:
Windows licensing can add to the overall cost of hosting a Windows 10 VPS, making it potentially more expensive than Linux alternatives.
If your applications and workflow are not dependent on Windows-specific software, a Linux VPS might offer a cost-effective and efficient alternative.
If you or your team have expertise in Linux, it may be more practical to choose a Linux VPS and adapt your workflow accordingly.
Ensure that your VPS plan provides sufficient resources (CPU, RAM, storage) to meet your needs. Windows 10 typically has higher resource requirements compared to Linux.
Now if you decide to buy a Windows 10 VPS server, we can recommend NeuronVM website, which is a reliable provider and can satisfy you because of 24/7 professional support and a variety of locations. It also is a great company with the purpose of giving the best services at a reasonable cost.
How to Buy Windows 10 VPS With Bitcoin?
Buying a Windows 10 VPS with Bitcoin involves a few steps, but it is really easy and fast. You’ll need to find a VPS provider (NeuronVM) that accepts Bitcoin as a payment method, create an account with them, select your desired Windows 10 VPS plan, and make the payment using Bitcoin. Follow the instructions below:
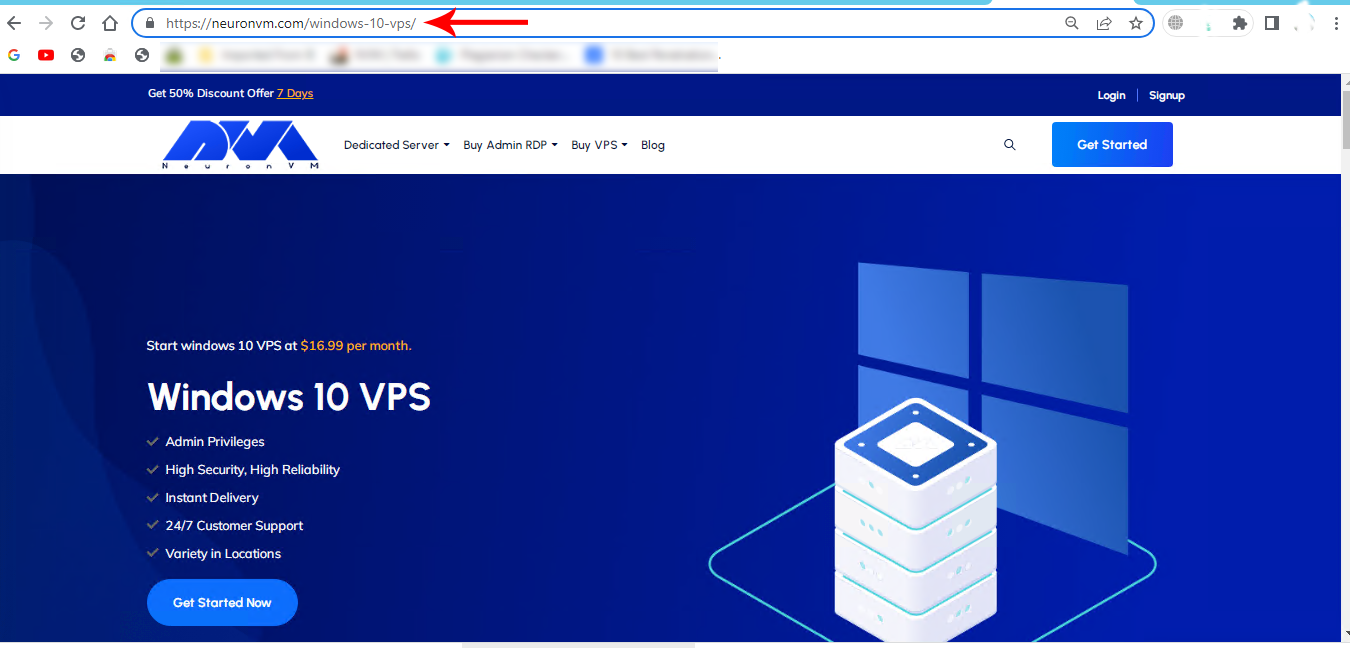
As the first step, refer to the Windows 10 VPS page on the official NeuronVM website to Buying a Windows 10 VPS:
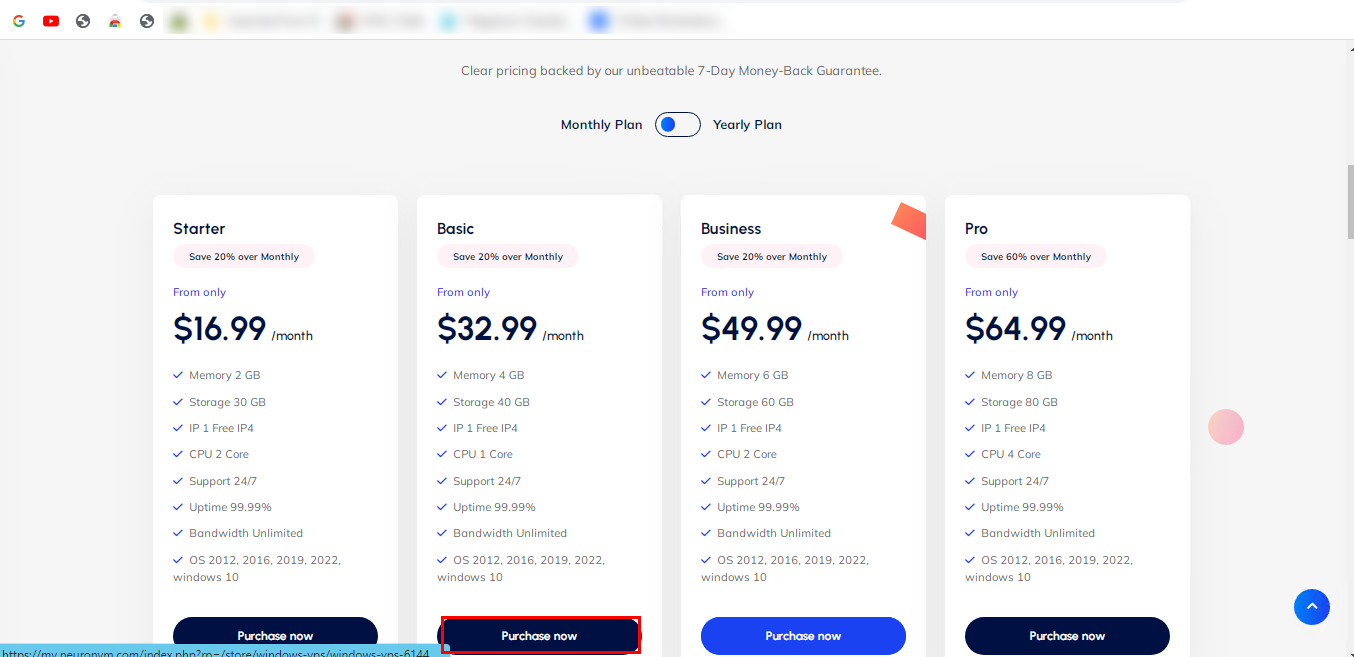
Scroll down and choose the desired plan. Click on Purchase Now:
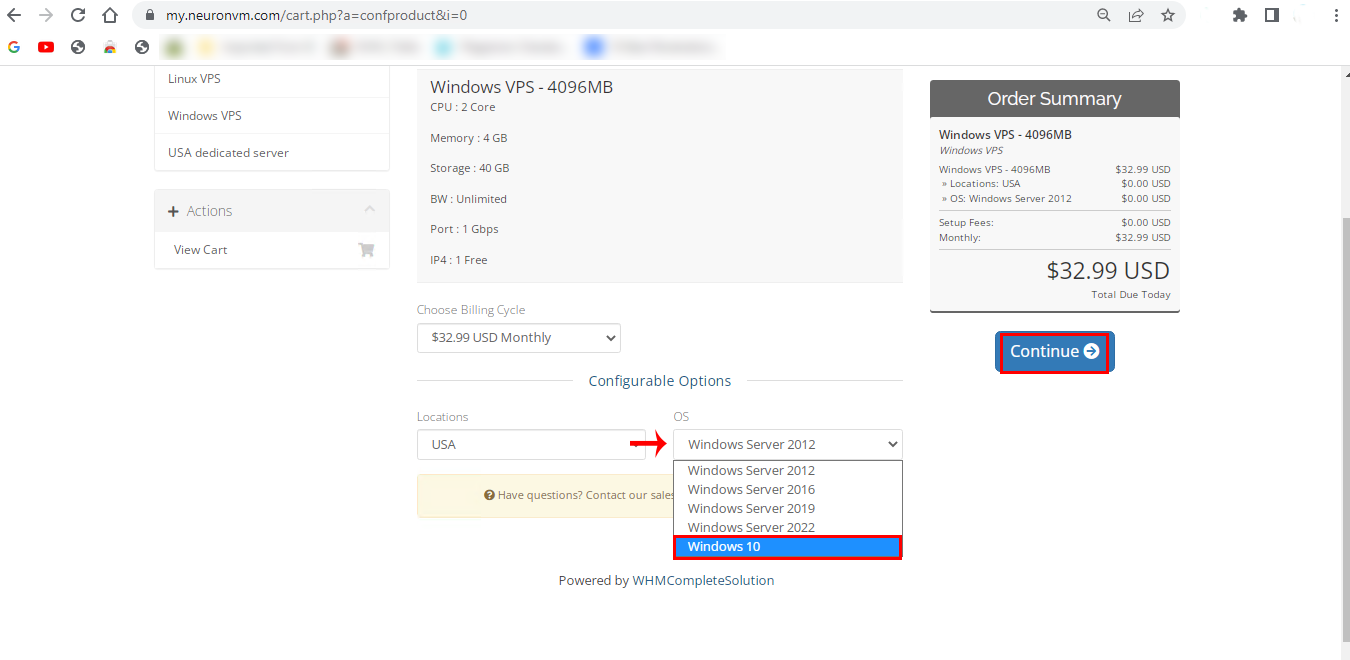
In the next part, choose the Windows 10 option in the OS box. Also, you can choose your locationhere. Then click on Continue:
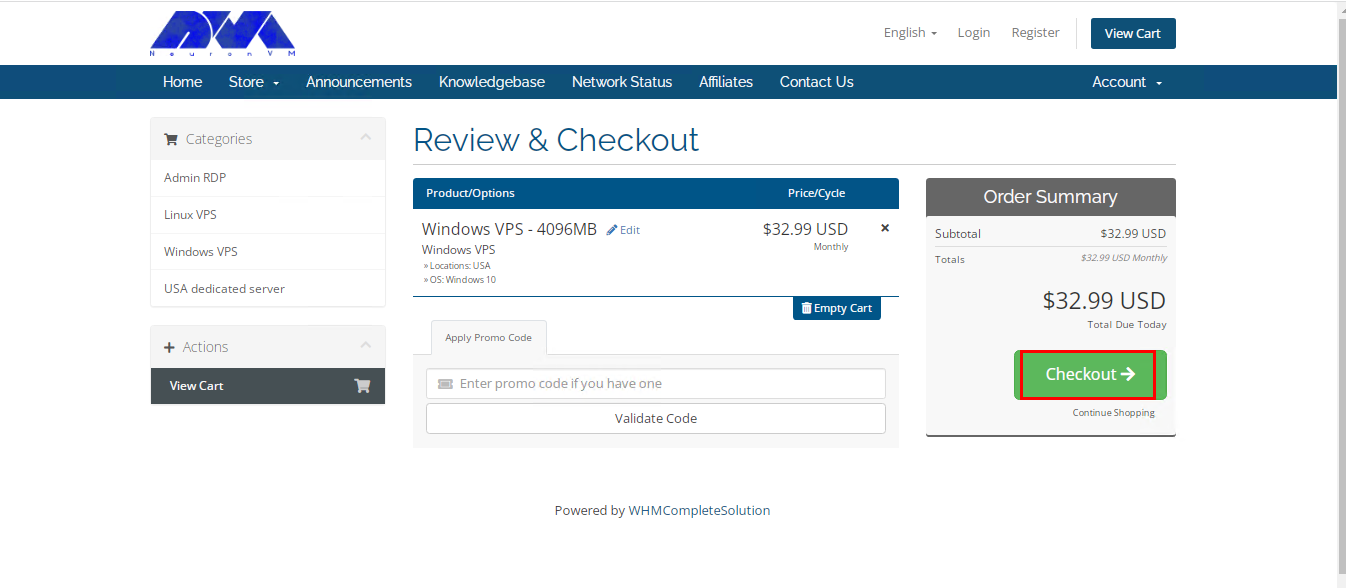
Now you can review the details of the chosen plan. Click on Checkout and continue:
Tip: you have the opportunity to insert the Promo Code for a discount.
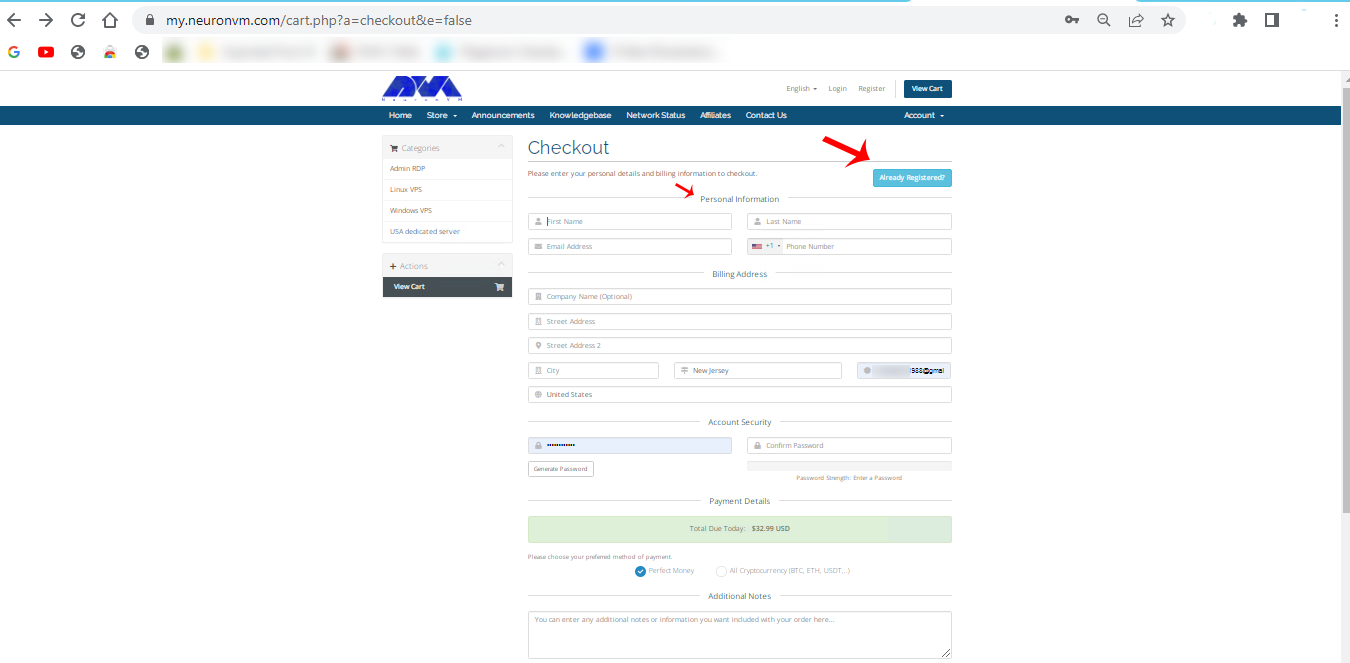
Here is the sign-in section. you can insert the related information and sign in, or you can press Already Registered and insert your email and password to go through the purchase process:
Here you can choose the payment method and add if you need to mention any notes. click on complete Order:
Tip: Your choice should be All Cryptocurrencies (Bit, Eth,…) to use Bitcoinfor your purchase that is windows 10 VPS with BTC.
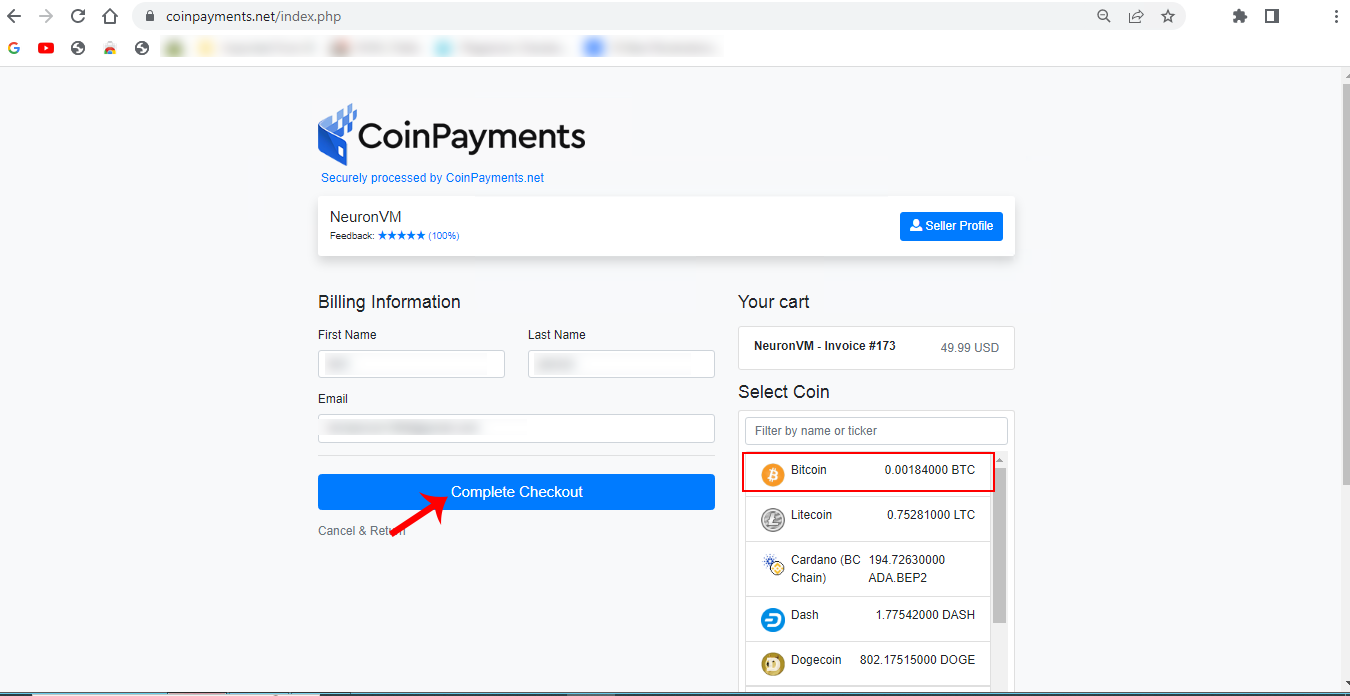
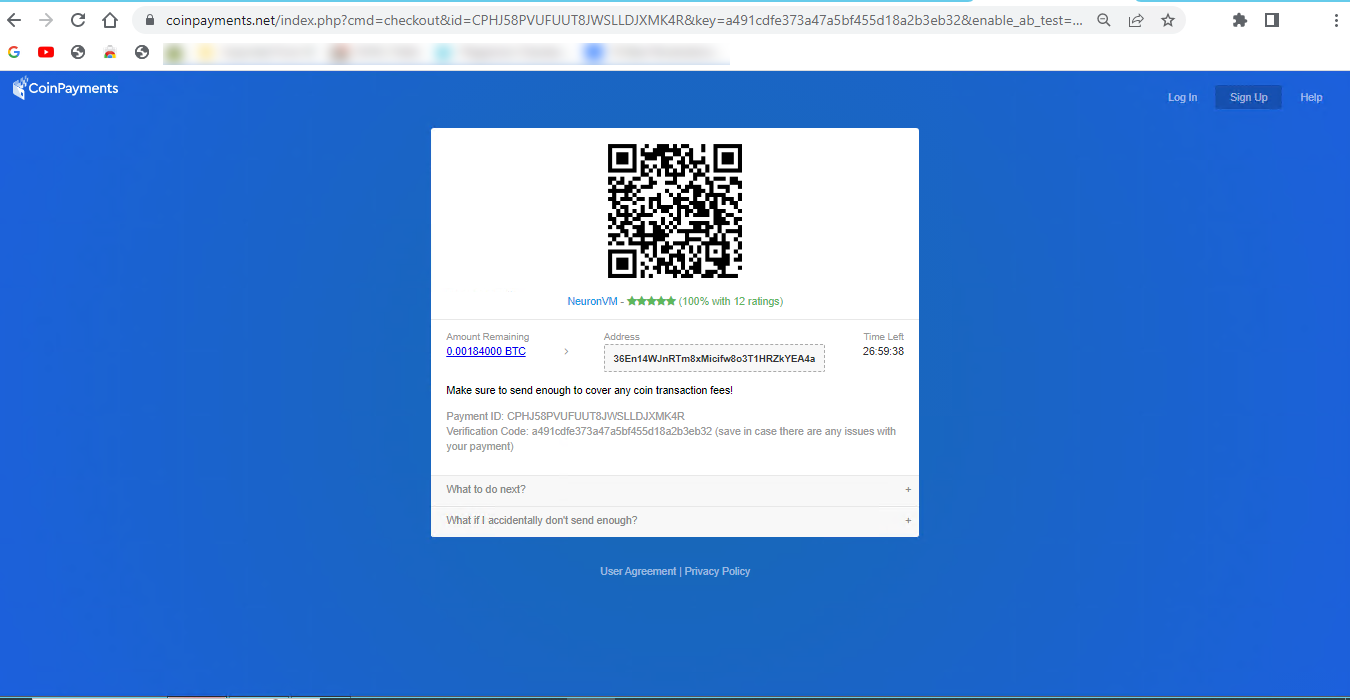
You will see the payment page. Insert personal information and choose Bitcoin, then click on Complete Checkout:
Here is the Payment ID and your payment information. confirm it and make the payment.
As soon as you complete your payment, you will receive the related details about your Windows 10 VPS server.
Best Practices to use Windows 10 VPS?
Using a Windows 10 Virtual Private Server comes with its own set of best practices to ensure that your virtual environment is secure, efficient, and well-maintained. Here are some best practices for using a Windows 10 VPS:
– Start by selecting a reputable VPS provider known for its reliability, customer support, and security. For example: NeuronVM.com
– Use strong, unique passwords for remote access, and consider using SSH keys for added security.
– Keep your Windows 10 VPS up-to-date with the latest security patches and updates to protect against vulnerabilities.
– Configure the Windows Firewall to only allow necessary traffic, blocking unnecessary ports and services.
– Install and configure antivirus and anti-malware software to protect your VPS from threats.
– Setup regular automated backups to ensure that your data is safe and can be easily restored in case of data loss.
– Enable encryption for data in transit and at rest, especially if you’re handling sensitive information.
– If using RDP to access the VPS, change the default RDP port, use strong passwords, and consider implementing Network Level Authentication (NLA) for enhanced security.
– Keep an eye on resource usage (CPU, RAM, disk space) to ensure your VPS is performing optimally. Adjust resources as needed.
– Enable auditing and review logs to monitor user activities and detect any suspicious behavior.
Troubleshooting Common Issues of Windows 10 VPS
Here are some common Windows 10 VPS issues and steps to troubleshoot them:
1- You have a slow performance problem
Solutions:
Check CPU and memory usage using Task Manager. Identify resource-hungry processes.
Consider upgrading your VPS resources if they are consistently maxed out.
Optimize startup programs and services using the “msconfig” utility.
2- Some problems related to networking
Solutions:
Test your internet connection on the VPS using the “ping” command to see if it’s responsive.
Check for any firewall rules that might be blocking traffic.
Ensure your VPS has the correct DNS settings.
3- Blue Screen of Death (BSOD) problem
Solutions:
Record the error code displayed on the BSOD.
Search for the error code online to find specific solutions.
Update drivers and Windows to the latest versions.
Check for hardware issues, especially if BSODs are frequent.
4- Lack of Disk Space Issues
Solutions:
Use the “Disk Cleanup” utility to free up disk space.
Uninstall unnecessary programs or move data to an external drive.
Consider expanding your VPS’s disk space if you consistently run out.
If you’re unable to resolve the issue, consider seeking help from your VPS hosting provider or a knowledgeable colleague. They may have access to additional tools and resources to diagnose and fix the problem.
Conclusion
Ultimately, whether a Windows 10 VPS is the best choice for you depends on your individual circumstances, application requirements, and budget constraints. Remember that the specific steps and details of buying Windows 10 VPS with BTC may vary depending on the VPS provider you choose. We hope you got how beneficial can Windows 10 VPS be for your business, so don’t waste your time and enjoy your server.
As the world of business becomes increasingly digital, companies are constantly seeking innovative solutions to enhance their operations and stay ahead of the competition. One such solution that has gained significant attention in recent years is Bitcoin VPS for business. Bitcoin, the decentralized digital currency, has revolutionized the way we think about transactions, and now it is making its mark on the world of virtual private servers (VPS). In this article, we will explore how Bitcoin VPS can contribute to the growth and success of businesses.
Bitcoin VPS offers a multitude of advantages for businesses looking to enhance their operations and drive growth.
Firstly, the decentralized nature of Bitcoin ensures that transactions are secure and immune to interference from third parties. This enhanced security provides peace of mind to businesses handling sensitive data and financial transactions.
Additionally, Bitcoin VPS allows for seamless and borderless transactions, eliminating the need for complex international wire transfers and currency conversions. This global accessibility opens up new markets and opportunities for businesses to expand their customer base and collaborate with partners from around the world.
Bitcoin VPS offers businesses enhanced security, global accessibility, and cost efficiency, driving business growth and expansion.
Securing Business Operations with Bitcoin VPS
Security is a top concern for businesses, especially in an increasingly digital landscape. Bitcoin VPS offers enhanced security features that make it an attractive option for businesses. With Bitcoin as the payment method, transactions are encrypted and decentralized, making it extremely difficult for hackers to intercept or manipulate sensitive data.
Moreover, Bitcoin VPS providers often implement state-of-the-art security measures, such as multi-factor authentication and DDoS protection, to further safeguard their clients’ data.
By utilizing Bitcoin VPS, businesses can ensure the integrity and confidentiality of their operations. It also helps them minimizing the risk of cyber threats and potential financial losses.
Global Expansion Made Easy with Bitcoin VPS
Bitcoin VPS provides businesses with a seamless and efficient solution for global expansion. Unlike traditional payment methods that are subject to geographical restrictions and currency conversions, Bitcoin allows businesses to transact seamlessly across borders.
This eliminates the need for complicated international wire transfers and reduces the associated fees and delays. With Bitcoin VPS, businesses can easily expand their operations to new markets, attract international customers, and collaborate with partners from different parts of the world. This global accessibility opens up new avenues for growth and enables businesses to tap into a larger customer base.
Cost Efficiency: How Bitcoin VPS Benefits Businesses
Cost efficiency is a key consideration for businesses, and Bitcoin VPS offers significant benefits in this regard. Traditional payment methods often involve high transaction fees, especially when dealing with international transfers.
In contrast, Bitcoin transactions have minimal fees, which makes them an ideal choice for businesses looking to reduce costs. Also, Bitcoin VPS providers offer competitive pricing plans, allowing businesses to scale their hosting needs without breaking the bank. This cost efficiency enables businesses to allocate their resources more effectively and invest in other areas of growth.
By leveraging Bitcoin VPS, businesses can optimize their financial management and achieve better cost control, ultimately enhancing their profitability.
Scalability and Flexibility: Harnessing the Power of Bitcoin VPS
Bitcoin VPS offers businesses unparalleled scalability and flexibility, allowing them to adapt to changing needs and growing demands. With traditional hosting solutions, businesses often face limitations and constraints when it comes to resource allocation and capacity.
However, Bitcoin VPS providers offer a wide range of hosting packages that can be easily scaled up or down based on the specific requirements of the business. This scalability ensures that businesses can accommodate increased traffic, storage needs, and processing power without experiencing any downtime or performance issues.
Additionally, Bitcoin VPS enables businesses to quickly and seamlessly upgrade their hosting plans as they grow. It also provides the necessary resources to support their expanding operations.
Privacy Protection and Future Potentials
Privacy protection is a critical concern for businesses in today’s digital era, and Bitcoin VPS offers a high level of privacy and confidentiality. Bitcoin transactions are pseudonymous, meaning that users can conduct transactions without revealing their personal information. This provides businesses with an added layer of privacy and protection against potential data breaches or identity theft.
Moreover, as blockchain technology continues to evolve, there is a growing potential for businesses to leverage the transparency and immutability of blockchain to enhance their operations further.
Bitcoin VPS opens up possibilities for businesses to explore innovative applications of blockchain technology. Possibilities like smart contracts and decentralized applications, can revolutionize various industries and drive future growth.
Fortunately it’s easy to get a secure Bitcoin VPS today from trusted websites, so you won’t need to worry about further complications.
Conclusion
In an ever-evolving business landscape, embracing innovative solutions is essential for growth and success. Bitcoin VPS for business offers enhanced security, global accessibility, cost efficiency, scalability, privacy protection, and future potential. By leveraging these benefits, businesses can optimize their operations and gain a competitive edge in the digital world. As the adoption of Bitcoin continues to rise, now is the time for businesses to explore the potential of Bitcoin VPS and unlock new opportunities for growth.
You can meet all your online needs with a simple one-step solution, this solution is Canada RDP or Remote Desktop Protocol. Some of the problems that users face in online work include slow connections, limited access to the website, and low security. Therefore, choosing a reliable and fast service like RDP will be a wise thing to do. Here we will give you a great explanation of Canada Remote Desktop Protocol and show how to get one and enjoy your online activity.
A Short Description Of Canada RDP
If we briefly explain Canada RDP, it is a remote desktop service that is hosted in Canada or a service provider that provides RDP access to computers located in Canada. One of these reliable providers is NeuronVM. In this case, the same principles of safe and authorized use apply.
The remote desktop protocol gives you dedicated access and IP, more control on the server. Also, you can monitor other devices and help solve technical problems from anywhere in an easy and fast way. Ensure that you use such services responsibly and comply with their terms of service or related legal requirements.
Using NeuronVM Canada RDP is recommended because you will have the best services and quality at an affordable price.
Features of Canada Remote Desktop Protocol
These are the significant features why choosing a Canada remote desktop protocol can be a wise choice for your business:
Using the Canada RDP services from NeuronVM, you can have fast and borderless access to your virtual desktop environment from anywhere in the world. They are managed with more hassle and pleasure.
Essential files and resources are also available with more security and peace of mind. The distinguishing point of NeuronVM from other RDP providers is providing robust and professional support for customers and first-class security measures and looking for a seamless user experience for your remote desktop solution. So NeuronVM will be a good choice for you.
How to Purchase Canada Remote Desktop Protocol?
To buy Canada RDP from NeuronVM follow these instructions:
1- Refer to the official website and choose the Buy Admin RDP tab:
2- Now you can choose your desired plan and go to the configure page:
3- Here you should choose the proper location so select Canada for Canada RDP and press Continue:
4- It is time to review the details of the chosen plan. check the details and press the checkout button:
Note: you can get a discount by adding a Promo Code.
5- Now you will encounter a Signup page. You should sign and fill out the personal information or if you registered before, just press Already Registered option:
6- If you registered before, here you can give your email and password to login to your NeuronVM account. Also down the page, you can see the payment type and a box to add additional notes, So choose the payment method and at last click on the Complete Order button:
8- In this section, you should choose the way to make the payment and click on Make payment option:
9- Finally, insert your payment details and ID to finalize your purchase. then Press Preview payment.
That’s it! So simple and fast. You will receive purchased service details in your email and can enjoy using the RDP server.
Best Practices Of Canada RDP
Canada RDP or Remote Desktop Protocol usage and administration should follow best practices to ensure security, compliance, and efficiency. Here are some best practices for using and managing Canada RDP:
– Implement multi-factor authentication (MFA) for added security.
– Use strong, unique passwords for RDP accounts.
– Restrict incoming RDP traffic to specific IP addresses or networks.
– Configure a firewall to block known malicious IP addresses.
– Use the latest RDP version for improved security.
– Require the use of encryption for RDP sessions (NLA, SSL/TLS).
– Keep the RDP server and client software up-to-date with security patches and updates.
– Enable RDP session logging to track user activity, and Monitor event logs for suspicious activities.
– Isolate RDP servers from other critical systems by using network segmentation and VLANs.
– Implement account lockout policies to protect against brute-force attacks.
– Backup RDP server configurations, data, and settings regularly.
– Keep the underlying operating system and software applications patched and up-to-date.
And so many other practices. Remember that security is an ongoing process, and staying vigilant is key to maintaining a secure RDP environment. Regularly review and update your security measures to adapt to evolving threats and best practices.
Conclusion
Canada RDP is one of the great locations to choose and it can help you to have a dedicated and hassle-free RDP system to control and monitor your online business. We tried to give a clear vision and simple guidance to purchase this fantastic RDP service and familiarize you with the features and different practices of Canada Remote Desktop Protocol. In order to have any questions you can leave a comment here.
A remote Desktop is a tool that you can use to connect to your PC and control it. This tool enables remote control of devices. In this case, the users who are in the administrative group or the users you have selected and allowed access will be able to manage or control the system. This article will teach you the way to adding remote desktop users, so stay with us.
Required Tools
Here are the requirements before adding a remote desktop user:
Logging in via RDP with an account that has administrative privileges
Tip: All the configurations and settings will be done on Windows 10 VPS server.
Accessing the Remote Desktop Services Configuration
First of all, Log in to the Server for which you want to add remote desktop users with an administrator account.
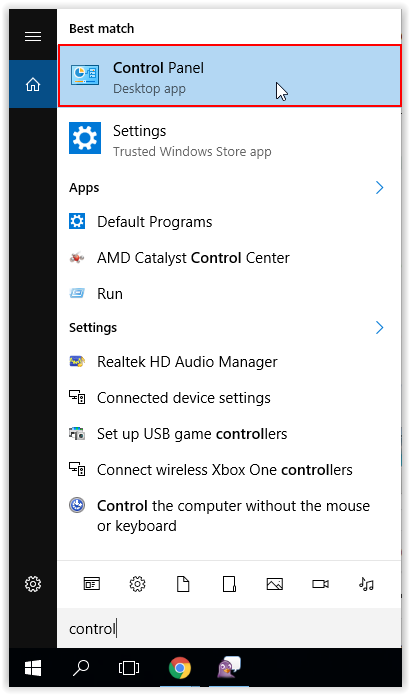
Now you should click the Control panel from the Start menu:
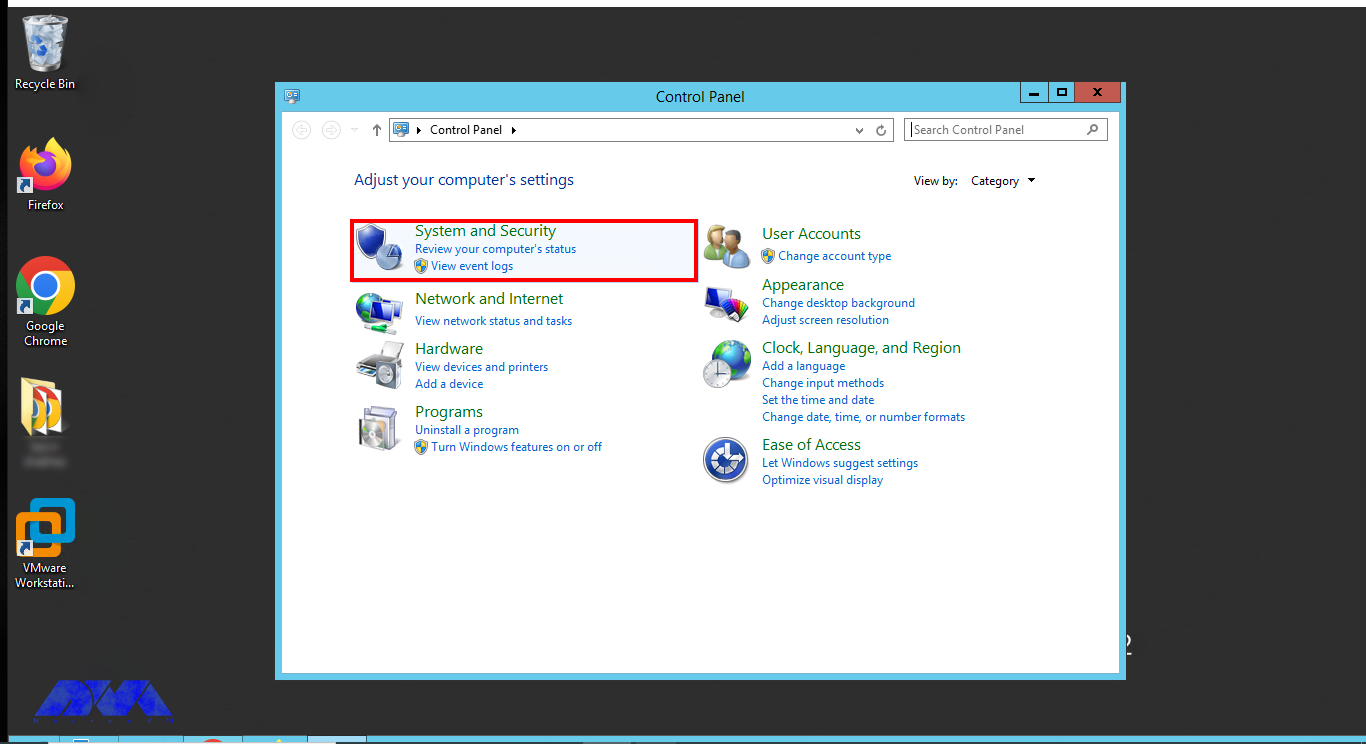
Choose System and Security once the panel opens:
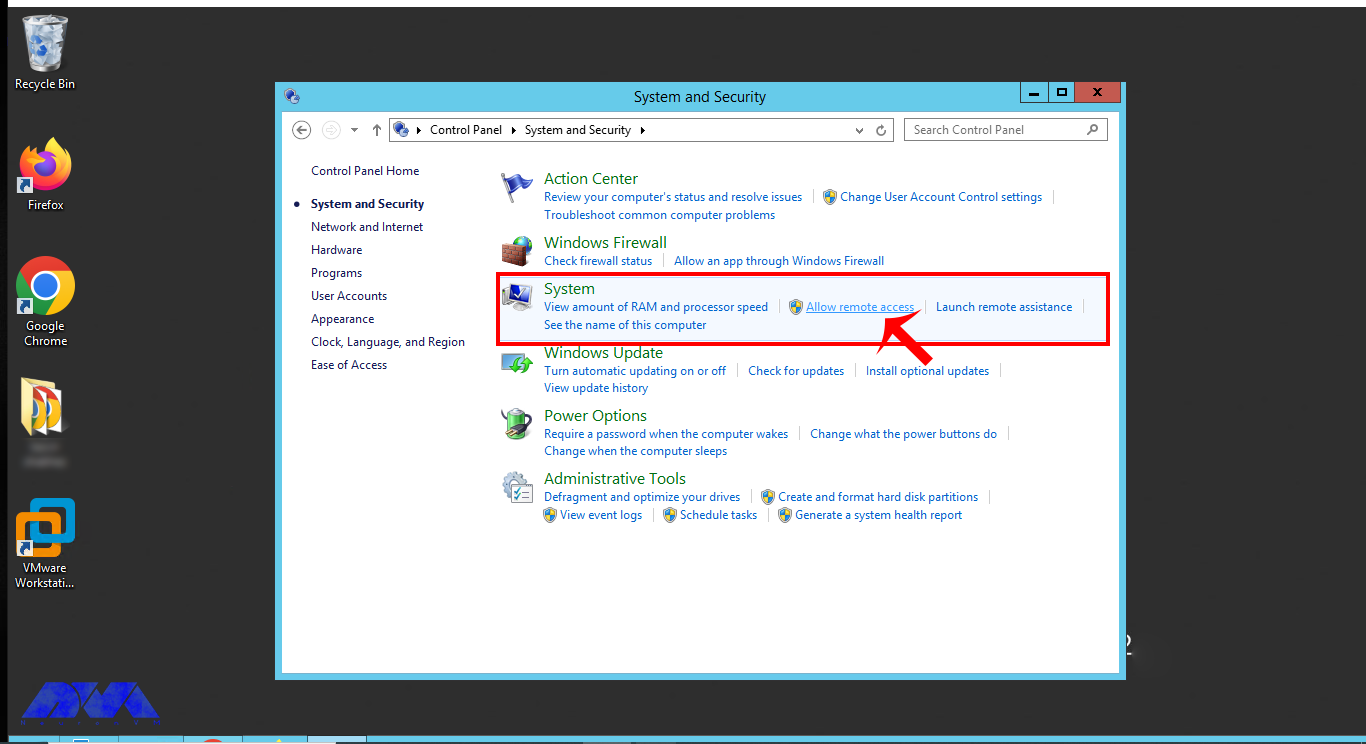
Now choose Allow Remote Access under the System option, This will enable remote access and then you can add Users:
Opening the Remote Desktop Users Properties Dialog
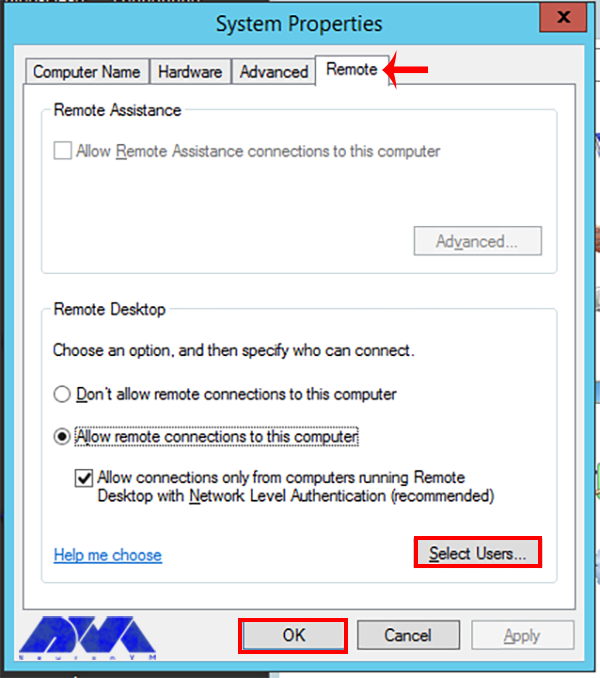
In the System Properties window, go to the Remote tab. You will find several options related to remote desktop settings here.
Now, under the Remote tab, select the option that says Allow remote connections to this computer. Make sure this option is checked:
Adding Remote Desktop Users
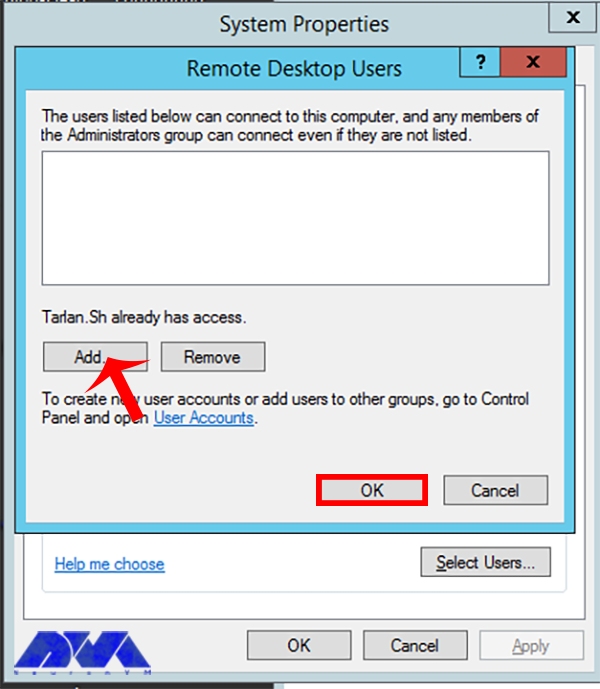
Click the Select Users button. This will open the “Remote Desktop Users” window:
In the window, click the Add button:
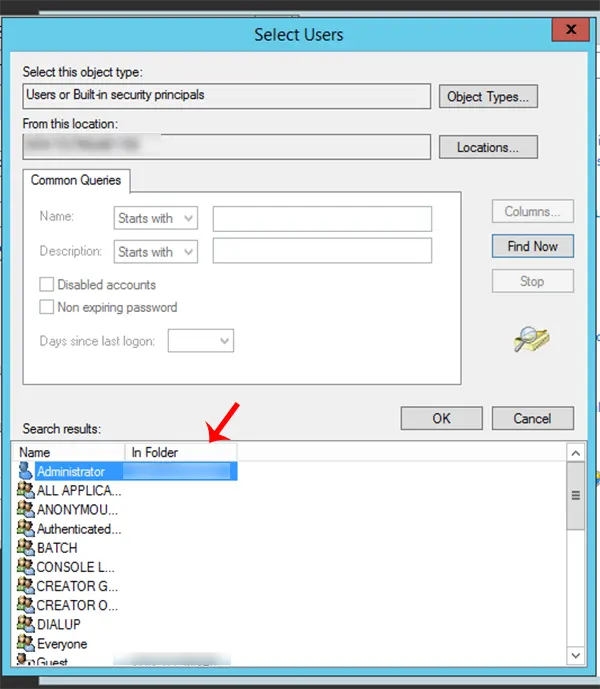
In the “Select Users or Groups” window, you can specify the users who should be allowed to connect remotely. You can add users by typing their names and then clicking Check Names to verify them. Once verified, click OK to add the user(s).
Adjusting User Access Level
In the Remote Desktop Users window, you can also set the level of permissions for the added users. By default, they will have Remote Desktop Users permissions, which allow them to log in remotely.
If you want to grant administrative rights, you can add the user(s) to the Administrators group by clicking on the Advanced option:
***
Click OK to close the window. and save the changes.
Sometimes, you may need to restart the computer for the changes to take effect.
That’s it!, the added users should be able to connect to the computer using Remote Desktop.
Troubleshooting User Access on Remote Desktop
You may encounter some problems. Let’s analyze some of them and see what can be the related solution:
1- Users are not able to access the system remotely even after being added as remote desktop users.
Solution:
Ensure that the users are members of the “Remote Desktop Users” group. You can add users to this group through the Local Users and Groups management console.
2- Users cannot connect to the remote desktop because the firewall is blocking the RDP port.
Solution:
Open the necessary port (default is 3389) in the Windows Firewall to allow RDP traffic. Make sure any network-level firewalls (e.g., on a router or security software) also allow RDP traffic.
3- Users cannot connect because of network issues.
Solution:
Verify that both the local and remote systems have a stable internet connection. Check for any issues with routers, switches, or other network devices.
4- Remote Desktop service (Term Service) is not running.
Solution:
Start the “Remote Desktop Services” service. You can do this in the Services management console (services.msc) or through PowerShell.
Conclusion
After completing these steps, the specified user(s) should be able to connect to your computer using Remote Desktop. Make sure to also configure any necessary firewall or network settings to allow remote desktop connections if you haven’t already. As you see adding users is so simple and straightforward. We hope this article was useful for you.
As the cryptocurrency market continues to gain momentum, an increasing number of Virtual Private Server (VPS) providers have started accepting Bitcoin as a payment method. In this article, we’ll explore six popular VPS providers who have embraced Bitcoin. While discussing the highlights of each provider, we will also critically examine the disadvantages associated with their VPS services.
A List of Top VPS Providers Accepting Bitcoin
I gathered a list of top 6 VPS providers that accept Bitcoin as a payment method. Most of these websites on the list also accept other cryptocurrencies or even other payment methods. Surely the list doesn’t end with these 6 names, but these are the ones that we’ve tested and investigated about. So without further ado, here’s the list of top bitcoin VPS providers!
NeuronVM
NeuronVM is relatively new to this business, but so far the feedback has been so good. It has been known for its diversity in locations by providing VPS in more than 60 cities in the whole world. You can also be sure about the instant delivery and no extra setup fee and choose your preferred payment method. You can buy VPS with perfect money or cryptocurrencies like Bitcoin. All of these options has made NeuronVM one of the top VPS providers in world today.
Pros:
– Instant delivery without any extra charge or setup fee
– Reasonable pricing and diversity in plans
– Providing VPS in more than 60 locations all over the globe
– High uptime
– Different VPS plans like Game VPS and Mikrotik VPS
Cons:
– A newer company compared to the others in the list
Hostinger
Hostinger is a globally recognized VPS provider offering excellent performance and reliability. With a multitude of data centers worldwide, they provide low latency and high-speed connectivity. They’ve been a trusted providers in all these years, providing solid VPS services. However, it is essential to consider a few cons when choosing Hostinger for VPS services.
Pros:
– Affordable VPS plans with excellent value for money.
– Wide availability of data centers in multiple regions.
– User-friendly interface and customer support.
– Trusted 24/7 support
Cons:
– Not much improved over time
– Some customer reviews suggesting occasional downtime and support delays.
Cherryservers
Cherryservers is a reputable VPS provider that accepts Bitcoin payments. They are known for their flexible pricing model and robust infrastructure. They’ve been able to make a name for themselves in a short time and they are going strong. It seems like the majority of customers are really happy with the provided services by this hosting company.
Pros:
– Flexible pricing structure with pay-as-you-go options.
– Extensive customization possibilities and a wide range of plans.
– Strong emphasis on high-performance computing and data processing.
Cons:
– Some complaints about the support team have been reported.
– Customer reviews mentioning occasional instability and slow response times.
Hostsailor
Hostsailor is a VPS provider that focuses on delivering customized solutions. Their acceptance of Bitcoin payments has attracted crypto enthusiasts. They’ve been around for quite a time now and they are providing quality services. Whether you want a KVM or XEN VPS, you can find the quality ones on Hostsailor. Here’s a full list of pros and cons regarding Hostsailor.
Pros:
– Diverse range of VPS plans to cater to varying needs and budgets.
– Advanced security features, including DDoS protection.
– Multiple data center locations for global reach.
Cons:
– Limited support options when comparing to other providers.
– Higher subscription costs in comparison to the competitors.
– Mixed customer reviews regarding stability and customer service.
Coin Host
Coin host is a VPS provider that specializes in cryptocurrency payments. They offer a range of VPS plans that can be purchased using various cryptocurrencies, including Bitcoin. With a focus on privacy and security, Coin host is a popular choice for those who value anonymity in their hosting services.
Pros:
– Accepts cryptocurrency payments, including Bitcoin.
– Strong emphasis on privacy and security.
– Flexible VPS plans to cater to different needs.
– Reliable uptime and performance.
Cons:
– Limited payment options for non-cryptocurrency users.
– Some customer support options are missing.
– Limited data center locations.
Shinjiru
Shinjiru.com is a trusted VPS provider offering excellent services to customers. They have a wide range of hosting options and provide VPS solutions tailored to various needs. With data centers located globally, they ensure low latency and high-speed connectivity. One of the unique features of Shinjiru is their focus on privacy and anonymity, making them a popular choice among users.
Pros:
– Wide range of hosting options with tailored VPS solutions.
– Data centers located globally for low latency and high-speed connectivity.
– Strong emphasis on privacy and anonymity.
Cons:
– There is no DDoS for basic plans.
Final Words
In conclusion, the emergence of Bitcoin as a widely accepted form of payment has played a crucial role in the evolution of the virtual private server (VPS) industry. As evidenced by the top VPS providers embracing Bitcoin, this innovative digital currency has not only provided users with a secure and anonymous way to transact, but it has also opened doors to a global market of potential customers. By allowing Bitcoin as a form of payment, these providers have demonstrated a commitment to adaptability, forward-thinking, and customer-centricity. As we look towards the future, it is clear that the integration of Bitcoin into the VPS industry will continue to grow, bringing forth an era of enhanced privacy, seamless transactions, and expanded opportunities for businesses and individuals alike.
In this day and age, businesses require reliable and secure hosting solutions to ensure their online presence is always up and running smoothly. Dedicated server offer a high level of performance and control. This makes them an ideal choice for businesses with advanced hosting needs. If you’re looking to purchase a dedicated server with Perfect Money, this ultimate guide will provide you with the necessary insights to make an informed decision. So let’s dive in and see how it’s done!
Understanding Dedicated Servers
Dedicated servers are physical machines solely dedicated to hosting a single website or application. Unlike shared hosting, where you can host multiple websites on the same server, dedicated servers offer exclusive resources, including CPU power, RAM, storage, and network connectivity.
This exclusivity guarantees optimal performance and flexibility, allowing businesses to handle heavy traffic loads, resource-intensive applications, and large-scale databases. By investing in a dedicated server, you have full control over server configuration, software installations, security measures, and more.
When opting for a dedicated server with Perfect Money payment, it is crucial to consider your specific requirements. Evaluate aspects such as the required CPU and RAM capacity, storage size, bandwidth limits, and the level of technical support offered by the hosting provider. Additionally, assess other factors such as server location, network uptime guarantees, scalability options, and data center certifications.
The Benefits of Purchasing Dedicated Servers with Perfect Money
Perfect Money is a reliable and convenient payment system that offers numerous benefits when purchasing dedicated servers. Firstly, it ensures fast and secure transactions, eliminating the risk of fraud or unauthorized access.
Second, it provides flexibility, allowing users to choose from various currencies and easily convert them. Additionally, Perfect Money offers competitive fees, enabling cost-effective server purchases.
Moreover, users can enjoy seamless integration with different platforms, making the buying process more efficient and convenient.
Lastly, Perfect Money’s user-friendly interface and customer support ensure a smooth experience, enhancing user satisfaction when acquiring dedicated servers.
Finding a Reliable Dedicated Server Provider Accepting Perfect Money
Once you have determined the specifications and features you need for your dedicated server, the next step is to find a reputable hosting provider that accepts Perfect Money as a payment method. Conduct thorough research to identify top-notch hosting companies that meet your requirements and have positive customer reviews. Look for providers with extensive industry experience, a diverse range of server configurations, and excellent customer support.
Exploring online forums, review websites, and social media can help you gather valuable insights from other users’ experiences. Check for any reported downtime issues, the performance of servers, and the provider’s responsiveness to customer concerns.
Additionally, it is essential to ensure that the hosting provider offers the necessary security measures, such as firewalls, DDoS protection, and regular backups, to safeguard your data.
Here at NeuronVM, we are providing different hosting solutions, with dedicated servers being one of the most important services. If you’re willing to buy dedicated server, the next section is written for you.
Step by Step Guide for Buying Dedicated Server with Perfect Money
So if you’re planning to buy a dedicated server, this is the section you’ll be looking for. There are not many providers out there that give you the option to buy this service using Perfect Money, but here at NeuronVM, we really want everyone to start their business as soon as possible and not worry about things like payment method.
There are a few steps you must take to buy a dedicated server with perfect money. Here, I’ll show you how!
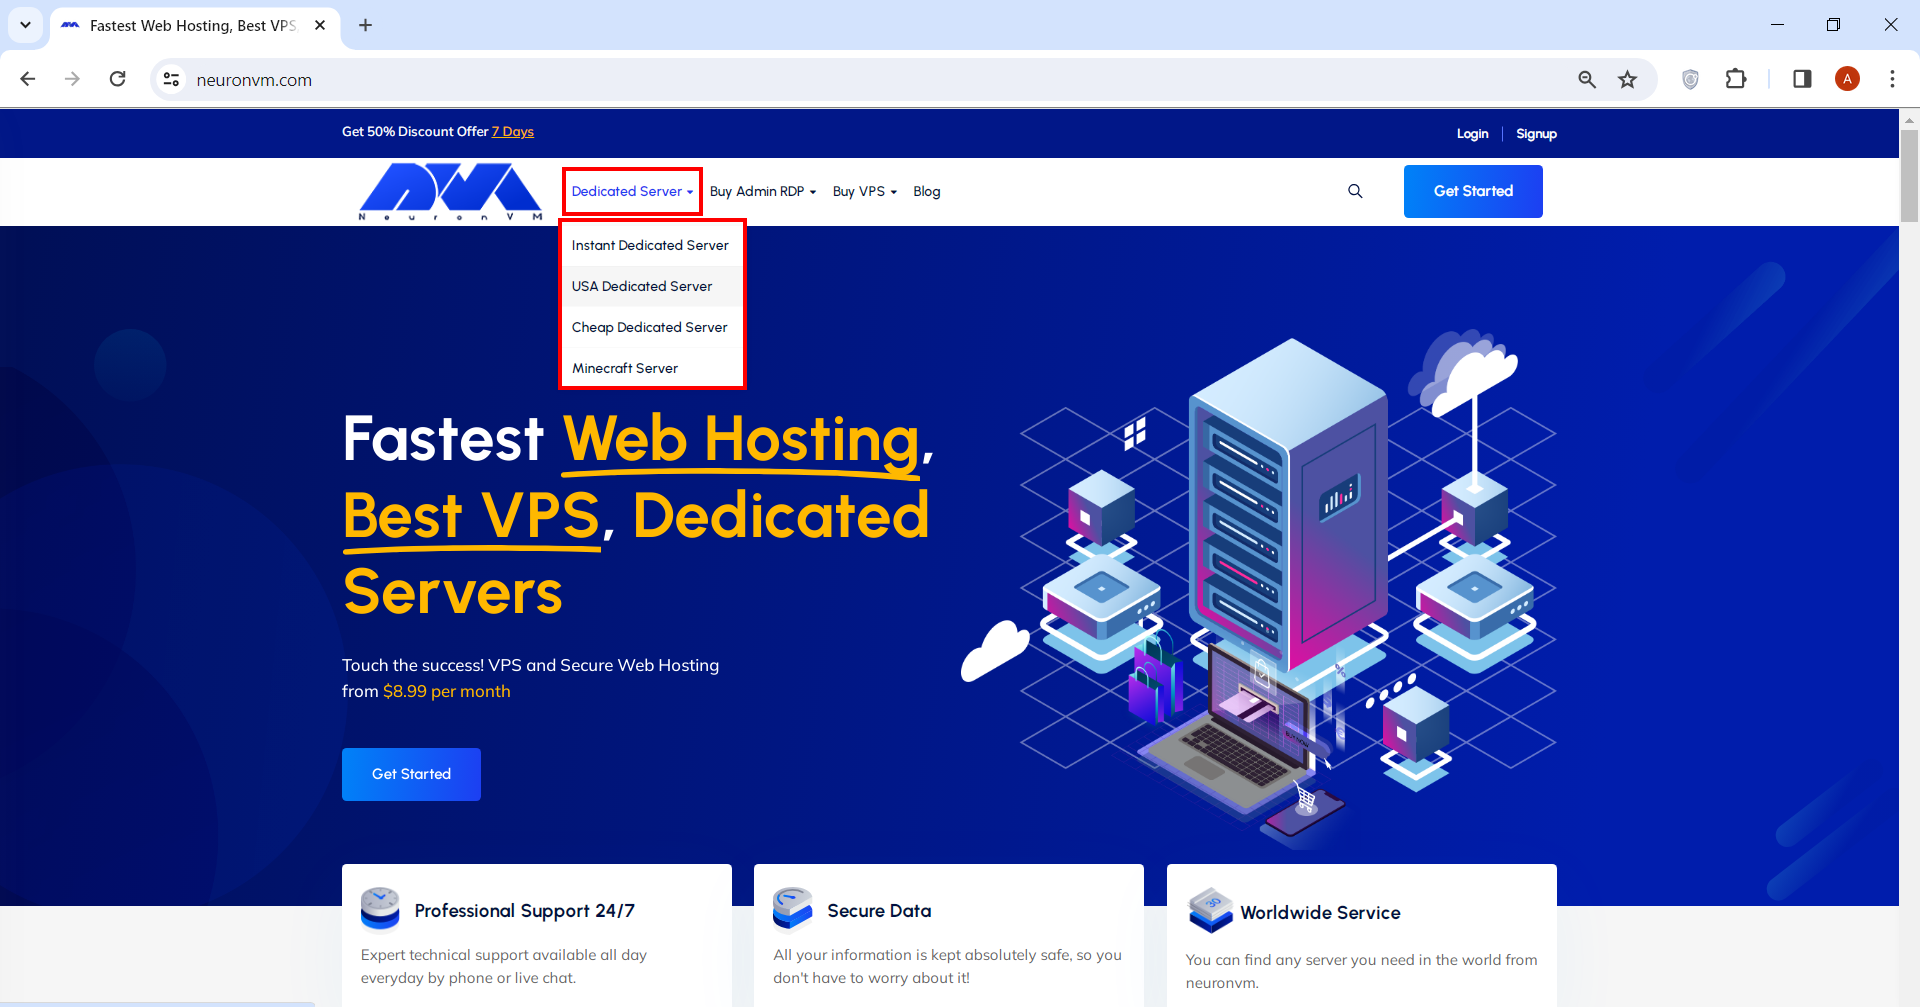
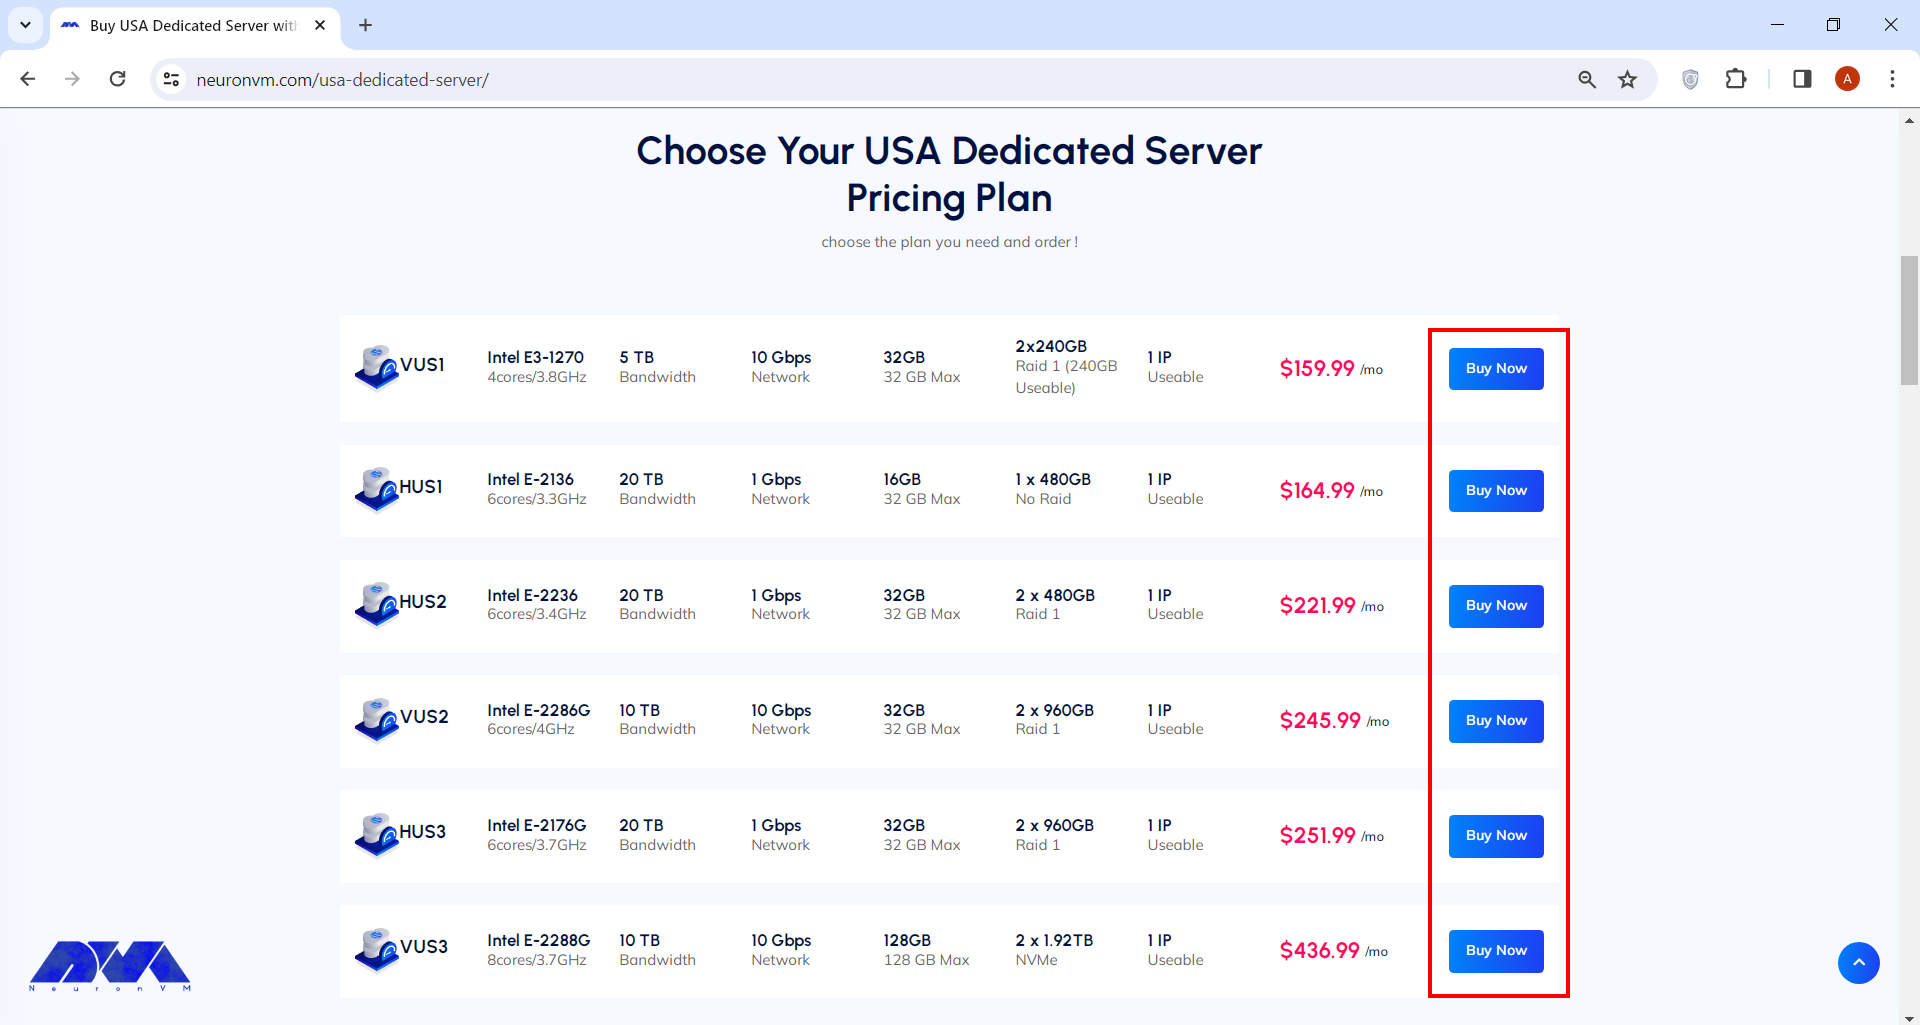
Go to our main page. From the menu above, you can choose a Dedicated Server option and see the plans. (for the sake of this tutorial I choose USA dedicated server, but the other ones are just the same).
You can choose your preferred plan on this page. After that, you can simply click on Buy Now and proceed.
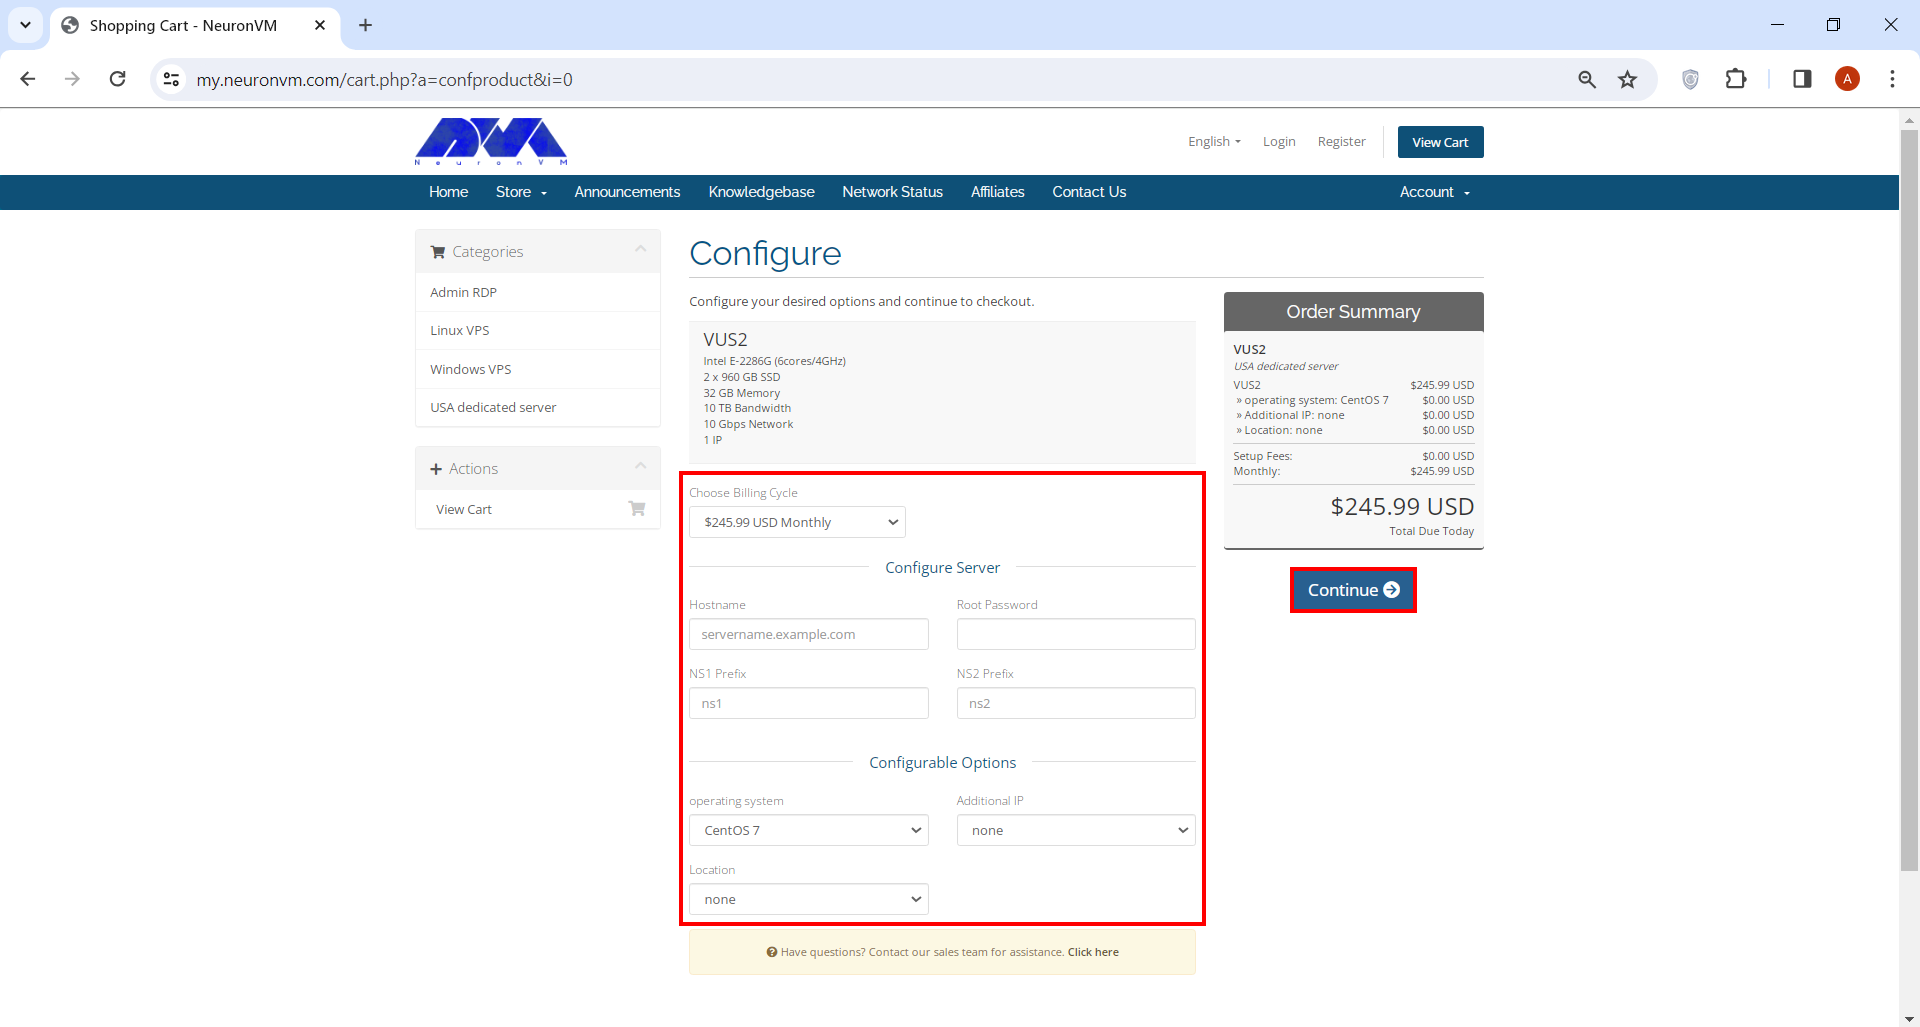
You’ll be directed to our shopping card webpage where you have to fill a few forms before you can proceed. You can also change options like operating system, billing cycle and location on this page.
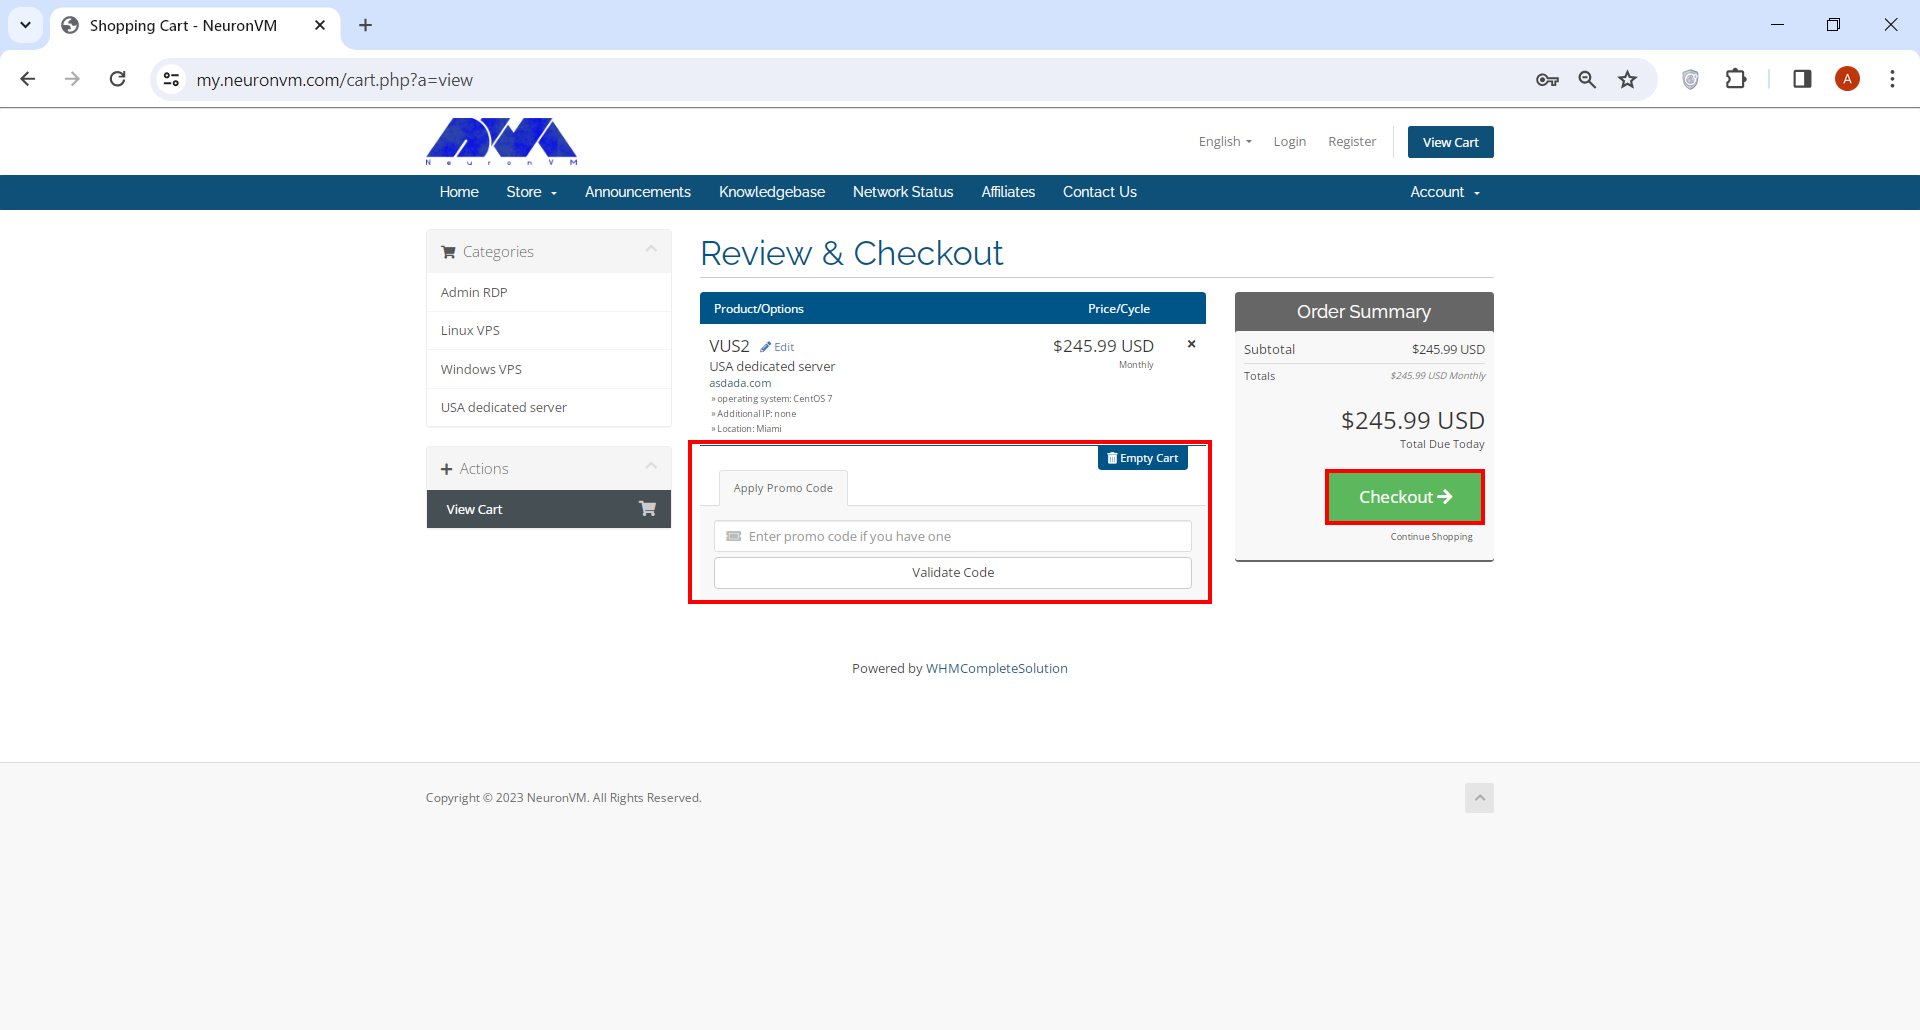
Review & Checkout page is where you can enter your promo code if you have any. Click on the Checkout button when you’re done.
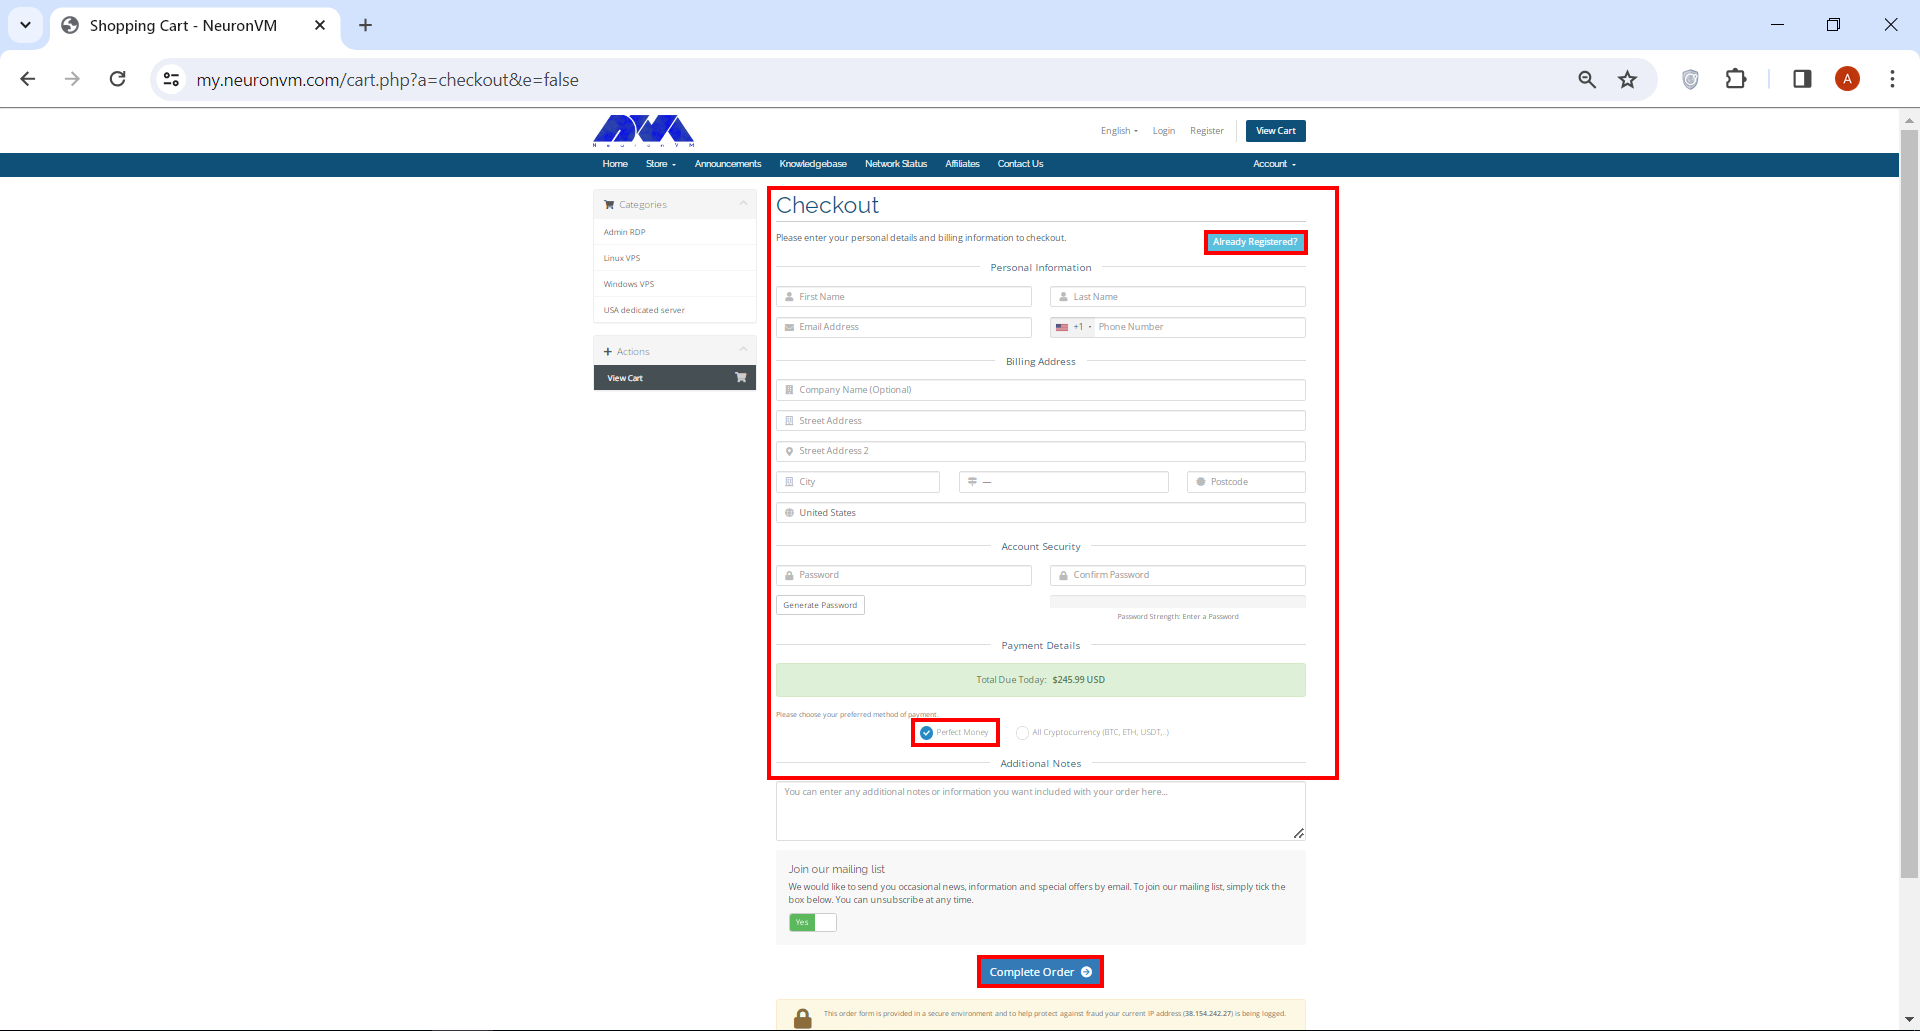
On Checkout page you have to enter a number of personal information. If you’ve signed up before, simply click on Already Registered button. At the bottom of the page, under Payment Details section, check Perfect Money box and finally click on Complete Order.
That’s it! Now you can purchase the dedicated server of your choice with Perfect Money. Remember we have a dedicated support team on NeuronVM who is there for you 24/7, so don’t hesitate to ask any questions you might have in mind.
Conclusion
Investing in a dedicated server with Perfect Money as the payment method offers businesses a secure and hassle-free solution for their hosting needs. By understanding the significance of dedicated servers, identifying reliable providers accepting Perfect Money, and following through with the purchase process, you can confidently establish a robust online presence for your business. Remember, taking the time to research, analyze, and compare different hosting options will ensure you make an informed decision that aligns perfectly with your specific requirements.
If you are looking for a convenient and easy-to-use solution for remote access and support, we can recommend Chrome remote desktop for you. It’s particularly popular because of its integration with the widely used Google Chrome browser which provides remote access to a computer. It allows you to access your own computer or a remote computer from another location, which can be incredibly useful for various scenarios. So we will focus on this tool and present a comprehensive tutorial on Chrome remote desktop.
What is Chrome Remote Desktop?
The Chrome remote desktop tool is a software for management and remote access that was developed for free by Google. With the help of this tool, you can remotely access another computer from devices that run the Google Chrome browser. Monitoring and control as well as remote support are positive points of this software and you can use it with confidence.
This tool helps you access your workplace system from anywhere in the world and share your screen to guide others. This can be particularly useful for remote technical support, accessing your own computer from a different location, or collaborating with others on a shared computer.
It’s important to note that this tool requires an active internet connection on both the local and remote devices. Also, you can use NeuronVM services like Windows VPS to use the Chrome management tool.
Benefits of Using Chrome Remote Desktop
Here are some advantages why users might choose Chrome remote desktop:
Security: Chrome Remote Desktop uses secure connections to protect your data during remote access. The optional PIN feature adds an extra layer of security.
Convenience: Using this software, users can access their computer from any device with a Chrome browser or app. So you can work from anywhere.
Access to Your Own Computer: If you need to access your work or home computer from a different location, you can do so using this tool.
Ease of Use: Chrome remote desktop is easy to use and straightforward. It requires minimal setup times and effort.
Collaboration: When collaborating on a project, you can use this tool to work on the same computer with others. Your physical location is not important anymore.
Cross-Platform Access: Chrome Remote Desktop is cross-platform. In other words, it allows you to access a Windows PC from a Mac, or vice versa. It also supports various operating systems, making it versatile for users with diverse device preferences.
Technical Support: It’s commonly used for providing technical support. If you’re tech-savvy, you can help friends or family members troubleshoot computer problems or perform maintenance on their systems from afar.
Offline Access: The ability to set up remote access even when the local computer is offline or in sleep mode is a unique feature.
6 Easy Steps to Access Google Chrome Remote Desktop
As we mentioned, Google Chrome Remote Desktop is a service that allows you to access and control a remote computer from another device using the Google Chrome web browser. To set up and use this tool, follow these steps:
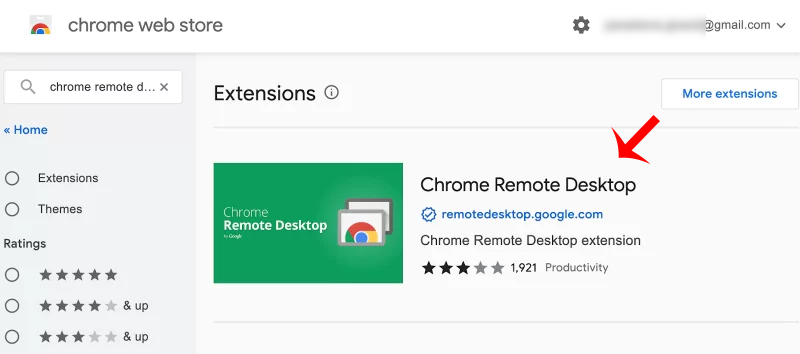
1- Open the Chrome browser. Then click on the three lines on the top right and click Extensions. Then search for Chrome Remote Desktop in the search field:
Tip: If it’s not already installed, download and install Google Chrome from the official website.
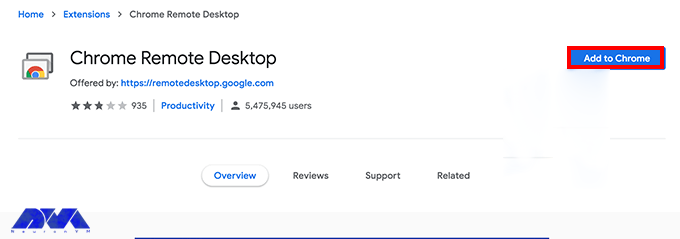
2- Now choose chrome option and press Add to chrome button:
Tip: It is recommended to install web application too. So, you can have more control.
Tip: Ensure you are signed in to Google Chrome with the same Google account on both the local and remote computers. This is necessary for synchronization.
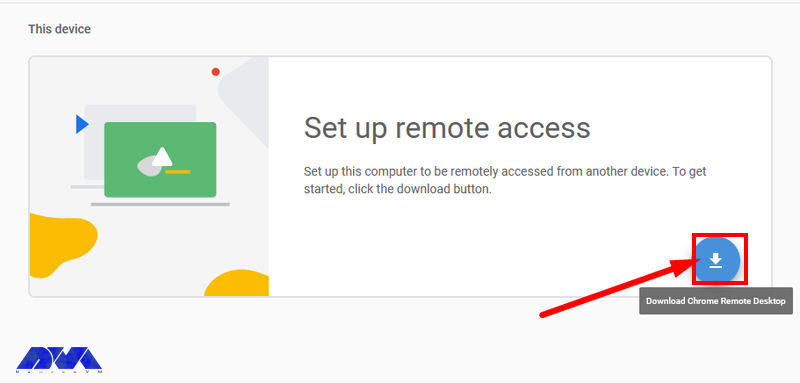
3- Now if you want to remotely access to your desktop after adding chrome extension, click on the blue button to start the download of .msi file and press Accept and Install:
4- In the next step, press Run on the encountered installation wizard. So, you can open the chrome remote desktop file on Downloads section. You will see the section to choose a name for your device:
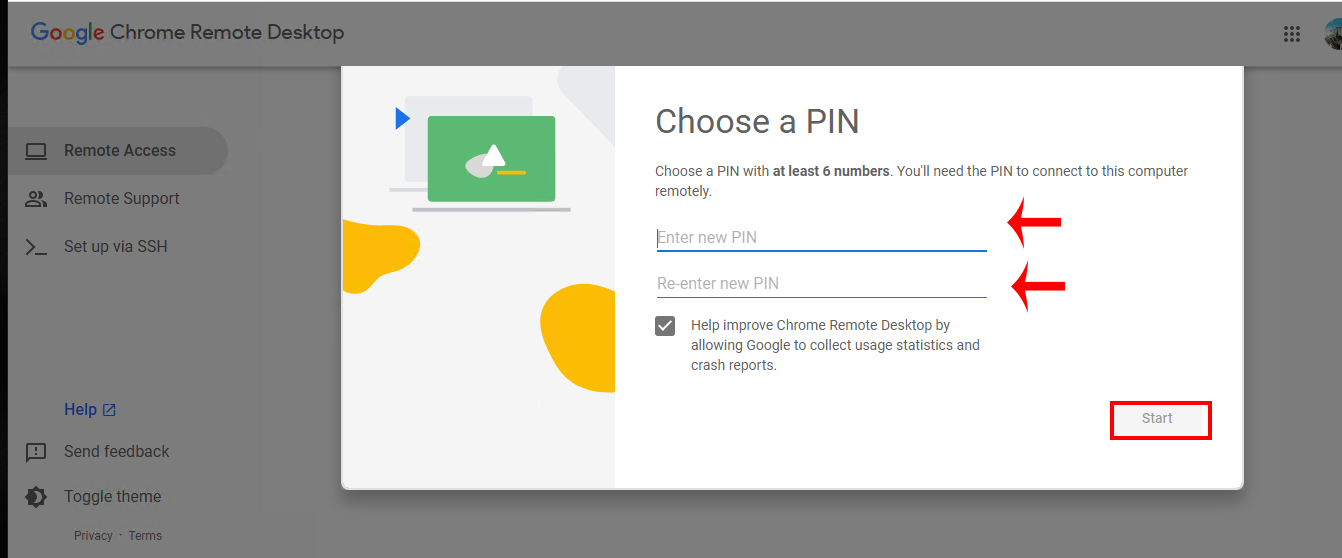
6- You should set a PIN code. As soon as you have entered the verification code, you will be connected to the remote computer and control it as if you were physically in front of it:
Departments Who Use Chrome Remote Desktop
As you know, using Chrome Remote Desktop is free and doesn’t cost anything, so many business sectors use it. Let’s analyze various departments that use this tool:
IT Department
The IT department uses the Chrome remote desktop tool the most and benefits from it. They can help and guide their employees remotely with the help of this software without the need for physical response.
So, in order to be more productive and save time, they show a great desire to use this tool. It is also possible to support users regardless of location. The only disadvantage of this system is that it is not possible to restart the device.
Customer Service
Customer service departments can benefit from using Chrome Remote Desktop (CRD) as a tool to provide remote support to customers. It is free and provided by Google and allows remote support. Among the outstanding options of the support department, we can mention a one-time code that is given to access the desktop and troubleshoot its problems.
In this way, the customer can continue his work with peace of mind. Also, the user can keep in touch by phone or live chat and always receive expert help.
Finance
Since the Chrome remote desktop tool is offered for free, it has attracted the attention of financial sectors. While it may not be as advanced as paid tools, it is good software for small businesses with limited budgets. These departments also take advantage of the screen-sharing function of Chrome desktop in employee-specific situations.
Marketing
Marketing departments must constantly work together to achieve the final product. The Chrome remote desktop tool helps users edit documents in real-time or share their home page with each other. Of course, it is not possible to manage multiple sessions with this tool, but it is still ideal for working remotely.
Best Practices to Use Chrome Remote Desktop
To ensure a secure and efficient remote desktop experience, here are some best practices to follow:
– Use strong and unique passwords for your Google account, enable two-factor authentication, and regularly review account security settings.
– Only share your computer with trusted individuals. Also, When using the service, always require a PIN or a one-time access code for added security.
– If you encounter connectivity issues, check your firewall settings and ensure that port 443 is open.
– Make sure you have a strong and unique password. Avoid using easily guessable passwords.
– Enable session logging for added security and auditing. This feature allows you to review past remote access sessions.
– For added security, you can configure session time limits, so remote users are automatically disconnected after a specified period.
– Adjust the quality settings to match your connection speed.
– Always remember to end your remote sessions when you’re done to prevent unauthorized access.
– Be aware of the difference between “Guest mode” (where you share your computer) and “Remote Assistance” (where you access another computer). Use the appropriate one.
– If you’re not actively using Chrome Desktop, it’s a good practice to close your browser.
By following these best practices, you can make the most of Chrome Remote Desktop while keeping your computer and data secure.
Conclusion
Chrome remote desktop is a simple and great remote management software for users to access devices using the Chrome browser. This article was presented to show the way of using Chrome desktop and gave an explanation to make you more familiar with this practical tool and its benefits. If you have any questions or ideas about this issue, please share.
People may want to delete their Instagram accounts for a variety of reasons, such as privacy concerns, the addictive nature of social media, a desire to reduce screen time, or to protect their mental health. Additionally, a change in life circumstances or personal preferences can also make someone decide that deleting their Instagram account is the right choice for them. So this is a personal decision. So we are going to teach you about deleting your Instagram account. Keep reading.
How to Delete an Instagram Account
If you need to delete your Instagram account, you should know that it will not be possible to return the account and there is no point in regretting it. So think carefully. Instagram has created another option for you to deactivate your account for as long as you want without deleting it.
But if your decision is final, you can restore your account after deletion within 30 days. Now we want to explain how to delete the Instagram account in 3 easy steps. Follow the steps below carefully. It should be noted that if you want to use Instagram in a desktop environment, use the high-speed Windows VPS server offered on our website.
Backup Instagram Before Deleting (Optional)
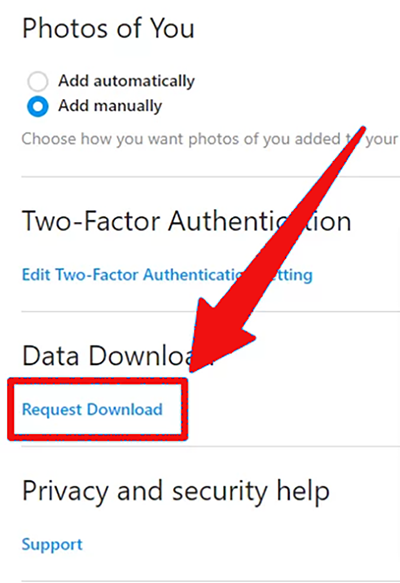
Before permanently deleting your Instagram account, you may want to backup your data. This includes saving your photos, videos, and other important content. You can do this by requesting to download your data from Instagram. To do this:
1- Open the Instagram app or visit the Instagram website.
2- Go to your profile and click the three horizontal lines in the top right corner (or the gear icon on your profile page):
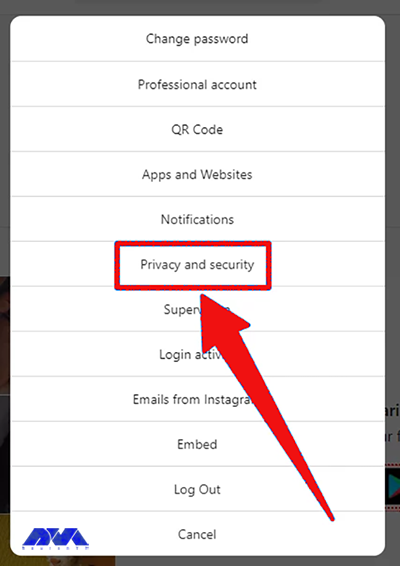
3- Select Settings. Scroll down and choose the Privacy and Security option:
4- In the Data and History section, select Download Data. Follow the on-screen instructions to request a download of your data:
3 Easy Steps to Delete Instagram
If you want to delete your Instagram and you don’t have access to your app or you are an Android user, you can use any browser for this. You can use browsers such as Safari or Chrome. So, follow these steps:
Tip: If you’re not already signed in, sign in to the account you want to delete.
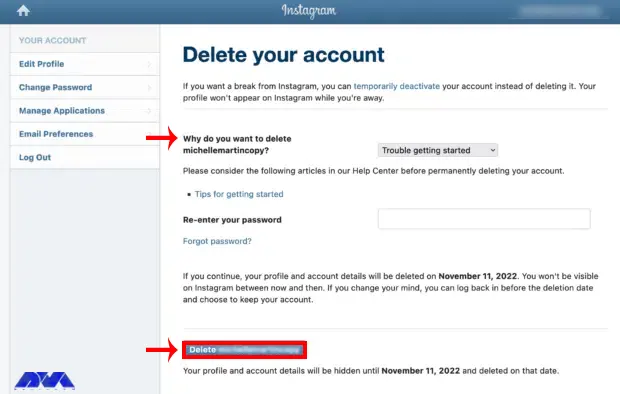
2- Instagram will ask you to provide a reason for deleting your account from the drop-down menu. Re-enter your Instagram password to confirm your identity. At last, Click on Permanently delete my account.
3- Finally, you should confirm the deletion.
Finally, delete your account permanently by clicking the Delete @username option at the bottom of the screen as indicated.
After completing the above steps, Instagram will give you a final warning that your account will be permanently deleted along with all your photos, comments, and other data. If you are sure you want to continue, click OK or Yes to confirm.
Tip: Make sure that the username matches the account you want to delete. If not, go to logout on the right side of the page and log in with the correct account.
Troubleshooting Issues About Instagram Account Deleting
Here are common issues and their solutions when trying to delete an Instagram account:
1- Deactivation Instead of Deletion
Solution:
Instagram offers two options – deactivation temporarily disables your account, while deletion permanently removes it. Make sure you’re choosing the right option.
2- 30 days waiting period
Solution:
After you request to delete your Instagram account, there’s a 30-day grace period during which you can reactivate your account. Be patient; it might take a few days for the deletion process to be initiated.
3- Third-Party Apps Issues
Solution:
Ensure that you’ve revoked access to any third-party apps or services that were linked to your Instagram account. Sometimes, these can interfere with the deletion process.
Also, If you encounter issues while trying to delete your Instagram account, contacting Instagram’s support through their Help Center or support channels is often the best way to resolve specific problems.
Conclusion
Deleting an Instagram account is a serious decision because it will not be possible to return it. So it is necessary to consider all the pros and cons before doing this. Don’t forget to make a backup. Analyze the results and choose the right position for you. We hope this tutorial was helpful for you. If you have any other questions related to this topic, please share.