

Ansible is known as a free, open-source automation tool that allows system administrators to configure and control hundreds of nodes from a central server without having to install any agents on the nodes. This tool is a better management solution than Poppet and Chef due to its easy installation and use. You will learn How to Configure and Use Ansible on AlmaLinux 8.5 by studying this article.
To configure and use Ansible on AlmaLinux 8.5, you need to ensure that your system meets the following requirements:
– Processor: You will need at least a 1 GHz processor or higher.
– RAM: It is recommended to have at least 4 GB of RAM for better performance.
– Storage: A minimum of 20 GB of storage should be sufficient.
– Network Connectivity: A stable network connection is essential for Ansible to communicate with the target hosts.
Notice that to use this helpful tool on distributions like AlmaLinux you can purchase Cheap Linux VPS servers from NeuronVM.
First, you need to make sure the system is up to date using the following commands:
sudo dnf update
sudo dnf upgrade
Then you need to install EPEL using the following command:
sudo dnf install epel-release
Then, use the following commands to install Python 3 and run other dependencies:
sudo dnf module install python3.8
sudo alternatives --config python
In this step, install Ansible from the official AlmaLinux repository:
sudo dnf install ansible
To install Ansible, you need to run the following commands:
sudo pip3 install setuptools-rust wheel
sudo pip3 install --upgrade pip
sudo python3 -m pip install ansible
When done, it is time to confirm the installation using the following command:
ansible –version
In the first step of this step, to configure Ansible, it is necessary to install OpenSSH-server using the following commands:
sudo dnf install openssh-server
sudo systemctl enable ssh
Enter the following command to allow port 22 in the firewall:
sudo ufw allow 22
You can use the following commands for RHEL or CentOS Linux VPS:
sudo dnf install openssh-server
sudo systemctl enable sshd
You should allow port 22 in the firewall:
sudo firewall-cmd --zone=public --permanent --add-port=22/tcp
To perform these steps, you must have three servers: Ubuntu, Debian, and CentOS:
Ubuntu – server_IP
CentOS – server_IP
Debian – server_IP
In the continuation of this article, we intend to teach you step-by-step How to Use Ansible on AlmaLinux 8.5.
To install the package or deploy it on the target remote server, create a pair of SSH keys on the localhost and then press them on each remote server so that you can manage them using SSH.
Type the command and press the Enter key several times until the keys are generated:
ssh-keygen
Press the key created in almaLinux to the remote servers that you want to configure or manage. You need to know the username of the remote server or use the default root user.
Tip: Replace Linda with sudo users on remote servers or use the default root and replace the IP address with the server address.
ssh-copy-id linda@Ubuntu – server_IP
ssh-copy-id linda@CentOS – server_IP
ssh-copy-id linda@Debian – server_IP
Run the following command on each server so that you can run sudo commands on them using Ansible without entering a password:
echo "$(whoami) ALL=(ALL) NOPASSWD:ALL" | sudo tee /etc/sudoers.d/$(whoami)
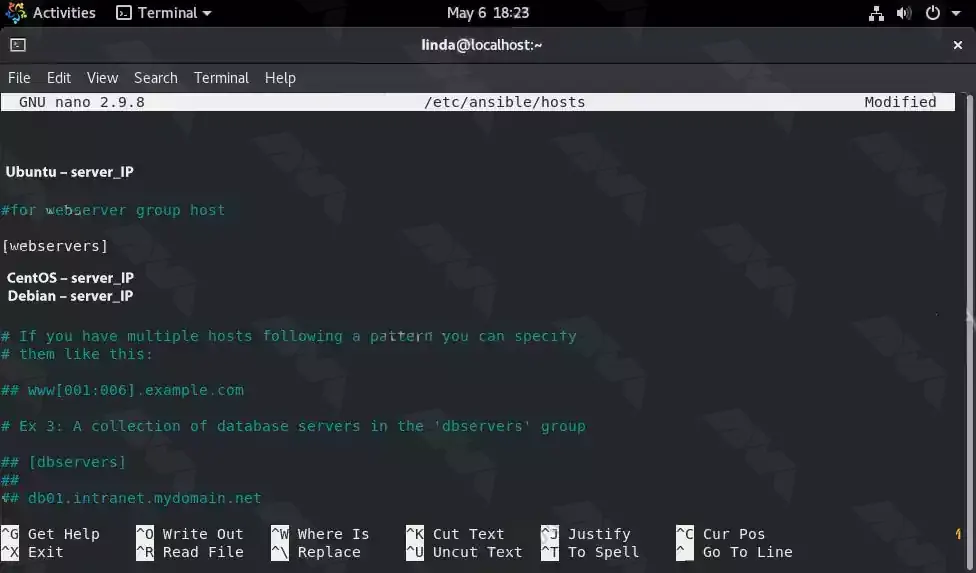
In Ansible, create a file that defines the entire remote host or target system that you want to manage. Also create a group of hosts, for example, a group is a web server that only includes a remote system that runs some web servers such as Apache, and another group can be a Mysql group running a Database server and so on. The Inventory file is also important because it uses the commands, modules, and tasks in a playbook.
Now as you have three remote servers in this tutorial, add them to the Ansible host file:
sudo dnf install nano -y
sudo nano /etc/ansible/hosts
If you do not want to create a group, put your remote server IP address or domain name in the file, and specify a group before adding IP addresses.
Edit the default values of the Ansible inventory file that already contains samples, or add your own samples at the bottom of the file. In this section, add two servers to a host group identified by the web servers, and one server is defined as an individual.
They are in a group called a web server. The advantage of creating a group is that you can issue a command to a complete set of servers defined in that particular group of hosts.
If you are using a server that does not have a default SSH port 22, for example, a server running on a Docker, you can also define it by its IP address:
your_IP_address ansible_user=remote-server-username ansible_port=49153
Tip: In the above command, replace the IP address, remote-server username, and port number and add it to the inventory file:

To save the file, just press Ctrl + X, Type “-y” and press Enter.
Once you have successfully created the inventory file, check if Ansible can ping all the added servers for it. To ping group server:
ansible -m ping group-name
example:
ansible -m ping web-servers
To ping a single server:
ansible -m ping ip-address
example:
ansible -m ping your_IP_address
Finally, you can type the following command to ping all:
ansible -m ping all
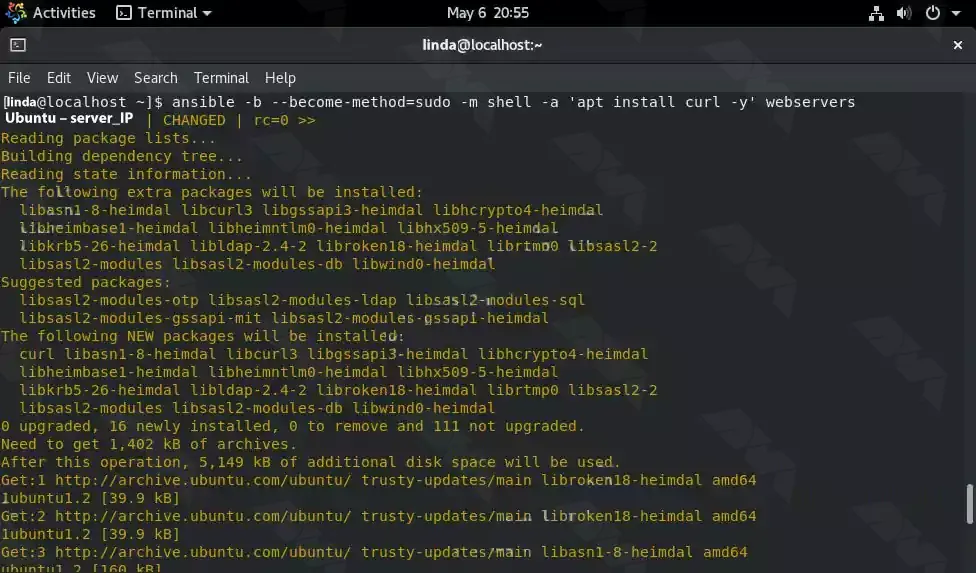
Suppose you want to install the Apache web server on a group of servers that you have defined in the Inventory file. Use a web server, as we have already mentioned here, you can use any name you give to your server group.
You can use the following command as a syntax command:
ansible -b --become-method = sudo -m shell -a 'command to execute' web servers
For example, running an update and installing the Apache server on Debian and Ubuntu remote systems simultaneously:
ansible -b --become-method=sudo -m shell -a 'apt update' webservers
You can use the following command to install Apache:
ansible -b --become-method=sudo -m shell -a 'apt install -y apache2' webservers

To execute the same command above for all defined remote PCs:
ansible -b --become-method=sudo -m shell -a 'apt install -y apache2 ' all
For non-grouped hosts, you can use their IP address, for example, the following command:
ansible -b --become-method=sudo -m shell -a 'apt install -y apache2' your_IP_address
Also use other commands that do not require sudo, such as working time check:
ansible -m command -a "uptime" group-name/ip-adress
The command can be used for other purposes, just replace the uptime with the command you want to run on the remote server and rename the group/IP address.
1) Ansible command not found:
If you are unable to run Ansible commands on AlmaLinux, it could be due to the package not being installed. You can troubleshoot this by running the following command to ensure Ansible is installed on your system.
sudo dnf install ansible
2) SSH connection failure:
Ansible relies on SSH for remote execution, so if you are unable to establish an SSH connection to the target host, it will prevent Ansible from working. Troubleshoot this issue by checking if SSH is installed and correctly configured on both the Ansible control node and the target host.
3) Inventory file not found:
Ansible uses an inventory file to define the hosts and groups it manages. If Ansible is unable to locate the inventory file, it will fail to execute playbooks. Verify the path to the inventory file specified in the Ansible configuration file (typically “ansible.cfg“) and ensure that it exists.
4) Permission denied for SSH key:
When using SSH key-based authentication, ensure that the SSH key is correctly configured and has the necessary permissions. The private key file should have permissions set to 600 (i.e., only readable by the owner) to prevent permission-denied errors.
5) Playbook syntax errors:
If you encounter issues with running Ansible playbooks, syntax errors within the playbook YAML files could be the cause. Use the “ansible-playbook” command with the “–syntax-check” flag to validate the syntax of the playbook files and troubleshoot any errors or warnings reported by the command. Also, ensure that indentation is correct, as YAML is sensitive to correct indentation.
In this tutorial, you have learned how to configure and use Ansible on AlmaLinux 8.5. We covered the installation process, configuring Ansible using an inventory file, testing the connection to remote hosts, writing Ansible playbooks, and running them to automate tasks on your server infrastructure. With Ansible, you can easily manage and deploy applications, configurations, and systems across your network, saving time and effort in the process. Experiment with Ansible, explore its vast capabilities and unlock the power of automation in your IT operations.
How useful was this post?
Click on a star to rate it!
Average rating 5 / 5. Vote count: 2
No votes so far! Be the first to rate this post.
 Tags
Tags

Samba is a widely used open-source software suite that allows interoperability between Linux and Win...


 Tags
Tags

Varnish Cache technology increases performance by keeping duplicate web pages in memory. In effect, ...


 Tags
Tags
What is your opinion about this Blog?


