


Mastering MySQL on Windows Server is crucial for efficient database management. This comprehensive guide will provide step-by-step instructions for various aspects, from installation to troubleshooting common issues. From system requirements to database scaling and replication, this guide will cover all the essential topics to help you become proficient in MySQL administration on Windows Server.
To ensure smooth operation, your Windows Server must meet certain requirements before installing MySQL.
– Operating System: Windows Server 2019, Windows Server 2016, Windows Server 2012 R2, Windows Server 2012
– Processor: 1 GHz or faster.
– Memory: At least 1 GB RAM
– Disk Space: Minimum of 2 GB of free disk space
– Administrator Privileges
We recommend you to use our Windows VPS plans to better understand the high speed, great performance and 24/7 support.
To download and install MySQL on a Windows server, follow these steps:
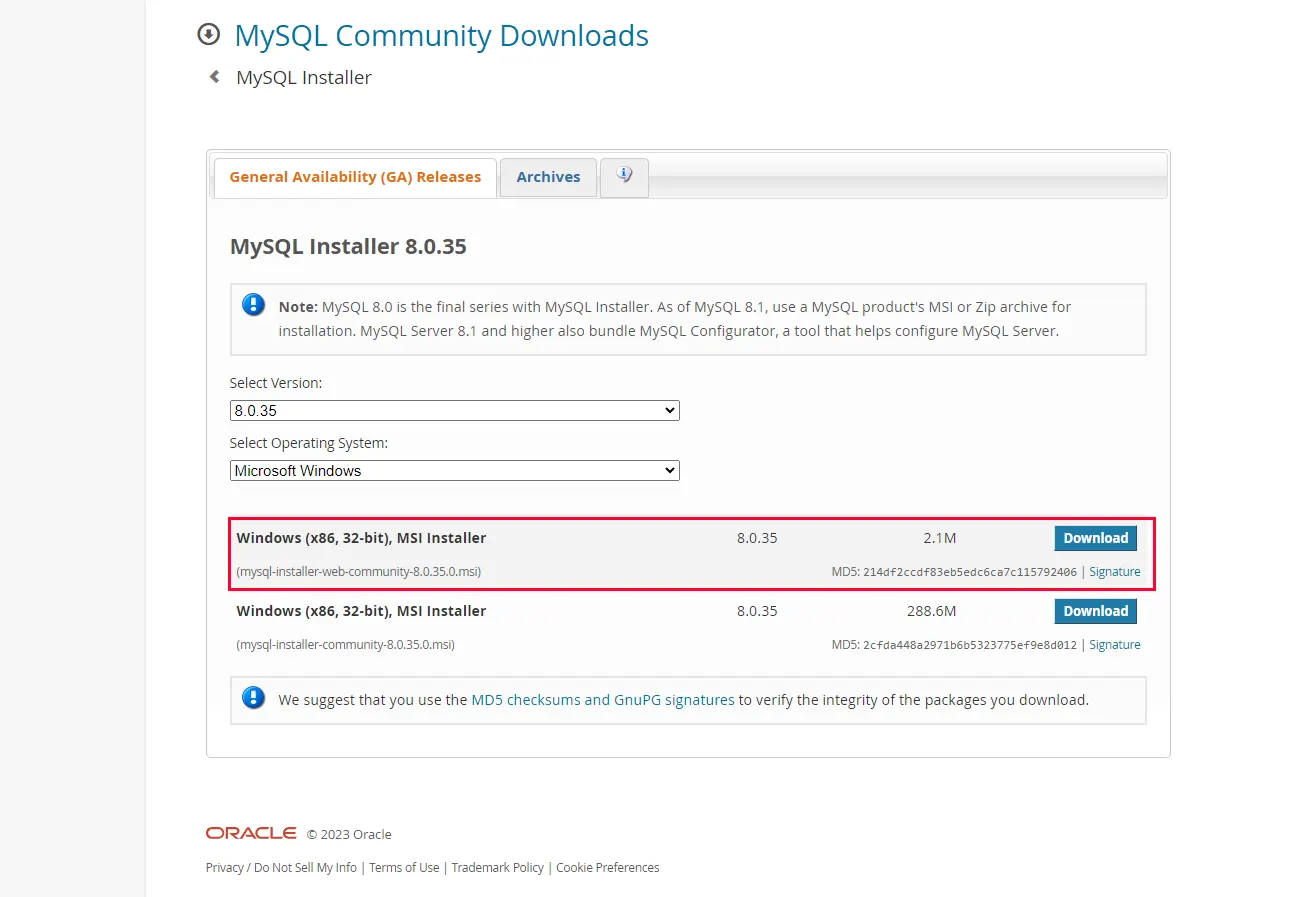
1. Visit the official MySQL website. Then, click on the “Download” button for the MySQL Installer appropriate for your system.
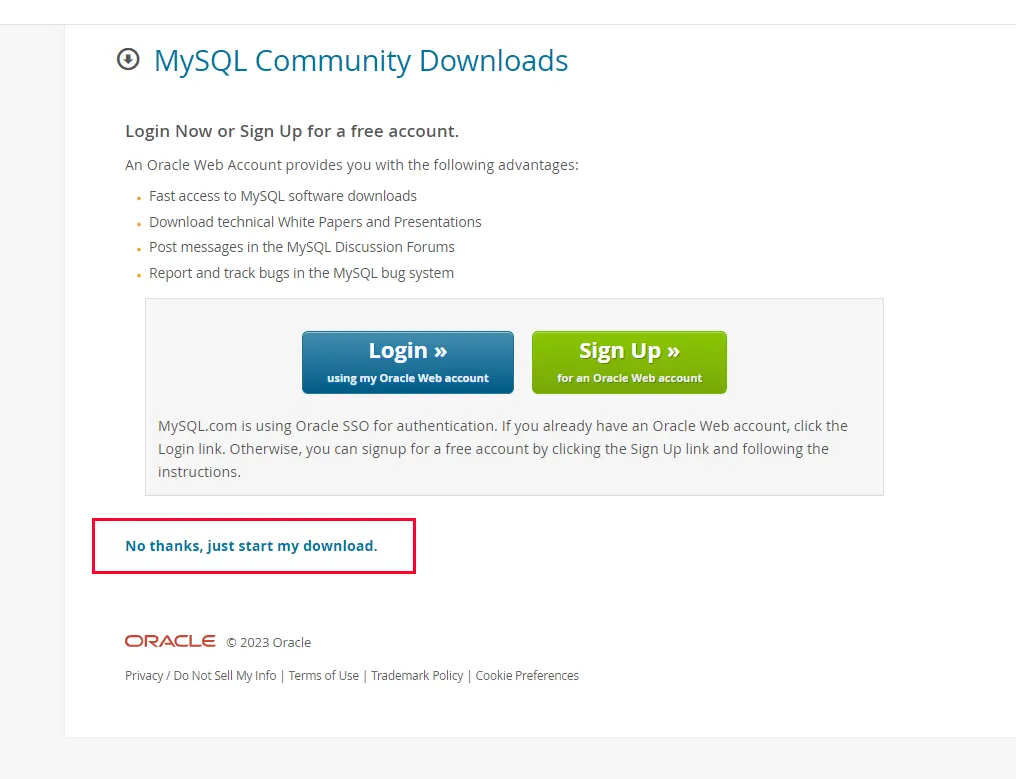
2. On the next page, scroll down and click on the “No thanks, just start my download” link:
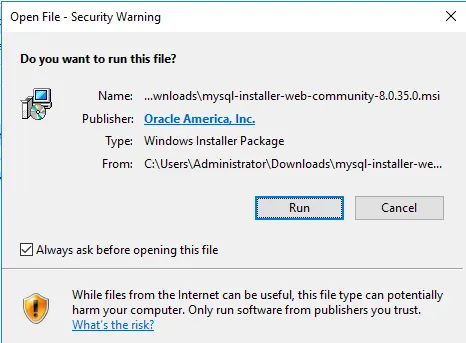
3. Once the installer file is downloaded, double-click on it to start the installation process:
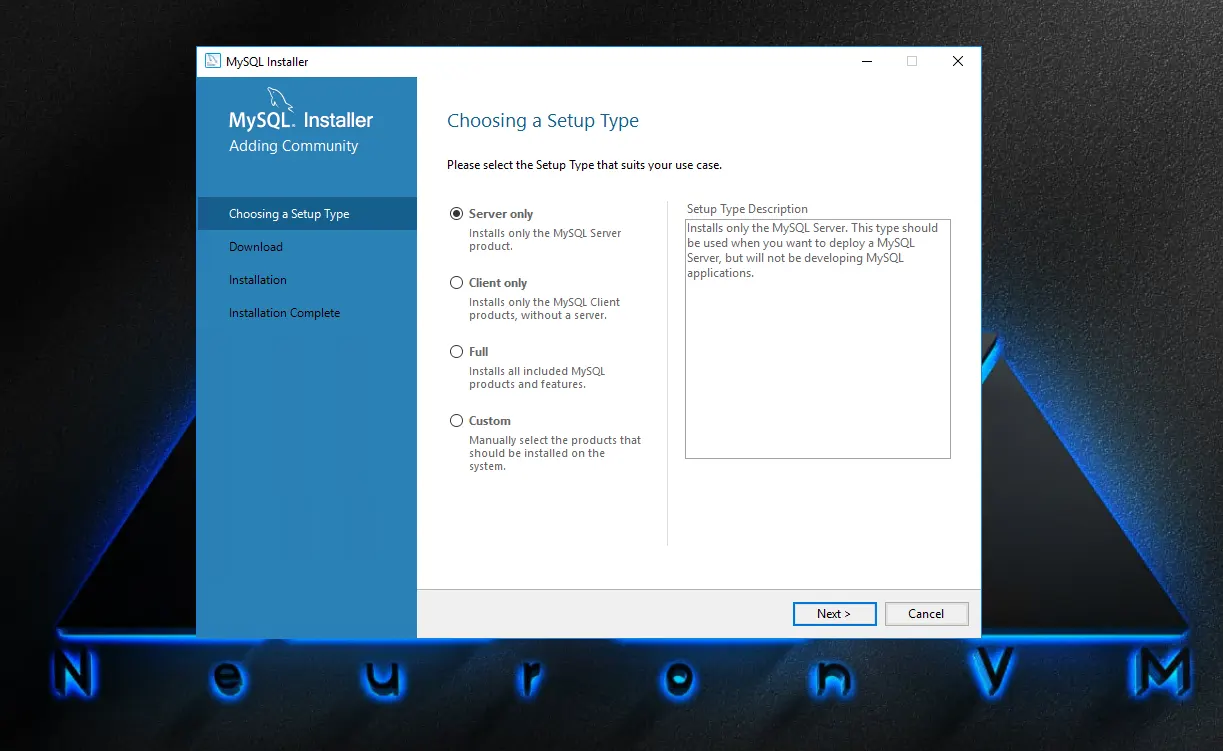
4. In the installer window, choose the “Server only” option and click “Next“:
5. Select the desired MySQL version and click “Next“:
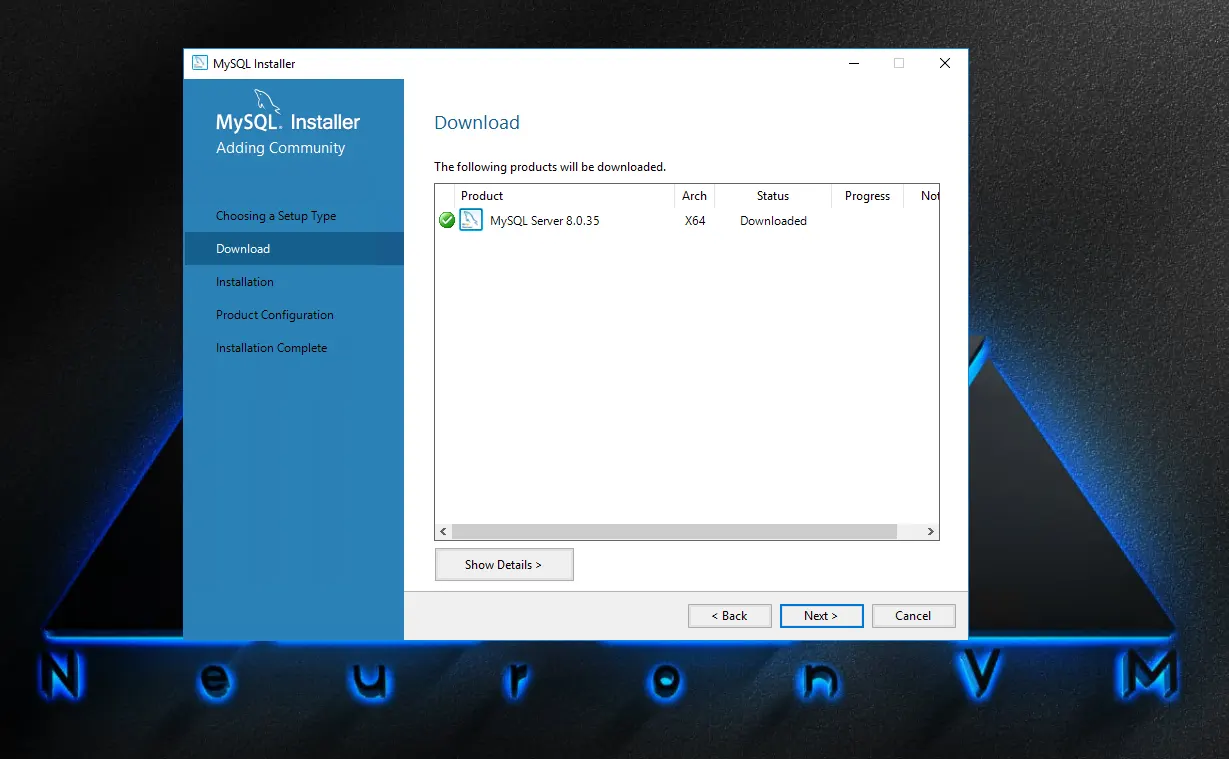
*
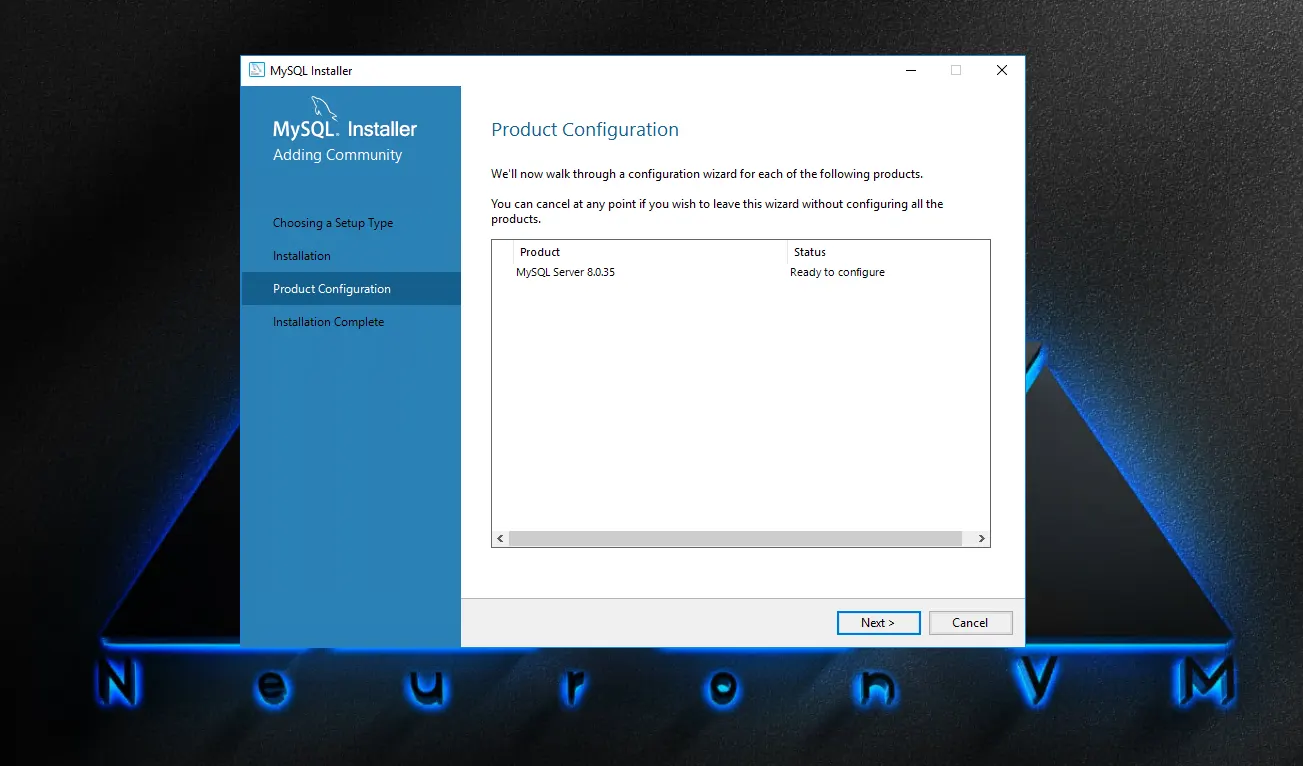
6. Choose the installation type. The “Development Computer” option is recommended for most users, as it includes MySQL Server, MySQL Workbench, and other helpful tools. Click “Next“.

7. Set a password for the root account, and click “Next“:
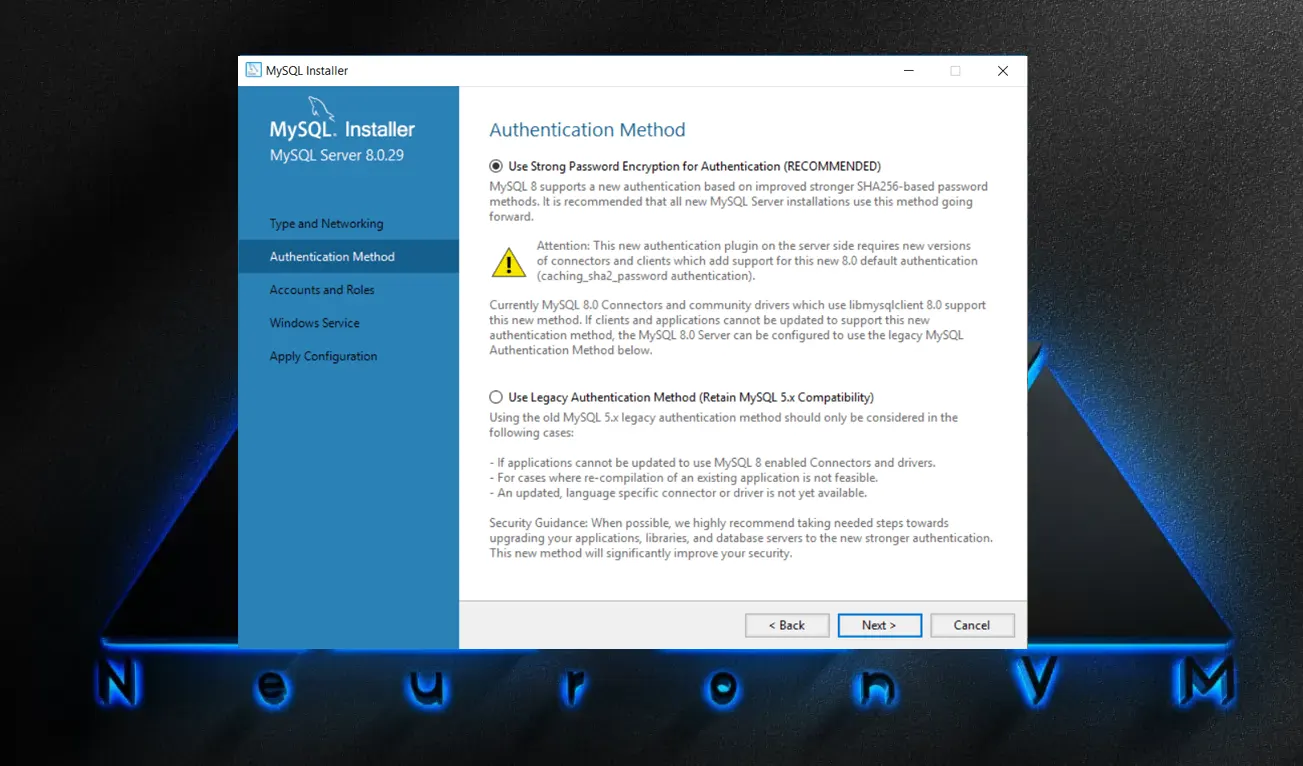
*
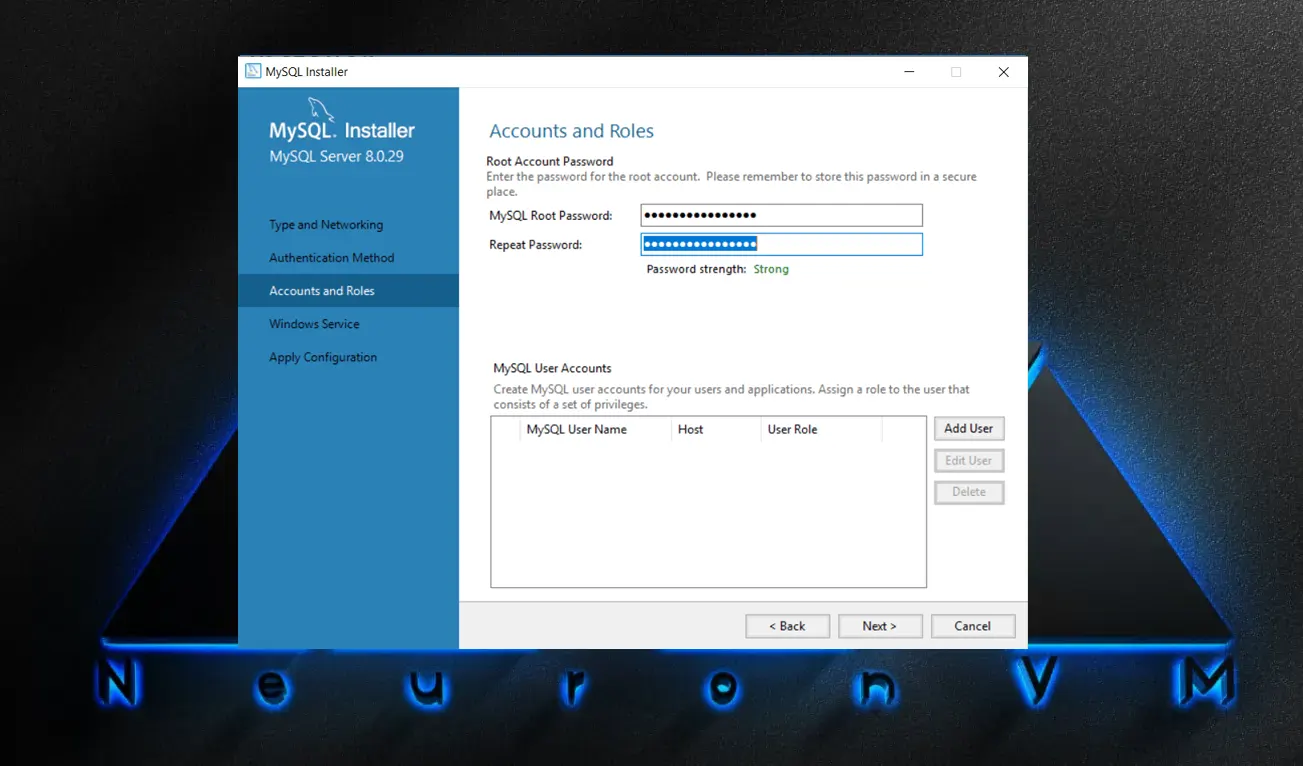
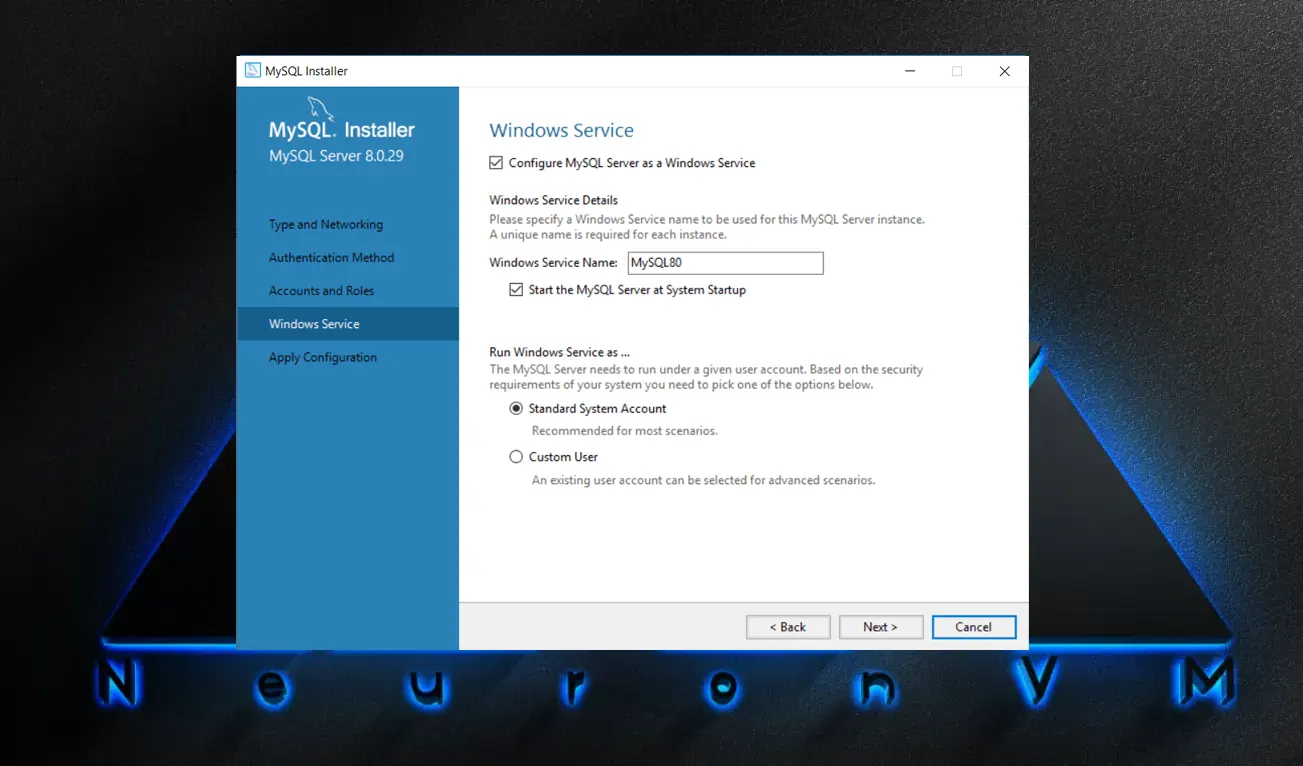
8. The Windows Service screen enables you to set up MySQL Server as a Windows service and assign a specific name to the MySQL service. Additionally, you have the option to automatically launch the service during System Startup and choose whether to run it using the standard system account or a personalized user account. Once you’ve made your choices, proceed by selecting “Next.”:
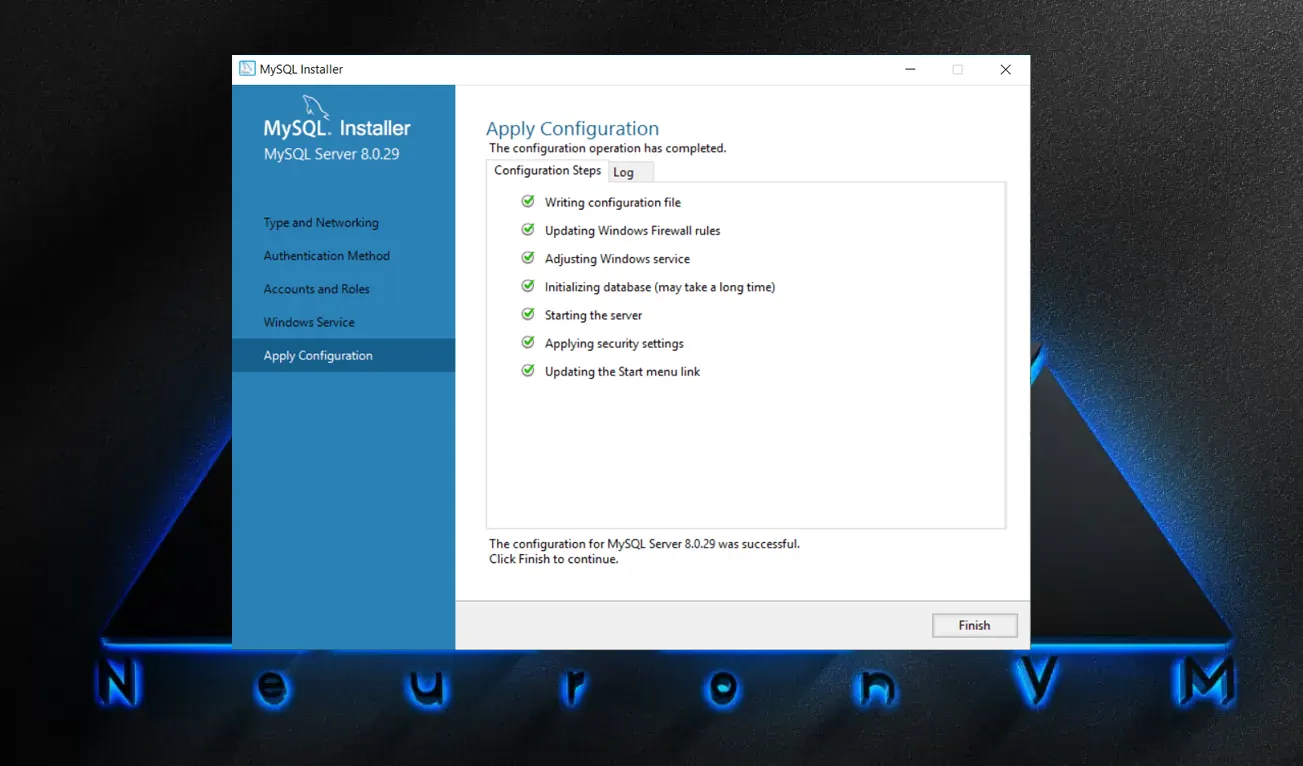
9. Finally, click on the “Finish” button to close the installer:
After installing MySQL on a Windows server, there are a few initial configurations that need to be done. Here are the steps to follow:
1. Open the command prompt as an administrator.
2. Navigate to the MySQL bin directory. The default path is usually as below:
C:\Program Files\MySQL\MySQL Server X.X\bin
3. Run the following command to initialize the MySQL installation:
mysqld --initialize --console
Note: This command will generate a temporary password for the root user.
4. Start the MySQL service by running the following command:
net start MySQL
If the service is already running, you can skip this step.
5. Connect to the MySQL server using the mysql command-line client:
mysql -u root -p
You will be prompted to enter the temporary password generated in step 3.
6. Once you are logged in to the MySQL server, you can change the root password by running the following command:
ALTER USER 'root'@'localhost' IDENTIFIED BY 'new_password';
Note: Replace “new_password” with your desired password.
7. Exit the MySQL command-line client by typing “exit” and pressing Enter.
These steps will help you complete the initial configuration of MySQL on a Windows server.
Securing a MySQL server on a Windows server involves implementing several security measures to protect the server from unauthorized access and potential vulnerabilities. Here are some steps to secure your MySQL server:
1. Set a strong root password: During the MySQL installation, make sure to set a strong password for the root user.
2. Create separate user accounts: Avoid using the root account for regular operations. Instead, create separate user accounts with limited privileges for day-to-day tasks.
3. Restrict remote access: By default, MySQL allows remote access to the server. Consider allowing access only from specific IP addresses or networks that need it, and disable access for others. Update the server’s firewall to only allow incoming connections on the necessary MySQL ports.
4. Enable SSL/TLS encryption: Configure MySQL to use SSL/TLS encryption for secure communications between the server and clients.
5. Use strong authentication methods: Consider using more secure authentication methods like MySQL Native Password or Kerberos instead of the default authentication method.
6. Regularly update MySQL: Keep your MySQL server up to date by regularly applying patches and updates.
7. Monitor and log activities: Enable MySQL’s logging feature to track and monitor all database activities. Regularly review the audit logs for any suspicious activities.
8. Backup your MySQL databases: Implement regular backups of your MySQL databases to ensure you have a copy of your data in case of any security incident or data loss.
9. Regular security audits: Conduct periodic security audits to assess the overall security of your MySQL server. Use tools like MySQL Enterprise Audit or third-party security scanning tools to identify vulnerabilities.
To create a new database, use the following command:
CREATE DATABASE database_name;
Note: Replace “database_name” with the desired name for your database.
To list all existing databases, use the following command:
SHOW DATABASES;
To select a specific database for further operations, use the following command:
USE database_name;
Note: Replace “database_name” with the name of the database you want to use.
To delete a database, use the following command:
DROP DATABASE database_name;
Note: Replace “database_name” with the name of the database you want to delete.
By default, the root user has full control over all databases. However, for security reasons, it’s recommended to create a separate user with limited privileges for each database. To create a new user and grant privileges to a specific database, use the following commands:
CREATE USER 'username'@'localhost' IDENTIFIED BY 'password';
GRANT ALL PRIVILEGES ON database_name.* TO 'username'@'localhost';
FLUSH PRIVILEGES;
Replace “username” and “password” with your desired values, and “database_name” with the name of the database.
1. Open Command Prompt: Click on the Start menu, type “cmd”, and press Enter to open Command Prompt.
2. Change directory to the MySQL installation folder: In Command Prompt, type the following command and press Enter. Replace “X.X” with the version number of your MySQL server installation.
cd C:\Program Files\MySQL\MySQL Server X.X\bin
3. Export Data: To export data from a MySQL database, use the “mysqldump” command. Type the following command and press Enter:
mysqldump -u [username] -p [database_name] > [path_to_save_file.sql]
Replace “[username]” with your MySQL username, “[database_name]” with the name of the database you want to export, and “[path_to_save_file.sql]” with the desired path and file name where you want to save the exported data.
Example:
mysqldump -u root -p mydatabase > C:\backup.sql
You will be prompted to enter your MySQL password. Once done, the data in the specified database will be exported and saved in the provided file.
4. Import Data: To import data into a MySQL database, you can use the “mysql” command. Type the following command and press Enter:
mysql -u [username] -p [database_name] < [path_to_import_file.sql]
Replace “[username]” with your MySQL username, “[database_name]” with the name of the database you want to import into, and “[path_to_import_file.sql]” with the path and file name of the SQL file you want to import.
Example:
mysql -u root -p mydatabase < C:\backup.sql
You will be prompted to enter your MySQL password. Once done, the SQL file will be imported, and the data will be added to the specified database.
1. Backup a MySQL database:
– Open the Command Prompt as an administrator.
– Navigate to the MySQL installation directory using the “cd” command. For example:
cd C:\Program Files\MySQL\MySQL Server 8.0\bin
– Run the following command to create a backup of the database:
mysqldump -u username -p database_name > backup_file.sql
Replace “username” with your MySQL username, “database_name” with the name of the database you want to backup, and “backup_file.sql” with the desired name for your backup file.
– Enter your MySQL password when prompted.
2. Restore a MySQL database:
– Open the Command Prompt as an administrator.
– Navigate to the MySQL installation directory, similar to step 1.
– Run the following command to restore the database:
mysql -u username -p database_name < backup_file.sql
– Enter your MySQL password when prompted.
Note: Make sure you have MySQL installed and the “mysql” and “mysqldump” commands available in your PATH environment variable.
There are several approaches you can take to optimize the performance of MySQL on a Windows Server:
1. Upgrade hardware
2. Tune MySQL configuration
3. Enable query caching
4. Optimize database schema and queries
5. Monitor performance
6. Utilize partitioning and sharding
7. Use connection pooling
8. Enable query, slow query, and error log
9. Regularly optimize and repair tables
10. Upgrade MySQL version
It’s important to note that the specific optimizations required may vary depending on your specific workload and requirements. It’s recommended to experiment with different settings and monitor performance to find the optimal configuration for your MySQL server on Windows Server.
1. Enable the general query log: The general query log records all queries received by the MySQL server. To enable it, open the MySQL configuration file (my.ini) located in the installation directory. Uncomment the line below by removing the ‘#‘ symbol. Save the file and restart the MySQL service for the changes to take effect.
#general_log=1
2. Configure the log file location: By default, MySQL logs are stored in the data directory. To specify a different location, add the following line to the my.ini file:
general_log_file = C:/path/to/log/file.log
Replace “C:/path/to/log/file.log” with the desired path and filename. Remember to create the directory and make sure the MySQL service has write permissions.
3. Enable the error log: The error log records critical errors encountered by MySQL. Open the my.ini file and uncomment the line below by removing the ‘#‘ symbol. Save the file and restart the MySQL service:
#log-error
4. Use a third-party monitoring tool: Consider using a monitoring tool like MySQL Enterprise Monitor or Percona Monitoring and Management (PMM). These tools provide comprehensive monitoring and alerting capabilities, along with historical data and performance analysis.
5. Enable slow query log (optional): The slow query log records queries that take longer than a predefined threshold to execute. To enable it, open the my.ini file and add the following lines:
slow_query_log = 1
slow_query_log_file = C:/path/to/slowquery.log
Replace “C:/path/to/slowquery.log” with the desired path and filename. Restart the MySQL service for the changes to take effect.
1. Connection Errors: If you are unable to connect to the MySQL server, first check if the MySQL service is running and ensure that the correct port (default is 3306) is open in the Windows Firewall. You should also verify the credentials being used to connect.
2. Performance Issues: Sluggish response times or high CPU usage may indicate performance issues. This can be resolved by optimizing the queries and indexes used in the database, increasing hardware resources like RAM, or tuning the MySQL configuration parameters.
3. Disk Space: As the database grows, it can consume a significant amount of disk space. Monitor the disk space regularly and ensure that there is enough free space for database operations. You may also consider partitioning the data or moving it to a larger disk.
4. Database Corruption: If the database becomes corrupt, it can lead to data loss or inaccessible data. Regularly backup the database and create automated tasks to verify the integrity of the data files. If corruption is detected, restore from a known good backup or use inbuilt database repair tools.
5. Resource Limits: MySQL’s default configuration may have resource limits that can cause issues with large databases or heavy workloads. Adjusting parameters like “max_connections“, “innodb_buffer_pool_size“, and “tmp_table_size” can help optimize resource utilization.
To integrate applications with MySQL on a Windows Server, you can follow the steps below:
– Install and Configure MySQL Server
– Create a Database
– Grant User Permissions
– Connect the Application to MySQL
– Test the Connection
– Implement Data Access
– Secure the Connection
By following these steps, you can integrate your application with MySQL on a Windows Server and leverage the power of a robust relational database system for managing your application’s data.
Scaling and replication of MySQL on Windows Server can be achieved through various methods and techniques. Here are some common approaches:
1. Vertical scaling: This involves increasing the resources of the MySQL server, such as CPU, RAM, and storage capacity.
2. Horizontal scaling: This strategy involves distributing the workload across multiple MySQL database servers. With this approach, you can set up multiple MySQL instances on different Windows Server machines and distribute the data between them. This can be done through sharding, where data is partitioned and stored on different servers based on a specific criterion (e.g., customer ID or region).
3. MySQL replication: MySQL provides built-in replication features that allow you to replicate data from one MySQL server to another. You can set up a master-slave replication configuration on Windows Server, where the master server handles write operations and the slave server(s) replicate the data.
4. MySQL cluster: MySQL Cluster is a distributed, shared-nothing database architecture that provides high availability and scalability. With MySQL Cluster, you can set up multiple nodes across different Windows Server machines, allowing for automatic sharding and replication of data. This helps distribute the workload and offers improved fault tolerance.
5. Load balancing: Implementing a load balancer can help distribute incoming traffic across multiple MySQL servers. This can be accomplished using various load balancing techniques, such as round-robin, least connections, or IP hashing. Load balancing ensures that requests are evenly distributed, preventing any single server from being overloaded.
6. Database partitioning: MySQL supports table partitioning, where large tables are divided into smaller, manageable pieces called partitions. Each partition can be stored on a separate Windows Server machine, allowing for distributed storage and query optimization.
To upgrade MySQL on a Windows server, follow these steps:
– Backup Data: Before upgrading, it is essential to backup your MySQL databases and configuration files as a precautionary measure.
– Download Latest Version: Go to the official MySQL website, select the Windows platform, and download the latest version of MySQL Community Server.
– Stop MySQL Service: Open the Windows Services Manager (services.msc), find the MySQL service, and stop it. Ensure that no MySQL processes are running.
– Uninstall Current Version: Open the Control Panel, go to “Programs and Features” (or “Add or Remove Programs“), find MySQL in the list of installed programs, and uninstall it.
– Delete MySQL Installation Folder: By default, MySQL is installed in “C:\Program Files\MySQL” or “C:\Program Files (x86)\MySQL“. Delete this folder and all its contents.
– Install New Version: Run the downloaded MySQL installer and follow the installation wizard. Choose the relevant options, including installation path, type of setup (Developer, Server only, or Custom installation), and necessary components like MySQL Server, MySQL Workbench, etc.
– Import Data: If you had taken a backup in the first step, you can import your databases and configuration files back into the upgraded MySQL installation. You can use tools like MySQL Workbench or Command Line to import the data.
– Start MySQL Service: Once all the steps are completed, start the MySQL service from the Windows Services Manager. Verify that the service starts successfully.
– Verify Upgrade: Check for any errors or issues in the MySQL error log and run basic tests to ensure that the upgraded MySQL installation is functioning correctly.
In conclusion, Mastering MySQL on Windows Server offers a comprehensive and user-friendly approach to mastering MySQL database management on Windows Server. With clear instructions and practical examples, this article equips readers with the knowledge and skills needed to efficiently manage MySQL databases on Windows Server platforms.
How useful was this post?
Click on a star to rate it!
Average rating 5 / 5. Vote count: 1
No votes so far! Be the first to rate this post.
 Tags
Tags

OpenSSH is a tool that allows you to securely connect to a remote server using the SSH protocol. Thi...


 Tags
Tags

NetBeans is a popular software development platform, primarily for Java, that provides wizards and t...


 Tags
Tags
What is your opinion about this Blog?


