


The impact of the virtual machine in the system is such that it abstracts the computer hardware such as CPU, memory, disk drives, network interface card, etc. For example, consider a virtual machine. A virtual machine can be created for many purposes. This system will share the underlying hardware, but the operating environments or operating systems will be different and separate. After this brief explanation, let’s check how to install Ubuntu on a VirtualBox.
To install Ubuntu on VirtualBox, you should have downloaded the ISO file for Ubuntu. You can find all the versions of Ubuntu on the Ubuntu Official Website.
As you found the related Ubuntu file and Download it, you can install Ubuntu on your VirtualBox using the instructions below. It should be noted that you can use Linux VPS servers that are offered cheaply and with high performance on our website to use Ubuntu.
1- Start by opening the VirtualBox and clicking on the New button:
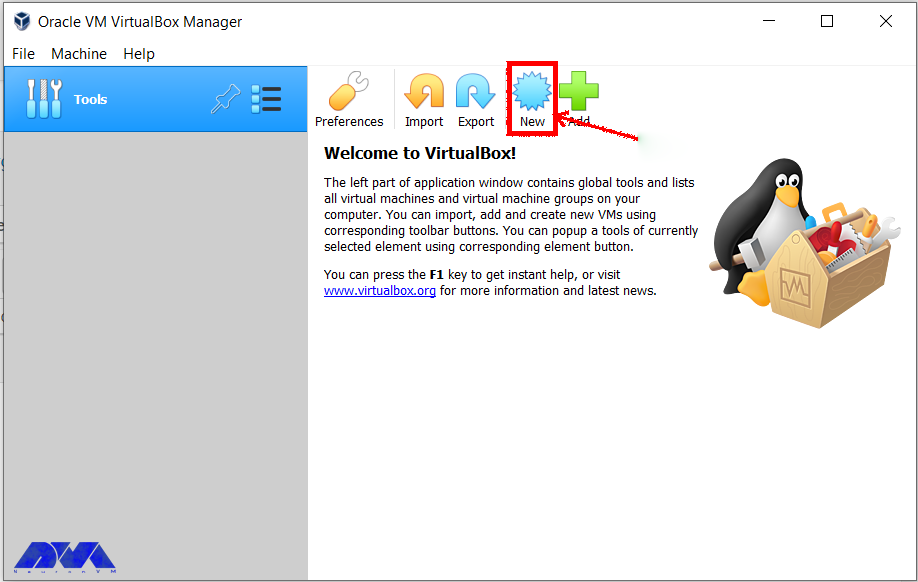
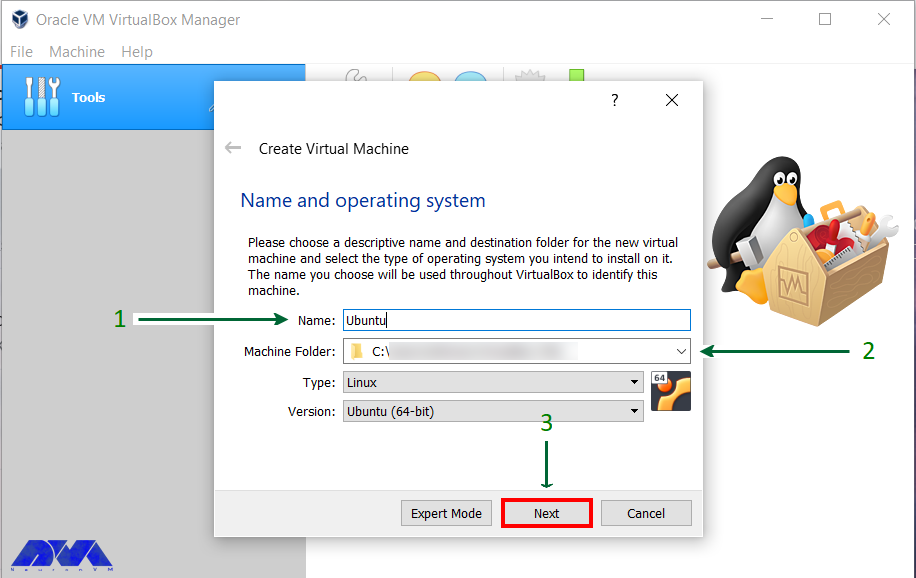
2- Choose a name for VirtualBox and select the location for the installation file:
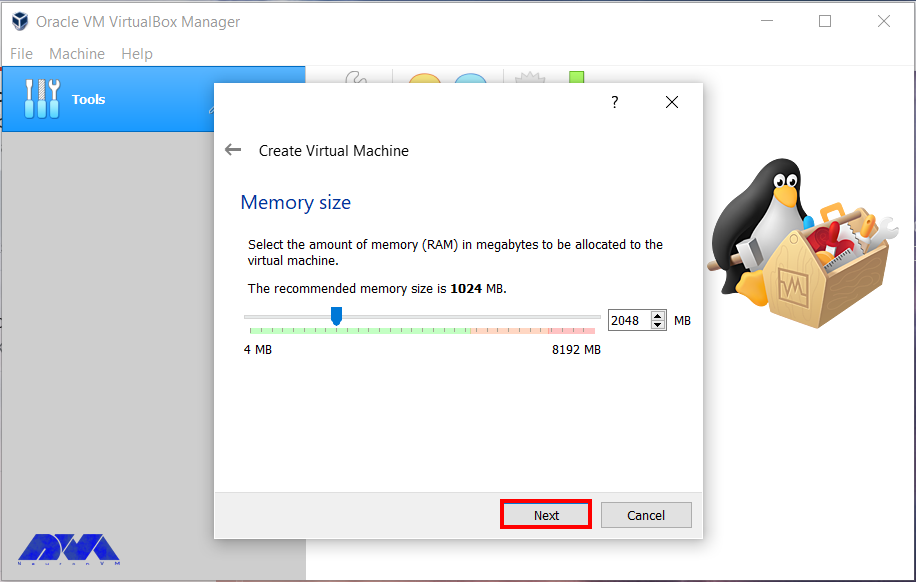
3- Determine the RAM size for your Virtual Machine:
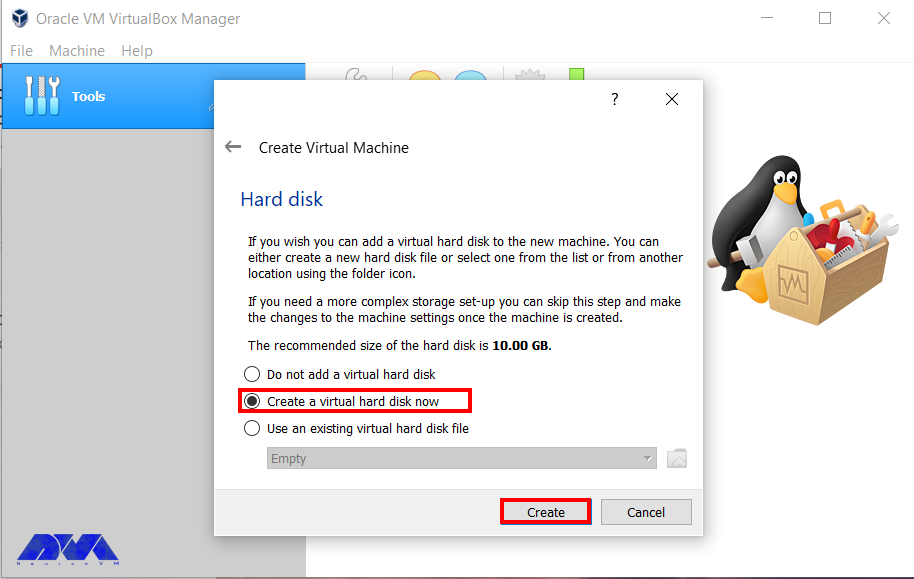
4- Now it’s time to create a Virtual hard disk to store files:
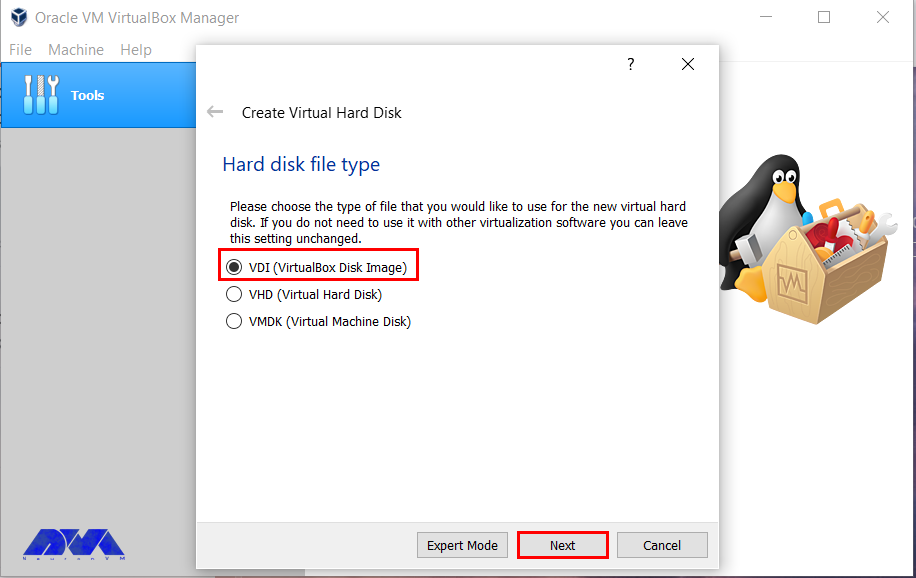
5- Choose the hard disk, VDI is recommended:
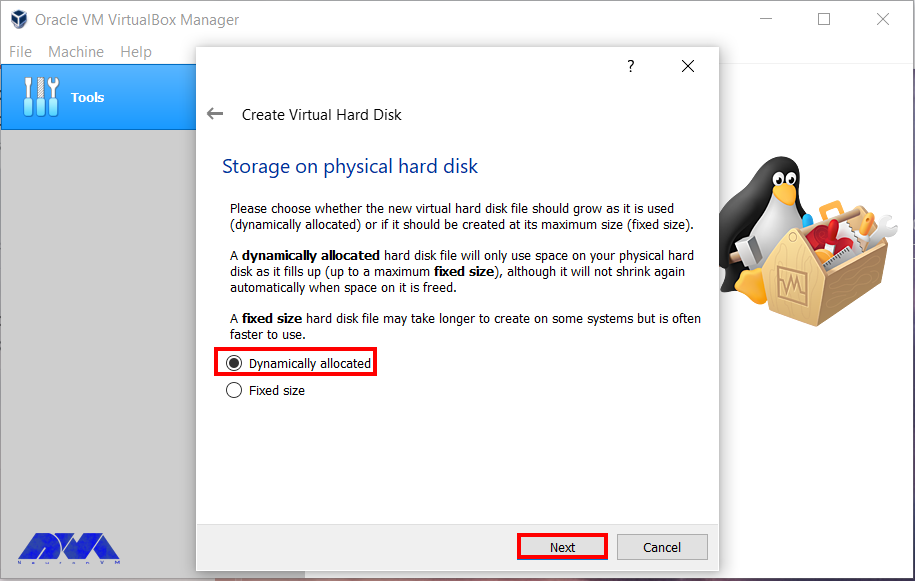
6- You can choose any of the physical storage types. It is better to choose a Dynamically allocated disk that is selected by default:
7- Determine your disk size and choose a destination folder to install:
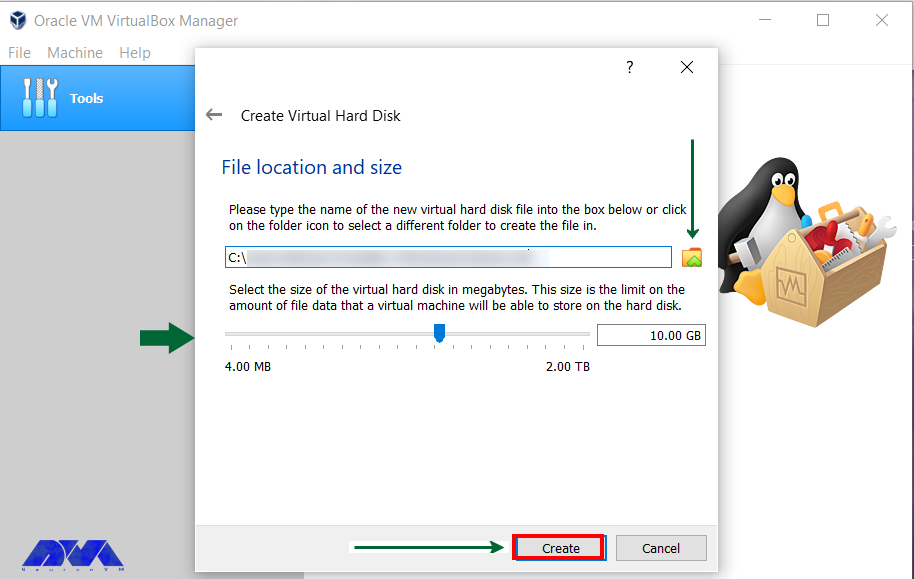
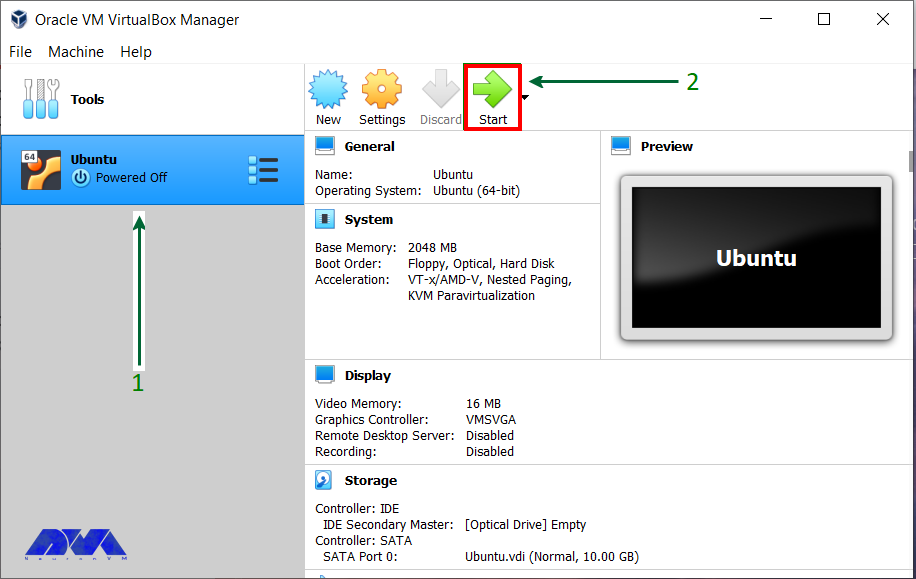
8- Now that you created the disk, boot your virtual machine and start the installation process:
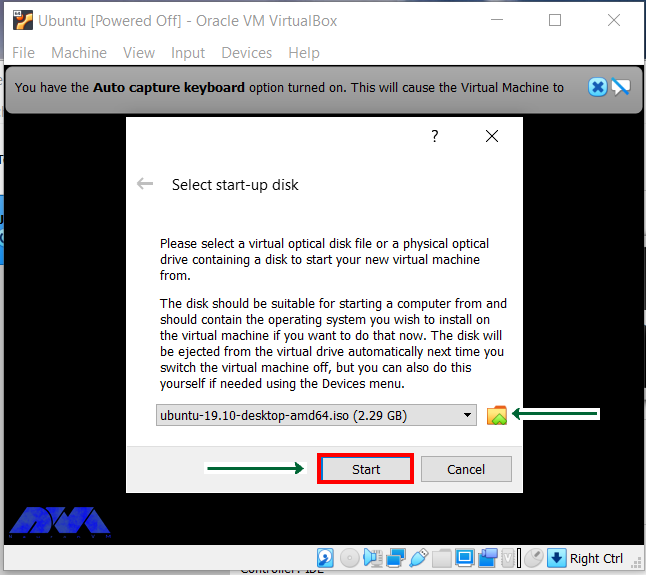
9- If you can’t detect the installation disc automatically, browse to the file location and install the ISO file for Ubuntu:
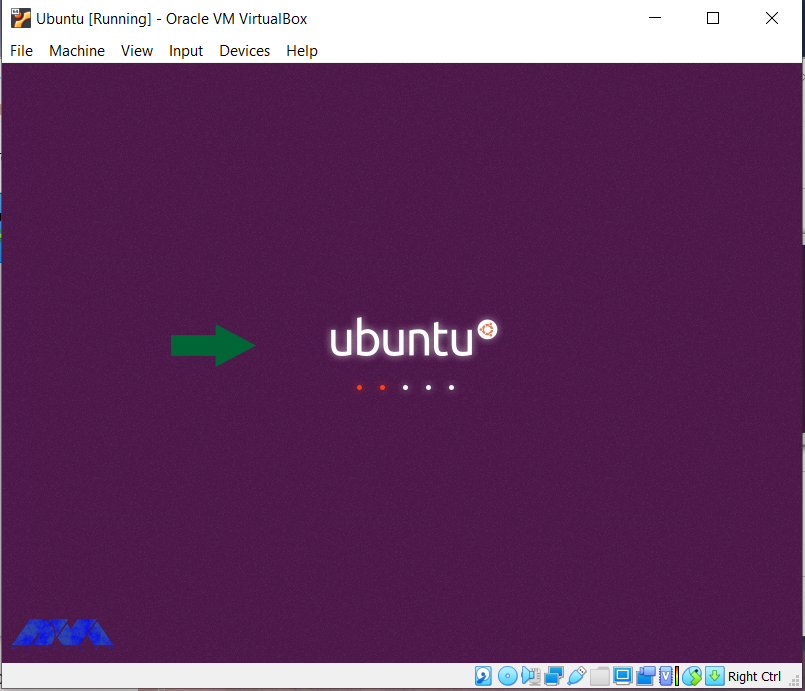
10- Continue the installation file and wait for the next options:
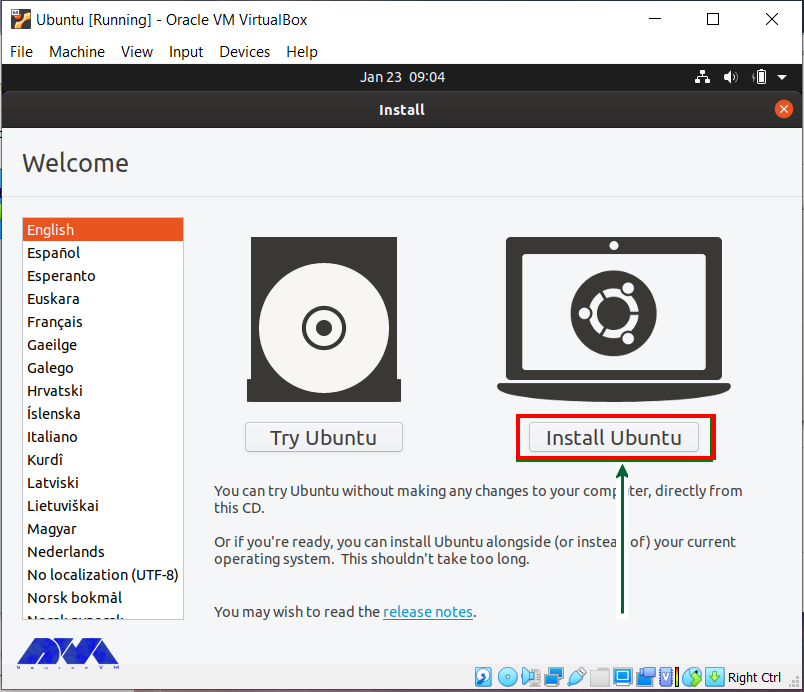
11- Here you will see two options. Click on the Install Ubuntu option:
Tip: This section might be different for other Ubuntu versions.
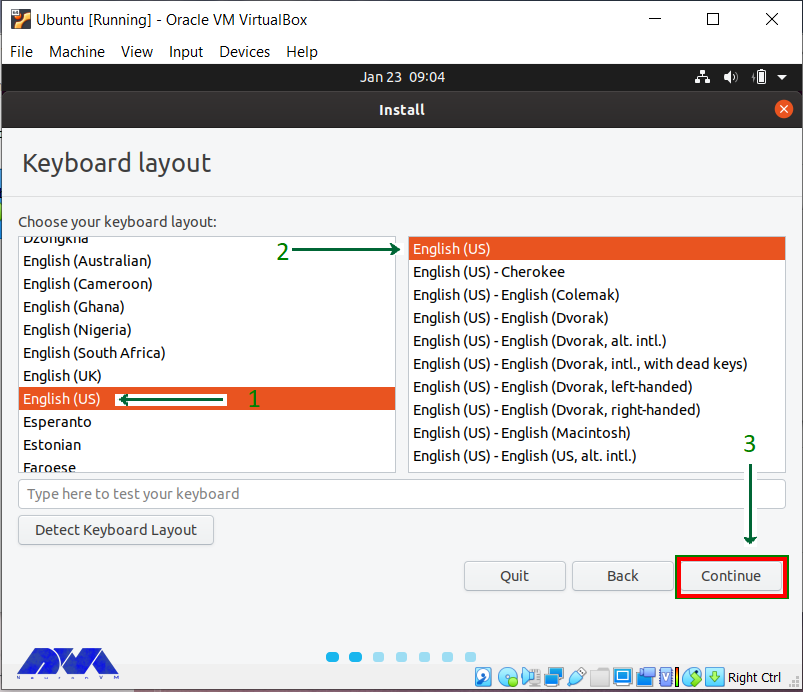
12- Check the defaults if they are compatible, click on the Continue button and proceed:
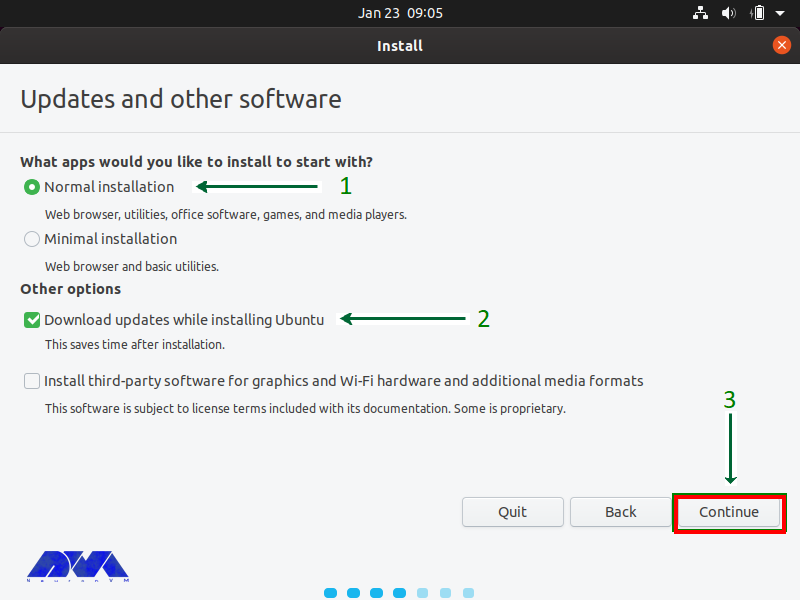
13- The default installation tab is Normal installation which is recommended, so select the type of installation. Note that if there is no need for all the features you can choose Minimal installation:
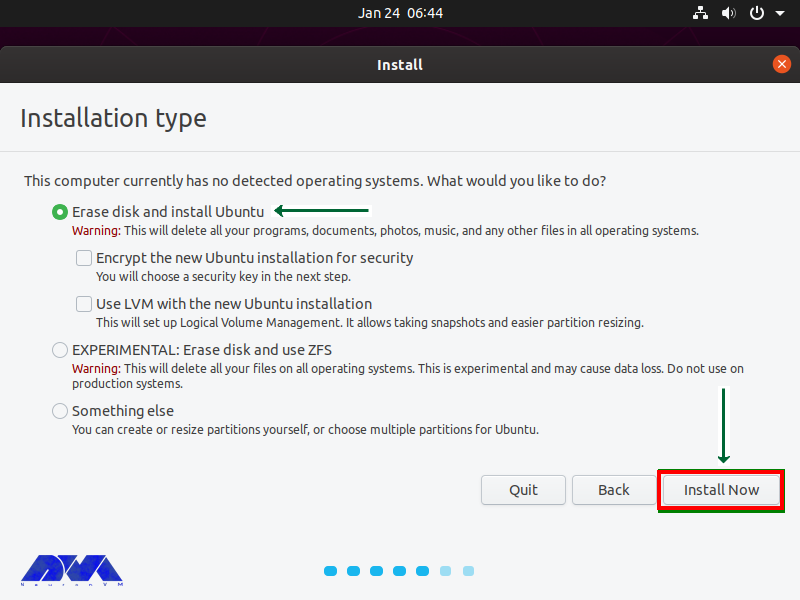
14- Now it is time to install Ubuntu, Click on the Install Now button and go on with the installation. Do not care about the Erase disk option. It is effective inside the virtual machine, these options will be intact outside the VirtualBox.
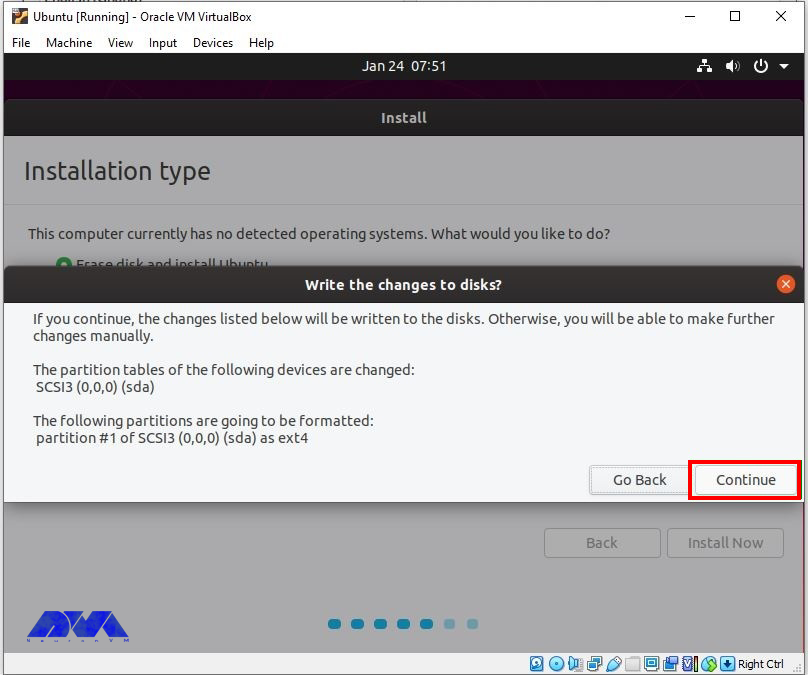
15- Now press the Continue button and carry on by writing changes on disk:
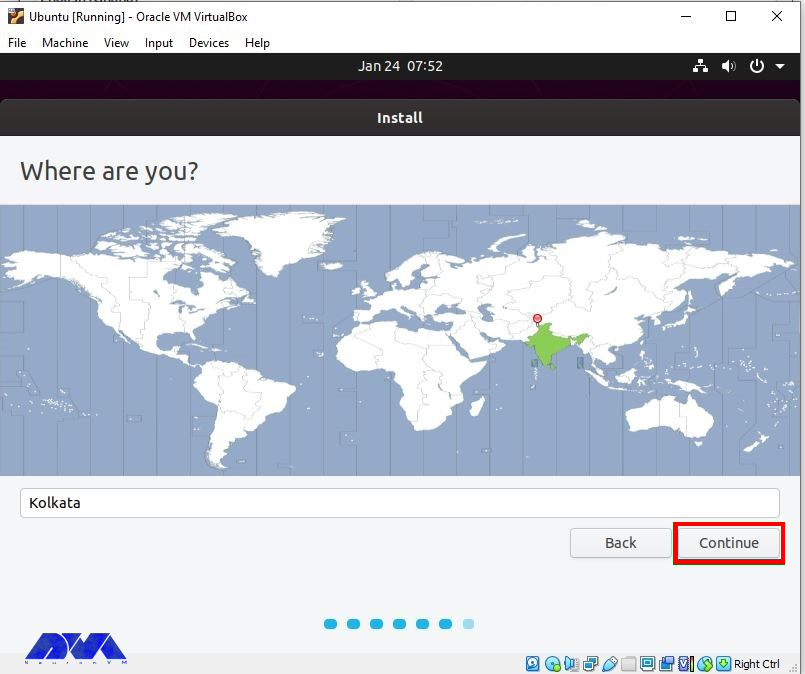
16- In this section, To setup the time zone, you should select the proper location:
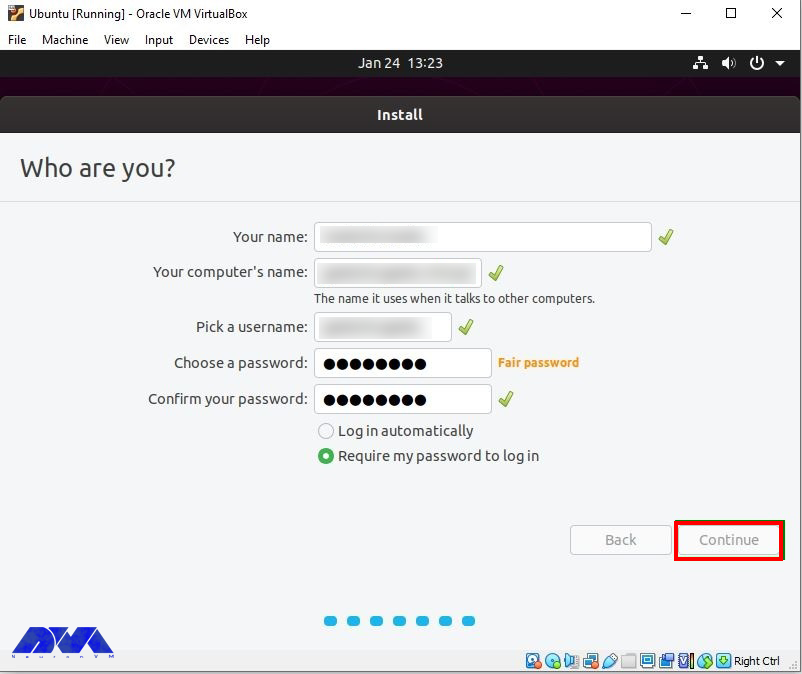
17- It is time to select a name for your system and then a password to secure login:
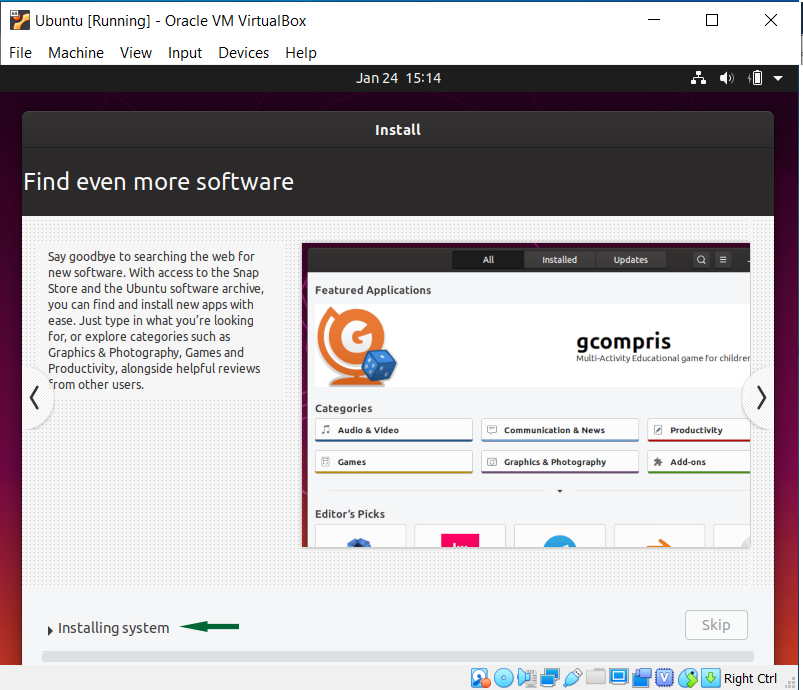
18- Wait to finish the installation process:
19- Great! Now that you finished the installation, reboot the virtual machine:
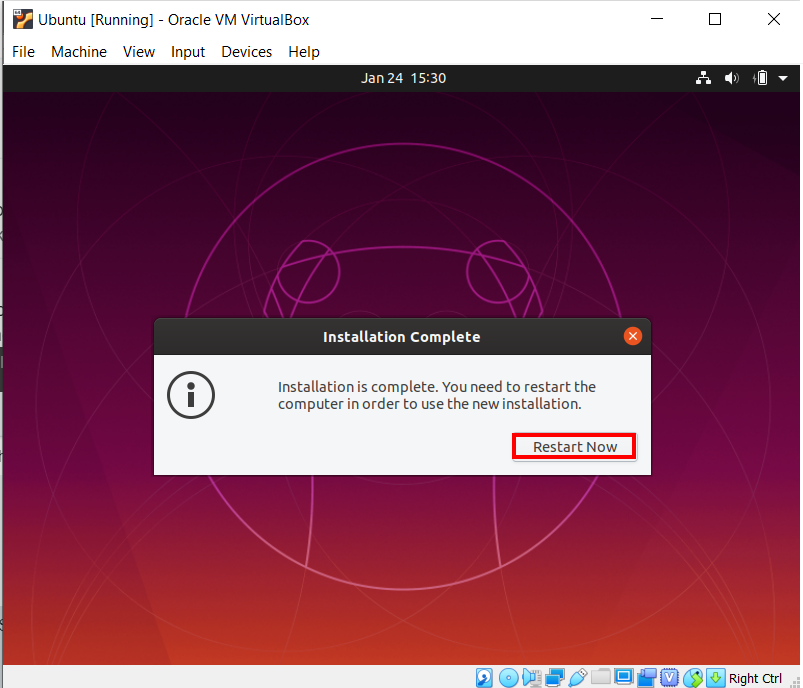
Well done! Now that you have completed the installation successfully, you can use Ubuntu along with Windows:
After the installation part, you are ready to run and use Ubuntu on your operating system.
Note: If your operating system is not suitable for the full-screen mode of your Ubuntu and you can not fit the screen by maximizing, go through the settings below to solve this problem:
– Click on the Devices button and then Insert Guest Addition CD image…
– Now you can see the Desk icon on the taskbar. Choose this icon and open the disk:
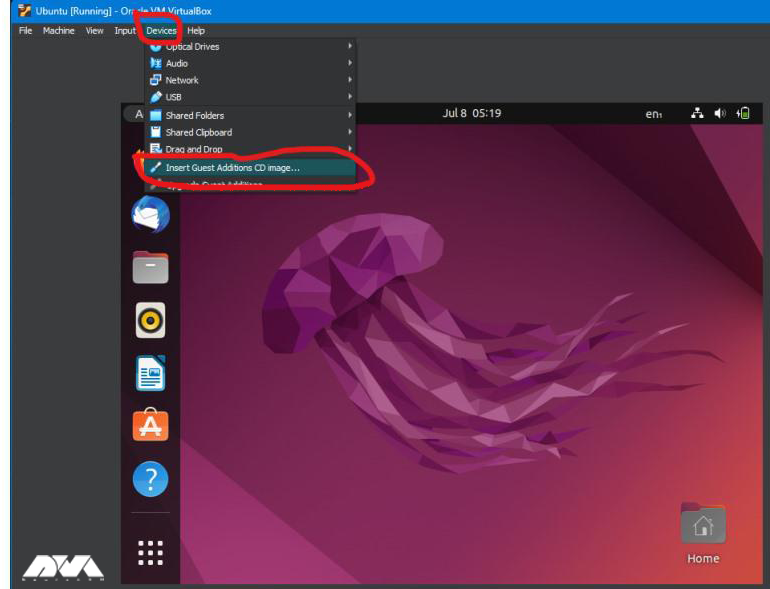
– You should Write Right-click inside the folder and choose open in the terminal. Run the command below:
sudo apt update
sudo apt upgrade
– You will be prompted to insert the password. Enter it and wait for the completion:
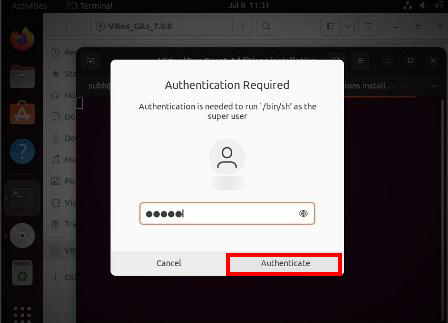
– Now run the command below:
./autorun.sh
– It’s time for the authentication. You will be asked for the password, and after checking the password, you will encounter a new terminal. Enter Yes.
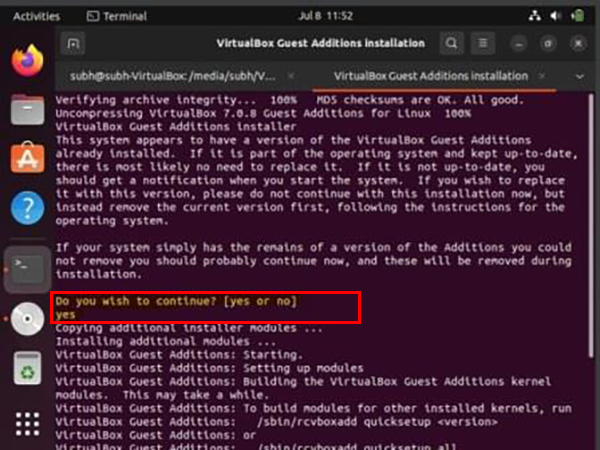
Now you can start Ubuntu and run in full-screen mode.
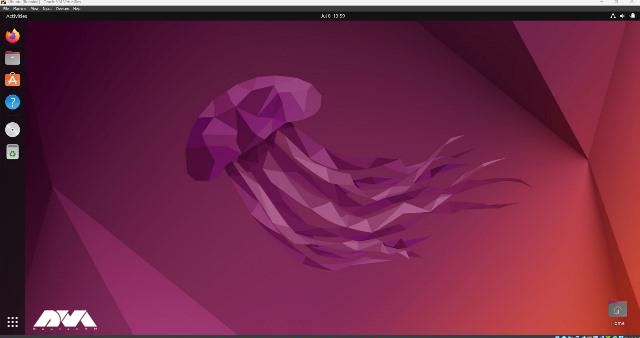
You may encounter various issues when setting up or using Ubuntu on VirtualBox. So, here are some common issues and their solutions:
1- Ubuntu may not display the correct screen resolution.
Solution:
Install the VirtualBox Guest Additions. After booting your Ubuntu VM, go to “Devices” in the VirtualBox menu and select “Insert Guest Additions CD image.” This will allow for better integration and automatic adjustment of the screen resolution.
2- The virtual machine can’t connect to the internet.
Solution:
Ensure that the VM network adapter is set to “NAT” or “Bridged” mode in the VirtualBox settings. Also, check if the network cable is connecting within the VM settings.
3- Ubuntu runs slowly or lags in VirtualBox.
Solution:
4- The sound doesn’t work in the VM.
Solutions:
Make sure you have installed the VirtualBox Guest Additions. You may also need to check sound settings within Ubuntu and VirtualBox.
Running Ubuntu in VirtualBox is a popular way to explore and use the Linux operating system within a virtualized environment. Studying this educational article, you now have Ubuntu installed on VirtualBox. You can use Ubuntu within the virtual machine just like you would on a physical computer. If you have any ideas about this issue please share. Happy coding!
How useful was this post?
Click on a star to rate it!
Average rating 0 / 5. Vote count: 0
No votes so far! Be the first to rate this post.
 Tags
Tags

We live in a data-driven world and these data should be organized and easily accessible information....


 Tags
Tags

Metasploit is an open-source penetration testing framework designed to help cybersecurity profession...


 Tags
Tags
What is your opinion about this Blog?


