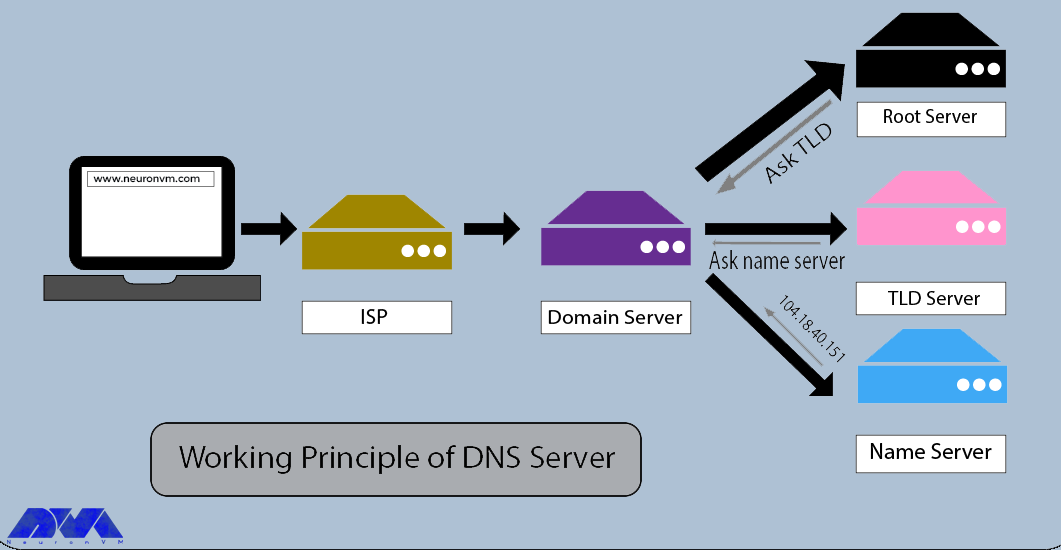


DNS or Domain Naming System, is a system for computers and internet-connected resources that operates in a hierarchical manner and links information with specific names to corporate entities and businesses. The purpose of this article is to show how to configure a DNS server on CentOS 7. DNS converts a meaningful domain name into numerical identifiers, so that, different devices can be tracked and identified from around the world.
In order to be able to setup a DNS server in your CentOS system, the first step is to install it.

– A Linux VPS with CentOS Operating System
– Choose your nameserver: ns1neuronvm.local
– Choose an IP address: 192.168.1.1
Tip: The used IP address is just an example.
Here, we will show the installation of DNS using Bind, a software that makes it possible to convert names to IP addresses. Now, use the command below:
yum -y install bind bind-utils
This is the only step to make the installation of the DNS server.
The DNS server is configured to listen to system IP addresses, so that, clients can access DNS for domain name resolution. In addition, as a default Bind is set to listen on localhost:
vi /etc/named.conf
If you want to listen to all IP addresses use the below command:
// listen-on port 53 { 127.0.0.1; };
// listen-on-v6 port 53 { ::1; };
But if you want to configure a specific IP, use the following command:
listen-on port 53 { 127.0.0.1; 192.168.1.1; };
Now you can add your network in the line you see below. By doing this, you enable the clients of the mentioned network to query DNS for name-to-IP translation.
Tip: We have added 192.168.0.0/24 for this demo:
allow-query { localhost; 192.168.0.0/24; };
At this part, edit /etc/named.conf directory.
vi /etc/named.conf
– Pay attention to the forward zone entry of neuronvm.local domain:
zone "neuronvm.local" IN {
type master;
file "/var/named/neuronvm.local.db";
allow-update { none; };
};
Explanation:
The domain name is neuronvm.local.
Primary DNS is the master.
The forward lookup file is fwd.neuronvm.local.
allow-update should be set on none.
– As you see the following part is your reverse zone entry:
zone "0.168.192.in-addr.arpa" IN {
type master;
file "/var/named/192.168.0.db";
allow-update { none; };
};
Explanation
The reverse lookup name is 0.168.192.in-addr.arpa.
Primary DNS is master.
The reverse lookup file is 192.168.0.db.
allow-update should be set on none.
Zone lookup files are inserted under /var/named directory. Here, you should create a zone file that can be fwd.neuronvm.local.db for the forward lookup and insert it in /var/named directory. End all the domain names with a dot (.).
vi /var/named/neuronvm.local.db
When you create a zone file there are some special keywords like:
A is your A record.
NS is the name server.
MX is the mail for exchange.
CNAME is a canonical name.
@ IN SOA ns1.neuronvm.local. root.neuronvm.local. (
1001 ;Serial
3H ;Refresh
15M ;Retry
1W ;Expire
1D ;Minimum TTL
)
;Name Server Information
@ IN NS ns1.neuronvm.local.
;IP address of Name Server
ns1 IN A 192.168.0.10
;Mail exchanger
neuronvm.local. IN MX 10 mail.neuronvm.local.
;A - Record HostName To IP Address
www IN A 192.168.0.100
mail IN A 192.168.0.150
;CNAME record
ftp IN CNAME www.neuronvm.local.
Now, you should create a zone file which can be 192.168.0.db for your reverse in the zone /var/named directory:
vi /var/named/192.168.0.db
Use the command below to create a reverse pointer for the entries of the forward Zone:
Here, PTR is the pointer and SOA is the start of authority.
@ IN SOA ns1.neuronvm.local. root.neuronvm.local. (
1001 ;Serial
3H ;Refresh
15M ;Retry
1W ;Expire
1D ;Minimum TTL
)
;Name Server Information
@ IN NS ns1.neuronvm.local.
;Reverse lookup for Name Server
10 IN PTR ns1.neuronvm.local.
;PTR Record IP address to HostName
100 IN PTR www.neuronvm.local.
150 IN PTR mail.neuronvm.local.
Then you can restart the Bind service by:
systemctl restart named
You can use the command below to enable the service on system startup:
systemctl enable named
If you want the clients to be able to connect to your DNS server for name resolution, you need to add an allow rule inside the firewall:
firewall-cmd --permanent --add-port=53/udp
firewall-cmd --reload
You can go to any client machine and add a DNS server IP address to /etc/resolv.conf directory:
nameserver 192.168.1.1
If the networking is managed by Network Manager, you should place the following entry in the /etc/sysconfig/network-scripts/ifcfg-eXX directory:
DNS1=192.168.1.1
Use the following command to restart your network service:
systemctl restart NetworkManager
In order to verify your forward lookup run the following command:
dig www.neuronvm.local
Tip: Use the following command to Install the package for Bind utilities to achieve nslookup or dig command:
yum install -y bind-utilsAs the last step, run the following command to confirm the reverse lookup:
dig -x 192.168.1.10
Now, you can be sure that the lookup and reverse zones work well.
Using the instructions in this article will give you a clear and functional process to have a successful installation of DNS/Bind on CentOS 7. Also, you learned how to set the firewall, and look up and reverse zones for your DNS server. We hope this article was helpful enough for you.
You can use ipconfig /all command prompt and identify the IP address, subnet mask, and default gateway.
A good way to check the safety is by visiting the DNS leak test website.
How useful was this post?
Click on a star to rate it!
Average rating 0 / 5. Vote count: 0
No votes so far! Be the first to rate this post.
 Tags
Tags

Choosing an operating system for your server can be a really confusing task due to the huge list of ...


 Tags
Tags

Domain name system or DNS is responsible for translating hostnames or URLs to IP addresses. For exam...


What is your opinion about this Blog?


