Cron jobs are scheduled tasks that run automatically at specified intervals on a Unix-like system. CentOS Web Panel (CWP) is a control panel for managing web hosting environments on CentOS servers. This article focuses on teaching you how to manage Cron Jobs on CWP (CentOS Web Panel), But first of all, you should understand completely what are Cron Jobs and how you can benefit from that. keep studying.
Note that to work with cron jobs, you should have a proper Linux distribution. If you want to buy Linux VPS server, we suggest you to visit the plans with a large variety of locations and high quality presented on our website.
Functionality of Cron Jobs
The function of cron jobs for system administrators in Linux is that they can automate and schedule various tasks such as system maintenance, data backups, updates with security patches, disk space monitoring, storage checks, etc. Use cron jobs to send notifications and other things. These tasks are written in a text editor to create a simple text file called crontab.
The crontab shows the current user’s profile, such as what they want to automate and when it should run.
So, this system is beneficial in two ways:
1- The first advantage is automation: You can automate repetitive tasks using cron. This saves time and reduces the risk of error.
2- Scheduling: Cron jobs allow you to schedule tasks at a certain time, bringing order to the work and systematic performance.
How We Can Manage Cron Jobs on CWP?
If you want to maintain and schedule Cron Jobs you can use Crontab or Cron Table, which is a Linux program. So to execute Cron Jobs on CWP, follow these steps:
– Login to the CWP as an administrative user by navigating to your server’s IP address or domain name.
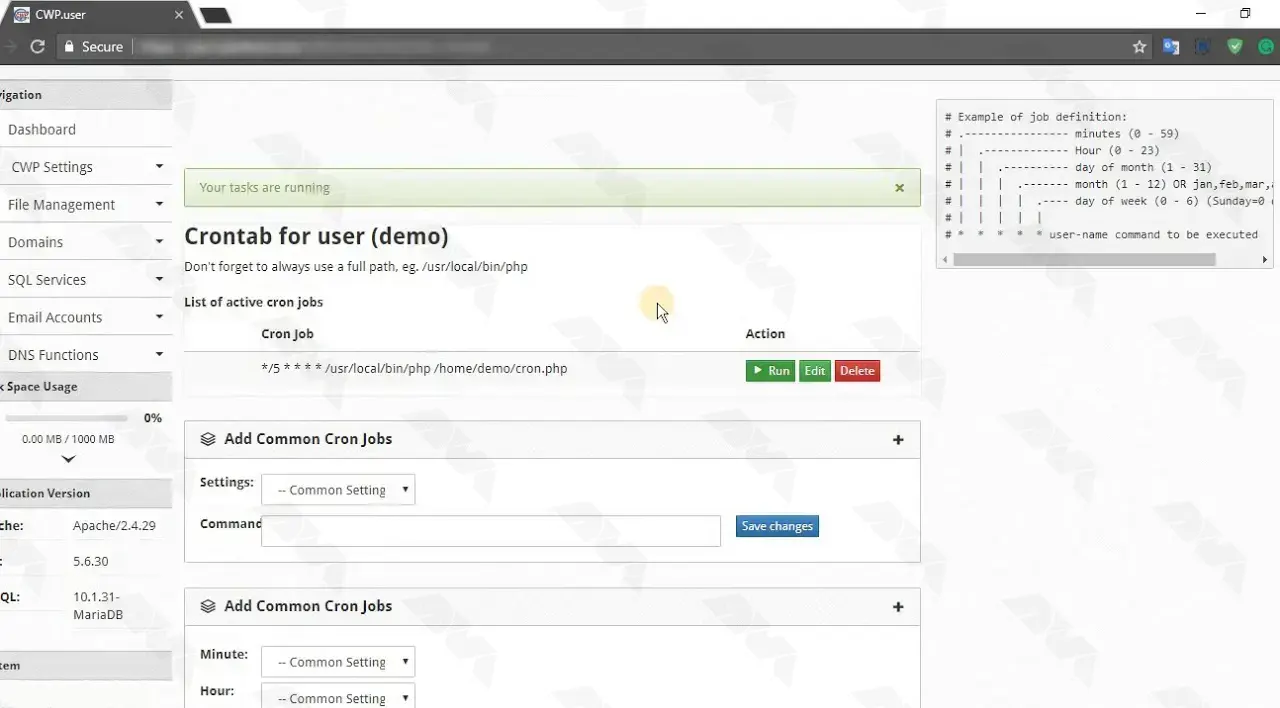
– Now navigate to the Cron Jobs section. Go to the left and select Crontab for root under the Server Settings. Activate Cron Jobs:
– If you need to quickly automate tasks and run every once or twice a day, week, etc. use the Common cron jobs Option.
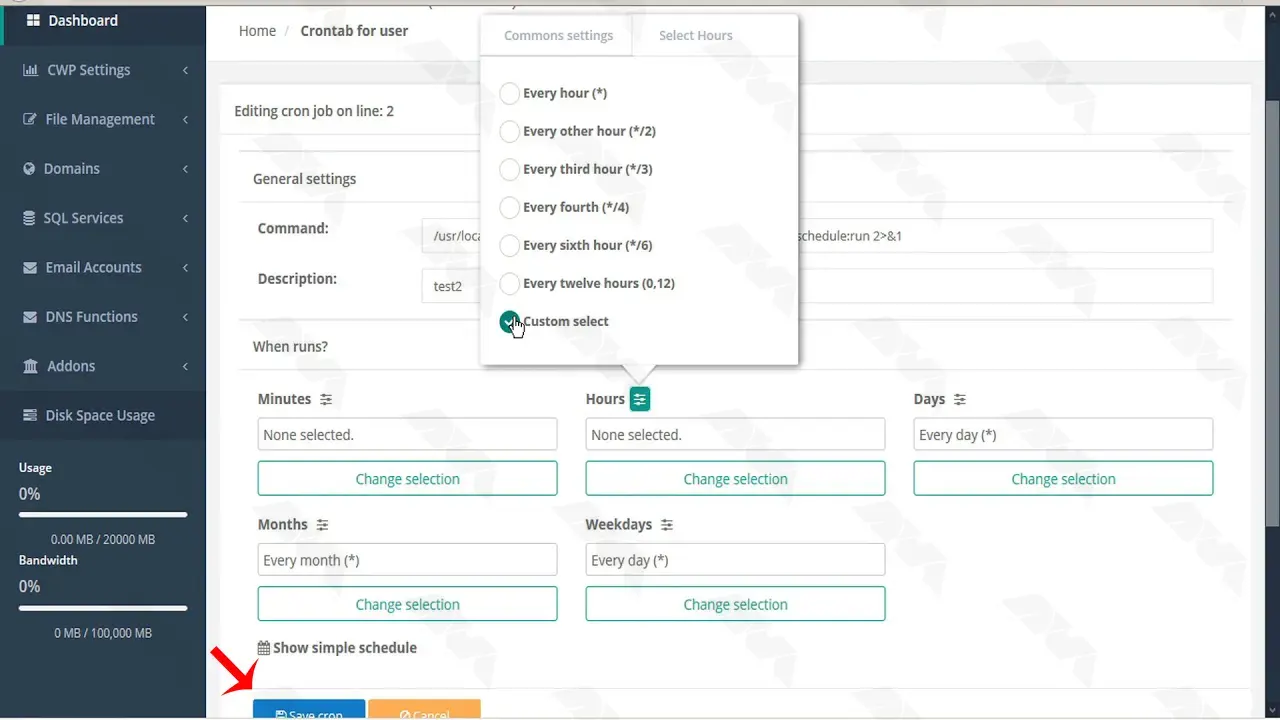
– If you want to set more unique schedules, use Add Custom Cron Jobs. This option is good for ensuring two resource-intensive tasks will not run concurrently.
– If you want to type or paste a full Cron Jobs, choose Add Full Custom Cron Jobs.
– As the last action select Save Changes.
Here we gave you an example of the way your command looks like:
Example of job definition:
.---------------- minutes (0 - 59)
| .------------- Hour (0 - 23)
| | .---------- day of month (1 - 31)
| | | .------- month (1 - 12) OR jan,feb,mar,apr …
| | | | .---- day of week (0 - 6) (Sunday=0 or 7)
| | | | |
* * * * * user-name command to be executed
How to Configure Cron Jobs on CWP
You’ll need to configure various settings for the cron jobs. Options to change are these:
Select User: Choose the user for whom the cron jobs will run. This user should have the necessary permissions for the task.
Common Settings: You can often select from common time intervals (e.g., hourly, daily, weekly) or set a custom cron expression.
Command: Enter the command you want to run as cron jobs. Provide the full path to the command and any necessary arguments.
Email: You can enter an email address to which the output of the cron jobs will be sent. This can be useful for debugging and monitoring.
After configuring the settings, click the Add or Save button to create the cron jobs. The cron jobs will be added to the system and will run according to the schedule you defined.
Conclusion
Cron jobs are scheduled tasks that run automatically at specified intervals on a Unix-like operating system. We tried to give a simple and useful explanation to show the way of creating and configuring Cron Jobs on CWP. Besides, it is a good idea to consult the official documentation for CWP or seek assistance from their support if you encounter any issues or need more specific guidance.
The ability to handle high traffic is crucial for any online business, website, or application. With the constant growth of internet usage, ensuring that your platform can handle a surge in visitors is a top priority. This is where a dedicated server comes into play. Handling high traffic can become a nightmare for many. Here, we’ll talk about how a dedicated server handles high traffic. We will delve into the importance of high traffic handling, the benefits of using a dedicated server, how dedicated servers handle high traffic, load balancing techniques, and finally, guide you on choosing the right dedicated server provider for effective high traffic handling.
Understanding the Importance of High Traffic Handling
For any online platform, the ability to accommodate high traffic volumes is vital for success. When your website or application experiences a surge in visitors, it should still maintain quick loading times, reliability, and efficiency. A seamless user experience is crucial, as high bounce rates due to slow loading times can significantly impact your business or website’s credibility. Ensuring that your dedicated server can handle high traffic is essential for user satisfaction and overall success.
The ability to handle high traffic is crucial for any online business, website, or application. With the constant growth of internet usage, ensuring that your platform can handle a surge in visitors is a top priority.
The Benefits of Using Dedicated Servers
A dedicated server stands out among other hosting options when it comes to handling high traffic. Unlike shared hosting, where multiple websites share the same server resources, a dedicated server provides you with exclusive resources, including processing power, storage, and memory. This ensures that your platform can handle high traffic with ease without being affected by the activities or resource usage of other websites.
Moreover, dedicated servers offer enhanced security, customization options, and scalability, making them an ideal choice for handling high traffic.
The ways that Dedicated Server Handles High Traffic
A dedicated server is specifically designed to handle high-traffic loads. With powerful hardware and top-notch infrastructure, it can efficiently process requests and deliver content to numerous users simultaneously. The exceptional processing power of dedicated servers enables them to handle heavy workloads, processing large volumes of data quickly and effectively.
Additionally, dedicated servers employ robust network connectivity to ensure seamless communication between the server and the users accessing the platform, resulting in fast response times and minimal latency.
Load Balancing Techniques for High Traffic Handling
To further optimize high-traffic handling, dedicated servers utilize load balancing techniques. Load balancing distributes traffic across multiple servers, preventing overload on a single machine by dividing the load among several interconnected servers. This not only ensures efficient resource utilization but also minimizes the risk of downtime due to server overload.
Load balancing techniques such as round-robin, weighted round-robin, or IP hash ensure that each server within the dedicated server cluster handles traffic evenly, maximizing performance and reliability.
Choosing the Right Dedicated Server Provider for High Traffic Handling
Selecting the right dedicated server provider is crucial for effective high-traffic handling. NeuronVM, a leading dedicated server provider, offers a wide range of solutions specifically optimized for handling high-traffic loads. With NeuronVM’s cutting-edge infrastructure, powerful hardware, and superior network connectivity, your dedicated server will effortlessly handle high traffic without compromising performance or user experience. By partnering with NeuronVM, your platform can stay ahead of the competition, ensuring that your dedicated server handles high traffic effectively.
In an increasingly digital world, ensuring that your online platform can handle high traffic has become a key factor in the success of any business or website. A dedicated server offers the ideal solution for high-traffic handling, providing exclusive resources, enhanced security, and scalability. By choosing the right provider, such as NeuronVM, you can guarantee that your dedicated server handles high traffic effectively, offering a seamless user experience and ensuring your online presence remains stable, reliable, and scalable. Don’t let high traffic become a limitation; leverage the power and efficiency of a dedicated server to unlock your platform’s full potential.
Dedicated servers that are growing, help you host your site on your own server and are significantly more advanced and powerful than shared hosting. Among the features that lead to the superiority of end servers, we can mention fast processors, high memory of GB to TB, data transfer, and extensive storage. These features will have a great impact on the optimization of your site. Of course, it should be noted that providing dedicated servers is not cheap, but it is worth spending. In this section, we will try to collect the best dedicated server providers on the market for you.
A Brief Understanding about Dedicated Servers
A dedicated server refers to a physical computer that is exclusively used by an individual, organization, or application. Unlike shared hosting, where multiple users share resources on the same server, a dedicated server provides exclusive access to all of its resources (such as processing power, memory, and storage) to a single user or entity. This exclusivity ensures better performance, control, and security.
Managing a dedicated server requires a certain level of technical expertise. Users should be familiar with server administration, security practices, and troubleshooting to make the most of a dedicated server hosting arrangement.
7 Best Dedicated Server Providers 2023
If you have a large online business, corporate website hosting, or a custom project, you should look for a dedicated server. Because a powerful project must be managed with a server that provides you with sufficient resources and necessary security measures. In this section, we will review the top 8 dedicated servers.
Another one of the best dedicated server hosting in the market is NeuronVM, which is advancing and becoming known with reasonable costs compared to the services provided. Also, by choosing Nero, you can have your own dedicated server with fully dedicated resources, full security, and high speed.
Different Features of NeuronVM:
The features of Neron’s dedicated server include 24-hour support and the possibility of paying with digital currencies. Also, the amount of RAM from 16 to 128 GB is also available for different applications. Notably, if you need additional storage space, more RAM, or increased processing power, our dedicated servers can easily meet your needs.
2) InterServer
InterServer is a web hosting provider that offers various hosting services, including dedicated hosting. This hosting offers the cheapest dedicated server hosting on the list. Interserver offers various programs and ideas about customization. You can use 11 different designs and customize each of them according to your needs.
Different Features of Interserver:
Server resources vary depending on the application you are considering. You can offer 1 to 2 TB of SSD storage and 15 to 118 GB of RAM. You can also configure your server as desired.
3) HostGator
If you are looking for a set of web solutions that are very flexible, HostGator hosting is a good option for you. This hosting provider includes full and semi-managed options, Windows, and Linux operating systems with extensive server resources.
Different Features of HostGator:
You can get different resources depending on your plan. The core provided in this hosting is between 4 and 8 cores. Also, 1 TB hard disk and 1 TB of SSD memory along with 8 to 30 GB of RAM are features of HostGator. You will have the option to choose between SSD or HDD storage in the mid-level plan:
4) DreamHost
One of the reasons why DreamHost is known is its low-cost and resource-rich shared hosting plans. On the other hand, it also provides users with managed and powerful dedicated hosting services. This hosting has 9 different plans, all of which include full root access, 100% uptime, and unlimited bandwidth.
Different Features of DreamHost:
If we want to mention the features of Dreamhost, we can say that it has 3 standard plans of Intel Xeon 4-Core 8-Thread system with 1 TB of HDD memory. The amount of RAM also varies from 4 to 16 GB. You can choose your resources between 16GB and 64GB RAM, 2TB HDD, and 240GB storage:
5) Liquid Web
If you want to work professionally, Liquid Web hosting is already in the field of advanced VPS servers and dedicated servers. Fast, secure, and reliable hosting for large and heavy projects or enterprise websites will be effective with this powerful provider.
Different features of Liquid Web:
The features of Liquid Web resources include 4-32F core, 16-64GB RAM, high storage capacity from 240-480GB, and 5-8TB bandwidth based on user needs. These features make it possible to host medium to large websites without running out of resources. Another unique feature of Liquid Web is the ownership of all its data centres, which are spread across Arizona, Michigan and Amsterdam:
6) BlueHost
One of the best options for dedicated hosting, especially for users who are looking for unmanaged hosting, is BlueHost. This company offers Linux-dedicated server hosting specifically. Among its positive results, we can mention the provision of a free cPanel with root access in all programs.
Different Features of BlueHost:
The features of this dedicated server hosting will vary based on the plan you choose. These devices have 4 to 8 cores, up to 2 TB of HDD memory and 8 to 30 GB of RAM. The bandwidth is unlimited and comes without SSL:
7) InMotion Hosting
If you want to have a dedicated Linux server managed with cPanel, Inmotion Hosting will be a good choice for you. This hosting is also useful for those who wish to purchase a bare metal server. If you keep your host hardware up to date, you will have better performance, smart routing technology, and high-quality security features.
Different Features of Inmotion Hosting:
Features of Inmotion Hosting managed and unmanaged servers include software configuration options. The plans of this hosting have 4 to 32 cores, 1 TB SSD, and 2 to 2×3.2 NVME hard drives. RAM options are also between 16 GB and 512 GB ddr4 RAM:
Comparison of the Best Dedicated Server Providers
In this section, a list of reliable and well-known dedicated server providers will be reviewed. This list will help you choose your server provider with a better mindset and a wiser decision:
*******
Server Uptime
Number of CPU Core
RAM
Price
NeuronVM
99.9%
4*
32GB
From $160.99 per month
InterServer
100%
2*
15GB
From $70.00 per month
HostGator
99.9%
4*
8GB
From $89.98 per month
DreamHost
100%
4*
4GB
From $149.00 per month
Liquid Web
100%
4*
16GB
From $75.00 per month
BlueHost
100%
2*
8GB
From $89.98 per month
InMotion Hosting
99.9%
4*
16GB
From $89.99 per month
Best Dedicated Server Providers in 2023
The Key Factors to Consider Dedicated Server
Dedicated servers can be used in various fields and you should pay attention to choose the right server for your field of activity. In the previous section, we reviewed the comparison table of the top 8 dedicated servers for you, now after the required reviews, we will tell you what field each of these servers is used for:
NeuronVM _ Is the best for hosting in every field.
InterServer – This is great if you are looking for the best cheap dedicated hosting.
HostGator – Is suitable for fully and semi-managed server hosting.
DreamHost – With DreamHost, you can have highly configured managed servers.
Liquid Web – This one is the best dedicated hosting in every field.
Bluehost – This server is proper for unmanaged server hosting.
InMotion Hosting – This one is perfect for resource-rich unmanaged solutions.
Conclusion
This article was prepared to give a list of the best and latest dedicated servers provided worldwide. We tried to explain about each hosting provider and some important features of them. Also, a comparison table was shown to make it easy to choose and purchase the best and most suitable dedicated hosting for users. So read carefully and make your choice.
A dedicated server is a hosting service that provides an entire physical server exclusively to one client or website. In contrast to shared hosting, where multiple websites share server resources, a dedicated server offers complete access to all the server’s resources, such as processing power, RAM, storage, and bandwidth. By using a dedicated server, the client gains full control over server configuration, software installations, and security settings. This level of control allows for superior customization, flexibility, and performance, making it ideal for resource-intensive applications like high-traffic websites, online gaming, large e-commerce platforms, or other demanding tasks. In this article, we will examine the benefits of buying a dedicated server, which we recommend you follow us until the end.
Reasons for using a Dedicated Server
Reasons why someone might choose to use a dedicated server:
Optimal Performance: Dedicated servers excel in performance compared to other hosting options, like shared hosting. The server’s resources are exclusively available for your website or application, enabling efficient handling of high traffic volumes and resource-intensive tasks.
Tailored Customization: Enjoy complete control over the server’s configuration with a dedicated server, allowing customization according to your specific needs. This flexibility allows installation and operation of any required software or applications for your website or business operations.
Enhanced Security: Dedicated servers offer heightened security compared to other hosting services. As the sole user of the server, you have full control over security protocols and can implement your own measures to protect your data.
Easy Scalability: Dedicated servers provide effortless scalability, allowing seamless upgrading or downgrading of server resources as your business needs evolve. This flexibility ensures your website or application can handle increased traffic without any slowdowns or downtime.
Improved SEO Ranking: A dedicated server contributes to better search engine optimization (SEO) performance for your website. Search engines favor fast-loading and reliable websites, and dedicated servers meet both criteria, resulting in improved search engine rankings.
Exclusive IP Address: Dedicated servers come with a unique IP address solely dedicated to your website or application. This benefits applications affected by shared hosting’s IP reputation, like SSL certificates or email marketing.
What are the most important Advantages of a Dedicated Server?
High-performance computing power and resources that are solely dedicated to a single user or organization enhance performance and reliability. This ensures optimal performance without the need to share resources with other users.
Full control over security measures, including firewalls, antivirus software, and data encryption, increases security. This provides a higher level of protection against potential security breaches compared to shared hosting environments.
Greater flexibility and customization options are offered by dedicated servers. You have complete control over the server’s hardware, software, and operating system, allowing you to tailor it to your specific needs and optimize performance according to your requirements.
Scalability is a key advantage of dedicated servers. They are highly scalable, allowing you to easily expand resources such as CPU, RAM, and storage as your business grows. This scalability ensures that your server can accommodate increasing demands without experiencing performance issues.
Website loading speed is improved with dedicated servers. They often offer faster website loading times and response rates compared to shared hosting. There is no congestion caused by other websites since the server resources are dedicated to a single user, resulting in a quicker and smoother user experience.
Better control and management is provided by a dedicated server. You have complete administrative access, allowing you to install and configure software applications, customize settings, and manage server resources. This level of control simplifies server management, making it easier to troubleshoot issues and optimize performance.
Dedicated server provides a unique IP address for your website, unlike shared hosting where multiple websites share a single IP address. This offers advantages such as better email deliverability and improved search engine rankings.
Cost-effective and efficient hosting of multiple websites on a single server is possible with a dedicated server. This is beneficial for businesses or individuals that manage multiple online properties.
Who is a Dedicated Server suitable for?
Dedicated servers cater to a variety of individuals and businesses, including:
1. Large businesses and corporations benefit from dedicated servers due to their provision of ample storage, processing power, and control over the server environment. This makes them ideal for organizations with high traffic websites, complex applications, and extensive databases.
2. E-commerce websites find dedicated servers advantageous as they ensure reliable performance, fast loading times, and enhanced data protection. This is especially important for online stores with high volumes of transactions and demanding security requirements.
3. Dedicated servers are commonly used by gaming enthusiasts and communities to host multiplayer games. This facilitates better performance, lower latency, and an improved user experience.
4. Web hosting providers utilize dedicated servers to offer greater flexibility, scalability, and customized solutions for their clients.
5. IT professionals can make use of dedicated servers to exercise complete control over server configurations, software installations, and security settings. This enables them to leverage their expertise for specific project requirements.
6. Media and streaming platforms, such as streaming services, content delivery networks, and media platforms, require dedicated servers to handle large amounts of data traffic. This ensures smooth streaming and downloads for their users.
Overall, dedicated servers are suitable for individuals and businesses in need of high-performance, secure, and customizable hosting solutions that cater to their specific requirements.
How to buy a Dedicated Server from NeuronVM
Buying a dedicated server offers numerous advantages, including improved security, performance, and customization options. It allows you to have full control over your hosting environment while benefiting from professional management and support from the hosting provider.
Buying a dedicated server, in conclusion, is a worthwhile investment for businesses and individuals. It offers numerous advantages such as improved performance, reliability, security, and customization options. This exclusive hosting solution ensures optimal website or application performance, meeting specific requirements effectively.
Are you ready to take your website or online business to the next level? If so, it might be time to consider using a dedicated server. While shared hosting may be suitable for beginners or small websites, a dedicated server offers the most control, flexibility, and power. In this guide, we will walk you through the process of mastering the art of dedicated servers. From choosing the right server to configuring it for optimum performance, you’ll be equipped with the knowledge to make the most of this powerful hosting solution.
Determining Your Requirements
Assessing your needs with a dedicated server requires a thorough understanding of your business requirements, resource demands, and growth projections. Here are some key factors to consider:
1. Performance and Scalability: Determine the level of performance required by your applications and consider any potential growth in traffic, users, or data. Evaluate if your current hosting environment can handle the increasing load or if a dedicated server is necessary to ensure optimal performance.
2. Security: Assess the sensitivity of your data and the level of security required. Dedicated servers offer enhanced security features, such as dedicated firewalls and isolated environments, which can be crucial for industries prone to cyber threats or compliance requirements.
3. Customization and Control: Evaluate whether your applications require specific configurations, software installations, or specialized environments. Dedicated servers provide complete control and flexibility, allowing you to tailor the server infrastructure to your exact needs.
4. Cost Considerations: Assess the cost implications of moving to a dedicated server. Calculate the expenses associated with hardware, software licensing, maintenance, and ongoing operational costs. Compare this with the potential benefits and savings from improved performance, scalability, and security.
5. Technical Expertise: Determine if you have the necessary technical expertise or if you require managed dedicated server services. Managed options provide assistance with server setup, maintenance, security, and troubleshooting, allowing you to focus on your core business.
6. Redundancy and High Availability: Evaluate your need for redundancy and high availability. Dedicated servers can be configured with failover solutions, clustered environments, or load-balancing setups to ensure consistent performance and minimal downtime.
7. Support and Service Level Agreements (SLAs): Consider the level of technical support and SLAs needed for your business. Evaluate the responsiveness, availability, and expertise of the hosting provider’s support team.
Selecting the Perfect Hardware
Choosing the right hardware for a dedicated server depends on several factors including the specific requirements of your server workload, budget considerations, and future scalability needs.
Here are some key hardware components to consider when choosing a dedicated server:
Processors (CPU)
Memory (RAM)
Storage
RAID Controllers
Network Connectivity
Power Supply
Server Chassis and Cooling
Remote Management and Monitoring
Scalability
It is recommended to get in touch with our support experts by sending a ticket from the user area to assess your specific needs and select the most suitable hardware for your dedicated server setup.
Operating System Selection
The next step is choosing an operating system (OS) for your server. Popular choices include Linux distributions like Ubuntu, CentOS, or Debian, as well as Windows Server OS. Consider your familiarity with the OS, compatibility with your applications, and any specific requirements when making your decision.
Server Setup
Setting up a dedicated server can be a complex process, but with the right knowledge and guidance, you can master the art of dedicated servers. Here are the key steps in server setup:
Step1: Plan and determine server requirements:
Define the purpose of the server, including the operating system, software, storage, memory, and bandwidth needed.
Step2: Choose a hosting provider:
Select a reliable hosting provider that offers dedicated server hosting services.
Step3: Order and provision the server:
Place an order for the dedicated server with the chosen hosting provider. Provide necessary information, such as the desired configuration, billing details, and initial setup requirements.
Step4: Configure network settings:
Determine the IP address allocation and set up the network configuration, such as assigning static IP addresses, configuring DNS settings, and configuring firewalls.
Step5: Install the operating system:
Install the preferred operating system on the server. This may include Windows Server, Linux distributions like Ubuntu or CentOS, or other customized versions.
Step6: Server hardening:
Enhance the security of the server by applying necessary security measures, such as setting up a strong password policy, disabling unnecessary services, configuring firewall rules, and installing security software.
Step7: Configure server settings:
Customize server settings according to the desired requirements, including optimizing performance, storage configuration, and network settings.
Step8: Backup and disaster recovery:
Establish regular backup processes and implement strategies for disaster recovery to ensure data integrity and availability.
Step9: Testing and optimization:
Test the server to ensure it is functioning properly and optimize its performance by fine-tuning configurations, monitoring system performance, and applying necessary updates and patches.
Tip: It is important to follow best practices and consult with professionals or technical support resources when setting up a dedicated server, as the process can be complex and may require advanced knowledge in server administration and security measures.
Security First: Fortify Your Server
One of the most crucial aspects of managing a dedicated server is ensuring its security:
– Start by installing a firewall to protect against unauthorized access.
– Regularly update your OS and installed software, and consider implementing security measures like two-factor authentication and strong passwords.
– Regularly monitor logs for any suspicious activity.
Software Installation and Server Optimization
Installing software and optimizing a dedicated server involves several steps. Here is a general outline of the process. In the first step, we will examine how to install software on a dedicated server:
1) Connect to the dedicated server using remote desktop software or SSH.
2) Update the operating system to ensure it has the latest security patches and software updates.
3) Install necessary software packages for your server. This could include web servers (such as Apache or Nginx), database servers (such as MySQL or PostgreSQL), programming languages (such as PHP or Python), and any other required applications.
4) Configure the software settings and make any necessary changes to meet specific requirements.
5) Test the installed software to ensure everything is working correctly.
To maximize the performance of your dedicated server, it’s important to optimize its configurations. This includes fine-tuning settings like PHP memory limit, web server caching, and database optimization. Additionally, consider implementing content delivery networks (CDNs) and load balancers to improve website speed and handle high traffic efficiently:
1) Optimize the server’s resources by adjusting server parameters and settings, such as memory allocation, disk read and write buffers, and network configurations.
2) Implement caching mechanisms to improve server performance, such as opcode caching for PHP or content caching for web servers.
3) Enable Gzip compression to reduce the size of files transmitted between the server and clients.
4) Configure server-level caching solutions, such as Varnish or Redis, to store frequently accessed data in memory for faster retrieval.
5) Implement a content delivery network (CDN) to distribute static resources across multiple servers globally for improved speed and reliability.
6) Monitor server performance and utilization using server monitoring tools, and make any necessary adjustments to ensure optimal performance.
Monitoring and Maintenance
Monitoring your server’s performance is crucial for identifying and resolving issues promptly. Implement monitoring tools that track resource usage, server uptime, and website performance. This allows you to identify potential bottlenecks, troubleshoot problems, and optimize your server for the best user experience.
Monitoring tools can be very helpful in ensuring the smooth functioning and optimal performance of a dedicated server. Here are some popular monitoring tools that can be utilized:
Nagios
Zabbix
PRTG Network Monitor
SolarWinds Server & Application Monitor
Datadog
New Relic
These monitoring tools can be installed on the dedicated server to continuously monitor its performance, identify any issues or bottlenecks, and enable proactive troubleshooting and optimization.
Scaling and Future-Proofing
Scaling and future-proofing dedicated servers involves ensuring that the infrastructure can handle increasing demands and technology advancements in the future. Here are some key considerations:
Scalability: A dedicated server should have the option to scale its resources vertically (increasing individual components like CPU, RAM, or storage) or horizontally (adding more servers to a cluster). This allows the server to handle increasing traffic and workload requirements.
Upgradable hardware: Choose a dedicated server provider that offers flexibility in upgrading or replacing hardware components. This ensures that your server can accommodate future advancements in hardware technology without requiring a complete replacement.
Network capacity: Ensure that the dedicated server provider has sufficient network capacity to handle increasing data transfer requirements. This includes sufficient bandwidth, low latency, and scalability to accommodate higher data volumes.
Virtualization support: Dedicated servers that support virtualization technologies such as VMware, Hyper-V, or KVM allow for efficient resource utilization and scalability. This enables the easy deployment of additional virtual machines as needed.
Redundancy and high availability: Consider redundancy options like RAID configurations for data storage, redundant power supplies, and network connections. High availability configurations, such as clustering or load balancing, can ensure that your server remains online even in the event of hardware or network failures.
Future technology support: Stay updated with emerging technologies and trends in server hardware, software, and networking. Regularly review your server infrastructure and consider upgrades or enhancements to keep pace with the latest advancements.
By incorporating these considerations, you can ensure that your dedicated server infrastructure is scalable, adaptable to future requirements, and can effectively handle increasing demands.
In this day and age, businesses require reliable and secure hosting solutions to ensure their online presence is always up and running smoothly. Dedicated server offer a high level of performance and control. This makes them an ideal choice for businesses with advanced hosting needs. If you’re looking to purchase a dedicated server with Perfect Money, this ultimate guide will provide you with the necessary insights to make an informed decision. So let’s dive in and see how it’s done!
Understanding Dedicated Servers
Dedicated servers are physical machines solely dedicated to hosting a single website or application. Unlike shared hosting, where you can host multiple websites on the same server, dedicated servers offer exclusive resources, including CPU power, RAM, storage, and network connectivity.
This exclusivity guarantees optimal performance and flexibility, allowing businesses to handle heavy traffic loads, resource-intensive applications, and large-scale databases. By investing in a dedicated server, you have full control over server configuration, software installations, security measures, and more.
When opting for a dedicated server with Perfect Money payment, it is crucial to consider your specific requirements. Evaluate aspects such as the required CPU and RAM capacity, storage size, bandwidth limits, and the level of technical support offered by the hosting provider. Additionally, assess other factors such as server location, network uptime guarantees, scalability options, and data center certifications.
The Benefits of Purchasing Dedicated Servers with Perfect Money
Perfect Money is a reliable and convenient payment system that offers numerous benefits when purchasing dedicated servers. Firstly, it ensures fast and secure transactions, eliminating the risk of fraud or unauthorized access.
Second, it provides flexibility, allowing users to choose from various currencies and easily convert them. Additionally, Perfect Money offers competitive fees, enabling cost-effective server purchases.
Moreover, users can enjoy seamless integration with different platforms, making the buying process more efficient and convenient.
Lastly, Perfect Money’s user-friendly interface and customer support ensure a smooth experience, enhancing user satisfaction when acquiring dedicated servers.
Finding a Reliable Dedicated Server Provider Accepting Perfect Money
Once you have determined the specifications and features you need for your dedicated server, the next step is to find a reputable hosting provider that accepts Perfect Money as a payment method. Conduct thorough research to identify top-notch hosting companies that meet your requirements and have positive customer reviews. Look for providers with extensive industry experience, a diverse range of server configurations, and excellent customer support.
Exploring online forums, review websites, and social media can help you gather valuable insights from other users’ experiences. Check for any reported downtime issues, the performance of servers, and the provider’s responsiveness to customer concerns.
Additionally, it is essential to ensure that the hosting provider offers the necessary security measures, such as firewalls, DDoS protection, and regular backups, to safeguard your data.
Here at NeuronVM, we are providing different hosting solutions, with dedicated servers being one of the most important services. If you’re willing to buy dedicated server, the next section is written for you.
Step by Step Guide for Buying Dedicated Server with Perfect Money
So if you’re planning to buy a dedicated server, this is the section you’ll be looking for. There are not many providers out there that give you the option to buy this service using Perfect Money, but here at NeuronVM, we really want everyone to start their business as soon as possible and not worry about things like payment method.
There are a few steps you must take to buy a dedicated server with perfect money. Here, I’ll show you how!
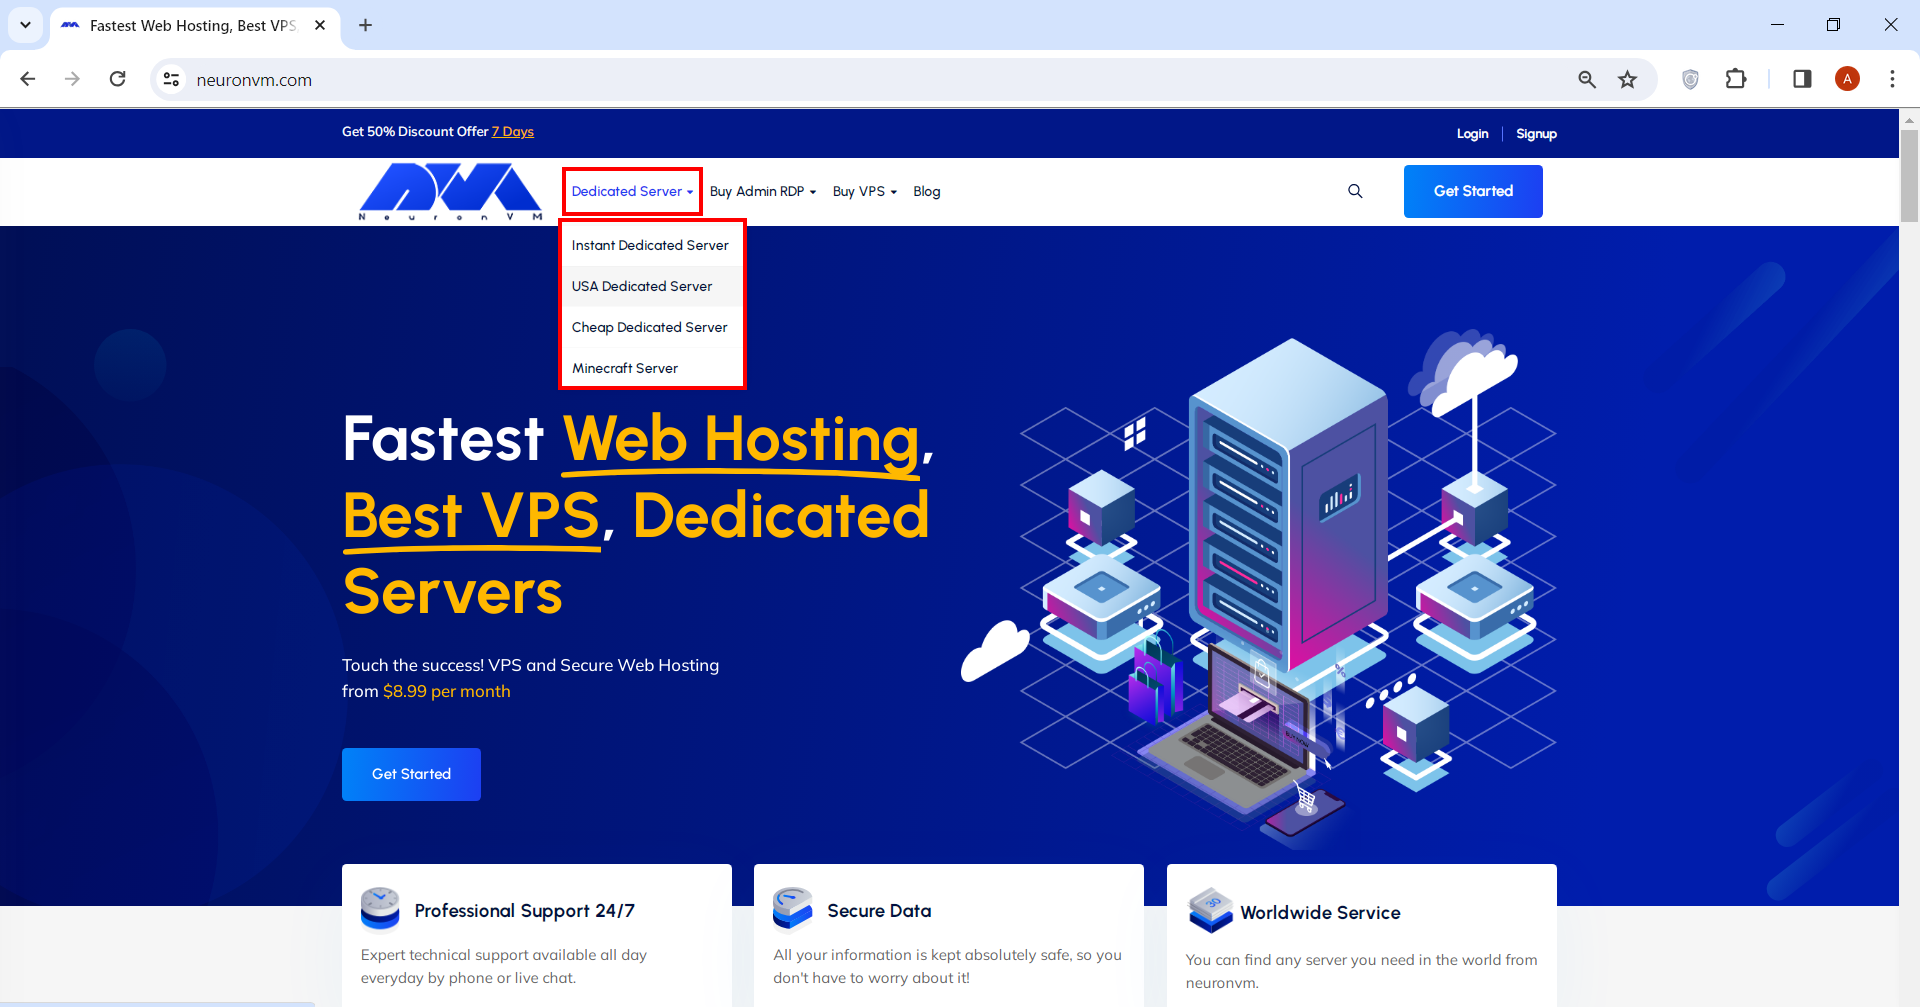
Go to our main page. From the menu above, you can choose a Dedicated Server option and see the plans. (for the sake of this tutorial I choose USA dedicated server, but the other ones are just the same).
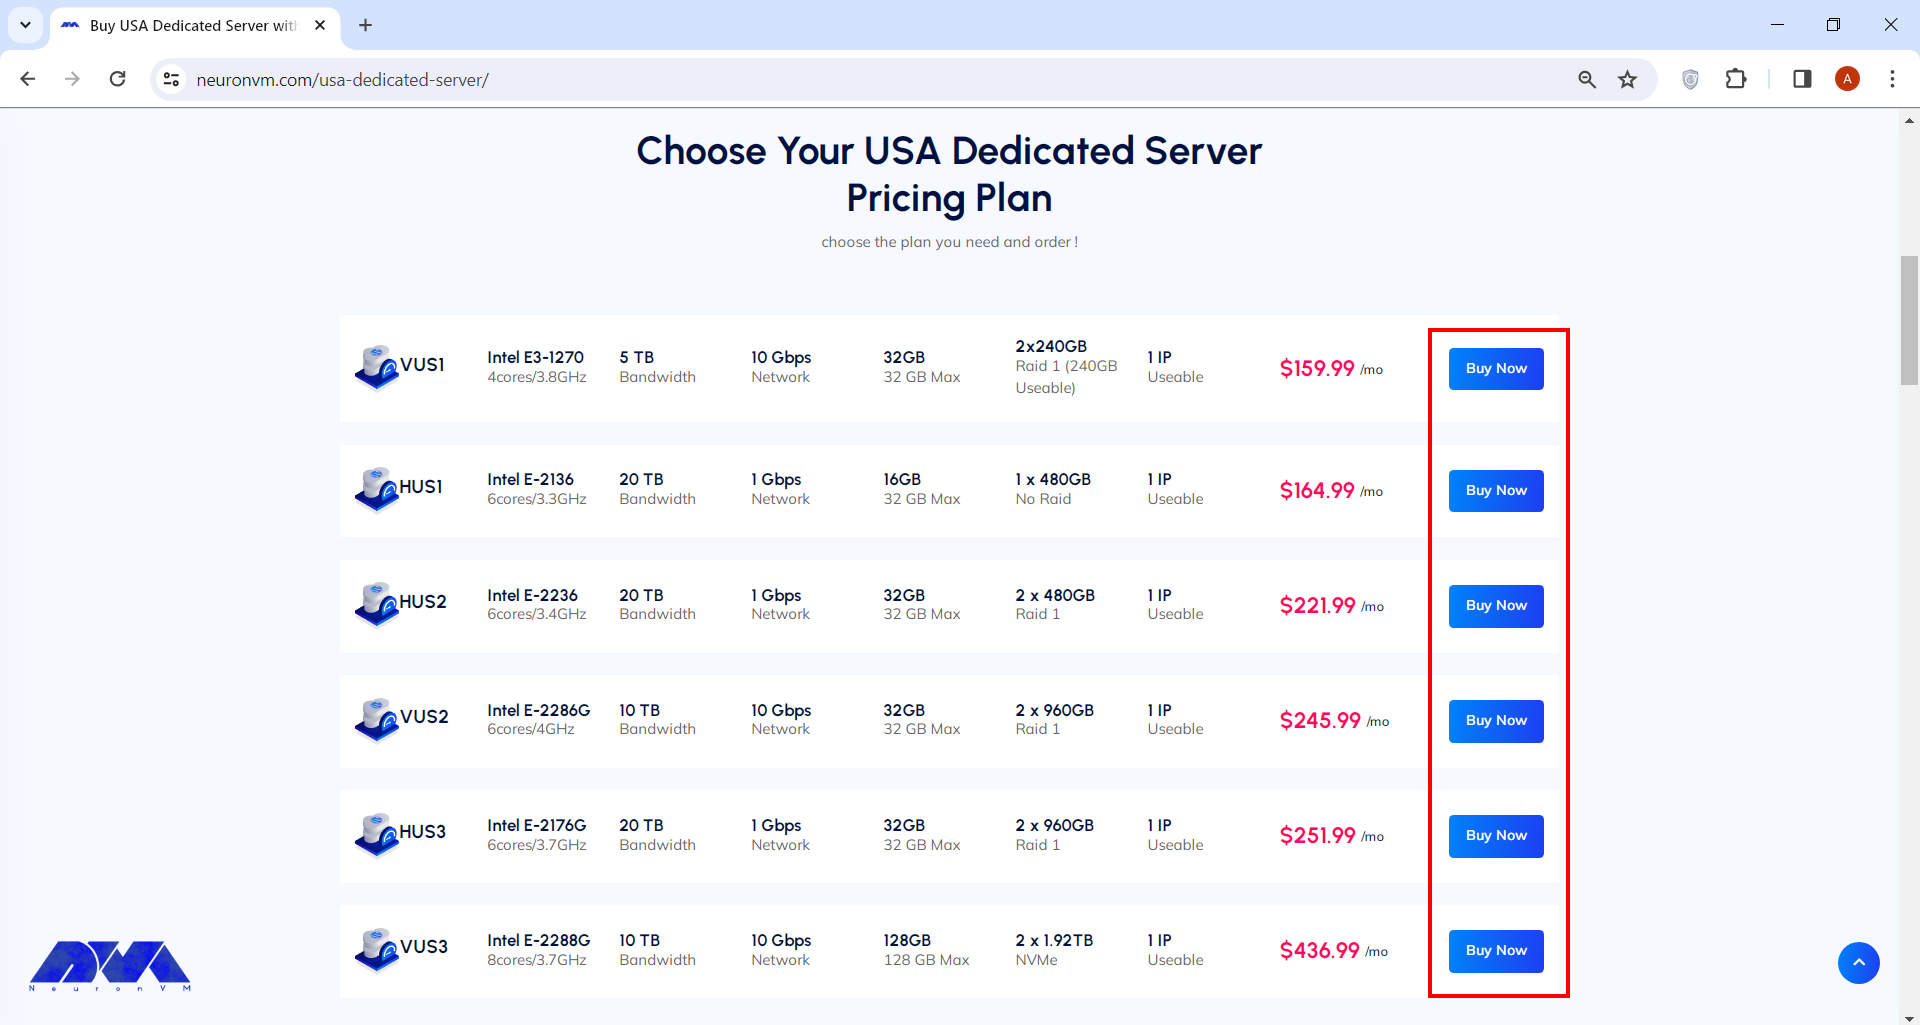
You can choose your preferred plan on this page. After that, you can simply click on Buy Now and proceed.
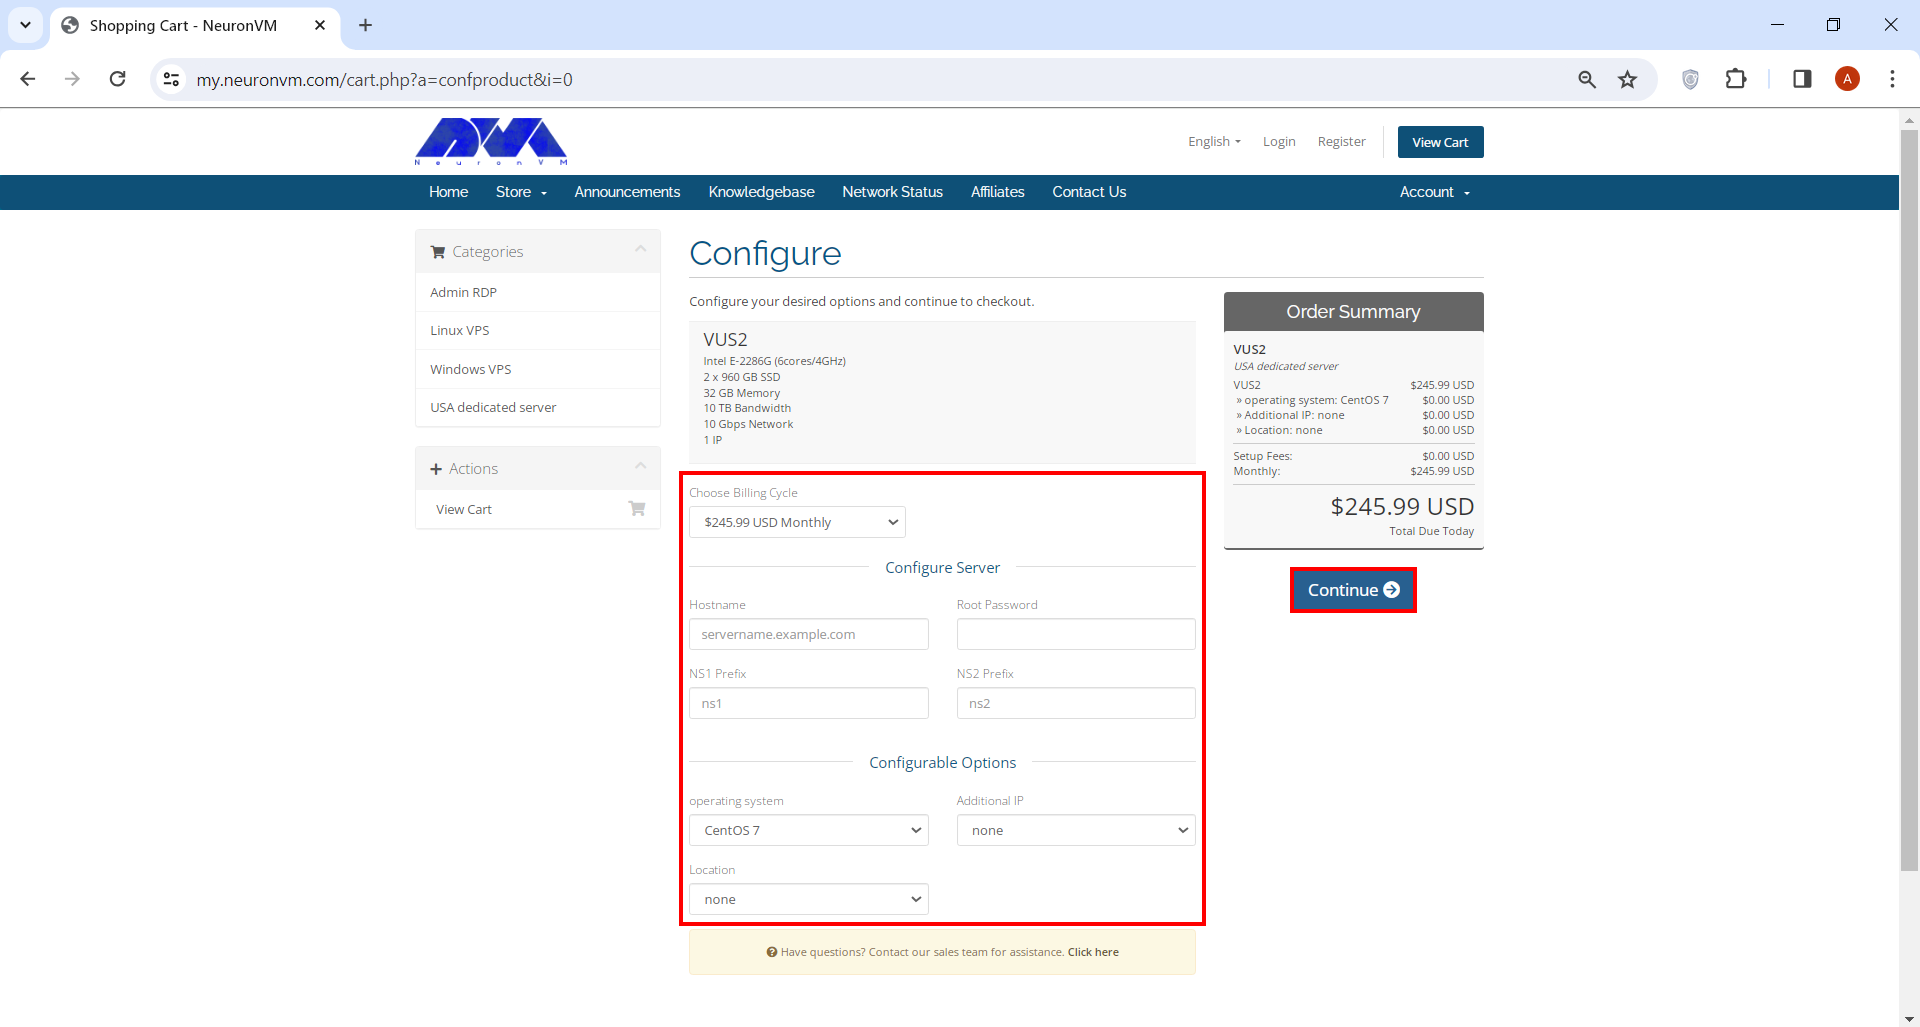
You’ll be directed to our shopping card webpage where you have to fill a few forms before you can proceed. You can also change options like operating system, billing cycle and location on this page.
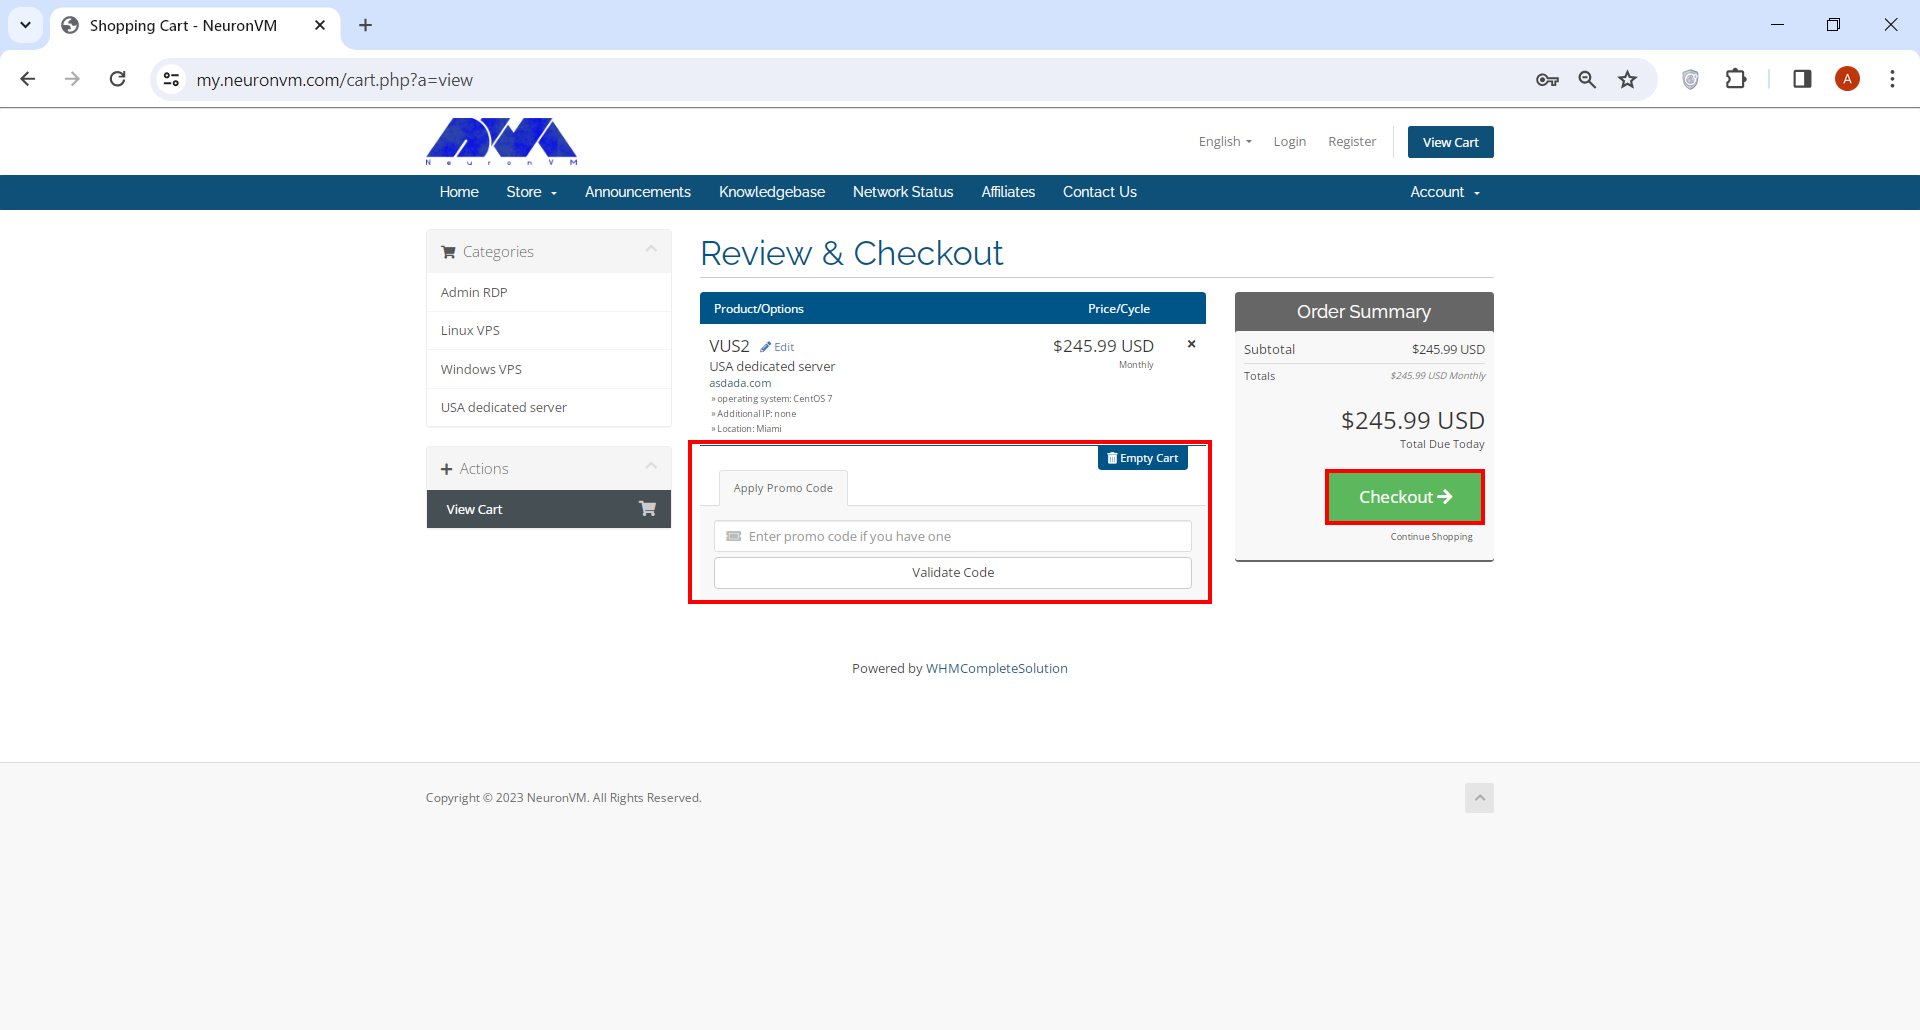
Review & Checkout page is where you can enter your promo code if you have any. Click on the Checkout button when you’re done.
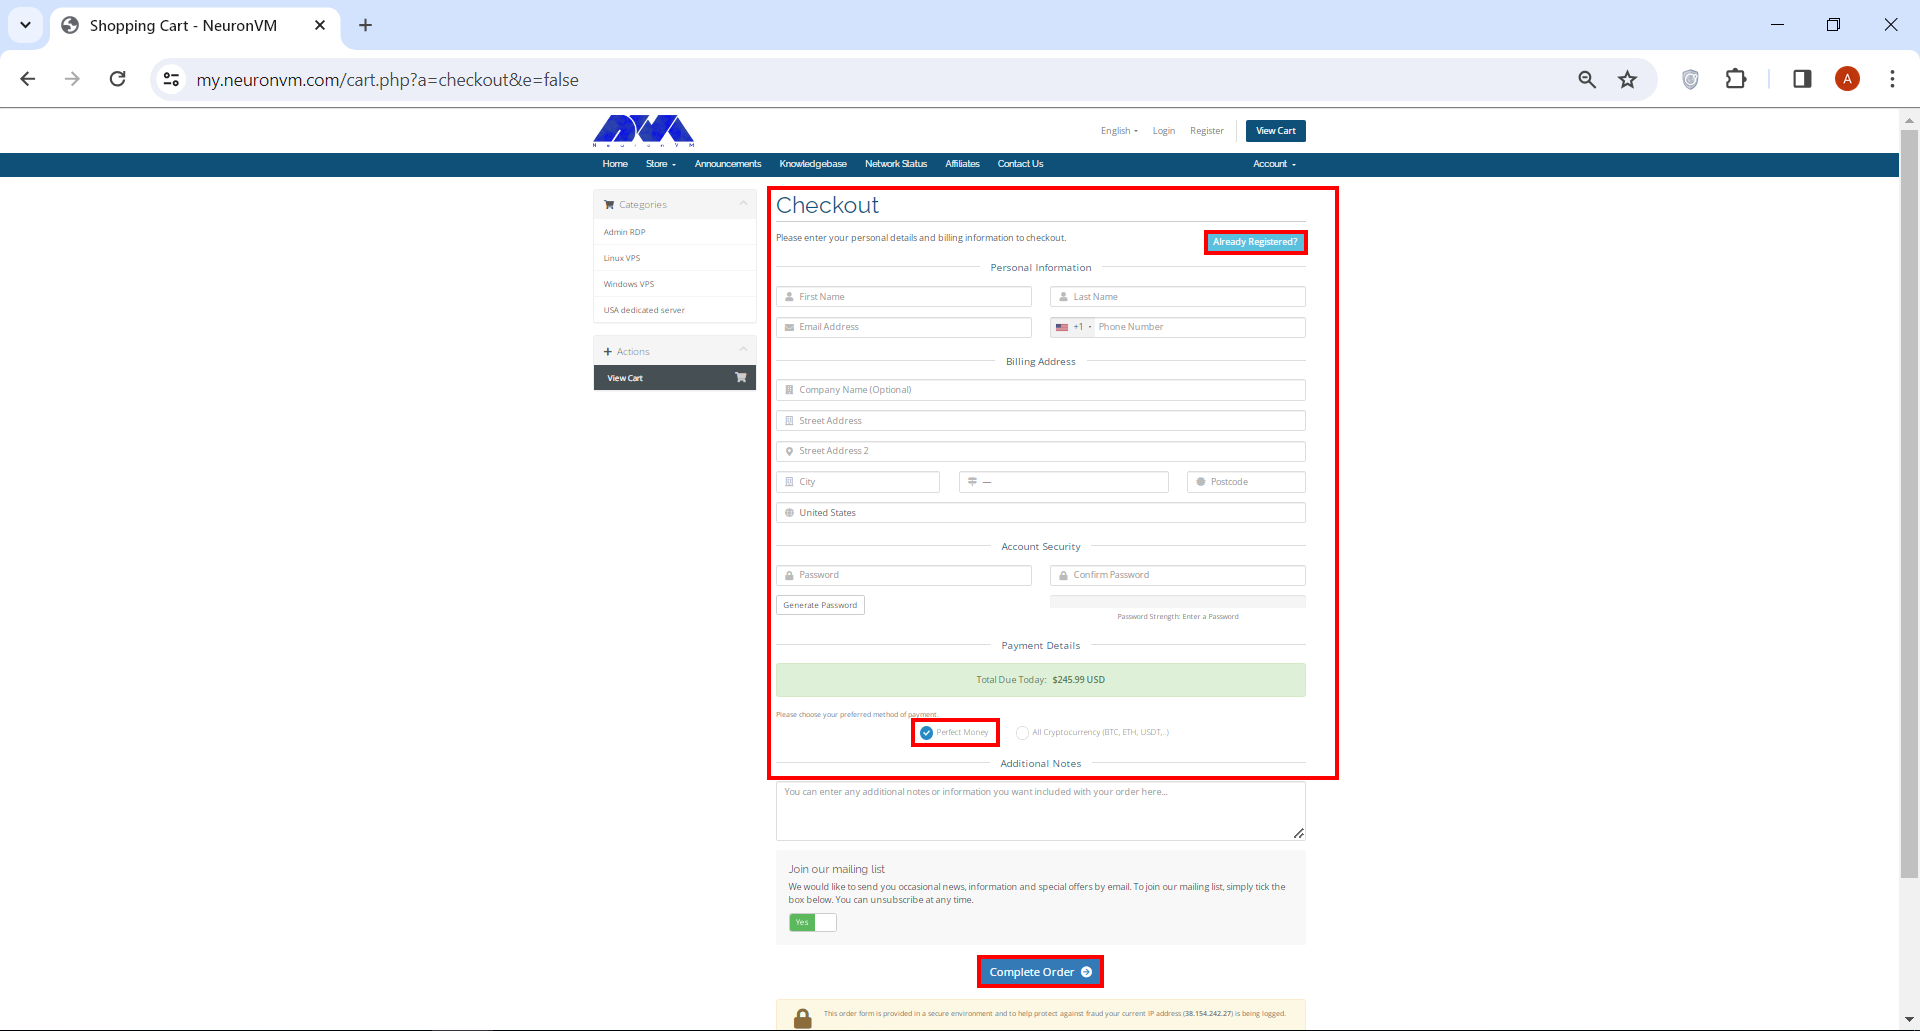
On Checkout page you have to enter a number of personal information. If you’ve signed up before, simply click on Already Registered button. At the bottom of the page, under Payment Details section, check Perfect Money box and finally click on Complete Order.
That’s it! Now you can purchase the dedicated server of your choice with Perfect Money. Remember we have a dedicated support team on NeuronVM who is there for you 24/7, so don’t hesitate to ask any questions you might have in mind.
Conclusion
Investing in a dedicated server with Perfect Money as the payment method offers businesses a secure and hassle-free solution for their hosting needs. By understanding the significance of dedicated servers, identifying reliable providers accepting Perfect Money, and following through with the purchase process, you can confidently establish a robust online presence for your business. Remember, taking the time to research, analyze, and compare different hosting options will ensure you make an informed decision that aligns perfectly with your specific requirements.
If you decide to recover your data through Jetbackup, which has become very popular, and your control panel is DirectAdmin, you have come to the right place. Our article aims to introduce you to Jetbackup and how to configure and use it in DirectAdmin. Not long ago, DirectAdmin put this solution on its platform, but note that the interface is entirely different from Cpanel. Keep studying to figure out more about this issue.
What is JetBackup?
JetBackup is a commercial backup and recovery solution primarily designed for web hosting providers and server administrators. It is often used in the context of web hosting control panels, such as cPanel, Plesk, and DirectAdmin, to automate and simplify the backup and restore processes for websites, databases, and server configurations.
JetBackup is a popular choice for web hosting companies and server administrators looking to provide reliable backup services to their clients and ensure data recovery in case of hardware failures, data corruption, or other issues. It helps protect websites, databases, and server configurations, making it a valuable tool in the web hosting industry. Note that you can also purchase our up-to-date and practical Linux VPSservices to use this powerful recovery solution on DirectAdmin.
What are the Features of JetBackup on DirectAdmin?
There are many features related to Jetbackup in DirectAdmin that we mention in this section:
Cron Jobs: The possibility of backing up and restoring Cron Jobs in DirectAdmin.
Home Dir: For Backing up and restoring files and folders (location of website source code)
Certificates: To backup and recover SSL
Email option: To backup and restore email accounts
FTP: For backing up and restoring FTP accounts
DB: To backup website database
DB user: Backup database users
How to Run JetBackup on DirectAdmin?
JetBackup is a popular backup solution for cPanel, DirectAdmin, and other web hosting control panels. To install JetBackup on DirectAdmin, you’ll need to follow a few steps. The installation steps may vary slightly based on the version of DirectAdmin and JetBackup you’re using, so always refer to the official documentation for the most up-to-date instructions. Here are the general steps to run JetBackup on DirectAdmin:
Download JetBackup
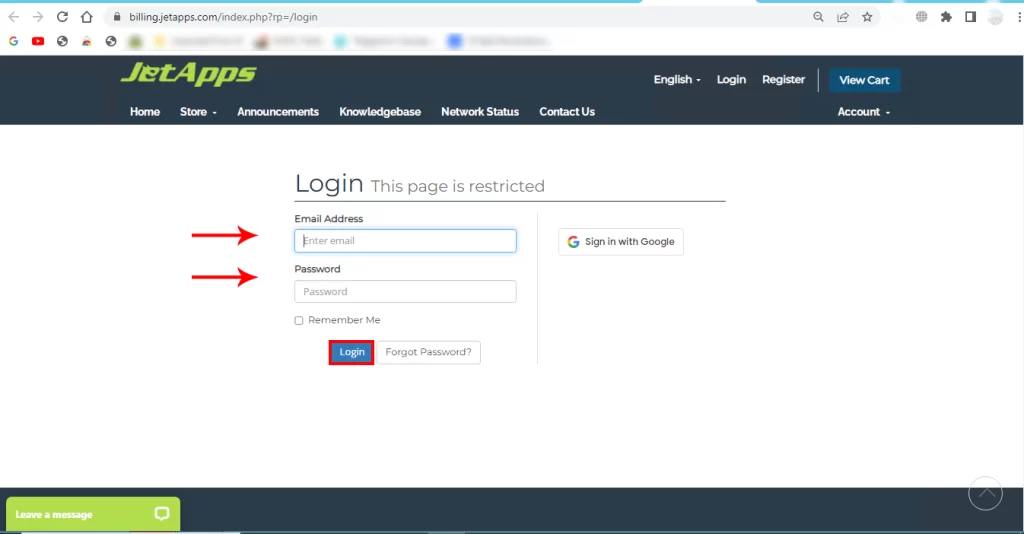
The first step is to visit the JetBackup website and log in to your JetBackup account. Download the DirectAdmin version of JetBackup:
Tip: Make sure you have root or administrator access to your DirectAdmin server.
Run JetBackup Solution on DirectAdmin
Enter your DirectAdmin, and search for the JetBackup icon to restore your account, then open it. It will look like this:
You will encounter a new window. So, click on the Full Backups icon:
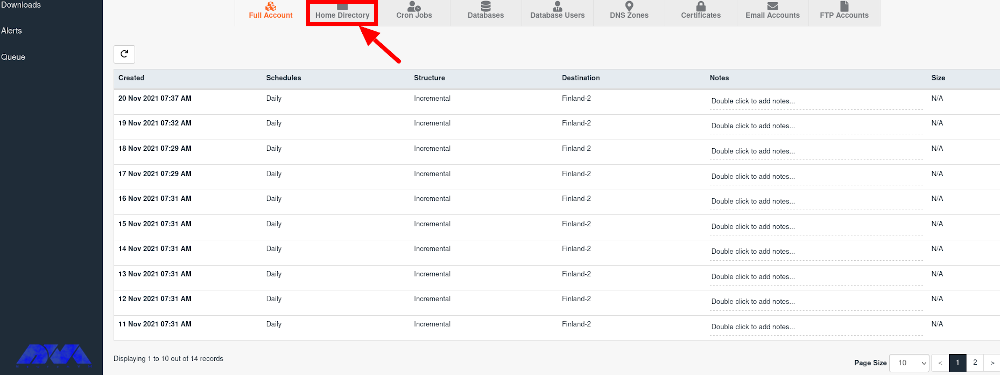
You should enter your username and choose View Backups. Now, In the Created column, select the backup you want to restore from the drop-down menu and click the Show Advanced Settings button.
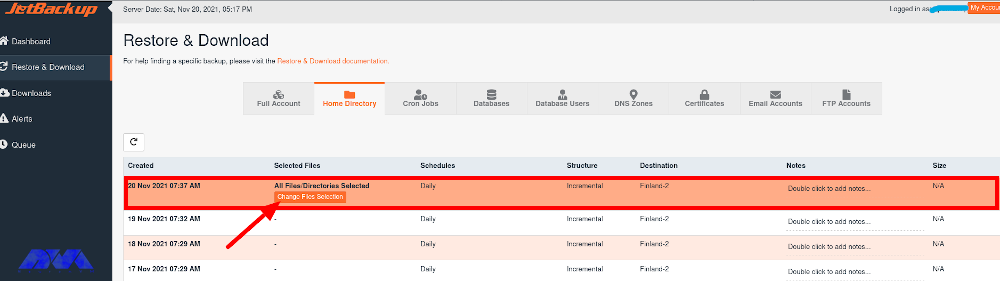
The first action will be referring to the Home Directory tab and clicking on the Change Files Selection button in the Select Files column:
***
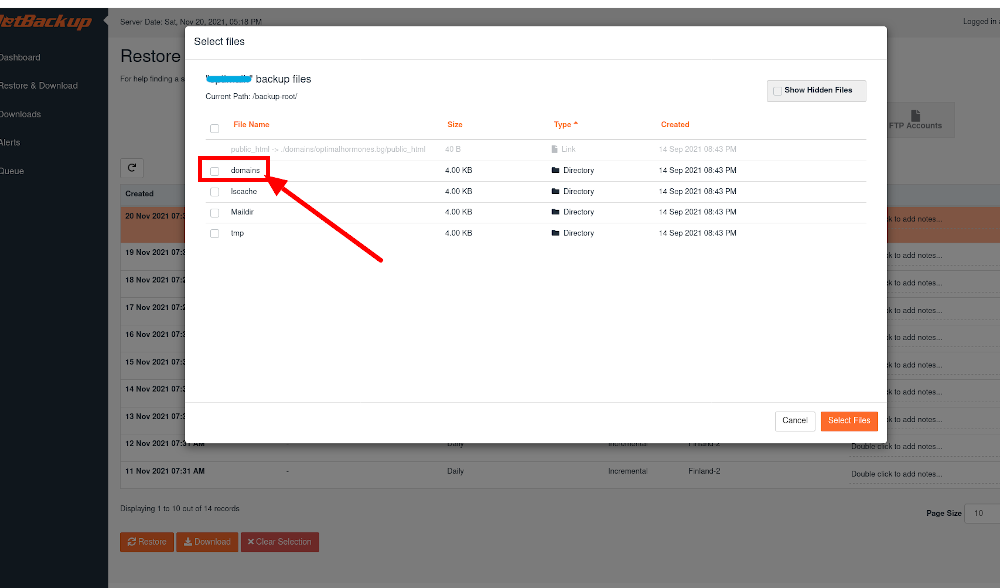
Now you have to go to the domains and choose the domain you want to restore from there.
Then, check the public_html directory. Meanwhile, to restore a specific folder or file, open the public_html option and select the desired items. If you also want to restore files like .htaccess, you must activate the Show Hidden Files check box:
To confirm the changes you should click on the Select Files tab:
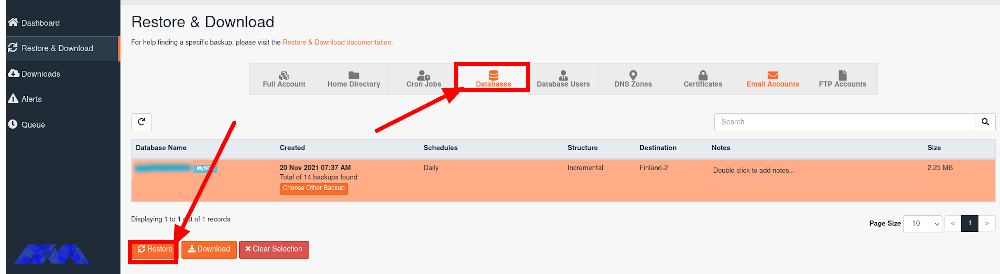
The next step is going to the DB tab, locating and marking the database name that corresponds to the website. The database name refers to whose data you wish to recover. Press the Restore button:
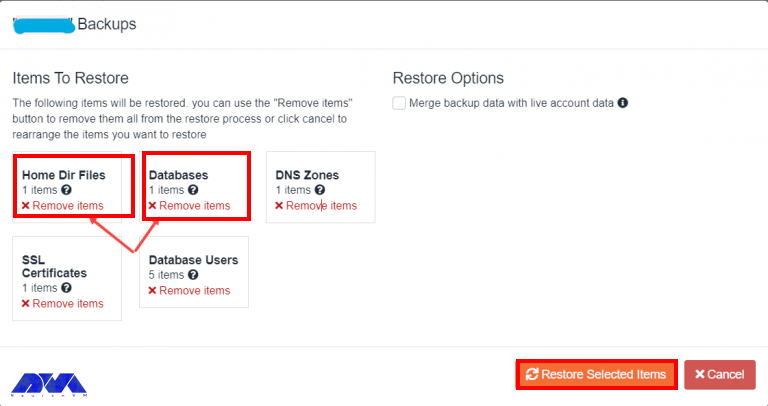
The most important components you have to keep, The only components you will need to keep, are Home Dir Files as well as Databases. You can remove the other files by the Remove Items button.
If you want to confirm the recovery, you should press the Restore Selected items tab:
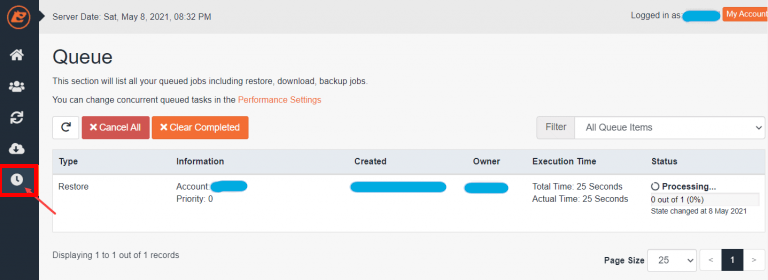
If you want to keep track of the restoration of the backup, open the Queue tab. the amount of time for this process depends on the amount of the data you need to record:
When you finish the final process, you will see a message like this:
Tip: It’s essential to test the backup and restore functionality to ensure everything is working correctly.
Troubleshooting JetBackup Solution on DirectAdmin
While JetBackup offers many features and benefits, there can still be issues that users might encounter. Here are some common problems with JetBackup on DirectAdmin and potential solutions:
1- Backups may fail for various reasons, including insufficient disk space, permission issues, or corrupted data.
Solution:
Ensure you have enough free disk space for backups.
Check file and directory permissions to make sure JetBackup can access and write to the necessary locations.
Validate the data integrity on your server to ensure there are no corrupted files causing backup failures.
2- JetBackup can put a significant load on your server, leading to performance issues.
Solution:
Schedule backups during non-peak hours to minimize the impact on server performance.
Optimize your server’s resources, such as CPU, RAM, and disk speed, to handle the backup process more efficiently.
3- Restoring backups may fail due to various reasons, such as data corruption or incorrect settings.
Solution:
Verify the integrity of the backup files before attempting to restore them.
Double-check your restoration settings to ensure they are correct and compatible with your server environment.
Conclusion
Remember that working with server software like JetBackup requires a good understanding of server administration, and it’s essential to take regular backups of your server before making any significant changes. We hope this tutorial was useful for you. If you have any questions please leave a comment.
We have discussed RDP servers in detail in our previous articles. RDP is a remote desktop protocol. This technology has enabled users to access and control other devices remotely through the Internet. People with different jobs can use this platform and access files, run programs, or manage servers. In this section, we will examine the benefits of buying RDP for your business.
An Introduction RDP Servers
RDP servers are software applications or services running on a computer that enables remote access to that computer’s desktop and resources. Besides, it is a valuable tool for remote administration, technical support, and remote work scenarios, but you should configure and use it with security in mind to protect the remote computer and its data from unauthorized access.
If you want to have a better understanding of Admin RDP, it is like mouse movements and user keystrokes are transmitted to other people’s systems remotely, but this work is done by the Internet instead of radio waves. Then, you will see the user’s desktop screen on the main computer.
What Are the Benefits of Buying RDP Servers?
Using Admin RDP Server in a business environment can offer several significant benefits:
– Cost Savings
– Enhanced Security
– Centralized Data
– Disaster Recovery
– Scalability
– Remote Access
– Easy Collaboration
– Support and Maintenance
– Improved Productivity
– Client Compatibility
Now, let’s analyze each of these factors separately.
Buying RDP Can Save Money
Businesses can save money on hardware and maintenance costs by centralizing resources on a server and providing remote access via RDP. This reduces the need for expensive workstations or laptops and can extend the lifespan of existing hardware.
Using Remote Desktop Protocol servers can potentially lead to cost savings in certain scenarios. It can reduce hardware costs, Centralized RDP servers are typically more power-efficient than individual PCs or workstations. This can lead to significant savings on electricity bills, and managing and maintaining a central RDP server environment can be more cost-effective than maintaining multiple individual workstations.
Lastly, You can implement robust security measures at the server level and ensure that data is regularly backed up, reducing the risk of data loss and associated recovery costs.
RDP Can Help to Secure Your Connection
Remote Desktop Protocol (RDP) can help secure your connection when used properly, but it can also pose security risks if not configured and managed correctly. This protocol is a proprietary protocol developed by Microsoft that allows users to connect to and control a remote computer over a network. RDP typically offers robust security features. These features include encryption and multi-factor authentication, to protect data during remote connections. In addition, centralizing resources on a server allows for better control over security policies and access permissions.
Here are some ways RDP can help secure your connection, along with considerations for maintaining security like using strong encryption to protect the data transmitted between the local and remote computers, authentication before granting access to a remote computer, having an additional layer of security that ensures the user is authenticated before a remote desktop session is established, or configure your firewall to allow RDP traffic only from trusted IP addresses or networks. Also, You can enforce strong password policies for RDP accounts to prevent brute-force attacks.
The Effect of Centralized Data in RDP Servers
Centralized data in RDP servers can have several advantages and considerations. RDP is a proprietary protocol developed by Microsoft that allows users to connect to a remote computer over a network connection. Centralized data refers to the practice of storing and managing data on a central server rather than on individual client devices.
Storing data and applications on a central server through RDP ensures that all users have access to the latest files and software versions. This reduces data silos and version control issues.
Disaster Recovery Plan on RDP Servers
Creating a Disaster Recovery Plan (DRP) for Remote Desktop Protocol servers is crucial to ensure business continuity in the event of unexpected disasters or disruptions. RDP servers are often critical components of an organization’s infrastructure, and any downtime can lead to significant financial and operational losses.
RDP can be part of a disaster recovery plan. In the event of a hardware failure or other disaster, employees can quickly access their work environment from an alternate location, minimizing downtime.
Remember that a well-structured Disaster Recovery Plan is a dynamic document that should evolve with your organization’s needs and the changing threat landscape. Regularly test, update, and improve your plan to ensure that it remains effective in protecting your RDP servers and the critical data they contain.
Scalability Option on RDP Servers
RDP can easily scale to accommodate growing business needs. Adding new users or expanding server resources can be done relatively quickly and without significant disruption. Scalability options for Remote Desktop Protocol (RDP) involve strategies and configurations to ensure that your RDP server infrastructure can efficiently handle an increasing number of remote desktop users.
Some scalability options for RDP are listed here: Load balancing, creating Terminal Services Farms, virtualization technologies like VMware, resource allocation, network configuration, and security consideration in a way that Implement Quality of Service (QoS) policies to prioritize RDP traffic and ensure a smooth user experience, especially when bandwidth is limited.
The choice of scalability option depends on your organization’s specific requirements, budget, and existing infrastructure. It’s essential to balance performance, scalability, and security when implementing RDP scalability solutions to ensure a seamless remote desktop experience for your users while maintaining the integrity of your network and data.
Buy RDP for full Remote Access
RDP enables employees to access their work computers or servers from anywhere using an internet connection. This is especially valuable in today’s increasingly mobile and remote work environments, as it allows for flexibility in work locations. The primary purpose of Full Remote Access Using RDP is to allow individuals or administrators to manage and use a computer located in a different physical location.
This is incredibly useful for scenarios such as IT support, remote work, server management, or accessing a home computer while traveling. For security reasons, it’s crucial to use strong, unique passwords for RDP access.
Note that before you can use RDP, you need to enable it on the target (remote) computer. This is typically done by going into the computer’s settings and allowing it to accept remote connections.
The Possibility of Easy Collaboration With Buying RDP
Nowadays, remote work has become a common thing and companies are looking for remote technologies with increasing advancements and expansion across borders. However, this process is associated with various challenges. RDP servers are powerful tools that can help improve teamwork in an environment and control activities remotely.
In this way, team members can access similar files and programs from all over the world. These members can collaborate and share their ideas in real-time on a project regardless of location or distance. Also, buying RDP provides a secure environment for members. You can access various files and programs without worrying about data breaches.
In summary, collaboration with RDP enables multiple users to work together on a remote computer or server, and share resources. It’s a versatile technology widely used for remote work, technical support, and collaborative tasks where remote access and control are essential.
Support and Maintenance in RDP Services
Support and maintenance in Remote Desktop Protocol (RDP) services refer to the ongoing activities and services provided. So you can be sure of the smooth functioning, security, and availability of RDP-based remote desktop solutions. As you know, RDP is a protocol developed by Microsoft that allows users to connect to and control remote computers over a network.
IT teams can more easily support and maintain remote servers and workstations through RDP. Software updates, troubleshooting, and system maintenance can be performed remotely, reducing the need for on-site visits.
Technical support involves offering assistance to end-users and IT personnel who use RDP services. It includes addressing user issues, troubleshooting problems, and providing guidance on how to use RDP effectively. Technical support can be provided through various channels like email, phone, or live chat.
Support and maintenance in RDP services are critical for ensuring that remote desktop solutions remain secure, reliable, and efficient. These activities help organizations provide remote access to resources while minimizing downtime and addressing any issues that may arise.
How Does Buying RDP Improve Productivity?
One of the characteristics of a good remote desktop tool is that it increases productivity by adding advantages such as flexibility, improving access to important data, and adding efficiency. You can also automate important tasks such as connecting devices and editing meetings, as well as speed up work monitoring and increase productivity.
RDP can boost productivity by eliminating the need for employees to be physically present in the office. It enables employees to work from home, travel, or any location with internet access. They can reduce commute times and improve work-life balance.
The Impact of Client Compatibility on RDP Servers
Client compatibility in a Remote Desktop Protocol (RDP) server refers to the ability of different RDP clients to connect and work effectively with a specific RDP server. RDP is a proprietary protocol developed by Microsoft for remote desktop access and management of Windows-based systems.
A wide range of devices and operating systems support RDP, making it accessible to users with various hardware and software preferences. Ensuring client compatibility is crucial for a smooth and secure remote desktop experience.
Different versions of Windows and other operating systems come with their own RDP client implementations. Compatibility can be affected by the specific version of the RDP client running on the user’s device and the version supported by the RDP server. For example, Windows 10 includes an RDP client that is compatible with Windows Server 2016 and other versions.
To ensure client compatibility in an RDP server environment, it’s important to carefully assess the specific client requirements, server capabilities, and network configurations. Regularly updating and maintaining both clients and servers can help mitigate compatibility issues and enhance the overall remote desktop experience.
What Are The Best Practices When Buying RDP?
When buying RDP for remote access, it’s crucial to follow best practices. This way you can ensure the security and reliability of your connections. Here are some key best practices for using RDP:
– Implement multi-factor authentication (MFA) whenever possible to add an extra layer of security.
– Ensure that both the RDP client and server software are regularly updated with the latest security patches and updates.
– Implement the principle of least privilege (PoLP) to restrict access to only the resources necessary for the user’s tasks.
– Implement network-level security measures such as intrusion detection/prevention systems (IDS/IPS) to monitor and block suspicious traffic.
– Configure RDP to limit the number of concurrent sessions to prevent abuse and resource exhaustion.
– Keep both the client and server endpoints secure by using up-to-date antivirus software and regularly patching operating systems and applications.
– NLA requires users to authenticate before establishing an RDP session, adding an additional layer of security.
– Configure RDP to automatically disconnect idle sessions to reduce the risk of unauthorized access.
– For security reasons, consider disabling the clipboard and drive redirection in RDP sessions to prevent data leakage.
– Periodically review and update your RDP access policies to adapt to evolving security threats and business requirements.
– Implement regular data backups and disaster recovery plans to ensure business continuity in case of a security incident.
Other Alternative Programs for RDP
As we covered in this article, RDP is a popular choice for remote desktop access to Windows systems, there are alternatives available for cross-platform use, such as:
Virtual Network Computing (VNC)
TeamViewer,
AnyDesk
SSH for command-line access to Unix/Linux systems.
Conclusion
While RDP offers many benefits, it’s essential to implement it securely to reduce potential risks such as unauthorized access or data breaches. RDP server includes using strong authentication methods, keeping software up-to-date, and following best practices for network security. With the information mentioned above, we conclude that if you want to have access to all users in your business and control or monitor them, using RDP services will be a wise action.
Migrating from cPanel to CWP can be a seamless process if you follow the right steps. cPanel, a popular control panel for managing web hosting environments, has a free alternative called CWP that offers similar functionality. Whether you’re switching hosting providers or seeking a change, this guide will walk you through the steps to migrate your website from cPanel to CWP successfully. By following these instructions, you can ensure a smooth transition and minimize any downtime or disruption to your website and email services. You can simply get a VPS and start your journey from cPanel to CWP.
What is a Web Hosting Control Panel?
A web hosting control panel is an interface that allows website owners to manage various aspects of their hosting account. It provides a centralized platform to control and configure different settings, such as managing domains, email accounts, databases, FTP accounts, and more. Essentially, it acts as a control panel for your web hosting services.
Using a web hosting control panel has several benefits. First, it simplifies the management of your hosting account, even for beginners. Second, instead of manually configuring each aspect of your hosting account, you can easily make changes and updates through the control panel, which saves you a lot of time. Additionally, some popular control panels like cPanel and CWP offer additional functionalities like automated backups, website builders, and one-click installations, making it easier to set up and maintain your website.
Some website owners might decide to change the control panel to the one that suits them better. CWP and cPanel are two of the most common control panels out there. In the next section, we’re gonna talk about the key differences between these two.
CWP and cPanel Key Differences
cPanel and CWP (CentOS Web Panel) are both popular web hosting control panels that provide users with an interface to manage their websites and server settings. While they are similar in many aspects, there are some key differences you need to know about.
One major difference is the operating system they are built on. cPanel is primarily designed for Linux-based servers, while CWP is specifically built for the CentOS operating system. This means that if you are using a different Linux distribution, cPanel may be a better choice for compatibility.
Another difference lies in their pricing models. cPanel is a commercial control panel that requires a paid license, which can be quite expensive for small-scale users. On the other hand, CWP is an open-source control panel that is available for free. This makes CWP a more cost-effective option, especially for those on a tight budget. So, if you are using CentOS as your server operating system and looking for a free control panel, CWP can be a great choice.
The rest of the article will focus on the process of migrating from cPanel to CWP.
Migrate from cPanel to CWP.
There are two methods for Migrating from cPanel to CWP, and each method requires a few steps. We have covered both methods in this article. The first one is the manual ways, in which you’ll read the complete guide on how to do it.
First Method
In the first step, you have to set up a new server with CentOS 7 and install CWP. Ensure that the server meets the system requirements for this control panel.
Take a backup of the cPanel account. Log in to your cPanel account on the old server. Then, navigate to the Backup section and click on Download a Full Website Backup.
Next, you will see this window. Select Secure Copy (SCP) and click on Generate Backup.
Choose a destination and click on Generate Backup. Wait until the backup process is complete and download the backup file to your local computer.
Transfer the backup to the new server. Connect to the new server via FTP or any other file transfer method and upload the backup file to a directory on the new server. Restore the backup in CWP.
Log in to CWP on the new server. Navigate to the File Manager section and then select Advanced File Manager.
You will see a list of folders. Click on the “home” folder.
You can see the Upload option on the top bar on this page. Click on that and upload your backup file there.
Navigate to the User Accounts section on the left side menu, then select cPanel Account Restore.
In the drop-down menus under Account Import, choose the backup file name. If the file name is not visible, it indicates that you did not save it under the /home directory. Follow the instructions mentioned earlier to upload the backup file to the /home directory.
Go through this step as the picture shown below and click the Import button:
That’s it! Here’s one way to migrate from cPanel to CWP. Now it’s time to learn about the second method which is a relatively easier way to do it.
Second Method
Log in to your CWP control panel using your credentials.
On the left-hand menu, locate and click on the “cPanel” option.
From the expanded menu, select “cPanel to CWP Migration.”
In the migration interface, you will see several input fields to fill in the cPanel server details. These fields include:
– Server IP: Enter the IP address of your cPanel server.
– Username: Provide the cPanel username associated with the account you want to migrate.
– Password: Enter the cPanel account password.
– API Key: This is an optional field. If you have an API key for your cPanel server, you can enter it here.
Once you have filled in the required information, click on the “Test & Save” button to initiate the connection and verify the details provided.
By following these steps, you can easily migrate your website from cPanel to CWP using the built-in migration feature, simplifying the process and saving time and effort.
Conclusion
Migrating from cPanel to CWP (CentOS Web Panel) can be a smooth and efficient process with proper planning and execution. By following the step-by-step instructions and utilizing the available tools and resources, users can successfully transfer their websites, email accounts, databases, and other essential data from cPanel to CWP. While the migration process may require some technical knowledge and experience, the benefits of switching to CWP, such as cost savings, improved performance, and increased control, make it a worthwhile endeavor for many users.
Here at NeuronVM, we offer Linux VPS servers with the OS of your choice. We also have an article addressing how you caninstall CWP on CentOS 8, which might come in handy.