If you work in the fields of data science and machine learning, you have heard the Anaconda distribution. The most important languages in the field of data science are Python and R, and Python is the leader in machine learning. You know Python is at the top with a variety of powerful packages, Anaconda released an open-source package called Anaconda in 2012, which was well-received by researchers and developers for the three major operating systems Windows, Linux, and Mac. This article will teach you How to Install Anaconda on RDP 2019.
What is Anaconda?
Anaconda is a free data science platform. Anaconda includes Python and R distributors and a packaging manager named Conda. This platform provides a collection of pre-installed libraries and packages. Some of them are NumPy, SciPy, Pandas, Scikit Learn, nltk, and client. Anaconda Enterprise is Anaconda’s commercial product. This program allows business organizations to develop scalable and secure applications.
Important Features of Anaconda
These are the significant features of Anaconda data science:
Anaconda Navigator: This feature is a simple user interface and helps you to directly access various tools like VS code, Spyder, etc. by clicking the launch button. You can use the environment tab in the left panel to maintain the environment and packages.
Anaconda Repository: Anaconda repository is one of its obvious advantages in that it works like a closed marketplace where there is a possibility of free access to installers, tools, and packages. These repositories offer more than 100 installers and 8000 packages for data science, according to official statistics.
Conda: Anaconda’s command-line utility is called Conda. This tool helps you control Anaconda and Python packages through CLI.
How to Install Anaconda on RDP 2019
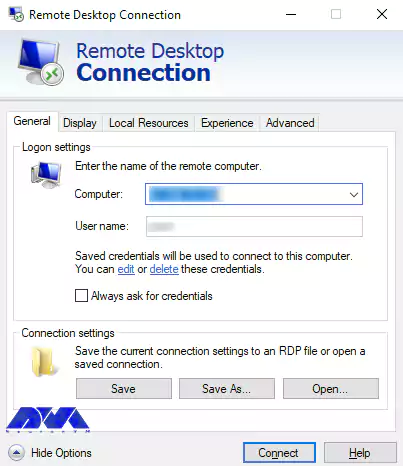
In the first step, you need to type the phrase Remote Desktop from the search section of your Admin RDP Start menu and run it.
Then you have to enter the IP and password you want to enter the RDP environment.
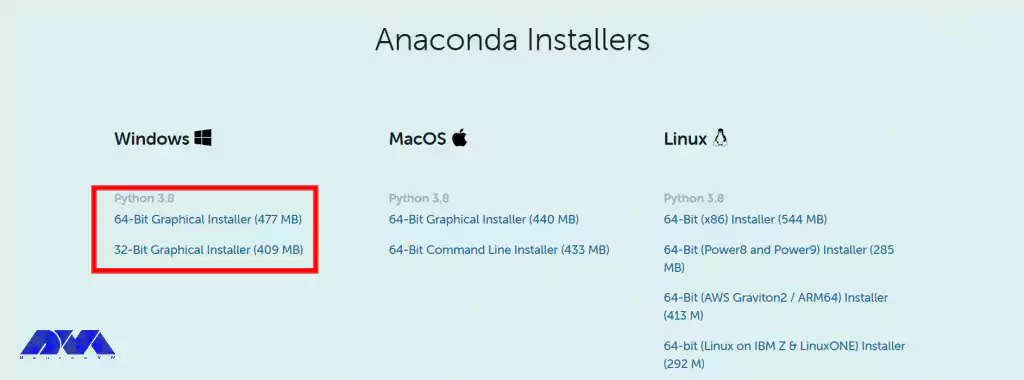
Once you have entered the RDP environment, you should now open one of your favorite browsers. Then you must first download the Anaconda Installer.
Be sure to download the Windows file on the appropriate site.
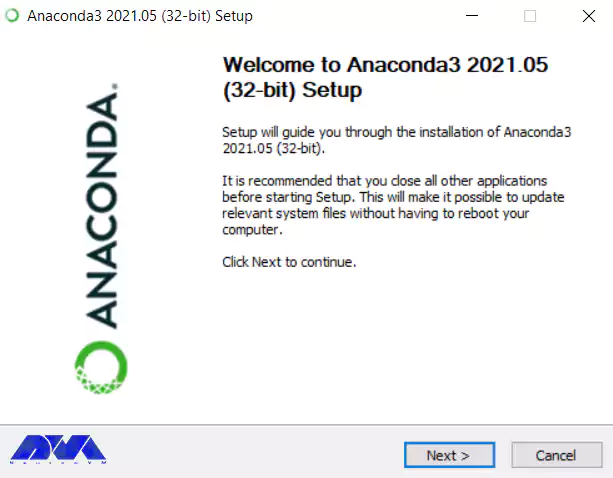
Then go to the folder where the file was downloaded and double-click on the installer.
It is better to disable antivirus software when installing and re-enable it after installation. Also, to prevent possible problems, install the software only for your user.
In this step, just click Next to start the installation progress.
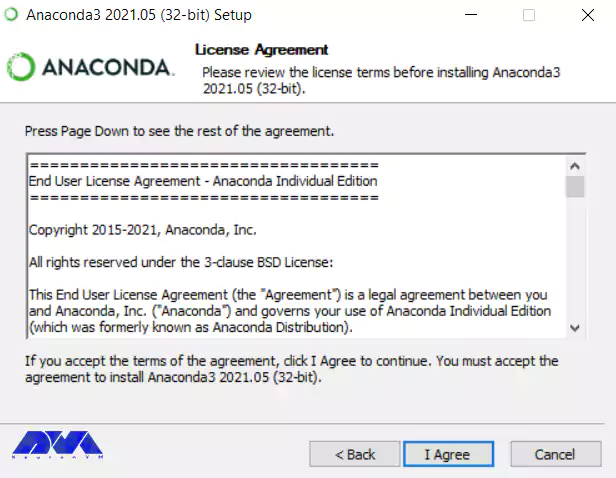
Now after reading the licensing terms, click on “I Agree”.
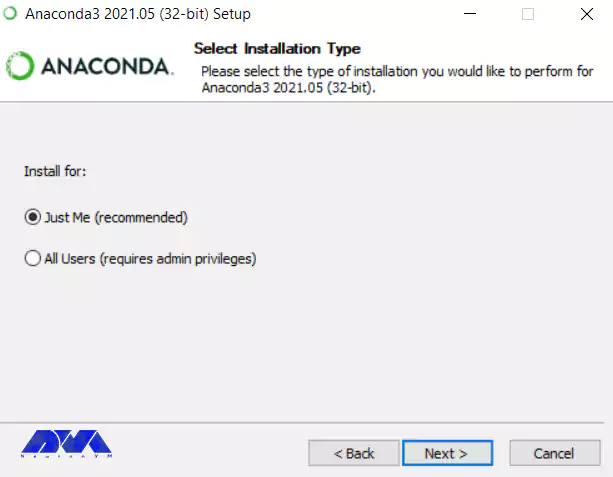
On the Select Installation Type page, select “Just Me” and click Next again.
Note that if you are installing the software for all users, you should not select “Just Me”. In this case, you need the privileges of Windows Administrator.
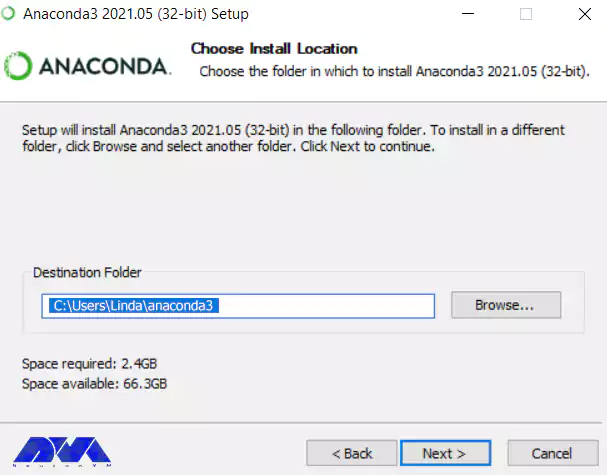
Now on the following page, click on “Browse” to select the destination folder to install Anaconda and then click Next.
Note that if you do not need administrator permissions, do not install the software as an administrator.
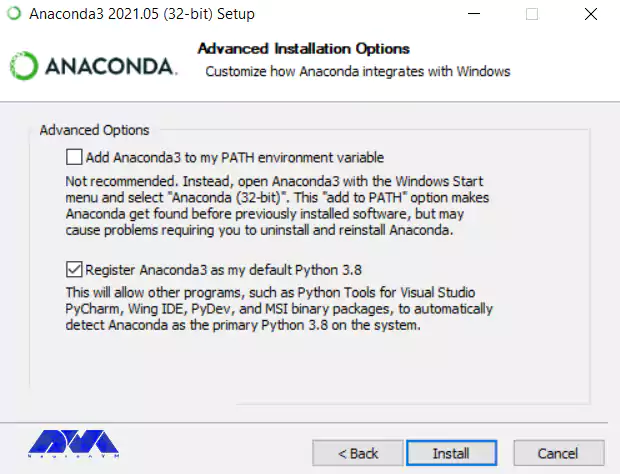
In this step, On the following page, if you choose to Add Anaconda to the PATH environment variable, it may interfere with other software. You can open Anaconda Prompt or Anaconda Navigator from the start menu and use it.
If you want to install and run multiple versions of Anaconda or multiple versions of Python, select Anaconda as your default Python and check the box. Finally, click on Install. To view the packages that Anaconda is installing, you have to click on Show Details.
Click Next again.
In this step, if you want to install PyCharm for Anaconda, click on the link on the page. If you do not want to install PyCharm, click Next.
Now you have to wait a while for the Anaconda installation to finish.
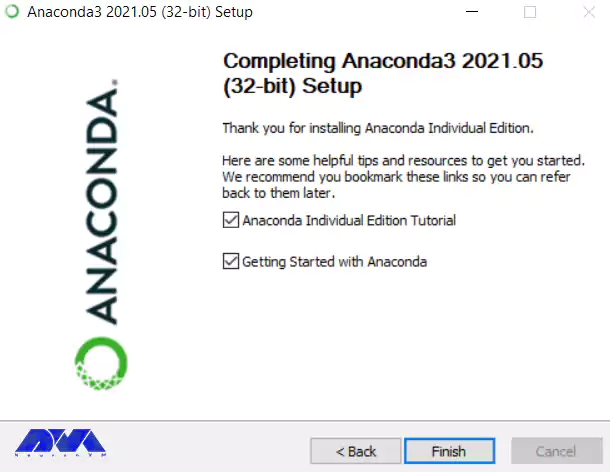
Check the “Anaconda Individual Edition Tutorial” and “Learn more about Anaconda” boxes on the following page if you want to know how to get started with Anaconda. Eventually, click Finish.
How to Run Anaconda on RDP 2019
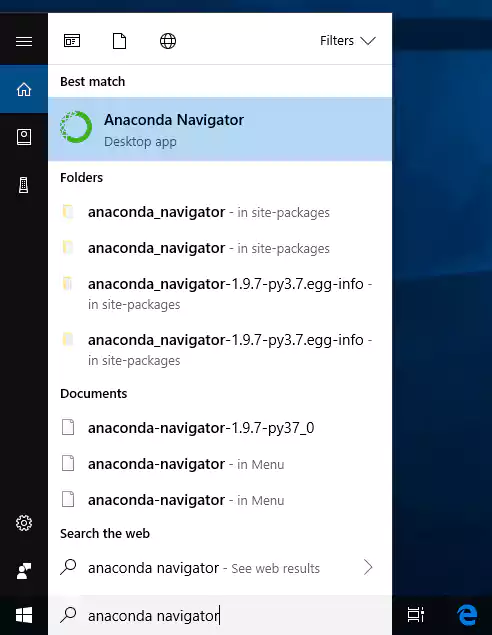
After you were able to install Anaconda according to the tutorial we gave in the previous section, now we want to teach you how to run it on RDP 2019. To do this, simply type and run the phrase anaconda navigator in the search menu of the Start menu.
In the image below you can see the Anaconda management dashboard.
Conclusion
We tried to teach you how to install Anaconda on RDP 2019. A comprehensive guide was introduced at the beginning of this article. You can easily install Anaconda for your Windows RDP by following this step-by-step tutorial. Now you can implement what we have discussed in this project. You can always refer to the official documentation page of Anaconda for the most up-to-date information.
Regarding using Remote Desktop Protocol (RDP) for administrative tasks, the importance of having both an antivirus and a firewall cannot be overstated. RDP allows you to remotely access and manage a computer, which introduces specific security risks that need to be addressed. Your organization may require to enable Windows Defender and other Windows security features to ensure that your device is secure. This tutorial will represent the way for activating Windows Defender security and explain some points to show the importance of antivirus and firewall in admin RDP.
A Short Definition of Windows Defender Security
Windows Defender Security, commonly known as Windows Defender, is a built-in antivirus and security software solution developed by Microsoft for the Windows operating system. It is designed to protect users’ computers from various types of malware, including viruses, spyware, ransomware, and other malicious software threats. Windows Defender provides real-time scanning, automatic updates, and a range of security features. This security option helps ensure the safety and privacy of a user’s data and activities while using a Windows-based device like Windows VPS. You can achieve services likeWindows VPS from our site.
What Are Important Features of Windows Defender?
Windows Defender offers a range of important features aimed at providing comprehensive security for Windows-based devices. Some of the key features are as follows:
Windows Defender constantly monitors your system in real-time, scanning files, programs, and downloads as they are accessed.
It offers browser extensions and features that help protect you from phishing websites and malicious downloads while browsing the internet.
Windows Defender integrates with the Windows Firewall to provide network protection. It monitors incoming and outgoing network traffic to identify and block potentially malicious connections
It detects and removes various types of malware, such as viruses, worms, trojans, spyware, adware, and potentially unwanted programs.
Windows Defender integrates with the Windows Security Center, providing a centralized location to manage various security settings and features on your device.
Windows Defender operates with minimal impact on system performance. It uses resource-efficient scanning techniques to avoid slowing down your computer.
Windows Defender includes parental control features. These features allow you to manage and monitor your children’s online activities, ensuring they are safe while using the computer.
Windows Defender SmartScreen helps protect you from phishing attacks and malicious websites by analyzing the URLs you visit and warning you about potential risks.
Windows Defender includes features to safeguard against ransomware attacks, which encrypt your files and demand a ransom for their release.
Windows Defender is regularly updated to stay up-to-date with the latest threats and security measures
How Can We Activate Windows Defender Security?
To activate Windows Defender security on your Microsoft systems like Windows VPS, you should follow the instructions below:
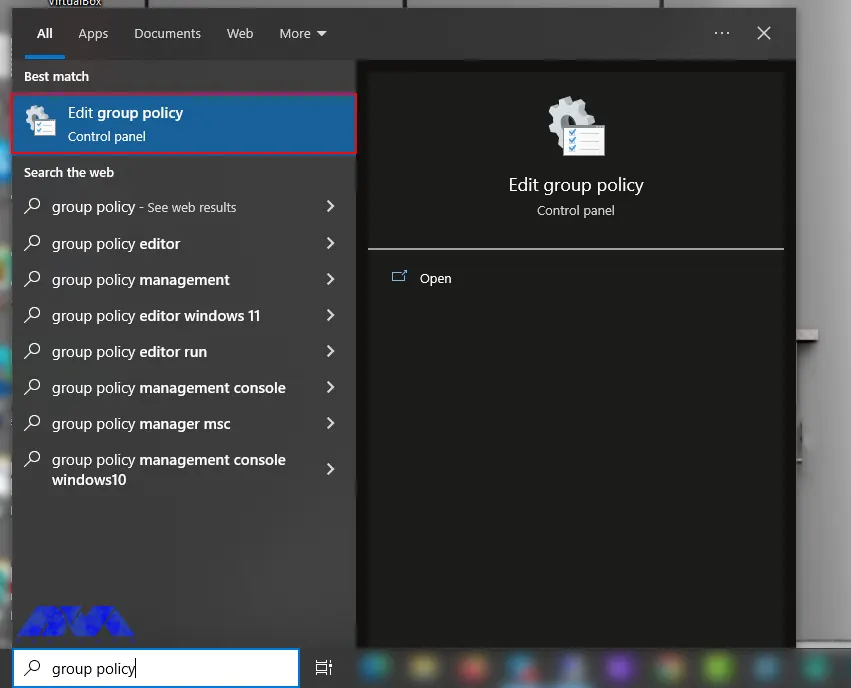
– Go to the Start menu.
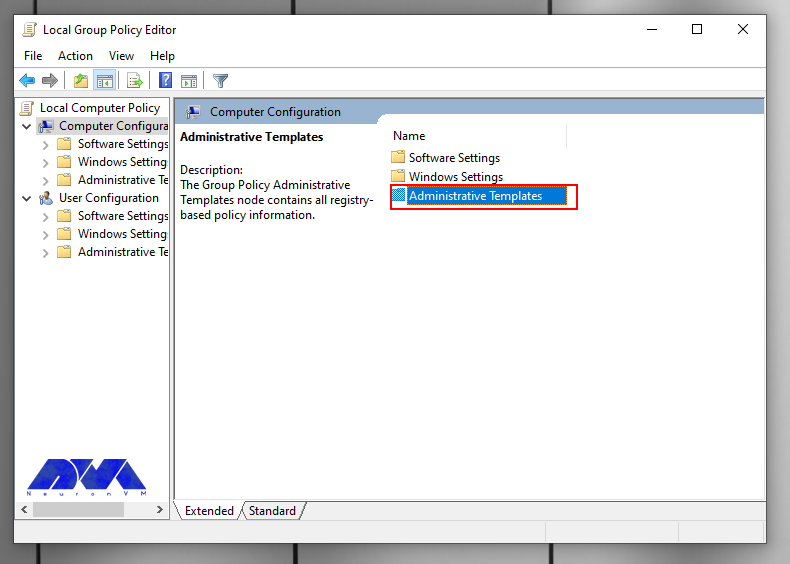
– Type Group Policy on your Search bar and Select Edit Group Policy from the list. Now you will see Local Group Policy Editor opens:
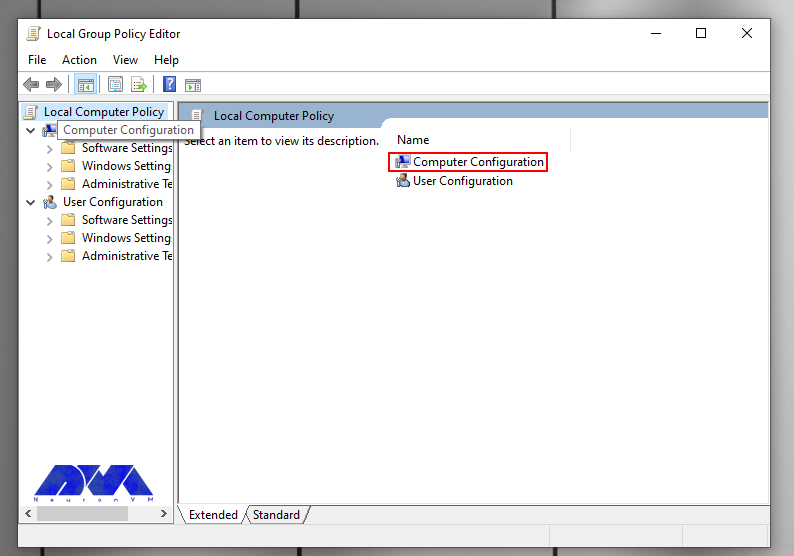
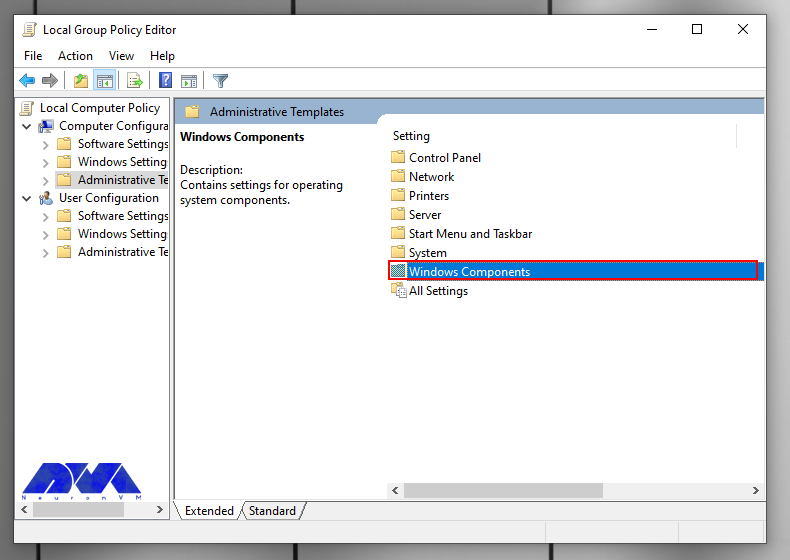
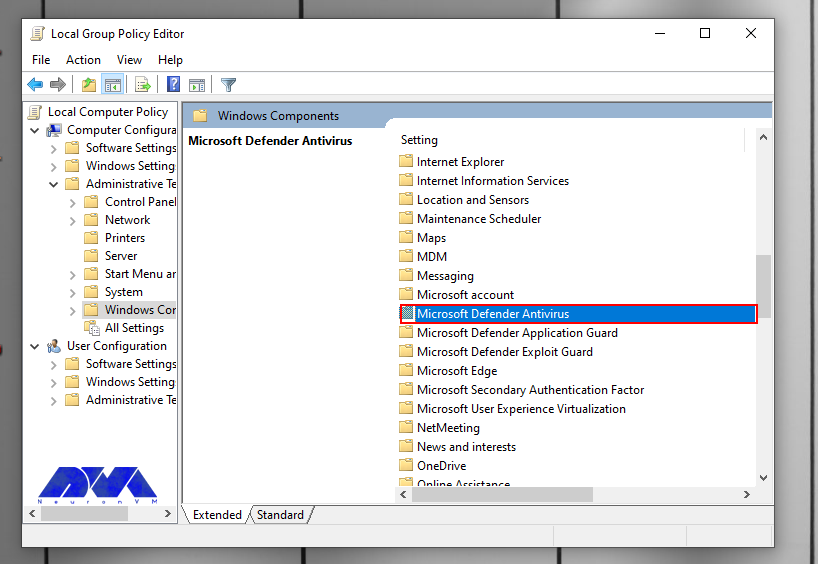
– Then you should go through this path: Computer Configuration => Administrative Templates => Windows Components => Microsoft Defender Antivirus.
—
—
—
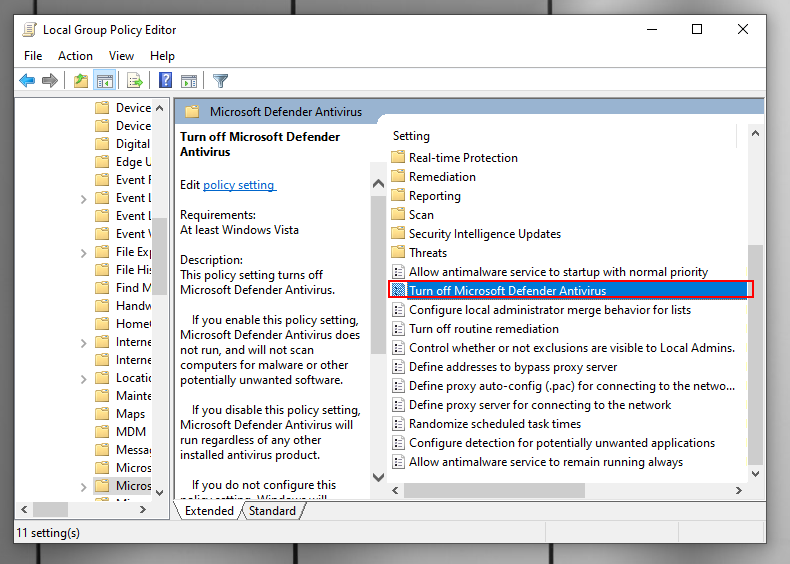
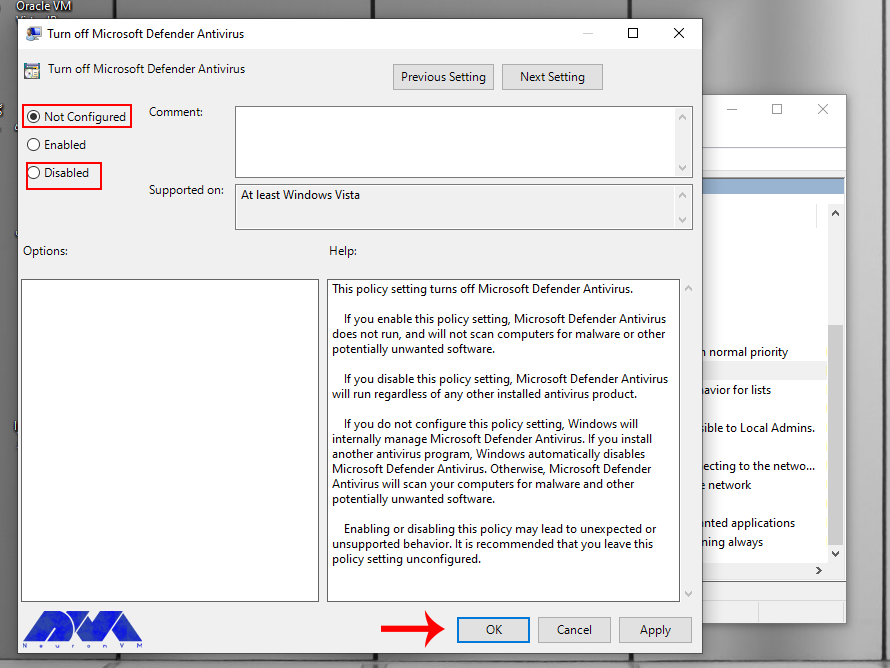
– In the list that appears, scroll down and select the option Turn off Microsoft Defender Antivirus:
– In this part, you have to do an unusual thing, and that is to click the Disable option or not configured because the names indicate disabling Windows Defender. Don’t worry because these options indicate that it is turn on:
As the last step, click on Apply and then OK.
Tip: Windows Defender offers real-time protection that monitors your computer for threats as they occur. This feature is typically enabling by default, but you can verify its status in the Windows Security Center.
Conclusion
Notice that Windows Defender is a basic level of security and while it provides a good baseline protection. It’s also recommending to practice safe browsing habits, regularly update your software, and consider additional security measures if you’re looking for more advanced protection. So we concentrated on this security action and gave simple guidance about activating Windows Defender Security to ease your mind about your Windows system. We hope this content was helpful to you.
One of the most powerful operating systems offered for servers is Windows Server 2019. This operating system is a supplementary version of the previous version and has added new features. But what are these new features? Windows Server 2019, which is based on the previous version, has undergone changes and optimization in various parts, and these changes have been made in the security, application platform, and hybrid performance sections. In this article, we fully explore the New Features of Windows Server 2019.
Key features and improvements in Windows Server 2019
In the main appearance and interior of Windows Server 2019, two major changes have been made, the first is Desktop Experience and the second is System Insights. The first feature is essentially the Windows Server appearance changes that have been created to improve customer satisfaction and users can choose to create new appearance changes for Windows Server 2019.
The second change, called System Insights, is a new feature built into Windows Server 2019. This feature analyzes your server data and evaluates everything that happens on your server, and gives you a report so that you can optimize your server. This feature can identify and report all the weak points of the server.
We recommend you choose and buy a plan according to your needs from the Windows VPS server plans provided on our website. After installing Windows Server 2019 on these servers, you will see the excellent performance of these servers. In the continuation of this article, we will fully review the key features of Windows Server 2019.
Enhanced security measures in Windows Server 2019
Windows Server 2019 has introduced a series of special platforms called Windows Defender ATP for more server security. This platform has 4 new features which are as follows:
1) Attack Surface Reduction: This feature, which is a set of instructions, identifies any corrupted files, emails containing corrupted attachments, and strange behavior of servers and ransomware and prevents them from penetrating the system and server.
2) Network protection: This feature also detects and blocks any anonymous or invalid IPs from the web.
3) Access to files is controlled: Critical data of the server and devices are protected by this new feature to prevent the penetration of programs such as ransomware.
4) Protection against security holes: A series of instructions have been designed for this platform to protect and prevent security holes. Note that you can activate this feature manually.
But the security optimizations are not only limited to the platform, these optimizations are also included in the virtualization section. In the previous versions, the troubleshooting problems were a bit too much and exhausting, but in Windows Server 2019, these problems have been solved and users can solve virtualization problems. On the other hand, these changes do not need to be adjusted manually and can be done automatically. Finally, if users want to have a mixed environment of the operating system, Windows Server 2019 can support Ubuntu, Linux, and Red Hat Hamel systems.
Improved performance and scalability in Windows Server 2019
Another benefit of Windows Server 2019 Standard is that it is highly scalable, meaning it can grow with your business as your server needs to grow. In addition, the platform also offers excellent performance, ensuring that your applications and systems run fast and smoothly.
One of the features of Windows Server 2019 that has improved performance and scalability is support for hybrid environments. Windows Server 2019 is designed to run in both on-premise and cloud environments, allowing enterprises to make the most of available resources and adapt to changing business needs.
Next is storage optimization. With Storage Spaces Direct (S2D), companies can easily group storage units into a single pool. Interestingly, this feature will improve storage efficiency and performance. In addition, the data deletion and compression feature reduces the space required for data storage.
It is interesting to note that Windows Server 2019 introduces network virtualization improvements. Such as hardware acceleration and support for container-based virtualization, which improves application performance and network efficiency.
Windows Admin Center: A powerful tool for managing Windows Server 2019
Server management is a very difficult task and many risks threaten it, so to reduce risks and simplify management, it is better to use a tool called Windows Admin Center, which has many features. Windows Admin Center installed on an internal server can manage standard Windows 2019 servers. It can also manage HyperV R2 and higher servers, Windows Server Core, Hyper-Converged systems, or Azure.
Windows Admin Center can increase the speed of doing things with the ability to personalize dashboards. This tool offers a modern view of monitoring, using which you can change the design of dashboards, put them in different sections, and separate the charts in them from each other. Each of these dashboards is a workspace where information can be saved and shared.
There are always tasks that require access to the server console, and in Windows Admin Center, the Remote Desktop feature has been placed to do this, which can be used through a browser. The interesting feature of this tool is to access the console of each managed server, without the need to open additional ports in the firewall. All engine traffic goes to Windows Admin Center through HTTPS protocol and is encrypted on the way.
Accessing files from Windows Admin Center has become a trivial matter. You can do things like create new folders, rename or delete files, upload and download files, cut, copy, paste, and even extract archives. Apart from these simple and routine things, you can also set file sharing, set file sharing permissions, and create and manage files. Also, with Admin Center, you can perform disk management, including formatting and resizing, creating and attaching VHD files, and saving information on disk and server.
Hybrid cloud capabilities in Windows Server 2019
A hybrid cloud is a combination of one or more public and private clouds. A hybrid cloud is a collection of virtual resources. These resources are powered by hardware that is owned, managed, and organized by a third party. Resources in the hybrid cloud are provided to a customer in a dedicated manner. These computing and storage resources are automatically provided and allocated through a self-service user interface.
Interoperability is the fundamental basis of a hybrid cloud. Without it, the public cloud and the private cloud can exist independently of each other, but they are not considered hybrid clouds. Even if they are used by a company or organization. Hybrid clouds include multiple connection points, and software services integrated into the core allow resources, operating systems, and applications to move across the environment.
Nowadays, it is impossible to imagine an IT environment without virtualization and hybrid cloud. Therefore, in Windows Server 2019, Microsoft has improved the connection between the Azure cloud platform and the Windows Server operating system. This connection is not only limited to the Admin center, but the Azure network adapter also provides the possibility of connecting to the cloud computing platform. In addition, the Windows Server 2019 release includes better support for Azure Backup, File Sync, Disaster Recovery (DR), and other Azure services.
Cloud management tools provide you with one-piece platforms for managing hybrid clouds. Thus, they free you from manual management of the hybrid environment using management and planning tools for multiple implementations and additional expert operators. These single-fabric platforms encapsulate the core technologies and centralize management tasks so that operators and users can control the system lifecycle, automated services, automation, policy enforcement, and costs when deploying services.
Containerization and virtualization advancements in Windows Server 2019
The interesting thing about Windows Server 2019 is that it supports both Windows and Linux containers that can run on the same container host. In addition, Windows Server 2019 includes built-in support for Kubernetes, which can significantly improve container networking. Additional container improvements include integrated Windows authentication in containers, improved application compatibility, and reduced size of base container images. These Hyper-V features can increase the speed of container workflows, make containers more secure and reliable, and ensure the efficiency of container networks.
Similar to the way Linux containers share host operating system kernel files, Windows Server containers do so in a similar way. In other words, while namespaces, filesystems, and network isolation are enforced to isolate containers from each other, vulnerabilities can exist between different Windows Server containers running on the same host. For example, if you want to log into the host operating system on your container server, you can see the processes running on each container.
The container is not able to see the host or other containers and is still isolated from the host in various ways, but knowing that the host can see the processes inside the container tells us that some interaction with the host may be shared. Windows Server containers are useful in situations where the server hosting the container and the container itself are in a secure domain and trust each other. Windows Server Containers are more useful for servers that are owned by the company and the company itself can manage them. If you trust your host server and container, using Windows Server containers provides the most efficient way to use hardware resources.
Upgrading to Windows Server 2019: Considerations and best practices
To upgrade to Windows Server 2019, you must log in as an administrator of the server you want to upgrade.
Then, in the next step, you need to insert the Windows Server 2019 DVD or install the installation ISO.
In the third step, you can go to the root of the installation media and double-click on setup.exe. After doing this, you will see the Windows Server 2019 setup window appear.
Now you can follow the steps in the wizard. Pay attention to the following:
Tip: If you are upgrading from a DVD, you may be prompted to boot from the DVD. You can let the request time out and the upgrade will continue.
When the upgrade is finished, a screen will be displayed that the settings are being finalized. When the upgrade is complete, you will be presented with the Windows Server 2019 login screen.
Case studies and success stories of organizations using Windows Server 2019
Windows Server 2019 is a version of Windows built. It is designed to meet business needs such as access control, data management, cloud integration, and virtualization. It comes in three editions: Datacenter, Essentials, and Standard, each suitable for different use cases and environments. Here are the success stories of many organizations using Windows Server 2019 to improve their performance, security, and efficiency.
1) ZDNet reviewed Windows Server 2019 and praised its features, particularly its improvements in security, hyper-converged infrastructure, and hybrid cloud. They also noted that Windows Server 2019 provides a solid foundation for future data center advancements, including edge locations.
2) Microsoft published a case study of Coles Group, an Australian retailer that migrated to Windows Server 2019 to modernize its IT infrastructure and reduce costs. Coles Group reported that Windows Server 2019 helped them achieve faster deployment, better scalability, increased security, and easier management.
Conclusion: The future of Windows Server 2019 and its impact on businesses.
Windows Server 2019 is another Microsoft operating system designed for servers. It can be used by large information centers of the world or even small companies. Windows Server 2019 has provided new and advanced features for users in the field of virtualization, network, storage, user experience, cloud computing, automation, etc. In simple words, Windows Server 2019 helps you to do your company’s IT affairs much easier and at a whole new level along with reducing costs. Businesses that are currently using Windows Server 2019 in their business receive a very positive impact compared to other operating systems. Because Windows Server 2019 has been able to perform better than other competitors in online businesses.
Windows RDP 2012 is a feature of Windows Server 2012 that allows users to connect to remote desktops and applications from any device. RDP stands for Remote Desktop Protocol, which is a protocol that enables remote desktop connections over a network. In this comprehensive article, we intend to teach you about Enhancing Remote Access with Windows RDP 2012.
Benefits of using Windows RDP 2012 for remote access
Some of the benefits of using Windows RDP 2012 for remote access include:
Compatibility: RDP is compatible with Windows operating systems, which means it can use with different devices and platforms. You can also use the Microsoft Remote Desktop program to connect from non-Windows operating systems.
Security: RDP uses strong encryption to secure remote desktop connections and prevent unauthorized access. You can also configure security settings and policies to control who can access your remote desktop and applications.
Multiple sessions: RDP supports multiple sessions, which means that multiple users can connect to the same computer at the same time. You can also use session shadowing to monitor and control other Windows RDP 2012 R2 user sessions.
Reliability: Remote Desktop Services in Windows RDP 2012 are reliable across a wide range of network configurations, hardware devices, and administrative scenarios. It also supports features such as network load balancing, failover clustering, and dynamic fair share scheduling to improve performance and availability.
User Personalization: User profile disks allow you to maintain user personalization settings across session sets and pooled virtual desktop sets. You can also use RemoteApps to deliver apps to users without installing them on their devices.
We assure you that you will enjoy the high quality of these servers by purchasing a Cheap Admin RDP from the plans provided on our website.
Features and capabilities of Windows RDP 2012
Some of the most important features and capabilities of Windows RDP 2012 will be explained below:
Management: Windows RDP has a powerful management console. In this console (Server Manager) you can manage all rules.
Server Core: Using this ability, you can install your Windows minimally (without a graphical interface).
Virtualization: Using this feature, your operating system becomes a virtual machine. That means you can have other operating systems on top of your current operating system.
IP Address Management: The IP AM feature was first introduced in Windows RDP 2012. Manages the IP structure under the network.
Using IIS 8 with advanced security capabilities: By IIS8, it provides the possibility of using advanced security protocols. You will be able to install each section separately. This feature increases the efficiency and security of your system.
Brand Cache feature: Brand cache is a capability that allows us to increase the responsiveness of applications on low-speed connections such as WAN networks. In this case, the files can be cached on the user’s computer.
File Server Resource Management: A set of tools that allow network administrators to control and manage the type and amount of data stored on the server. By using this feature, the network administrator will be able to manage. On the other hand, it will have complete control over file management, disk quota management or codes, detailed reporting, and discussion of file classification. It has the power to support magnetic smart cards (Smart Cart) for authentication. These intelligent cards increase network security.
Windows Deployment Service feature: With this feature, the remote network manager installs the operating system without the need for DVDs or other portable discs on the network through the user’s computer, which does not even have an operating system on it.
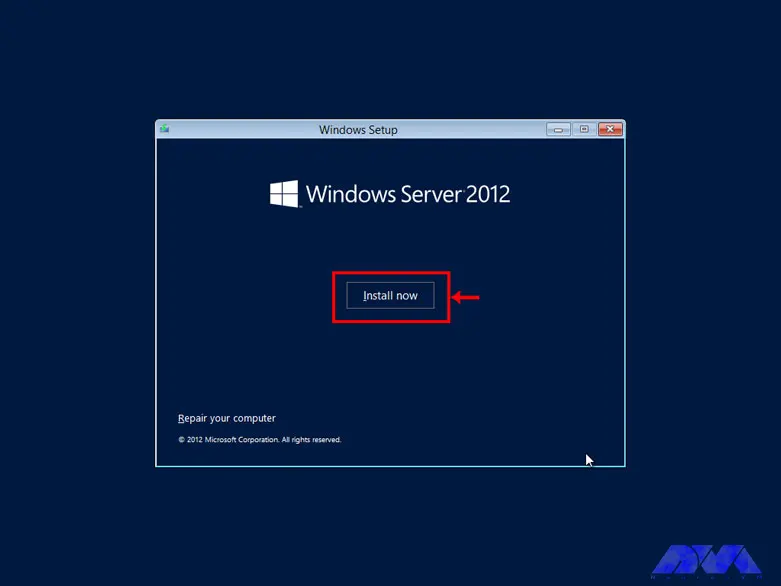
First, put the boot of your computer or server on the CD-ROM and put the Windows CD in the CD-ROM and wait for the Windows installation section to load:
*
According to the image, click on the Install Now option to enter the Windows installation:
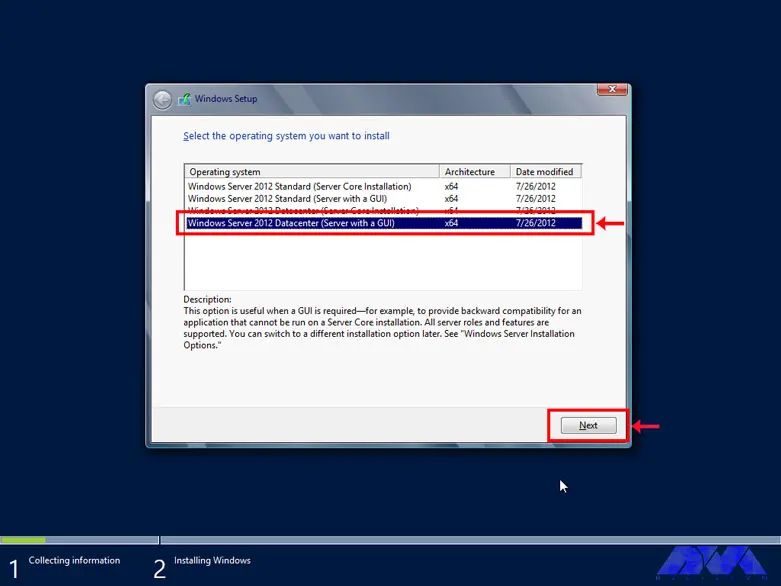
Choose one of the GUI options, either the standard Windows GUI or the datacenter GUI that is specific to the server:
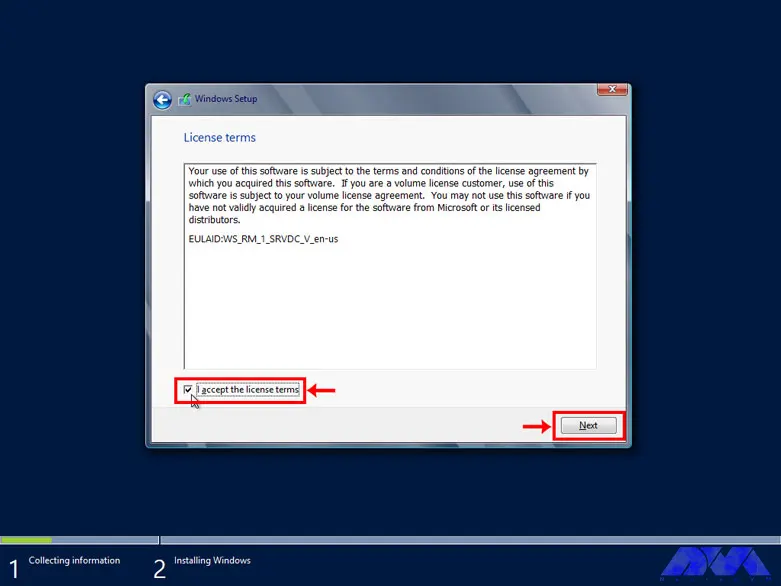
Confirm the copyright and license server rules to allow Windows installation:
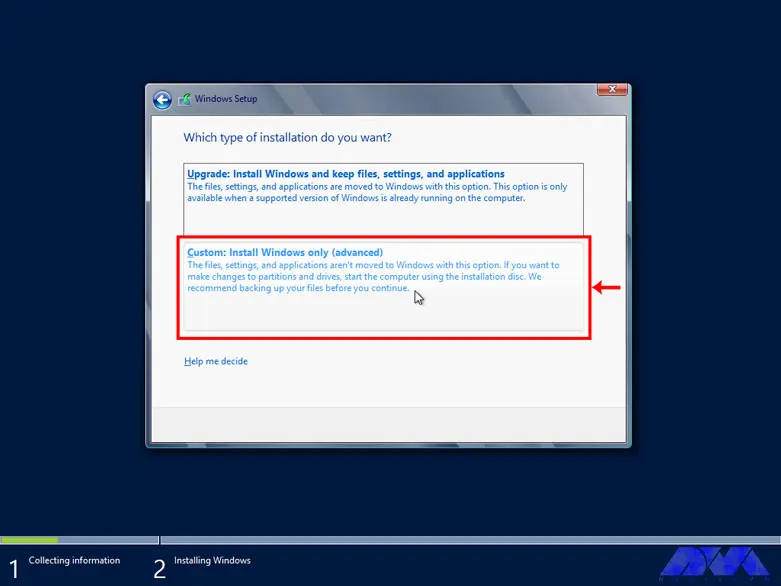
Select the Custom option for custom Windows installation. In this section, you will be given the option of partitioning and installing Windows in your desired partition:
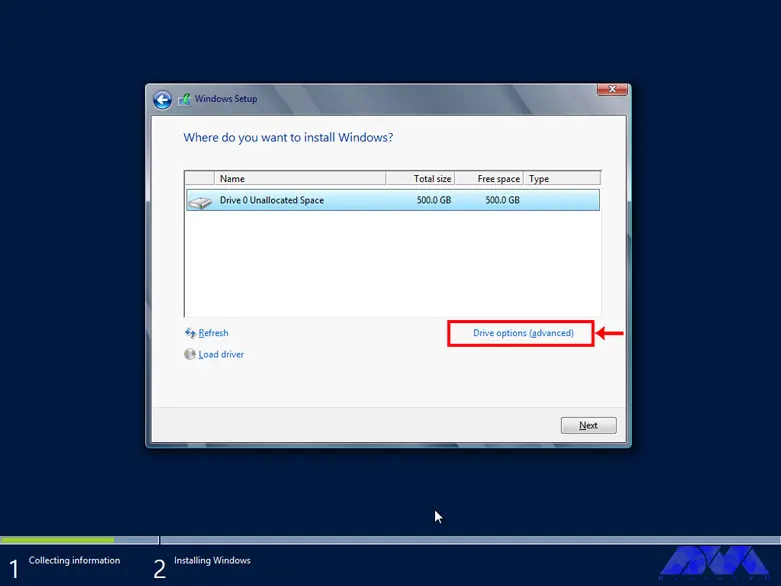
Select Drive Options (advanced) to select the desired partition and partitioning:
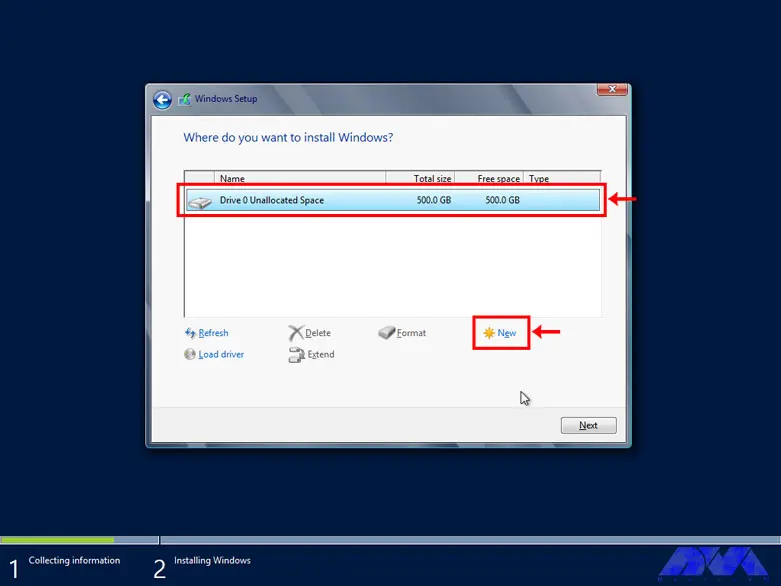
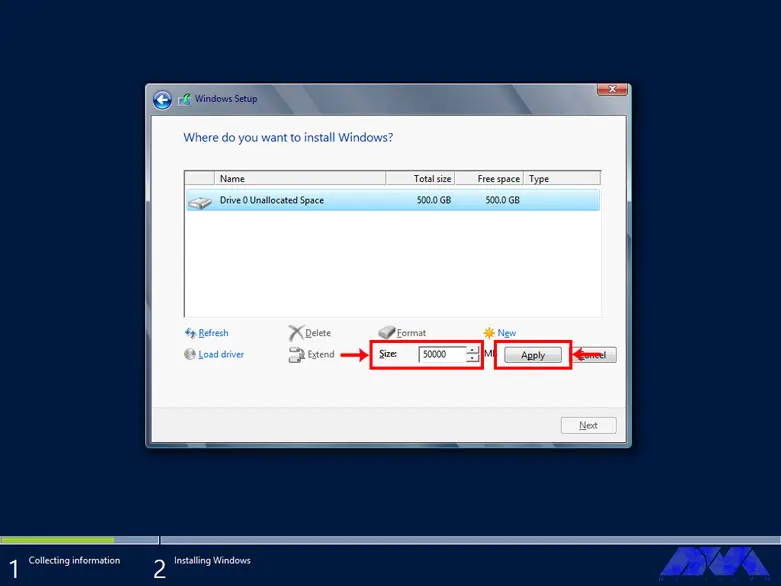
First, click on the hard drive and select the New option to create a new partition. In high-volume hard drives, it is recommended to choose 50 GB for Windows and software required by Windows and partition the rest of the hard drive as desired:
Choose the volume of your desired partition to create your desired partition:
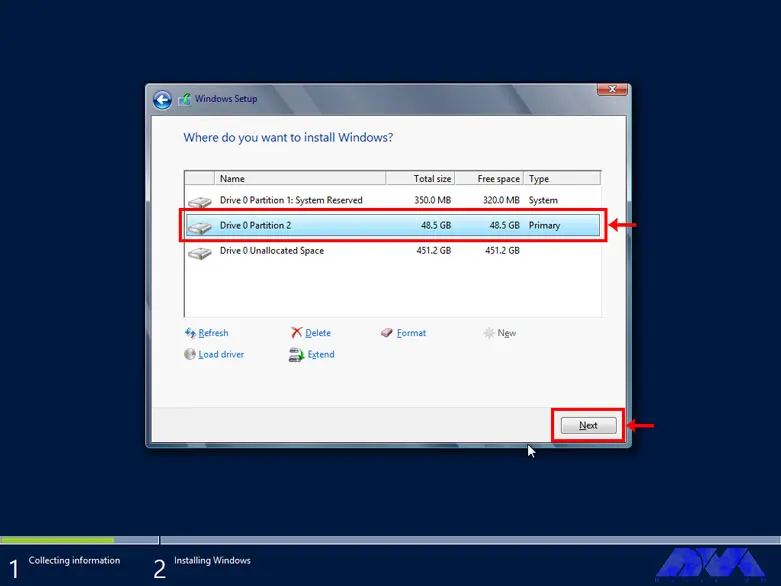
From the created partitions, choose your desired partition to install Windows:
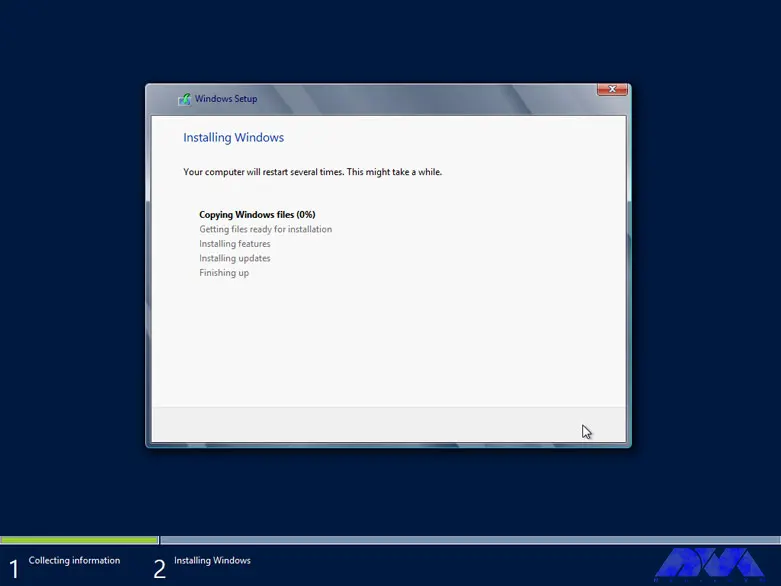
Wait for Windows to be completely installed on your hard drive:
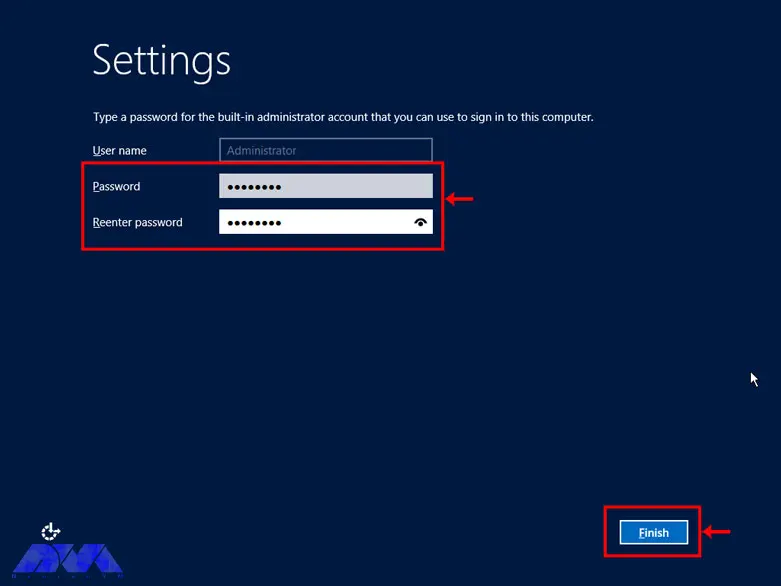
Choose a desired password for the administrator and repeat it twice:
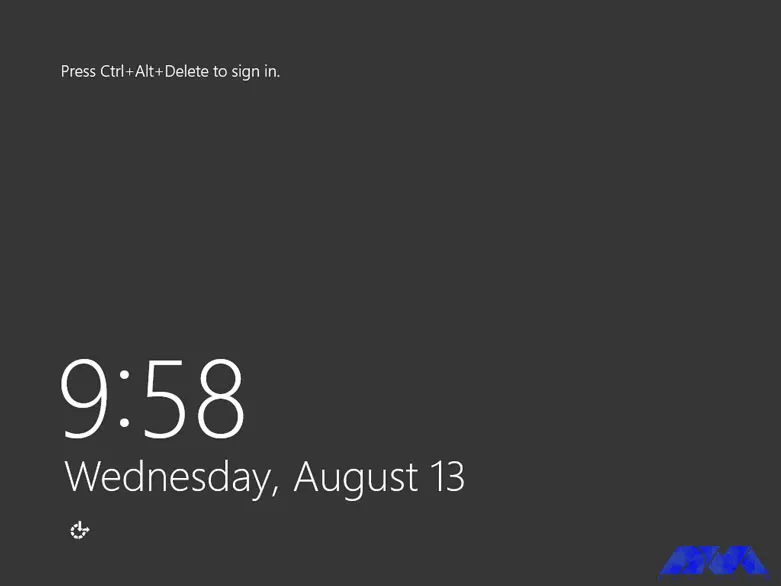
Press Ctrl+Alt+Delete to enter the Windows login section:
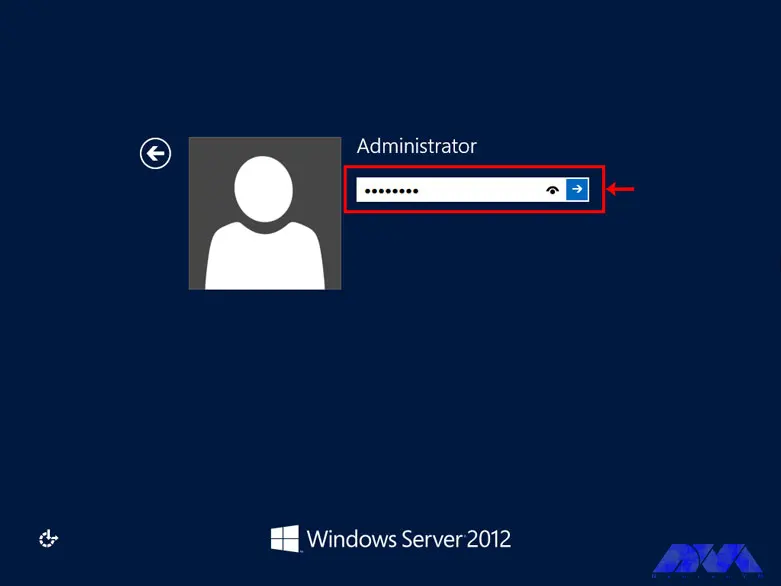
Enter your Windows password to enter Windows:
Enhancing security with Windows RDP 2012
There are several ways to increase Windows RDP security. Next, we will introduce the solutions to increase the security of Windows RDP 2012:
Use the feature of the lowest access point in the Windows RDP
Increase the security of the Windows RDP by configuring the network
Remove unnecessary ports and software and services
Consider security considerations in NTP configuration
Periodically check the server logs
Establish specific security policies
Use a powerful firewall to increase the security of the Windows RDP
Use the Windows MBSA feature to identify vulnerable parts of the server
Troubleshooting common issues with Windows RDP 2012
Windows RDP is much more powerful than regular Windows and is able to perform much heavier tasks. But if there is a problem with it, the activity of all the clients connected to it will be disrupted. Such problems can be mentioned as Windows not booting, blue screen after startup, inability to open files and folders on the desktop, inability to update Windows, etc.
Most of these problems are caused by corrupt system files, damaged boot records, etc., which are mainly caused by individual mistakes or negligence of client system users. In this situation, the importance of creating a level of access to files for clients is very necessary and vital.
Windows RDP troubleshooting using the Image file
1) You can scan system files by using the SFC scannow command in the CMD environment. For this, connect the flash drive containing the image file to your server and turn on the server.
2) Enter the BIOS environment and boot the server to DVD or USB.
3) After the server is booted from the desired media, click the Repair Your Computer option.
4) Select the operating system you want to repair and click Next.
5) A dialogue box called System Recovery Options will open for you, choose Command prompt from it.
Tip: Note that you can use the SFC command only with Administrator access.
6) After opening CMD, type the following command and press Enter:
SFC/scannow
In addition, using the SFC command, you can repair damaged boot files and records. Just enter the following commands and press Enter at the end of each line:
bootrec / fixmbr
bootrec / fixboot
bootrec / rebuildbcd
After you have entered all the commands and the process has been completed successfully, restart your server. You will see that your Windows RDP has been repaired.
Tips and best practices for optimizing Windows RDP 2012 performance
Decreased performance and speed of servers is a common problem that may occur for various reasons. Servers may also suffer from the same problems as a standard computer, except that the way servers work, unlike normal computers, is set in a more precise way.
In the rest of the article, we have provided a list of things that can increase the performance and speed of servers. Before looking into any of these, we recommend that you take a backup of your computer’s data and settings. Make a note of any changes you make to the main system settings and record the changes made by this change as well.
Switch to High-Performance Power mode.
Disable shorthand naming in DOS 8.3.
Check for commands and processes with high CPU or memory usage rates.
Scan the system for malware.
Check network speed.
Update necessary drivers.
Take the signs of external attacks seriously.
Disable login via SMB packets.
Run SFC/Scannow.
Check for hardware errors.
Consider the Tuning Guide functionality.
Comparing Windows RDP 2012 with other remote access solutions
Windows RDP 2012 is a remote access solution that allows you to connect to a remote computer and control it over the network. This protocol uses Remote Desktop Protocol (RDP), which is a proprietary protocol. RDP is fast and efficient because it transfers low-level screen drawing operations and stores pixmaps on the client side. It also supports encryption, authentication, compression, and redirection of various devices and resources.
Other remote access solutions may use different protocols or methods to capture and transmit screen changes, such as VNC, SSH, HTTP, etc. Some of them may be faster or slower than RDP depending on network conditions, screen resolution, and compression algorithm.
To compare Windows RDP 2012 with other remote access solutions, you may want to consider the following factors:
Performance: How fast and smooth is the remote control experience? How much bandwidth and CPU does it consume? How well does it deal with latency and packet loss?
Security: How secure is the connection between the client and the server? What encryption and authentication methods are used? How vulnerable is it to attacks or intrusions?
Functionality: What features and capabilities does it offer other than remote control? How easy is it to configure and use? How compatible is it with different operating systems and devices?
Cost: How much does it cost to acquire and maintain? Is it free for personal or commercial use? What are the terms and conditions of licensing?
Windows RDP 2012 licensing and pricing options
Windows RDP 2012 licensing and pricing options depend on the version and number of processors you need for your server deployment. There are four editions of Windows RDP 2012:
The Datacenter edition is designed for highly virtualized private cloud environments. You can run any number of virtual operating system environments (OSE) on a licensed server. It also includes advanced features such as tiered storage, software-defined networking, and the Windows Azure package. The licensing model is processor-based, meaning you must license each processor on the server. You must also obtain client access licenses (CALs) for each user or device accessing the server.
The standard edition is designed for non-virtualized or slightly virtualized environments. It offers two virtualization rights, which means you can run up to two virtual OSEs on one licensed server. The licensing model is also processor-based and requires a CAL for each user or device that accesses the server.
The Essentials edition is designed for small businesses with up to 25 users and 50 devices. It also includes features such as simple management, integration with cloud services, and remote web access. The licensing model is server-based, meaning you must license each server with up to two processors. No need to get CAL for this version.
The Foundation version is designed for small businesses with up to 15 users and no need for virtualization. It also includes basic features such as file and print services, remote access services, and Active Directory domain services. The licensing model is also server-based, meaning you must license each server with one processor. No need to get CAL for this version.
Pricing for Windows RDP 2012 editions varies by volume licensing program, agreement type, license type, and region. You can use the Microsoft License Advisor tool to estimate pricing for your specific scenario.
Conclusion
Windows RDP 2012 provides advanced features in virtualization, networking, storage, user experience, cloud computing, and automation. In simpler words, this Windows helps you to do IT-related things much easier and with reduced costs. After mastering the basics of Windows Server, it is recommended to use Windows Server as an operating system instead of using the provided client Windows. Because it works much better than Windows clients in terms of resource allocation (both hardware and software).
Using a VPN (Virtual Private Network) means you’ll leave no trace of yourself on the Internet for the ISP or anyone else. Instead of connecting directly to a crowded and insecure Internet space, a VPN connects you to a private Internet network that is limited to you. A VPN chooses your location based on IP, where it does not belong to you at all. In this way, you can ensure your security in the Internet space. Another use of a VPN is to remotely run a company’s employees to the office’s private network, even if they are not physically present in the office. Due to the importance of VPN, we decided to teach you in this article about the Tutorial Create VPN Connection on RDP 2016.
Introduction to VPN and its benefits
Using a VPN can be beneficial for you in two different ways. Firstly, activating it allows you to access the internet from another country through VPN hosting servers, which can be useful for accessing content that is not available in your country of residence. Secondly, and most importantly, using a VPN encrypts all your traffic data over the internet, providing you with enhanced security.
By connecting to VPN servers, you are provided with an encrypted connection with trusted links, and you can use the Internet normally and without any restrictions. Keep in mind that using a VPN slows down download and upload speed. That’s because when using a VPN data transfer speed reduces.
How to Create VPN Connection on RDP 2016
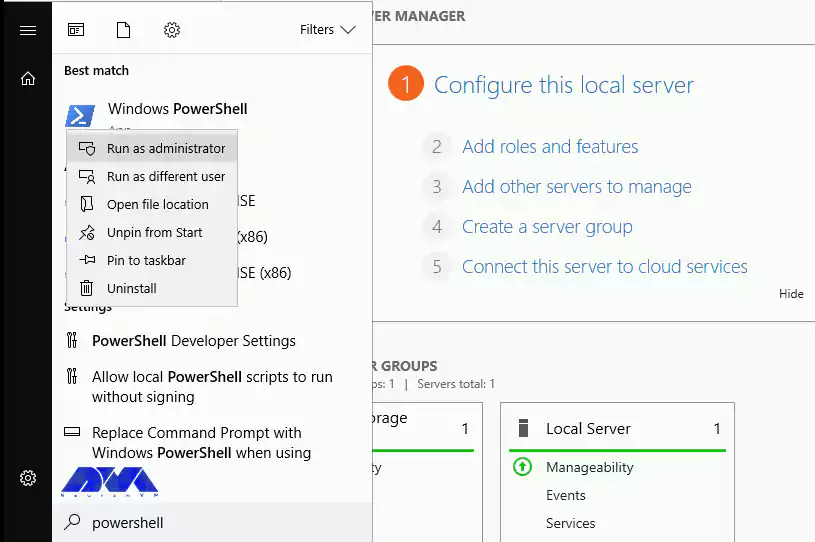
Before starting the training on how to create a VPN account, we recommend you choose and buy the plan you need from thecheap Admin RDP plans provided on our website. The first step is to type PowerShell in the Windows Start menu and right-click on Run as Administrator and open it in Administrative mode.
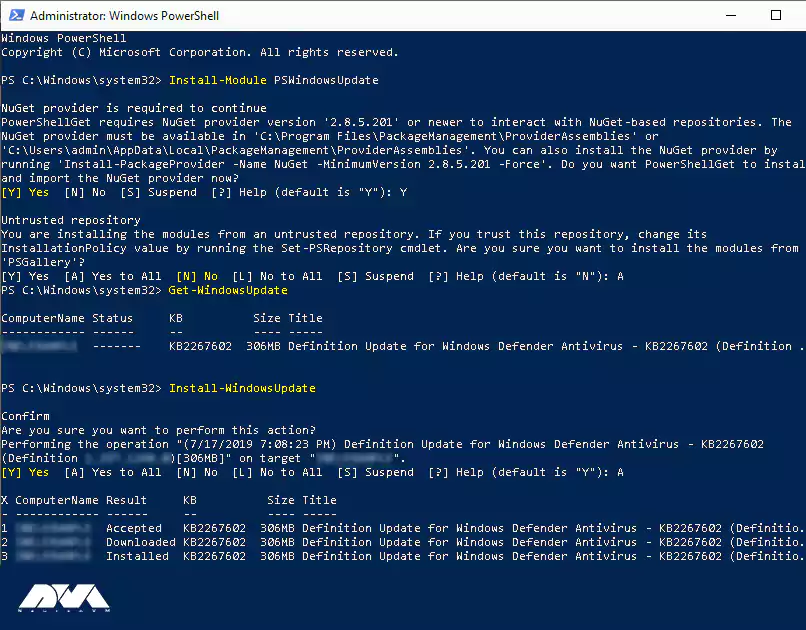
By running the following command, you will install the Windows Update module for PowerShell:
Install-Module PSWindowsUpdate
If you are asked to confirm, you can press Y and enter.
Then run the following command to get a list of the latest updates:
Get-WindowsUpdate
Finally, run the following command to install the updates.
Install-WindowsUpdate
After the updates are installed, run the following command to restart the computer:
Restart-Computer
How to Install a Remote Access Role
To install the Remote access feature with Direct Access and VPN (RAS) and Routing with the management tools, you must first open PowerShell in administrative mode again and then enter the following commands:
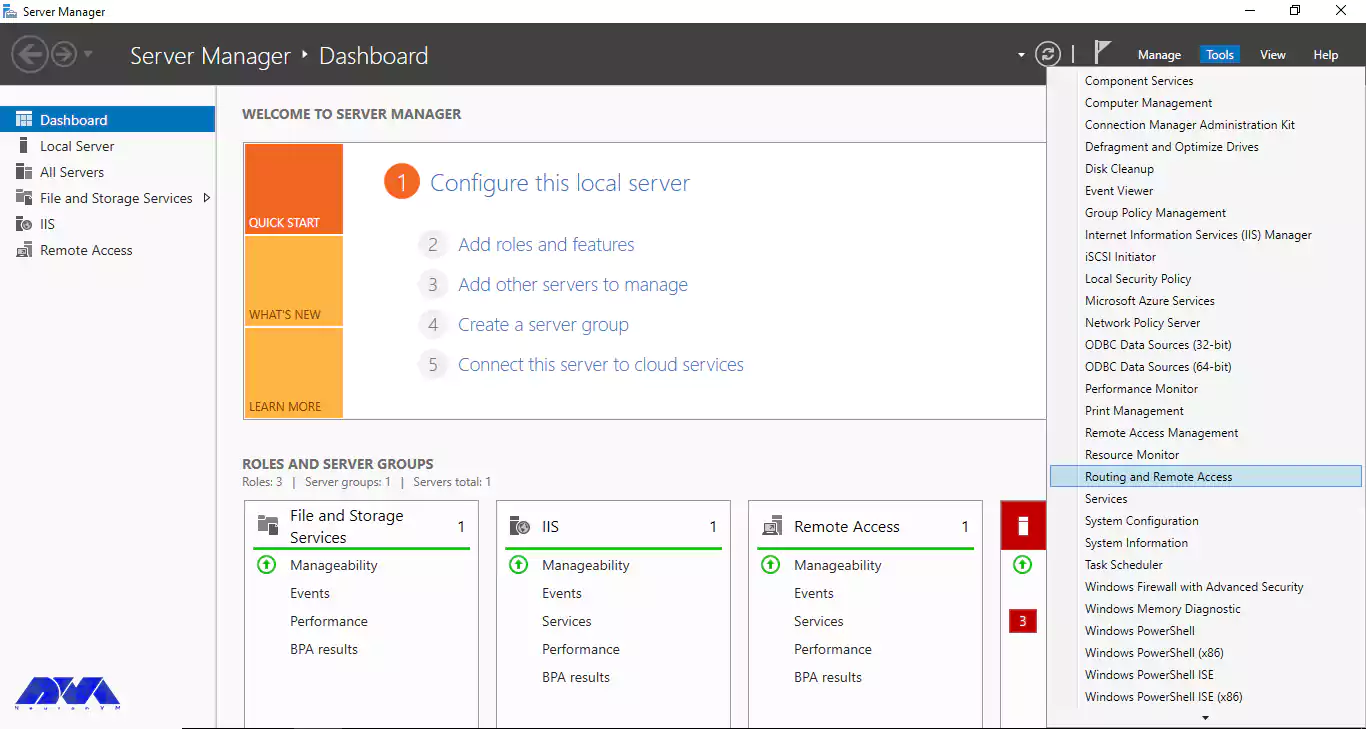
First, open the Server Manager in your RDP 2016 and click on Routing and Remote Access from the Tools section.
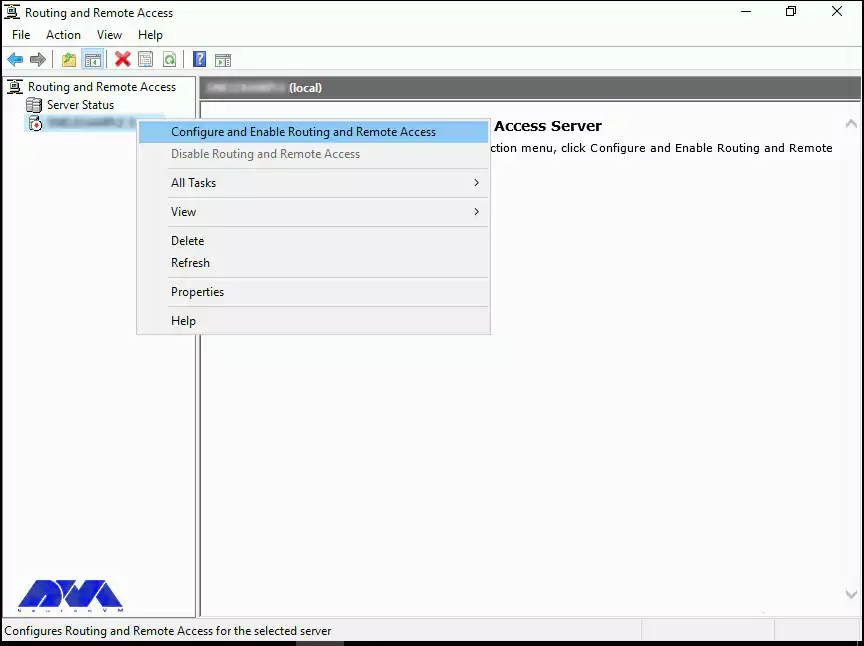
In this step, you must right-click on the local server and click on Configure and Enable Routing and Remote Access.
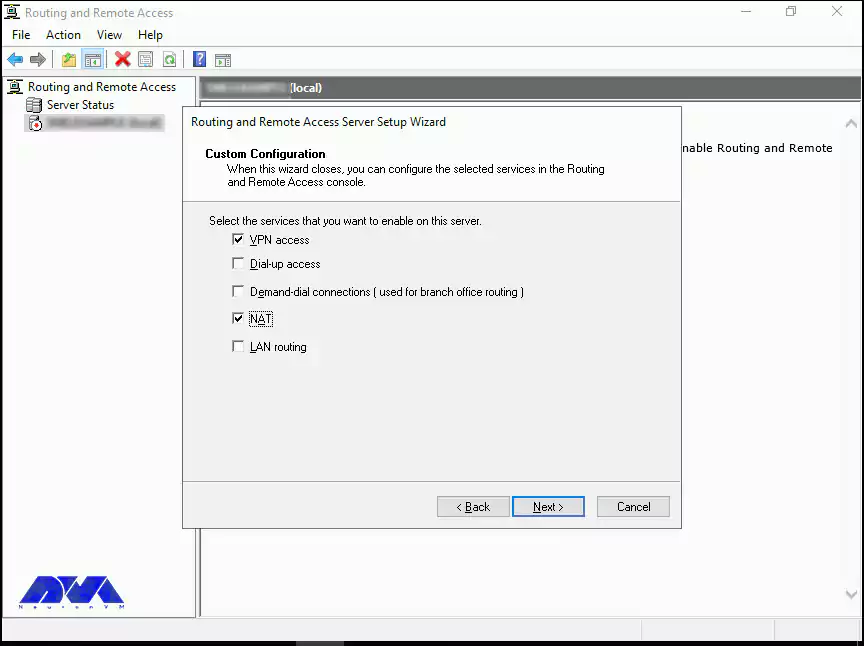
Because the routing and access configuration is done manually, select the Custom Configuration button here and click Next.
Now you must select the VPN and NAT boxes and click Next.
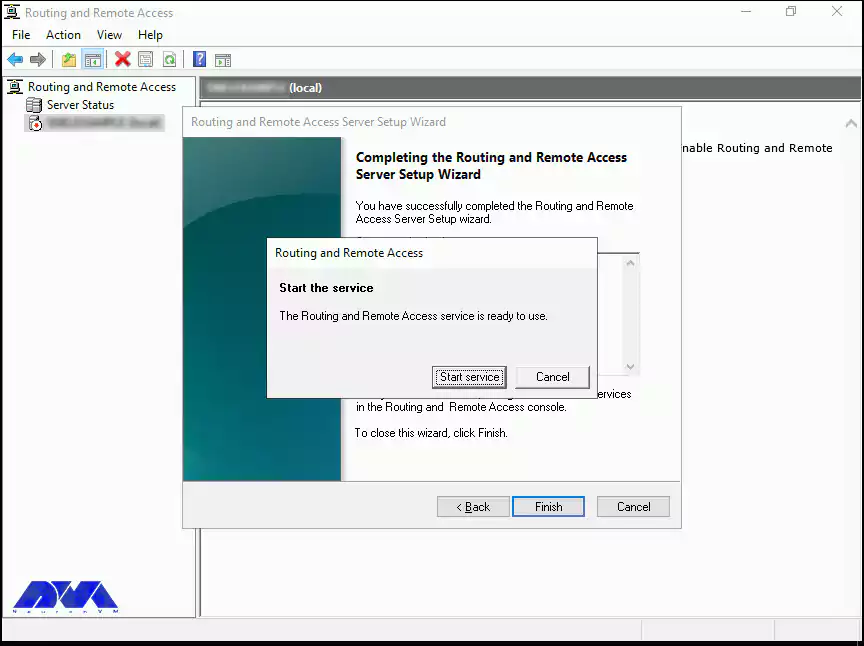
Finally, click Finish. Then click on Start Service after seeing the instruction to start Routing and Remote Access Services.
How to Configure VPN Properties
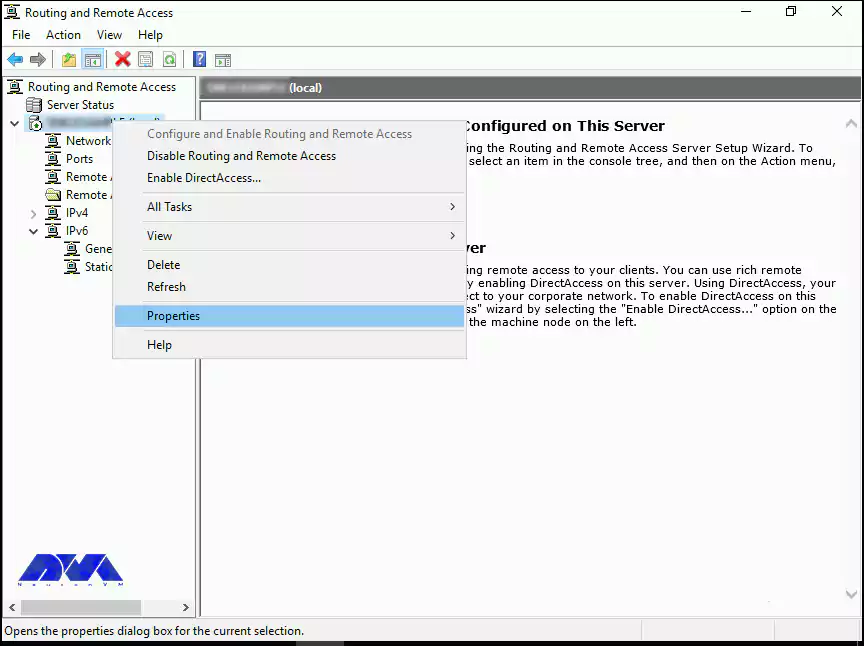
Now it’s time to configure VPN. First, right-click on your local server and then click Properties.
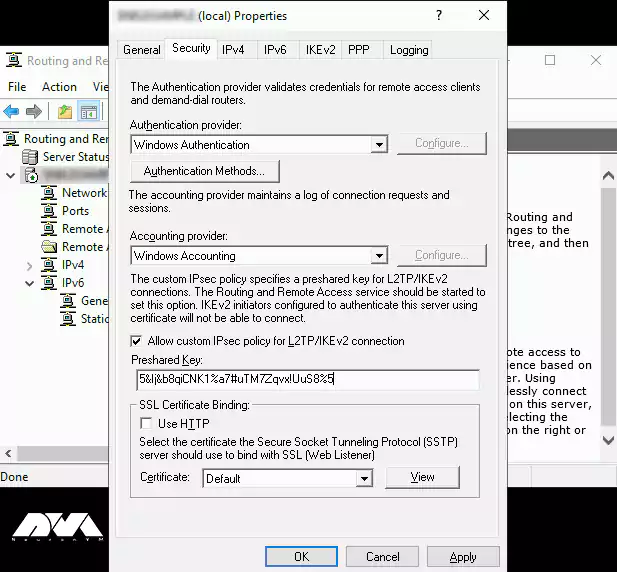
Now you need to go to the Security tab and mark the check box of Allow custom IPSec policy for L2TP/IKEv2 connection, insert a very long PSK (Pre-shared key). Remember to write down the PSK as the PSK must be shared with any user who connects to the server. You can use any tool to generate a random key.
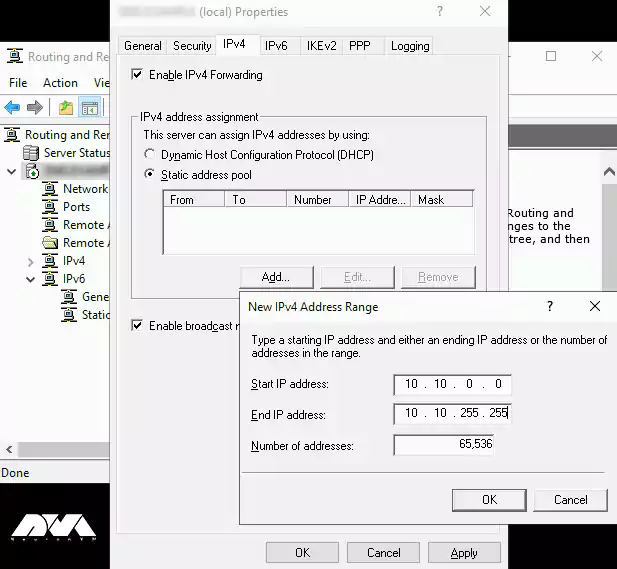
In this step, you have to go to the IPv4 section and select the Static address pool option from the IPv4 address assignment section and click Add. After the pop-up window opens, enter the IP address ranges. You must put the starting address and ending address of the IP address range you want users to assign.
Now click OK to save the address range and finally click OK again to save the changes. Click OK if you receive the “you need to restart the Routing and Remote Access for changes to apply” warning.
How to Create VPN User
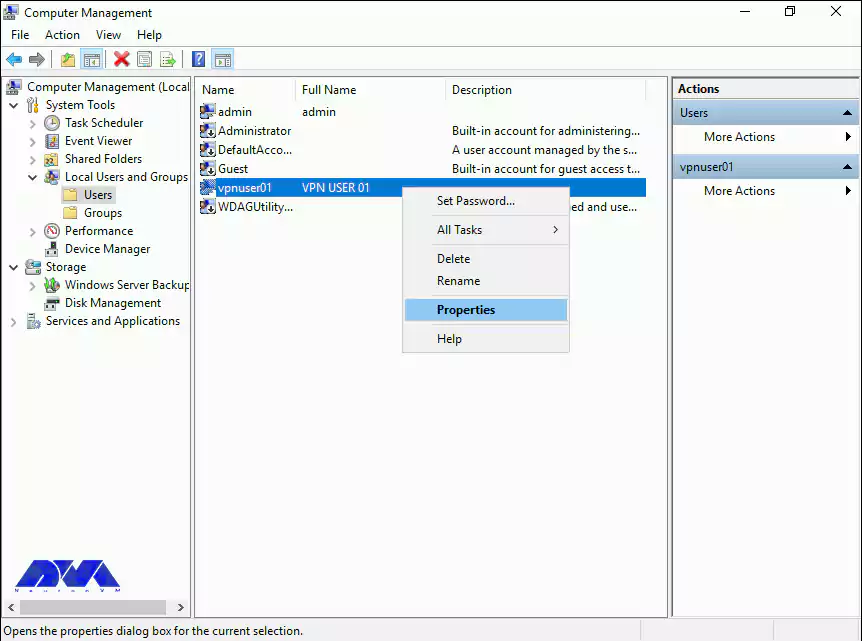
In the Start menu, type, and then open the Computer Management window. Open the Local Users and Groups window on the left, right-click Users, and then click New User.
In the New User prompt, you must enter a username, full name, and strong password, Uncheck the “User must change password at next logon” box and then click Create.
After creating the user, if you return to the computer management interface, you can find a new user in the list of users. To view the list of users in the Computer Management section, right-click Users and click Properties.
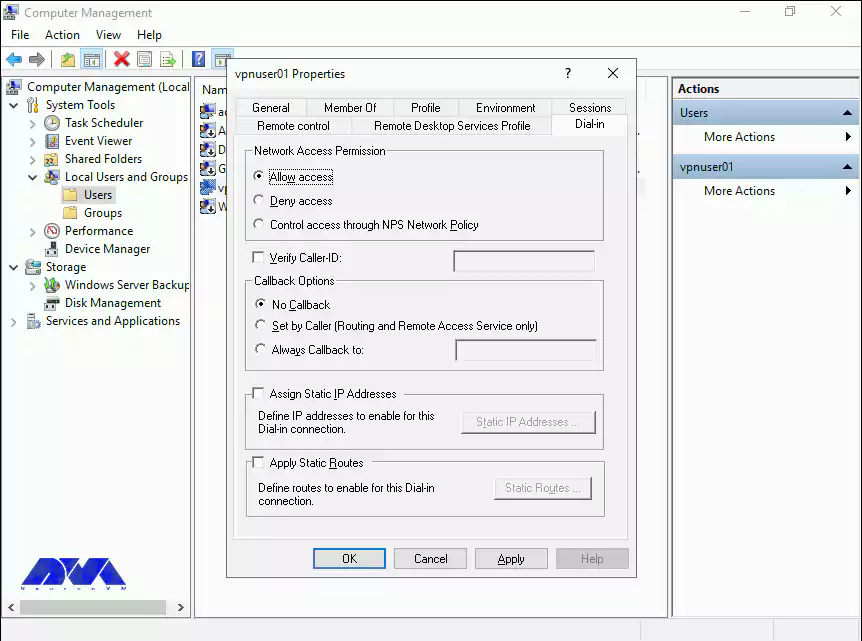
In the VPN usersproperties section, go to the Dial-in tab. Then select the Allow access option from the Network Access Permission settings. Finally, click OK to save the properties.
Finally, the L2TP/IPSec VPN server can accept connections.
To connect to VPN Clients you must share the PSK and Windows username and password with the user who wishes to connect to the remote VPN server.
Conclusion
Creating a VPN connection on RDP 2016 is a simple and effective way to enhance security and privacy when accessing remote servers or networks. By following the step-by-step tutorial provided, users can establish a secure connection and ensure that their data remains encrypted and protected. Implementing a VPN not only safeguards sensitive information but also provides a seamless and efficient remote working experience. With the increasing importance of remote access, understanding how to create a VPN connection on RDP 2016 is a valuable skill for any user or organization.
OpenSSH is a tool that allows you to securely connect to a remote server using the SSH protocol. This tool encrypts all traffic between client and server to prevent eavesdropping, connection hijacking, and other attacks. Stay with us until the end of this post to teach you how to Boost Your Windows Server Security with OpenSSH.
1) Free and open-source: You can review, modify, and distribute the source code under a BSD-style license.
2) Extensive support: integrates into multiple operating systems such as Microsoft Windows, macOS, Linux, and BSD.
3) Development and Improvement: It is continuously developed and improved by the OpenBSD team and the user community, who follow a policy of producing clean and audited code.
It is based on the original free version of SSH by Tatu Ylonen, which was the first to replace the insecure authentication of .rhosts with public key authentication. It offers various features and options such as tunneling, authentication methods, configuration options, X11 forwarding, SCP, SFTP, and more.
Installing OpenSSH on a Windows Server
Before we teach you how to install OpenSSH, we recommend you choose and use the Windows VPS server plans provided on our site. Installing OpenSSH on Windows Server is easy. To do this, you need to follow the steps below.
1) From the search section in the start menu, type PowerShell and run it.
2) Now you can install OpenSSHServer by running the following command in PowerShell:
In this section, we are going to show you the OpenSSH configuration steps. You can make the desired changes by running the following command in PowerShell:
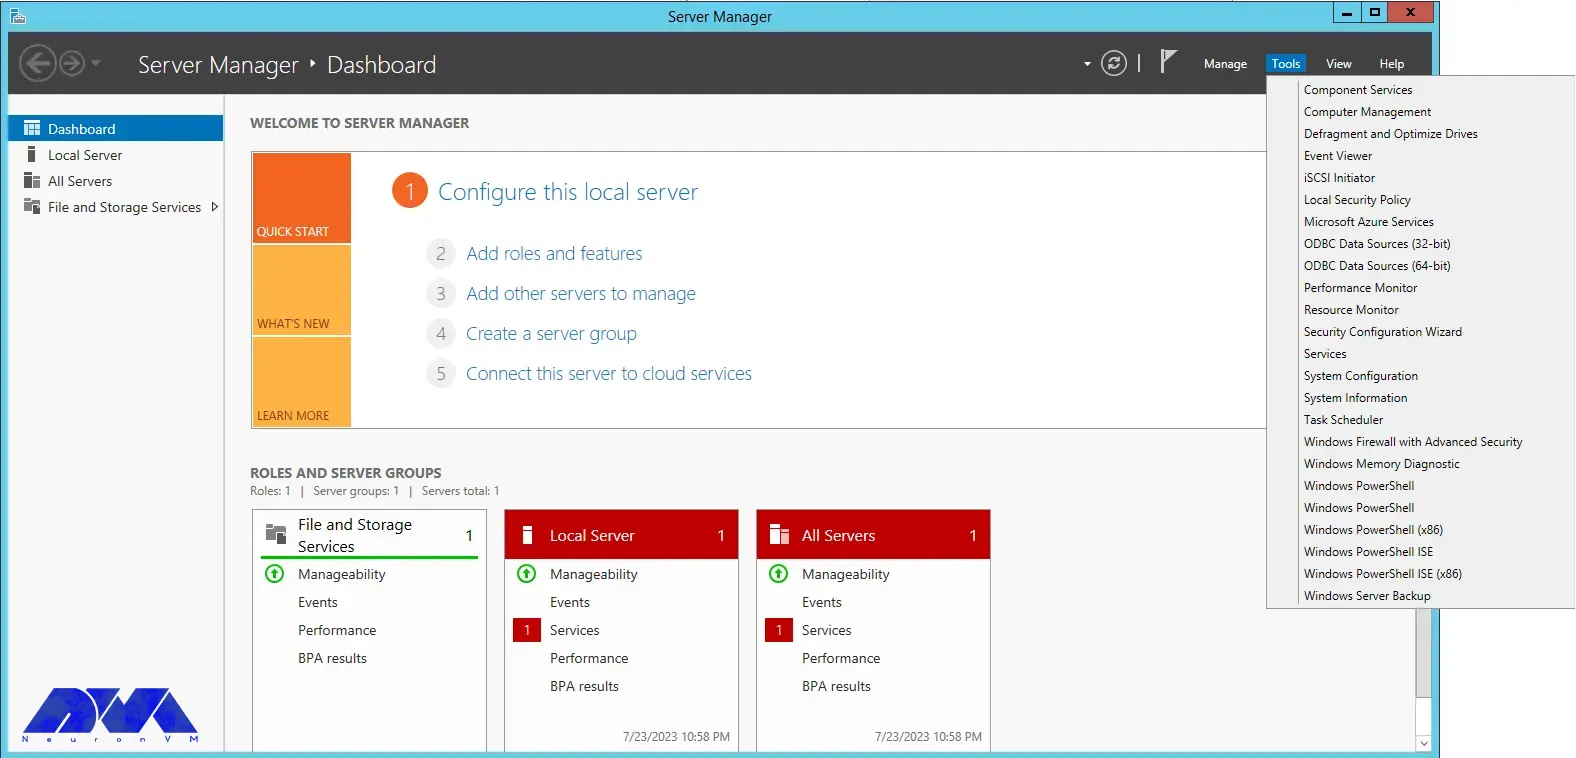
To configure the firewall, it is necessary to run Server Manager from the start menu.
Then select “Windows Firewall with Advanced Security” from the Tools menu:
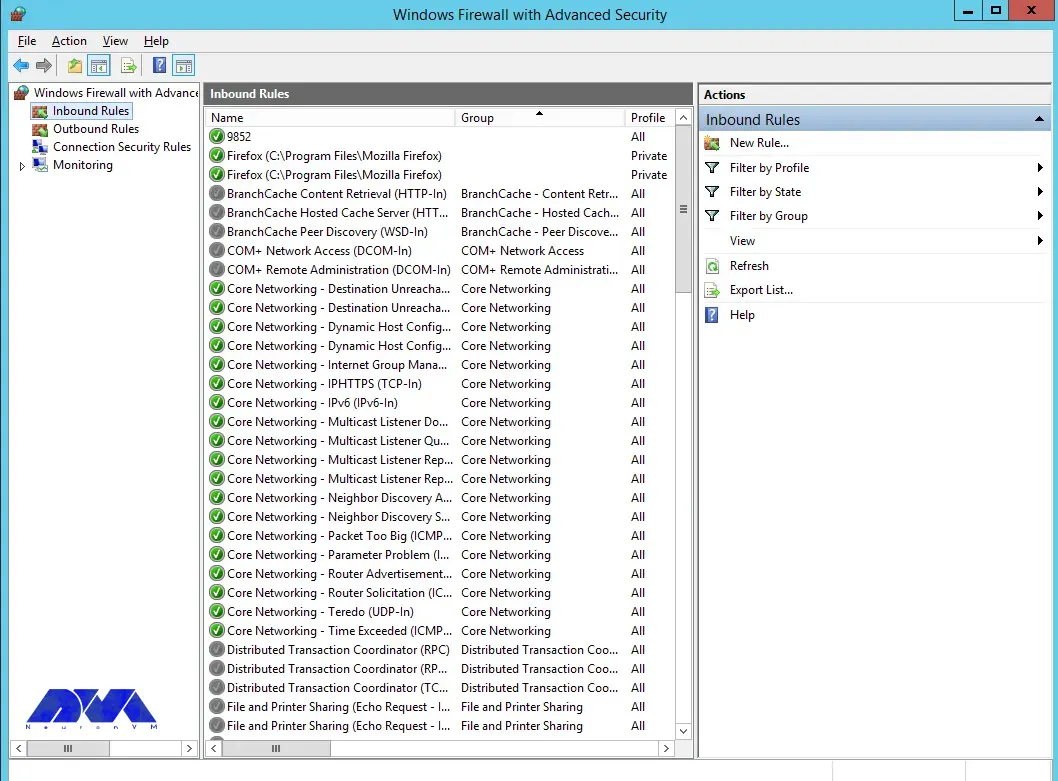
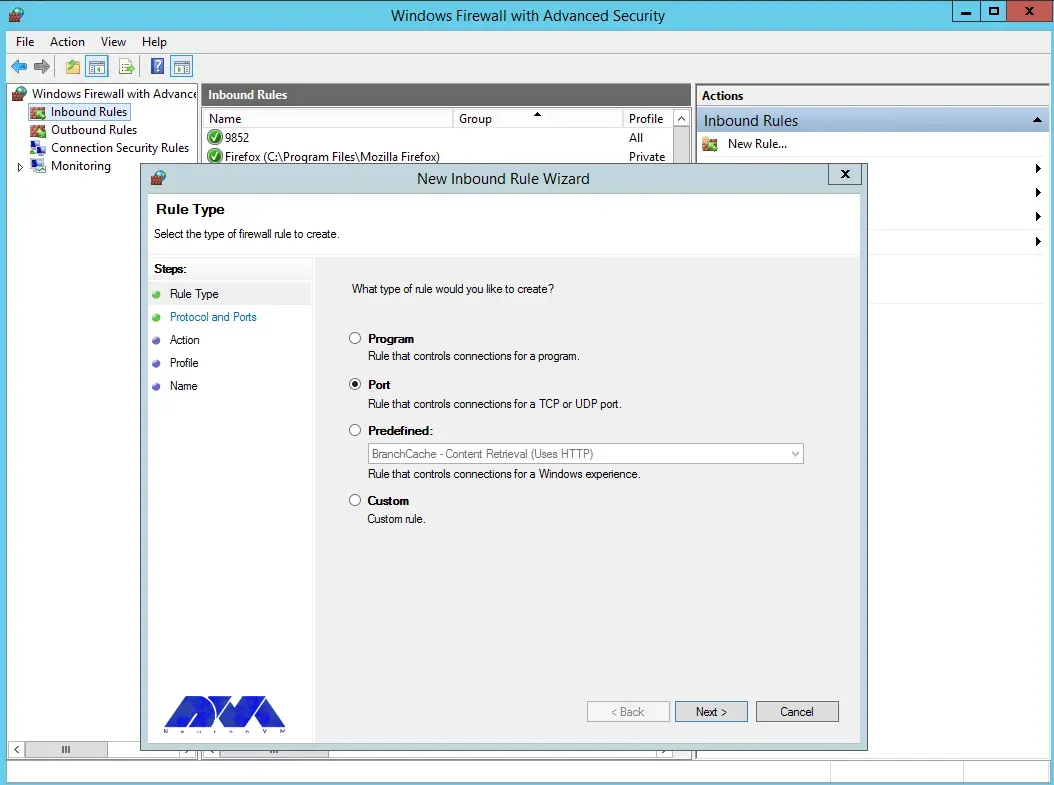
You can select the New Rule option from the Inbound Rules section:
Select the port and then click Next:
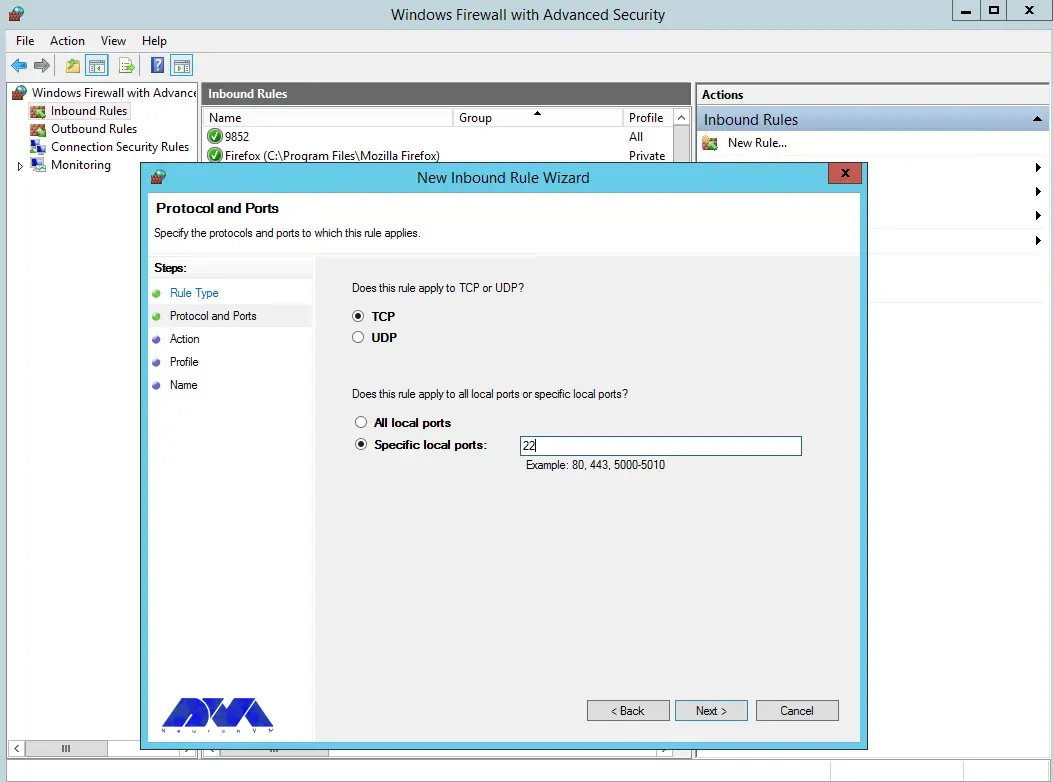
Select TCP as shown in the image below, then type port 22 and click Next:
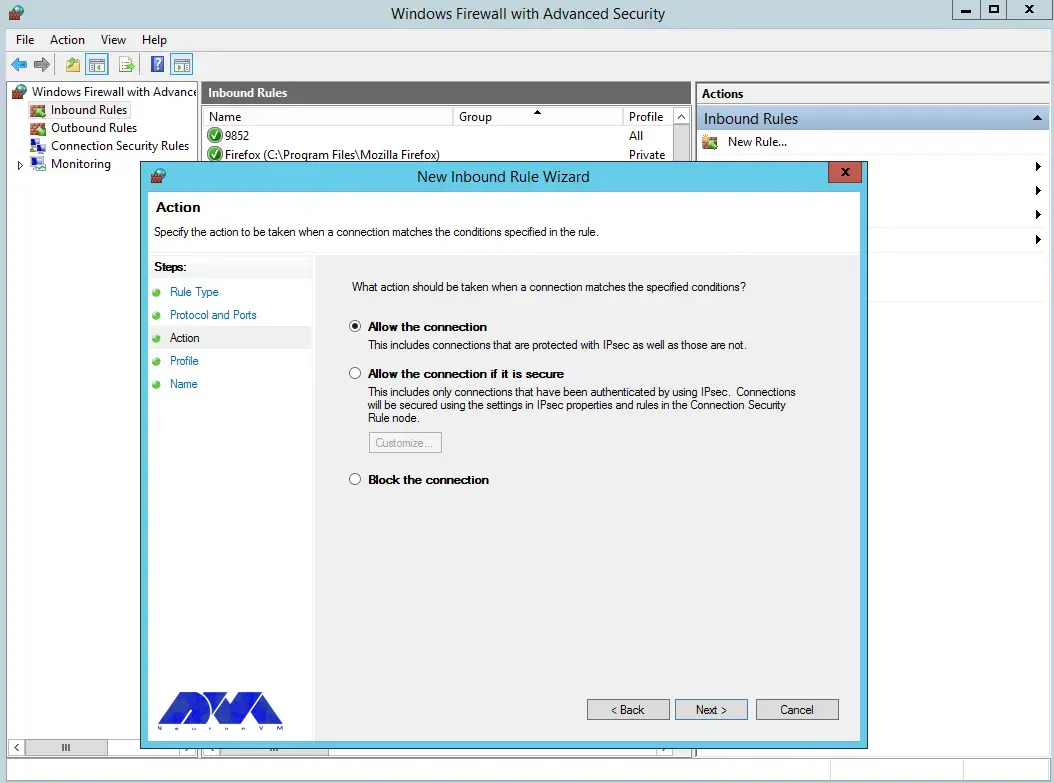
Next, you need to allow the connection:
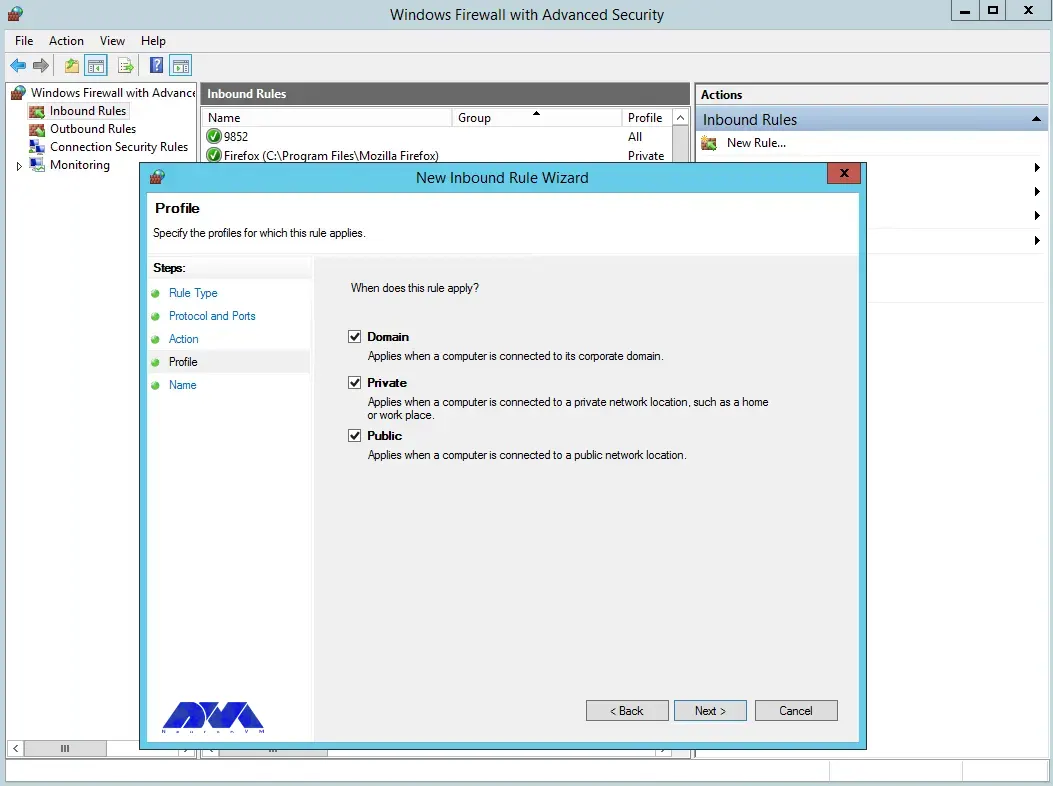
You can also assign the rule to server profiles and set a custom name for easy identification from the list of firewall rules:
In the final step, you can complete the firewall configuration steps by clicking Finish:
Using OpenSSH for secure remote access
With the help of the OpenSSH tool, you can securely connect to remote machines using SSH protocol. This tool will help you log in to the shell, copy files, enable key-based authentication, mount remote file systems, and more. Note that to use OpenSSH, you must install it on both the client and server machines.
Advanced OpenSSH security features
As mentioned in the previous sections, OpenSSH is a tool that allows you to securely connect to a remote server using the SSH protocol. OpenSSH encrypts all traffic between client and server to prevent possible attacks.
To take advantage of the advanced security features of OpenSSH, it is necessary to perform the following steps:
1) You can install OpenSSH on client and server machines using Windows settings or package manager.
2) To configure OpenSSH, open the file /etc/ssh/sshd_config and make the following settings:
PasswordAuthentication no
PermitRootLogin no
3) Using a public and private key pair, you need to generate SSH keys on the client machine by running the ssh-keygen command.
4) Copy the public key to the server machine by running the ssh-copy-id command. Note that you can log in without a password by adding the public key to the ~/.ssh/authorized_keys file.
Troubleshooting OpenSSH installation and configuration issues
In this section, we are going to review and troubleshoot OpenSSH installation and configuration issues.
1)Remote Hostname Identification Error:
The first error we are going to troubleshoot is Remote Hostname Identification Error. You may receive the following error:
REMOTE HOST IDENTIFICATION HAS CHANGED
Or when an SSH host cannot connect using a specific network address, the following error may occur:
error output
ssh: Could not resolve hostname example.co: Name or service not known
Solution:
Check the correctness of the hostname.
Check if the hostname error can be resolved using the ping command.
This error means that the user’s attempt to connect to a server has encountered the server’s refusal to load results within the specified time interval. Note that running the following command ssh [email protected] in OpenSSH may cause this error:
Error output
ssh: connect to host 111.111.111.111 port 22: connection timed out
Solution:
Ensure the correctness of the IP address
Checking the possibility of connecting the SSH port with the network
Check that the firewall rules are not set to default.
3) Connection failure
An important point is that connection failure is different from timeout. Connection failure means that your request reaches the SSH port, but the host refuses to receive the request.
Error output
ssh: connect to host 111.111.111.111 port 22: connection refused
Solution:
Ensure correct IP
Ensuring that the SSH port can be connected by the network
Check that the firewall rules are not set to default.
Best practices for using OpenSSH on Windows Server
In this section, we intend to teach you the Best practices for using OpenSSH on Windows Server.
1) Limit ssh access of users:
Given that all system users can log in via SSH using their password or public key, they have full access to system tools, including compilers and programming languages. This can open some network ports for some users. You can limit user access to allow only root, Jonnson, and Terri users by adding the following command to sshd_config file:
AllowUsers Jonnson Terri
To allow access to all users except a limited number of them, add the following command:
DenyUsers root Linda Thomas Michael
2) Disable empty passwords:
You can disable all password-based logins. Therefore, it is necessary to allow only public key-based logins by adding the following commands:
In this section, we want to tell you how to disable the root user login. First, you need to make sure that the normal user can log in as root. For example, let the user Jannson log in as root using the sudo command:
On a Debian/Ubuntu:
sudo adduser Jonnson sudo
id Jonnson
On a CentOS/RHEL/Fedora:
sudo usermod -aG wheel Jonnson
id Jonnson
Now you can test sudo access and disable root login for ssh by running the following commands:
sudo -i
sudo /etc/init.d/sshd status
sudo systemctl status httpd
Finally, disable root login by adding the following line to sshd_config:
PermitRootLogin no
ChallengeResponseAuthentication no
PasswordAuthentication no
UsePAM no
4) Disable password-based login:
To disable password-based login, you should add the following commands to the sshd_config file:
Check that ssh key-based login works for you by running the following command:
ssh jannson@rhel7-aws-server
Alternatives to OpenSSH for Windows Server security
In this section, we intend to tell you the best alternatives to OpenSSH for Windows Server security in 2023. These alternatives are:
1) SecureCRT: SecureCRT is software for terminal access to network devices and servers. This software can be used for Windows, Mac, and Linux operating systems. In addition, it provides a suitable environment for professional work with terminals along with increasing productivity, advanced management of sessions, and saving time by not doing repetitive tasks!
2) Mobaaxterm: MobaXterm software is the best toolbox for remote computing. This program on the Windows operating system offers many functions designed for programmers, webmasters, IT managers, and almost all users who need to do their remote work in an easier way.
3) PuTTY: PuTTY software is a terminal emulator and file transfer program developed as free software for Windows. But it has also been ported to other operating systems. This program supports several different protocols including Serial, SSH, Telnet, Raw, and rlogin.
4) Remmina:
Remmina software is one of the useful tools for connecting to remote machines through the network. This software has the ability to support several protocols, which have a plug-in for each of them. The protocols that Remmina software supports are as follows:
RDP (Remote Desktop Protocol)
VNC (Virtual Network Protocol)
Telnet
SSH
NX
XDMCP
5) mRemoteNG: mRemoteNG is a multi-tab remote connection manager. This tool is also a central tool for managing communications to remote systems. mRemoteNG has many features including the ability to manage multiple types of connections. In addition to RDP, this tool also supports other protocols including VNC, ICA, SSH, Telnet, RAW, Rlogin, and HTTP/S.
The tab feature is perfect for when you have multiple sessions open and need to move between them. Other features of this software include simplicity in organizing communications, saving password information for automatic login, importing from Active Directory, full-screen mode, ability to group folders.
Conclusion and next steps
OpenSSH is the SSH service protocol. OpenSSH is recommended for remote login, backup, remote file transfer via scp or sftp, and much more. SSH is the best way to keep confidential and complete information and data exchanged between two networks and systems. However, its main advantage is server authentication through the use of public key encryption.
Using screen readers can play a key role in interacting with computer devices for the blind, visually impaired, and even the illiterate. Nevertheless, even those who possess unimpaired vision and reading abilities can reap the advantages of utilizing this software to convert textual content into audio. By employing the Screen Reader, one can effortlessly analyze and transform content into either synthesized human speech or content that is compatible with Braille displays. The primary emphasis of this article centers around the process of install Screen Reader on Admin RDP. Please continue reading for further instructions.
Introduction to Screen Reader
The Screen Reader software is designed to cater to a wide range of needs, supporting popular applications including web browsers, email clients, web chat programs, office suite applications, and virtual servers on Windows Server. Furthermore, its text-to-speech engine is equipped to handle over 80 languages, ensuring a comprehensive user experience. Not only does it announce the text formatting details such as font name, size, writing style, and even spelling errors, but it also goes the extra mile by automatically vocalizing the text beneath the mouse cursor. And if that wasn’t enough, it even provides auditory feedback to indicate the precise position of the mouse upon the user’s request.
Install Screen Reader on Admin RDP
To ensure a successful installation of Screen Reader to Admin RDP, follow the following steps:
1. Begin by typing “Remote Desktop” in the WIN field and hitting Enter.
2. In the resulting window, proceed to enter the IP address of your server and click on the Connect button.
3. If you have recently installed VPS, after logging in, you will gain access to your desktop, which will display all available icons on your Windows server.
4. Now, in order to enable sound, press WIN+R to open the run dialog. This is necessary because the sound is disabled by default in the Windows server.
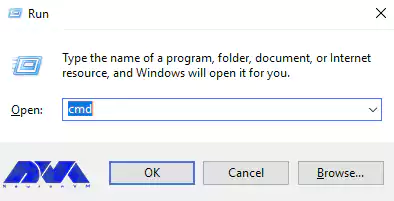
5. In the Run dialog, type “cmd” and press Enter. By following these steps, you will successfully install Screen Reader to Admin RDP.
In this step, you have to type the following command and then press Enter.
net start audiosrv
It’s important to keep in mind that the previously mentioned methods do not automatically start the audio service during Windows startup. To address this, follow the steps provided below.
How to enable the narrator on Admin RDP
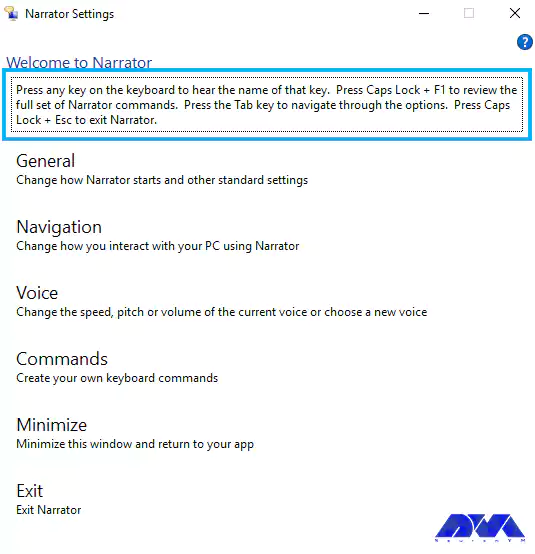
To activate Windows Narrator, revisit the Remote Desktop on Windows guide. Microsoft Windows Narrator is a program available on Windows Server that facilitates screen reading for individuals with visual impairments. Typically, blind users navigate using keyboard inputs rather than a mouse. They rely on keystrokes like ALT+TAB to switch between open windows.
First Method:
The first way to enable Microsoft Windows Narrator is simple. If you use Windows Server 2012 or 2016, you should turn on Narrator by pressing CTRL+WIN+ALT at the same time.
Because this method does not always work, you can use the following method to enable Microsoft Windows Narrator.
Second Method:
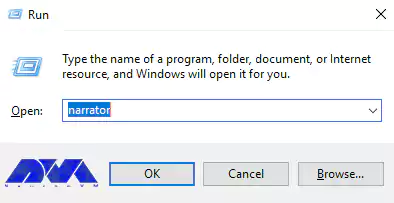
Now you have to press WIN+R again to open the run dialog. Then you should type narrator into the run dialog, and then press Enter. You will only hear the sound of the Narrator speaking if your sound is on.
*
If you plan to permanently use the screen reader on your server, you will need to configure the audio service to start automatically. We need the audio service to start automatically when the server starts up because for a blind user, using audio is the only way to communicate with the system.
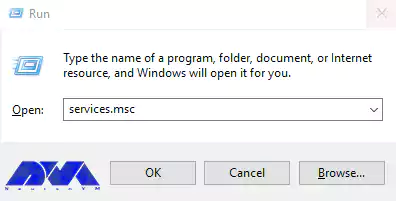
Now you should open the run dialog again and type services.msc and press enter.
Upon executing the steps, you will come across a prompt that states: “You are in a tree view.” To navigate through the services, simply press the TAB key and utilize the arrow keys.
You should continue pressing w until you hear the Windows audio services and then press Enter. If the setting is configured as manual, you can modify it by pressing the up and down arrow keys. After hearing ”automatic”, press Enter. Now you can close the dialog box.
Conclusion
In this article, we explained the importance of a screen reader for blind people and also enumerated its features. Using this article, you can easily install and setup Screen Reader on Admin Remote Desktop.
This tutorial presents the way to Change Password on RDP 2016, 2012, and 2019 step by step. One of the security measures after purchasing an Admin RDP VPS server is changing its password. You may want to change the password on your Windows server for security reasons. Changing the Windows server password is not difficult; you can change your password on Windows servers with a few simple steps. Join us for How to Change Password on RDP 2016.
Importance of changing RDP 2016 password
Because AD Administrator is a very powerful user for Active Directory and you can restrict or open features to other users and computers, install or remove programs, and you can turn off any member computer using Admin. So you need to keep the AD Administrator user in a safe place.
You may also sometimes need to change the Administrator password or other users that connect to the server via a Remote Desktop Connection. You may want to do this for added security.
Changing your password is essential because when you use Windows as a server, you must use secure passwords so that you do not have security problems and no one can hack your server. It should be noted that you can change your RDP 2016 password at any time.
First method: Change Password on RDP 2016
You can change the passwords of the domain users by using the following method. The first step is to log in to the Domain Controller and open the Server Manager.
In the next step, you have to click Tools from the Server Manager and then click Active Directory Users and Computers.
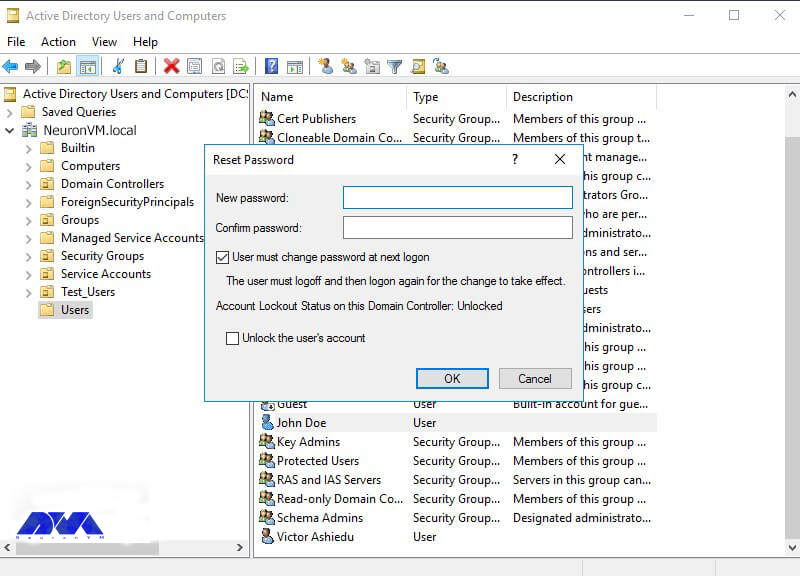
After opening Active Directory Users and Computers, go to the AD container where the user is. Now you need to right-click on the user and click Reset Password.
In this field, you must type the password in the New password field. Then type the same password in the password confirmation field. To not force the user to change the password when they log in, the box next to “User must change the password on the next login” must be unchecked. To unlock a locked account, you should check the unlock the user’s account box. Finally, click on OK.
How to Change RDP 2016 password through the control panel
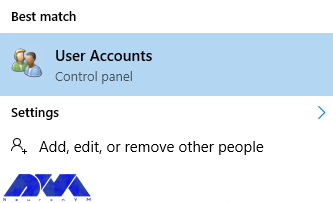
First, type “user accounts” in the search field from the Start menu of your Windows server. Then click on it.
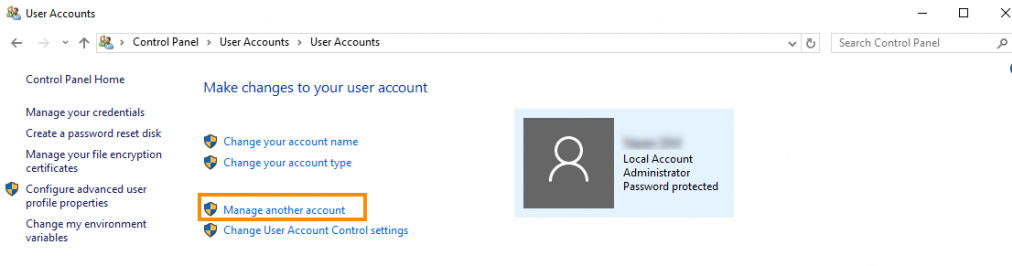
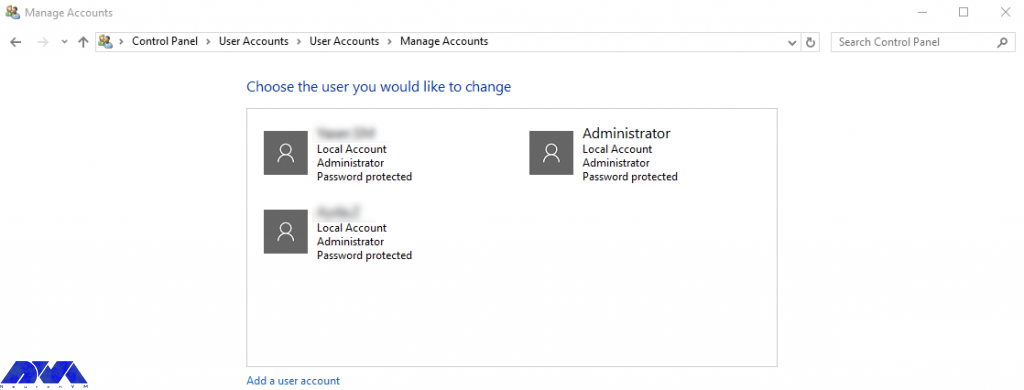
After opening the User Accounts window, click on the Manage another account option as shown below.
Note: This operation must be done with users who have admin access.
On the opened page, the list of users on your server can be seen. By default, the Administrator user is the entire server with full access.
Please click on the desired username.
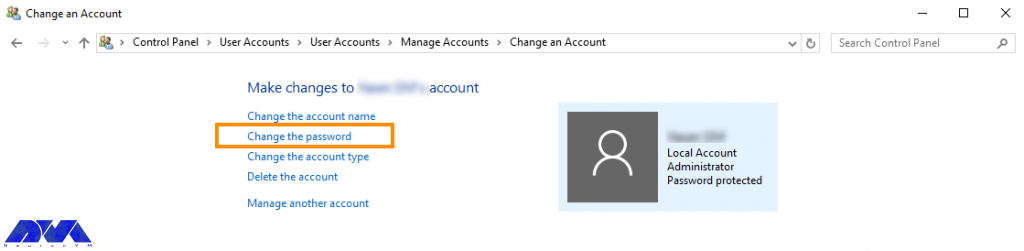
After selecting the desired user in the open window, click on Change the password.
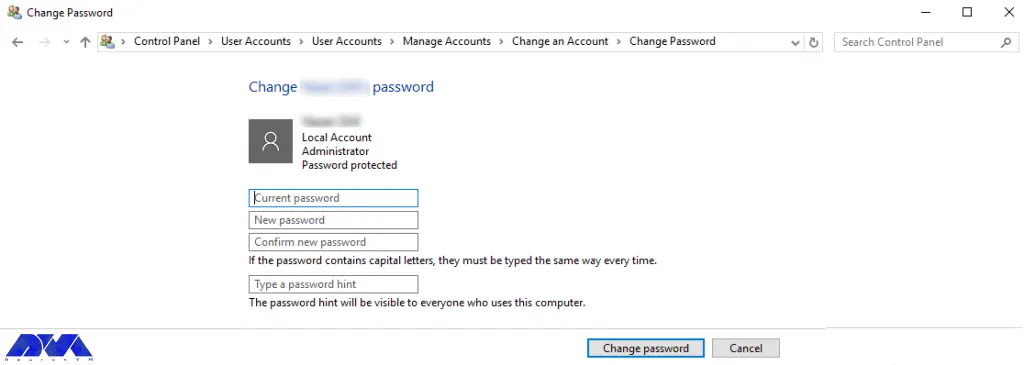
In the Current password field, enter the current server password. Then you must consider a new server password in the New Password section. Enter the new password again in the Confirm new password field.
Finally, click on Change password.
Now the password of RDP 2016 has changed and you can use your new password in the subsequent logins. Be sure to use strong passwords and change your password at short intervals.
Second method: Changing the password in RDP 2016 through server settings
First, log in to the server directly or using Remote Desktop before starting.
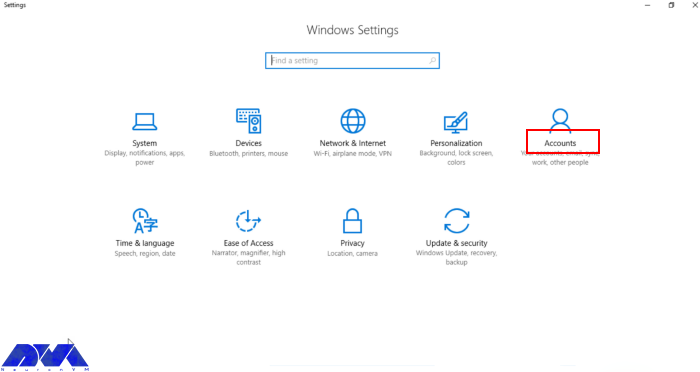
Then press the Windows key+i or enter the settings section through the Windows menu.
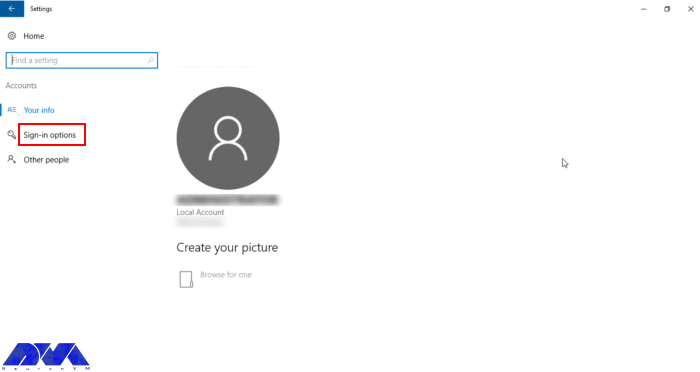
Go to the Accounts section and open the Sign-in options.
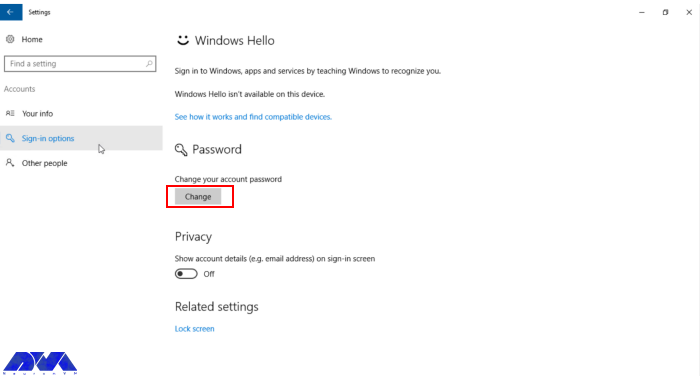
Then go to the Password section and click on Change.
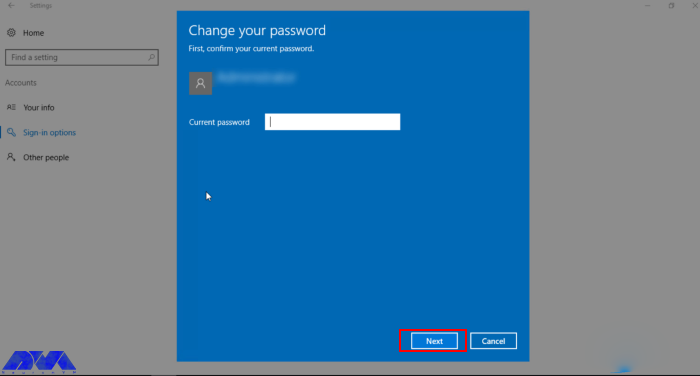
Now enter the current password and click Next.
Then enter and confirm the new password.
The password has now been successfully changed.
Conclusion
As we mentioned above, this article was prepared to teach you how to change the password on RDP 2016 using two methods. Password and authentication are some of the most critical issues for the security of your system. So after purchasing an Admin RDP, it is better to change the account password and make your server more secure. If you have any other questions or ideas please share.
One of the most familiar and practical VPN protocols is OpenVPN. It is famous for its security and excellent connection speed. You can use its official client for free. But there are many users who report that OpenVPN is not working on their Windows 10 PCs. If you also have problems working with this VPN, we will help you this way and show you how to fix OpenVPN errors on Windows 10.
What Is OpenVPN?
OpenVPN is a very popular open-source VPN client and VPN protocol. If your goal is to create a secure web tunnel, you can download and install an OpenVPN client for free on all popular systems and access all resources easily. But as mentioned before, you may encounter problems in each of these steps. So we recommend that you read this article carefully. To use OpenVPN, you can buy Windows VPS servers that are presented on our website with excellent quality.
OpenVPN Errors on Windows 10 and Its Solutions
Here are some of the most common OpenVPN problems and the ways to solve them:
The Error of TLS Key Negotiation Failed to Occur In 60 Seconds (TLS Error)
Various reasons should cause this problem. The main reason is that the client program is old. To be sure of this, enter the server and examine the log file on the server side. There is a strong possibility that the client application is an old version. For example 2.2. If you see such messages on the server side:
If you want to solve this problem you should upgrade it to the latest version.
Another reason can be a block in a firewall or in the ISP that somehow blocks or interferes with the TLS handshake. The next thing would be to change the settings related to the TLS minimum requirement level, but the OpenVPN client uses an old version that has incorrect instructions.
Solution:
The solution may be to install a new copy of the configuration profile.
The Error of Local or Remote Keys is not synchronized
There may be cases where the TLS key negotiated to be used for TLS encryption and decryption differs from the key used on the server side. Because when the client and the server talk to each other, they use a common TLS key that is used to encrypt and decrypt the traffic. There should be a short overlap where both the old and new keys are accepted but when the old key is expired and the new key must be used. As a result, for some reason one side doesn’t do this and there is no synchronization, so, you will see this error message.
Solution:
In this case, use an openvpn3-based client. This client could be OpenVPN Connect Client 2, update it to the latest version. So the solution is to update your access server to the latest version so that you can put the updated connection client on it. Then download and install the latest version of OpenVPN Connect Client from the Access Server section. Finally, despite the reduced security, you can change the TLS key update on the VPN page of the admin interface to get rid of these problems.
The Error of Server Poll Timeout
If you get a server poll timing error, it means that the server is not reachable on the specified port. Here the error message is quite clear: that is, there is no response at the address or port. When you see this error, check if the port is really open and the port is correct or if the port is accessible from the Internet, etc., to make an initial connection to the server to confirm. As a result of these symptoms, you will see the message “This server cannot be reached”.
Also, another mistake is that you forget to open the three ports that are required for the OpenVPN access server. These ports are TCP 443, TCP 943, and UDP 1194.
Solution:
To solve this problem, you can set a DNS name, and then configure and save it. In the next step, you need to delete the connection profile or the OpenVPN connect client program, and then download and install again and test it.
The Error of OpenVPN Doesn’t Connet
Another common issue is that Windows or Admin RDP may fail to connect to OpenVPN. As you downloaded the new version of OpenVPN, some connection and compatibility issues may encounter, or the new version may fail to create a virtual network adapter.
Solution:
Opening a VPN client can solve this problem. Go through these steps:
1- Install and run OpenVPN under an administrative account.
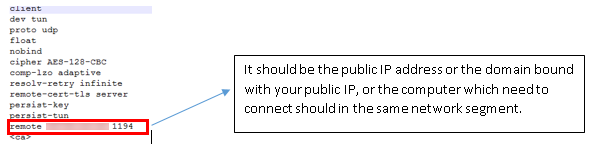
2- Analyze the settings on your computer and your router. You have to be sure that the WAN IP address is public or that the IP address to connect must be on the same network. As you export the configuration file, you can open it as txt, and recheck the IP address and port are correct or not.
How to fix OpenVPN errors on Windows
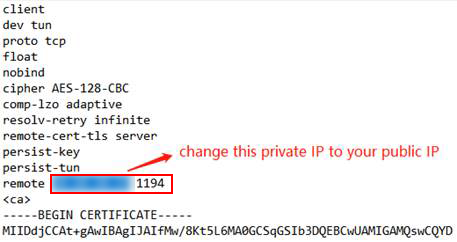
3- If there is a NAT router in front of the VPN server, note that you have done port forwarding. Then, do the update manually to the “remote IP address” in the previously exported .ovpn file. Change the previous IP address to the network’s public IP address:
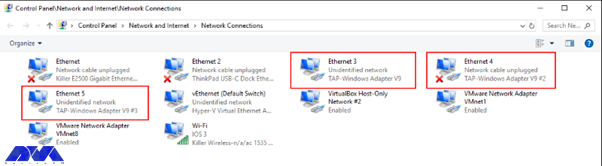
4- Then, choose to activate the TAP adapter:
5- You should close the firewall and security software.
The Error of Your Session Has Expired, Please Reauthenticate
As you use a server-locked or user-locked profile, the OpenVPN Access Server works with a session token-based authentication system. Then after successful authentication, you will take a session token instead. You will be identified by the session token now. The session token is set to expire after 5 minutes of inactivity when it is not connected to the server, and will also expire after 24 hours by default. Also when the token is generated on the server, it will be locked to the VPN client’s connecting IP address.
Solution:
This action can be disabled and the timeout for the total session duration can be set. So, you should either employ an auto-login type profile or raise the session token duration.
The Error of User Account Suspended or User Is in Deny List
This error will occur for two reasons:
1- In the User Permissions table, the deny access box is activated with a check mark for the user.
2- The box of The user is authenticating with an external system because the User Permissions Required for VPN Access record box is checked, then the user’s permissions table does not exist or does not match the username of the external system.
Solution:
When you want to solve the deny access box:
Enter the admin web UI, click on User Management, then go to User Permissions.
You should click on Deny Access and remove the check mark for the username.
Save the setting and update your running server.
If you want to solve the issue with the requireduser permissions record for the VPN access box:
Go to the user permissions table and add the user if it doesn’t exist.
You should be sensitive about the spelling and case match between the access server and the authentication server.
As you see the required user permissions record for the VPN access option, uncheck the box in the user permission table.
The Error of Open Tap Device “” PATH=”” FAILED TUN or Can Not Acquire Tap Handle Event
This error message will occur when the OpenVPN Connect 3.x service stops or does not start again when you sign back into the computer. The cause of this problem is an antivirus program. Mostly, this happens for ESET Antivirus.
Solution:
To solve this problem, you can reconnect by restarting the service manually, note that the automatic connection may still encounter the problem. If you want to be sure, turn off ESET. As your problem is resolved, then you may want to open a support ticket with ESET.
The Error of OpenVPN Connect Is not Showing on Windows 10
As you click on the shortcut, nothing shows up. The OpenVPN Connect window is missing. As you tried to install and re-install you will still get the same error. There is no error message appearing. It’s a bit scary.
Solution:
The only thing to do is to delete the file called “.ovpn-connect-lockfile“. Then, go to the C:\Users\YourUserName\AppData\Local\Temp. Simply delete the .ovpn-connect-lockfile file and restart OpenVPN Connect. That’s it.
Conclusion
OpenVPN is one of the most powerful VPNs which can be used on Windows. Here, we tried to make you familiar with some of the issues and errors of using OpenVPN on Windows 10. These are some common issues with solutions. So if you encounter any of them, read this article carefully to fix OpenVPN errors on Windows and enjoy using this great VPN.