Category: Tutorials

  • How To Install CloudLinux on Dedicated Server

    How To Install CloudLinux on Dedicated Server

    After reading this post, you will learn How to Install CloudLinux on Dedicated Server step by step. This platform is a great operating system that can be deployed on various systems like dedicated servers, cloud servers, or virtual machines. It can be said that one of the best solutions to secure the hosting environment on servers is to isolate the file system and keep the user’s process secret.

    What is CloudLinux?

    CloudLinux is an operating system that helps create a secure and stable platform for shared hosting. This cloud computing system is based on CentOS and Cause users to have more control over server resources:

    Features of CloudLinux

    – Isolation of user accounts prevents users from influencing each other.

    – It prevents users from seeing each other’s configuration files or private information.

    – Allows you to monitor and control limits such as RAM, CPU, and I/O.

    – Monitor and implement MySQL usage.

    – It provides CageFC, which is a type of file system.

    – It allows users to choose between different versions of php

    – Prevent symbolic link attacks

    – It is compatible with all major control panels.

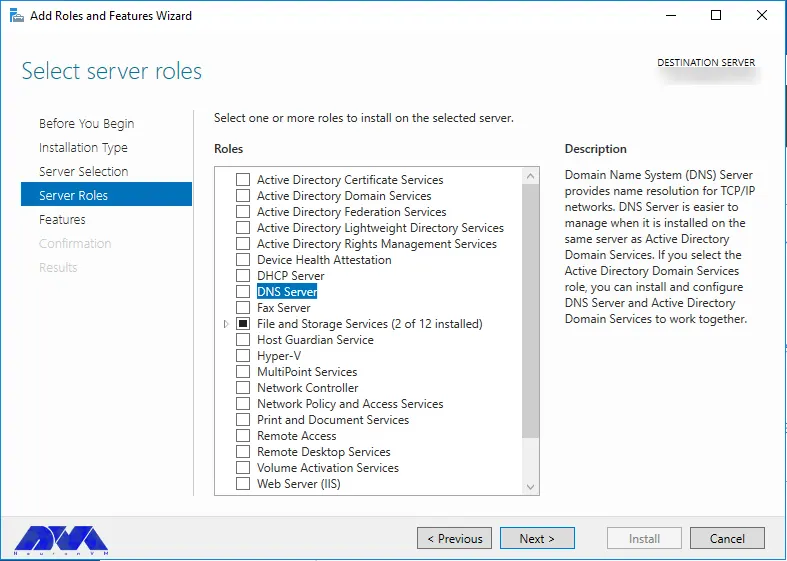
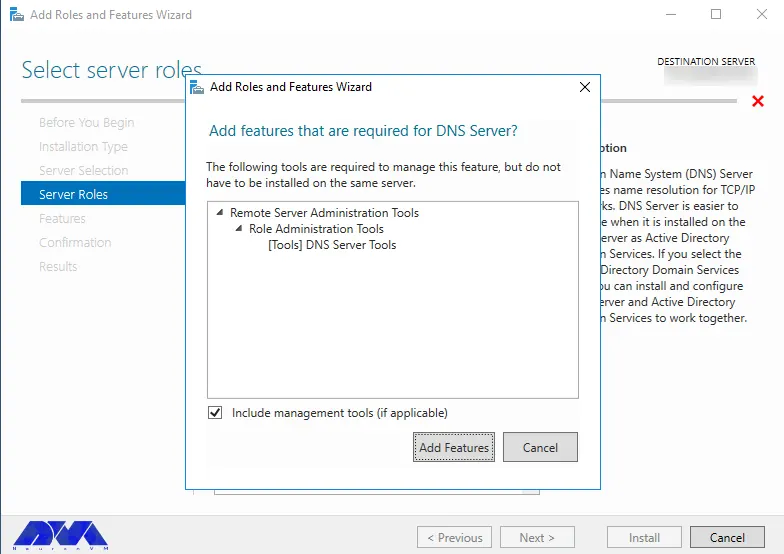
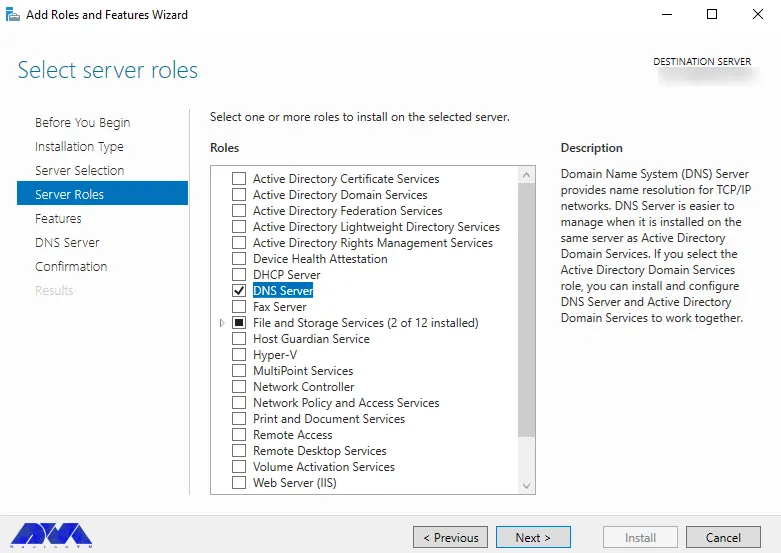
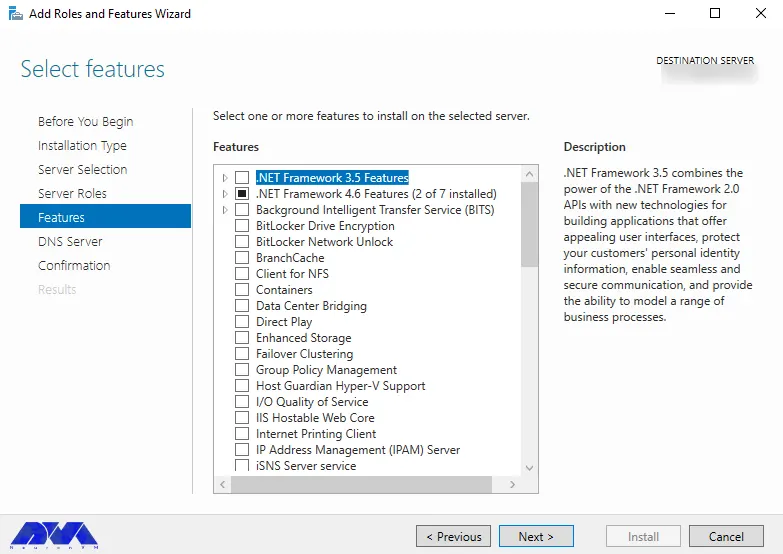
    Install CloudLinux on a Dedicated Server

    Now, it’s time to find out how to install CloudLinux on your dedicated server. To start and install CloudLinux on a dedicated server, you must have a dedicated server in the first step. Therefore, we suggest you visit the Cheap Dedicated Server plans presented on our website. So follow the instructions in this section carefully so that you can do the installation successfully.

    The first step is to run the following command to download cldeploy script:

    wget https://repo.cloudlinux.com/cloudlinux/sources/cln/cldeploy

    The installation step should be done based on the activation key, so run the command below:

    sh cldeploy -k < CL activation_key >

    If you want to get permission based on IP, use the following command:

    sh cldeploy -i

    When you finish the installation part, it’s time to run the command below to reboot the Linux server:

    reboot

    Now you have CloudLinux on your system. After rebooting, you can run the server through CloudLinux shared OS.

    Configure CloudLinux on Dedicated Server

    After installing CloudLinux on your server, you should apply the configuration by using the following commands:

    If your control panel is Cpanel, navigate WHM, then LVEmanager.

    If you use DirectAdmin, then go through Dashboard and then CloudLinux Manager.

    Tip: The CoudLinux user interface is always the same for every control panel.

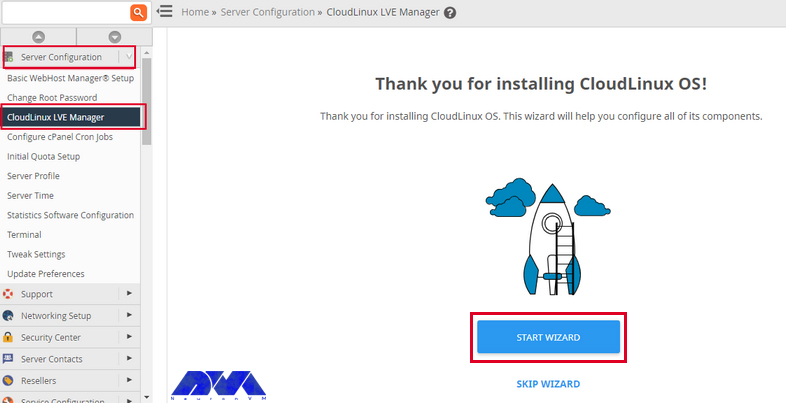
    At last, open CloudLinux through the control panel. In this case, you will face a welcome page, and you can click on the Start wizard option to finish the process:

    Configure CloudLinux on Dedicated Server

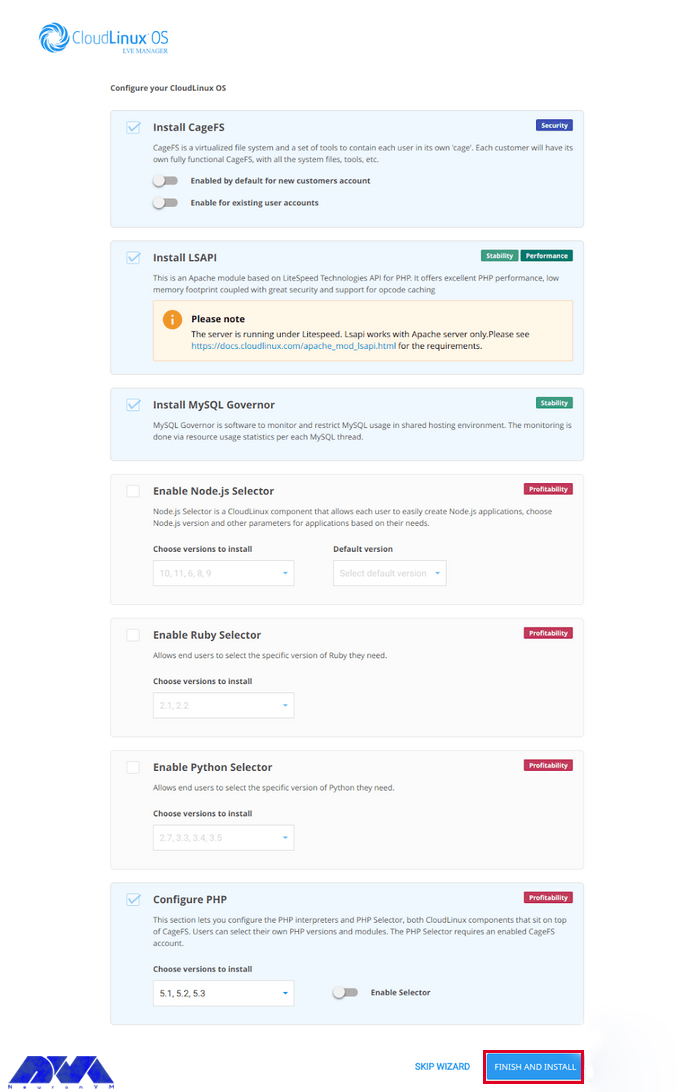
    Now, you can continue the configuration part. Here, your first choices are like this:

    Cagefc- It is a kind of virtual file system and set of tools that keeps the user hidden.

    LSAP- This case is actually a kind of Apache module, based on Lightspeed API technology for PHP and great performance of that.

    MySQL Governor- This software integrates and monitors MySQL in a shared hosting environment.

    Node.js selector- This tool is one of the components of CloudLinux that allows the user to easily create Node.js applications and also select them and other parameters based on their needs.

    Configure PHP- With this tool, you can also configure selectors and PHP interpreters. It also allows users to choose their versions and modules.

    After you have made your selection, click Finish & Install, and keep in mind that the installation may take a few minutes depending on the hardware:

    configure cloudlinux on dedicated server

    Now we are going to take a look at the interface of CloudLinux by presenting pictures.
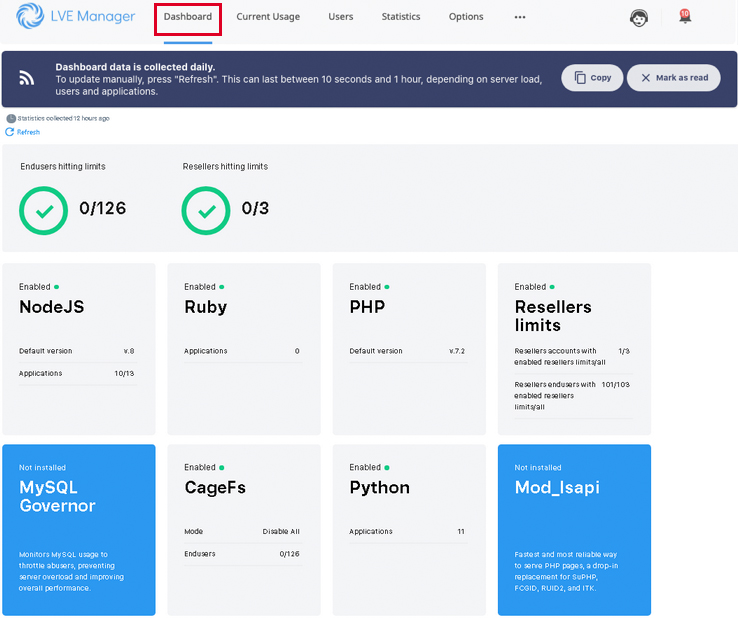
    Dashboard:

    Here, you can see the summary interface for CloudLinux. This summary gives information about the status of every other feature enabled with CloudLinux. In addition, you can see the number of users and resellers hitting the resource limits.

    configure cloudlinux on dedicated server

    Current usage:

    This interface is used to get information about the live usage of users who hit the limits. (like CPU, RAM, etc.)
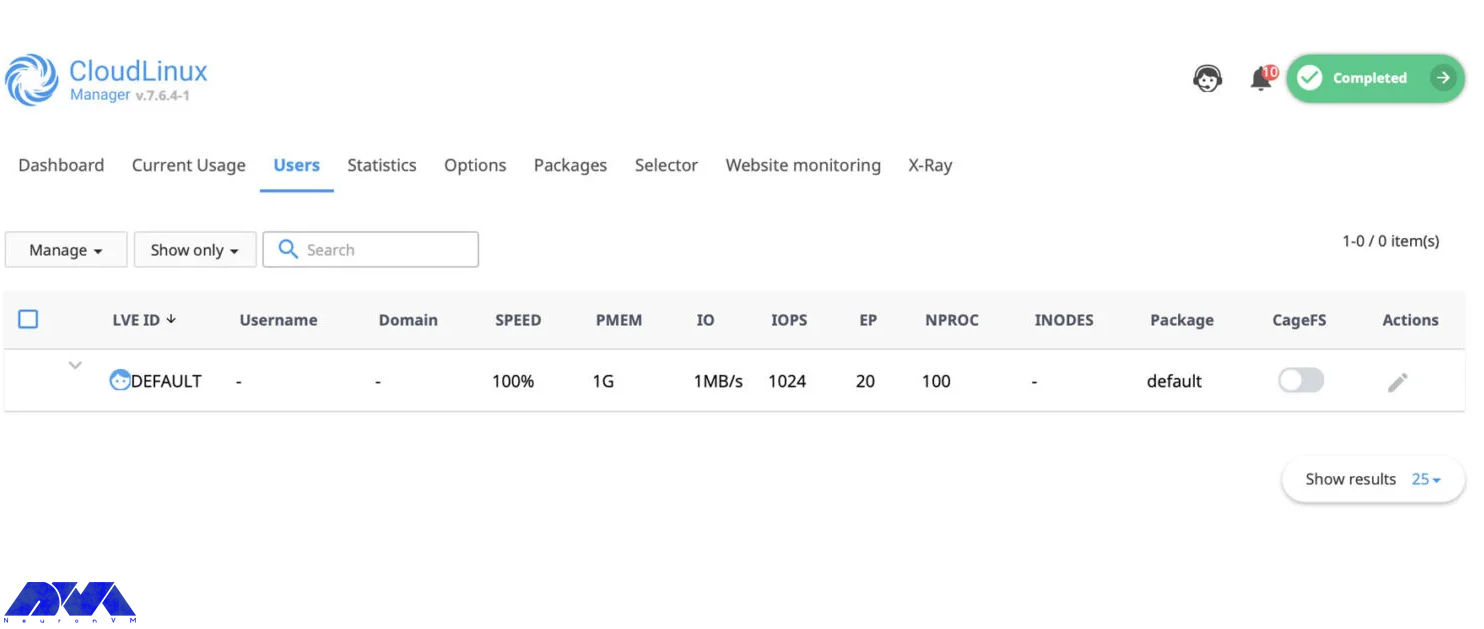
    Configure CloudLinux on Dedicated Server

    Users:

    This interface shows the list of users and their adjusted limits. In addition, you can change the individual user’s custom assignment of the resources.

    Configure CloudLinux on Dedicated Server

    Statistics:

    This one is called the statistics interface. This interface will filter the average usage of every parameter for users according to the time.
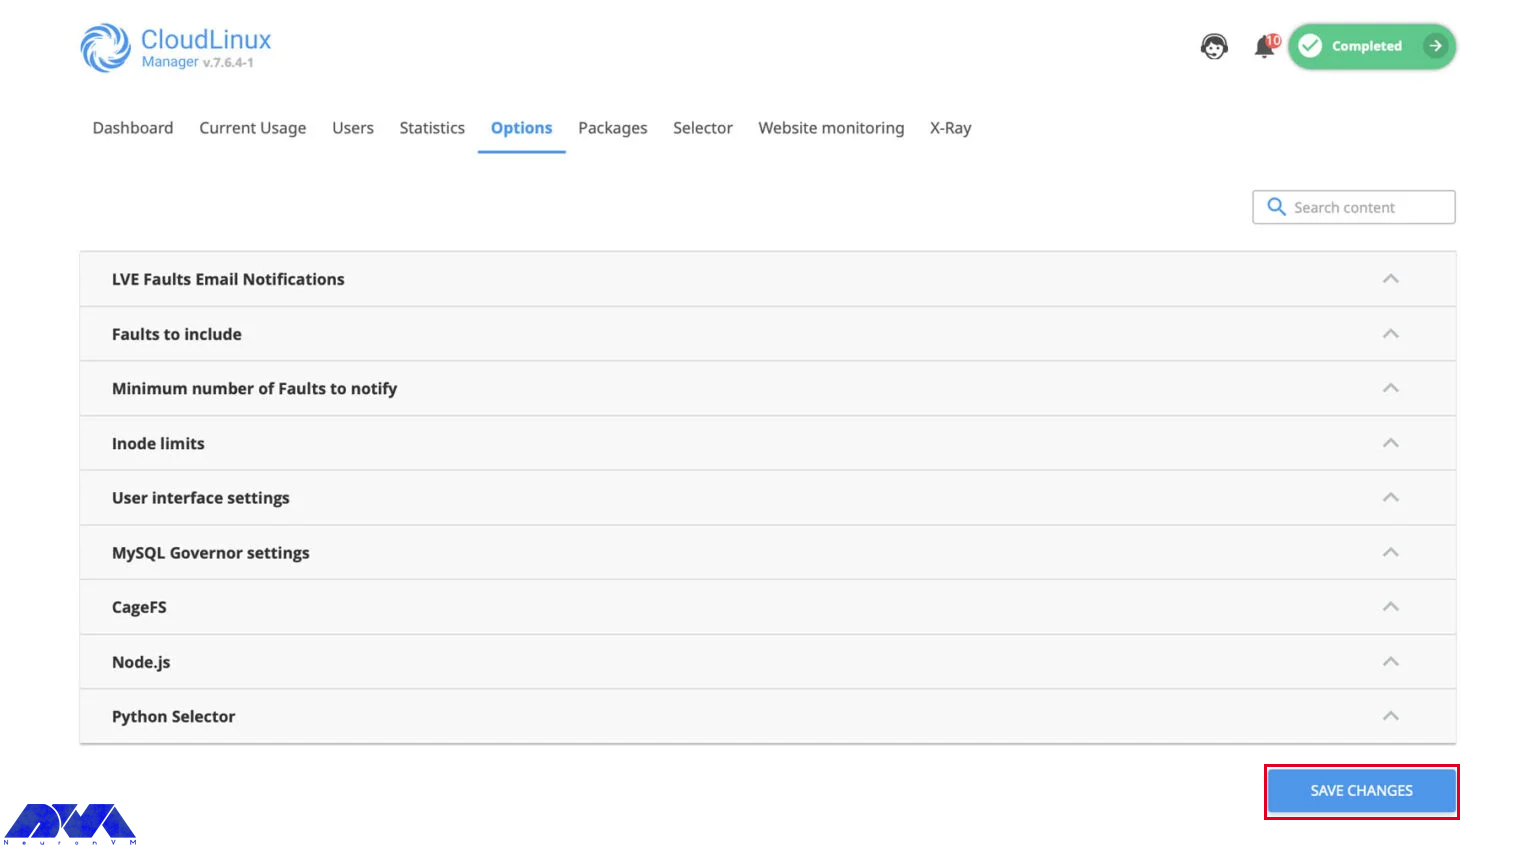
    Configure CloudLinux on Dedicated Server

    Options:

    This interface is a configurable option used to configure notifications, MySQL, Python Selector, CageFS, and so on.
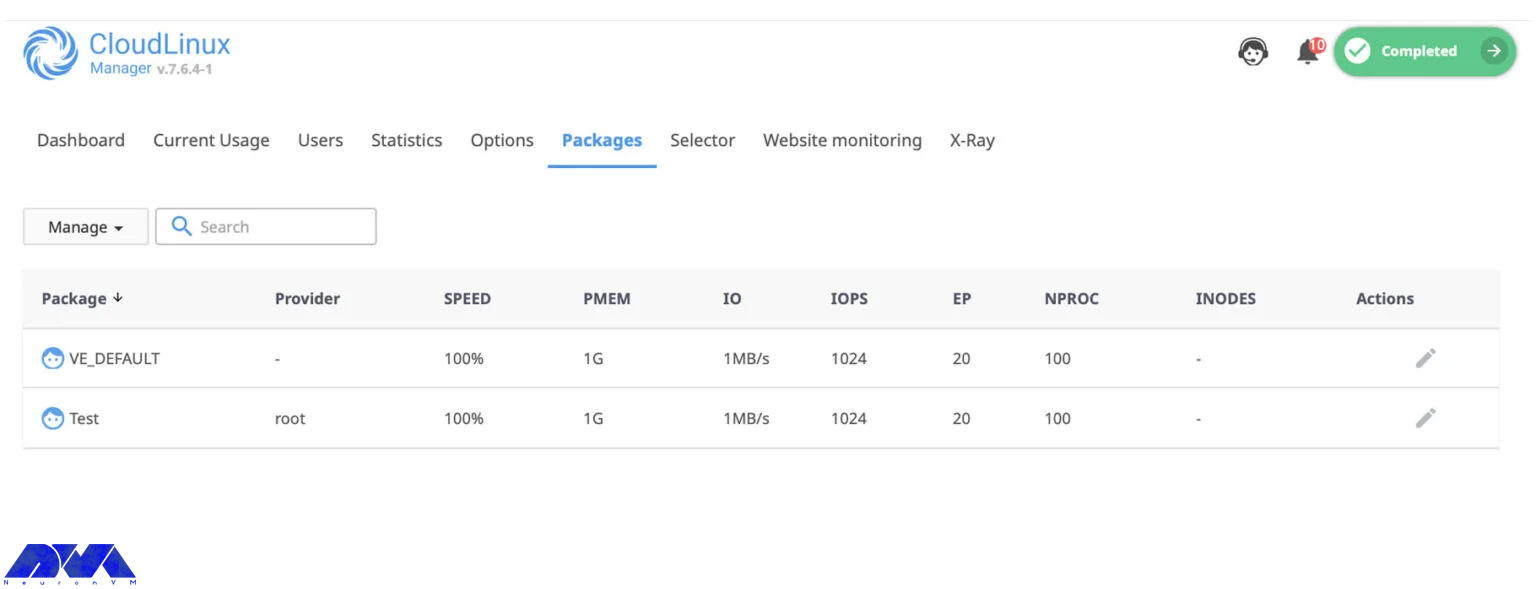
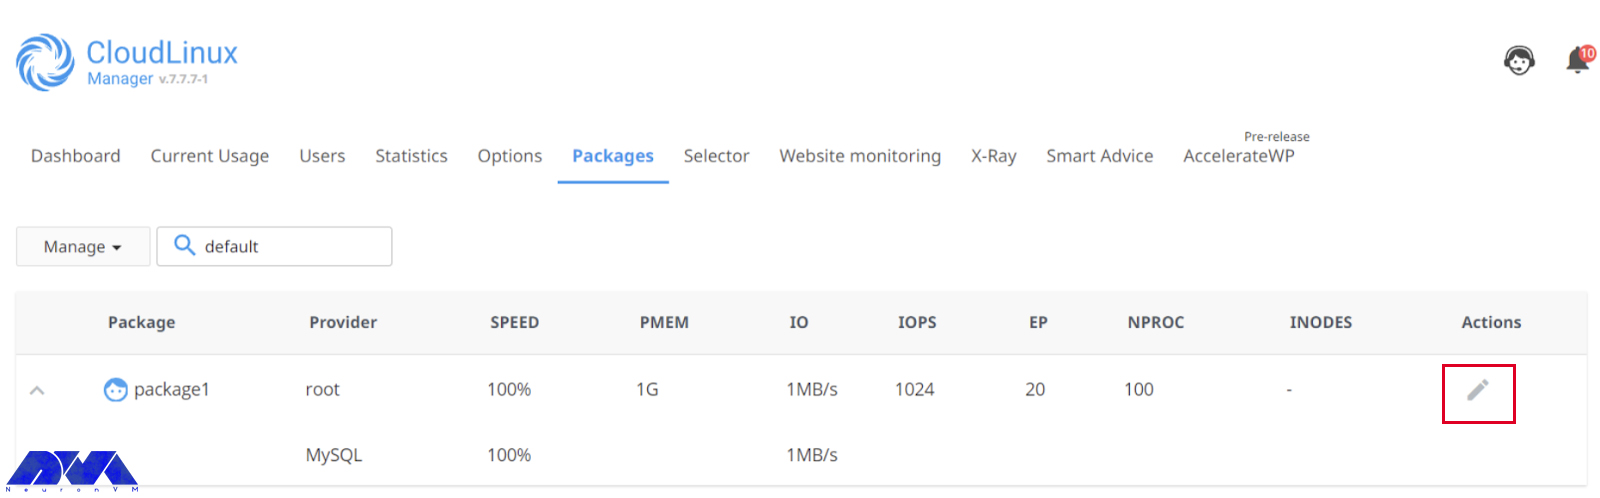
    Configure CloudLinux on Dedicated Server

    Packages:

    The package interface is used to configure the limitations of the packages.

    Configure CloudLinux packages

    Selectors:

    You can configure the PHP selector setting using this interface.
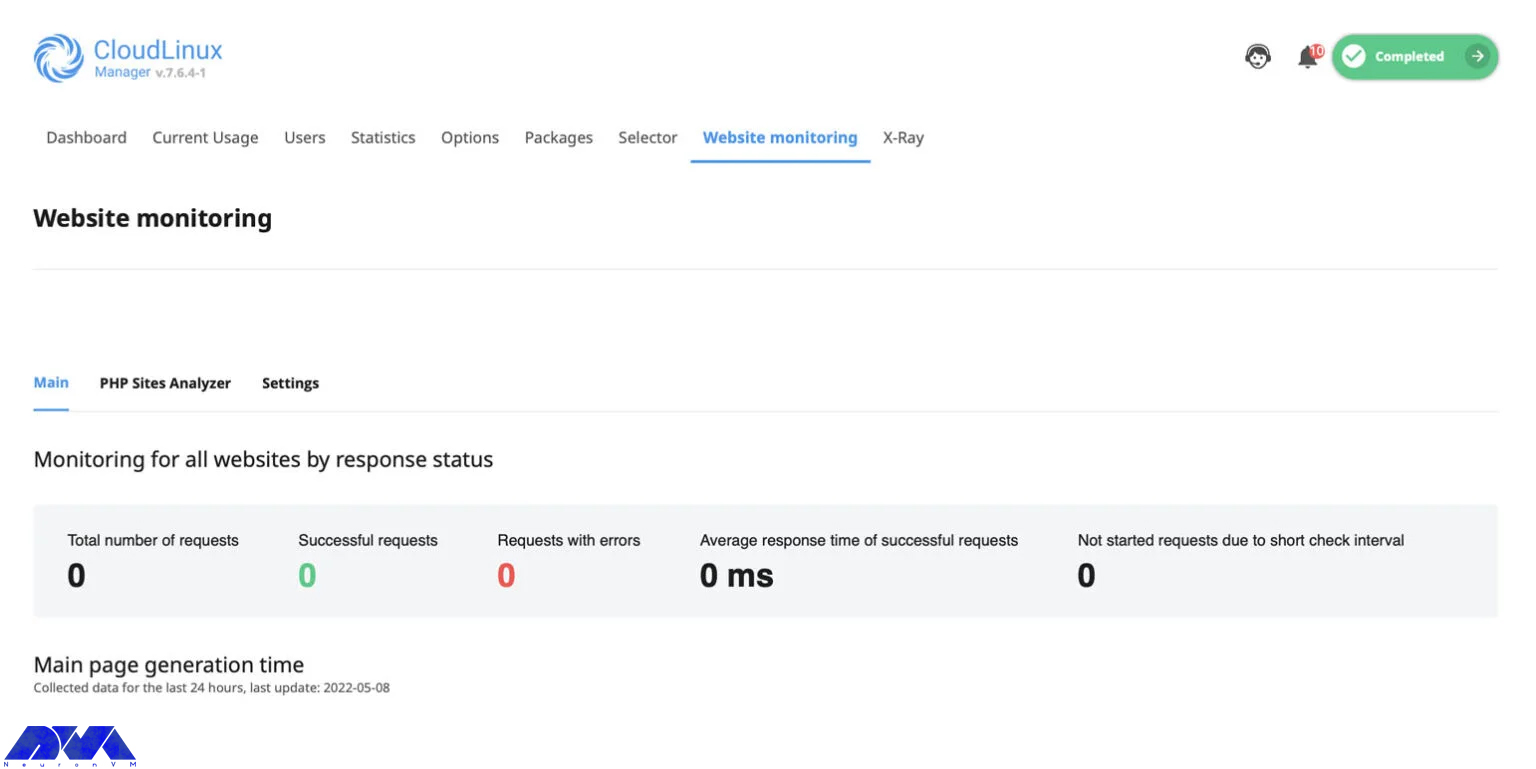
    Configure CloudLinux on Dedicated Server

    Website Monitoring:

    Use this interface to monitor the website’s number of requests and PHP reports.

    website monitoring on CloudLinux

    Configure CloudLinux Package

    After you have created the packages, go to the CloudLinux packages section to configure package restrictions. Now, you can see a list of already created packages. Then click the Pencil icon to edit the package:

    Configure CloudLinux package

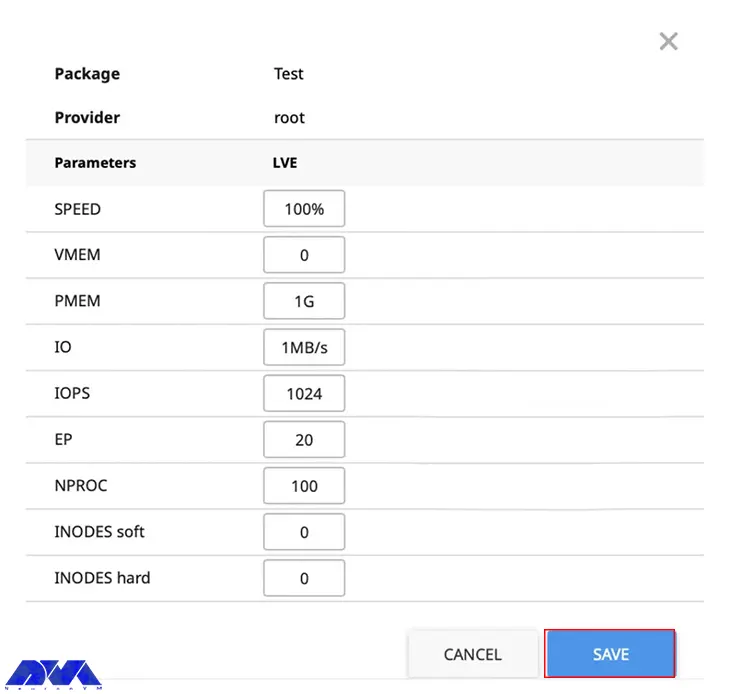
    The Limits of CloudLinux are shown here, and you can configure them for every individual package:

    Speed: Speed limit for CPU

    VMEM: limitation of Virtual memory

    PMEM: Limitation of Physical memory

    IO: Combines the operation of reading and writing.

    IOPS: This limit restricts the total number of reading and writing per second

    NPROC: Maximum number of processes on LVE

    EP: It represents a maximum number of connections that happen simultaneously to dynamic Apache scripts and SSH and corn jobs.

    Now that you have set the limit of the required parameters, you can click the save button. Note that you can apply the same procedure to other packages:

    package-limits-parameters-cloudlinux-1

    Conclusion

    In this article, we tried to teach how you can install CloudLinux on a dedicated server. We hope you enjoy this useful content. It represents a complete guide for you. If you have any questions, just comment.

    FAQ

    Does cloudLinux include technical support?

    Yes, it offers technical support services.

    Can we test CloudLinux before purchase?

    CloudLinux offers a trial period. So you can use it to test the service. Go to the website to get the trial.

  • Easy Purchase Admin RDP with Cardano (ADA)

    Easy Purchase Admin RDP with Cardano (ADA)

    Cardano is one of the largest digital currencies worldwide and the cryptocurrency associating with it was calling ADA. Of course, it should note that most people use these terms interchangeably. In this post, we will show the way to easily purchase Admin RDP with Cardano. Admin RDP is a good server that gives you administrator access and is known as a dedicated RDP. Here, you can have a dedicated IP and dedicated resources too. Our website will give you the opportunity to buy Admin RDP using Cardano.

    Benefits of Admin RDP

    Buying Admin RDP will bring lots of benefits for you. It is the cheapest RDP with admin access and is fast enough to give you a good experience of using a remote desktop. Admin RDP provides a secure connection to computers running the Windows operating system. Using Admin RDP for Windows, you can restrict access to specific computers through IP address or hostname.

    Steps to Buy Admin RDP With Cardano

    In previous articles, we provided a full explanation of Cardano digital currency. In this section, we will show the steps to buy Admin RDP with Cardano. So, follow the instructions of this post, to find out how to go through this process.

    – First, you should go to the main page of our website and click on the Admin RDP tab or directly refer to the Admin RDP page.:

    Buy Admin RDP With Cardano

    – Scroll down to see the plans. Here, you can choose the desired plan for Admin RDP to purchase:

    choose the proper plan for admin rdp

    – This section is related to the configuration part. In this part, you can choose the proper Operating System, the desired server Location, and the cycle of your payment and press Continue:

    choose admin rdp location and operating system

    – Then, you will redirect to the Review & Checkout section. Review the details of the chosen plan and click on the Checkout button.

    Tip: If you received any Promo Code for a discount. Enter the code inside the box below:

    review and checkout admin rdp payment

    On this page, you should sign up and insert your personal information, or click on the Already Registered button, if you created an account before:

    how to register on neuronvm

    – The next step is related to the payment details. Select the All Cryptocurrency icon and add notes or extra information if it is requiring, and select the Complete Order button:

    choose admin rdp payment method

    – Here, you can enter the needed Billing information. So scroll to select the Cardano cryptocurrency and press Complete Checkout to finish the purchase process:

    how to buy admin rdp with ada

    The last step is to identify the crypto Payment ID and Verification Mode. To achieve more information about your payment refer to the What to do Next Icon and click to see the information and confirm the payment:

    how to buy admin rdp with ada

    The purchase details will be sent to you by email.

    Conclusion

    This tutorial was prepared to help you learn the way of purchase Admin RDP with Cardano. Use the instructions and have an easy payment process. Admin RDP would be a great choice for you. Get this practical server for a more reasonable price and feel the difference. If you need any help or have any questions, just leave a comment.

    FAQ

    What is important about buying Admin RDP?

    It is very important to understand the legal implications and ensure that the purchase is on the way of applicable laws and regulations.

    How many users allow to access RDP?

    As a default, just 2 users are allowed to access Admin RDP, and if you want to connect more than 2 at the same time, then you have to install the RD session host role on your virtual machine.

  • A Full Introduction to CWP

    A Full Introduction to CWP

    CWP or Control Web Panel is an application software for server management in Linux systems, which was previously known as a Linux panel. This system has many features for managing servers, which makes learning easy for beginners who don’t have much experience in using the command line. So, here we will analyze and try to give a full introduction to CWP.

    What is CWP?

    As we mentioned before, CWP is a management system that is created for Linux distributions specifically AlmaLinux. It is produced to allow users to manage, edit, and maintain website content without requiring advanced technical knowledge. This control panel has a simple and understandable area where the navigation menu is in the form of a sidebar with other subsections. We suggest that you choose and buy from the cheap but high-quality Linux VPS server plans offered on our website to set up the CWP control panel.

    The dashboard is like the image below:

    cwp dashboard

    Important Features of CWP

    CentOS Web Hosting servers or the CWP has many features. In this section, we try to analyze the most notable ones for you:

    – CWP is equipped with user-advanced features and makes it possible to easily manage websites with modern and advanced user interfaces.

    – This control panel provides complete support for the automation of processes. You can set a billing software to help with the creation of user accounts or run user backups or cronjobs, etc.

    – It contains a powerful file manager. Also, you can manage FTP users and user limits with CWP.

    – The advanced file manager is equipping with a code editor that makes it easy to manage your websites.

    – This control panel contains many security and safety features that are dedicating to you. These security functions are integrating into CWP:

    cwp security

    – CWP has several monitoring tools. These tools are NetData, Live monitoring of MySQL process, an AI bot, and so on.

    – An advanced backup system with daily, weakly, and monthly backup options in all fields.

    – CWP helps you configure client packages and service plans so easily.

    – Multiple billing systems are supporting by CWP. These systems are WHMCS, Hostbill, Wisecp, and Blesta.

    What Is the difference between Free and CWPpro?

    As the name suggests, you can get the free version of CWP and use it without any payment, but it has features that require a premium version. These features are:

    – The ability to create unlimited CWP users

    – Having sales agents

    – Immediate update of CWP and ModeSecutity

    – Using multiple versions of PHP simultaneously

    – Migration tools for Cpanel

    – Providing additional system security solutions

    Note that, these are all for use in the CWP interface and you can log into the terminal to update the software or install your web security.

    Conclusion

    This article is prepared to introduction to CWP or Control Web Panel and makes a clear understanding of it for you. By studying the features and analyzing this control panel, you can see how useful and applicable is CWP. We hope you enjoyed the content.

    FAQ

    How secure is CWP

    The security in this control panel depends on various factors like implementation, authentication mechanisms, regular updates, and secure coding practices that are completely effective in this field.

    Cpanel or CWP; Which one is better?

    CWP provides a completely free package, whereas, Cpanel is a paid version.

  • Tutorial Add a New DNS Zone with WHM on Dedicated Server

    Tutorial Add a New DNS Zone with WHM on Dedicated Server

    In this tutorial, you will learn how to add a new DNS zone with WHM on the dedicated server. To explain this process with an example, we will assume that you have a DNS server with Cpanel permission. In order to be able to display your site on the internet, the only way is to setup the DNS server correctly. So you need to add a DNS zone for your address and run it in the right way.

    What is the DNS Zone?

    DNS is the domain name system and it has the role of converting domain names into IP addresses. In this way, allows browsers to access internet resources and websites. IP addresses are actually like site identifiers and other devices can use them to find your system location.

    Prerequisite

    – A Dedicated Server (We recommend you visit the Cheap Dedicated Server plans presented on our website and choose a plan.)

    – Install cPanel on Dedicated Server

    Buying Cpanel License is easy. Cpanel has a graphical interface and it is like you can manage your server even with little information as a beginner. Of course, you should have some knowledge to control and make changes to this control panel. Because, if you do not master what you are doing, then will disrupt the performance of your server.

    How to Add a New DNS Zone with WHM on Dedicated Server

    Actually, if you have a least Cpanel license, the process of adding a DNS zone is simple and easy. So as the first step, login WHM and follow the direction below:

    login to whm/cpanel

    Go to the DNS functions > Add a DNS Zone

    Add a New DNS Zone with WHM on Dedicated Server

    Then go through the following steps to add a new DNS zone:

    1- You should go to the Domain selection part and as you see the IP field enter the IP address.

    2- Now you see the domain field. Enter your domain name.

    3- At last click the add zone Button, and add a new zone on your server.

    how to add a dns zone on whm

    The Way to Edit an Existing Zone

    In this way, again you should log in to WHM and find the Edit DNS Zone option:

    The Way to Edit an Existing Zone

    Here, you will see the Choose a zone to edit option. In the box, type the domain name of your DNS zone to edit and then click the Edit button to start:

    dns zone editor

    If you want to edit a zone, you should have basic information about your preferred parameters to change. The instructions to apply are from the developers, hosting, and internet service provider. This instruction is based on the model of replacing an entry with the new one.

    For any DNS domain, NS and A records are critical. In this way, the nameservers are specific to the IP addresses that the DNS server responds to. Be careful not to change them randomly because if you make a mistake, your site will fail.

    Conclusion

    Here, we tried to show how you can add a DNS zone with WHM on dedicated server. We did this by using Cpanel. Keep in mind that, if you want to control and manage your WHM server, check to make sure the domain is pointing to your correct server IP.

    FAQ

    Where is the DNS storage location?

    These files are stored on the DNS server and are used by the authoritative name server to perform DNS lookups for the domain.

    Is it possible to delete the DNS zone?

    Of course. First, select a domain name from the choose zones to delete menu. Then click delete on the next interface to confirm that you wish to delete the selected zone

  • How to Install and Configure Antivirus on Linux Dedicated Server

    How to Install and Configure Antivirus on Linux Dedicated Server

    If you are worried about the penetration of viruses, malware, exploits, or shell scripts into your system, then you should do it. For this, there are tools and antivirus software for your Linux system’s WHM panel that you can use to scan your damaged content. After reading this post you will learn How to Install and Configure Antivirus on Linux Dedicated Server.

    Install and Configure Antivirus on Linux Dedicated Server

    In this article, we will teach installing antivirus on CentOS, Ubuntu, and Debian distributions of Linux dedicated servers. To do this you can use different antivirus software the most popular among them is ClamAV which is an open-source solution against security threats. So follow the instructions here to secure your system.

    install antivirus on dedicated server

    Prerequisite

    – A Dedicated Server (We recommend you visit the Cheap Dedicated Server plans presented on our website and choose a plan.)

    Install cPanel on Dedicated Server

    Install ClamAV on Dedicated Server (CentOS)

    First, you should know that ClamAV is not prepackaged on CentOS. Therefore, we need to add a repository (epel) by running “Yum” commands in the order:

    sudo yum -y install epel-release
    sudo yum clean all

    Now, you are ready to install ClamAV on the CentOS operating system. So, use the following command line:

    sudo yum -y install clamav-server clamav-data clamav-update clamav-filesystem clamav clamav-scanner-systemd clamav-devel clamav-lib clamav-server-systemd

    How to Configure ClamAV on CentOS

    Here you can find the steps to configure ClamAV on CentOS. But before configuring the first step is to remove the example string from the configuration:

    sudo sed -i -e "s/^Example/#Example/" /etc/clamd.d/scan.conf

    Now it’s time to specify the type of server. Open the configuration file using your text editor (here is nano):

    sudo yum install nano -y

    Then, open the ClamAV configuration file:

    Sudo nano/Etc/cmd.d/scan.conf

    You should find the line below :

    #LocalSocket /var/run/clamd.scan/clamd.sock

    On the command below, remove the example string from the ClamAV fresh clam update configuration file:

    sudo sed -i -e "s/^Example/#Example/" /etc/freshclam.conf

    At last, use this command to run the ClamAV database update:

    sudo freshclam

    Then you can run and boot the Clam service:

    sudo systemctl start clamd@scan
    sudo systemctl enable clamd@scan

    Install ClamAV on Dedicated Server (Ubuntu/Debian)

    In this section, we are going to show how to install ClamAV antivirus on Ubuntu or Debian. Since the installation process and commands are the same in both operating systems, we will examine the instruction as follow.

    install ClamAV on dedicated server

    In both operating systems, use the command line below to update your system:

    sudo apt update

    Now, go to the installation process using this command:

    sudo apt install clamav clamav-daemon

    To check the installation status, you can run the command below:

    clamscan --version

    How to Configure ClamAV on Ubuntu/Debian

    To configure ClamAV on Ubuntu or Debian follow the commands below:

    First, you should stop the daemon to update the ClamAV database manually and then Usenet command to update:

    sudo systemctl stop clamav-freshclam 
    sudo freshclam

    The next step will be to download the latest database signature file by the command below:

    sudo wget https://database.clamav.net/daily.cvd

    Copy the file to the required directory with the related command:

    sudo cp daily.cvd /var/lib/clamav/

    In the end, start the fresh clam daemon using the following command:

    sudo systemctl start clamav-freshclam

    Conclusion

    That’s all! Here we tried to teach how to install and configure antivirus on Linux dedicated server. Now you can safely use and protect your system. We hope you enjoy this article. Don’t forget that if you own a Linux dedicated server, you must install an antivirus to protect from danger and malicious files. For any question leave command.

    FAQ

    Is it essential to use antivirus?

    Yes, Operating systems do need antivirus protection. Linux is really safe among other operating systems but it can also be affected by malware and viruses.

    Is it possible to use the same antivirus on a dedicated server and my personal computer?

    It’s not recommended.

  • How to Create a FTP Account with SSH on Dedicated Server

    How to Create a FTP Account with SSH on Dedicated Server

    After reading this article, you will be completely familiar with Create a FTP Account with SSH on Dedicated Server. To be able to setup a functional and fully secure FTP server with key components in minutes without wasting time, follow the given instructions:

    Steps to Create a FTP Account with SSH on Dedicated Server

    Before starting work, we recommend you visit the Cheap Dedicated Server plans presented on our website and choose a plan. Then you will easily be able to Create a FTP Account with SSH on Dedicated Server.

    In this section, we will examine step by step how to create an FTP account using SSH.

    1- In the first step, to access FTP you should install the vsftpd package. But if you have installed that before then skip this part:

    sudo apt-get install vsftpd

    2- Your second step, will be to change the configuration setting for vsftpd. For this, you need to open /etc/vsftpd.conf with your favorite text editor which here is nano:

    Sudo nano /etc/vsftpd.conf

    3- Here, in this file, you should change the setting below:

    Listen=YES

    By this action, you order vsftpd to run as a standalone daemon (the simplest way to run).

    Anonymous-Enable=NO

    This function prohibits anonymous FTP users. These users are preferred for security reasons.

    Local-Enable=YES

    This function also allows the user’s accounts defined in the /etc/passwd file to access the FTP server.

    Write-Enable=YES

    This one is given by default. But removing the hash (#) will cause the files to be uploaded to the FTP server.

    Chroot_Local_User=YES

    It causes users to be selected to the main directory and is also set by default.

    If you want to test your setting and make sure that everything is working well, make the following setting for the above parameters:

    listen=YES
    anonymous_enable=YES
    local_enable=YES
    write_enable=YES
    chroot_local_user=YES

    Now you have to save the vsftpd.conf file and then you can run the vsftpd service again with the commands in this section:

    sudo service vsftpd restart

    Add a FTP User on Server

    Here, you should add a user using the below command:

    sudo adduser testes

    Now you have to permit the user that you have created, so use the following command:

    sudo chown root:root /home/testuser

    You can assign the directory to the user here:

    usermod --home /var/www/html/test-dir/testuser

    Use this command to restart vsftpd service:

    sudo service vsftpd restart

    Now you create a user, open FileZilla, and connect the user as you see in this image:

    Add an FTP User on Server

    In this part, you can check if the user has been connected to the folder assigned or not:

    create a ftp account with ssh on dedicated server

    And if you are about to update the user folder again use the command below:

    usermod -d /var/www/html/test-dir testuser
    sudo service vsftpd restart

    Updating FTP User Password on Dedicated Server

    To update your FTP user password, you have to apply this command:

    passwd testuser

    You can permit the folders for the new user by running the following command:

    chmod -R 755 /var/www/html/test-dir

    Delete FTP User on Dedicated Server

    Here you will learn how to delete an FTP user on a dedicated server:

    userdel testuser

    Deleting User with the Directory

    And the last command shows how to delete a user with a directory:

    userdel -r testuser

    That’s it. Now you are able to add or configure any FTP user on a dedicated server.

    Conclusion

    Now that you find out how to add a FTP user with SSH on a dedicated server, you are able to add extra users. Also, you learned how to delete users here. Hope this article will help you. If you have any questions or ideas, please add a comment.

    FAQ

    Which type of FTP allows users without any account on the server?

    Anonymous FTP, which is the most basic form of it. It provides support for data transfer without encrypting data or using a username

  • How to Buy USA Admin RDP by Crypto

    How to Buy USA Admin RDP by Crypto

    RDP Admin is a great service and helpful feature that can bring many features. Fortunately, there are many sites like NeuronVM, that give you the possibility to purchase this service using cryptocurrencies. So, the purpose of this tutorial is to prepare a comprehensive and practical guide. You can learn how to buy USA Admin RDP by crypto and become familiar with this service.

    Reasons to Buy USA Admin RDP

    As mentioned, you can get Admin RDP from different locations, one of which is the United States. This state which is one of the strong providers in the field of server and hosting brings benefits like full server access, dedicated RDP, unlimited bandwidth, High speed, and full support for the users.

    Admin RDP has an easy-to-use panel that ultimately aims for high-quality hardware and software, and provides at a low price.

    Steps to Buy Admin RDP by Cryptocurrency

    If you are willing to buy Admin RDP using Crypto, the first step is to go to our website and click on USA RDP on the Admin RDP tab:

    buy admin rdp with crypto

    – The next step, is to choose the plan you desire to purchase. You can see these plans in the image below:

    choose rdp plan

    – In this section, you will enter the configuration part. Here, you can choose the operating system, your server’s location which should be the USA, and the cycle of your payment then press Continue:

    choose location and operating system on Admin RDP

    Now, you will encounter the Review & Checkout section. Check the details of the chosen plan and press the Checkout button. Also, If you have any Promo Code for Discount, you can enter it in the box below:

    review and checkout details

    As you choose your plan for Admin RDP, it is time to sign up for NeuronVM and fill in the personal information which is required. But, if you created an account before, click on the Already Registered button:

    sign up for checkout

    This section is related to the payment details. Check the All Cryptocurrency icon and add notes or other information if it’s required and click on the Complete Order button:

    how to buy cheap admin rdp

    Here, you can view your personal information. You can scroll and select the desired crypto and press Complete Checkout to finish your process:

    choose crypto in ordering usa admin rdp

    Your Crypto Payment ID and Verification Mode will be shown in this window. To get more information about your payment refer to the What to do Next icon and click to see the information and confirm your payment.

    usa server confirm payment

    Conclusion

    By reading this article, you will have a clear vision of the steps to purchase USA Admin RDP using crypto. Get it now and you will see how easy and practical this service is, as it is secure and delivered to you with convincing speed and quality. If you have any problem or question, just comment here.

    FAQ

    What is the benefit of buying RDP?

    The most brilliant feature that encourages users to buy Admin RDP is that everything you do is private and you have full access to the server.

  • 2 Ways to Configure DNS Server on Admin RDP

    2 Ways to Configure DNS Server on Admin RDP

    If you want to know how to configure a DNS server on admin RDP, the following article will be a helpful guide for you. You can use two practical methods for this. Also, this article contains the installation process in two ways, configuration of the DNS server and removing the DNS server role.

    How to Configure DNS Server on Admin RDP

    Before we start to explain the way to install and configure DNS, there are some requirements that you have to prepare. So let’s analyze them first. Then we will discuss how to install and configure DNS Server using PowerShell and GUI and we will teach you step by step.

    Prerequisites

    – An admin RDP server

    – An administrator group member or equivalent

    – A valid static IP

    Installing DNS Server

    We can install and configure admin RDP in two different ways. These two methods include a graphical user interface and PowerShell. Now let’s examine each one.

    If you prefer to install Active Directory Domain Services and use the installation wizard, you have the automatic install option and configure a DNS server. In this way, the DNS zone is merged with the AD DS namespace. But if you decided to do the installation manually (as a standalone server), go through the steps below:

    How to Install DNS Server Using PowerShell

    You can use the install-Windowsfeature command below to install the DNS server role.

    First, in an elevated session, Run PowerShell on your system by searching for PowerShell from the Start Menu.

    Second, apply the following command to install the DNS role. Here you don’t need to reboot:

    Install-WindowsFeature -Name DNS

    How to Install DNS Server Using GUI on Admin RDP

    Use the server manager of your Windows desktop to install the DNS server role and follow the instructions:

    – The first step here is to click on the Start Menu on the desktop and select the Server Manager option.

    How to congifure dns server on rdp

    – Then go to the Manage part and choose to Add Roles and Features option.

    add roles and features in server manager

    – Now you will visit the Before You Begin and click on Next to begin.

    before you begin section in server manager

    – On this page, go to the Select Installation Type, select the Role-based or featured-based option, and press on the Next button.

    Role-based or featured-based option

    – Here, you can select the destination. Go to the Select Destination Server and leave it as default, then press Next.

     select destination server on server manager

    – To select server roles, you can go to the Select Server Roles option, then mark the DNS Server checkbox and click Next. In this part, you should add features that are required for DNS. If the default setting is acceptable to you, press Add Features.

    configure dns server on admin rdp

    ###

    add roles and features (dns server)

    ###

    add roles and features (dns server) on admin rdp

    – On the next page, you can leave the setting as default and select next.

    add roles and features (dns server) on admin rdp

    – Now you can see the DNS server page, review the descriptions carefully and press next.

    dns server configure on server

    – Here, you should confirm your installation selections by reviewing the selected roles and features, and at the end select the Install button to begin the installation.

    confirm dns server installation on admin rdp server

    – When you complete the installation press the close button, and take note that there’s no need to reboot.

    dns server installation progress

    Configure DNS Server on Admin RDP

    As you finished the installation part, it’s time to set the configuration for your DNS server. A DNS server can listen for requests on all IP address interfaces. But you can configure the DNS server to listen for a specific interface using PowerShell or GUI.

    Configure DNS Using Powershell

    If you want to set the configuration using PowerShell, follow the instructions here:

    – First, you should go through set-DNSServerSetting.

    – In an elevated session, run PowerShell on your system.

    – Apply the related command to find your system’s exciting IP address and make a note of that:

    Get-NetIPAddress | fl IPAddress,InterfaceAlias

    – Here, you should store the current setting in an impermanent variable and adjust the ListeningIpAddress. Then apply your new settings using the following command. Replace the <IP_Address> with the IP you stored before:

    DnsServerSettings = Get-DnsServerSetting -ALL
    DnsServerSettings.ListeningIpAddress = @("")
    Set-DNSServerSetting $DnsServerSettings

    Configure DNS Using GUI

    – The first step is to open the Start Menu and go to the Windows Administrative Tools then DNS.

    windows administrative tools

    ###

    windows administrative tools

    – Next, you can Right-click on your server and choose Properties.

    dns settings on admin rdp

    – By selecting Only the following IP addresses and choosing the IP address you wish to use, you can limit the DNS server to use a specific IP address.

    ip address of dns server

    Configuring Root Hints Server on Admin RDP

    You can use Root hints servers for resolving DNS address information, for the time when the DNS server is unable to resolve the query locally from a hosted zone or DNS cache. The root hint name server is populated by default in your new installations. Again you can use PowerShell or GUI to edit the list of root name servers.

    Actually, you can not remove all root hint servers, But you can go through this pass to disable it.

    Configure Root Hints Using PowerShell

    Go to the DNS manager console and choose advanced tab. Select the disable recursion server option. This act will disable any configured forwarders.

    To start the instruction to configure root hints server, you should apply the Set-DnsServerRootHint command. Now follow the steps below:

    – Execute PowerShell on your system In an elevated session.

    – Run the Get-DnsServerRootHint cmdlet command to find your system’s IP address. Notice that you should save the name server:

    Get-DnsServerRootHint

    – Use the following command to save the current DNS server setting in a variable and put the placeholder of <root-hint-name-server> instead of the stored root hint name server.

    RootHintServer = (Get-DnsServerRootHint | Where-Object {$_.NameServer.RecordData.NameServer -match ""} )

    – You can use the following commands to configure the Ipv4address property in temporary variable:

    RootHintServer.IPAddress[0].RecordData.Ipv4address = ""

    – Use the command below to insert the updated record:

    Set-DnsServerRootHint $RootHintServer

    – At last, if you want to check the updated root hints, use the following command:

    Get-DnsServerRootHint

    Configuring Root Hints Using GUI

    Here, you can use the Manager console to root hints:

    – Go to the Start Menu and then Window Administrative Tools, and select DNS.

    – Right-click or select on your server and choose properties.

    – Choose the Root hints tab and select your item and choose edit.

    configuring root hints using gui

    – Now you should enter the domain name and click on Resolve. You should verify your IP address and edit if necessary.

    how to configure root hints on admin rdp

    – Click on Ok button.

    – As the last action, check the updated root hint server in the list and when your done, click on ok.

    Configuring Forwarders on Admin RDP

    This part is optional and it is to configure a forwarder to resolve DNS address information. You can use PowerShell or GUI for this reason.

    Tip: You should use the DNS root hints Just the time your forwarders fail to response.

    Configure forwarder using PowerShell

    By using Install-WindowsFeature command, you can install DNS server role. In the same direction follow the instructions below.

    – In an session, execute PowerShell on your system.

    – Put the placeholders <ip_forwarder_1> and <ip_forwarder_2> instead of IP address of the DNS server, to be used as your forwarders and run the command below:

    $Forwarders = "",""
    Set-DnsServerForwarder -IPAddress $Forwarders

    Configure forwarder using GUI

    Here, we will show the way of configuring forwarder using GUI. So follow the steps:

    – Go to start menu and select Windows Administrative Tools then DNS.

    – Right-click on your server and select Properties.

    – Choose the forwarders tab and click on Edit.

    configure forwarder using gui on admin rdp

    – Enter DNS IP address to forward requests to. You should repeat this action as many time as it is needed and select Ok.

    how to setup forwarder on admin rdp

    – As the last action, check the DNS server in the list. Select Ok and confirm configuration.

    Remove DNS Server Role

    Follow the instruction in this section to remove DNS server:

    Remove DNS Using PowerShell

    Use the following command in an elevated prompt:

    Uninstall-WindowsFeature -Name DNS

    Remove DNS Using GUI

    – Go to the Start menu and select the Server Manager.

    – Go to the Manage part and select Removes roles and features .

    – Here, you will encounter Before you begin page and select Next.

    – On Destination page, choose the serer that you want to remove DNS server role service from and click Next.

    – On the list, you should clear the DNS server checkbox . In this part, you should remove features that requires DNS server. Select Remover Features and click on Next button.

    – Here, on the Remove Features page, Leave the default setting and press Next button.

    – Then you will see Confirm Removal Selections page, check the selected roles and features and choose Remove.

    – As you removed the roles and features, select Close.

    – At last, restart your system and complete the uninstallation process.

    Tip: Pay attention to these points as you are removing the DNS server role service:

    – If a DNS server is hosting AD DS-integrated zones, the saving or deleting action will be done according to their storage type.

    – If a DNS server is hosting standard DNS zones, the zones file will be stayed in the %systemroot%\System32\Dns directory, but you can reload them if the DNS server is reinstalled.

    Conclusion

    This article tried to show you the way to install and configure DNS server on Admin RDP. Also we tried to give a complete explanation of DNS server configuration steps, so that, you will encounter no problem during the installation. If you have any questions or if you know any other method please share.

    FAQ

    Which one is faster; DNS or VPN?

    A smart DNS is faster than VPN because it only changes your DNS address while a VPN encrypts data traffic and spoof the location by changing your IP.

    Can DNS effects your internet speed?

    DNS is not related to internet speed in a direct way, but it can influence the speed of appearing individual webpage on your computer.

  • Get Admin RDP with Ethereum (ETH)

    Get Admin RDP with Ethereum (ETH)

    Ethereum is one of the most popular and well-known digital currencies that is used all over the world and in many fields. We provided a definition of Admin RDP in previous articles. This service is a remote desktop system and allows you to connect to other devices or Windows services using a browser and manage them. NeuronVM has provided various ways to buy RDP services. One of these ways is through Ethereum which is a popular digital currency. Read this content to get more information about the buying process.

    Reasons to Buy Admin RDP with Ethereum

    Now we would like to point out some positive factors about the purchase of Admin RDP. As mentioned before, it allows you to manage the remote system from everywhere you want. Providing RDP services by our site is fast and continuous. It’s also very affordable in price and boosts your business. Access as an admin user should also be added to the benefits of this applicable operating system.

    Admin RDP Locations

    Another advantage to buying Admin RDP is the variety of locations that provide this service. You can have this server from different locations like the US, Uk, Germany, Netherlands, France, Canada, and so many other regions.

    Steps to Buy Admin RDP Using Ethereum

    As you figure out what is Admin RDP server and the good points of using this operating system, it’s time to learn how to buy it in step-by-step guidance using Ethereum digital currency.

    1- To buy Admin RDP the first step is to visit the Admin RDP page:

     buy Admin RDP Using Ethereum

    2- In this section, as you scroll down the page you can see different plans for this service. choose the proper one and click on the Purchase Now button:

     Admin RDP plans

    3- Now, it’s time to do the configuration part. As indicated in the image below, choose the Billing Cycle of your payment, the Location of the server you want, and the suitable Operating System then click on the continue button:

     how to configure Admin RDP

    4- Then, you will get the Review and Checkout section. Here you can review the details of the desired product and if you have any Promo Code enter it in the related box. Go to the next part by clicking on Checkout:

     buy Admin RDP Using Ethereum

    5- This part is related to Personal Information. Fill in the related boxes, so that, you can continue the steps. Notice that, if you have registered before, just press on Already Registered and enter the next part by inserting your email and password:

    Tip: You don’t need to fill company name as it is optional.

    get server with eth

    6- Scroll down to choose the Payment Method. Here, you should select the All Cryptocurrency option and if you need to add extra information write in the Additional Notes box and click on Complete order:

    choose payment method

    7- The last part is related to the payment process. Here, you can see your personal information filled out automatically, as you signed up before. Also, you can choose your cryptocurrency in the Select Coin section (Ether) and click on Complete Checkout.

    complete payment in ordering admin rdp

    As the last step, you can see your Eth payment ID and Verification Code. For more information about your payment, you can click on What to do next option. Here, you will find out all the needed information to confirm your payment.

    admin rdp confirm payment

    Conclusion

    Now that you got familiar with the steps of purchasing Admin RDP using Ethereum, you can easily buy it from the NeuronVM website and use this affordable and user-friendly server on your system to manage remote devices. If you have any questions, please share them in the comments.

    FAQ

    Does Admin RDP offer full admin access?

    Yes, all of the RDP plans are privately owned and give full access to users.

    Is it possible to use RDP for free?

    Free remote desktop software is possible but users should connect to a device in a different location than their own.