Author: Jannson Miller

  • The Future is Here: Exploring the New Features of Windows Server 2019

    The Future is Here: Exploring the New Features of Windows Server 2019

    One of the most powerful operating systems offered for servers is Windows Server 2019. This operating system is a supplementary version of the previous version and has added new features. But what are these new features? Windows Server 2019, which is based on the previous version, has undergone changes and optimization in various parts, and these changes have been made in the security, application platform, and hybrid performance sections. In this article, we fully explore the New Features of Windows Server 2019.

    Key features and improvements in Windows Server 2019

    In the main appearance and interior of Windows Server 2019, two major changes have been made, the first is Desktop Experience and the second is System Insights. The first feature is essentially the Windows Server appearance changes that have been created to improve customer satisfaction and users can choose to create new appearance changes for Windows Server 2019.

    The second change, called System Insights, is a new feature built into Windows Server 2019. This feature analyzes your server data and evaluates everything that happens on your server, and gives you a report so that you can optimize your server. This feature can identify and report all the weak points of the server.

    We recommend you choose and buy a plan according to your needs from the Windows VPS server plans provided on our website. After installing Windows Server 2019 on these servers, you will see the excellent performance of these servers. In the continuation of this article, we will fully review the key features of Windows Server 2019.

    windows server 12019

    Enhanced security measures in Windows Server 2019

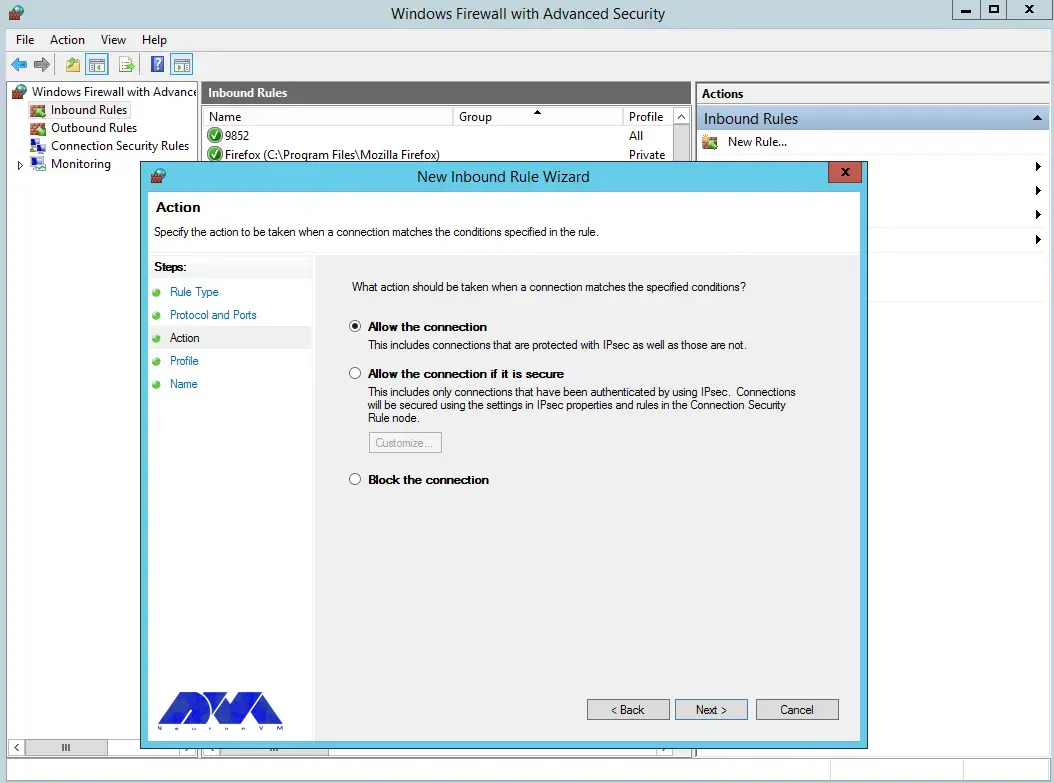
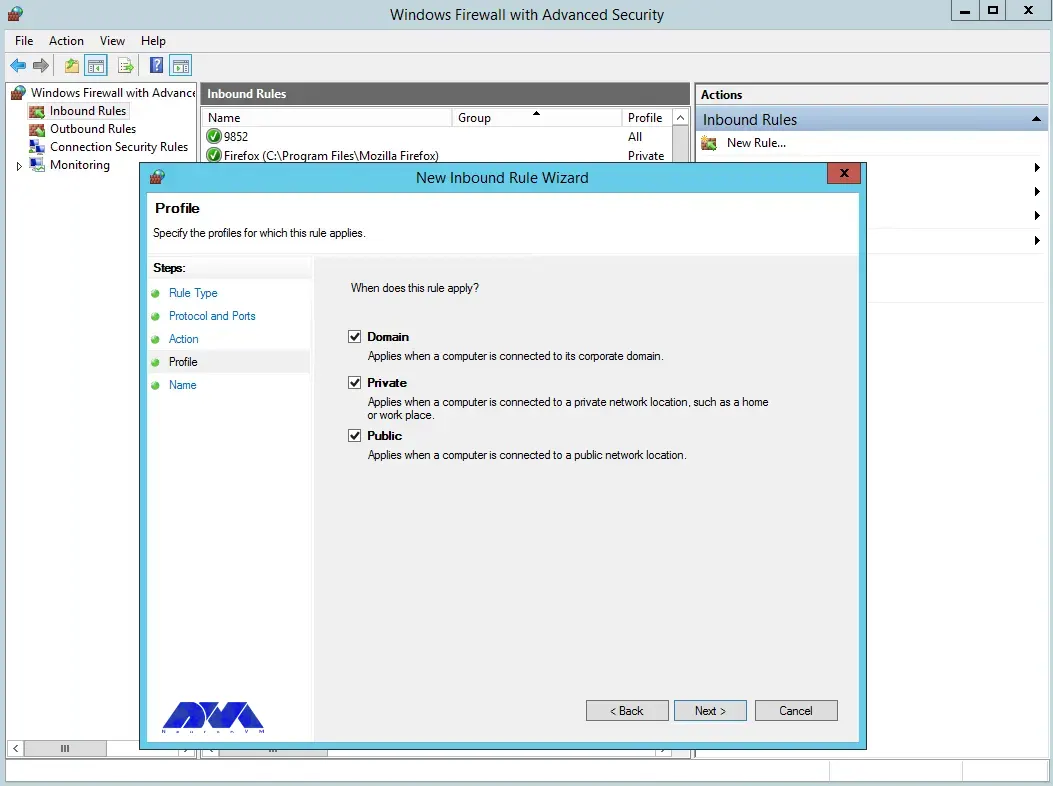
    Windows Server 2019 has introduced a series of special platforms called Windows Defender ATP for more server security. This platform has 4 new features which are as follows:

    1) Attack Surface Reduction: This feature, which is a set of instructions, identifies any corrupted files, emails containing corrupted attachments, and strange behavior of servers and ransomware and prevents them from penetrating the system and server.

    2) Network protection: This feature also detects and blocks any anonymous or invalid IPs from the web.

    3) Access to files is controlled: Critical data of the server and devices are protected by this new feature to prevent the penetration of programs such as ransomware.

    4) Protection against security holes: A series of instructions have been designed for this platform to protect and prevent security holes. Note that you can activate this feature manually.

    But the security optimizations are not only limited to the platform, these optimizations are also included in the virtualization section. In the previous versions, the troubleshooting problems were a bit too much and exhausting, but in Windows Server 2019, these problems have been solved and users can solve virtualization problems. On the other hand, these changes do not need to be adjusted manually and can be done automatically. Finally, if users want to have a mixed environment of the operating system, Windows Server 2019 can support Ubuntu, Linux, and Red Hat Hamel systems.

    Improved performance and scalability in Windows Server 2019

    Another benefit of Windows Server 2019 Standard is that it is highly scalable, meaning it can grow with your business as your server needs to grow. In addition, the platform also offers excellent performance, ensuring that your applications and systems run fast and smoothly.

    One of the features of Windows Server 2019 that has improved performance and scalability is support for hybrid environments. Windows Server 2019 is designed to run in both on-premise and cloud environments, allowing enterprises to make the most of available resources and adapt to changing business needs.

    Next is storage optimization. With Storage Spaces Direct (S2D), companies can easily group storage units into a single pool. Interestingly, this feature will improve storage efficiency and performance. In addition, the data deletion and compression feature reduces the space required for data storage.

    It is interesting to note that Windows Server 2019 introduces network virtualization improvements. Such as hardware acceleration and support for container-based virtualization, which improves application performance and network efficiency.

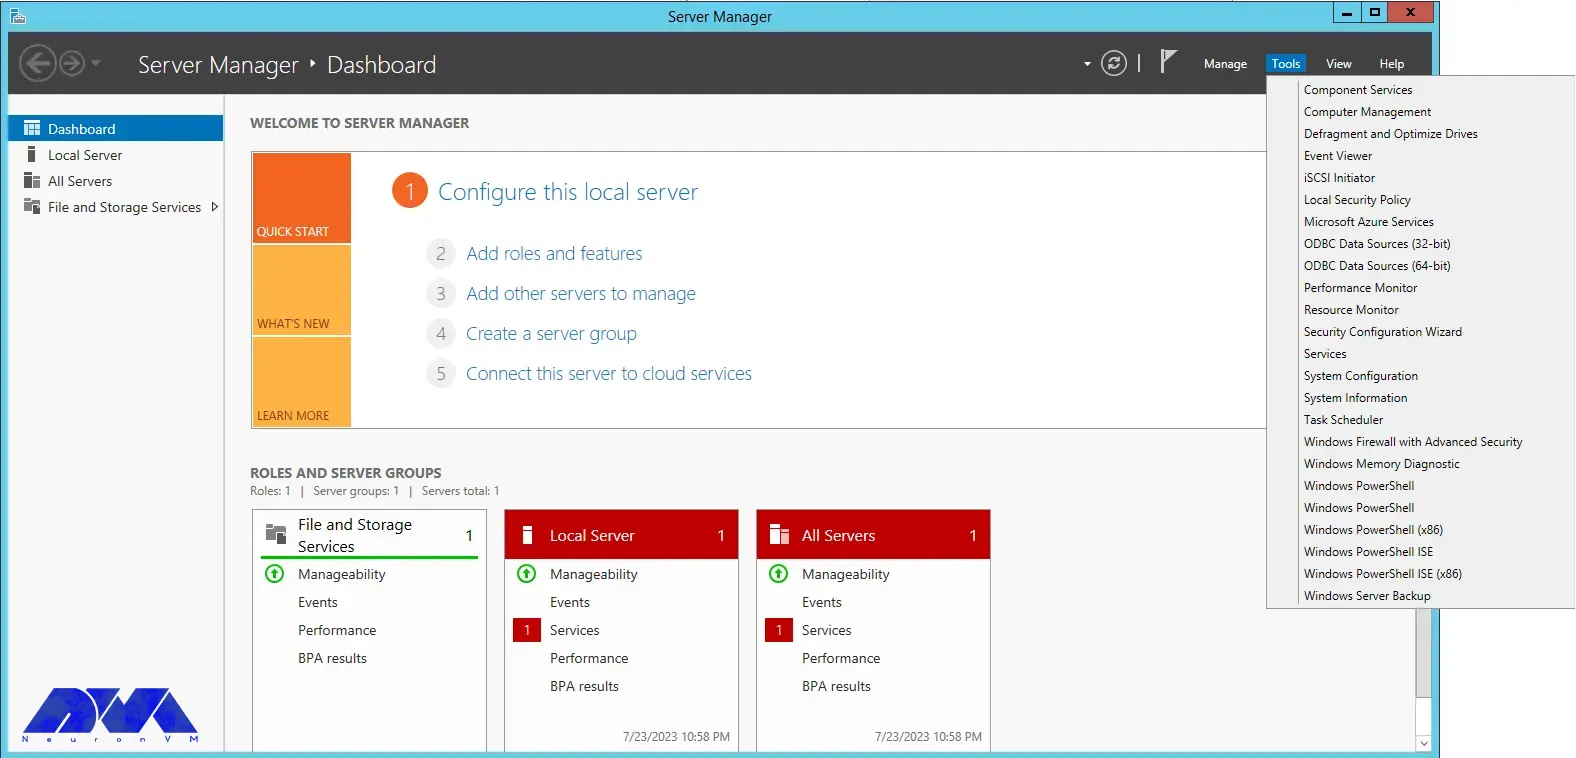
    Windows Admin Center: A powerful tool for managing Windows Server 2019

    Server management is a very difficult task and many risks threaten it, so to reduce risks and simplify management, it is better to use a tool called Windows Admin Center, which has many features. Windows Admin Center installed on an internal server can manage standard Windows 2019 servers. It can also manage HyperV R2 and higher servers, Windows Server Core, Hyper-Converged systems, or Azure.

    Windows Admin Center can increase the speed of doing things with the ability to personalize dashboards. This tool offers a modern view of monitoring, using which you can change the design of dashboards, put them in different sections, and separate the charts in them from each other. Each of these dashboards is a workspace where information can be saved and shared.

    There are always tasks that require access to the server console, and in Windows Admin Center, the Remote Desktop feature has been placed to do this, which can be used through a browser. The interesting feature of this tool is to access the console of each managed server, without the need to open additional ports in the firewall. All engine traffic goes to Windows Admin Center through HTTPS protocol and is encrypted on the way.

    Accessing files from Windows Admin Center has become a trivial matter. You can do things like create new folders, rename or delete files, upload and download files, cut, copy, paste, and even extract archives. Apart from these simple and routine things, you can also set file sharing, set file sharing permissions, and create and manage files. Also, with Admin Center, you can perform disk management, including formatting and resizing, creating and attaching VHD files, and saving information on disk and server.

    Hybrid cloud capabilities in Windows Server 2019

    A hybrid cloud is a combination of one or more public and private clouds. A hybrid cloud is a collection of virtual resources. These resources are powered by hardware that is owned, managed, and organized by a third party. Resources in the hybrid cloud are provided to a customer in a dedicated manner. These computing and storage resources are automatically provided and allocated through a self-service user interface.

    Interoperability is the fundamental basis of a hybrid cloud. Without it, the public cloud and the private cloud can exist independently of each other, but they are not considered hybrid clouds. Even if they are used by a company or organization. Hybrid clouds include multiple connection points, and software services integrated into the core allow resources, operating systems, and applications to move across the environment.

    Nowadays, it is impossible to imagine an IT environment without virtualization and hybrid cloud. Therefore, in Windows Server 2019, Microsoft has improved the connection between the Azure cloud platform and the Windows Server operating system. This connection is not only limited to the Admin center, but the Azure network adapter also provides the possibility of connecting to the cloud computing platform. In addition, the Windows Server 2019 release includes better support for Azure Backup, File Sync, Disaster Recovery (DR), and other Azure services.

    Cloud management tools provide you with one-piece platforms for managing hybrid clouds. Thus, they free you from manual management of the hybrid environment using management and planning tools for multiple implementations and additional expert operators. These single-fabric platforms encapsulate the core technologies and centralize management tasks so that operators and users can control the system lifecycle, automated services, automation, policy enforcement, and costs when deploying services.

    Containerization and virtualization advancements in Windows Server 2019

    The interesting thing about Windows Server 2019 is that it supports both Windows and Linux containers that can run on the same container host. In addition, Windows Server 2019 includes built-in support for Kubernetes, which can significantly improve container networking. Additional container improvements include integrated Windows authentication in containers, improved application compatibility, and reduced size of base container images. These Hyper-V features can increase the speed of container workflows, make containers more secure and reliable, and ensure the efficiency of container networks.

    Similar to the way Linux containers share host operating system kernel files, Windows Server containers do so in a similar way. In other words, while namespaces, filesystems, and network isolation are enforced to isolate containers from each other, vulnerabilities can exist between different Windows Server containers running on the same host. For example, if you want to log into the host operating system on your container server, you can see the processes running on each container.

    The container is not able to see the host or other containers and is still isolated from the host in various ways, but knowing that the host can see the processes inside the container tells us that some interaction with the host may be shared. Windows Server containers are useful in situations where the server hosting the container and the container itself are in a secure domain and trust each other. Windows Server Containers are more useful for servers that are owned by the company and the company itself can manage them. If you trust your host server and container, using Windows Server containers provides the most efficient way to use hardware resources.

    Upgrading to Windows Server 2019: Considerations and best practices

    To upgrade to Windows Server 2019, you must log in as an administrator of the server you want to upgrade.

    Then, in the next step, you need to insert the Windows Server 2019 DVD or install the installation ISO.

    In the third step, you can go to the root of the installation media and double-click on setup.exe. After doing this, you will see the Windows Server 2019 setup window appear.

    Now you can follow the steps in the wizard. Pay attention to the following:

    Tip: If you are upgrading from a DVD, you may be prompted to boot from the DVD. You can let the request time out and the upgrade will continue.

    When the upgrade is finished, a screen will be displayed that the settings are being finalized. When the upgrade is complete, you will be presented with the Windows Server 2019 login screen.

    Case studies and success stories of organizations using Windows Server 2019

    Windows Server 2019 is a version of Windows built. It is designed to meet business needs such as access control, data management, cloud integration, and virtualization. It comes in three editions: Datacenter, Essentials, and Standard, each suitable for different use cases and environments. Here are the success stories of many organizations using Windows Server 2019 to improve their performance, security, and efficiency.

    1) ZDNet reviewed Windows Server 2019 and praised its features, particularly its improvements in security, hyper-converged infrastructure, and hybrid cloud. They also noted that Windows Server 2019 provides a solid foundation for future data center advancements, including edge locations.

    2) Microsoft published a case study of Coles Group, an Australian retailer that migrated to Windows Server 2019 to modernize its IT infrastructure and reduce costs. Coles Group reported that Windows Server 2019 helped them achieve faster deployment, better scalability, increased security, and easier management.

    Conclusion: The future of Windows Server 2019 and its impact on businesses.

    Windows Server 2019 is another Microsoft operating system designed for servers. It can be used by large information centers of the world or even small companies. Windows Server 2019 has provided new and advanced features for users in the field of virtualization, network, storage, user experience, cloud computing, automation, etc. In simple words, Windows Server 2019 helps you to do your company’s IT affairs much easier and at a whole new level along with reducing costs. Businesses that are currently using Windows Server 2019 in their business receive a very positive impact compared to other operating systems. Because Windows Server 2019 has been able to perform better than other competitors in online businesses.

  • From Zero to Hero: Becoming a Metasploit Expert on Kali Linux

    From Zero to Hero: Becoming a Metasploit Expert on Kali Linux

    Every year, breaches of users’ information and privacy cause huge financial and credit losses to organizations, half of which are caused by cyber-attacks. By conducting a penetration test, companies can prevent data breaches caused by cyber-attacks. Because penetration testing projects include attack simulation along with other techniques. Penetration testing allows businesses to identify vulnerabilities in their IT infrastructure. In the rest of this article, we will tell you how to become a Metasploit Expert on Kali Linux.

    Understanding the basics of penetration testing

    Penetration testing, also known as Pen Test, is one of the most common and standard methods of security and penetration testing of web applications. Pen Test runs simulated attacks on the website from inside and outside to find out which parts of our website have security weaknesses. It is recommended that all websites in the world use Pen Test so that they can find out the security weakness of their site before hackers and correct it quickly.

    The main issue here is that many web applications request sensitive user data and store it in their database. This makes web applications a mine of valuable information. Therefore, hackers have shown great interest in databases. The situation becomes dire when we consider the generality of web applications!

    By performing pen test, we pursue the following goals:

    • Detecting system vulnerabilities that were previously unknown
    • Checking the effectiveness of the current website security rules
    • Testing active security components on a site such as a firewall and DNS
    • Identifying the weakest parts of the program
    • Identifying the appropriate parts of the site for data leakage

    Getting started with Kali Linux

    Kali Linux is a security distribution of Linux derived from Debian and used specifically for computer crime prevention and advanced penetration testing. This version was developed through the BackTrack rewrite by Mati Aharoni and Devon Kearns of Offensive Security.

    metasploit on kali linux

    Kali Linux includes several hundred tools that have been assembled to perform various tasks in the field of information security, such as penetration testing, security research, computer crimes, and reverse engineering.

    Kali Linux has more than 600 penetration testing applications installed on it, each of which you need to discover. Each program has its own flexibilities and uses. Kali Linux has done a great job of separating these useful tools into the following categories:

    • Information gathering
    • Vulnerability analysis
    • Wireless attacks
    • Web applications
    • Exploit tools
    • stress test
    • Criminological tools
    • wiretapping and forgery
    • Password attacks
    • Maintenance accesses
    • Reverse Engineering
    • Reporting tools
    • Hardware hacking

    In the rest of this article, we will teach how to install and set up Metasploit on Kali Linux.

    Installing and setting up Metasploit on Kali Linux

    Before starting the installation and configuration process, we recommend you use the Linux VPS server plans provided on our website. In this section, we want to teach you how to install and run Metasploit. To do this, simply run the following command in the Kali terminal:

    sudo apt install metasploit-framework

    One thing to note is that the Metasploit Service Framework requires the PostgreSQL database service to run. Therefore, you can activate the PostgreSQL service using the following command:

    sudo systemctl enable --now postgresql

    Now you can start PostgreSQL by running the following command:

    sudo /etc/init.d/postgresql start

    Confirm PostgreSQL using the following command:

    systemctl status postgresql@*-main.service

    or

    sudo /etc/init.d/postgresql status

    Considering that PostgreSQL’s default port is 5432, it is necessary to confirm that the service is active:

    sudo ss -ant | grep 5432

    In the next step, it is necessary to enter the Rapid7 signature key with the following command:

    curl https://raw.githubusercontent.com/rapid7/metasploit-omnibus/master/config/templates/metasploit-framework-wrappers/msfupdate.erb> msfinstall && chmod 755 && msfinstall && ./msfinstall

    Start the Metasploit PostgreSQL database by running the following command:

    sudo msfdb init

    or

    sudo msfdb run
    sudo msfdb init && msfconsole

    You can now configure the Metasploit Framework Service and launch the Metasploit Service Framework (msf) console on your system. Therefore, in the first step, you need to check the database connection:

    sudo msfconsole -q
    msf5 > db_status

    Metasploit modules and functionalities

    Metasploit modules are the main components of the Metasploit framework. A module is a piece of software that can perform a specific action such as scanning or exploiting. Every task you can do with Metasploit is defined in a module.

    There are four main types of Metasploit modules:

    1) Exploit modules: These modules execute code on a target using a vulnerability. Exploit modules can be used to gain access, elevate privileges, or execute commands on a target system.

    2) Auxiliary modules: These modules perform various support tasks such as scanning, fingerprinting, sniffing, or brute-forcing. Auxiliary modules can be used to gather information, test for vulnerabilities, or launch denial-of-service attacks.

    3) Payload modules: These modules define the code that is executed on a target after a successful exploit. Payload modules can be used to create a shell, execute commands, upload or download files, or create processes on a target system.

    4) Post-exploitation modules: These modules are executed after the successful implementation of the exploit and payload. Post-exploitation modules can be used to maintain access, collect data, rotate to other targets, or cover routes to a target system.

    To use Metasploit modules you must search for them using the search command and appropriate search operators such as name, platform, type, program, author, etc. You can also use the show command to view a list of all available modules of a specific type.

    For example, to search for an exploit module for Windows that has the name “ms08-067”, you can use the following command:

    search name:ms08-067 platform:Windows type:exploit

    To view all the payload modules, you can use the following command:

    show payloads

    Exploitation techniques using Metasploit

    Exploitation techniques using Metasploit are the methods and steps that you can use to exploit vulnerabilities in systems or applications with the help of Metasploit modules and tools.

    These are some of the exploitation techniques using Metasploit that you can use to test or compromise systems or applications:

    1) Automated exploitation: Metasploit Pro can build an attack plan based on the service, operating system, and vulnerability information it has for the target system and use it to execute an automated exploit. An attack plan defines the exploit modules that Metasploit Pro will use to attack target systems. To run an automated exploit, you need to specify the hosts you want to exploit and the minimum reliability settings that Metasploit Pro should use.

    2) Autopwn: Autopwn is a tool that can be used to automatically execute all exploits against open ports of a target system. This is a feature of Metasploit Express and Metasploit Pro, but can also be used with the Metasploit framework using the db_autopwn command. Autopwn requires a database to store scan results and exploit options.

    3) AutoSploit: AutoSploit is a Python-based tool that uses Shodan and Metasploit modules to automate mass exploitation of remote hosts. This allows you to search for targets based on keywords or filters in Shodan and then launch Metasploit exploits against them. You can also customize exploit options and load-outs or use random ones. Scan and/or exploit results appear in the Metasploit console and in the output file(s).

    4) Manual Exploitation: Manual Exploitation is the process of selecting and configuring an Exploit Module according to the target system or application, setting required options such as RHOSTS, RPORT, LHOST, LPORT, etc. Manual exploitation gives you more control and flexibility over the exploitation process, but it also requires more knowledge and skill.

    Post-exploitation and gaining control

    Post-exploitation and gaining control are the processes of performing actions on a target system or network after successful exploitation. It can include collecting information, maintaining access, escalating privileges, pivoting to other targets, or covering tracks. Gaining control can involve creating shells, executing commands, uploading or downloading files, or spawning processes on a target system.

    Some of the tools and techniques you can use to post-exploit and gain control include:

    1) Meterpreter: Meterpreter is a powerful payload that runs in memory and provides an interactive shell for the target system. It supports various commands and modules that can perform post-exploitation tasks, such as collecting system information, removing passwords, taking screenshots, recording keystrokes, migrating processes, etc.

    2) Post-Exploitation Modules: Metasploit has a class of modules called post-exploitation modules that are executed after the successful execution of the exploit and payload. These modules can perform various actions on the target system or network, such as collecting data, maintaining access, routing to other targets, or masking routes. For example, the post/windows/gather/hashdump module dumps password hashes from the SAM database on a Windows system.

    3) C2 frameworks: C2 frameworks are tools that allow you to remotely control vulnerable machines through a command and control (C&C) infrastructure. C2 frameworks can help you manage multiple sessions, execute commands, transfer files, or perform further attacks on the target network. Some popular C2 frameworks include Cobalt Strike, Covenant, Empire, etc.

    4) Privilege escalation techniques: Privilege escalation is the process of obtaining higher privileges or access rights on a target system or network. The increase in score can be vertical (from a lower score to a higher score) or horizontal (from one user account to another with the same score level). Elevation can be achieved by exploiting vulnerabilities in the system or application, misconfiguration, weak passwords, etc.

    Advanced Metasploit techniques and tools

    Advanced Metasploit techniques and tools are methods and features that you can use to perform more complex and sophisticated penetration testing tasks with Metasploit. Some advanced Metasploit techniques and tools include:

    1) Database Support: Metasploit can integrate with a database to store and manage scan results, hosts, services, vulnerabilities, credentials, loot, etc. It can help you organize and analyze data and share it with other users or tools. Metasploit supports PostgreSQL, MySQL, and SQLite databases.

    2) Evading anti-virus: Metasploit can help you evade antivirus detection by using various techniques such as encoding, encryption, obfuscation, or polymorphism. You can use the msfvenom tool to generate payloads with different codecs or formats or use escape modules to create executables that can bypass standard antivirus solutions.

    3) Exploit ranking: Metasploit assigns a ranking to each exploit module based on its reliability, stability, and side effects. The ranking can help you choose the best exploit for your target system or application. The ranking levels are excellent, great, good, normal, average, low, and manual.

    4) Hashes and password cracking: Metasploit can help you collect and crack password hashes from various sources such as Windows SAM database, Linux shadow files, or network protocols.

    5) Metasploit plugins: Metasploit plugins are Ruby scripts that extend the functionality of Metasploit by adding new features or commands. You can use the load command to load a plugin or the show plugins command to view the available plugins. Some useful plugins are auto_add_route, sounds, wmap, etc.

    6) Payload UUID: Payload UUID is a feature that allows you to track and identify your shipments by assigning an identifier (UUID). This can help you manage loads and multiple meetings more easily and also avoid conflicts or collisions. You can use msfvenom tool to generate payload with UUID.

    Metasploit best practices and ethical considerations

    Regarding Metasploit’s best practices, you should know that you need to use a VPS or VPN server or a proxy to hide your real IP address and protect your anonymity. In other words, it is recommended not to expose your identity or location to the target or third parties. The next thing is to watch out for payloads that can cause damage to the target system or network. Do not use payloads that can delete files, corrupt data, or disrupt services unless you have a specific reason and permission to do so.

    Keep your Metasploit up to date with the latest exploits and patches. Do not use outdated or unreliable exploits that may fail or cause unintended consequences.

    In the following, we will explain some ethical considerations that you should keep in mind when using Metasploit.

    Do not harm the target system or network beyond the scope of penetration testing or exploitation. In other words, don’t use Metasploit to harm, disrupt, or steal data or resources. We recommend that you do not violate the laws or regulations of the country or region where you are conducting penetration testing or exploitation. Do not use Metasploit to attack systems or networks protected by law or owned by government, military, or critical infrastructure entities.

    One of the most important ethical issues when using Metasploit tools is not to disclose vulnerabilities or exploits you discover or use to anyone who might exploit them. Do not share or sell information or tools you obtain from Metasploit to hackers, criminals, or competitors. Do not impersonate the owner or administrator of the target system or network. We also recommend that you do not use Metasploit to gain unauthorized access to accounts, credentials, or privileges that do not belong to you.

    Becoming a certified Metasploit expert

    If you want to become a certified Metasploit expert, you have a few options to learn. You must learn how to:

    1. Perform network discovery and vulnerability scanning
    2. Exploit and validate vulnerabilities
    3. Conduct phishing campaigns and test web applications
    4. Use post-exploitation modules and pivot techniques
    5. Report production and project management
    6. Master the Metasploit console and command line interface
    7. Use Metasploit modules, exploits, payloads, and utilities
    8. Avoid antivirus detection and bypass security controls
    9. Conduct spear-phishing attacks and social engineering campaigns
    10. Use Meterpreter for post-exploitation detection and manipulation

    These are some of the options you can consider if you want to become a certified Metasploit expert.

    Conclusion

    Today, the Metasploit framework has more than 1,677 Metasploit applications organized on more than 25 platforms and operating systems, including Java, Android, Python, PHP, Cisco, and more. Static payloads that enable port forwarding and communication between networks and shell worker payloads that allow users to execute random scripts or commands against the host and target are among Metasploit payloads. In this article, we tried to explain Metasploit Zero to Hero to you to become a Metasploit Expert on Kali Linux.

  • Elevate Your Music Experience: Installing Koel on CentOS Made Easy

    Elevate Your Music Experience: Installing Koel on CentOS Made Easy

    Koel is a simple web-based personal audio player. It is interesting to know that this program is written in Vue on the client side and Laravel on the server side. The interesting point is that the Koel source code is hosted on GitHub. In this post, we will tell you how you can Elevate Your Music Experience. Also, after reading this article, you will see that installing Koel on CentOS is easy.

    Benefits of installing Koel on CentOS

    In this section, we are going to examine the benefits of installing Koel on CentOS. Koel is a web-based personal audio streaming service that lets you access your music collection from anywhere. In the following, we will introduce you to some advantages of installing Koel on CentOS:

    1) Easy installation of Koel on CentOS: To install Koel on CentOS, just install the required dependencies. These dependencies include installing PHP, Node.js, yarn, and FFmpeg, cloning the Koel repository, configuring the database and web server, and running the installation script.

    2) Enjoy modern web technologies: As mentioned in the introduction of the article, Koel is written in Vue on the client side and Laravel on the server side, which are popular and powerful web frameworks. You may be interested to know that Koel also uses CSS grid, sound, and drag-and-drop API to provide a stylish and responsive user interface.

    3) The possibility of customization and expansion with Koel: Since Koel is open-source and free, you can modify it according to your preferences and needs. You can also help develop and improve the project by reporting issues, submitting pull requests, or donating to the project.

    4) Possibility of using HTTPS server and storage: Unlike other streaming services that require you to upload your music to their cloud, Koel lets you use your own server and storage. Koel gives you more control and privacy over your data. On the other hand, you can choose a database system that suits your needs. such as MySQL, MariaDB, PostgreSQL, or SQLite.

    Elevate Your Music Experience - Installing Koel on CentOS Made Easy

    System requirements for installing Koel on CentOS

    • A Linux VPS with CentOS Operating System
    • PHP version 5.6.4 or greater, with OpenSSL, PDO, Mbstring, Tokenizer, and XML extensions
    • The latest stable version of Node.js
    • Nginx
    • MariaDB
    • Composer

    Setting up CentOS for Koel installation

    Before starting the Koel installation process, you need to take some steps to set up CentOS. In the first step, you should check the CentOS version by running the following command:

    cat /etc/centos-release

    Then you need to create a new non-root user account and switch to it. It should be noted that you can substitute your username instead of Jannson in the following commands.

    useradd -c "Jannson" jannson&& passwd jannson
    usermod -aG wheel jannson
    su - jannson

    In the next step, it is necessary to set the timezone by executing the following commands:

    timedatectl list-timezones
    sudo timedatectl set-timezone 'Region/City'

    Then you need to update the system:

    sudo yum update -y

    Install the required packages with the help of the following command:

    sudo yum install -y wget curl vim git && sudo yum groupinstall -y "Development Tools"

    Finally, you can disable SELinux and the firewall using the following commands:

    sudo setenforce 0
    sudo systemctl stop firewalld
    sudo systemctl disable firewalld

    Installing dependencies for Koel on CentOS

    As mentioned, the dependencies that need to be installed before installing Koel are PHP, MariaDB, Nginx, Node.js, Yarn, and Composer. In the following, we will learn how to install each of these tools.

    1) Installing PHP on CentOS:

    Follow the steps below to install PHP:

    sudo rpm -Uvh https://mirror.webtatic.com/yum/el7/webtatic-release.rpm
    sudo yum install -y php72w php72w-cli php72w-fpm php72w-common php72w-mysql php72w-curl php72w-json php72w-zip php72w-xml php72w-mbstring

    Now you can start and enable PHP:

    sudo systemctl start php-fpm.service
    sudo systemctl enable php-fpm.service

    2) Installing MariaDB on CentOS:

    To create the MariaDB repository, open the configuration file by running the following command:

    sudo vi /etc/yum.repos.d/MariaDB.repo

    Add the following commands to the configuration file. Then save it and exit:

    [mariadb]
    
    name = MariaDB
    baseurl = https://yum.mariadb.org/10.2/centos7-amd64
    gpgkey=https://yum.mariadb.org/RPM-GPG-KEY-MariaDB
    gpgcheck=1

    Install MariaDB. Then start and enable it:

    sudo yum install -y MariaDB-server MariaDB-client

    sudo systemctl start mariadb.service
    sudo systemctl enable mariadb.service

    To increase security, you can run the following command and then set your password:

    sudo mysql_secure_installation

    Now you can connect as a root user:

    mysql -u root -p
    #Enter password

    Create an empty MariaDB database and user for Koel by running the following commands:

    CREATE DATABASE dbname;
    GRANT ALL ON dbname.* TO 'username' IDENTIFIED BY 'password';
    FLUSH PRIVILEGES;
    EXIT

    3) Installing Nginx on CentOS:

    Run the following commands to install, start and enable Nginx:

    sudo yum install -y nginx
    sudo systemctl start nginx.service
    sudo systemctl enable nginx.service

    Open the configuration file by running the following command:

    sudo vim /etc/nginx/conf.d/koel.conf

    Do the following configurations inside the file. Then save the file and exit:

    server {
    
      listen 80;
    
      server_name example.com;
    
      root /var/www/koel;
    
      index index.php;
    
    
      # Allow only index.php, robots.txt, and those start with public/ or api/ or remote
    
      if ($request_uri !~ ^/$|index\.php|robots\.txt|api/|public/|remote) {
    
        return 404;
    
      }


      location /media/ {
    
        internal;
    
        # A 'X-Media-Root' should be set to media_path settings from upstream
    
        alias $upstream_http_x_media_root;
    
       }
    
    
       location / {
    
         try_files $uri $uri/ /index.php?$args;
    
       }


       location ~ \.php$ {
    
         try_files $uri $uri/ /index.php?$args;
    
         fastcgi_param PATH_INFO $fastcgi_path_info;
    
         fastcgi_param PATH_TRANSLATED $document_root$fastcgi_path_info;
    
         fastcgi_param SCRIPT_FILENAME $document_root$fastcgi_script_name;
    
         fastcgi_pass 127.0.0.1:9000;
    
         fastcgi_index index.php;
    
         fastcgi_split_path_info ^(.+\.php)(/.+)$;
    
         fastcgi_intercept_errors on;
    
         include fastcgi_params;
    
       }
    
    }

    Test the configuration file and then reload Nginx:

    sudo nginx -t
    sudo systemctl reload nginx.service

    4) Installing Node.js on CentOS:

    You can install Node.js by running the following commands:

    curl --silent --location https://rpm.nodesource.com/setup_8.x | sudo bash -
    sudo yum -y install nodejs

    You can check the Node.js version by running the following command:

    node --version

    5) Installing Yarn on CentOS:

    In this section, you can install Yarn by running the following commands:

    curl --silent --location https://dl.yarnpkg.com/rpm/yarn.repo | sudo tee /etc/yum.repos.d/yarn.repo
    sudo yum install -y yarn

    6) Installing Composer on CentOS:

    Finally, you can install the Composer using the following commands:

    php -r "copy('https://getcomposer.org/installer', 'composer-setup.php');"
    php -r "if (hash_file('sha384', 'composer-setup.php') === '93b54496392c062774670ac18b134c3b3a95e5a5e5c8f1a9f115f203b75bf9a129d5daa8ba6a13e2cc8a1da0806388a8') { echo 'Installer verified'; } else { echo 'Installer corrupt'; unlink('composer-setup.php'); } echo PHP_EOL;"
    php composer-setup.php
    php -r "unlink('composer-setup.php');"
    sudo mv composer.phar /usr/local/bin/composer

    Downloading and configuring the Koel installation package

    Finally, we have reached the installation stage of Koel. In order for Koel to be installed in your desired location, you need to create an empty folder:

    sudo mkdir -p /var/www/koel

    Now navigate to the desired folder by running the following command:

    cd /var/www/koel

    Now it is necessary to change the ownership of the /var/www/koel folder to the user Jannson using the following command. Note that you can replace Jannson with your desired username in the following command:

    sudo chown -R jannson:jannson /var/www/koel

    Clone the Koel repository with the following command:

    git clone https://github.com/phanan/koel.git .

    Now you need to check the latest tagged version:

    git checkout v3.7.2

    Finally, you can install its dependencies with the help of the following command:

    composer install

    Configuring the database for Koel on CentOS

    In this section, we want to teach you how to configure the database for Koel on CentOS. Run the following command to start the database and management account:

    php artisan koel:init

    Run the following command:

    vim .env

    Now you can set the following command to your URL:

    APP_URL=http://example.com

    Again, you can use the following command to compile and install front-end dependencies:

    yarn install

    In this section, use the following command and change the ownership of the /var/www/koel folder to Nginx:

    sudo chown -R nginx:nginx /var/www/koel

    Set the user and group for Nginx using the following commands:

    sudo vim /etc/php-fpm.d/www.conf
    
    # user = nginx
    
    # group = nginx

    After completing all the mentioned steps, it is now necessary to restart PHP-FPM:

    sudo systemctl restart php-fpm.service

    Setting up user authentication for Koel on CentOS

    To set up user authentication for Koel on CentOS, you need to follow these steps:

    1) Configure your web server (Nginx or Apache) to use PHP-FPM and enable the rewrite module.

    2) Configure your database (MySQL, MariaDB, PostgreSQL, or SQLite) to create a database and a user for Koel.

    3) Run php artisan koel:init in the Koel root directory to populate the necessary configurations. You will be prompted to enter the database details and create an admin account for Koel.

    4) Optionally, you can configure your system to use a centralized authentication service, such as FreeIPA, LDAP, or Active Directory. You can use SSSD or authselect to configure the communication between your system and the authentication service.

    Customizing the Koel interface on CentOS

    To customize the Koel interface on CentOS, you need to follow these steps. Note that in order for Nginx to be able to read the files, you must grant it the correct rights and permissions:

    sudo mkdir /var/www/html/streaming/koel/storage/logs
    sudo chown -R www-data:www-data /var/www/html/streaming/
    sudo chmod -R 755 /var/www/html/streaming/
    sudo systemctl restart nginx php7.4-fpm

    Troubleshooting common issues during Koel installation on CentOS

    Some of the common issues that you may encounter during Koel installation on CentOS are:

    1) Permission errors: You may need to set the correct permissions for the Koel directories and files, such as the sqlite database, the logs, the covers cache, and the .env file. You can use the chmod and chown commands to do so.
    For example:

    sudo chown -R www-data:www-data /var/www/koel.

    2) Migration errors: You may need to run php artisan migrate:fresh –seed to reset and seed the database if you encounter any errors during the migration step. This will delete all your existing data, so make sure you have a backup before doing this.

    3) Authentication errors: You may need to generate a new JWT secret by running php artisan jwt:secret if you encounter any errors during the authentication step. This will invalidate any existing tokens, so make sure you log out and log in again after doing this.

    4) Node errors: You may need to update your Node version to the latest stable one by running the following command if you encounter any errors during the asset compilation step:

    sudo npm install -g n && sudo n stable

    Conclusion and next steps

    As we told you in this tutorial, Koel is a web-based audio streaming service written in the Laravel PHP framework. If you have followed all the steps mentioned in this post correctly, you can use this tool to stream your personal music collection and access it from anywhere. It is interesting to know that this program supports multiple media formats including AAC, OGG, WMA, FLAC, and APE.

  • Boost Your Windows Server Security with OpenSSH: Here’s How to Install It

    Boost Your Windows Server Security with OpenSSH: Here’s How to Install It

    OpenSSH is a tool that allows you to securely connect to a remote server using the SSH protocol. This tool encrypts all traffic between client and server to prevent eavesdropping, connection hijacking, and other attacks. Stay with us until the end of this post to teach you how to Boost Your Windows Server Security with OpenSSH.

    Why use OpenSSH for Windows server security?

    Some of the reasons to use OpenSSH are:

    1) Free and open-source: You can review, modify, and distribute the source code under a BSD-style license.

    2) Extensive support: integrates into multiple operating systems such as Microsoft Windows, macOS, Linux, and BSD.

    3) Development and Improvement: It is continuously developed and improved by the OpenBSD team and the user community, who follow a policy of producing clean and audited code.

    It is based on the original free version of SSH by Tatu Ylonen, which was the first to replace the insecure authentication of .rhosts with public key authentication. It offers various features and options such as tunneling, authentication methods, configuration options, X11 forwarding, SCP, SFTP, and more.

    Installing OpenSSH on a Windows Server

    Before we teach you how to install OpenSSH, we recommend you choose and use the Windows VPS server plans provided on our site. Installing OpenSSH on Windows Server is easy. To do this, you need to follow the steps below.

    1) From the search section in the start menu, type PowerShell and run it.

    2) Now you can install OpenSSH Server by running the following command in PowerShell:

    Add-WindowsCapability -Online -Name OpenSSH.Server

    Also, to install OpenSSH Client, you need to run the following command:

    Add-WindowsCapability -Online -Name OpenSSH.Client

    Configuring OpenSSH for Windows Server

    In this section, we are going to show you the OpenSSH configuration steps. You can make the desired changes by running the following command in PowerShell:

    start-process notepad C:\Programdata\ssh\sshd_config

    To configure the firewall, it is necessary to run Server Manager from the start menu.

    Then select “Windows Firewall with Advanced Security” from the Tools menu:

    Windows Firewall with Advanced Security

    You can select the New Rule option from the Inbound Rules section:

    Inbound Rules section in firewall

    Select the port and then click Next:

    firewall settings on windows server

    Select TCP as shown in the image below, then type port 22 and click Next:

    new inbound rule wizard

    Next, you need to allow the connection:

    how to allow the connections on firewall

    You can also assign the rule to server profiles and set a custom name for easy identification from the list of firewall rules:

    Configuring OpenSSH for Windows Server

    In the final step, you can complete the firewall configuration steps by clicking Finish:

    Configuring firewall for OpenSSH

    Using OpenSSH for secure remote access

    With the help of the OpenSSH tool, you can securely connect to remote machines using SSH protocol. This tool will help you log in to the shell, copy files, enable key-based authentication, mount remote file systems, and more. Note that to use OpenSSH, you must install it on both the client and server machines.

    Advanced OpenSSH security features

    As mentioned in the previous sections, OpenSSH is a tool that allows you to securely connect to a remote server using the SSH protocol. OpenSSH encrypts all traffic between client and server to prevent possible attacks.

    To take advantage of the advanced security features of OpenSSH, it is necessary to perform the following steps:

    1) You can install OpenSSH on client and server machines using Windows settings or package manager.

    2) To configure OpenSSH, open the file /etc/ssh/sshd_config and make the following settings:

    PasswordAuthentication no
    PermitRootLogin no

    3) Using a public and private key pair, you need to generate SSH keys on the client machine by running the ssh-keygen command.

    4) Copy the public key to the server machine by running the ssh-copy-id command. Note that you can log in without a password by adding the public key to the ~/.ssh/authorized_keys file.

    Troubleshooting OpenSSH installation and configuration issues

    In this section, we are going to review and troubleshoot OpenSSH installation and configuration issues.

    1) Remote Hostname Identification Error:

    The first error we are going to troubleshoot is Remote Hostname Identification Error. You may receive the following error:

    REMOTE HOST IDENTIFICATION HAS CHANGED

    Or when an SSH host cannot connect using a specific network address, the following error may occur:

    error output
    ssh: Could not resolve hostname example.co: Name or service not known

    Solution:

    • Check the correctness of the hostname.
    • Check if the hostname error can be resolved using the ping command.
    • Use the IP address as a trusted solution by using ssh [email protected] instead of ssh [email protected] if you have a DNS problem.

    2) Connection Timeout:

    This error means that the user’s attempt to connect to a server has encountered the server’s refusal to load results within the specified time interval. Note that running the following command ssh [email protected] in OpenSSH may cause this error:

    Error output
    ssh: connect to host 111.111.111.111 port 22: connection timed out

    Solution:

    • Ensure the correctness of the IP address
    • Checking the possibility of connecting the SSH port with the network
    • Check that the firewall rules are not set to default.

    3) Connection failure

    An important point is that connection failure is different from timeout. Connection failure means that your request reaches the SSH port, but the host refuses to receive the request.

    Error output
    ssh: connect to host 111.111.111.111 port 22: connection refused

    Solution:

    • Ensure correct IP
    • Ensuring that the SSH port can be connected by the network
    • Check that the firewall rules are not set to default.

    Best practices for using OpenSSH on Windows Server

    In this section, we intend to teach you the Best practices for using OpenSSH on Windows Server.

    1) Limit ssh access of users:

    Given that all system users can log in via SSH using their password or public key, they have full access to system tools, including compilers and programming languages. This can open some network ports for some users. You can limit user access to allow only root, Jonnson, and Terri users by adding the following command to sshd_config file:

    AllowUsers Jonnson Terri

    To allow access to all users except a limited number of them, add the following command:

    DenyUsers root Linda Thomas Michael

    2) Disable empty passwords:

    You can disable all password-based logins. Therefore, it is necessary to allow only public key-based logins by adding the following commands:

    AuthenticationMethods publickey
    PubkeyAuthentication yes

    3) Disable root user login:

    In this section, we want to tell you how to disable the root user login. First, you need to make sure that the normal user can log in as root. For example, let the user Jannson log in as root using the sudo command:

    On a Debian/Ubuntu:

    sudo adduser Jonnson sudo
    id Jonnson

    On a CentOS/RHEL/Fedora:

    sudo usermod -aG wheel Jonnson
    id Jonnson

    Now you can test sudo access and disable root login for ssh by running the following commands:

    sudo -i
    sudo /etc/init.d/sshd status
    sudo systemctl status httpd

    Finally, disable root login by adding the following line to sshd_config:

    PermitRootLogin no
    ChallengeResponseAuthentication no
    PasswordAuthentication no
    UsePAM no

    4) Disable password-based login:

    To disable password-based login, you should add the following commands to the sshd_config file:

    AuthenticationMethods publickey
    PubkeyAuthentication yes

    5) Use SSH public key-based login:

    For public key-based authentication, it is necessary to generate the key pair in the first step using the following commands:

    ssh-keygen -t key_type -b bits -C "comment"
    ssh-keygen -t ed25519 -C "Login to production cluster at xyz corp"
    ssh-keygen -t rsa -b 4096 -f ~/.ssh/id_rsa_aws_$(date +%Y-%m-%d) -C "AWS key for abc corp clients"

    Finally, install the public key using the following commands:

    ssh-copy-id -i /path/to/public-key-file user@host
    ssh-copy-id user@remote-server-ip-or-dns-name
    ssh-copy-id jannson@rhel7-aws-server

    Check that ssh key-based login works for you by running the following command:

    ssh jannson@rhel7-aws-server

    Alternatives to OpenSSH for Windows Server security

    In this section, we intend to tell you the best alternatives to OpenSSH for Windows Server security in 2023. These alternatives are:

    1) SecureCRT: SecureCRT is software for terminal access to network devices and servers. This software can be used for Windows, Mac, and Linux operating systems. In addition, it provides a suitable environment for professional work with terminals along with increasing productivity, advanced management of sessions, and saving time by not doing repetitive tasks!

    2) Mobaaxterm: MobaXterm software is the best toolbox for remote computing. This program on the Windows operating system offers many functions designed for programmers, webmasters, IT managers, and almost all users who need to do their remote work in an easier way.

    3) PuTTY: PuTTY software is a terminal emulator and file transfer program developed as free software for Windows. But it has also been ported to other operating systems. This program supports several different protocols including Serial, SSH, Telnet, Raw, and rlogin.

    4) Remmina:

    Remmina software is one of the useful tools for connecting to remote machines through the network. This software has the ability to support several protocols, which have a plug-in for each of them. The protocols that Remmina software supports are as follows:

    • RDP (Remote Desktop Protocol)
    • VNC (Virtual Network Protocol)
    • Telnet
    • SSH
    • NX
    • XDMCP

    5) mRemoteNG: mRemoteNG is a multi-tab remote connection manager. This tool is also a central tool for managing communications to remote systems. mRemoteNG has many features including the ability to manage multiple types of connections. In addition to RDP, this tool also supports other protocols including VNC, ICA, SSH, Telnet, RAW, Rlogin, and HTTP/S.

    The tab feature is perfect for when you have multiple sessions open and need to move between them. Other features of this software include simplicity in organizing communications, saving password information for automatic login, importing from Active Directory, full-screen mode, ability to group folders.

    Conclusion and next steps

    OpenSSH is the SSH service protocol. OpenSSH is recommended for remote login, backup, remote file transfer via scp or sftp, and much more. SSH is the best way to keep confidential and complete information and data exchanged between two networks and systems. However, its main advantage is server authentication through the use of public key encryption.

  • The Great Linux Debate: Comparing CentOS and Ubuntu

    The Great Linux Debate: Comparing CentOS and Ubuntu

    Choosing an operating system for your server can be a really confusing task due to the huge list of options available. Especially if you want to use your own server with a Linux distribution. There are many choices, but none are as popular as Ubuntu or CentOS. Whether you’re a pro or a beginner, it usually comes down to choosing between the two options. It is safe to say that there is no direct decision. In the post you will read, the comparison of CentOS and Ubuntu will be done using different parameters.

    What is Linux?

    The Unix operating system was developed and expanded in 1971 by the American Telephone and Telegraph Company. This operating system was expensive and not all people could easily use it. Therefore, the Linux system, which is very similar to Unix and its sub-branches, was chosen as a successor.

    In 1991 Torvalds Linux created the Linux kernel. Linux operating system is supported by many companies. Among the most important tasks of the Linux kernel, the following can be mentioned:

    • Data storage: Data storage is done in memory that works with random access, in permanent memory, or virtual file system.
    • Access to the computer network
    • Timing
    • Using input and output tools such as a mouse, keyboard, webcam, and USB flash drive
    • Security: This security can include the security of resources as well as users and different user groups.

    Types of Linux distribution (distro) is an operating system that is made of a software package based on the Linux kernel and often a package management system. Linux users usually get their operating system by downloading one of the Linux distributions. A typical Linux distribution includes the Linux kernel, GNU tools and libraries, additional software, documentation, a window system, a window manager, and a desktop environment.

    To know more about Linux software, you should know its famous distributions. The following distributions are among the most famous:

    • Debian
    • Cloud Linux
    • CentOS
    • AlmaLinux
    • Rocky Linux
    • Ubuntu
    • Mint
    • Kali Linux
    • OpenSUSE

    In the rest of this article, we will do a full review of CentOS and Ubuntu distributions and compare them in terms of security, stability, ease of use, and package management.

    centos vs ubuntu

    What is CentOS?

    The CentOS operating system (Community Enterprise Operating System) is a server operating system. CentOS is a free distribution of Linux supported by communities and there is no need to pay for it. CentOS is based on the Enterprise version, which is known as the server version of the RedHat Linux distribution. The versions of CentOS that enter the market are basically the mirror version of the versions introduced in Red Hat Enterprise Linux. By choosing this popular distribution, there is no need to pay exorbitant fees to buy Enterprise products.

    In most organizations, RHEL is used as the main server, and CentOS is used as a backup and redundant server. This issue will cause other organizations not to need to hire several system administrators, and only by hiring a system administrator who has mastered RHEL, the organization’s CentOS management will be done.

    From the perspective of architecture, this distribution has the ability to support x86, x64, and i386 architectures and even PowerPCs. CentOS also supports GNOME and KDE desktops and this operating system can be used as a server and workstation.

    Advantages of CentOS:

    This operating system is chosen by many users and organizations for several reasons. Some of the important advantages of CentOS are:

    • Open-Source
    • Establishment in the industry
    • Long term support
    • Active community
    • Stability

    What is Ubuntu?

    Ubuntu is a popular free and open-source Linux-based operating system that you can use on your PC or Linux VPS server. It’s a massive project that helps millions of people worldwide run machines built with free and open-source software on various devices.

    Linux comes in many shapes and sizes, with Ubuntu being the most popular version on desktops and laptops. Note that when we say Ubuntu is free, we don’t mean that it costs only; Rather, unlike most proprietary software (such as Windows and macOS), free and open-source software allows you to edit its code and install and distribute as many copies as you like. You don’t pay to use it; So, so not only is Ubuntu free to download; But you can use it as you want.

    Advantages of Ubuntu:

    There are many reasons to use Ubuntu, but here are the most important ones:

    • This program is free and open source.
    • It is easy to install and test. In fact, you don’t need to be an expert to install it.
    • It is beautiful and user-friendly.
    • It’s stable and fast, typically loading in less than a minute on modern computers.
    • It does not have any important viruses and is immune to harmful Windows viruses.
    • is up to date; Because Canonical releases new versions every 6 months and provides regular updates for free.
    • It is supported and you can get all the backups and guidance you need from the global FOSS community and Canonical.
    • Among the different versions of the Linux operating system, Ubuntu has the most support.

    The differences between CentOS and Ubuntu

    CentOS and Ubuntu are both popular operating systems for web servers in the software operations market. CentOS is basically built on the Linux framework and Linux distribution to provide a free and supported computing platform. Ubuntu is also basically an open-source distribution of Linux and it is considered one of the popular cloud operating systems it runs in most cases and places such as desktop and cloud environments and almost everything related to the Internet.

    In the rest of this article, we will compare Ubuntu and CentOS in terms of security, stability, ease of use, and package management.

    CentOS vs. Ubuntu: Security

    Ubuntu is updated frequently. A new version is published every six months. Ubuntu offers LTS (Long Term Support) releases every two years, supported for five years. These different versions allow users to choose whether they want the “latest and greatest” or the “tried-and-true”. Due to frequent updates, Ubuntu often includes newer software in newer versions. This feature can be fun to play with new features and technologies but can conflict with existing software and configurations.

    CentOS is rarely updated. This is partly because the CentOS development team is smaller. It is also due to extensive testing on each component before release. CentOS versions are supported for ten years from the release date and include security and compatibility updates. However, a slow release cycle means a lack of access to software updates. If they have failed to release these updates to the main repository, you can either install the updates manually.

    CentOS, on the other hand, is based on the Linux framework and is therefore very secure and protected through 3 layers of security. Ubuntu also has good security layers, but sometimes it may be prone to web threats due to frequent updates.

    Regardless of the differences between CentOS and Ubuntu, both are secure with regular updates.

    CentOS vs. Ubuntu: Stability

    The stability of an operating system means that its bugs are fixed quickly. Stability is one of the most important things that affect the performance of servers because an error can lead to the loss of information or server down. This in itself is considered an irreparable disaster, which is associated with a large financial burden. CentOS operating system consists of a strong kernel so its stability is guaranteed and it is better than other Linux distributions.

    One of the reasons that makes Ubuntu suitable for beginners is its stability. You may have heard that if you use Linux, you should be well aware of how to manually fix things and use the command line. This is definitely not the case with Ubuntu. Stability is the main reason why Ubuntu is the first choice of operating system for beginners. Once you’re done with the installation process, all you have to do is keep the packages up-to-date on your system, nothing else. Since packages are tested before being included in the official repositories, you can be sure that your system won’t crash when you install new software. Ubuntu is stable enough to run on servers where uptime and performance are a priority.

    CentOS vs. Ubuntu: Ease of Use

    Ubuntu has gone a long way in designing its system to be user-friendly. The graphical interface is intuitive and easy to manage with useful functionality. Running applications from the command line is simple. But on the other hand, CentOS is more suitable for users with more expertise in this field.

    CentOS is primarily based on Red Hat Linux and is more difficult to learn than Ubuntu due to its smaller community and less documentation. In Ubuntu, it is easier to learn due to the support of more communities and the large number of tutorials and books on the market and the Internet.

    CentOS vs. Ubuntu: Package Management

    A software package is an archive of compiled binary files, resources needed to build the software, and scripts to install and run the software. A package also includes a list of packages in the form of dependencies that must be installed on the system to run the desired software. While the features and facilities of this package manager are very similar in different Linux distributions, the format of packages, tools, and commands are different.

    In Ubuntu, the package format is deb. APT (Advanced Packaging Tool) provides commands for various tasks with packages, including installing, updating, removing, and finding packages in repositories. APT commands act as front-end and high-level commands for the low-level dpkg tool. dpkg can be used to install package files that are on the system. You can also use the apt-get and apt-cache commands (the older version of the apt command) to manage packages in most Debian-based distributions.

    CentOS uses rpm format packages. In CentOS, the yum tool is used to manage the packages in the repositories as well as the packages on the system. The low-level rpm tool can also be used to install the package files that are on the system. In recent versions, the dnf command is used instead of yum.

    Which is better for your needs: CentOS or Ubuntu?

    In this section, in general, by providing several different parameters, including the origin, purpose, support model, how to install programs and application communities, we will give you the opportunity to decide which is better for your needs depending on your needs.

    CentOS and Ubuntu are both Linux operating systems, but they are based on different Linux distributions. Next, we explore the key differences between CentOS and Ubuntu.

    1) Origin: CentOS is developed from Red Hat’s commercial operating system. For this reason, CentOS is commonly used as a commercial-grade Linux distribution. While Ubuntu is developed from the roots of Debian and is known as a Linux distribution based on the Debian family.

    2) Purpose: CentOS is primarily designed for server environments and business and enterprise uses. Ubuntu is often considered a general purpose, desktop distribution and is suitable for everyday use, servers, and desktop systems.

    3) Support model: CentOS typically uses a long-term support model. This means that released versions of CentOS will be updated and supported for a long time. In contrast, Ubuntu comes with two standard versions, namely LTS (Long-Term Support) and regular (non-LTS) versions. LTS versions receive security updates and support for five years, while non-LTS versions receive support for about nine months.

    CentOS consists of a set of Red Hat software, including the Apache web service, MySQL, and Python programming language. On the other hand, Ubuntu uses software such as LibreOffice, Evolution e-mail program, and Firefox browser.

    4) How to install applications: CentOS uses the YUM (Yellowdog Updater Modified) package manager, while Ubuntu uses the APT (Advanced Package Tool) package manager. These two package managers work with differences in syntax and functionality.

    5) User Communities: Both CentOS and Ubuntu have strong and active user communities. However, the Ubuntu user community is much larger and more active, and there are more discussions about Ubuntu. This means more resources, online tutorials, and community support from users.

    Ultimately, choosing between CentOS and Ubuntu depends on your needs, preferences, and uses. If you need a stable and reliable operating system for servers and business use, CentOS is a good choice. If you need a desktop Linux distribution for daily use and development of software and games, Ubuntu can be a good option. Also, if you’re looking for a larger user community and the most training and support resources, Ubuntu might be the best option. However, to choose between CentOS and Ubuntu, it is better to consider your personal needs, skills, and experience and determine the best option for you by testing and experimenting with both distributions.

    Conclusion

    To conclude this comparison of CentOS and Ubuntu, both are famous and one of the best Linux distributions that have their own advantages and disadvantages. Choosing one is easy if you consider your needs and are willing to do some work. The purpose of this article was to compare CentOS and Ubuntu and provide an overview of the differences between these two Linux distributions to facilitate the decision-making process.

  • Experience Lightning-Fast Website Loading with Varnish Cache on AlmaLinux

    Experience Lightning-Fast Website Loading with Varnish Cache on AlmaLinux

    Varnish Cache technology increases performance by keeping duplicate web pages in memory. In effect, when a user searches for a web page, it receives a cached copy, bypassing the time-consuming process of waiting for the original web server to recreate the page. This function provides better control over the performance of your website and allows for more fine-tuning for the main results. Because Varnish Cache is open source and user-friendly, it is used by millions of websites worldwide to increase performance. In this post, we will tell you how you can Experience Lightning-Fast Website Loading with Varnish Cache on AlmaLinux.

    What is Varnish Cache?

    Varnish Cache is an open-source web application accelerator that helps optimize web pages for faster loading. It does this by storing copies of web pages in memory. When a user requests a web page, it retrieves the cached version instead of waiting for the original web server to generate the page from scratch.

    This reduces server load and page load times, making websites more responsive and improving user experience. Varnish also allows you to control how pages are stored in your cache using HTTP cache control headers. Using these, you can specify when the cached version of a page should expire before Varnish sends it back to the origin server to be regenerated.

    This gives you more control over the performance of your website and allows you to fine-tune it even more for optimal results. Because it’s open-source and relatively easy to use, millions of websites around the web now use Varnish Cache to improve performance.

    Experience Lightning-Fast Website Loading with Varnish Cache on AlmaLinux2

    Benefits of using Varnish Cache on AlmaLinux

    Varnish Cache on AlmaLinux offers several significant benefits that enhance the performance and user experience of a website:

    1- Faster Content Delivery: Varnish Cache stores a copy of the most commonly accessed pages on your website in memory. This reduces the need for frequent requests to your server, resulting in significantly faster delivery of content to end users.

    2- Reducing Server Load: Because Varnish Cache serves content from its own cache instead of relying on the server to regenerate content for each request, it significantly reduces server load and increases the overall performance of your website.

    3- Scalability: Cache Varnish can help your website handle increased traffic more easily by serving cached content to a large number of concurrent users. This feature makes it a great tool for scalability.

    4- Ability to Customize: Varnish Cache uses a flexible programming language called VCL. This allows you to create specific storage rules and policies tailored to your website’s needs.

    5- Increasing Accessibility: In cases where the backend server is down or unreachable, Varnish Cache can serve the old version of the content from its cache. As a result, the availability and uptime of your site will increase.

    6- Edge Side Includes (ESI) support: Cache Varnish supports ESI. A technology that allows you to cache different parts of a web page separately. This feature is especially useful for websites with dynamic content.

    7- GeoIP support: With Varnish, you can serve localized content using GeoIP extensions to identify users’ geographic locations.

    These benefits make Varnish Cache an invaluable tool on AlmaLinux for anyone looking to increase the performance, scalability, and reliability of their web server.

    Installing Varnish Cache on AlmaLinux

    Before we start teaching how to install Varnish Cache on AlmaLinux, it is necessary to have a Linux VPS server with the AlmaLinux operating system.

    In the first step, you must log in to the server using the following command through SSH as the root user:

    ssh root@IP_ADDRESS -p PORT_NUMBER

    Update the packages on the server with the help of the following command:

    dnf update -y

    Disable the default Varnish repo by running the following command:

    dnf module disable varnish

    Now you need to install the EPEL repository:

    dnf install epel-release -y

    Then you can install the Varnish repo using the following command:

    curl -s https://packagecloud.io/install/repositories/varnishcache/varnish70/script.rpm.sh | bash -

    Finally, you can install Varnish on Almalinux using the following command:

    dnf install varnish -y

    After the successful installation of Varnish, you should now verify the version of Varnish by running the following command:

    rpm -qi varnish

    You can start and enable Varnish using the following commands and view the installation status:

    sudo systemctl start varnish
    sudo systemctl enable varnish
    sudo systemctl status varnish

    Configuring Varnish Cache for your website

    In this section, we will teach how to configure the varnish cache on AlmaLinux. In order for Varnish to listen on port 80, you need to open the configuration file using a text editor:

    nano /usr/lib/systemd/system/varnish.service

    Now you can change the default port 6081 to port 80 using the following command:

    ExecStart=/usr/sbin/varnishd -a :80 -a localhost:8443,PROXY -p feature=+http2 -f /etc/varnish/default.vcl -s malloc,2g

    After saving the configuration file and exiting it, you can now reload the systemd daemon by running the following command:

    sudo systemctl daemon-reload

    Finally, to apply the changes, restart Varnish with the help of the following command:

    sudo systemctl restart varnish

    To configure Nginx to work with Varnish, you need to first install the Nginx package:

    sudo dnf install nginx

    Then you need to run the Nginx configuration file using a text editor:

    nano /etc/nginx/nginx.conf

    Change the listening port to 8080 as follows:

    .....
    server {
            listen       8080 default_server;
            listen       [::]:8080 default_server;
            server_name  _;
            root         /usr/share/nginx/html;
    .....

    After saving the configuration file, restart Nginx to apply the changes:

    sudo systemctl restart nginx

    In the final step, it is necessary to open access to the HTTP service in the firewall:

    sudo firewall-cmd --zone=public --permanent --add-service=http

    Also, reload the firewall settings to apply the new changes:

    sudo firewall-cmd --reload

    Testing website performance with Varnish Cache

    In this section, we are going to check the performance of cache varnish using wrk. Note that wrk is a modern tool written in C language and used to measure HTTP. This tool can be used to load test web servers with many requests per second. To install wrk, it is necessary to first install some build tools for C and git using the following command:

    sudo apt-get install build-essential libssl-dev git unzip -y

    In the next step, you can clone the git repository for wrk in the wrk directory by running the following command:

    git clone https://github.com/wg/wrk.git work

    Now you can easily change to that new directory:

    cd wrk

    After changing to the new directory, it’s time to build the wrk executable with the make command:

    make

    Copy wrk to the corresponding folder as in the command below. By doing this you will be able to access it from anywhere in your directory structure:

    sudo cp wrk /usr/local/bin

    You can use wrk to test Apache responsiveness:

    wrk -t2 -c1000 -d30s --latency http://server_ip/

    The meaning of the parameters in the above command is as follows:

    • -t2: Run two threads.
    • -c1000: Keep 1000 HTTP connections open.
    • -d30s: Run the test for 30 seconds.
    • –latency: Print latency statistics.

    The output of the above command will be as follows:

    output
    Running 30s test @ http://your_ip_address/
      2 threads and 1000 connections
      Thread Stats   Avg      Stdev     Max   +/- Stdev
        Latency    44.45ms  104.50ms   1.74s    91.20%
        Req/Sec     8.29k     1.07k   12.40k    71.00%
      Latency Distribution
         50%   11.59ms
         75%   22.73ms
         90%  116.16ms
         99%  494.90ms
      494677 requests in 30.04s, 5.15GB read
      Socket errors: connect 0, read 8369, write 0, timeout 69
    Requests/sec:  16465.85
    Transfer/sec:    175.45MB

    Now it’s time to run the same test for the Varnish server by running the following command:

    wrk -t2 -c1000 -d30s --latency http://server_ip:8080/

    The output of the above command will be as follows:

    output
    Running 30s test @ http://server_ip:8080/
      2 threads and 1000 connections
      Thread Stats   Avg      Stdev     Max   +/- Stdev
        Latency    14.41ms   13.70ms 602.49ms   90.05%
        Req/Sec     6.67k   401.10     8.74k    83.33%
      Latency Distribution
         50%   13.03ms
         75%   17.69ms
         90%   24.72ms
         99%   58.22ms
      398346 requests in 30.06s, 4.18GB read
      Socket errors: connect 0, read 19, write 0, timeout 0
    Requests/sec:  13253.60
    Transfer/sec:    142.48MB

    Troubleshooting common issues

    In some cases, the varnish may show incorrect behavior. In other words, it doesn’t behave the way you want it to. There are a few places you can check to troubleshoot these, including:

    • varnishlog
    • /var/log/syslog
    • /var/log/messages

    In the following, we will introduce you to the basic troubleshooting method in Varnish.

    1) Varnish won’t Start

    Sometimes the varnish may not start. There are many reasons for not starting Varnish. Start Varnish in debug mode with the following command:

    varnishd -f /usr/local/etc/varnish/default.vcl -s malloc,1G -T 127.0.0.1: 2000 -a 0.0.0.0:8080 -d

    The output of the above command will be as follows:

    Using old SHMFILE
    Platform: Linux,2.6.32-21-generic,i686,-smalloc,-hcritbit
    200 193
    -----------------------------
    Varnish Cache CLI.
    -----------------------------
    Type 'help' for command list.
    Type 'quit' to close CLI session.
    Type 'start' to launch worker process.

    Now you can tell the main process to start the cache by running the command:

    start
    bind(): Address already in use
    300 22
    Could not open sockets

    2) Varnish is Crashing (panics)

    The next thing is that when the varnish wears off, the child’s processing may be damaged. Note that when Varnish encounters this, the save process will be disabled in a controlled manner. It should be noted that this failure may be due to incorrect configuration. You can check the status of panic messages by running the following command:

    panic.show

    The output of the above command may be as follows:

    Assert error in ESI_Deliver(), cache_esi_deliver.c line 354:
      Condition(i == Z_OK || i == Z_STREAM_END) not true.
    thread = (cache-worker)
    ident = Linux,2.6.32-28-generic,x86_64,-sfile,-smalloc,-hcritbit,epoll
    Backtrace:
      0x42cbe8: pan_ic+b8
      0x41f778: ESI_Deliver+438
      0x42f838: RES_WriteObj+248
      0x416a70: cnt_deliver+230
      0x4178fd: CNT_Session+31d
      (..)

    3) Varnish is Crashing (segfaults)

    The next error you may encounter is Varnish crashing (segfaults). In other words, Varnish may encounter a segmentation fault. When this event is registered by the child process, the core is unloaded and the child process is restarted. But to debug a segfault, you need to provide some data.

    First, you need to make sure you have installed Varnish with debug symbols. After that, you need to make sure that kernel dump is allowed in the main shell:

    ulimit -c unlimited

    Open the kernel with gdb and issue the following command. By doing this you will get a stack trace of the thread that caused the segfault error:

    bt

    4) Varnish gives me Guru Meditation

    To fix this problem, it is necessary to first find the corresponding log entries in varnishlog. Since it can be difficult to trace the entries, you can set varnishlog to log all your 503 errors using the following command:

     $ varnishlog -q 'RespStatus == 503' -g request

    To get varnishlog to process the entire shared memory log, just run the following command:

    $ varnishlog -d -q 'RespStatus == 503' -g request

    Best practices for using Varnish Cache on AlmaLinux

    To get the most out of Varnish Cache in AlmaLinux, it’s important to follow best practices. Some key best practices include:

    1) Fine-tune the Varnish configuration: Experiment with different TTL values and URL patterns to find the optimal configuration for your website.

    2) Monitor website performance: Regularly monitor website performance using tools like GTmetrix or Pingdom.

    3) Keep Varnish Cache up-to-date: Update Varnish Cache regularly to make sure you’re using the latest version with the latest features and bug fixes.

    Alternatives to Varnish Cache

    10 alternatives to Varnish Cache are:

    1) ApacheBooster

    2) Squid-Cache

    3) Speed Kit

    4) WampServer

    5) W3 Total Cache

    6) Amazon DynamoDB Accelerator (DAX)

    7) TwicPics

    8) F5 NGINX

    9) F5 NGINX Plus

    10) Varnish Software

    Conclusion

    As you read in this article, Varnish Cache is a powerful open-source web application accelerator that is widely used to increase the speed and performance of websites. By storing cached versions of web pages, it significantly reduces server load and improves page load times. Customization through its configuration language allows tailored storage rules based on specific website needs. Due to the use of Varnish cache and its importance, in this article, we tried to teach you how to Lightning-Fast Website Loading with Varnish Cache on AlmaLinux.

  • VPN vs RDP: Which One Offers Better Security for Your Remote Workforce?

    VPN vs RDP: Which One Offers Better Security for Your Remote Workforce?

    Since the creation of the Internet, the priority was to send packets without defects and damage, and for this reason, the Internet space is an inherently insecure space. All the programs you use on the Internet, such as e-mail, web, messaging systems, etc., are built according to global standards, but it is still not possible to talk about their security with certainty. For this reason and due to the importance of security, in this article we are going to compare VPN vs RDP. We will also tell you Which One Offers Better Security for Your Remote Workforce?

    Understanding the Risks of Remote Work

    Nowadays, remote working has become a very popular and common method all over the world. Especially now that companies are allowing their employees to do their jobs remotely. But on the other hand, the rise of remote work has created a new range of challenges for businesses that want to keep their sensitive information safe.

    Among the risks that users may face when working remotely are:

    • Email fraud and phishing
    • Cyber attacks on Remote work infrastructure
    • Increased attack levels
    • Weak passwords
    • Webcam Hacking
    • Insecure Connections
    • Lack of awareness of cyber security
    • Lack of monitoring

    As more employees work outside the traditional office environment, companies must find new ways to manage and monitor access to data. After reading this article, you can choose and buy the plan you want from the high-quality and high-speed Admin RDP plans provided on our website. You can also contact our experts if you need support.

    What is VPN and how does it work?

    A VPN or virtual private network is one of the best tools to protect your internet privacy. A VPN encrypts your connection, hides your IP address, and keeps you private while browsing the web, shopping, and banking online. While virtual private networks were once a new technology solution, they are now an essential tool.

    Using a VPN, all your data traffic is sent through an encrypted virtual tunnel. This encryption prevents hackers and profiteers from accessing your organizational information. A VPN establishes a point-to-point connection between your device and the global Internet and allows a user to access another computer from their PC using tunneling protocols. In order to protect your organization’s data and prevent information from being tracked in transit, traffic is often encrypted with network encryption protocols such as SSH or IPsec.

    what is vpn

    VPN vs RDP

    Enterprise VPNs are now used by various businesses. Encryption increases security and privacy. Encryption is a method of converting plain text into a set of unreadable codes. A key or decryptor converts codes into readable information. When you use a VPN, only your device and the VPN provider contain the decryption key, and if someone tries to spy on you, they will only see a series of characters.

    Note that instead of sending your internet traffic (eg online searches, uploads, and downloads) directly to your ISP, a VPN first routes your traffic through a VPN server. That way, when your data is finally transmitted to the Internet, it will appear to come from the VPN server, not your personal device. Without a VPN, your IP address is visible on the web. It is interesting to know that VPN as an intermediary hides your IP address by redirecting traffic.

    What is RDP and how does it work?

    Remote Desktop Protocol (RDP) is a widely used software that allows you to connect to your Windows server in another location. Using this protocol, you can connect to your Windows server, open files, and use them, just like you use your system. Finally, the RDP protocol puts your Windows system and server under your complete control remotely, so that you can use it without any problems.

    In the following, we intend to describe the use of the RDP protocol:

    • Image transfer between the user’s computer and the Windows server
    • The ability to transfer sound from a Windows server to a computer
    • Encrypt all information exchanged between you and the server
    • The ability to access all computer files inside the server using the File System Redirection system
    • Having access to the printer and any system connected to the server

    To understand how RDP works over the internet, consider a drone. You can control your drone by pressing buttons and through radio waves. The use of multi-user remote desktop protocol (RDP) also has almost the same process; Sending your mouse movements and keyboard keys to the desired Windows server. with the difference that this work is done on the internet and not with radio waves. The Windows server desktop appears on the computer screen as if you were sitting behind the main server.

    rdp-remote-desktop-protocol

    VPN vs RDP

    A remote desktop creates a separate path between you and the RDP server over the Internet, where data is sent and received. Mouse movements, keyboard keys, server screen information, and all other required information are sent in this channel with the help of TCP/IP protocol. Also, the RDP connection encrypts all the information between the user and the server so that the user and the remote desktop can experience a secure connection.

    VPN vs RDP: Key Differences

    RDP is a service that allows you to host your website in a virtual environment, while VPN is a user-centric tool that allows you to browse various websites safely and securely. Probably the only thing that an RDP and a VPN have in common is the virtualization aspect of each service.

    RDP is a type of web hosting service. This means it gives you a personal space on the online server to keep your data safe and secure. This will help you to host your website better to get more traffic. While a VPN is a virtual private network that hides your real IP address from hackers and spammers. This makes all your data unreadable so no one can track your online activities. This significantly helps to maintain your privacy and security.

    In the rest of this article, we will discuss the key differences between RDP and VPN and examine each one thoroughly.

    Security Features of VPN

    VPNs use a variety of different protocols. Older protocols, such as PPP and PPTP, are considered less secure. Note that VPN security, like other security programs such as antiviruses, may sometimes malfunction and fail to function fully. VPNs protect your IP and internet history, but they cannot prevent outsiders from attacking your system.

    Using a VPN alone cannot protect you from Trojans, viruses, bots, or other malware. It is better to use an antivirus on your system. This is because once malware gets into your system, it can steal your data, whether you have a VPN or not. For this reason, do not forget to use antivirus. Of course, when your VPN has a problem, you are definitely at risk. For this reason, be sure to use a reliable VPN provider so that you are at less risk.

    Here are some types of security protocols:

    • IP Security Protocol (IP Sec)
    • Layer Two Tunneling Protocol (L2TP)
    • SSL and TLS protocols
    • Point-to-Point Tunneling Protocol (PPTP)
    • SSH protocol (Secure Shell)
    • Secure Socket Tunneling Protocol (SSTP)
    • Internet Key Exchange, Version 2 Protocol (IKEv2)
    • OpenVPN

    Security Features of RDP

    remote desktop provides users with various security settings such as 128-bit encryption and NLA; So you won’t necessarily need a VPN. Of course, due to its high popularity and the existence of Remote Desktop in most modern versions of Windows, this software has become the main target of many hackers. To solve this problem, in recent years, Microsoft has defined several security updates for the RDP protocol. Because of this, an RDP connection can be very secure. However, remember that it is the responsibility of admins and technical support to ensure security patches are installed, and remote users only have access to the hardware resources they need to do their jobs.

    Pros and Cons of VPN

    Geolocation Spoofing: With a VPN, it appears as if your connection to the Internet is coming from a different location. This issue allows users to remove the restrictions of their country regarding access to some specific sites or the restrictions of the sites themselves due to geographical location.

    High Security: Since the communication goes through the encrypted tunnel, no one but the VPN provider can know about it. These encrypted communications prevent data collection by ISPs, hackers, and other malicious and spying agents. If the site you are looking for uses HTTPS, the VPN server will not be able to see the content of your request and will only be informed of the website you have visited.

    Better Privacy: Because your ISP prevents your activity from being tracked, the websites you visit also cannot identify your geographic location.

    Cost and Variety: With a little effort, you can create your own VPN. Also, there are many providers that provide access to servers in hundreds of countries. Some of these providers offer mobile and desktop apps, while others simply require you to connect to a server through open-source software.

    Lower Speed: A VPN connection is often slower than a regular connection. This makes sense once you put at least one extra step between your device and websites. For example, if you’re in the UK and using an Australian server, not only should you expect some lag, but the server’s download and upload speeds will also slow down.

    Legal Issues: Some countries have banned the use of VPNs and identify users by implementing methods such as Deep Packet Inspection. In these countries, trying to hide internet traffic can lead to legal issues.

    Pros and Cons of RDP

    If we want to tell you about the benefits of RDP, we must mention the following:

    • Exclusivity of processor resources, main memory, and information storage space
    • The possibility of dedicated remote management
    • Ability to install desired software
    • The ability to upgrade resources in the shortest possible time
    • Having a dedicated IP
    • Ability to manage the server such as turning off or turning on the server by accessing the server control panel
    • Ability to quickly troubleshoot and transfer information to another RDP machine

    Among the disadvantages of RDP, we can mention the dependence on the network and the need to have a powerful RDS.

    Need Powerful RDS: If there is a need to use RDP on a large scale, a powerful Remote Desktop Service (RDS) is needed to monitor all RDP connections.

    Requires a powerful network: A reliable network connection is required for the client computer to successfully connect to the host computer. Otherwise, the entire Remote Desktop service may fail.

    By connecting to a remote PC, the destination computer is locked for local use and the local user cannot use the system at the same time or see what the remote person is doing.

    Choosing the Right Solution for Your Remote Workforce

    All in all, both services are very valuable for businesses. RDP increases website performance, while VPN increases the security of your data. If your business is growing, an RDP may be right for you. This type of hosting has a high level of customization, which is suitable for those who need to use specific software or programs. In addition, you can do almost everything over an RDP on a dedicated server, but at a lower cost.

    On the other hand, a VPN is very useful for those who travel a lot, work remotely, or hold client meetings in public places. No matter where your destination is, it hides your IP address and provides you with a secure network. For any job where data security is critical, it’s best to invest in a VPN.

    Conclusion

    Both RDP and VPN services have their uses in the business world, and many online companies choose to use one or both services. RDP is a premium hosting option for businesses that need speed to scale and maintain a website with consistently high traffic. For those who work remotely or travel a lot, a VPN can also be a useful solution. In fact, both technologies can be valuable additions to your online toolbox.

  • Secure Your AlmaLinux with Firewall: Ultimate Guide to Protect Your System from Cyber Threats

    Secure Your AlmaLinux with Firewall: Ultimate Guide to Protect Your System from Cyber Threats

    If you are going to prevent malicious traffic or data coming from the Internet or other networks to your system, you need to know what a firewall is and how it works. Generally, a firewall is a device and network security mode that monitors incoming and outgoing network traffic and blocks or allows packets or information data to pass based on its security rules. In this post, with an Ultimate Guide to Protect Your System from Cyber Threats, we will tell you how to Secure Your AlmaLinux with Firewall.

    Introduction to Firewall in AlmaLinux

    A firewall is used to prevent sabotage and security of any system of this system. We must say that every system connected to the Internet needs its firewall to be active to prevent malware attacks and the penetration of dangerous data. It is interesting to note that AlmaLinux and other RHEL-based Linux distributions use firewalls to manage firewall rules. Before we start and explain to you the methods of Secure Your AlmaLinux with Firewall, we recommend you choose and buy a plan from the Linux VPS server plans presented on our website. After installing AlmaLinux on our servers, you will enjoy their high quality.

    How to Secure Your AlmaLinux with Firewall

    In the rest of this article, we will comprehensively teach you how to Secure Your AlmaLinux with Firewall.

    Harden Access with SSH

    If we want to describe SSH with a simple example, we should say that it is like the door of your house. Therefore, securing the front door will keep your home safe. When you purchase a Linux server, your service provider will provide you with SSH root access. To increase security, you should start with SSH access. In the following, we will teach you 5 ways to harden SSH access.

    To carry out the steps that we will tell in the rest of this article, it is enough to open the configuration file using your desired text editor:

    nano /etc/ssh/sshd_config

    It is also necessary to save and exit the configuration file after completing each step. Then, to apply the changes, you must restart the sshd file by running the following command:

    systemctl restart sshd

    1: Setting an idle timeout

    The first method is to exit SSH if the user is inactive. Therefore, you can search for the following command inside the configuration file:

    #ClientAliveInterval 0

    Now, if you want to set the idle time to 5 minutes, for example, you need to set it in seconds. That is 300 seconds:

    ClientAliveInterval 300

    2: Limit the maximum authentication attempts

    In the second method, you can reduce the number of unsuccessful attempts to enter the system. (3 unsuccessful logins):

    MaxAuthTries 3

    3: Changing the SSH Port number

    Another very effective method is to change the SSH port. Given that the default SSH port is 22, you can easily change it to the desired number by running the following command. (for example port 1022):

    #Port 22

    and change it to:

    Port 1022

    4: Disable Tunneling and forwarding

    It should be noted that SSH tunnels allow connections made to a local port to be forwarded to a remote device over a secure channel. To disable some unnecessary options related to tunneling and forwarding, you can search for the following commands in the configuration file:

    #AllowAgentForwarding yes
    #AllowTcpForwarding no
    #PermitTunnel no

    Now you need to change the above commands as below and save the configuration file and exit it:

    AllowAgentForwarding no
    AllowTcpForwarding no
    PermitTunnel no

    5: Using authentication without a password and public key

    To generate your public key on a desktop computer on different platforms, you need to do the following. If you are using OpenSSH Client on Windows, you must use the following command in the command prompt:

    ssh-keygen

    But if you don’t use OpenSSH Client, you can generate SSH keys using PuTTYgen.

    Also, if you use MacOS or Linux operating systems, you can use the following command:

    ssh-keygen

    Again, it is necessary to run the configuration file after entering the server by running the following command:

    nano /.ssh/authorized_keys

    Put your public key in a row in the file and save it. After doing this you can connect to SSH using your private key. Now it’s time to run the following command:

    /etc/ssh/sshd_config

    Finally, you need to paste the following lines in the desired path:

    Password Authentication yes
    PubkeyAuthentication yes

    Installing CSF Firewall

    AlmaLinux has a default firewall but we recommend CSF firewall for intrusion detection, intrusion detection, and security in this article. This firewall is very popular among the users of the popular control panels CPanel, DirectAdmin, and Webmin. To install the CSF firewall, you must first install the necessary prerequisites using the following command:

    dnf install perl-libwww-perl.noarch perl-LWP-Protocol-https.noarch perl-GDGraph wget tar perl-Math-BigInt

    Now you can run the following commands to download, extract and install CSF Firewall:

    cd /usr/src
    wget https://download.configserver.com/csf.tgz
    tar -xzf csf.tgz
    cd csf
    sh install.sh

    In the next step, you can use the following command to check if your server has iptable modules or not:

    perl /usr/local/csf/bin/csftest.pl

    After learning the relevant explanations, you should turn off the test mode:

    sed 's/TESTING = "1"/TESTING = "0"/g' /etc/csf/csf.conf

    Finally, you can restart the CSF firewall by running the following command:

    csf -r

    Install ClamAV Antivirus

    ClamAV is an open-source, cross-platform, anti-malware toolkit developed by Cisco Systems Inc. This kit contains a new protection system to deal with Trojans, viruses, worms, and other types of malware. This antivirus is basically a light and command-line-based system that is combined with other tools such as FreshClam, ClamDaemon, ClamDTop, ClamScan, and Clamtk and offers many valuable features such as automatic database update and real-time scanning and scheduled scanning.

    You can run the following commands to install ClamAV on AlmaLinux:

    dnf install clamav
    dnf install clamd

    You should know that ClamAV uses FreshClam to check for new database versions periodically. Run ClamAV to update the signature database. To do this, just follow the instructions below step by step.

    Stop the freshclam service by running the following command:

    systemctl stop clamav-freshclam

    You can also run Freshclam using the following command:

    freshclam

    Run the following command again to start the Freshclam:

    systemctl start clamav-freshclam

    After completing the installation process, you can use the following command to run a full system scan and remove malware:

    clamscan --infected --recursive --remove /

    AlmaLinux update

    As you know AlmaLinux is a binary-compatible fork of the RHEL and CentOS base. On the other hand, RHEL and CentOS are secure enough for an enterprise environment. However, it is important to try to always keep AlmaLinux up-to-date by running the following command:

    dnf update all

    How to enable the Firewall on AlmaLinux

    In the first step, you can check the status of the firewall on AlmaLinux by running the following command:

    systemctl status firewalld

    Check the services configured in the firewall using the following command:

    sudo firewall-cmd --list-all

    You can stop the firewall with the help of the following command:

    sudo systemctl stop firewalld

    You can also run the following command to start the firewall again:

    sudo systemctl start firewalld

    To restart the process, use the following command:

    sudo systemctl restart firewalld

    As you know, by default, the firewall starts automatically after the system boots. To disable the firewall, you can use the following command:

    systemctl disable firewalld

    It should be noted that if the above command is executed with the systemctl stop firewalld command, the firewall will be disabled forever.

    The interesting thing is that you can reactivate the firewalld service at any time:

    sudo systemctl enable firewalld

    Conclusion

    In this article that you read, we tried to fully familiarize you with the steps to secure AlmaLinux so that you can be safe from cyber-attacks. We also tried to teach you how to Secure Your AlmaLinux with Firewall. In this way, now you can easily install FirewallD on AlmaLinux and other RPM-based Linux systems. By doing this you will partially secure your system from the outside world.

  • Admin RDP vs. User RDP: What’s the Difference?

    Admin RDP vs. User RDP: What’s the Difference?

    Remote Desktop Connection Protocol (or RDP for short) is a proprietary protocol, developed by Microsoft and used to graphically represent a connection to a computer connected to a network. RDP is a protocol for working with another system completely offsite. But in the rest of this post, we will explain the difference between Admin RDP and User RDP.

    The Difference between Admin RDP and User RDP

    In the rest of this article, we will explain the definition and benefits of each of the Admin RDP and User RDP services. Then we will compare these two services from the aspects of Resources, Security, Virtualization, Accounts, OS, Port, Installing Programs, IP, and Access Level.

    What is Admin RDP?

    The RDP protocol was introduced in 1998 by Microsoft. This protocol allows the user to connect to another server instead of going to the server room or sitting behind the destination system to remotely connect to the server or the destination system and do his work. So, the RDP protocol allows the user to remotely connect to the server or target system through the network. RDP is used for remote work and management of services and windows that are started on the main server. We recommend you choose one according to your needs after viewing Admin RDP plans and enjoy the high quality and speed of this service.

    Advantages of Admin RDP

    In this section, we are going to mention some features of Admin RDP. These features include the following:

    • Faster and more reliable RDP connection using a dedicated resource pool.
    • Full root access to the server
    • Dedicated IP address
    • The adjustability of programs and operating system
    • Full root access to the server
    • Ability to create firewall options and access security features
    • Ability to increase resources

    What is User RDP?

    In this part of the paper, we are going to introduce you to User RDP. User RDP is like an account, not a server. In User RDP, the developer does not receive any personal resource or IP address. All the main resources like RAM, CPU, connection, and bandwidth on the host server will be shared among other developers.

    Users will only get dedicated storage space on a server. In User RDP, all user accounts use the same server to store data. Also, the number of developers or other users with whom you must share resources is defined by the type of sharing plan.

    In User RDP, accounts are managed through the Active Directory Service of Windows Server. User RDP has no regular maintenance except maybe once a month. If any RDP subscriber consumes too many resources, it may affect other users. If the server does not have any security or configuration, there will be some security issues in the user accounts. A webmaster does not perform the basic tasks of installing/uninstalling software on the server. It limits the possibilities of a website. Such resource-limited websites are only good for browsing-related uses.

    Advantages of User RDP

    In this section, we are going to mention some features of User RDP. These features include the following:

    • High computing speed compared to regular servers
    • No need for a website administrator
    • High network speed
    • Dedicated storage space
    • Lowest fees for single-user accounts

    Admin RDP vs User RDP

    In the continuation of this article, we will compare Admin RDP and User RDP with 10 parameters.

    1) Resources

    All resources in a User RDP are shared by the hosting company’s customers. Only the provided storage space is allocated and inaccessible to any other client. Limited resources often affect the user experience on the server. When a single client uses a high amount of resources, it also affects the performance of other users.

    When the customer wants to allow several users to access their server, the quality of the server will not be good. This is why User RDP is only preferred for browsing websites and has no facility for user accounts or user data storage where multiple people can log in at the same time.

    The resources in the Admin RDP are exclusively owned by the customer and no other customer of the hosting company has access to them. Dedicated resources allow a client to make maximum use of resources regardless of whether another client is using them or not. Such dedicated resources help the developer to have a website with multiple registered accounts with additional storage facilities.

    2) Security

    The security in User RDP is very low. The server host performs security checks once or twice a month. For websites with risk factors, this is very low. Poor security affects the integrity of data transmission over RDP connections.

    With an Admin RDP connection, the user can use whatever security actions they need. They can perform security and error checking at any specified time interval. As security increases, so does the integrity of data transmission. Prevents data leaks and hacks during transmission.

    3) Virtualization

    Hosting accounts in Admin RDP is via virtualization. User RDP has no virtualization feature.

    4) Accounts

    Most companies that provide single User RDP servers can facilitate only one user. This means that only one user can log in to the server through the provided credentials. If multiple users want to use the account, they must use the same login credentials.

    Some RDP Admins allow up to 50 users on a single RDP server. Admin RDP allows different members in different ranks to have limited or open access to details according to their level. Multiple users also allow different website administrators to manage the server.

    5) OS

    In User RDP, the user has no choice but to go with the server OS provided by the host. It may affect performance because sometimes the host may not necessarily update or upgrade versions after release, making new features unavailable to the customer.

    Admin RDP has complete control over the operating system used and when and how it is installed. The user can choose any server operating system they prefer and install it directly on the server without the help of the server host. They can patch updates and upgrades to access new features of the server operating system. They can also restore the server operating system to restore the changes made to the system.

    6) Port

    Another parameter to compare between Admin RDP and User RDP is the port. It is interesting to know that TCP port 3389 is one of the most User RDP ports. Port 25 is the only primary port User RDP is connected. However, this port is the only important port User RDP is connected.

    On the other hand, all ports are accessible for Admin RDP. The important thing to know is that Admin RDP programs provide user access to all RDP connection capabilities.

    7) Installing Programs

    Another parameter that can be checked is the permission to install programs and bots in Admin RDP and User RDP. In User RDP, the user cannot configure any application or program due to a lack of permissions or resources. It limits the compatibility of the server with the needs of the developer.

    On the other hand, it is very easy to install programs and bots on the server with Admin RDP. The hosting business has no control over the customer’s ability to add, remove, or change plans.

    8) IP

    Clients using User RDP access the same RDP. Like other customers of the same hosting company, they log in using the same credentials. Because they all have the same IP address, there is no distinct identity for websites generated in this area.

    An Admin RDP hosting provider uses unique IP addresses for each of its clients.

    9) Access Level

    Administrator privileges on the server are not granted to users using User RDP. Any significant changes must be approved by the user or, failing that, requested by the user. Installing or removing programs, wiping the hard drive, resetting data, changing the operating system, and adding or removing users are all examples of system changes.

    Admin RDP gives the client administrator-level access. The user has full control over the server configuration thanks to the hierarchy. Moreover, they can customize the server according to their needs and plans. When something goes wrong, you don’t have to depend on your hosting provider to fix it because you have a lot of control over the server.

    10) Price

    User RDP costs less because it has fewer resources than Admin RDP. User RDP costs less because the hosting server business only needs to invest a small amount of money. All clients have access to RAM, CPU, and bandwidth at the same time, and storage space is prorated based on the number of new consumers joining the service. Their RDP server business does not require much capital, so the client is spared the cost of paying for it.

    Admin RDP can cost three to four times as much as User RDP for the same amount of resources. In some cases, depending on the number of resources available, the cost can increase significantly. Dedicated resources are the reason for the high price. Furthermore, the IP address provided is unique and will not be shared with any other website hosted by the same server business.

    Conclusion

    Even though all major server hosting companies offer RDP hosting through User RDP and Admin RDP, you should choose one that suits your needs. But if you have the ability to pay and have only one user, Admin RDP has better security features and we recommend you use this service. If you have specific questions about Admin RDP or User RDP, you can Write to us in the comments section so that we can answer them as soon as possible.