Author: Nicol G

  • How to Purchase USA RDP from NeuronVM

    How to Purchase USA RDP from NeuronVM

    USA RDP is one of the options that you can consider for your career development, If looking for web hosting with features like instant delivery, unlimited bandwidth, and low ping time, NeuronVM will be with you. Today, I want to talk about how to purchase USA RDP that is suitable for all businesses, So stay with us until the end of this tutorial.

    Get USA RDP from NeuronVM

    To start the process of purchasing USA RDP, follow the steps below carefully.

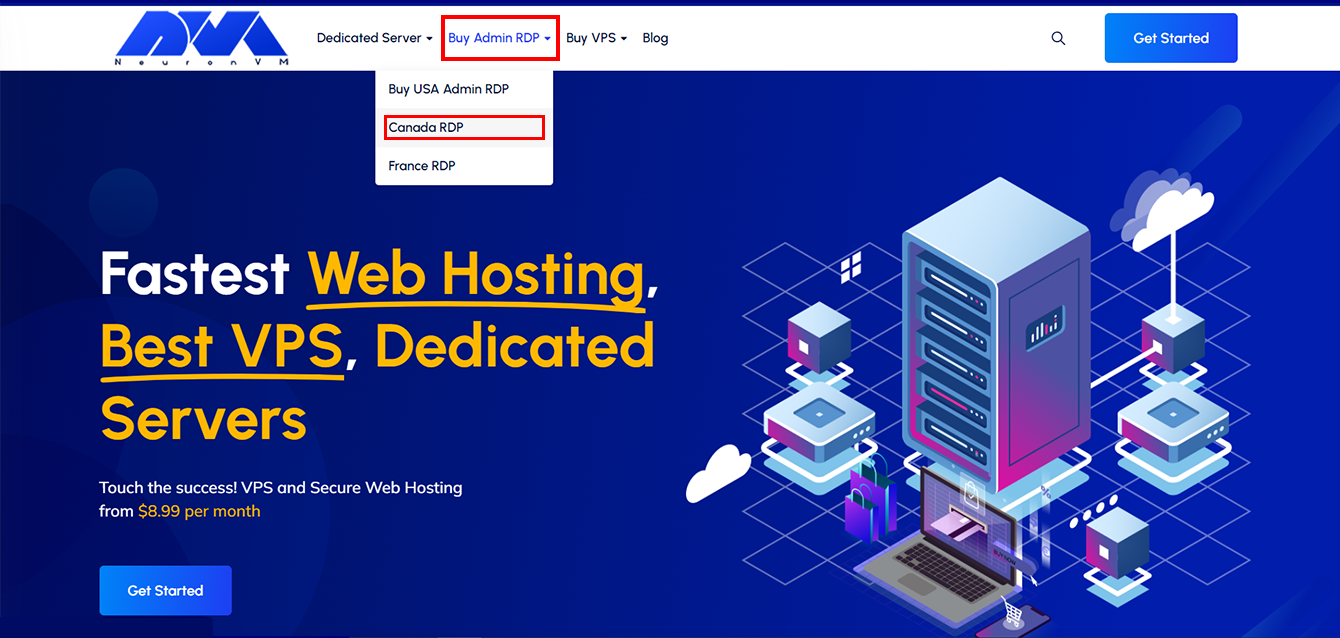
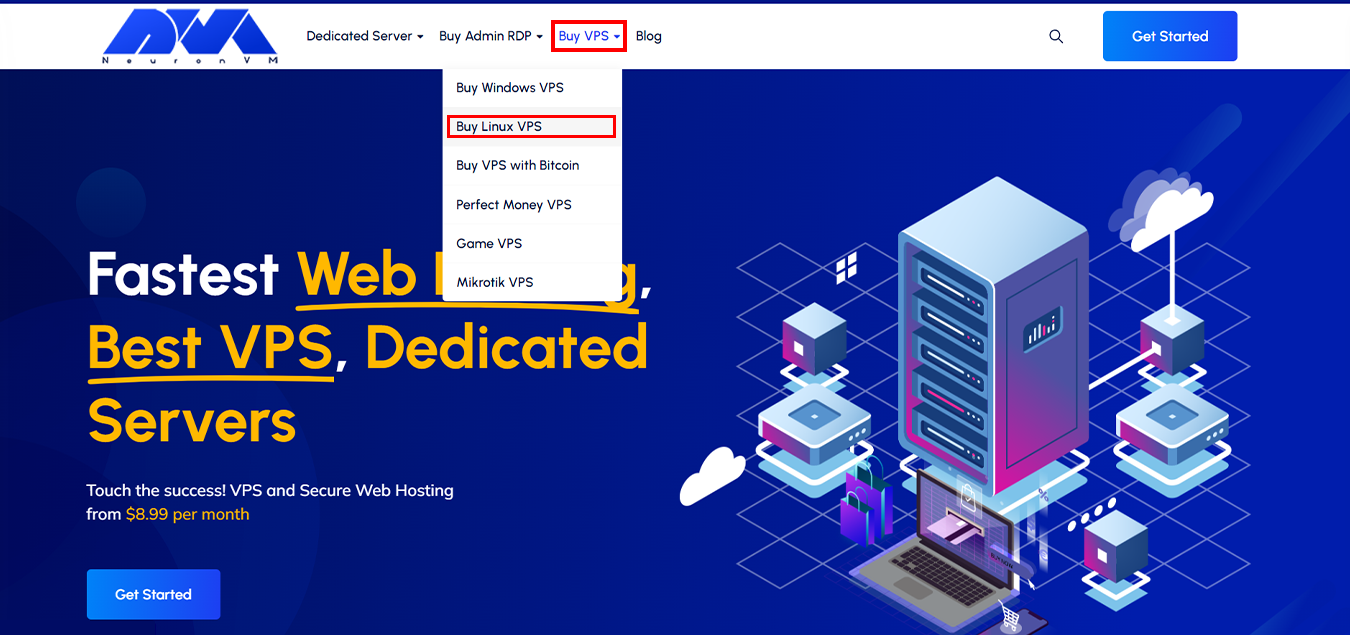
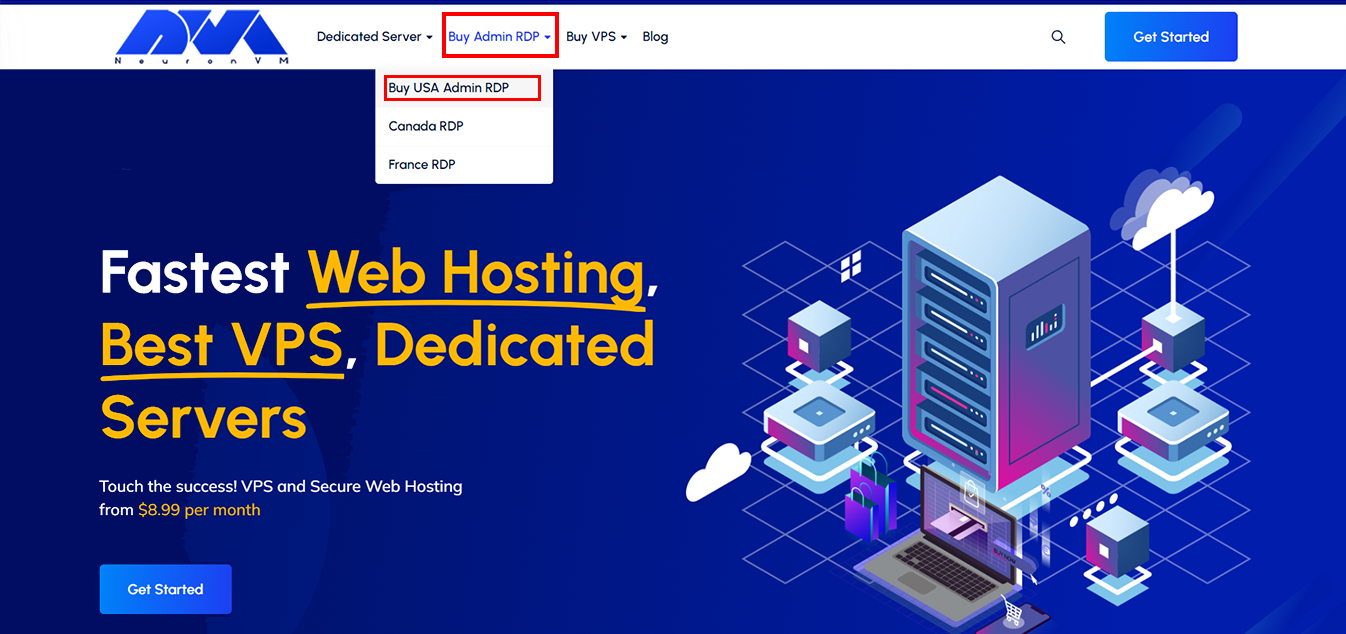
    Open the NeuronVM website. Then hold the mouse over the Buy Admin RDP option in the main menu and click on Buy USA Admin RDP:

    buy admin rdp from neuronvm

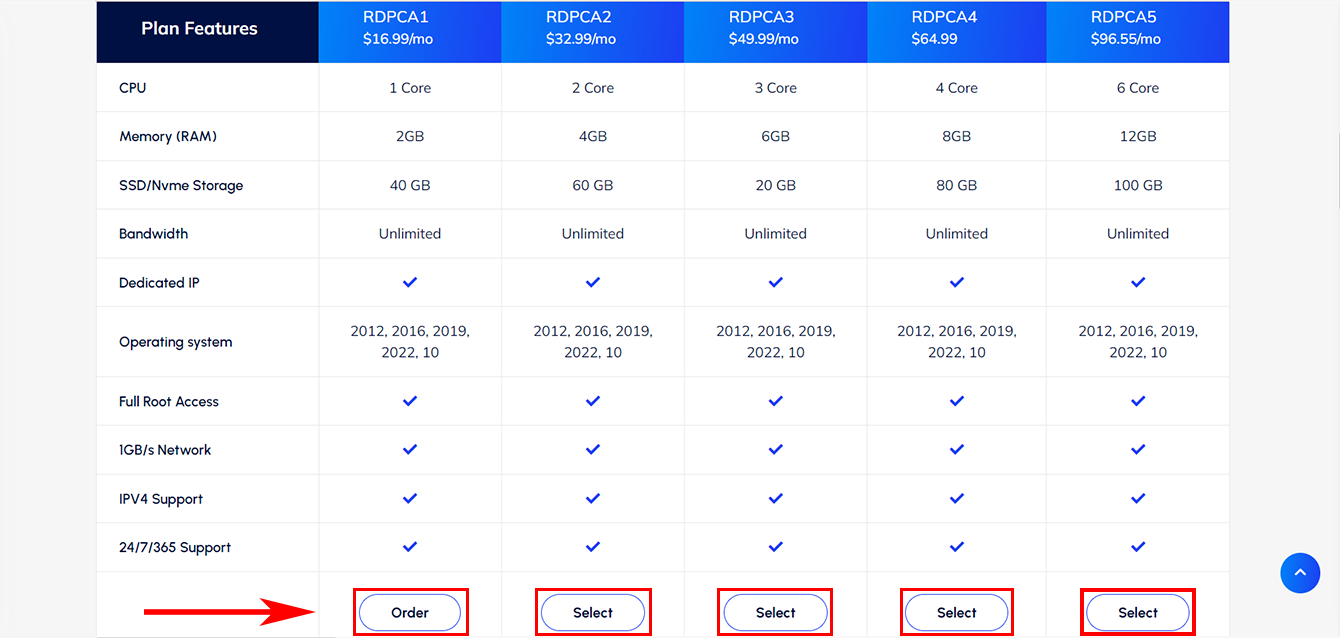
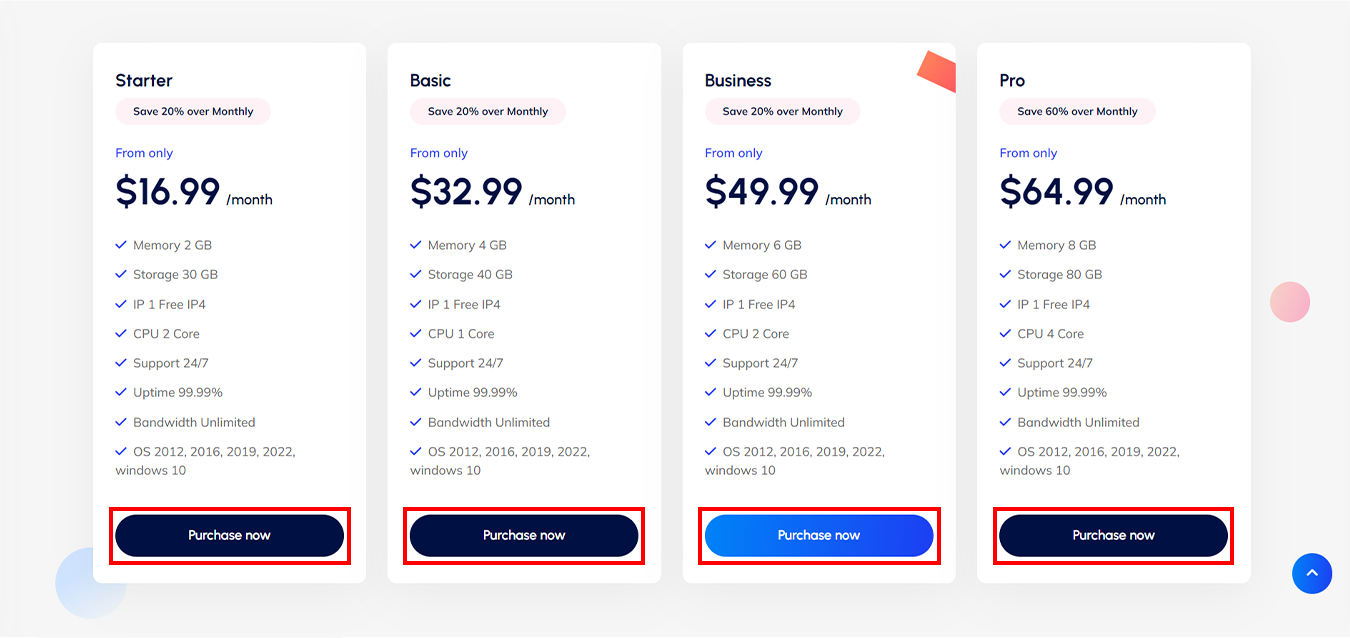
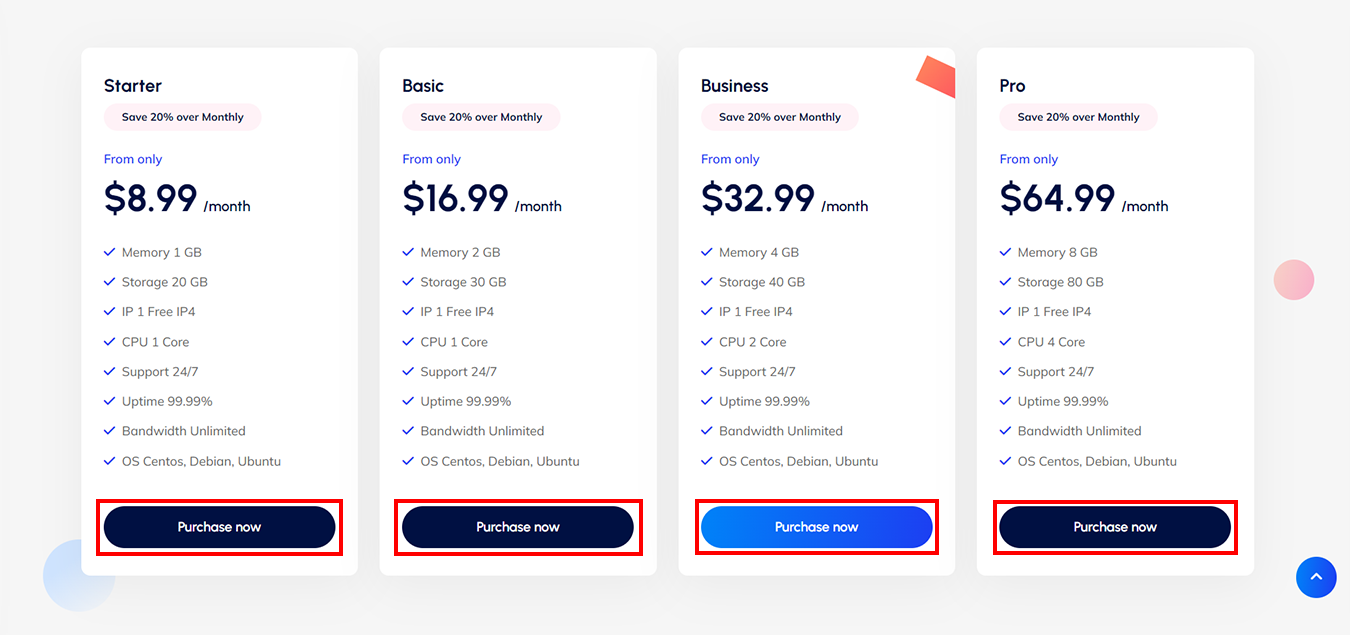
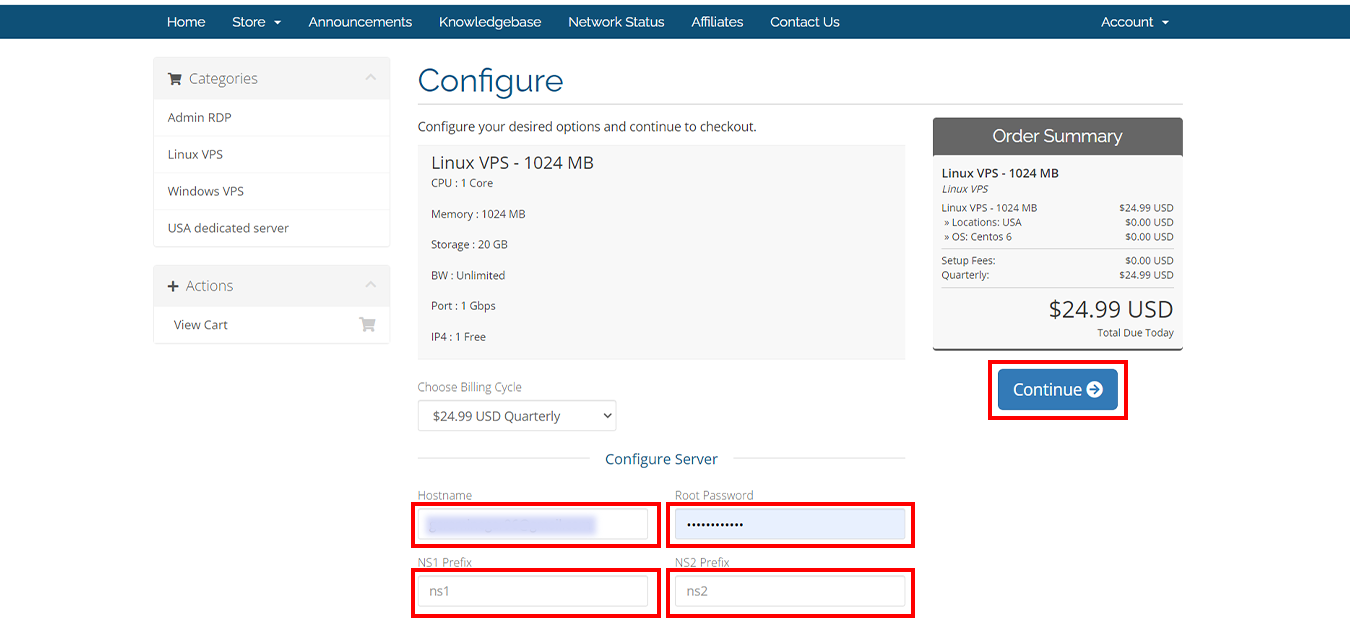
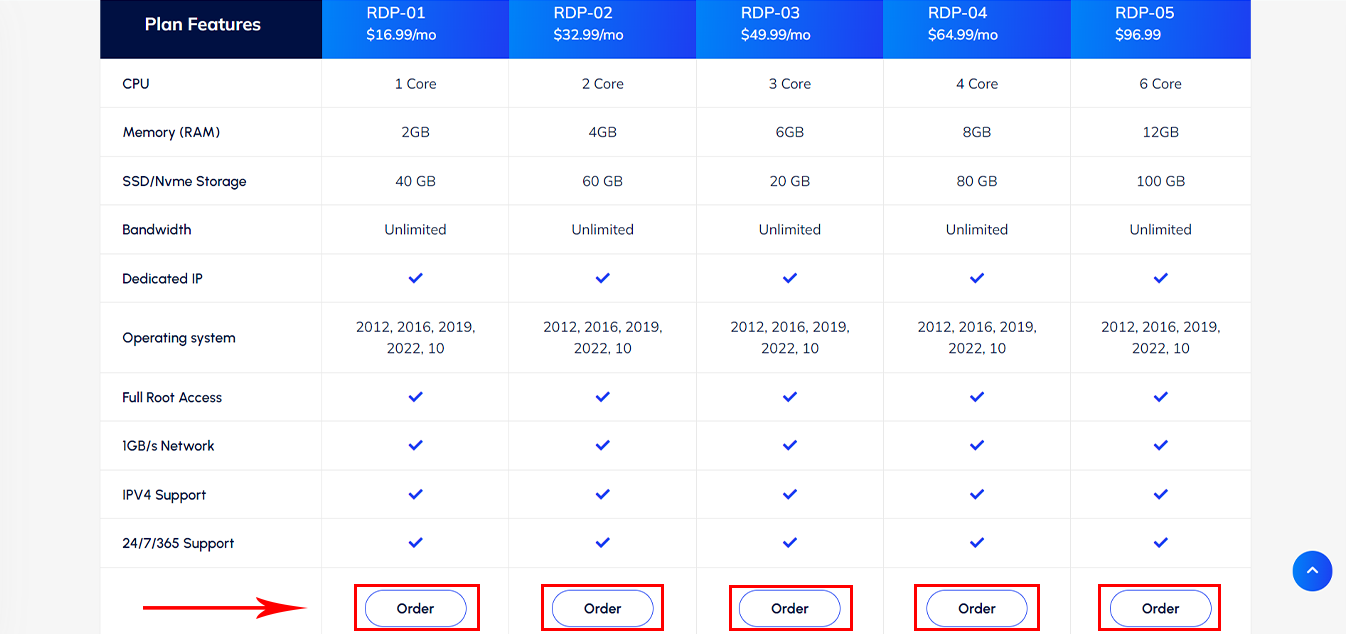
    We have prepared ” Various Plans ” with different specifications for you, read them and choose the most suitable one:

    usa rdp plans in neuronvm

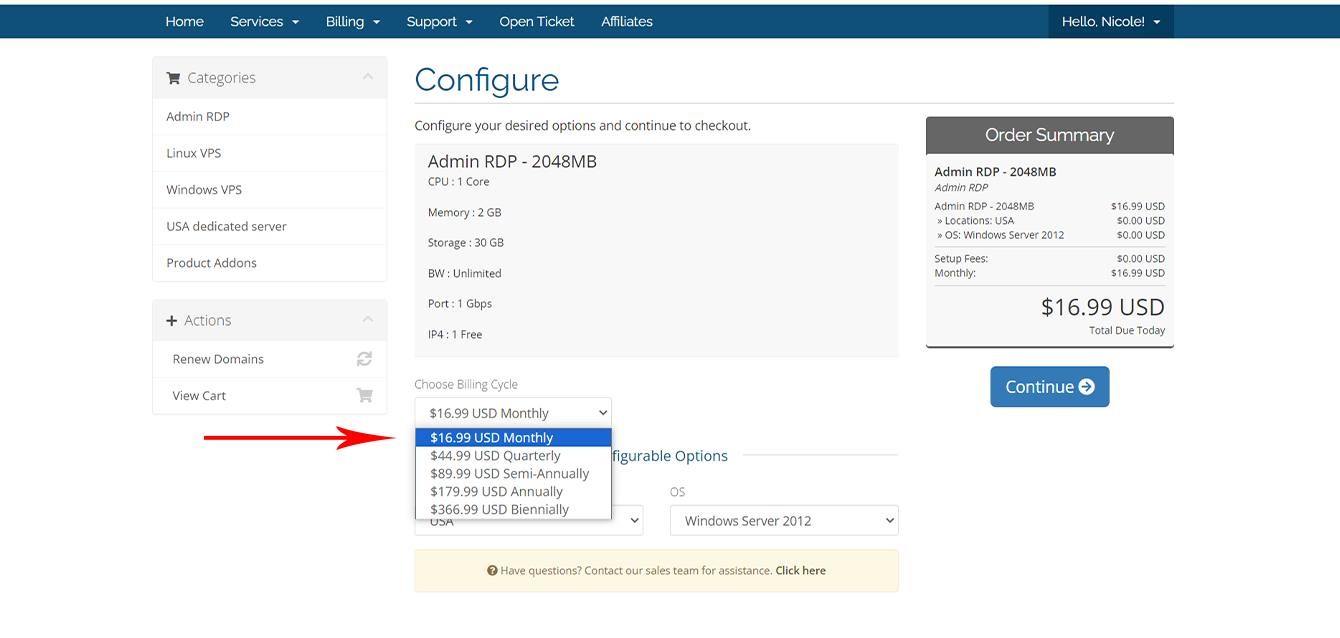
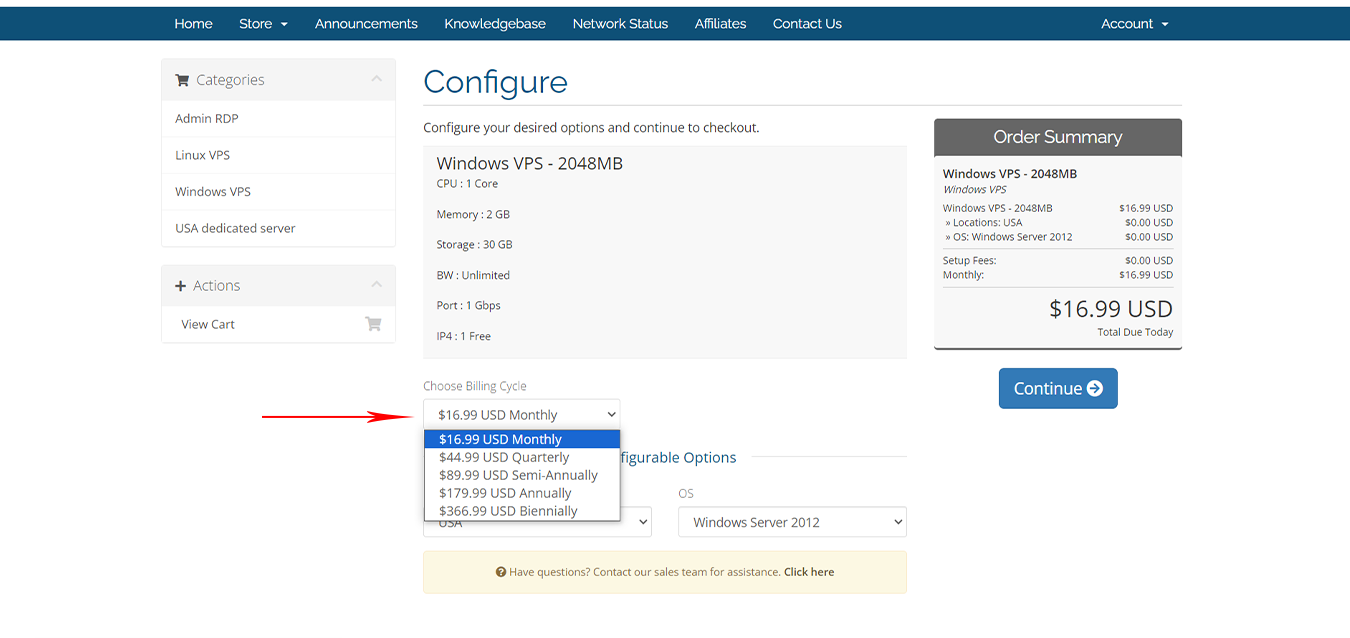
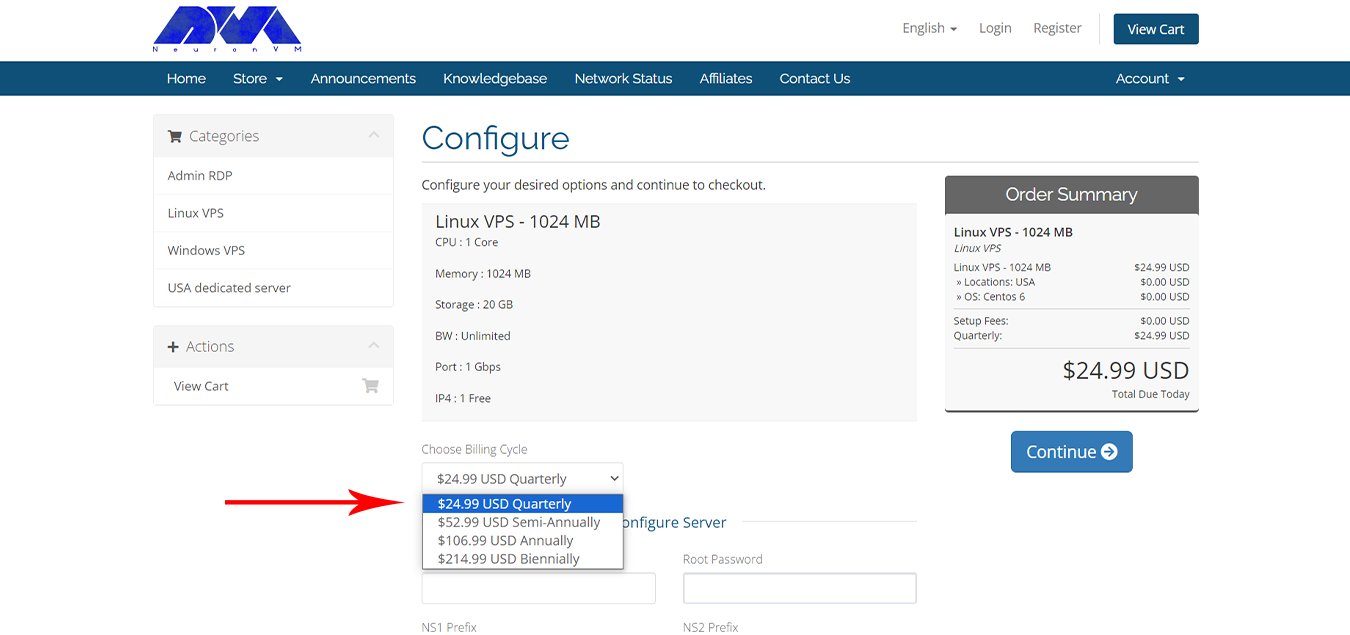
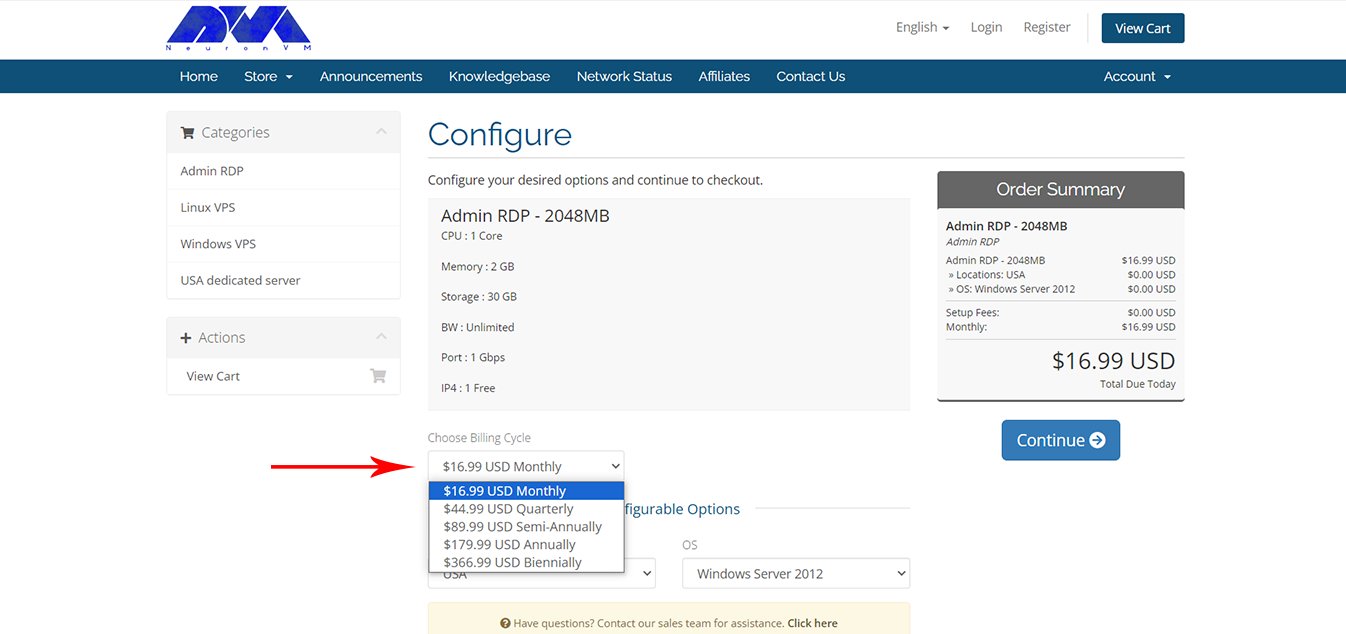
    Please select your “Billing Cycle” from the options provided on the page below:

    NEURONVM-CONFIGURE-PAGE

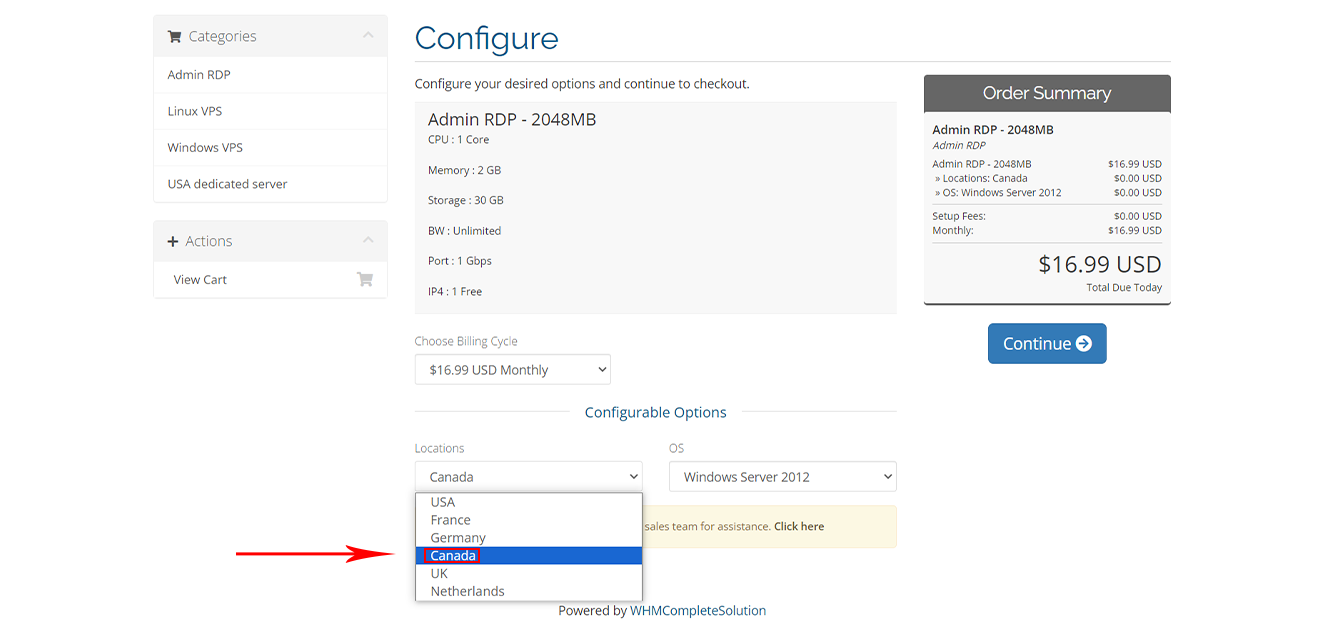
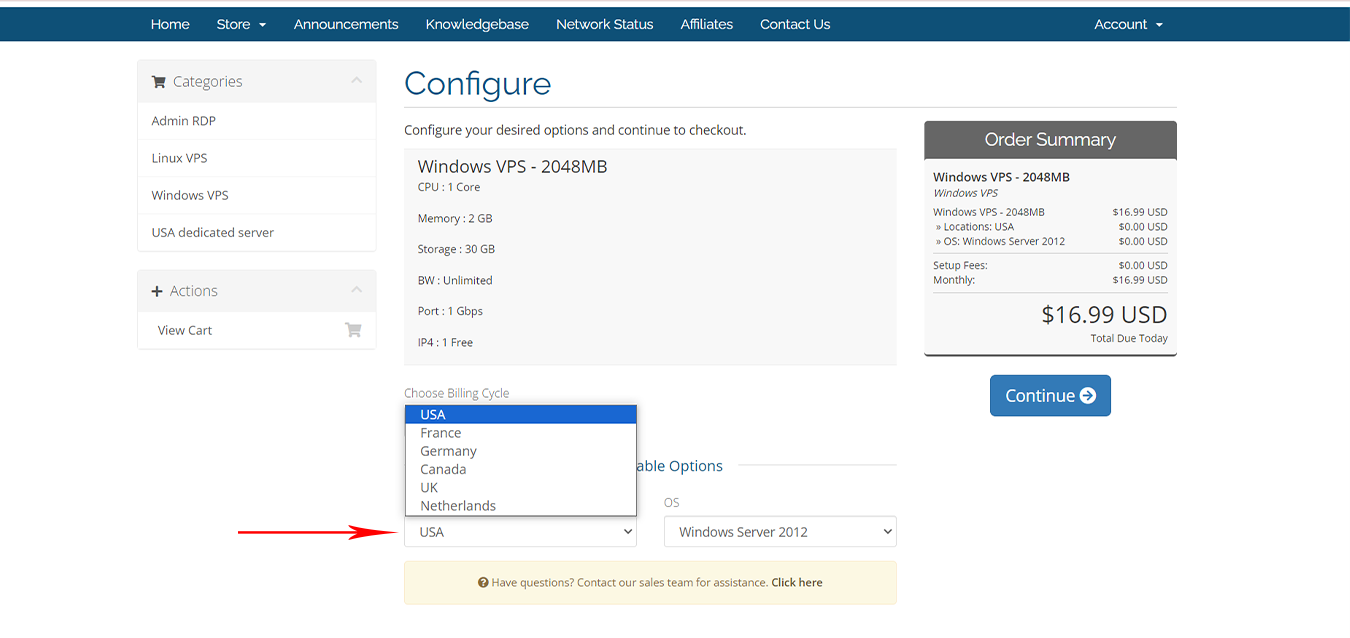
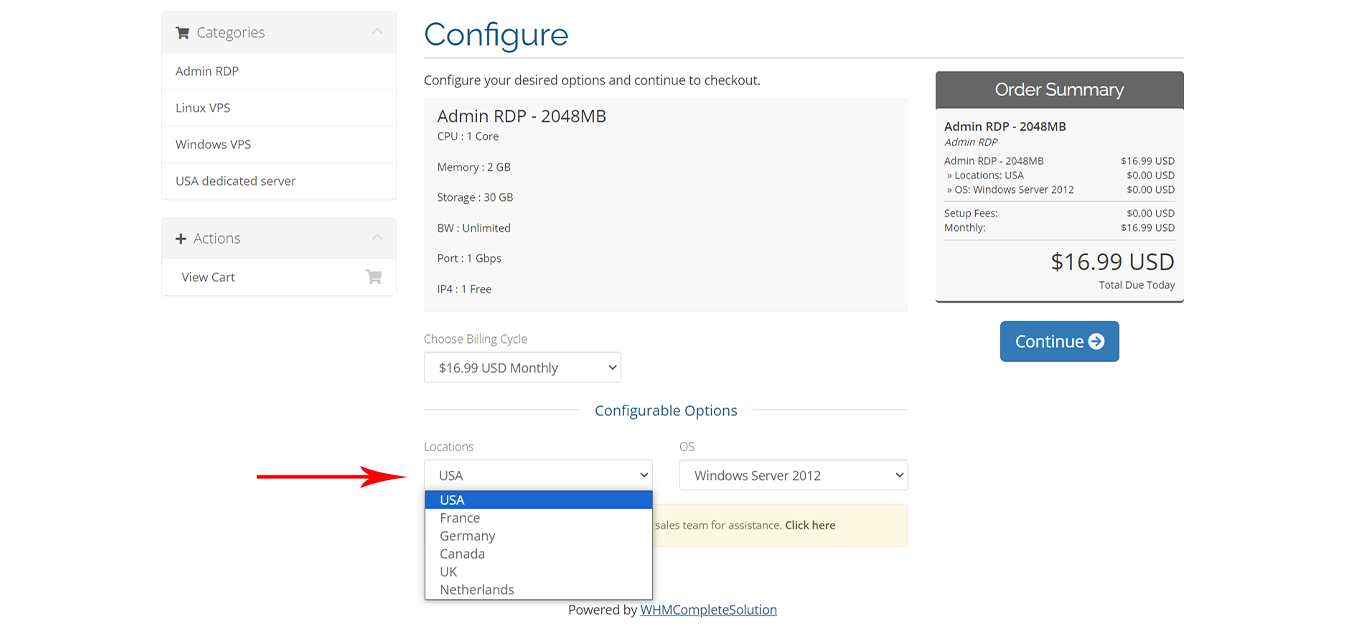
    In the “Location” section, you must select the USA:

    NEURONVM-SELECT-LOCATION-PAGE

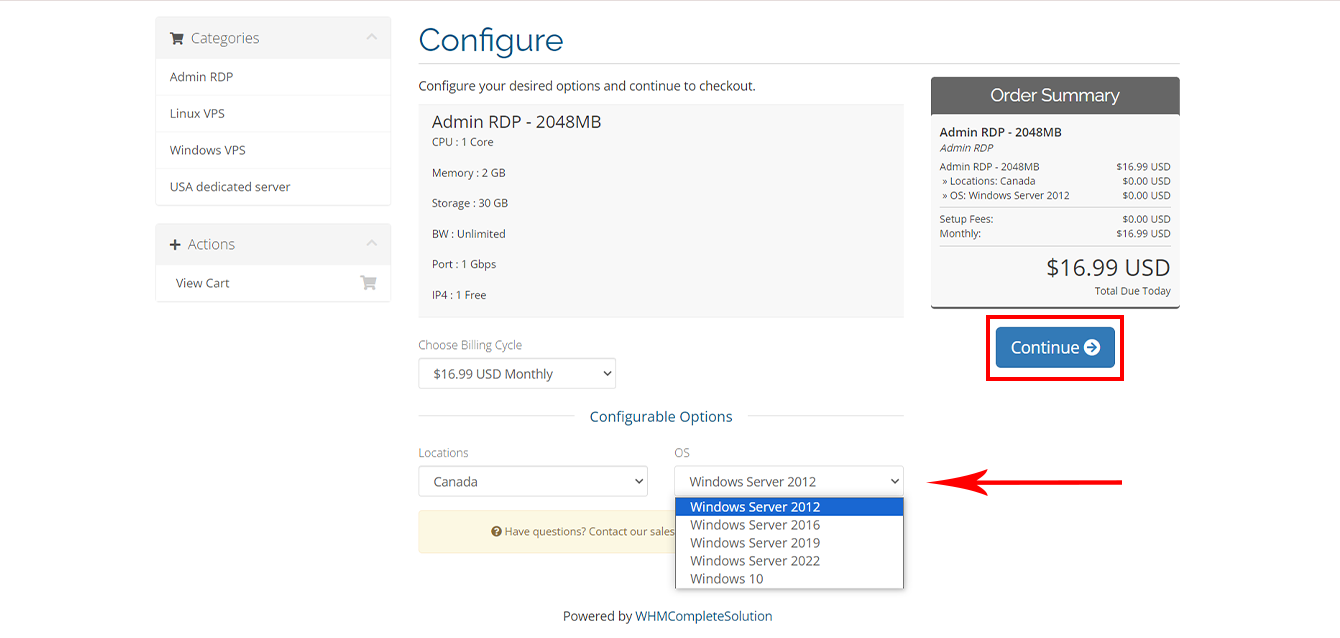
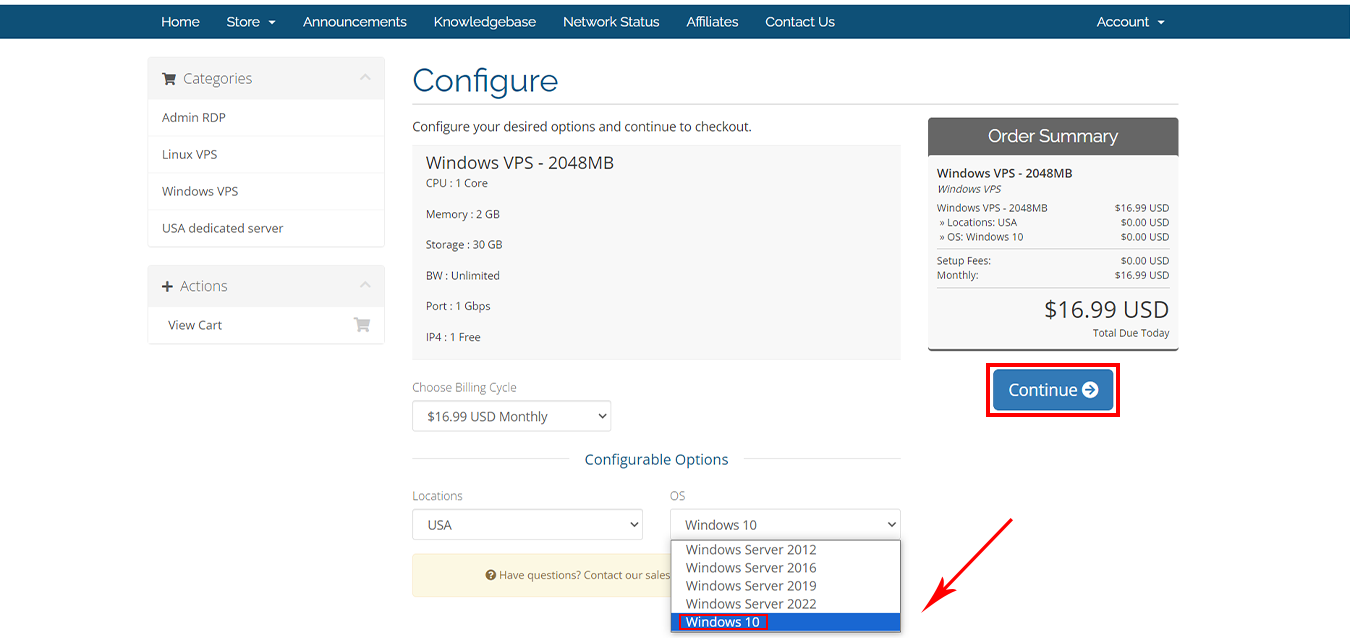
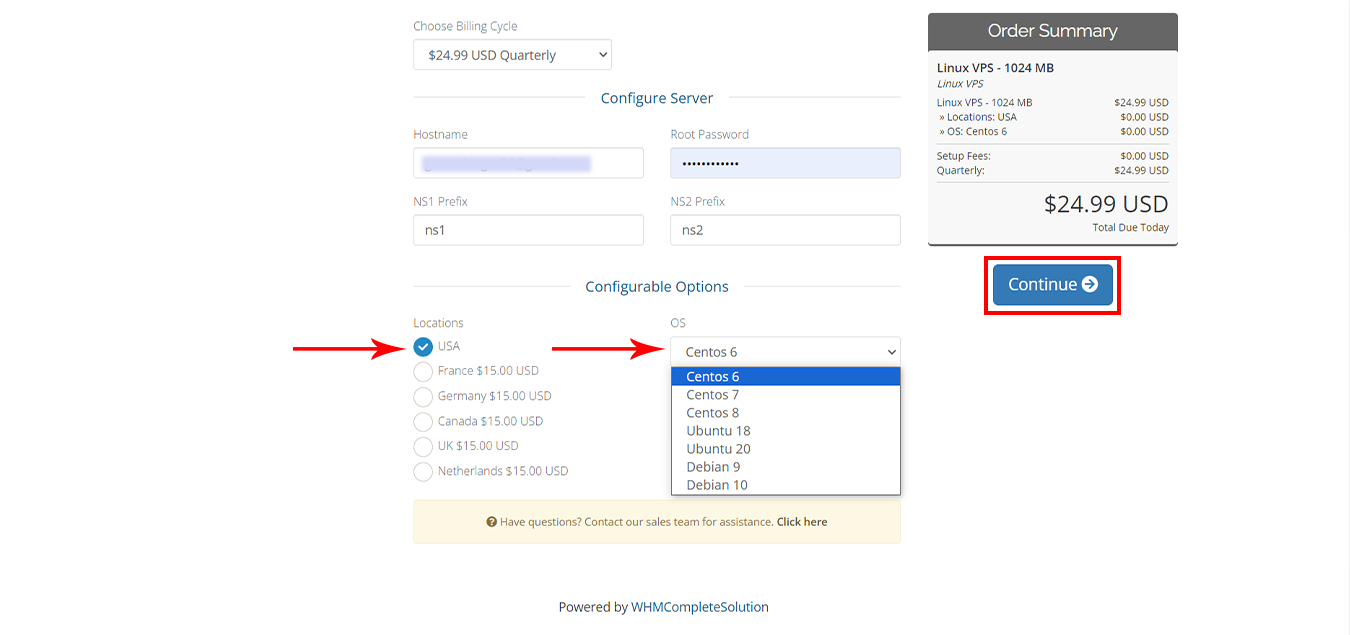
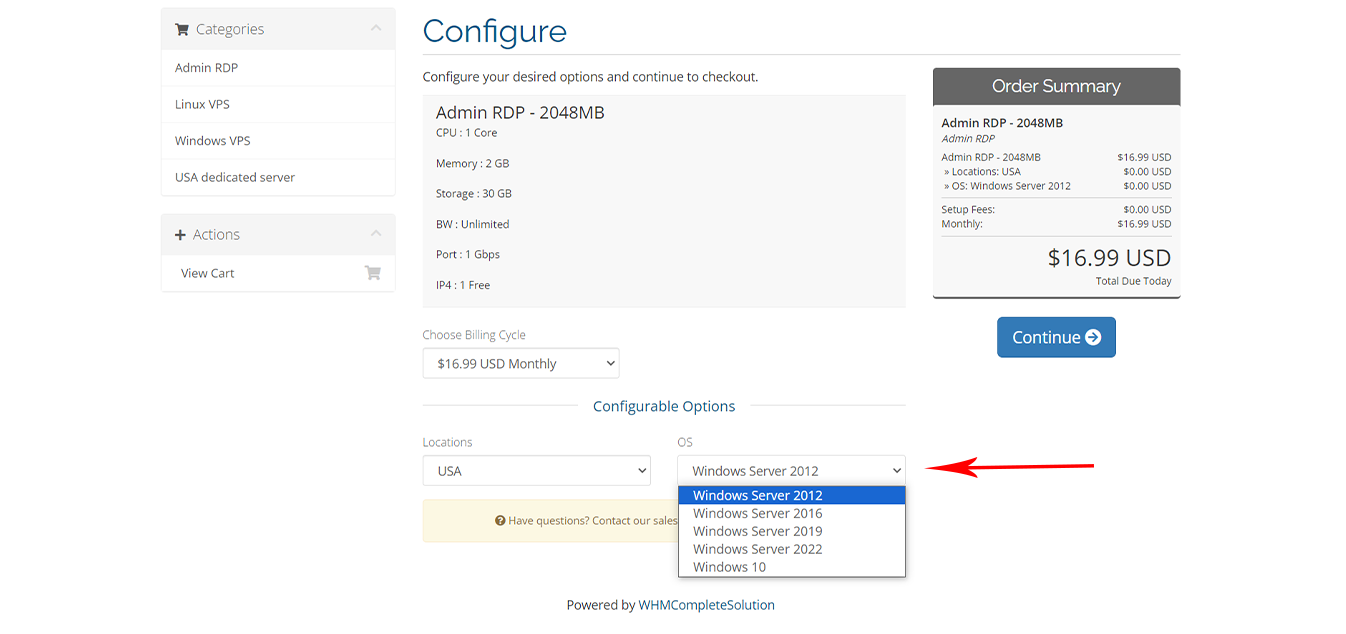
    You also have an option to choose the “Operating System“:

    NEURONVM-AVAILABLE-USA-RDP-LOCATIONS

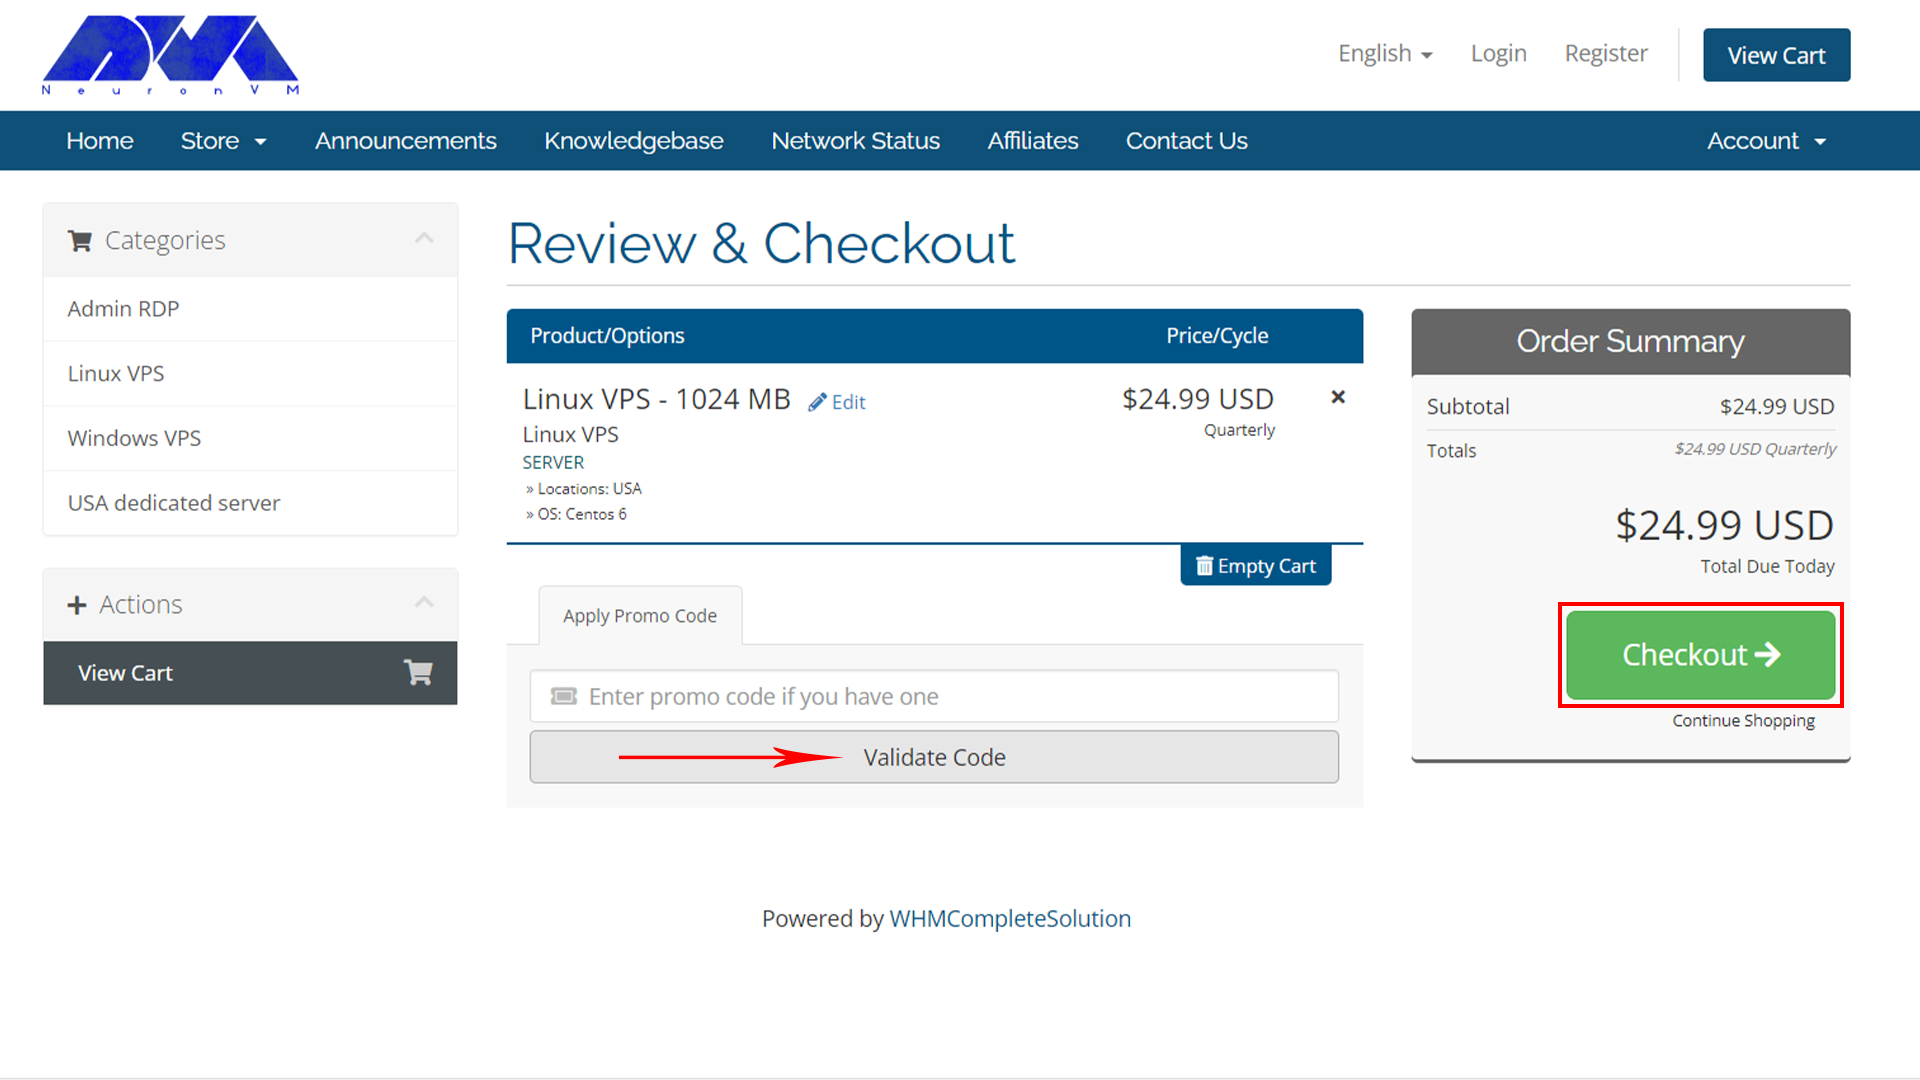
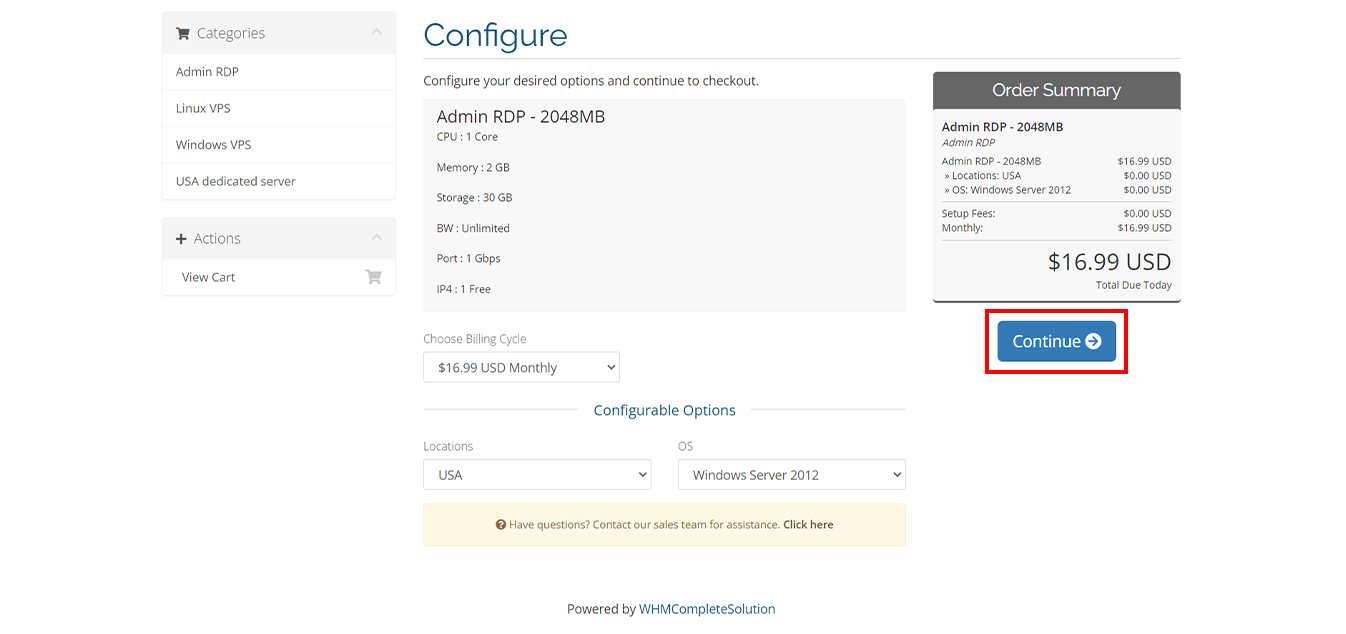
    After making the necessary settings, click the ” Checkout ” option:

    NEURONVM-CONFIGURE-PAGE

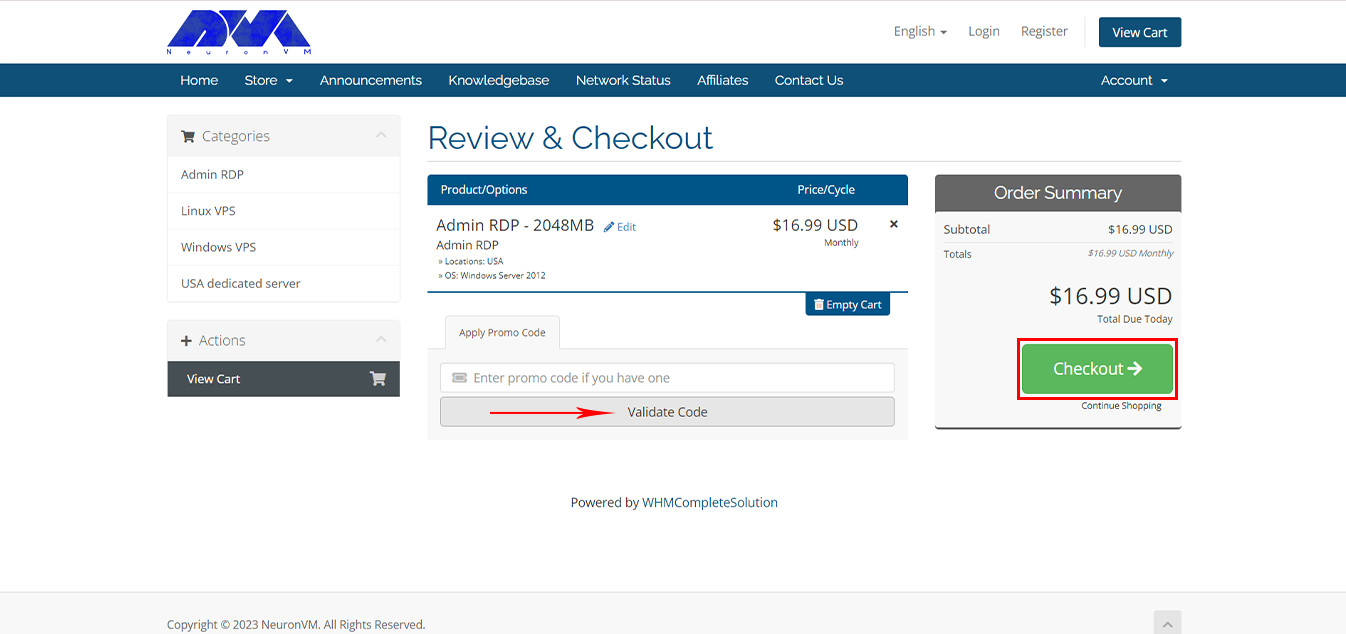
    If you have a “Discount Code“, enter it in the box below to enjoy its benefits. Then, click on Checkout:

    buy usa rdp

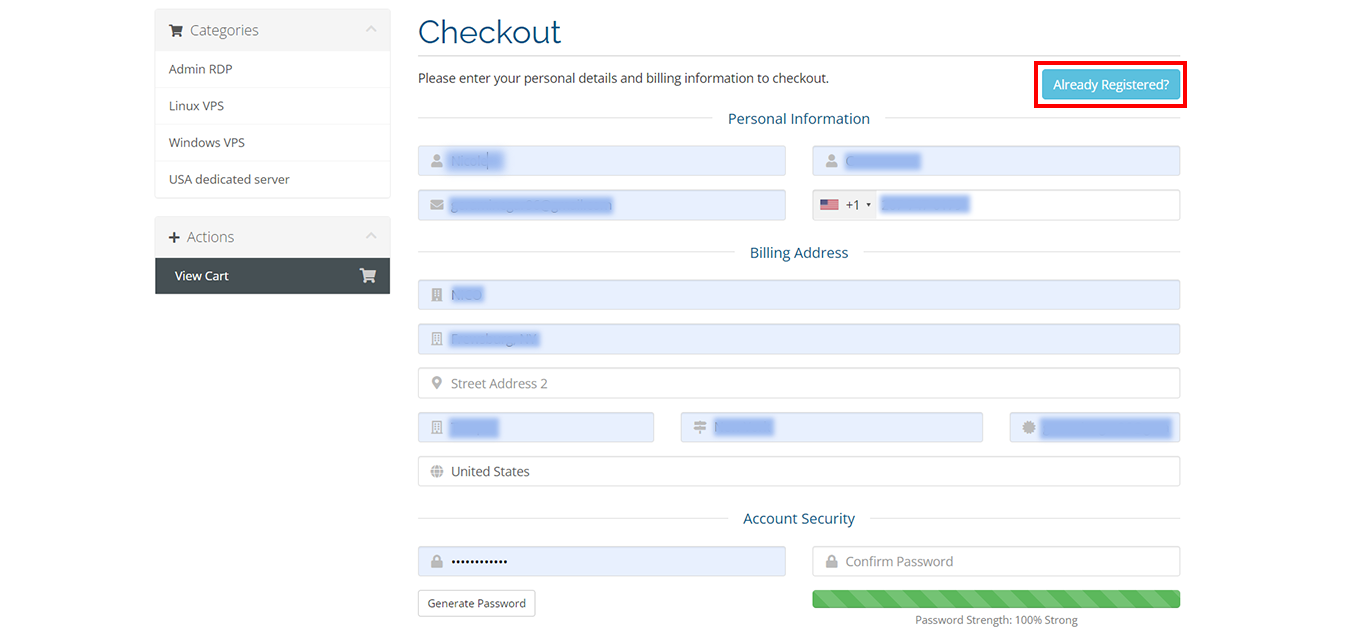
    To connect to the payment stage, you must enter the information requested from you in the boxes below, but if you already have an account, click on the “Already Registered” option:

    how to register on neuronvm.com

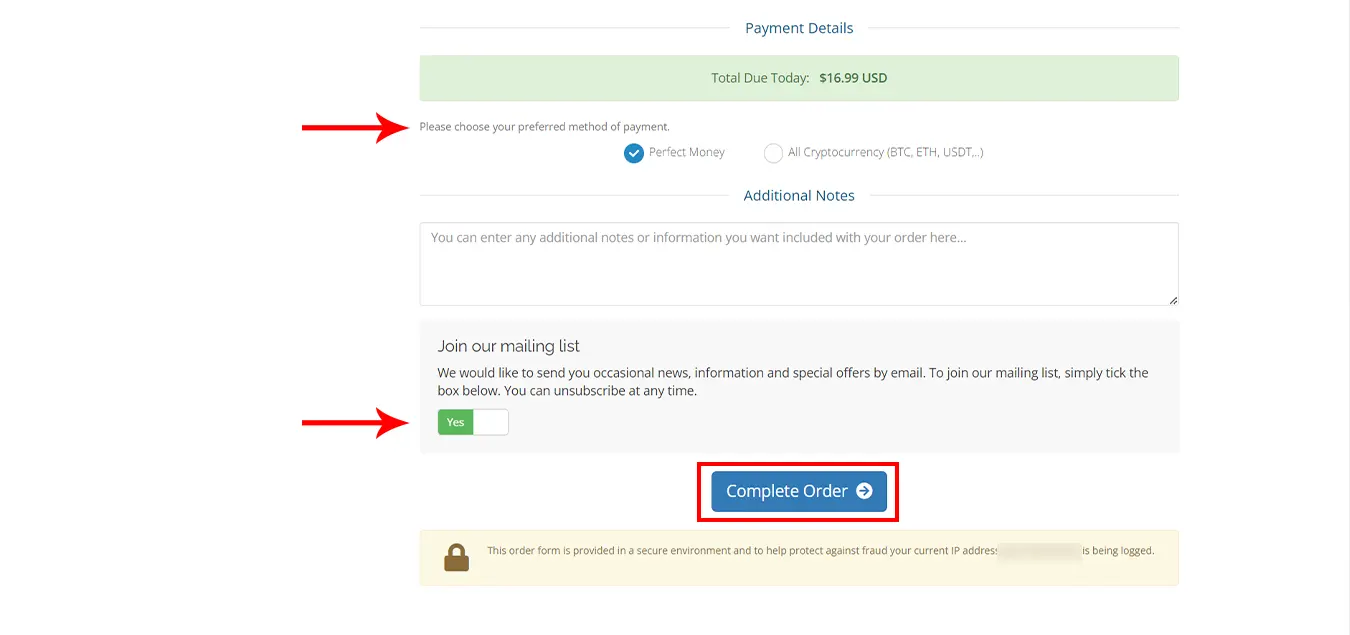
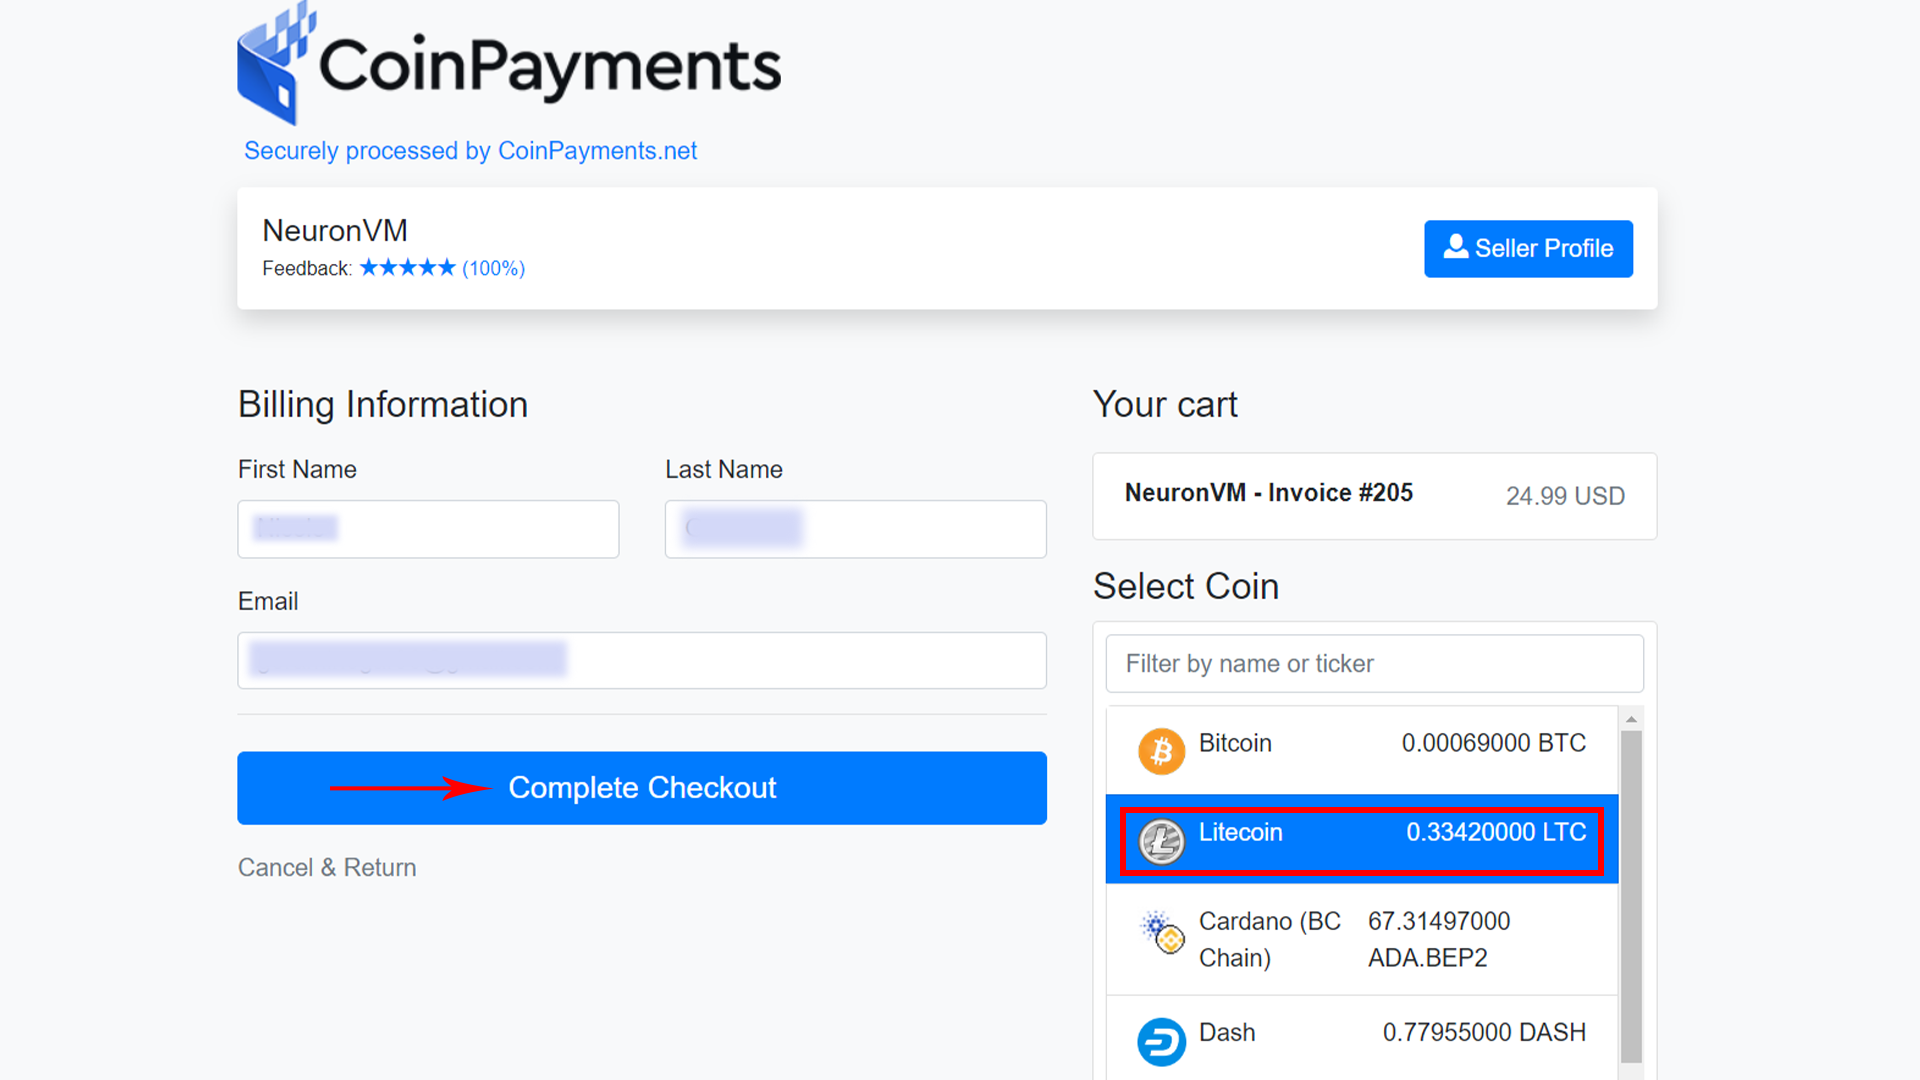
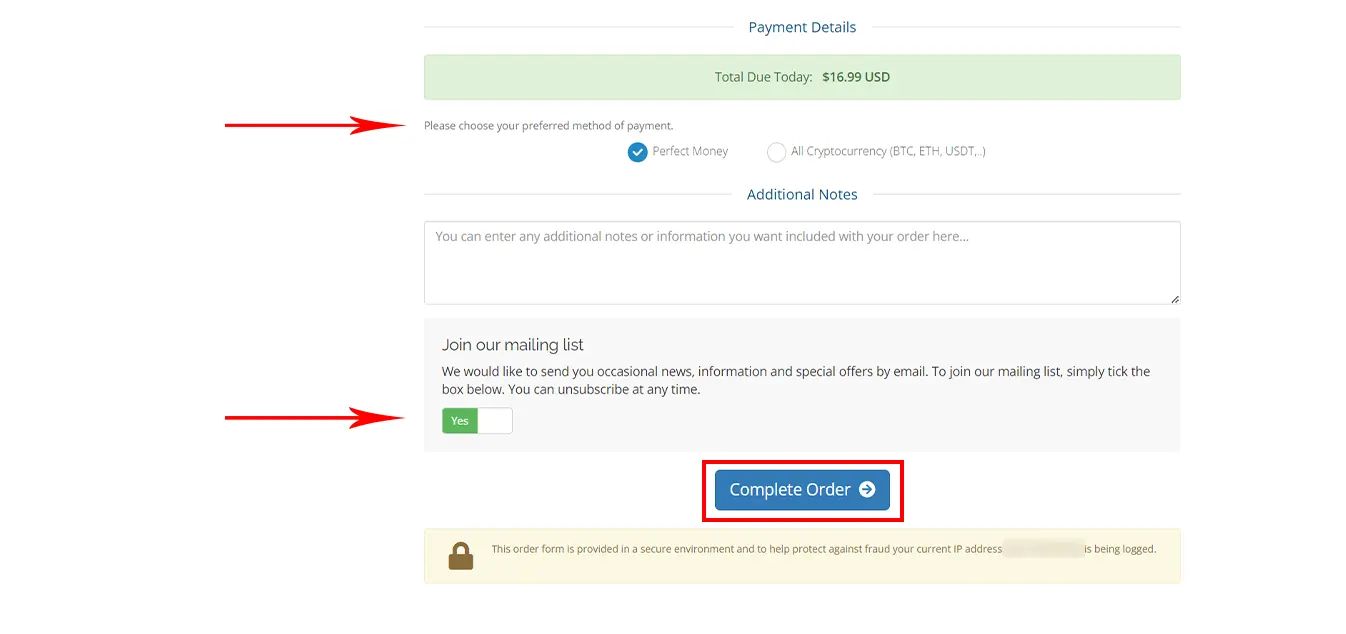
    You can choose how to pay for the service as you wish, (Perfect Money | All Cryptocurrency). Also If you want, you can keep the email-sending option active to receive special offers. Click on Complete Order:

    get usa rdp from neuronvm

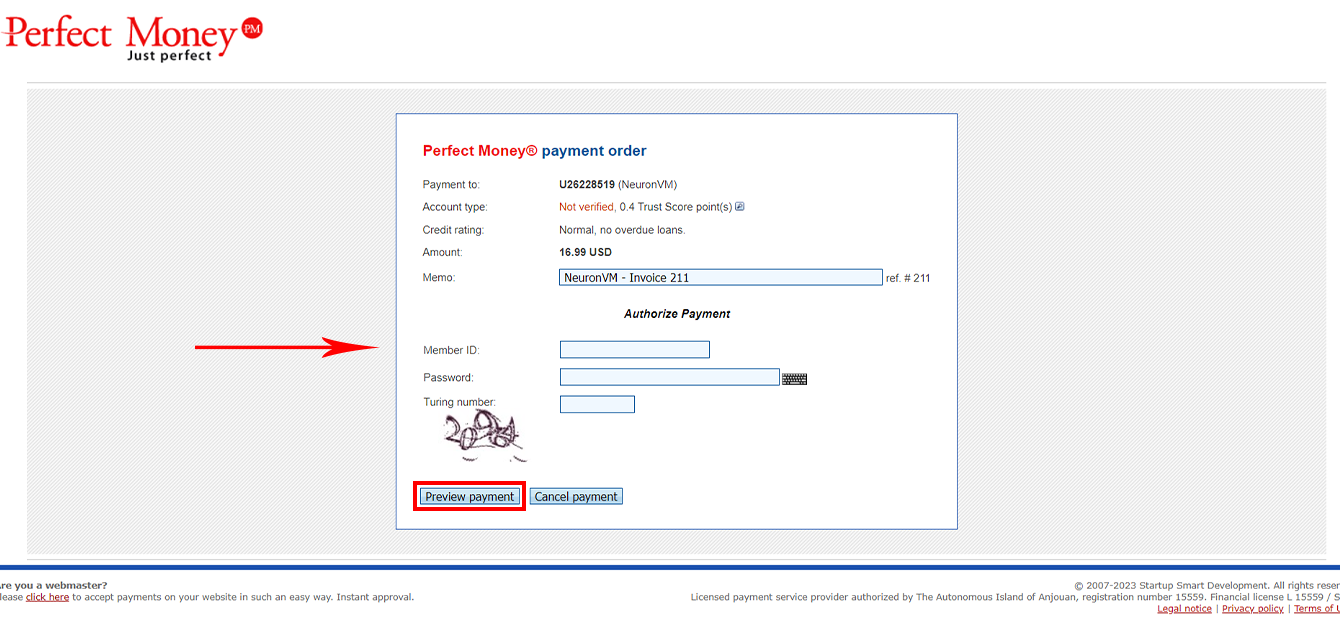
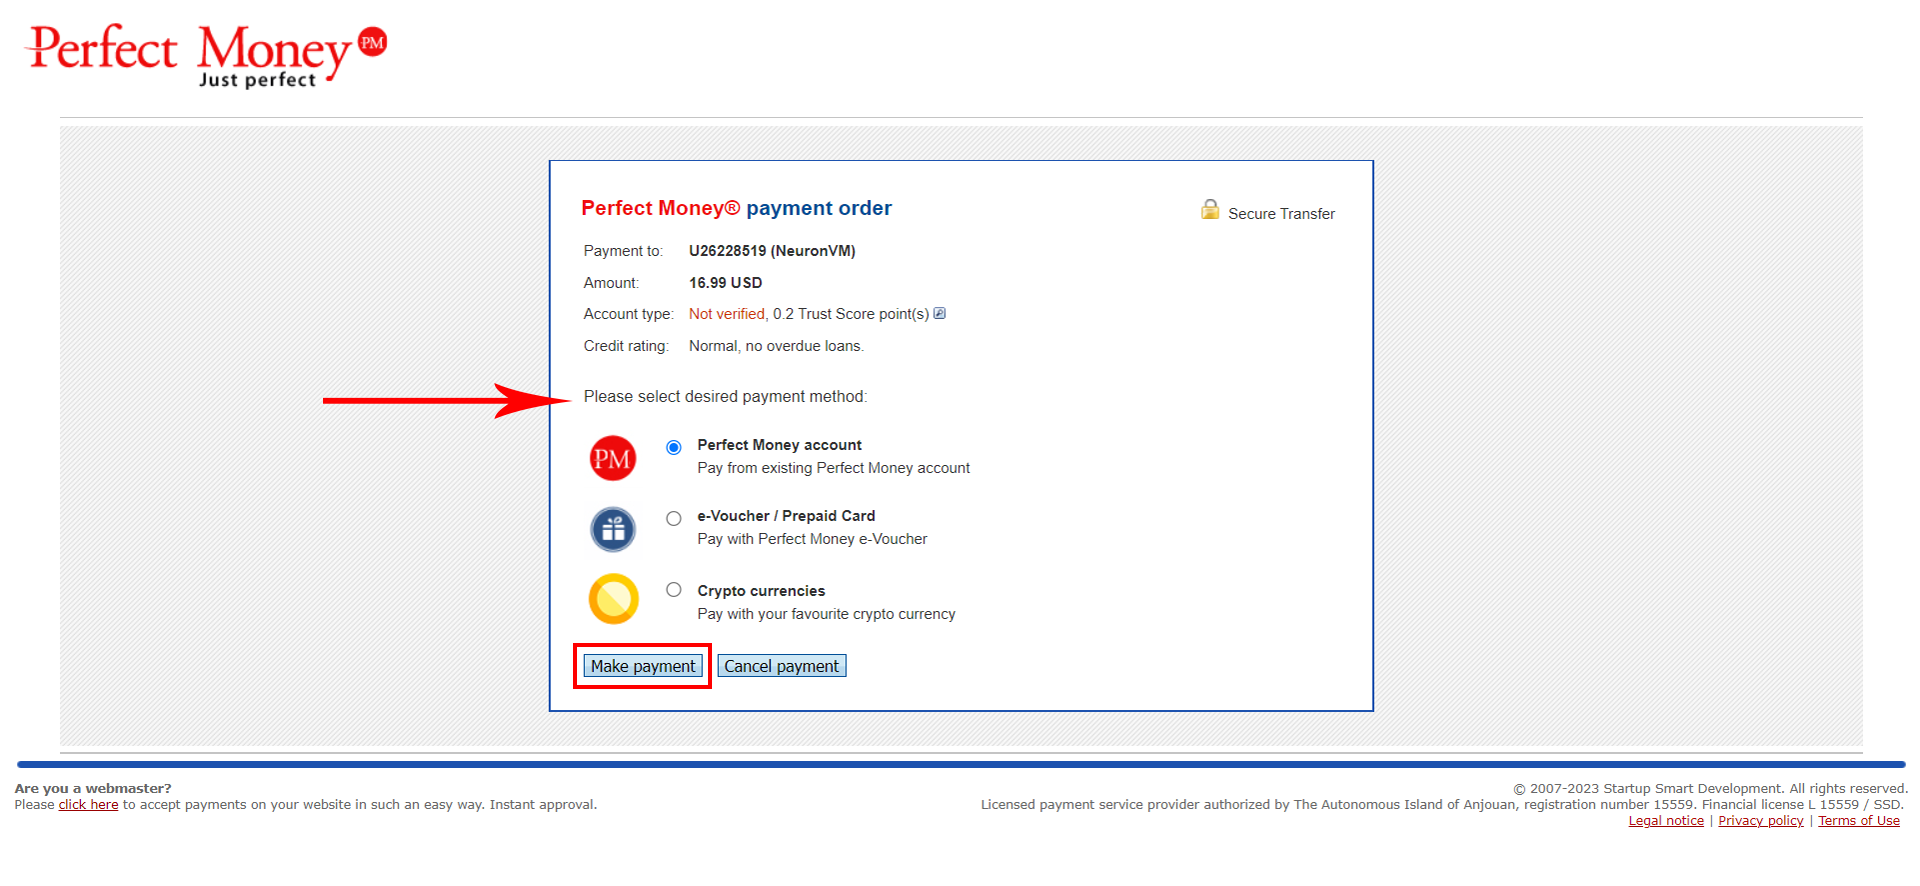
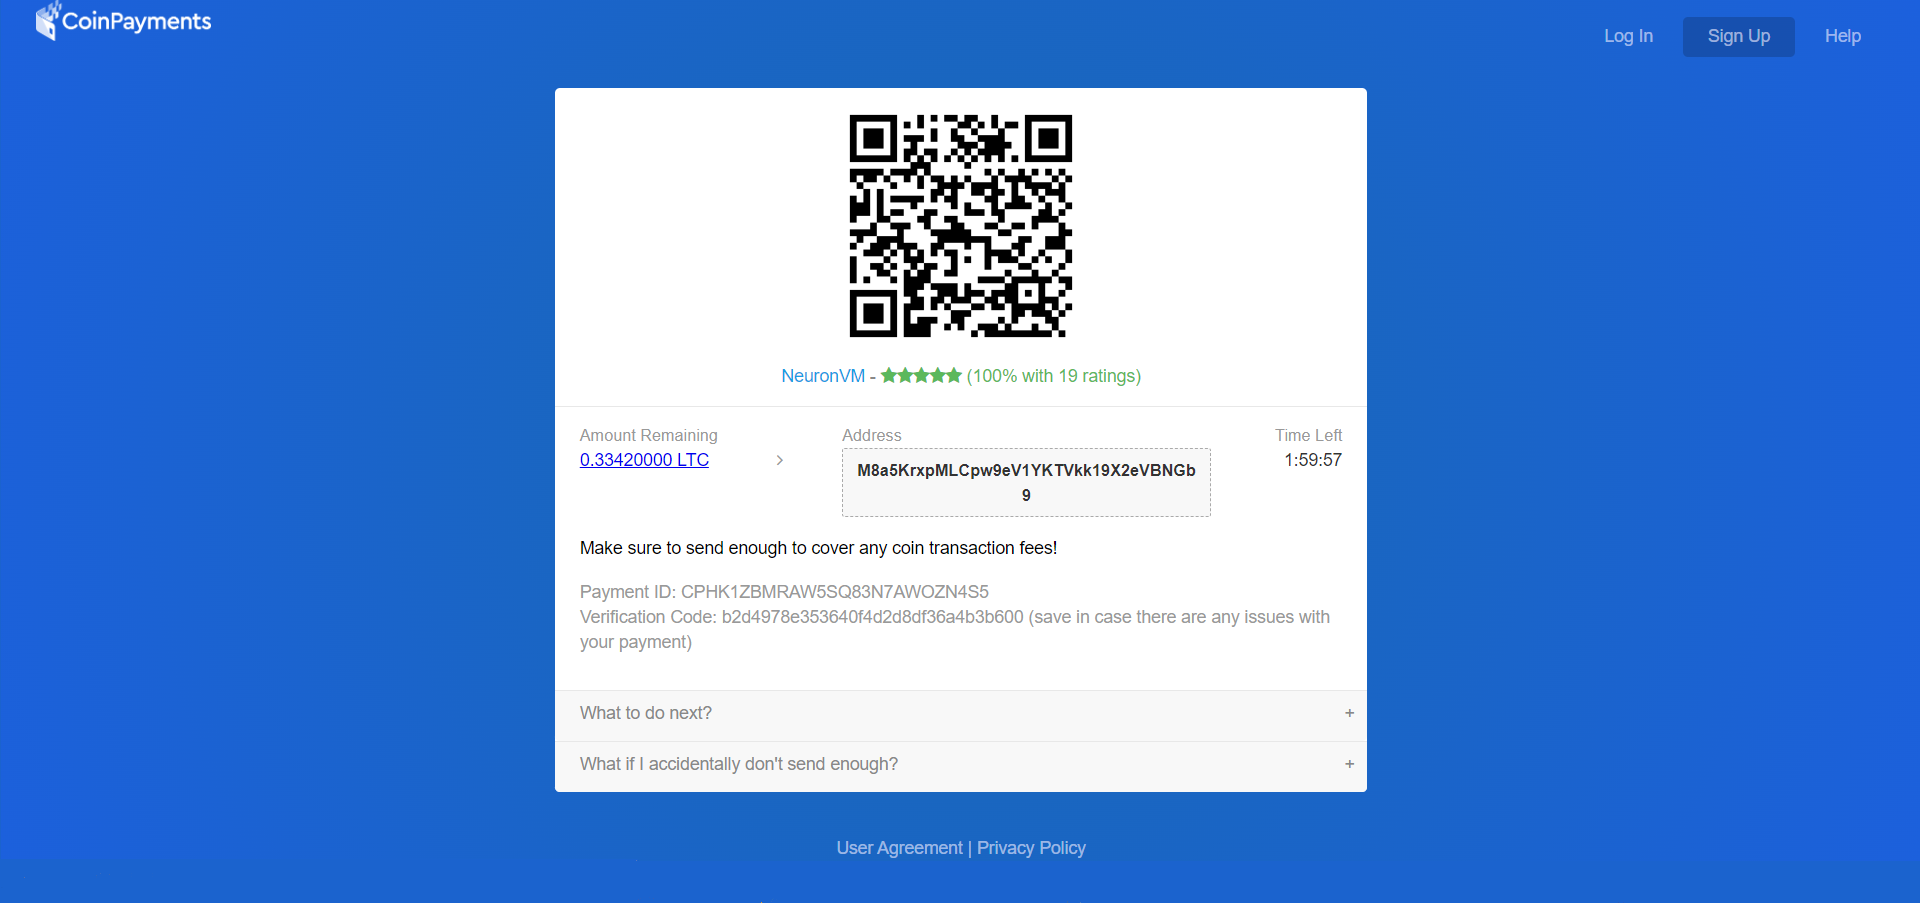
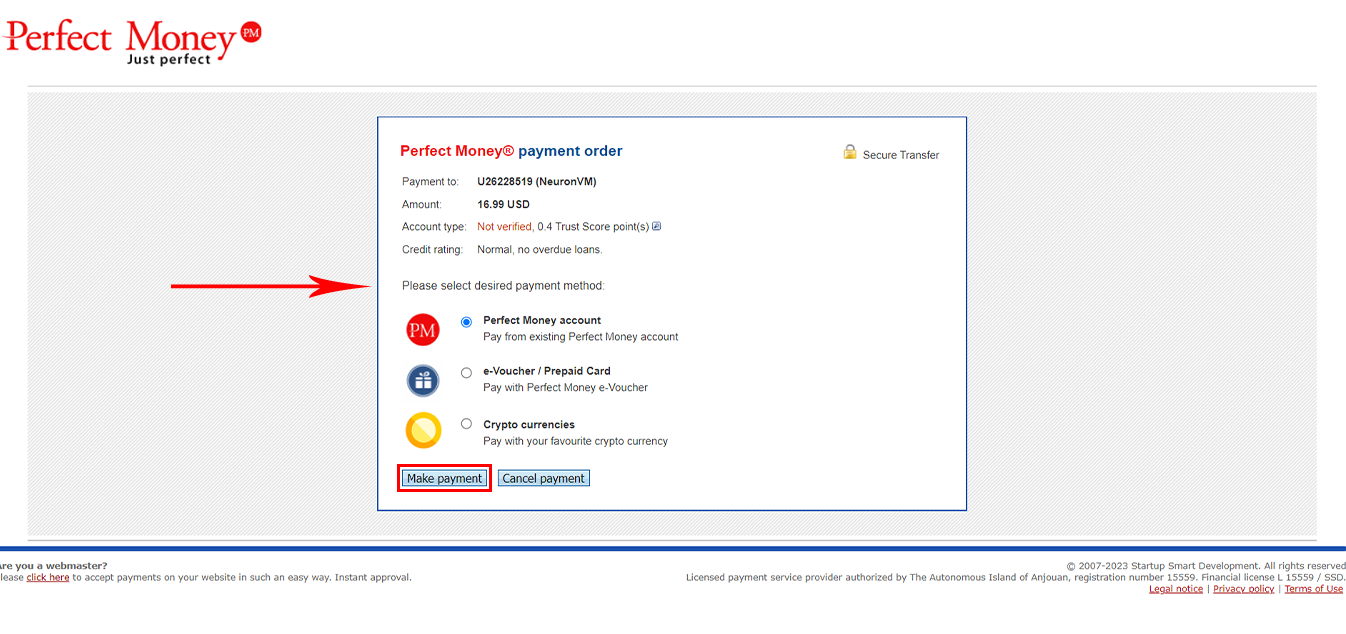
    Please choose one of the alternatives below, and click on the “Make Payment” button:

    perfect money usa rdp

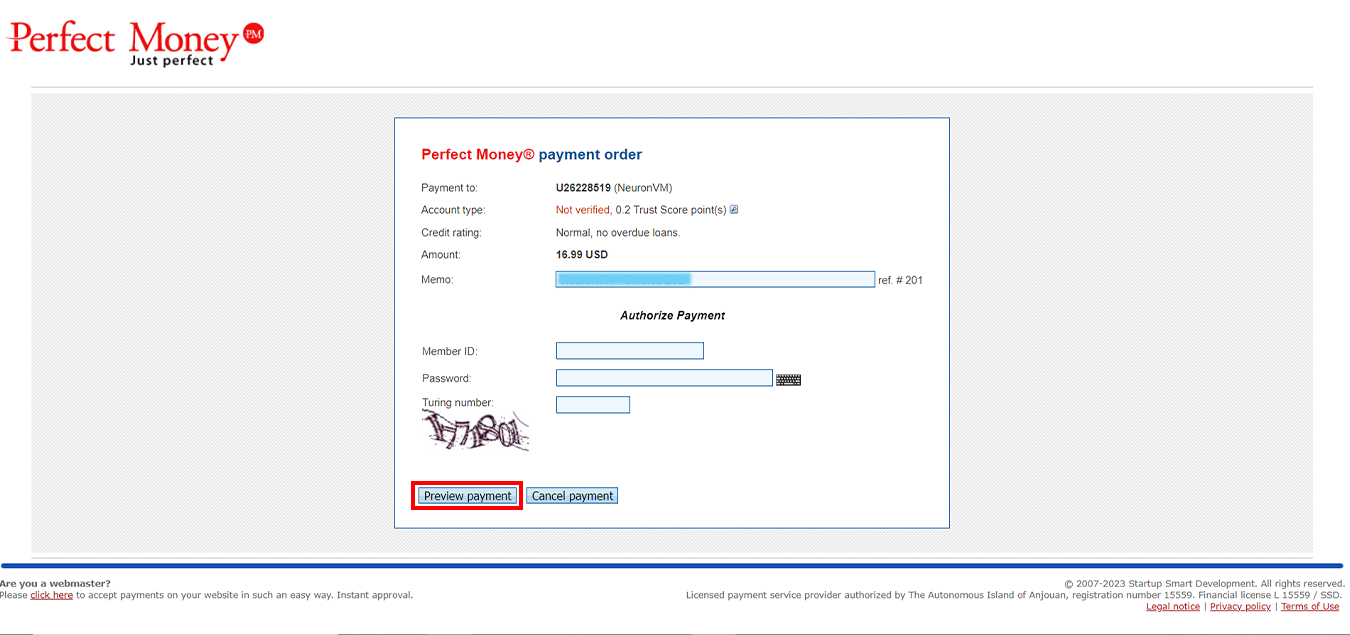
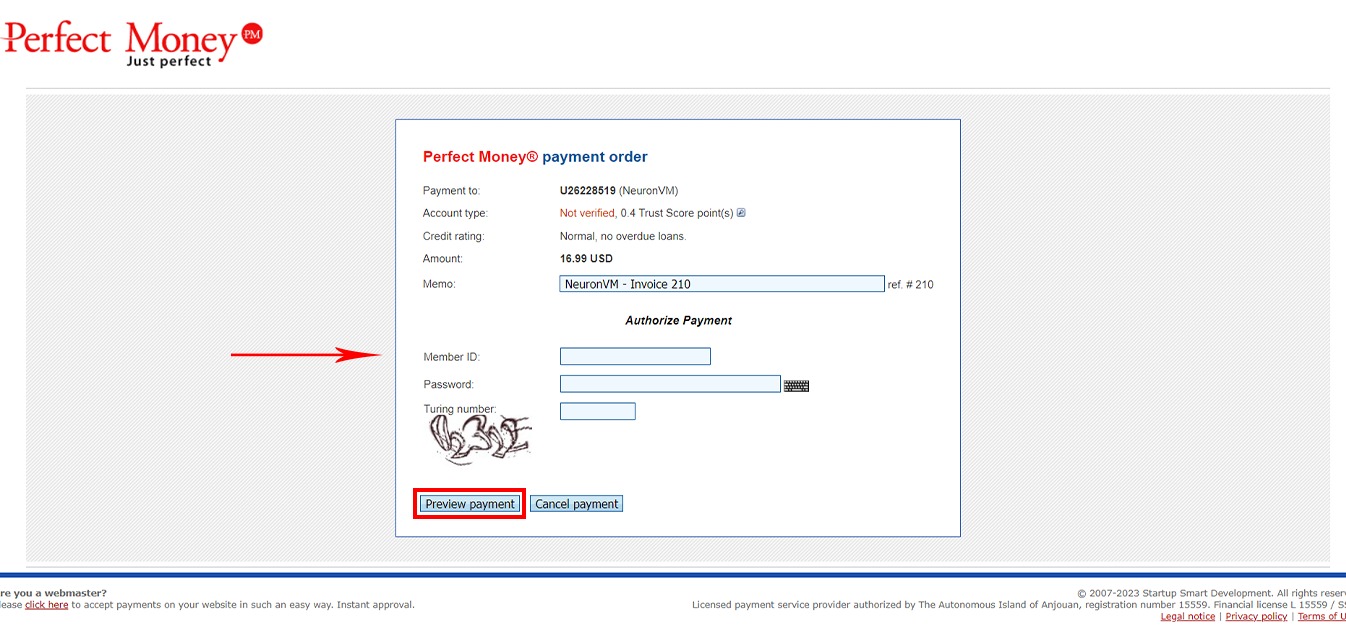
    Finally, enter payment information to complete your order:

    buy usa admin rdp with perfect money

    After a few minutes, your server information will be sent to you via email. Now, your USA RDP service is ready for use!

    Conclusion

    I hope that the above steps have been a good guide for you to purchase USA RDP from NeuronVM. Also, you can get free RDP from NeuronVM by doing some simple stuff. In case of any problem, you can contact NeuronVM experts 24/7 via the ticket section in your client area.

  • How to Get Cheap Canada RDP From NeuronVM

    How to Get Cheap Canada RDP From NeuronVM

    Knowing and understanding the RDP protocol is very important, Both normal users and people working in the field of computer networks, security, and network monitoring should have Remote Desktop Protocol to avoid security risks and attacks through RDP. In this tutorial, we will introduce you to how to buy Canadian RDP, which is one of the best, if you are planning to buy Cheap Canada RDP, follow this tutorial.

    Buy Cheap Canada RDP From NeuronVM

    To start, on the first page of the “NeuronVM” website, click on “Buy Admin RDP” in the menu bar and then click on “Canada RDP“.

    NEURONVM-HOME-CANADA-RDP-PAGE

    We have prepared 5 useful plans for you. Please study the features of each plan and choose one that best suits your needs by clicking on “Order“:

    NEURONVM-CANADA RDP-PLANS

    On this page, you need to personalize your order, for this first select the duration of Canada RDP service:

    NEURONVM-CONFIGURE-CANADA-RDP

    Set your location to “Canada“:

    NEURONVM-CANADA-RDP-CONFIGURATION

    Select your desired operating system, and “Continue“:

    NEURONVM-CONFIGURE-RDP-SERVER

    Enter your valid “Discount Code” and  click on “Validate Code” to enjoy its benefits:

    NEURONVM-PROMO-CODE-TO-BUY-RDP

    Fill in the requested information in the boxes below, if you have already registered, select the “Already Registered” option:

    NEURONVM-BUY-CANADA-RDP-WITH-BTC

    We have two “Payment Methods” here that you can select from your preferred method, Also, if you want to receive discount codes and the latest news of NeuronVM, activate the green option:

    NEURONVM-PAYMENT

    Choose one of the Payment options:

    NEURONVM-BUY-CANADA-RDP-WITH-PERFECT-MONEY

    For the “Final Payment“, enter the requested information and click the Preview Payment option:

    NEURONVM-RDP-SERVICES

    Your “Canada RDP” order is now complete, and you are now able to access the Canada RDP that you ordered.

    Conclusion

    Thank you for staying with us until the end of this tutorial. Also, you can get free RDP from NeuronVM by doing some simple stuff. If you have any questions, you can contact the support section of the NeuronVM website 24 hours a day.

  • The Clever One’s Guide to Buying Windows 10 VPS

    The Clever One’s Guide to Buying Windows 10 VPS

    Today we gonna learn “The Clever One’s Guide to Buying Windows 10 VPS”. However, before we start this tut there are some points to remember. Whether you are a tech enthusiast, developer, or business owner, our Windows 10 virtual server is tailored to meet your specific requirements. You need a Windows VPS with an uptime % 99.99, Connection without delay, simple, scalable, customizable, and affordable prices.

    Windows 10 virtual server is a virtual machine you can use as a dedicated environment to your web projects, So get ready to elevate productivity.

    How to Order a Windows 10 VPS

    To begin! Go to the NeuronVM website, Click on “Buy VPS” then choose “Buy Windows VPS“:

    NEURONVM-HOME-PAGE

    Windows 10 Virtual Server Plans

    Choose a plan that fits your goals:

    NEURONVM-AVAILABLE-WINDOWS VPS PLANS

    Choose your ” Billing Cycle “:

    NEURONVM-CONFIGURE-PAGE

    Next, choose one of the 6 available options for the location:

    NEURONVM-SELECT-LOCATION-PAGE

    At this stage, to buy a Windows 10 VPS, select the ” Windows 10 ” option from the operating systems, And press ” Continue “:

    how to select OS for windows VPS

    If you have any promo code apply that and checkout:

    NEURONVM-CHECKOUT-PAGE2

    Fill blanks with your ” Personal Details ” and scroll down for more:

    NEURONVM-CHECKOUT-PAGE2

    Windows 10 Virtual Server Payment Methods

    You can choose your method of payment ” Perfect Money ” Or ” All Cryptocurrency like BTC, ETH, USDT.. “:

    NEURONVM-PAYMENT- for windows 10 vps

    Please select the desired payment method:

    buy windows 10 vps with perfect money

    Please fill “ Member ID “, ” Password ” and ” Turning number “:

    perfect money windows 10 vps

    Your purchase is now completed. Your desired server information will be sent to your email after a few minutes.

    Conclusion

    Thank you for being with us! For more information, visit the website.
    If you have a problem or question in any of the above steps, you can contact our experts 24/7 via ticket section in your user area.

  • The Smart Guide to Purchasing Linux VPS with LTC

    The Smart Guide to Purchasing Linux VPS with LTC

    Most organizations use virtual servers to reduce server hardware costs and reduce electricity and energy costs. Also, Virtual servers play a key role in building applications, tools, or environments.

    Another one of the best features of a Linux virtual server is its unlimited ability to provide the resources you need. If you need the best Linux VPS, follow the instructions in this guide to the end of this tutorial

    How to Select Linux VPS

    To start the process, On the home page of Neuronvm, Select “Buy Linux VPS” option from the  “Buy VPS” menu:

    NEURONVM-HOME-PAGE

    Scroll down to choose the plan that suits your business goals:

    NEURONVM-AVAILABLE-LINUXVPSPLANS

    Please choose the billing cycle slots, for your service according to your preference:

    NEURONVM-CONFIGURE-PAGE4

    On the configuration page, Carefully complete the billing cycle and server configuration options:

    Attention: Fill in the fields with “ns1” and “ns2“.

    NEURONVM-LINUXVPS-CONFIGURE-PAGE

    Choose your desired location and operating system. Afterward, select “Continue“:

    NEURONVM-CONFIGURE-PAGE5

    At this stage, Please enter your own discount code and checkout:

    NEURONVM-CHECKOUT-PAGE

    Fill in your personal information with accuracy, But if you already have an account click on “already registered“:

    NEURONVM-CHECKOUT-PAGE2

    Select “All Cryptocurrency (BTC, ETH, USDT, …)” to pay through LTC, And tap to “Complete Order“:


    To complete the order choose “Litecoin” and click on “Complete Checkout“:

    NEURONVM-LTC-PAYMENT-PAGE

    Complete your payment by the indicated deadline:

    NEURONVM-LTC-PAGE

    If the sales invoice is completed, it will be displayed.

    Conclusion

    In this article, we tried “How to Purchase Linux VPS with LTC from NeuronVM”, In case of problems, We are ready to serve you around the clock, We will get back to you in no time!

    NEURONVM-PAYMENT- for windows 10 vps