PowerShell is a powerful scripting language and command-line shell that allows automation and management of Windows operating systems. One of the essential commands in PowerShell is the “Echo” command, which is using to display text or variables on the console. Mastering the PowerShell Echo command is crucial for effectively managing and troubleshooting PowerShell scripts and commands. Echo is using to display information or messages on the console or output stream. In this comprehensive guide, we will delve into the various ways to utilize Echo and explore examples of its usage.
We recommend you to use our Windows VPS plans to better understand the high speed, great performance and 24/7 support.
Understanding the Echo Command
The Echo command is a command using in scripting languages and command-line interfaces to print text or variables back to the user or output device. It is commonly using to display messages, prompt for user input, or debug code. The Echo command is useful for displaying information or manipulating data in a script. It is a simple and versatile command that can help automate various tasks and provide feedback to the user.
Basics of the PowerShell Echo Command
The Echo command in PowerShell is primarily using for displaying text messages on the console or output stream. It serves as a tool for communication between the script and the user, enabling feedback, information display, or user interaction. To utilize the Echo command, the following syntax is using:
Write-Host <Message>
Here, <Message> represents the text or information that needs to be displayed. The Write-Host command is an alias for the Echo command, making them interchangeable.
Echo Command Syntax
The basic syntax of the echo command is:
echo [options] [string]
Here are some examples of how to use the echo command:
1. Echo a string:
echo "Hello, World!"
Output: Hello, World!
2. Redirect the output to a file:
echo "This is a message" > output.txt
This will create a file named “output.txt” and write the string “This is a message” into it.
3. Append the output to an existing file
echo "This is another message" >> output.txt
This will add the string “This is another message” to the end of the existing “output.txt” file.
Note: The behavior of the echo command may vary slightly depending on the operating system and shell being use.
Basic Echo Command Usage
The basic usage of the echo command in PowerShell is to display text on the console. Here’s how you can use it:
1. To display the contents of a variable:
$myVar = "This is a variable"
echo $myVar
Output:
This is a variable
2. To concatenate multiple variables or strings:
$firstName = "Jannson"
$lastName = "Miller"
echo "My name is " + $firstName + " " + $lastName
Output:
My name is Jannson Miller
Note: In PowerShell, the “echo” command is equivalent to “Write-Host”. If you want to write to the console without using the “echo” command, you can simply use:
Write-Host "Hello, world!"
Concatenating Strings with Echo
In PowerShell, you can concatenate strings using the “+” operator or by using the ‘”Jannson-Miller” cmdlet.
Both methods allow you to concatenate strings in PowerShell. Choose the one that best suits your needs.
Advanced Techniques with Echo
– Changing the Foreground and Background Colors of the Echo Output:
You can use the “-ForegroundColo” and “-BackgroundColor” parameters with the “Write-Host” cmdlet to change the colors of the echo output. For example, to display a message in yellow on a blue background, you can use:
Write-Host "This is a message" -ForegroundColor Yellow -BackgroundColor Blue
– Using Formatting Options:
You can use formatting options to control the appearance of the echoed output. For example, you can use the “-f” operator to format a string and include variables. Here’s an example:
$name = "Jannson"
$age = 30
$formattedString = "My name is {0} and I am {1} years old" -f $name, $age
Write-Host $formattedString
Output: “My name is Jannson and I am 30 years old”
– Displaying Progress Bars:
You can use the “Write-Progress” cmdlet to display progress bars during lengthy operations. This can be helpful to keep users informed about the progress of a script. For example:
– Displaying Colored Text with ASCII Escape Codes:
You can use ASCII escape codes to customize the appearance of the echoed output, including colors and text effects like bold or underline. Here’s an example:
$escape = [char]27
$reset = "${escape}[0m"
$red = "${escape}[31m"
Write-Host "${red}This is a red message${reset}"
Note: The ASCII escape codes might not work in all console applications or environments.
These are just a few examples of advanced techniques you can use with echo in PowerShell. Experiment and explore the various options and functionalities available to customize and enhance your scripts.
Conclusion
In this comprehensive guide, we explored the PowerShell Echo command and learned its various applications. By now, you should be equipped with the knowledge to effectively utilize Echo for outputting text and manipulating strings in your PowerShell scripts. Remember, the Echo command is a powerful tool that can enhance your PowerShell experience, and practice will help you master it.
If you are looking for a convenient and easy-to-use solution for remote access and support, we can recommend Chrome remote desktop for you. It’s particularly popular because of its integration with the widely used Google Chrome browser which provides remote access to a computer. It allows you to access your own computer or a remote computer from another location, which can be incredibly useful for various scenarios. So we will focus on this tool and present a comprehensive tutorial on Chrome remote desktop.
What is Chrome Remote Desktop?
The Chrome remote desktop tool is a software for management and remote access that was developed for free by Google. With the help of this tool, you can remotely access another computer from devices that run the Google Chrome browser. Monitoring and control as well as remote support are positive points of this software and you can use it with confidence.
This tool helps you access your workplace system from anywhere in the world and share your screen to guide others. This can be particularly useful for remote technical support, accessing your own computer from a different location, or collaborating with others on a shared computer.
It’s important to note that this tool requires an active internet connection on both the local and remote devices. Also, you can use NeuronVM services like Windows VPS to use the Chrome management tool.
Benefits of Using Chrome Remote Desktop
Here are some advantages why users might choose Chrome remote desktop:
Security: Chrome Remote Desktop uses secure connections to protect your data during remote access. The optional PIN feature adds an extra layer of security.
Convenience: Using this software, users can access their computer from any device with a Chrome browser or app. So you can work from anywhere.
Access to Your Own Computer: If you need to access your work or home computer from a different location, you can do so using this tool.
Ease of Use: Chrome remote desktop is easy to use and straightforward. It requires minimal setup times and effort.
Collaboration: When collaborating on a project, you can use this tool to work on the same computer with others. Your physical location is not important anymore.
Cross-Platform Access: Chrome Remote Desktop is cross-platform. In other words, it allows you to access a Windows PC from a Mac, or vice versa. It also supports various operating systems, making it versatile for users with diverse device preferences.
Technical Support: It’s commonly used for providing technical support. If you’re tech-savvy, you can help friends or family members troubleshoot computer problems or perform maintenance on their systems from afar.
Offline Access: The ability to set up remote access even when the local computer is offline or in sleep mode is a unique feature.
6 Easy Steps to Access Google Chrome Remote Desktop
As we mentioned, Google Chrome Remote Desktop is a service that allows you to access and control a remote computer from another device using the Google Chrome web browser. To set up and use this tool, follow these steps:
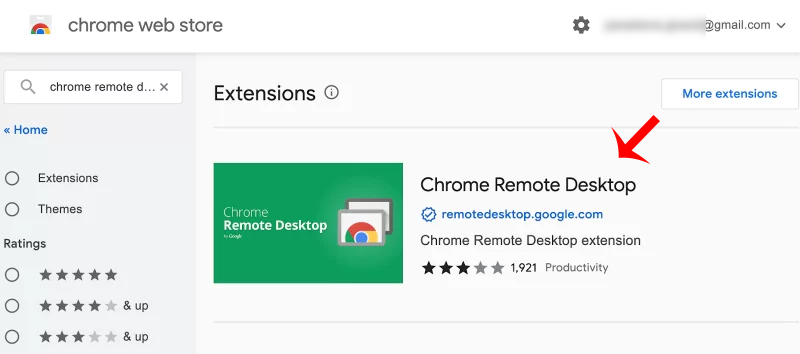
1- Open the Chrome browser. Then click on the three lines on the top right and click Extensions. Then search for Chrome Remote Desktop in the search field:
Tip: If it’s not already installed, download and install Google Chrome from the official website.
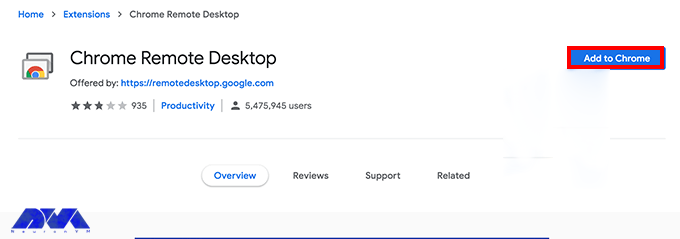
2- Now choose chrome option and press Add to chrome button:
Tip: It is recommended to install web application too. So, you can have more control.
Tip: Ensure you are signed in to Google Chrome with the same Google account on both the local and remote computers. This is necessary for synchronization.
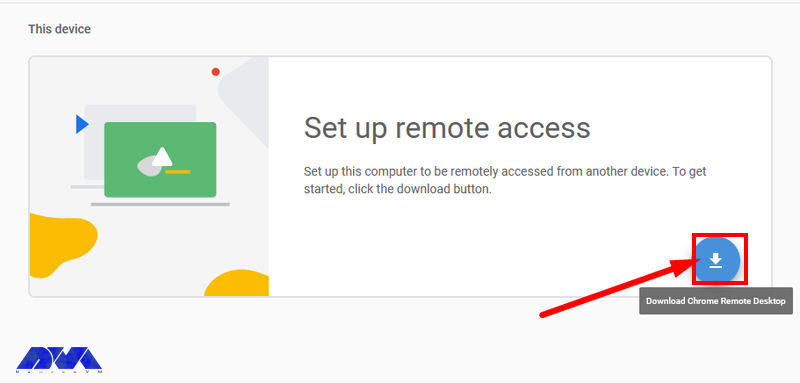
3- Now if you want to remotely access to your desktop after adding chrome extension, click on the blue button to start the download of .msi file and press Accept and Install:
4- In the next step, press Run on the encountered installation wizard. So, you can open the chrome remote desktop file on Downloads section. You will see the section to choose a name for your device:
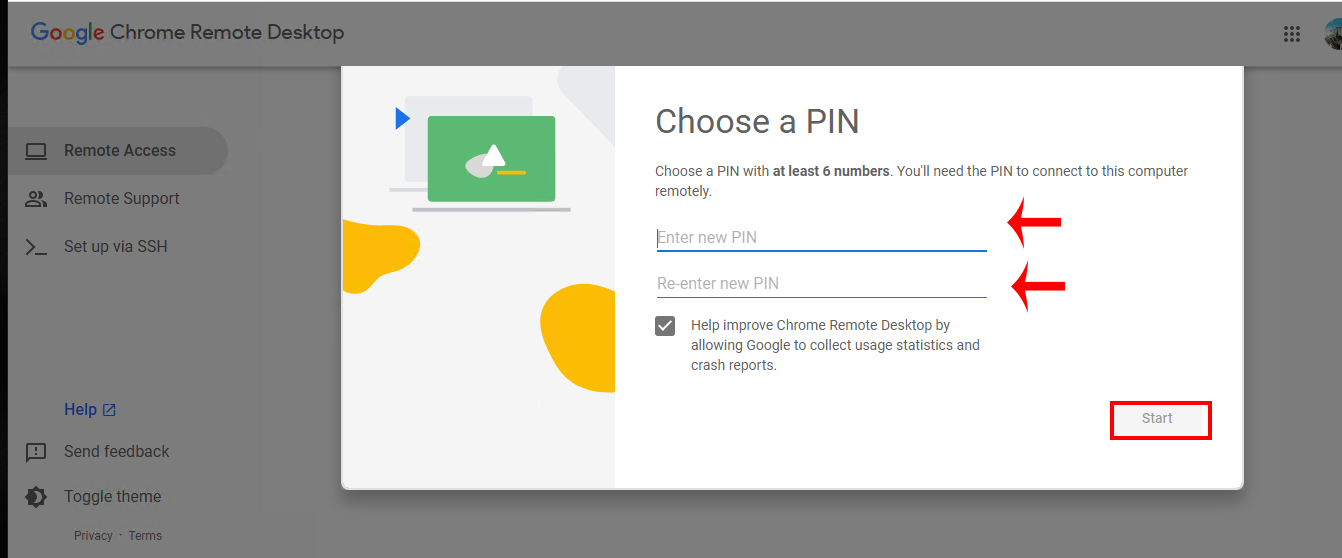
6- You should set a PIN code. As soon as you have entered the verification code, you will be connected to the remote computer and control it as if you were physically in front of it:
Departments Who Use Chrome Remote Desktop
As you know, using Chrome Remote Desktop is free and doesn’t cost anything, so many business sectors use it. Let’s analyze various departments that use this tool:
IT Department
The IT department uses the Chrome remote desktop tool the most and benefits from it. They can help and guide their employees remotely with the help of this software without the need for physical response.
So, in order to be more productive and save time, they show a great desire to use this tool. It is also possible to support users regardless of location. The only disadvantage of this system is that it is not possible to restart the device.
Customer Service
Customer service departments can benefit from using Chrome Remote Desktop (CRD) as a tool to provide remote support to customers. It is free and provided by Google and allows remote support. Among the outstanding options of the support department, we can mention a one-time code that is given to access the desktop and troubleshoot its problems.
In this way, the customer can continue his work with peace of mind. Also, the user can keep in touch by phone or live chat and always receive expert help.
Finance
Since the Chrome remote desktop tool is offered for free, it has attracted the attention of financial sectors. While it may not be as advanced as paid tools, it is good software for small businesses with limited budgets. These departments also take advantage of the screen-sharing function of Chrome desktop in employee-specific situations.
Marketing
Marketing departments must constantly work together to achieve the final product. The Chrome remote desktop tool helps users edit documents in real-time or share their home page with each other. Of course, it is not possible to manage multiple sessions with this tool, but it is still ideal for working remotely.
Best Practices to Use Chrome Remote Desktop
To ensure a secure and efficient remote desktop experience, here are some best practices to follow:
– Use strong and unique passwords for your Google account, enable two-factor authentication, and regularly review account security settings.
– Only share your computer with trusted individuals. Also, When using the service, always require a PIN or a one-time access code for added security.
– If you encounter connectivity issues, check your firewall settings and ensure that port 443 is open.
– Make sure you have a strong and unique password. Avoid using easily guessable passwords.
– Enable session logging for added security and auditing. This feature allows you to review past remote access sessions.
– For added security, you can configure session time limits, so remote users are automatically disconnected after a specified period.
– Adjust the quality settings to match your connection speed.
– Always remember to end your remote sessions when you’re done to prevent unauthorized access.
– Be aware of the difference between “Guest mode” (where you share your computer) and “Remote Assistance” (where you access another computer). Use the appropriate one.
– If you’re not actively using Chrome Desktop, it’s a good practice to close your browser.
By following these best practices, you can make the most of Chrome Remote Desktop while keeping your computer and data secure.
Conclusion
Chrome remote desktop is a simple and great remote management software for users to access devices using the Chrome browser. This article was presented to show the way of using Chrome desktop and gave an explanation to make you more familiar with this practical tool and its benefits. If you have any questions or ideas about this issue, please share.
Remote Desktop Protocol is a technology developed by Microsoft that allows users to remotely connect to and control a computer or server over a network connection. Windows Server 2016 is a server operating system released by Microsoft. Admin RDP refers to the use of RDP by administrators to manage and control servers. Here we are going to present a comprehensive overview of Admin RDP 2016 and its features.
An Introduction to Admin RDP 2016
Admin RDP, also known as Administrative Remote Desktop Protocol, refers to the practice of using the Remote Desktop Protocol (RDP) technology for administrative purposes. RDP is a dedicated protocol developed by Microsoft that allows users to connect to and control another computer or server over a network connection.
Admin RDP involves using RDP to remotely manage and administer servers, systems, or computers. It’s a common practice in IT and system administration, where administrators need to maintain and troubleshoot remote machines without physically being present at the location of the servers. With Admin RDP, administrators can access the graphical user interface (GUI) of the remote system, just as if they were sitting in front of it. We recommend using the Cheap Admin RDP plans prepared on our website.
Features of Admin RDP 2016
Windows Server 2016, introduced several new features and improvements in the realm of remote desktop administration (RDP). Here are some key features of Admin RDP in Windows Server 2016:
– Improved computing: With higher security, better resource use, fewer updates, and faster reboots servers like Nano can manage remotely. Also, containers in this server allow users to isolate apps, and make it easy to administer and provide better virtualization. capabilities.
– Administration (Powershell feature): This way with improved usability and security, users can have more control over the management of a Windows-based environment. You can run Powershell on a nano server.
– User Profile Disks: This feature simplifies the management of user profiles in remote desktop environments. User Profile Disks allow user profiles to be stored as virtual hard disks, making them easier to manage and back up.
– Credential Security Support Provider (CredSSP): CredSSP is a security support provider that enhances security for RDP connections by providing an additional layer of protection during the authentication process. It helps prevent man-in-the-middle attacks and provides more secure authentication.
– Remote Desktop Web Access: This feature enables users to access remote desktops and applications using a web browser. It provides a web-based interface for launching remote sessions without requiring the installation of a dedicated client.
– Security: Windows Server 2016 introduced improved security measures for RDP, including support for Remote Credential Guard. These measures help protect user credentials by preventing the storage of sensitive information in the remote session.
– Remote Desktop Gateway: The Remote Desktop Gateway role allows authorized users to connect to remote desktops and resources over the internet using the Remote Desktop Protocol (RDP) while maintaining security through SSL encryption.
What are the Use Cases of Admin RDP?
In this section, we will introduce you to the main use cases for admin rdp:
1- Remote troubleshooting: This can be done by the company’s help desk or by a person trying to help someone else.
2- The possibility of remote system management: In this way, remote configuration changes can be made in network servers.
What are the Best Practices for Admin RDP 2016
Here, are the best practices for Admin RDP 2016:
– Use Strong Passwords: Ensure that strong, unique passwords are used for accounts with remote access privileges.
– Network Security: Implement firewalls, network segmentation, and VPNs to enhance the security of remote connections.
– Two-Factor Authentication: Consider implementing two-factor authentication for an added layer of security.
– Regular Auditing: Monitor and log remote access activities for security and compliance purposes.
– Regular Updates: Keep the server’s operating system, RDP software, and security tools up to date to address potential vulnerabilities.
Troubleshooting Issues to Admin RDP 2016
Now let’s analyze some common problems of RDP on Windows Server 2016 and their solutions;
1: Unable to Connect to RDP Server
Solution: Verify that the Remote Desktop service is running on the server. Try to reboot it by following these steps:
– Open the “Services” management console (run services.msc).
– Find “Remote Desktop Services” or “TermService,” right-click, and select Restart.
2: RDP Port Blocked
Solution: Check if the default RDP port (3389) is blocking by a firewall. If so, you can change the RDP listening port: Open the Registry Editor (run regedit).
Navigate to HKEY_LOCAL_MACHINE\SYSTEM\CurrentControlSet\Control\Terminal Server\WinStations\RDP-Tcp. Then, Find the PortNumber DWORD and change its value to the desired port. Restart the Remote Desktop Services.
3: Network Connectivity Problems
Solution: Verify network connectivity using ping and tracert commands to ensure the server is reachable from the client. Examine if there is high latency or packet loss.
4: Licensing Problems
Solution: Ensure Remote Desktop Licensing is configuring correctly:
– Set up a Remote Desktop Licensing server.
– Install and activate the required Client Access Licenses (CALs).
Conclusion and End Point
Admin RDP is a good way for someone who needs to check and have control of systems remotely. Using this server makes it easy and enjoyable to control, manage, or configure other systems so it is going to be a well-known and useful assistant for you. As a result, we gave you a comprehensive and helpful guide to make you more familiar with Admin RDP and its features. We hope this guide was helpful for you.
One of the most powerful operating systems offered for servers is Windows Server 2019. This operating system is a supplementary version of the previous version and has added new features. But what are these new features? Windows Server 2019, which is based on the previous version, has undergone changes and optimization in various parts, and these changes have been made in the security, application platform, and hybrid performance sections. In this article, we fully explore the New Features of Windows Server 2019.
Key features and improvements in Windows Server 2019
In the main appearance and interior of Windows Server 2019, two major changes have been made, the first is Desktop Experience and the second is System Insights. The first feature is essentially the Windows Server appearance changes that have been created to improve customer satisfaction and users can choose to create new appearance changes for Windows Server 2019.
The second change, called System Insights, is a new feature built into Windows Server 2019. This feature analyzes your server data and evaluates everything that happens on your server, and gives you a report so that you can optimize your server. This feature can identify and report all the weak points of the server.
We recommend you choose and buy a plan according to your needs from the Windows VPS server plans provided on our website. After installing Windows Server 2019 on these servers, you will see the excellent performance of these servers. In the continuation of this article, we will fully review the key features of Windows Server 2019.
Enhanced security measures in Windows Server 2019
Windows Server 2019 has introduced a series of special platforms called Windows Defender ATP for more server security. This platform has 4 new features which are as follows:
1) Attack Surface Reduction: This feature, which is a set of instructions, identifies any corrupted files, emails containing corrupted attachments, and strange behavior of servers and ransomware and prevents them from penetrating the system and server.
2) Network protection: This feature also detects and blocks any anonymous or invalid IPs from the web.
3) Access to files is controlled: Critical data of the server and devices are protected by this new feature to prevent the penetration of programs such as ransomware.
4) Protection against security holes: A series of instructions have been designed for this platform to protect and prevent security holes. Note that you can activate this feature manually.
But the security optimizations are not only limited to the platform, these optimizations are also included in the virtualization section. In the previous versions, the troubleshooting problems were a bit too much and exhausting, but in Windows Server 2019, these problems have been solved and users can solve virtualization problems. On the other hand, these changes do not need to be adjusted manually and can be done automatically. Finally, if users want to have a mixed environment of the operating system, Windows Server 2019 can support Ubuntu, Linux, and Red Hat Hamel systems.
Improved performance and scalability in Windows Server 2019
Another benefit of Windows Server 2019 Standard is that it is highly scalable, meaning it can grow with your business as your server needs to grow. In addition, the platform also offers excellent performance, ensuring that your applications and systems run fast and smoothly.
One of the features of Windows Server 2019 that has improved performance and scalability is support for hybrid environments. Windows Server 2019 is designed to run in both on-premise and cloud environments, allowing enterprises to make the most of available resources and adapt to changing business needs.
Next is storage optimization. With Storage Spaces Direct (S2D), companies can easily group storage units into a single pool. Interestingly, this feature will improve storage efficiency and performance. In addition, the data deletion and compression feature reduces the space required for data storage.
It is interesting to note that Windows Server 2019 introduces network virtualization improvements. Such as hardware acceleration and support for container-based virtualization, which improves application performance and network efficiency.
Windows Admin Center: A powerful tool for managing Windows Server 2019
Server management is a very difficult task and many risks threaten it, so to reduce risks and simplify management, it is better to use a tool called Windows Admin Center, which has many features. Windows Admin Center installed on an internal server can manage standard Windows 2019 servers. It can also manage HyperV R2 and higher servers, Windows Server Core, Hyper-Converged systems, or Azure.
Windows Admin Center can increase the speed of doing things with the ability to personalize dashboards. This tool offers a modern view of monitoring, using which you can change the design of dashboards, put them in different sections, and separate the charts in them from each other. Each of these dashboards is a workspace where information can be saved and shared.
There are always tasks that require access to the server console, and in Windows Admin Center, the Remote Desktop feature has been placed to do this, which can be used through a browser. The interesting feature of this tool is to access the console of each managed server, without the need to open additional ports in the firewall. All engine traffic goes to Windows Admin Center through HTTPS protocol and is encrypted on the way.
Accessing files from Windows Admin Center has become a trivial matter. You can do things like create new folders, rename or delete files, upload and download files, cut, copy, paste, and even extract archives. Apart from these simple and routine things, you can also set file sharing, set file sharing permissions, and create and manage files. Also, with Admin Center, you can perform disk management, including formatting and resizing, creating and attaching VHD files, and saving information on disk and server.
Hybrid cloud capabilities in Windows Server 2019
A hybrid cloud is a combination of one or more public and private clouds. A hybrid cloud is a collection of virtual resources. These resources are powered by hardware that is owned, managed, and organized by a third party. Resources in the hybrid cloud are provided to a customer in a dedicated manner. These computing and storage resources are automatically provided and allocated through a self-service user interface.
Interoperability is the fundamental basis of a hybrid cloud. Without it, the public cloud and the private cloud can exist independently of each other, but they are not considered hybrid clouds. Even if they are used by a company or organization. Hybrid clouds include multiple connection points, and software services integrated into the core allow resources, operating systems, and applications to move across the environment.
Nowadays, it is impossible to imagine an IT environment without virtualization and hybrid cloud. Therefore, in Windows Server 2019, Microsoft has improved the connection between the Azure cloud platform and the Windows Server operating system. This connection is not only limited to the Admin center, but the Azure network adapter also provides the possibility of connecting to the cloud computing platform. In addition, the Windows Server 2019 release includes better support for Azure Backup, File Sync, Disaster Recovery (DR), and other Azure services.
Cloud management tools provide you with one-piece platforms for managing hybrid clouds. Thus, they free you from manual management of the hybrid environment using management and planning tools for multiple implementations and additional expert operators. These single-fabric platforms encapsulate the core technologies and centralize management tasks so that operators and users can control the system lifecycle, automated services, automation, policy enforcement, and costs when deploying services.
Containerization and virtualization advancements in Windows Server 2019
The interesting thing about Windows Server 2019 is that it supports both Windows and Linux containers that can run on the same container host. In addition, Windows Server 2019 includes built-in support for Kubernetes, which can significantly improve container networking. Additional container improvements include integrated Windows authentication in containers, improved application compatibility, and reduced size of base container images. These Hyper-V features can increase the speed of container workflows, make containers more secure and reliable, and ensure the efficiency of container networks.
Similar to the way Linux containers share host operating system kernel files, Windows Server containers do so in a similar way. In other words, while namespaces, filesystems, and network isolation are enforced to isolate containers from each other, vulnerabilities can exist between different Windows Server containers running on the same host. For example, if you want to log into the host operating system on your container server, you can see the processes running on each container.
The container is not able to see the host or other containers and is still isolated from the host in various ways, but knowing that the host can see the processes inside the container tells us that some interaction with the host may be shared. Windows Server containers are useful in situations where the server hosting the container and the container itself are in a secure domain and trust each other. Windows Server Containers are more useful for servers that are owned by the company and the company itself can manage them. If you trust your host server and container, using Windows Server containers provides the most efficient way to use hardware resources.
Upgrading to Windows Server 2019: Considerations and best practices
To upgrade to Windows Server 2019, you must log in as an administrator of the server you want to upgrade.
Then, in the next step, you need to insert the Windows Server 2019 DVD or install the installation ISO.
In the third step, you can go to the root of the installation media and double-click on setup.exe. After doing this, you will see the Windows Server 2019 setup window appear.
Now you can follow the steps in the wizard. Pay attention to the following:
Tip: If you are upgrading from a DVD, you may be prompted to boot from the DVD. You can let the request time out and the upgrade will continue.
When the upgrade is finished, a screen will be displayed that the settings are being finalized. When the upgrade is complete, you will be presented with the Windows Server 2019 login screen.
Case studies and success stories of organizations using Windows Server 2019
Windows Server 2019 is a version of Windows built. It is designed to meet business needs such as access control, data management, cloud integration, and virtualization. It comes in three editions: Datacenter, Essentials, and Standard, each suitable for different use cases and environments. Here are the success stories of many organizations using Windows Server 2019 to improve their performance, security, and efficiency.
1) ZDNet reviewed Windows Server 2019 and praised its features, particularly its improvements in security, hyper-converged infrastructure, and hybrid cloud. They also noted that Windows Server 2019 provides a solid foundation for future data center advancements, including edge locations.
2) Microsoft published a case study of Coles Group, an Australian retailer that migrated to Windows Server 2019 to modernize its IT infrastructure and reduce costs. Coles Group reported that Windows Server 2019 helped them achieve faster deployment, better scalability, increased security, and easier management.
Conclusion: The future of Windows Server 2019 and its impact on businesses.
Windows Server 2019 is another Microsoft operating system designed for servers. It can be used by large information centers of the world or even small companies. Windows Server 2019 has provided new and advanced features for users in the field of virtualization, network, storage, user experience, cloud computing, automation, etc. In simple words, Windows Server 2019 helps you to do your company’s IT affairs much easier and at a whole new level along with reducing costs. Businesses that are currently using Windows Server 2019 in their business receive a very positive impact compared to other operating systems. Because Windows Server 2019 has been able to perform better than other competitors in online businesses.
Windows RDP 2012 is a feature of Windows Server 2012 that allows users to connect to remote desktops and applications from any device. RDP stands for Remote Desktop Protocol, which is a protocol that enables remote desktop connections over a network. In this comprehensive article, we intend to teach you about Enhancing Remote Access with Windows RDP 2012.
Benefits of using Windows RDP 2012 for remote access
Some of the benefits of using Windows RDP 2012 for remote access include:
Compatibility: RDP is compatible with Windows operating systems, which means it can use with different devices and platforms. You can also use the Microsoft Remote Desktop program to connect from non-Windows operating systems.
Security: RDP uses strong encryption to secure remote desktop connections and prevent unauthorized access. You can also configure security settings and policies to control who can access your remote desktop and applications.
Multiple sessions: RDP supports multiple sessions, which means that multiple users can connect to the same computer at the same time. You can also use session shadowing to monitor and control other Windows RDP 2012 R2 user sessions.
Reliability: Remote Desktop Services in Windows RDP 2012 are reliable across a wide range of network configurations, hardware devices, and administrative scenarios. It also supports features such as network load balancing, failover clustering, and dynamic fair share scheduling to improve performance and availability.
User Personalization: User profile disks allow you to maintain user personalization settings across session sets and pooled virtual desktop sets. You can also use RemoteApps to deliver apps to users without installing them on their devices.
We assure you that you will enjoy the high quality of these servers by purchasing a Cheap Admin RDP from the plans provided on our website.
Features and capabilities of Windows RDP 2012
Some of the most important features and capabilities of Windows RDP 2012 will be explained below:
Management: Windows RDP has a powerful management console. In this console (Server Manager) you can manage all rules.
Server Core: Using this ability, you can install your Windows minimally (without a graphical interface).
Virtualization: Using this feature, your operating system becomes a virtual machine. That means you can have other operating systems on top of your current operating system.
IP Address Management: The IP AM feature was first introduced in Windows RDP 2012. Manages the IP structure under the network.
Using IIS 8 with advanced security capabilities: By IIS8, it provides the possibility of using advanced security protocols. You will be able to install each section separately. This feature increases the efficiency and security of your system.
Brand Cache feature: Brand cache is a capability that allows us to increase the responsiveness of applications on low-speed connections such as WAN networks. In this case, the files can be cached on the user’s computer.
File Server Resource Management: A set of tools that allow network administrators to control and manage the type and amount of data stored on the server. By using this feature, the network administrator will be able to manage. On the other hand, it will have complete control over file management, disk quota management or codes, detailed reporting, and discussion of file classification. It has the power to support magnetic smart cards (Smart Cart) for authentication. These intelligent cards increase network security.
Windows Deployment Service feature: With this feature, the remote network manager installs the operating system without the need for DVDs or other portable discs on the network through the user’s computer, which does not even have an operating system on it.
First, put the boot of your computer or server on the CD-ROM and put the Windows CD in the CD-ROM and wait for the Windows installation section to load:
*
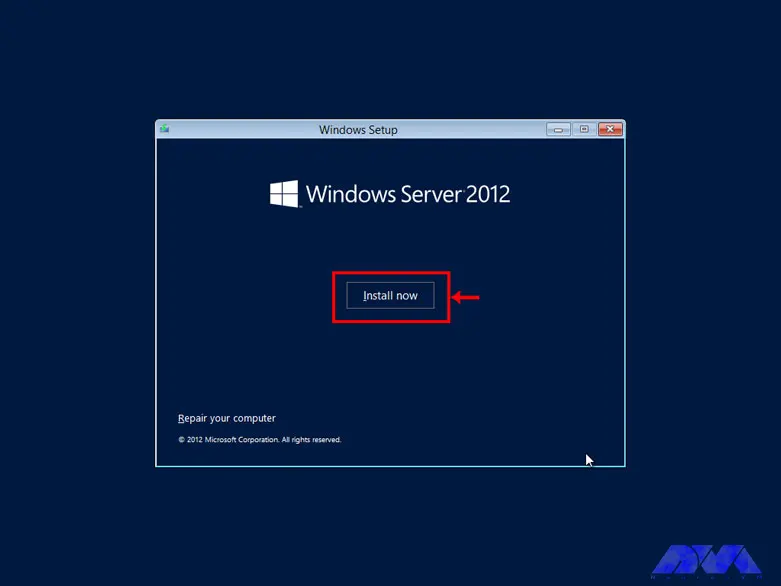
According to the image, click on the Install Now option to enter the Windows installation:
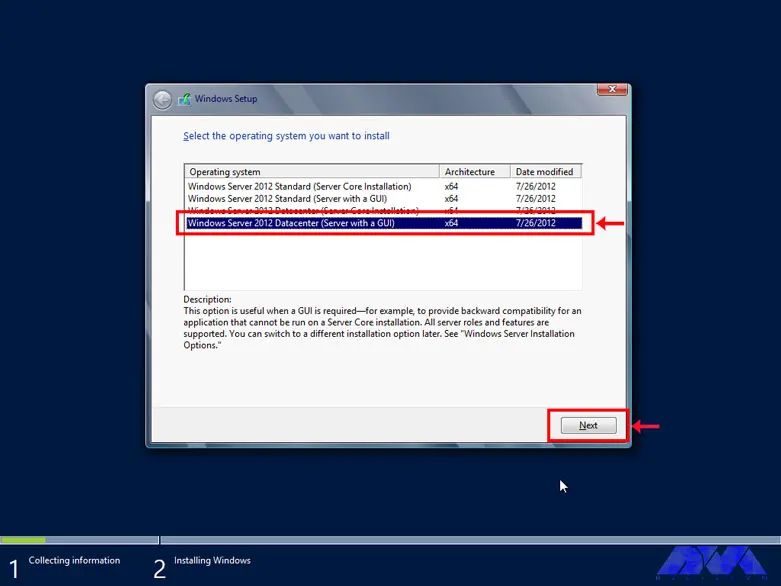
Choose one of the GUI options, either the standard Windows GUI or the datacenter GUI that is specific to the server:
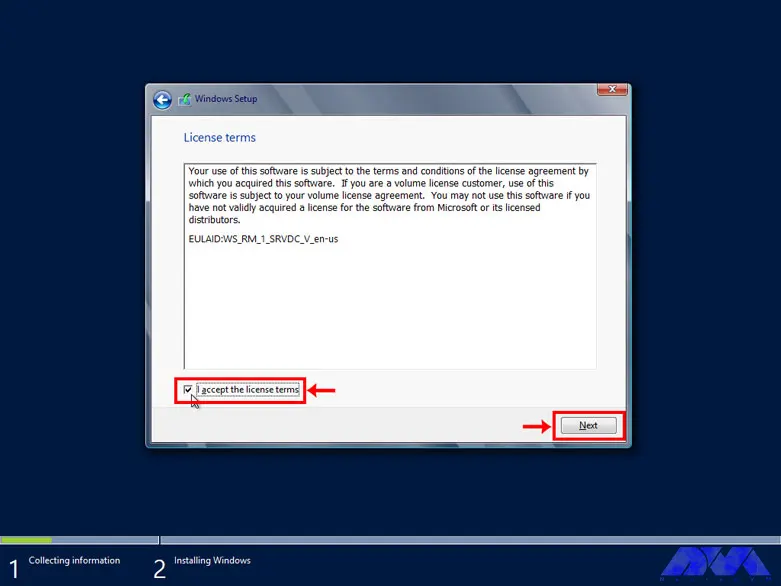
Confirm the copyright and license server rules to allow Windows installation:
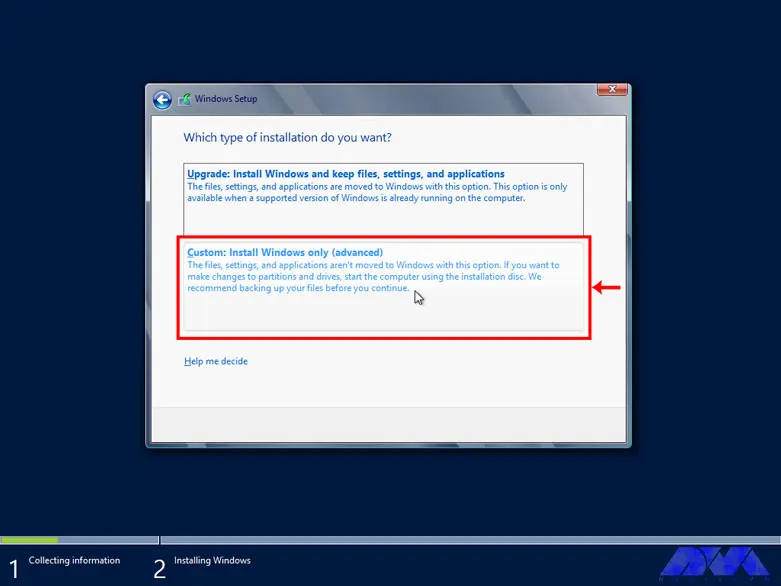
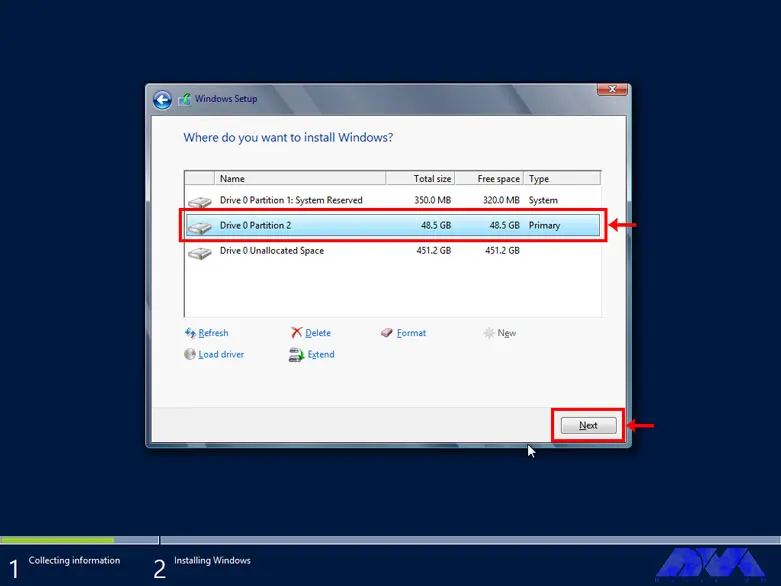
Select the Custom option for custom Windows installation. In this section, you will be given the option of partitioning and installing Windows in your desired partition:
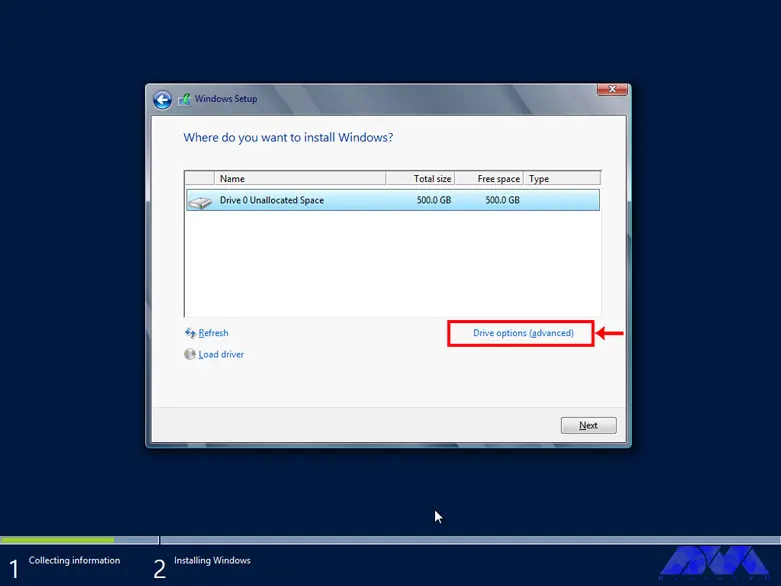
Select Drive Options (advanced) to select the desired partition and partitioning:
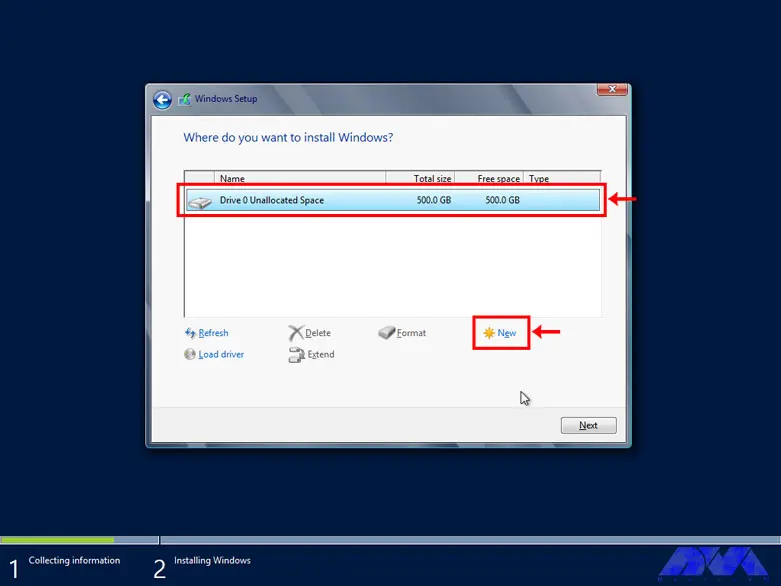
First, click on the hard drive and select the New option to create a new partition. In high-volume hard drives, it is recommended to choose 50 GB for Windows and software required by Windows and partition the rest of the hard drive as desired:
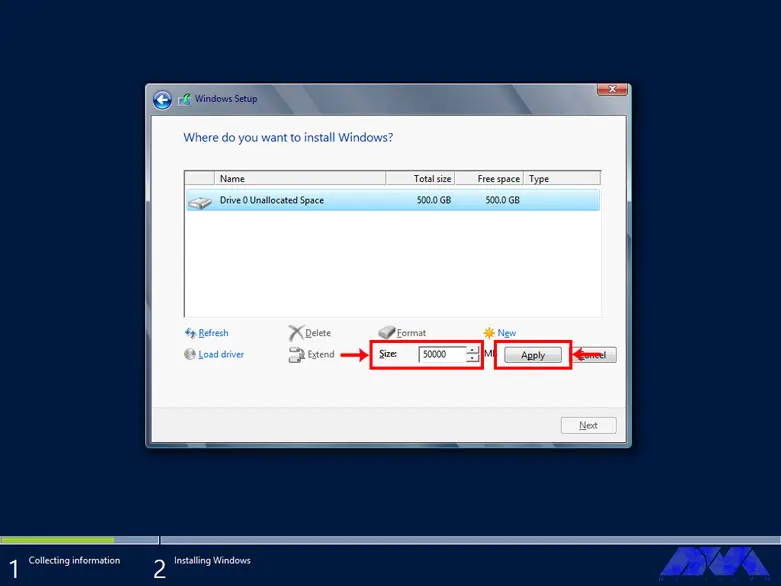
Choose the volume of your desired partition to create your desired partition:
From the created partitions, choose your desired partition to install Windows:
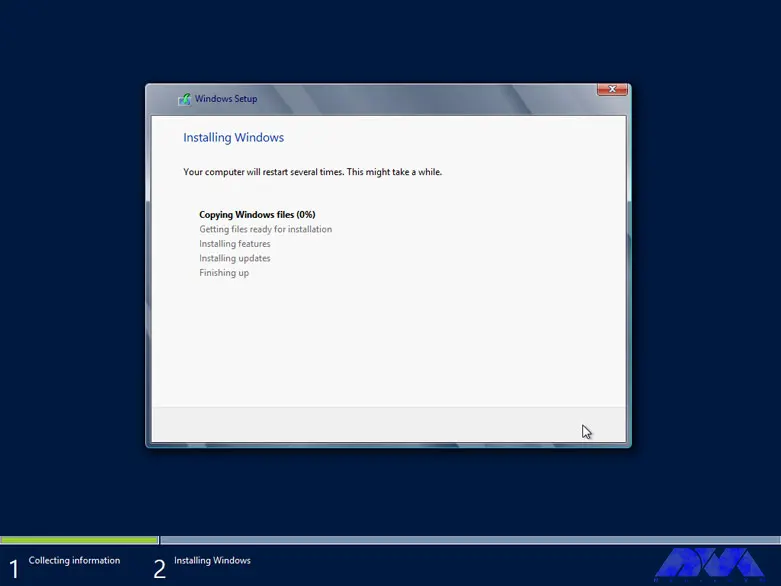
Wait for Windows to be completely installed on your hard drive:
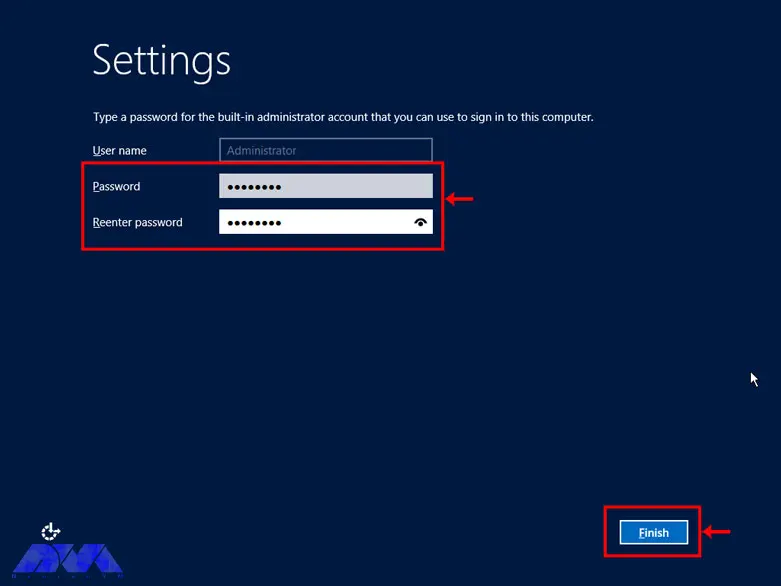
Choose a desired password for the administrator and repeat it twice:
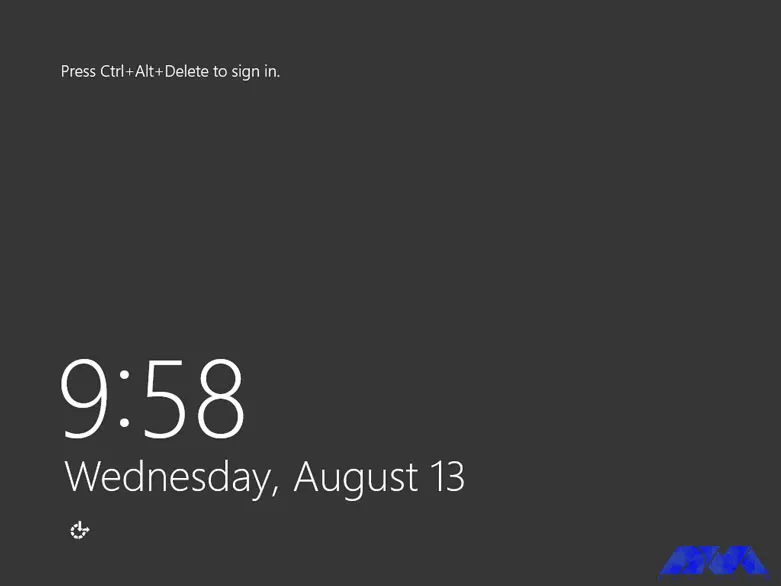
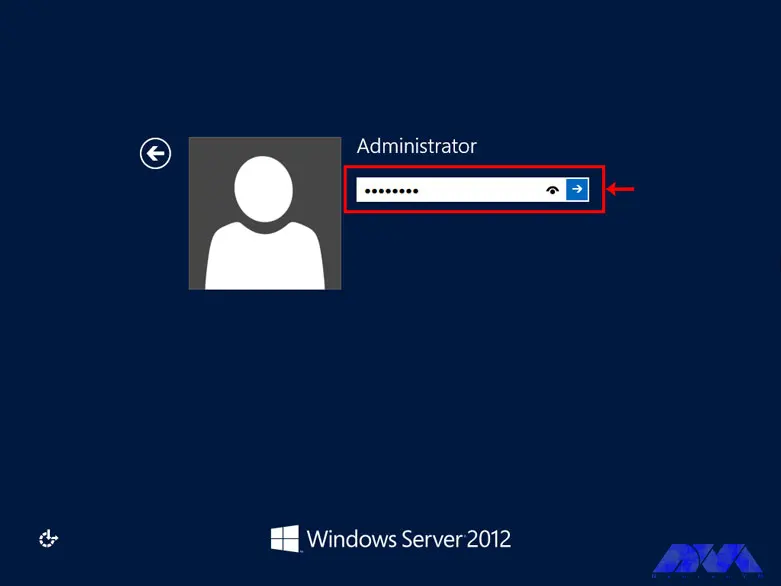
Press Ctrl+Alt+Delete to enter the Windows login section:
Enter your Windows password to enter Windows:
Enhancing security with Windows RDP 2012
There are several ways to increase Windows RDP security. Next, we will introduce the solutions to increase the security of Windows RDP 2012:
Use the feature of the lowest access point in the Windows RDP
Increase the security of the Windows RDP by configuring the network
Remove unnecessary ports and software and services
Consider security considerations in NTP configuration
Periodically check the server logs
Establish specific security policies
Use a powerful firewall to increase the security of the Windows RDP
Use the Windows MBSA feature to identify vulnerable parts of the server
Troubleshooting common issues with Windows RDP 2012
Windows RDP is much more powerful than regular Windows and is able to perform much heavier tasks. But if there is a problem with it, the activity of all the clients connected to it will be disrupted. Such problems can be mentioned as Windows not booting, blue screen after startup, inability to open files and folders on the desktop, inability to update Windows, etc.
Most of these problems are caused by corrupt system files, damaged boot records, etc., which are mainly caused by individual mistakes or negligence of client system users. In this situation, the importance of creating a level of access to files for clients is very necessary and vital.
Windows RDP troubleshooting using the Image file
1) You can scan system files by using the SFC scannow command in the CMD environment. For this, connect the flash drive containing the image file to your server and turn on the server.
2) Enter the BIOS environment and boot the server to DVD or USB.
3) After the server is booted from the desired media, click the Repair Your Computer option.
4) Select the operating system you want to repair and click Next.
5) A dialogue box called System Recovery Options will open for you, choose Command prompt from it.
Tip: Note that you can use the SFC command only with Administrator access.
6) After opening CMD, type the following command and press Enter:
SFC/scannow
In addition, using the SFC command, you can repair damaged boot files and records. Just enter the following commands and press Enter at the end of each line:
bootrec / fixmbr
bootrec / fixboot
bootrec / rebuildbcd
After you have entered all the commands and the process has been completed successfully, restart your server. You will see that your Windows RDP has been repaired.
Tips and best practices for optimizing Windows RDP 2012 performance
Decreased performance and speed of servers is a common problem that may occur for various reasons. Servers may also suffer from the same problems as a standard computer, except that the way servers work, unlike normal computers, is set in a more precise way.
In the rest of the article, we have provided a list of things that can increase the performance and speed of servers. Before looking into any of these, we recommend that you take a backup of your computer’s data and settings. Make a note of any changes you make to the main system settings and record the changes made by this change as well.
Switch to High-Performance Power mode.
Disable shorthand naming in DOS 8.3.
Check for commands and processes with high CPU or memory usage rates.
Scan the system for malware.
Check network speed.
Update necessary drivers.
Take the signs of external attacks seriously.
Disable login via SMB packets.
Run SFC/Scannow.
Check for hardware errors.
Consider the Tuning Guide functionality.
Comparing Windows RDP 2012 with other remote access solutions
Windows RDP 2012 is a remote access solution that allows you to connect to a remote computer and control it over the network. This protocol uses Remote Desktop Protocol (RDP), which is a proprietary protocol. RDP is fast and efficient because it transfers low-level screen drawing operations and stores pixmaps on the client side. It also supports encryption, authentication, compression, and redirection of various devices and resources.
Other remote access solutions may use different protocols or methods to capture and transmit screen changes, such as VNC, SSH, HTTP, etc. Some of them may be faster or slower than RDP depending on network conditions, screen resolution, and compression algorithm.
To compare Windows RDP 2012 with other remote access solutions, you may want to consider the following factors:
Performance: How fast and smooth is the remote control experience? How much bandwidth and CPU does it consume? How well does it deal with latency and packet loss?
Security: How secure is the connection between the client and the server? What encryption and authentication methods are used? How vulnerable is it to attacks or intrusions?
Functionality: What features and capabilities does it offer other than remote control? How easy is it to configure and use? How compatible is it with different operating systems and devices?
Cost: How much does it cost to acquire and maintain? Is it free for personal or commercial use? What are the terms and conditions of licensing?
Windows RDP 2012 licensing and pricing options
Windows RDP 2012 licensing and pricing options depend on the version and number of processors you need for your server deployment. There are four editions of Windows RDP 2012:
The Datacenter edition is designed for highly virtualized private cloud environments. You can run any number of virtual operating system environments (OSE) on a licensed server. It also includes advanced features such as tiered storage, software-defined networking, and the Windows Azure package. The licensing model is processor-based, meaning you must license each processor on the server. You must also obtain client access licenses (CALs) for each user or device accessing the server.
The standard edition is designed for non-virtualized or slightly virtualized environments. It offers two virtualization rights, which means you can run up to two virtual OSEs on one licensed server. The licensing model is also processor-based and requires a CAL for each user or device that accesses the server.
The Essentials edition is designed for small businesses with up to 25 users and 50 devices. It also includes features such as simple management, integration with cloud services, and remote web access. The licensing model is server-based, meaning you must license each server with up to two processors. No need to get CAL for this version.
The Foundation version is designed for small businesses with up to 15 users and no need for virtualization. It also includes basic features such as file and print services, remote access services, and Active Directory domain services. The licensing model is also server-based, meaning you must license each server with one processor. No need to get CAL for this version.
Pricing for Windows RDP 2012 editions varies by volume licensing program, agreement type, license type, and region. You can use the Microsoft License Advisor tool to estimate pricing for your specific scenario.
Conclusion
Windows RDP 2012 provides advanced features in virtualization, networking, storage, user experience, cloud computing, and automation. In simpler words, this Windows helps you to do IT-related things much easier and with reduced costs. After mastering the basics of Windows Server, it is recommended to use Windows Server as an operating system instead of using the provided client Windows. Because it works much better than Windows clients in terms of resource allocation (both hardware and software).