Category: WordPress Hosting

  • JetBackup: An Extensive Backup Solution for Directadmin

    JetBackup: An Extensive Backup Solution for Directadmin

    If you decide to recover your data through Jetbackup, which has become very popular, and your control panel is DirectAdmin, you have come to the right place. Our article aims to introduce you to Jetbackup and how to configure and use it in DirectAdmin. Not long ago, DirectAdmin put this solution on its platform, but note that the interface is entirely different from Cpanel. Keep studying to figure out more about this issue.

    What is JetBackup?

    JetBackup is a commercial backup and recovery solution primarily designed for web hosting providers and server administrators. It is often used in the context of web hosting control panels, such as cPanel, Plesk, and DirectAdmin, to automate and simplify the backup and restore processes for websites, databases, and server configurations.

    JetBackup is a popular choice for web hosting companies and server administrators looking to provide reliable backup services to their clients and ensure data recovery in case of hardware failures, data corruption, or other issues. It helps protect websites, databases, and server configurations, making it a valuable tool in the web hosting industry. Note that you can also purchase our up-to-date and practical Linux VPS services to use this powerful recovery solution on DirectAdmin.

    What are the Features of JetBackup on DirectAdmin?

    There are many features related to Jetbackup in DirectAdmin that we mention in this section:

    • Cron Jobs: The possibility of backing up and restoring Cron Jobs in DirectAdmin.
    • Home Dir: For Backing up and restoring files and folders (location of website source code)
    • Certificates: To backup and recover SSL
    • Email option: To backup and restore email accounts
    • FTP: For backing up and restoring FTP accounts
    • DB: To backup website database
    • DB user: Backup database users

    How to Run JetBackup on DirectAdmin?

    JetBackup is a popular backup solution for cPanel, DirectAdmin, and other web hosting control panels. To install JetBackup on DirectAdmin, you’ll need to follow a few steps. The installation steps may vary slightly based on the version of DirectAdmin and JetBackup you’re using, so always refer to the official documentation for the most up-to-date instructions. Here are the general steps to run JetBackup on DirectAdmin:

    Download JetBackup

    The first step is to visit the JetBackup website and log in to your JetBackup account. Download the DirectAdmin version of JetBackup:

    Jetbackup login page

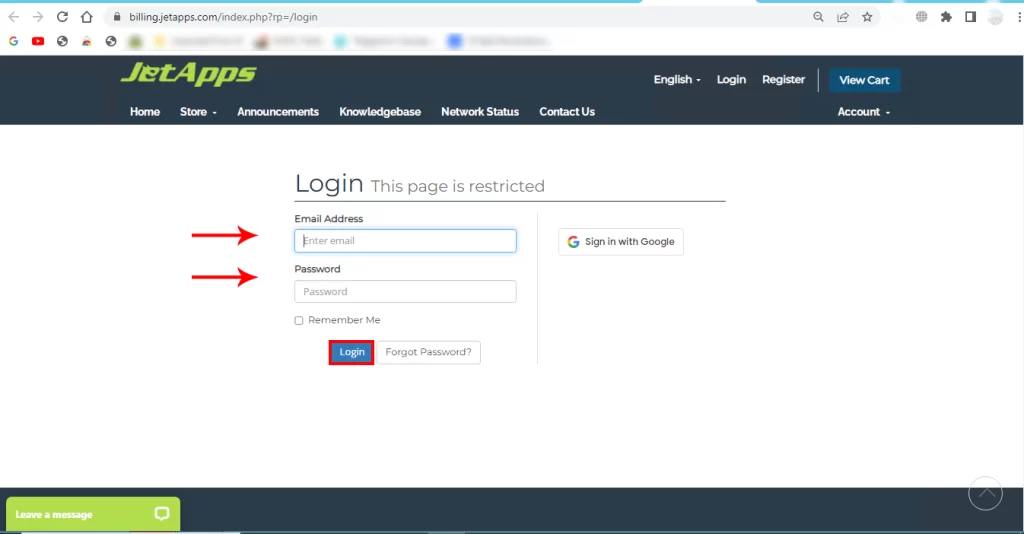
    Tip: Make sure you have root or administrator access to your DirectAdmin server.

    Run JetBackup Solution on DirectAdmin

    Enter your DirectAdmin, and search for the JetBackup icon to restore your account, then open it. It will look like this:

    running jetbackup on directadmin

    You will encounter a new window. So, click on the Full Backups icon:

    choosing proper icon for backup

    You should enter your username and choose View Backups. Now, In the Created column, select the backup you want to restore from the drop-down menu and click the Show Advanced Settings button.

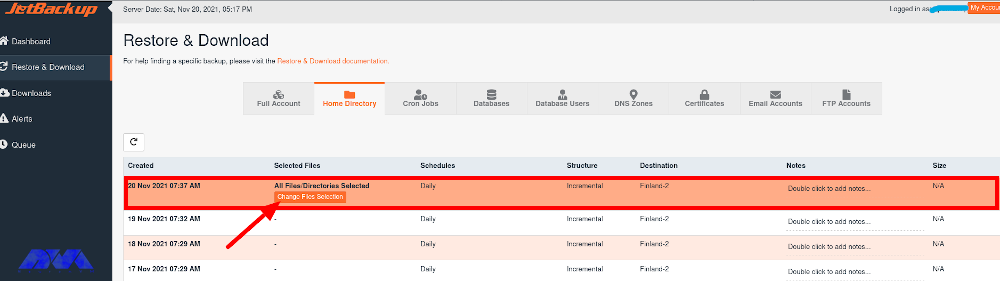
    The first action will be referring to the Home Directory tab and clicking on the Change Files Selection button in the Select Files column:

    restore and download section on jetbackup

    ***

    restore and download section on jetbackup-2

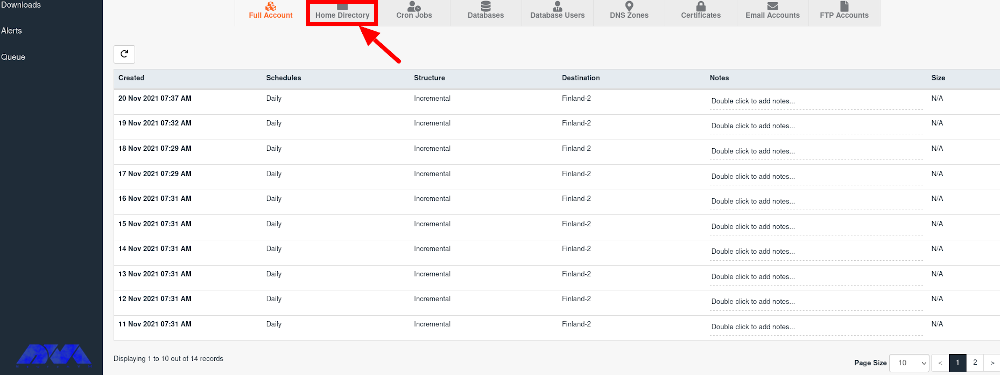
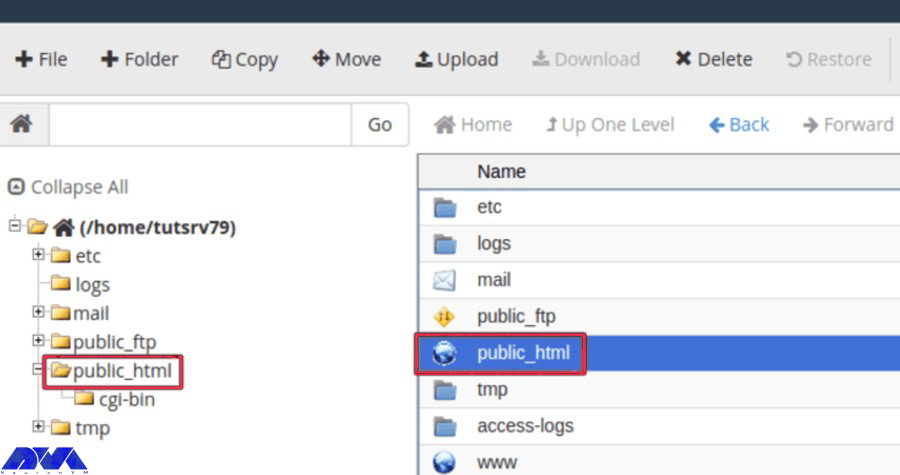
    Now you have to go to the domains and choose the domain you want to restore from there.

    Then, check the public_html directory. Meanwhile, to restore a specific folder or file, open the public_html option and select the desired items. If you also want to restore files like .htaccess, you must activate the Show Hidden Files check box:

    select file section - jetbackup

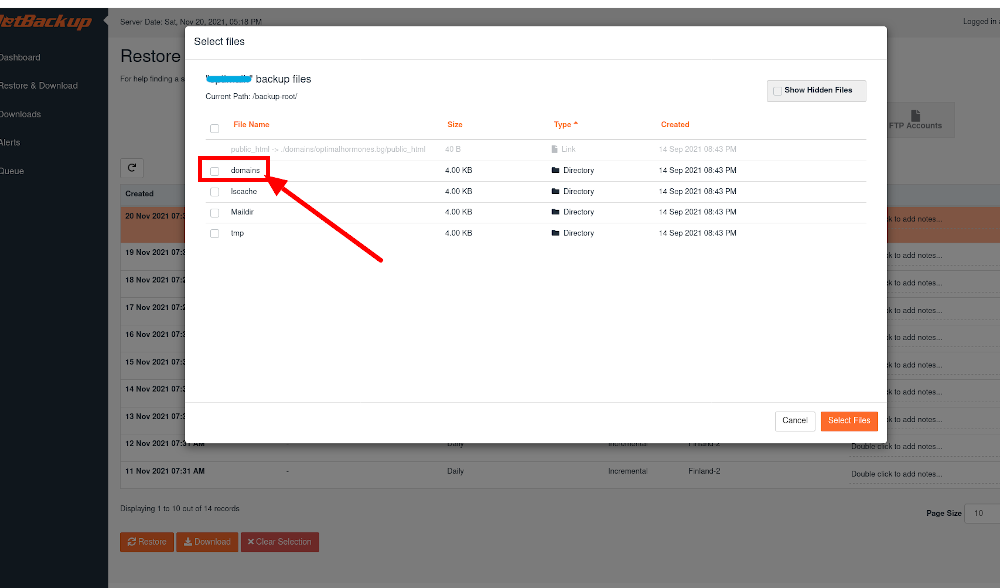
    To confirm the changes you should click on the Select Files tab:

    confirm selecting files on jetbackup

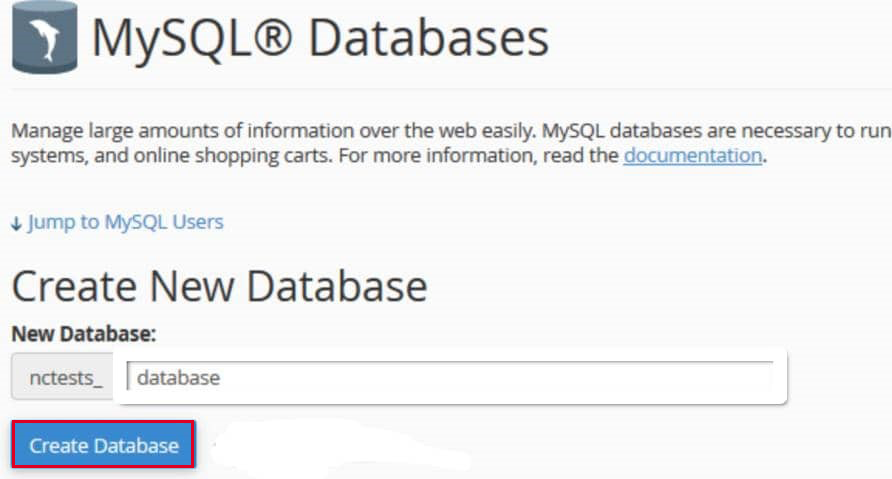
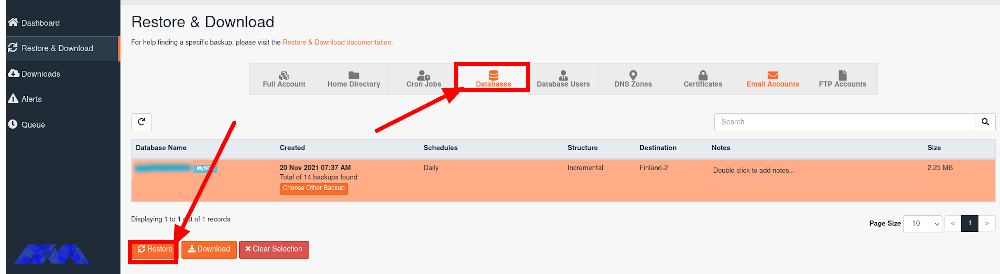
    The next step is going to the DB tab, locating and marking the database name that corresponds to the website. The database name refers to whose data you wish to recover. Press the Restore button:

    database section on jetbackup

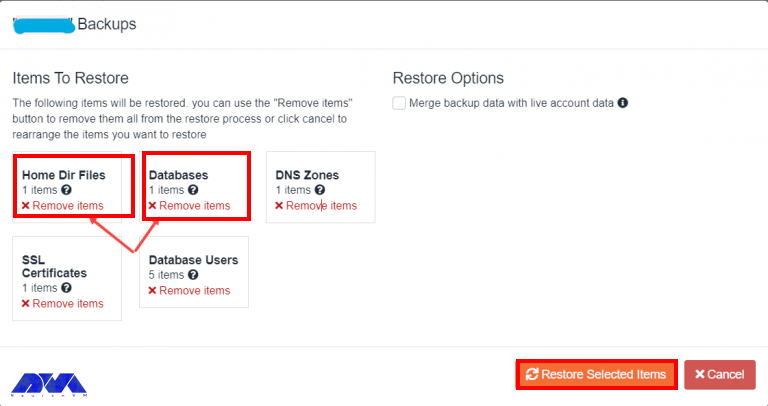
    The most important components you have to keep, The only components you will need to keep, are Home Dir Files as well as Databases. You can remove the other files by the Remove Items button.

    If you want to confirm the recovery, you should press the Restore Selected items tab:

     restore section on jetbackup - JetBackup solution for directadmin

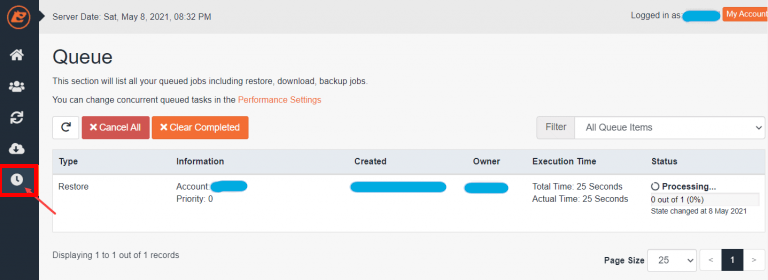
    If you want to keep track of the restoration of the backup, open the Queue tab. the amount of time for this process depends on the amount of the data you need to record:

    Qeue section on jetbackup - JetBackup solution for directadmin

    When you finish the final process, you will see a message like this:

    final process of backup file on jetbackup

    Tip: It’s essential to test the backup and restore functionality to ensure everything is working correctly.

    Troubleshooting JetBackup Solution on DirectAdmin

    While JetBackup offers many features and benefits, there can still be issues that users might encounter. Here are some common problems with JetBackup on DirectAdmin and potential solutions:

    1- Backups may fail for various reasons, including insufficient disk space, permission issues, or corrupted data.

    Solution:

    • Ensure you have enough free disk space for backups.
    • Check file and directory permissions to make sure JetBackup can access and write to the necessary locations.
    • Validate the data integrity on your server to ensure there are no corrupted files causing backup failures.

    2- JetBackup can put a significant load on your server, leading to performance issues.

    Solution:

    • Schedule backups during non-peak hours to minimize the impact on server performance.
    • Optimize your server’s resources, such as CPU, RAM, and disk speed, to handle the backup process more efficiently.

    3- Restoring backups may fail due to various reasons, such as data corruption or incorrect settings.

    Solution:

    • Verify the integrity of the backup files before attempting to restore them.
    • Double-check your restoration settings to ensure they are correct and compatible with your server environment.

    Conclusion

    Remember that working with server software like JetBackup requires a good understanding of server administration, and it’s essential to take regular backups of your server before making any significant changes. We hope this tutorial was useful for you. If you have any questions please leave a comment.

  • Step by Step to Configure Plesk on RDP Server

    Step by Step to Configure Plesk on RDP Server

    Have you ever heard of Plesk and its features? Well, In this article, we will provide you with step-by-step instructions and valuable insights to help you successfully configure Plesk on Admin RDP. Plesk is a powerful web hosting control panel and it comes with tons of different features. Whether you are a beginner or an experienced user, this guide will equip you with the knowledge and tools necessary to Configure Plesk on RDP Server and optimize your server management experience. Let’s dive in and get started!

    What is Plesk?

    Plesk is a web hosting control panel that simplifies website, domain, and server management. It offers a user-friendly interface for both beginners and experienced users, allowing easy creation and management of email accounts, installation of applications, database setup, and server performance monitoring. Plesk provides security features like firewall management and SSL certificate installation, ensuring website and data protection. Its benefits include centralized website management, streamlined administration tasks, compatibility with different web technologies, and extensive documentation for efficient management, enhanced security, and improved productivity.

    Plesk and its features

    Requirements for Configuring Plesk on RDP Server

    Before we start installing Plesk, there are some software and hardware requirements that should be met. We’ve listed them below:

    • Operating System: Windows Server 2012, 2016, 2019 or 2022.
    • Server Hardware: A minimum of 2 CPU cores, 2 GB RAM, and 10 GB of free disk space.
    • Supported Web Server: Plesk supports popular web servers like Apache and Nginx. Ensure that your desired web server is compatible with this panel.
    • Supported Database: MySQL, MariaDB, PostgreSQL, or Microsoft SQL Server.
    • License: A valid Plesk license to install and use Plesk. You can obtain a license from the Plesk website or through a hosting provider.

    Before installation, it’s always a good practice to check the official Plesk documentation for the latest and specific requirements based on the version you intend to install.

    Configuring Plesk on RDP server

    How to Configure Plesk on RDP Server

    This section will help you to successfully configure Plesk on your Admin RDP. First, we want toteach you how to install pleskon RDP Server. You can install Plesk using cmd prompt or you can use web GUI for the installation. Because the latter is easier, in this tutorial we’re going to focus on that. All you have to do is to follow the steps down below:

    • Log in to your server with administrative privileges.
    • Download the Plesk installation package from their official website. Make sure to choose the package compatible with your server’s operating system.
    installing plesk on admin rdp
    • Now scroll down and choose Download the Windows Installer:
    download plesk on admin rdp
    • Open Windows command prompt and navigate to the directory where you saved the installer binary, then execute the command down below.
    plesk-installer.exe --web-interface

    Now you will see the installer GUI in your browser.

    • Choose your preferred language and log in using your Windows administrator username and password.
    plesk Installer GUI
    • If you want to apply some changes before installation, choose update source and installation settings tab. You can change the installation files directory, set username and password and more:
    Updates source and installation settings
    • After you made the necessary changes, hit save and go the next step:
    Updates source and installation settings
    • The welcome page will pop up in front of you. Click on Install or Upgrade Product to move into installation. Then check the box next to Plesk and choose the version you want to install.
    Install-Plesk-on-admin-rdp

    After selecting the desired installation type, you may receive a notification to adjust additional preferences, such as the installation directory for Plesk, the location for hosting websites in Plesk, and the password for the Plesk “admin” user (which, along with your login name, grants access to Plesk).

    Once you have made the necessary configurations, proceed by clicking on Continue to initiate the installation process.

    Configuring Plesk on RDP server

    That’s it! Now you have Plesk installed on your system. Now you can locate the file where you’ve installed it and use it to your advanntage.

    Troubleshooting Common Issues

    Generally installing Plesk is not a complicated task, but just like any other tool, you might face some issues while setting it up. But don’t worry; because here we will help you with each of these issues.

    • Compatibility Issues: To solve such issues, ensure that your server meets the system requirements specified by Plesk before attempting the installation.
    • Firewall or Antivirus Interference: If you faced this problem, temporarily disable the firewall or antivirus software during the installation process or configure them to allow Plesk’s required ports and processes.
    • Database Connection Problems: To solve this, simply verify the database credentials and ensure that the database server is running and accessible. Troubleshoot any network or permission issues that may be preventing the connection.

    Remember, these are just a few common issues, and the solutions provided are general guidelines. For more specific troubleshooting, it is recommended to consult Plesk documentation or contact their support team.

    Conclusion

    Well, there you have it friends! In this article we gave you all the things needed to know for installing Plesk and troubleshoot the related issues. By following these instructions, users can easily set up and configure Plesk, allowing them to efficiently manage their websites and server resources. With this guide, users can confidently configure Plesk on RDP server and take advantage of its powerful features for website management and server administration.

  • How to Install WordPress on Dedicated Server (2 Methods)

    How to Install WordPress on Dedicated Server (2 Methods)

    WordPress is a common and well-known content management system provided as an open-source and accessible tool. You can install WordPress on a dedicated server in different ways. Here, we will mention two practical ways to install this CMS. One of these methods is via FTP and the other is an installer provided by a web hosting service.

    2 Methods to Install WordPress on Dedicated Server

    Now follow the steps below to have a successful installation process for WordPress. We should say that installing WordPress on dedicated servers has some advantages like great speed and performance, the safety of the website and the least concern about hackers and malware, the ability to customize your website, more control over your hardware and software, and so on. We recommend that you use the cheap dedicated server plans that are available on our website to install WordPress and enjoy its speed and quality.

    1. Instant Install WordPress with Softculous

    One of the excellent and simple ways to install WordPress on your website is by making a few clicks through the Softaculous app installer. WordPress is an applicable and popular content management system and more than one million websites are powered by it. let’s see how we can install WordPress using this beautiful software.

    Install WordPress through Softaculous. Most companies will offer Cpanel when you sign up:

    1. click on Blogs on the left side of your menu and press WordPress:

    adding wordpress on directadmin

    2. Click on the Install button to start the process of installing WordPress:

    install wordpress on dedicated server

    3. Now you should do some configuration to complete the installation process:

    configuring wordpress on direct admin

    Here, you will have three options for software setup

    Protocol: You should choose the appropriate WordPress protocol. These protocols can be HTTP or HTTPS. Note that if you choose HTTPS, you should have an SSL certificate.

    Domain: Here, you can open the dropdown menu and choose any root domain or subdomain that you created.

    Directory: You can select the directory, in which you wish to install WordPress. But if you desire to install the program on the root website, leave this one empty.

    Three options for Site setting

    Site Name: create a name for your website.

    Site Description: give a short description of your website.

    Enable Multisite: As you mark this field, it will install a WordPress network installation

    Three options for Admin Account

    Username: Insert the administrator username.

    Password: Insert the administrator password here.

    Email: Put the email address on which you prefer to receive the necessary notifications.

    As the final touch, select your language for the installation and install some extra plugins, and also do the advanced settings. This part is optional.

    Last, select your desired Theme and click on the Install button:

    adding theme of wordpress

    2. Install WordPress Via FTP

    This method is not necessary, cause most hosting companies will already install WordPress for your server or you can use automatic installers on your Cpanel. But if you want to install manually follow the instructions here:

    You should use an FTP application like FileZilla or SmartFtp before starting installation. Now go to the official page of WordPress and download the last version:

    Install WordPress Via FTP

    Unzip the WordPress archive and place it in your public directory which is called public_html:

    Install WordPress on dedicated server Via FTP

    Find the “MySQL Databases” button on your Cpanel:

    . Install WordPress Via FTP

    When it is needed insert your database name and as you have finished select the “Create Database” option:

    Install WordPress Via FTP

    As you created the database, it’s time to establish a “User” from the MySQL account.

    After entering the username and password, click on the “Create user” button:

    Install WordPress Via FTP

    Once you have entered the required details and the name of the database, you can allow the user to access:

    Install WordPress Via FTP

    Be sure to check all the permissions you want to grant on the page below:

    Install WordPress Via FTP

    Now you need to go to your site domain and finish the installation, so that, your FTP transfer is finished. When you visit your domain, then you will need to select your language after a successful transfer:

    Here, select your language and press Continue:

    Install WordPress Via FTP

    Now, insert your database information like Name, Username, Password, Database Host, and table prefix, and once you are finished, click Submit:

    Install WordPress Via FTP

    You should select “run the install” from the menu. Then you have to insert admin information like Site Title, Username, Password, and Email:

    Install WordPress Via FTP

    In the end, click Install WordPress” and finish your task. the only thing you have to do is to enter your username and password.

    Well done! WordPress is manually installed on your server.

    Conclusion

    In this tutorial, we thought about how to install WordPress on a dedicated server. Now you can use this popular CMS and enjoy controlling your system as you wish. Hope this guide was useful for you. If you have any questions, leave a comment.

    FAQ

    Can I host WordPress on my server?

    Yes, by hosting WordPress, you can tweak caching rules and optimize your site on the server. You can have your dedicated CPU and memory.

    Is it recommended to install WordPress on a Windows-based dedicated server?

    WordPress is suitable for Linux-based dedicated servers but it is technically possible to install it on a Windows server.