This tutorial presents the way to Change Password on RDP 2016, 2012, and 2019 step by step. One of the security measures after purchasing an Admin RDP VPS server is changing its password. You may want to change the password on your Windows server for security reasons. Changing the Windows server password is not difficult; you can change your password on Windows servers with a few simple steps. Join us for How to Change Password on RDP 2016.
Importance of changing RDP 2016 password
Because AD Administrator is a very powerful user for Active Directory and you can restrict or open features to other users and computers, install or remove programs, and you can turn off any member computer using Admin. So you need to keep the AD Administrator user in a safe place.
You may also sometimes need to change the Administrator password or other users that connect to the server via a Remote Desktop Connection. You may want to do this for added security.
Changing your password is essential because when you use Windows as a server, you must use secure passwords so that you do not have security problems and no one can hack your server. It should be noted that you can change your RDP 2016 password at any time.
First method: Change Password on RDP 2016
You can change the passwords of the domain users by using the following method. The first step is to log in to the Domain Controller and open the Server Manager.
In the next step, you have to click Tools from the Server Manager and then click Active Directory Users and Computers.
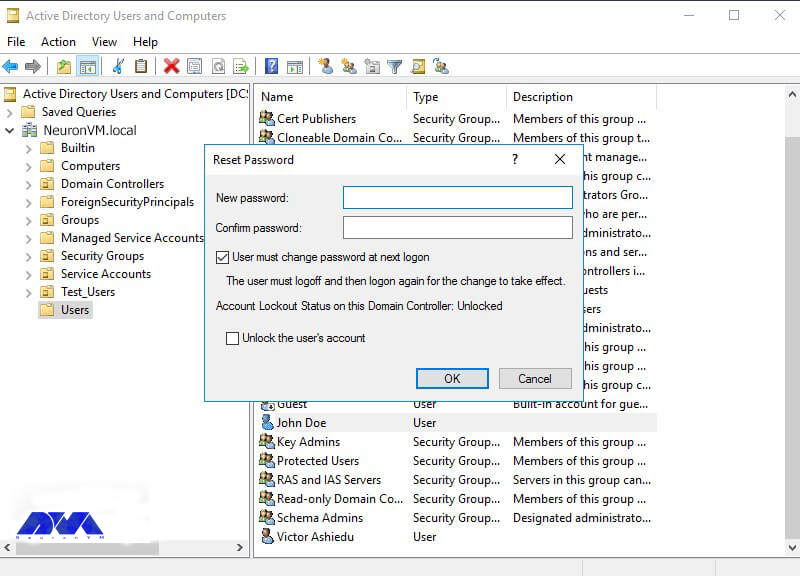
After opening Active Directory Users and Computers, go to the AD container where the user is. Now you need to right-click on the user and click Reset Password.
In this field, you must type the password in the New password field. Then type the same password in the password confirmation field. To not force the user to change the password when they log in, the box next to “User must change the password on the next login” must be unchecked. To unlock a locked account, you should check the unlock the user’s account box. Finally, click on OK.
How to Change RDP 2016 password through the control panel
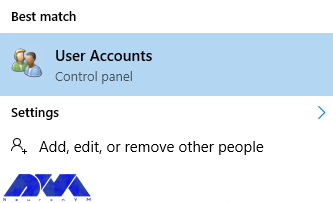
First, type “user accounts” in the search field from the Start menu of your Windows server. Then click on it.
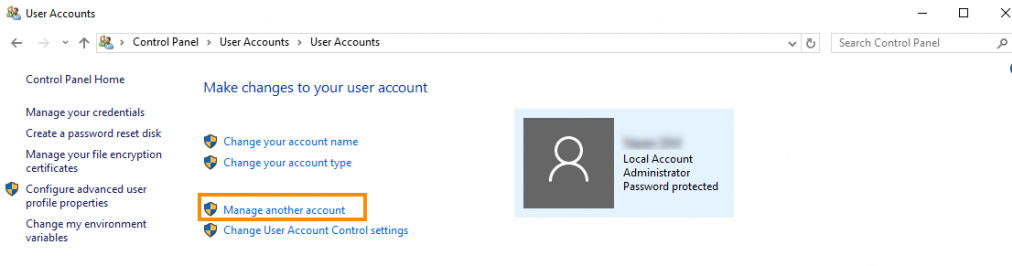
After opening the User Accounts window, click on the Manage another account option as shown below.
Note: This operation must be done with users who have admin access.
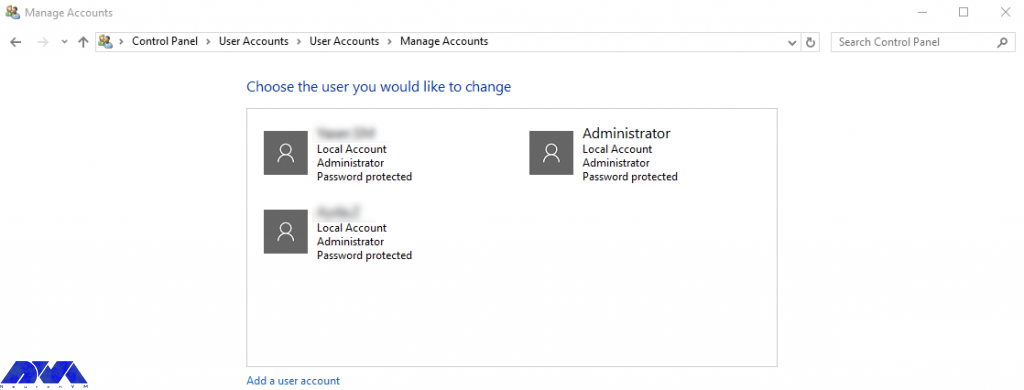
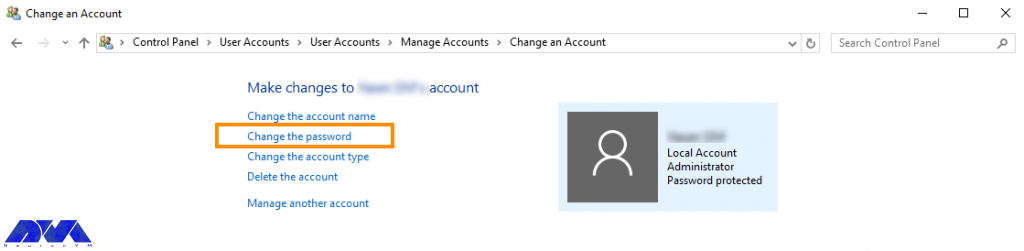
On the opened page, the list of users on your server can be seen. By default, the Administrator user is the entire server with full access.
Please click on the desired username.
After selecting the desired user in the open window, click on Change the password.
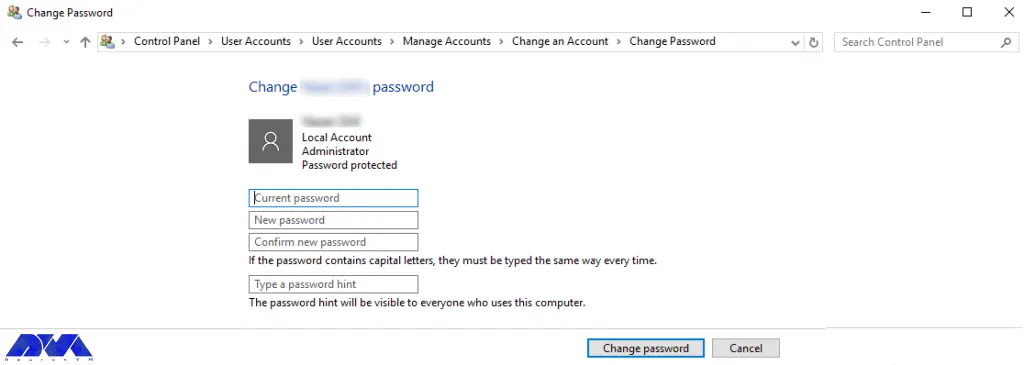
In the Current password field, enter the current server password. Then you must consider a new server password in the New Password section. Enter the new password again in the Confirm new password field.
Finally, click on Change password.
Now the password of RDP 2016 has changed and you can use your new password in the subsequent logins. Be sure to use strong passwords and change your password at short intervals.
Second method: Changing the password in RDP 2016 through server settings
First, log in to the server directly or using Remote Desktop before starting.
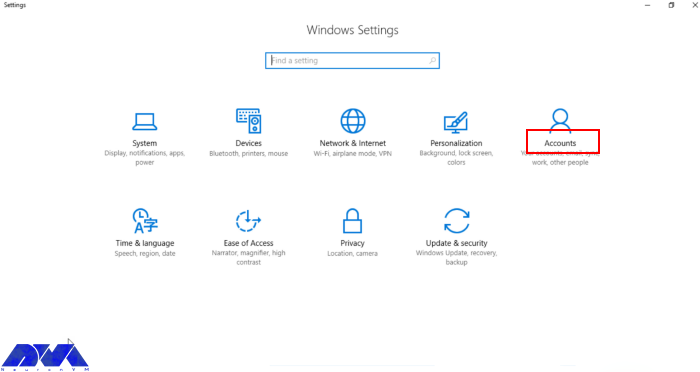
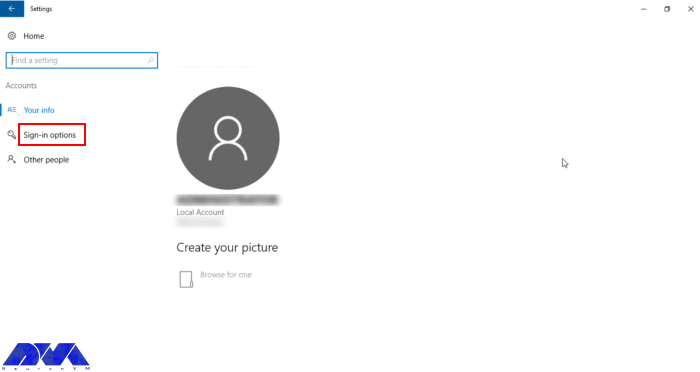
Then press the Windows key+i or enter the settings section through the Windows menu.
Go to the Accounts section and open the Sign-in options.
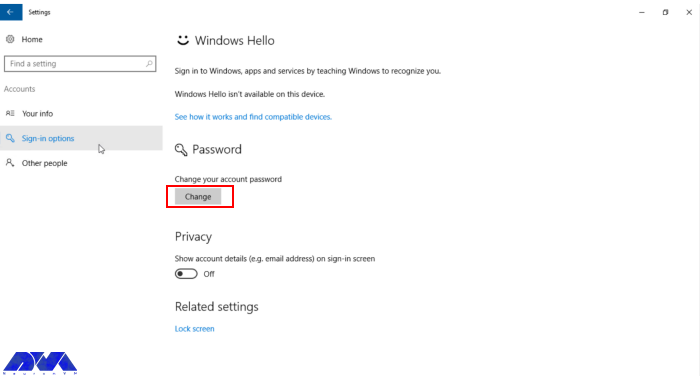
Then go to the Password section and click on Change.
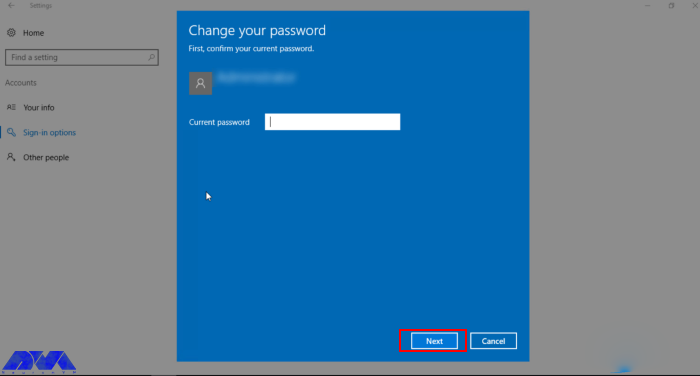
Now enter the current password and click Next.
Then enter and confirm the new password.
The password has now been successfully changed.
Conclusion
As we mentioned above, this article was prepared to teach you how to change the password on RDP 2016 using two methods. Password and authentication are some of the most critical issues for the security of your system. So after purchasing an Admin RDP, it is better to change the account password and make your server more secure. If you have any other questions or ideas please share.
One of the most familiar and practical VPN protocols is OpenVPN. It is famous for its security and excellent connection speed. You can use its official client for free. But there are many users who report that OpenVPN is not working on their Windows 10 PCs. If you also have problems working with this VPN, we will help you this way and show you how to fix OpenVPN errors on Windows 10.
What Is OpenVPN?
OpenVPN is a very popular open-source VPN client and VPN protocol. If your goal is to create a secure web tunnel, you can download and install an OpenVPN client for free on all popular systems and access all resources easily. But as mentioned before, you may encounter problems in each of these steps. So we recommend that you read this article carefully. To use OpenVPN, you can buy Windows VPS servers that are presented on our website with excellent quality.
OpenVPN Errors on Windows 10 and Its Solutions
Here are some of the most common OpenVPN problems and the ways to solve them:
The Error of TLS Key Negotiation Failed to Occur In 60 Seconds (TLS Error)
Various reasons should cause this problem. The main reason is that the client program is old. To be sure of this, enter the server and examine the log file on the server side. There is a strong possibility that the client application is an old version. For example 2.2. If you see such messages on the server side:
If you want to solve this problem you should upgrade it to the latest version.
Another reason can be a block in a firewall or in the ISP that somehow blocks or interferes with the TLS handshake. The next thing would be to change the settings related to the TLS minimum requirement level, but the OpenVPN client uses an old version that has incorrect instructions.
Solution:
The solution may be to install a new copy of the configuration profile.
The Error of Local or Remote Keys is not synchronized
There may be cases where the TLS key negotiated to be used for TLS encryption and decryption differs from the key used on the server side. Because when the client and the server talk to each other, they use a common TLS key that is used to encrypt and decrypt the traffic. There should be a short overlap where both the old and new keys are accepted but when the old key is expired and the new key must be used. As a result, for some reason one side doesn’t do this and there is no synchronization, so, you will see this error message.
Solution:
In this case, use an openvpn3-based client. This client could be OpenVPN Connect Client 2, update it to the latest version. So the solution is to update your access server to the latest version so that you can put the updated connection client on it. Then download and install the latest version of OpenVPN Connect Client from the Access Server section. Finally, despite the reduced security, you can change the TLS key update on the VPN page of the admin interface to get rid of these problems.
The Error of Server Poll Timeout
If you get a server poll timing error, it means that the server is not reachable on the specified port. Here the error message is quite clear: that is, there is no response at the address or port. When you see this error, check if the port is really open and the port is correct or if the port is accessible from the Internet, etc., to make an initial connection to the server to confirm. As a result of these symptoms, you will see the message “This server cannot be reached”.
Also, another mistake is that you forget to open the three ports that are required for the OpenVPN access server. These ports are TCP 443, TCP 943, and UDP 1194.
Solution:
To solve this problem, you can set a DNS name, and then configure and save it. In the next step, you need to delete the connection profile or the OpenVPN connect client program, and then download and install again and test it.
The Error of OpenVPN Doesn’t Connet
Another common issue is that Windows or Admin RDP may fail to connect to OpenVPN. As you downloaded the new version of OpenVPN, some connection and compatibility issues may encounter, or the new version may fail to create a virtual network adapter.
Solution:
Opening a VPN client can solve this problem. Go through these steps:
1- Install and run OpenVPN under an administrative account.
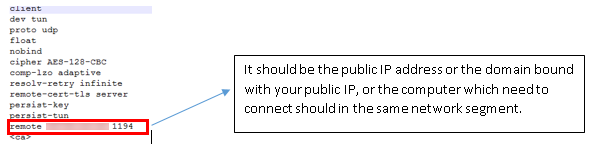
2- Analyze the settings on your computer and your router. You have to be sure that the WAN IP address is public or that the IP address to connect must be on the same network. As you export the configuration file, you can open it as txt, and recheck the IP address and port are correct or not.
How to fix OpenVPN errors on Windows
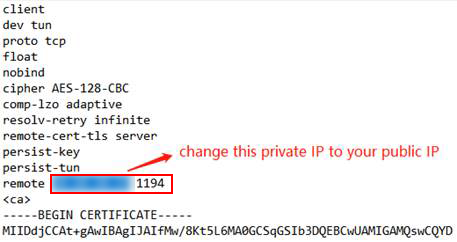
3- If there is a NAT router in front of the VPN server, note that you have done port forwarding. Then, do the update manually to the “remote IP address” in the previously exported .ovpn file. Change the previous IP address to the network’s public IP address:
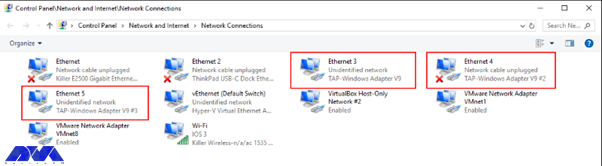
4- Then, choose to activate the TAP adapter:
5- You should close the firewall and security software.
The Error of Your Session Has Expired, Please Reauthenticate
As you use a server-locked or user-locked profile, the OpenVPN Access Server works with a session token-based authentication system. Then after successful authentication, you will take a session token instead. You will be identified by the session token now. The session token is set to expire after 5 minutes of inactivity when it is not connected to the server, and will also expire after 24 hours by default. Also when the token is generated on the server, it will be locked to the VPN client’s connecting IP address.
Solution:
This action can be disabled and the timeout for the total session duration can be set. So, you should either employ an auto-login type profile or raise the session token duration.
The Error of User Account Suspended or User Is in Deny List
This error will occur for two reasons:
1- In the User Permissions table, the deny access box is activated with a check mark for the user.
2- The box of The user is authenticating with an external system because the User Permissions Required for VPN Access record box is checked, then the user’s permissions table does not exist or does not match the username of the external system.
Solution:
When you want to solve the deny access box:
Enter the admin web UI, click on User Management, then go to User Permissions.
You should click on Deny Access and remove the check mark for the username.
Save the setting and update your running server.
If you want to solve the issue with the requireduser permissions record for the VPN access box:
Go to the user permissions table and add the user if it doesn’t exist.
You should be sensitive about the spelling and case match between the access server and the authentication server.
As you see the required user permissions record for the VPN access option, uncheck the box in the user permission table.
The Error of Open Tap Device “” PATH=”” FAILED TUN or Can Not Acquire Tap Handle Event
This error message will occur when the OpenVPN Connect 3.x service stops or does not start again when you sign back into the computer. The cause of this problem is an antivirus program. Mostly, this happens for ESET Antivirus.
Solution:
To solve this problem, you can reconnect by restarting the service manually, note that the automatic connection may still encounter the problem. If you want to be sure, turn off ESET. As your problem is resolved, then you may want to open a support ticket with ESET.
The Error of OpenVPN Connect Is not Showing on Windows 10
As you click on the shortcut, nothing shows up. The OpenVPN Connect window is missing. As you tried to install and re-install you will still get the same error. There is no error message appearing. It’s a bit scary.
Solution:
The only thing to do is to delete the file called “.ovpn-connect-lockfile“. Then, go to the C:\Users\YourUserName\AppData\Local\Temp. Simply delete the .ovpn-connect-lockfile file and restart OpenVPN Connect. That’s it.
Conclusion
OpenVPN is one of the most powerful VPNs which can be used on Windows. Here, we tried to make you familiar with some of the issues and errors of using OpenVPN on Windows 10. These are some common issues with solutions. So if you encounter any of them, read this article carefully to fix OpenVPN errors on Windows and enjoy using this great VPN.
A firewall generally prevents dangerous attacks on the local network and computer. In simple terms, a wall that prevents fire from moving from one part to another is called a firewall. Generally, a firewall controls the information that is transmitted between computers and the Internet. In this article, we are going to teach you How to Configure Firewall on Windows Server 2016.
What is Firewall?
A Firewall is a network security system that controls and monitors incoming and outgoing network traffic based on predefined security rules. A firewall is a network security device that monitors inbound and outbound network traffic. It protects the network against threats and creates a barrier between a trusted internal network and an unreliable external network such as the Internet. This process is governed by a set of predefined security instructions. It is interesting to know that a Firewall is designed to secure the communication process between different networks. The Firewall prevents unauthorized data from entering computers where ports called ports enter.
How to Configure Firewall on Windows Server 2016
Before starting the steps to configure the firewall, we suggest you visit the Windows VPS and Admin RDP plans provided on our website and configure the firewall after installing Windows Server 2016.
By default, the Windows Firewall with Advanced Security is turned on. Note that you should confirm the current status and turn on the firewall.
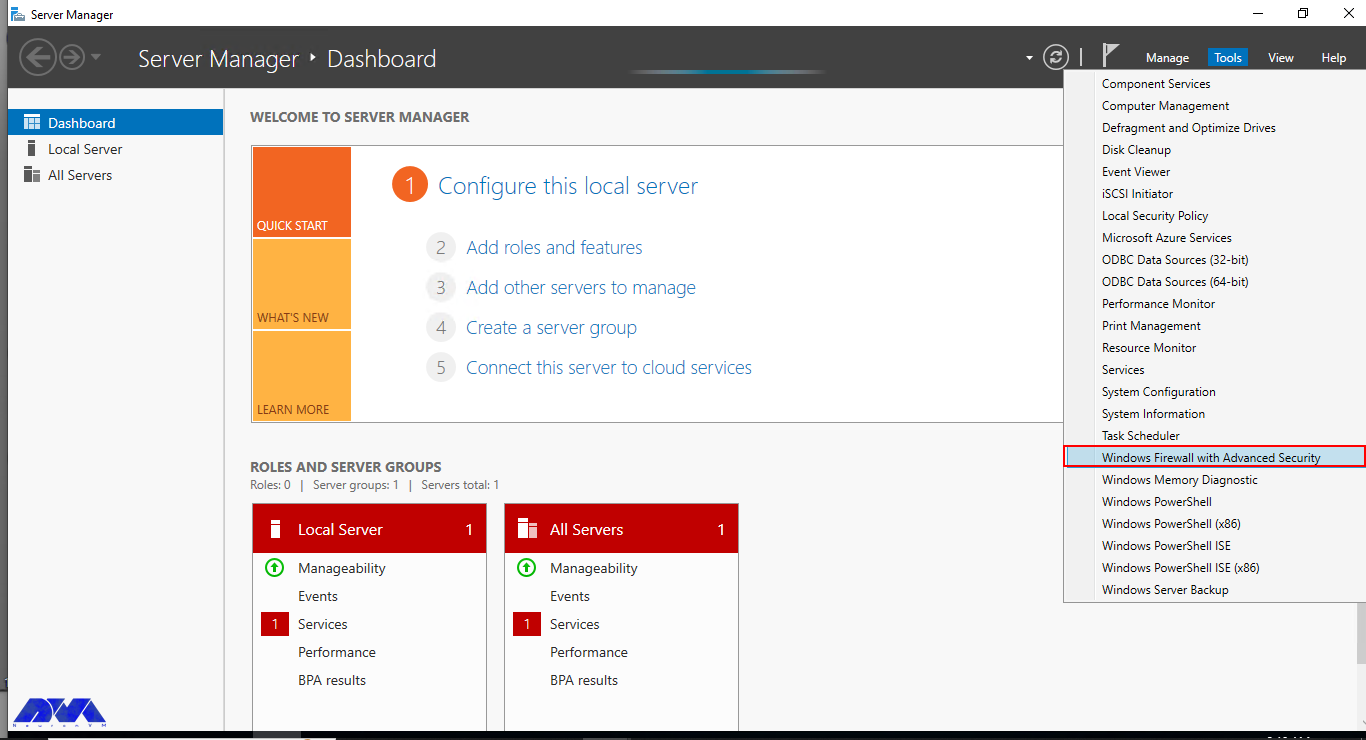
To turn on the firewall first, you need to open “Server Manager“, then click on the Tools tab, and then select Windows Firewall with Advanced Security:
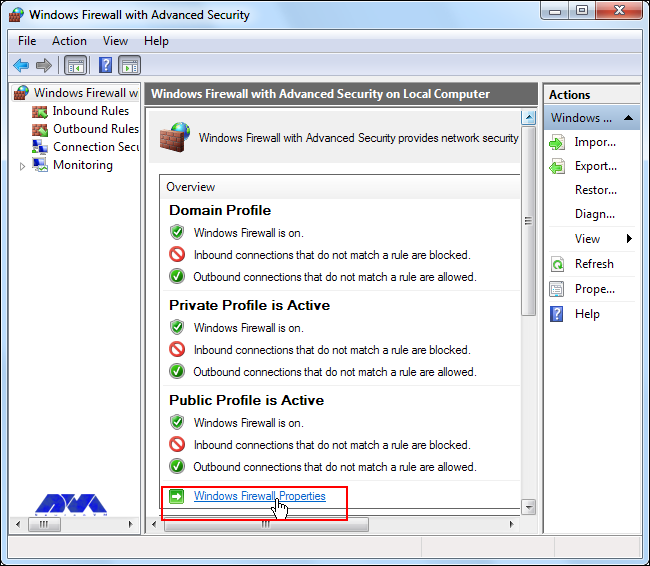
Now you can check the current status of Windows Firewall profiles from open group policy management and if it was not set to On. You need to click on Windows Firewall properties and turn on the service in each profile:
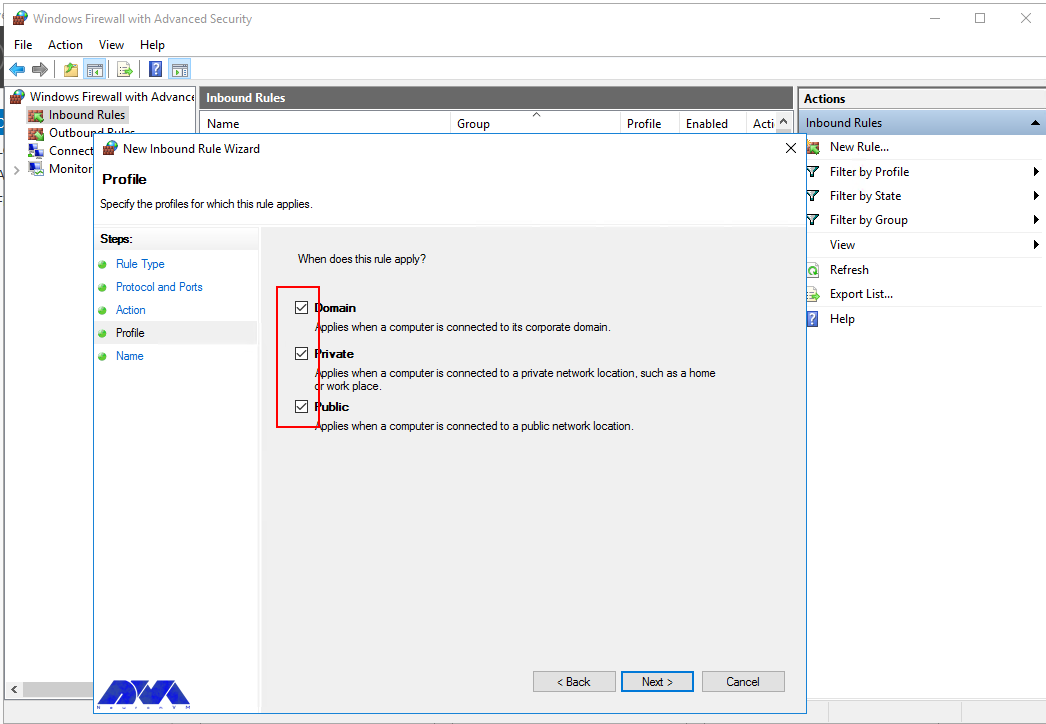
You can permit or block specific input and output network packets on your server and select multiple parameters for each inbound or outbound rule with the help of a Windows Firewall. Windows server profiles include Domain, Private, and Public groups. The Domain represents your server’s connection to a corporate domain network, Private is used to connecting to your home or workplace network, and Public represents insecure public network locations.
How to Open an Inbound Port
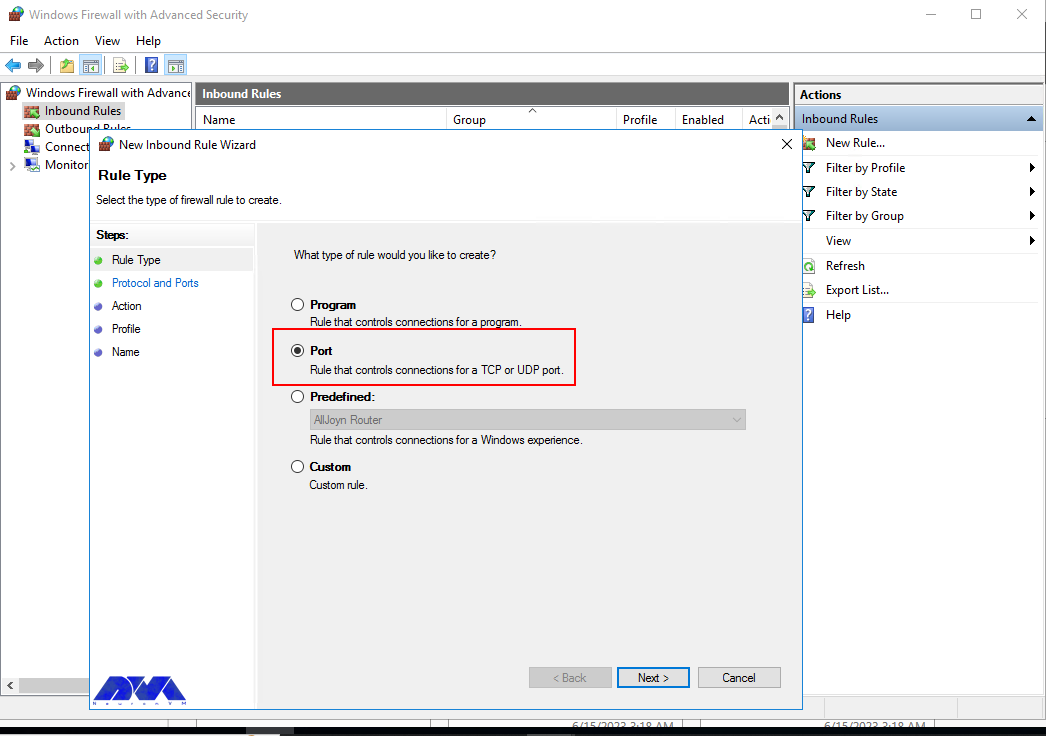
First, you need to launch the Windows Firewall with Advanced Security from the Tools sub-menu under Server Manager. Select Inbound Rules from the left panel of the Firewall console. Then click on New Rule under the right sub-menu of Inbound Rules under Actions:
Now you should select Port in the rule wizard section and then click on Next:
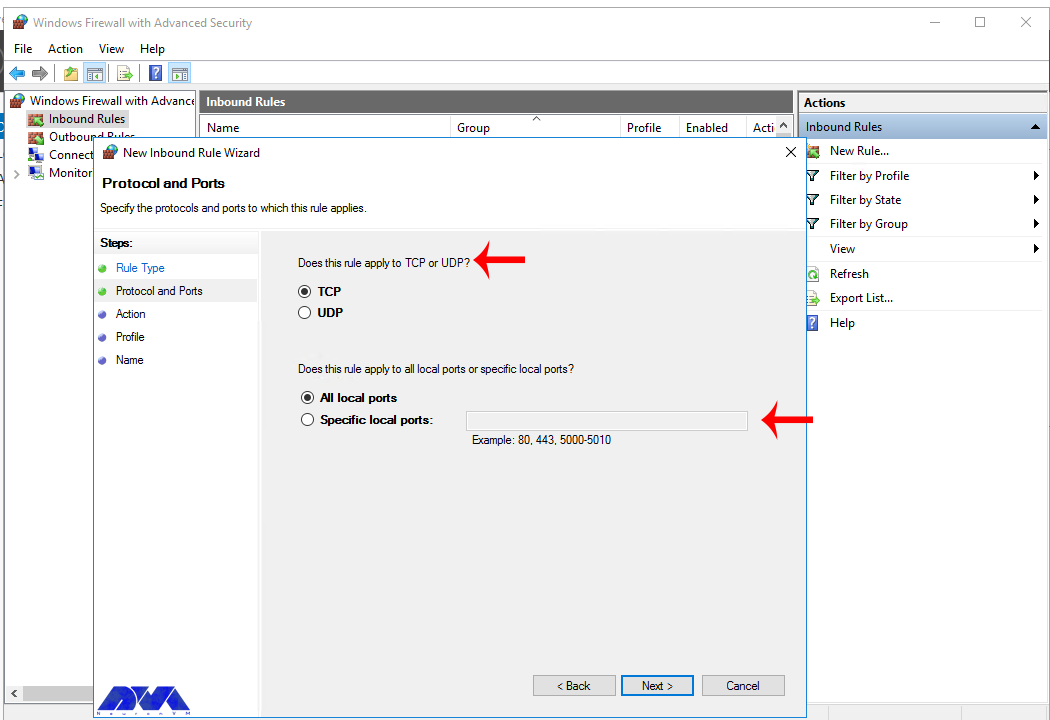
In this step, you have to choose whether the new rule applies to a TCP or UDP port on the server. Then select your desired ports and enter their number. Also, you can enter ports range or multiple ports separated by – and, respectively, and finally click Next:
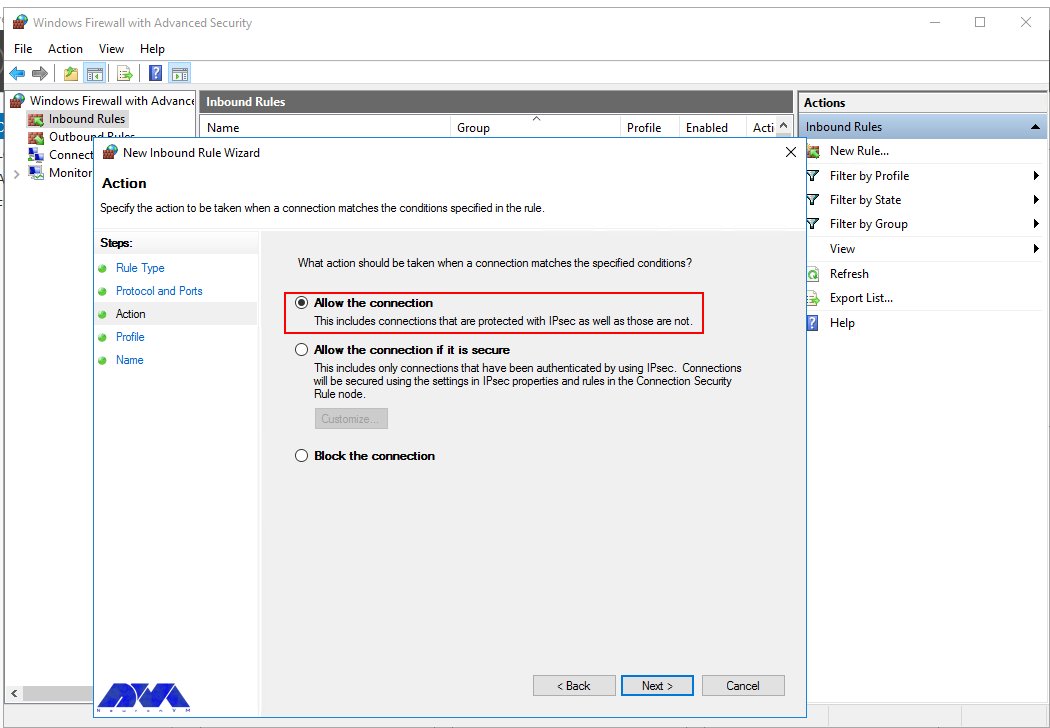
You can use Allow the connection to allow incoming connections to the specified server port.
Allow the connection if it is secure will authenticate with IP security and you can deny or allow the connection. For example, HTTP connections will be allowed and HTTP blocked.
Block the connection will block all incoming connections to your server through the specified port.
In this step, you should select the allow the connection to open port option and then click Next to assign a new rule to the profile:
Now select Domain, Private, and Public, or select all to apply the Firewall rule in multiple profiles:
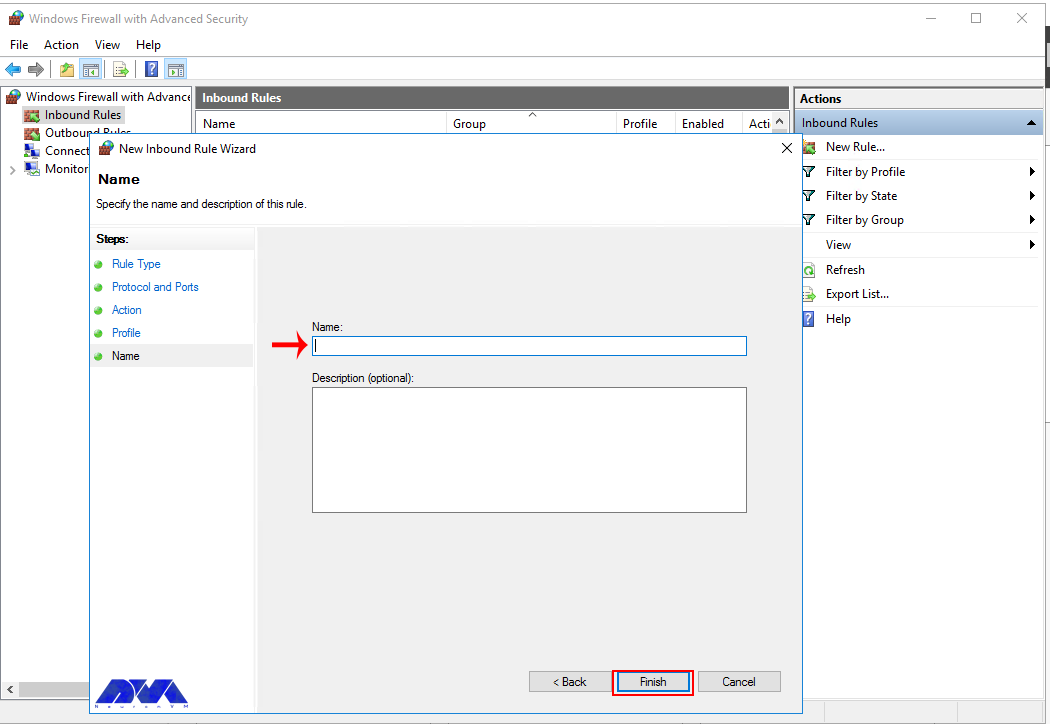
Remember to give your new firewall rule a name and description. Finally, you should click on Finish to enable the new rule. All connections to the server that match the port are accepted:
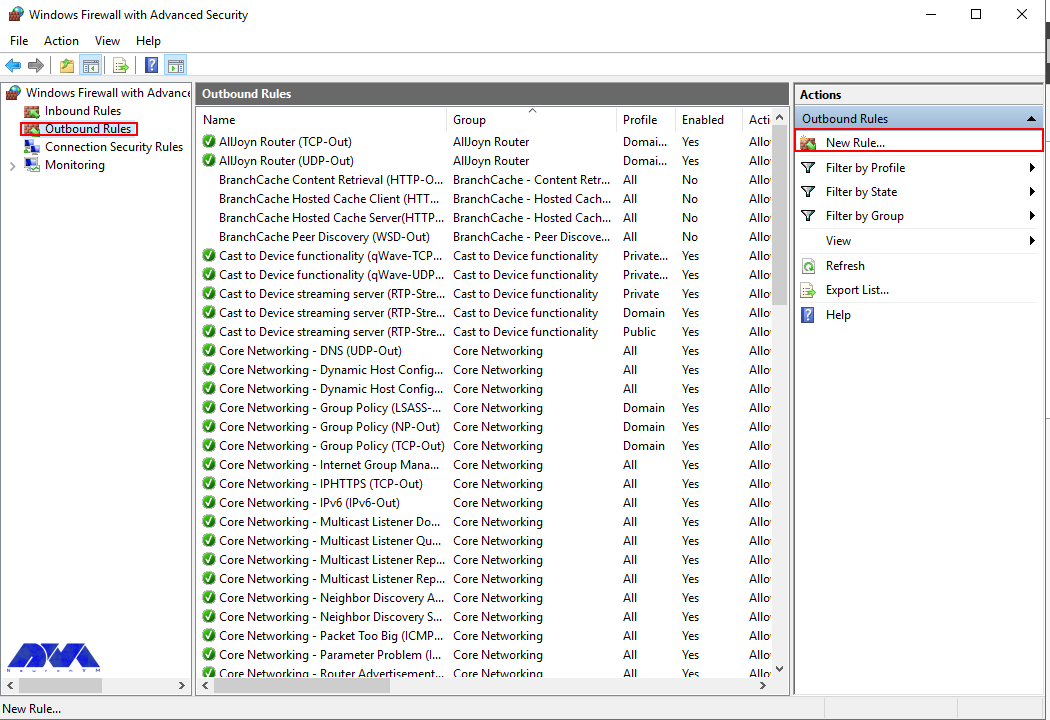
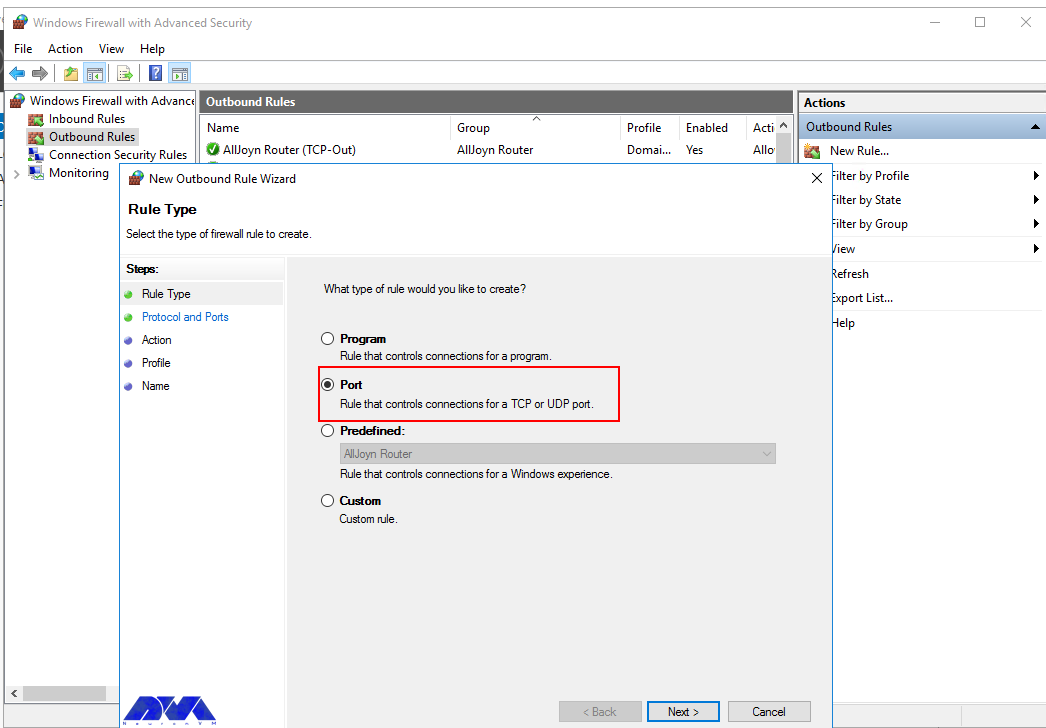
How to Open an Outbound Port
First, you should go to the Windows Firewall with Advanced Security console and click on Outbound Rules on the left pane. Now you will see a list of available outgoing connection rules. Then, you need to click on New Rule on the right pane under the outbound rules node.
In the next step, you should select Port as the rule type in the new output rule wizard and then click Next:
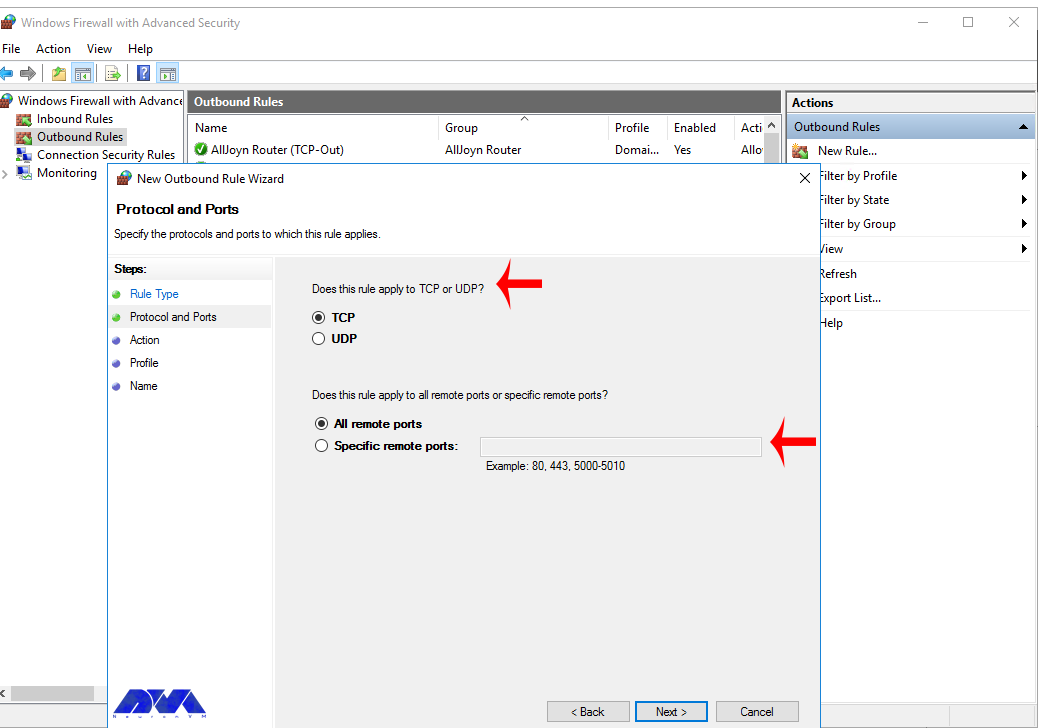
Next, you have to choose whether the new rule applies to the TCP port or UDP. Select specific remote ports and then enter the port number of the server you want:
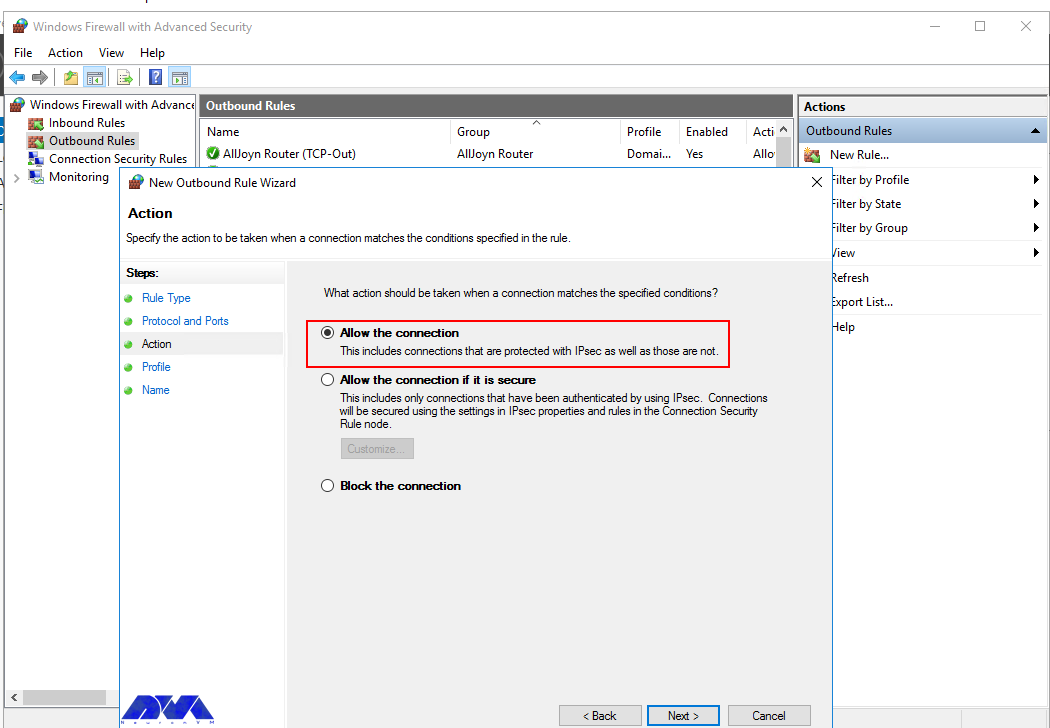
In this step, after selecting Allow the connection on the Action page, you should click Next:
Then you need to select the Server Profile on which the rule should be enabled:
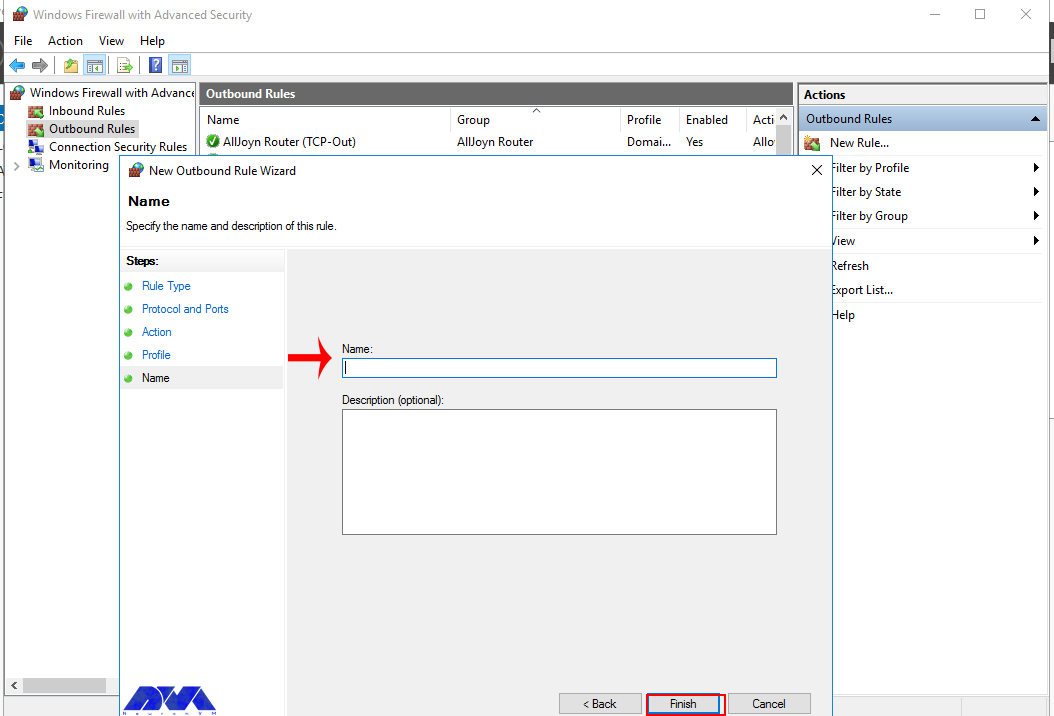
Remember to name the new output rule and describe it. Finally, you should click Finish to enable the outbound rule for the target port on all selected server profiles:
How to Open a Port through Windows PowerShell
To do this first, you should go to the Windows Start menu and search for PowerShell and open it. Then you have to replace your settings in the following command:
New-NetFirewallRule -Enabled:True -LocalPort 21 -Protocol TCP -Direction Inbound -Profile Domain -Action Allow -DisplayName example opening a port rule"
The words in the above command indicate:
New-NetFirewallRule: It will create a new Firewall rule.
Enabled: It enables the new rule and by default, it will be set to True.
LocalPort: It is your target port number.
Protocol: It specifies the protocol associated with your port number.
Direction: It sets your target direction to either Inbound or Outbound.
Profile: It assigns the new rule to a server profile.
Action: It defines the state for the new firewall rule. You should enter Allow.
DisplayName: It sets a custom name for the new firewall rule.
Output:
PS C:\Users\Administrator> New-NetFirewallRule -Enabled:True -LocalPort 21 -Protocol TCP -Direction Inbound -Profile Domain -Action Allow -DisplayName "example opening a port rule"


Name : {427a1b12-ece6-4d54-847d-de482b227c6c}
DisplayName : example opening a port rule
Description :
DisplayGroup :
Group :
Enabled : True
Profile : Domain
Platform : {}
Direction : Inbound
Action : Allow
EdgeTraversalPolicy : Block
LooseSourceMapping : False
LocalOnlyMapping : False
Owner :
PrimaryStatus : OK
Status : The rule was parsed successfully from the store. (65536)
EnforcementStatus : NotApplicable
PolicyStoreSource : PersistentStore
PolicyStoreSourceType : Local
That is it!
Conclusion
This article taught you how to configure the Firewall on Windows Server 2016. You can use this article to open a network port on your Windows Server 2016. The server accepts incoming and outgoing connections through selected ports, but the Firewall blocks profile connections that don’t comply with port rules.
FAQ
Are there any other tools available for managing Windows Firewall?
Yes, you can use a command line provided by Microsoft.
Is it dangerous to turn off Windows Firewall?
It allows all the data packets to enter your network easily and makes it vulnerable to all kinds of Cyber attacks.
If you aim to install Xubuntu on VirtualBox, you are on the right pass. In this context, we will introduce you to the best way to install this beautiful and user-friendly operating system. Xubuntu is designed for those who want to get the most out of their services and is derived from the Ubuntu operating system.
What is Xubuntu?
As we mentioned in the introduction part, Xubuntu is a user-friendly and lightweight distribution based on Ubuntu which is used Xfce as its graphical desktop and is a stable desktop environment for users. a good feature of this distribution is its satisfactory performance on old hardware. Xubuntu is developed by Canonical Ltd. The noticeable point is that this operating system only includes GTK+ applications.
Prerequisites
In this section, we will examine Xubuntu installation step-by-step on VirtualBox. But before starting the installation process, it is better to provide the necessary prerequisites. You must first install VirtualBox on the system. We suggest that you visit the plans offered in NeuronVM to buy a Windows VPS server.
Download and Install VirtualBox
1- As the first step you should download the VirtualBox from the VirtualBox official website, so that, you can run Xubuntu on it and click on Windows hosts.
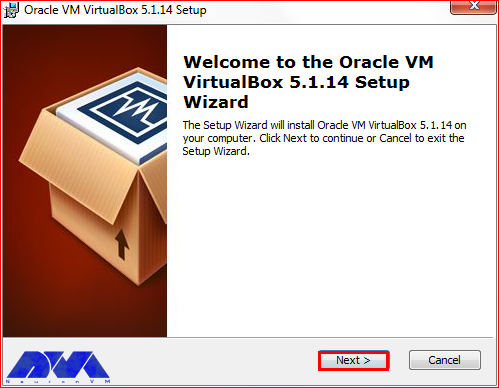
2- As you finished downloading the .exe file. You can start the installation process using the VirtualBox wizard. Press Next to continue:
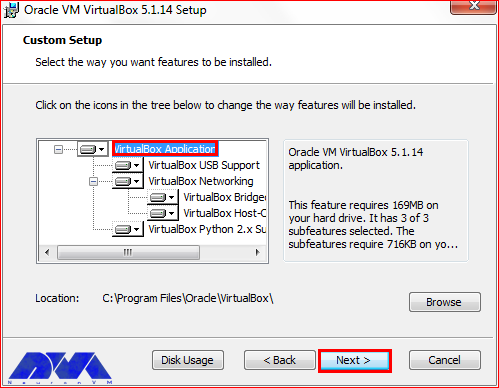
3- In the custom setup, choose the VirtualBox application and select the location of your installation file by pressing the Browse button. Now press Next:
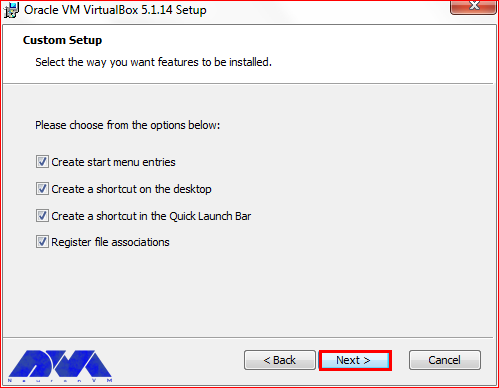
4- You can choose the way you want features to be installed and press Next:
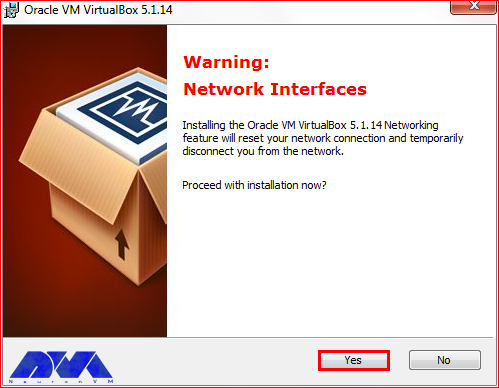
5- In this section, by pressing the Yes button you will accept the installation:
6- At the last window, you can pressthe Install button and start the installation:
***
8- As you finished the installation part, press the Finish button:
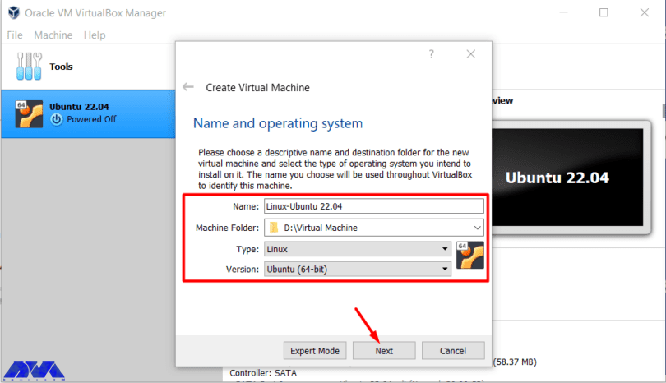
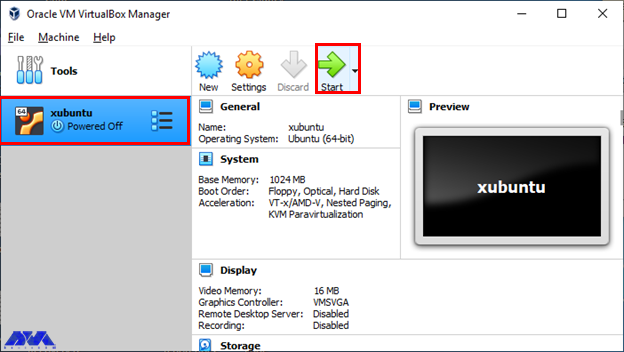
Now that you have VirtualBox on your system, it’s time to create it. For this reason, open the VirtualBox manager from your desktop shortcut and click onthe New button, which will look like this:
Here, you should choose a Name for your VirtualBox and set the type on Linux, and the version on Ubuntu:
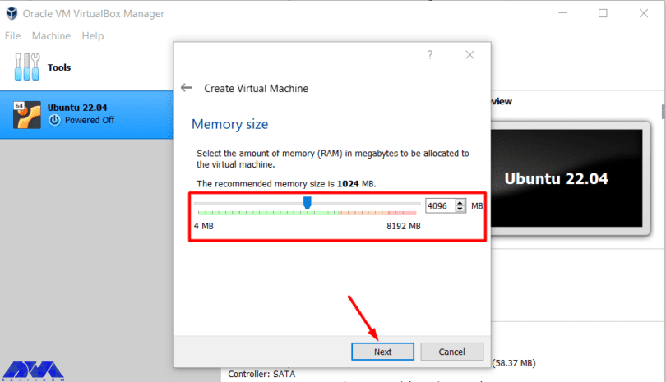
Now, choose the proper Memory size and press Next:
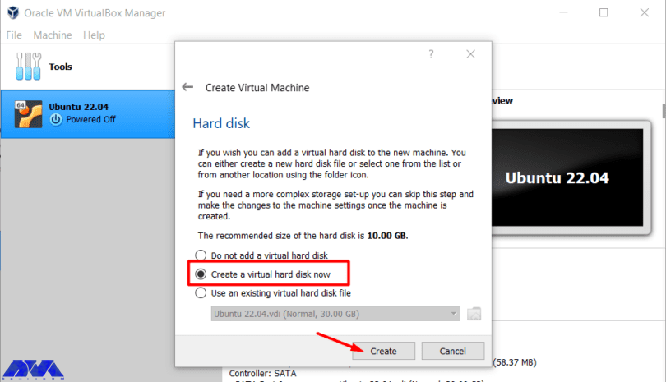
On the created virtual machine window, check the Create a virtual hard disk now option and Create to add a hard disk to your virtual machine:
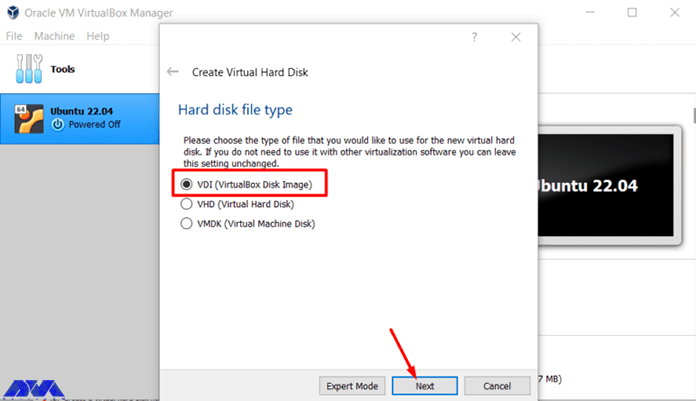
Here you should choose the type of file you want for your hard disk:
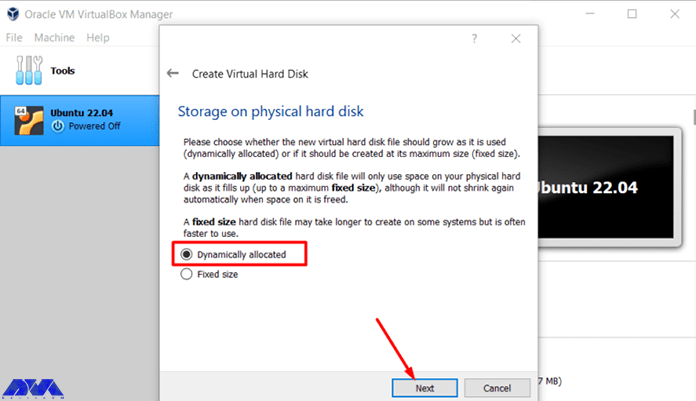
Choose the storage of your hard disk. It is better to check the Dynamically allocated option and press Next:
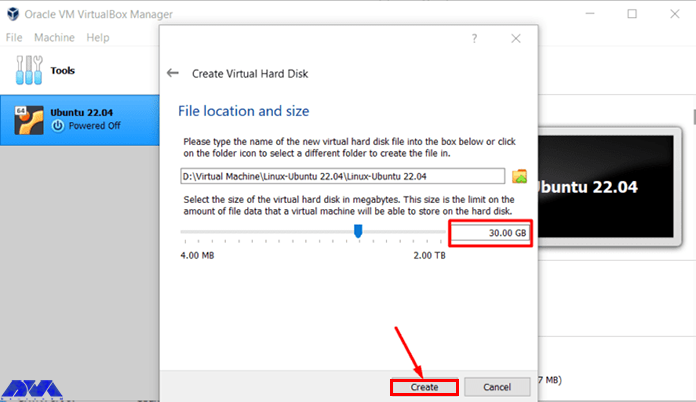
Here, in the first box, you should type the name of your virtual machine and specify the size of the virtual hard disk. At last, press create:
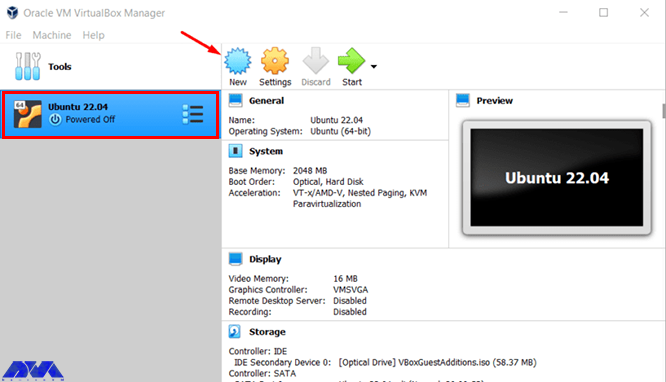
Now, you can see the created VirtualBox and it’s time to add the Xubuntu operating system.
How to Install Xubuntu on VirtualBox
After downloading the iso file, save the desired file in a specified path. Open VirtualBox and click on the Start button to boot the virtual machine and go to the browse part to put the Xubuntu file. Like the image below:
As you created the virtual machine, let’s do the instruction below to add Xubuntu. Notice that you should download the iso file of Xubuntu on a 64-bit operating system. For this reason, go to the official page of Xubuntu.
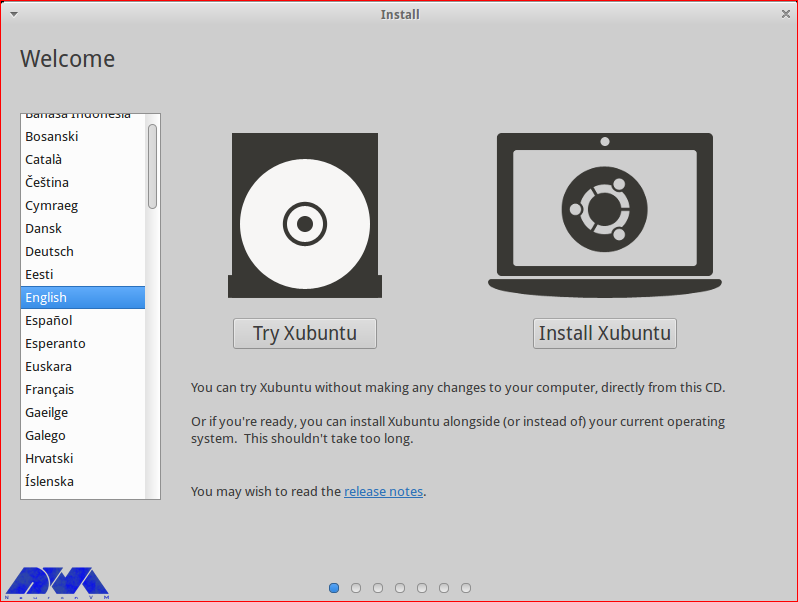
Here, you will see the Welcome page. Choose the preferred language and click on Install Ubuntu:
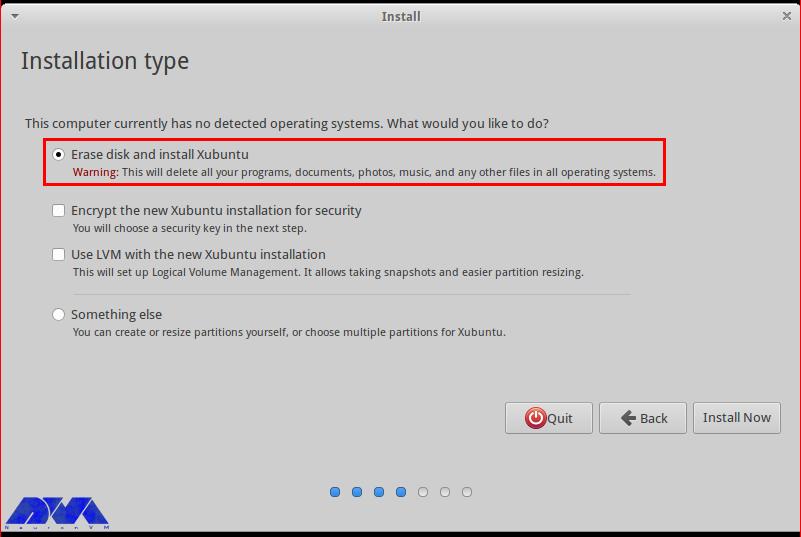
In this section, choose the Erase disk and install Xubuntu and click on Install Now:
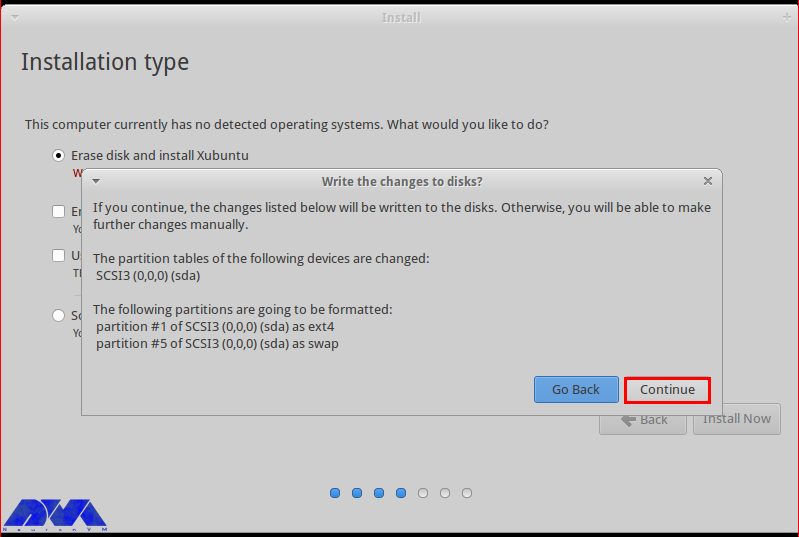
There will appear a pop-up window. Press Continue to confirm the changes you did to the disk:
Choose the proper location and go to the next part:
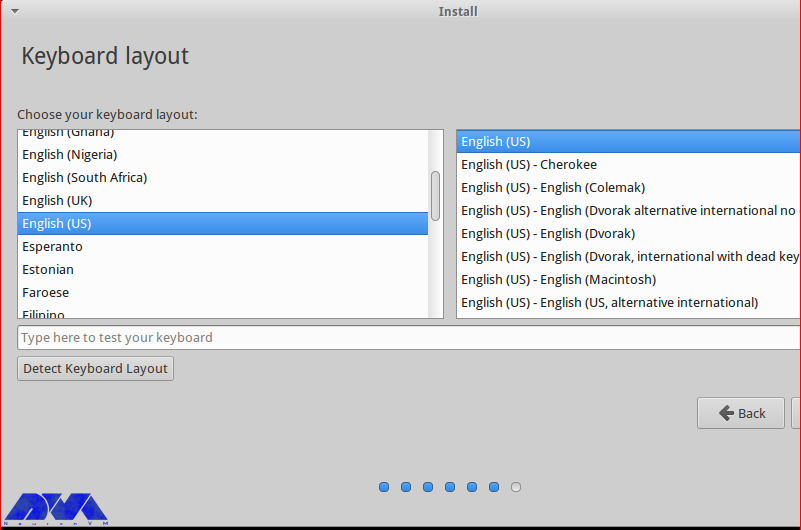
Choose the language of the keyboard layout and continue:
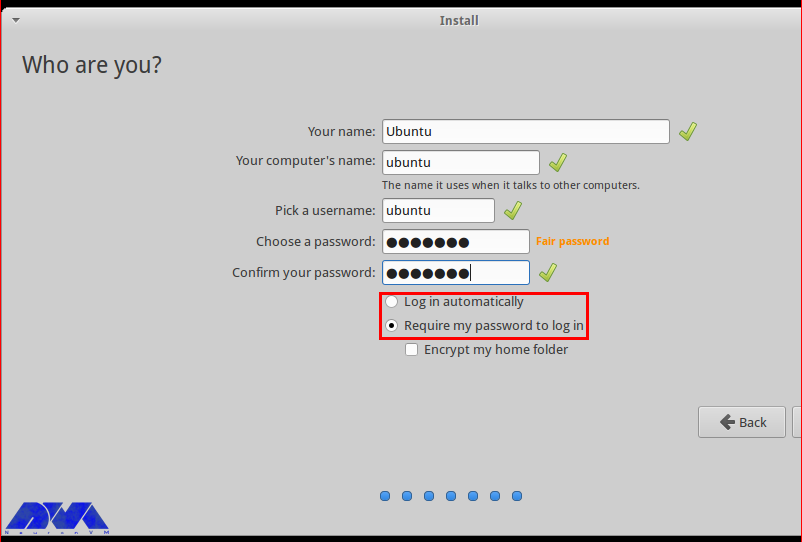
In this section, fill the related details and determine the login way:
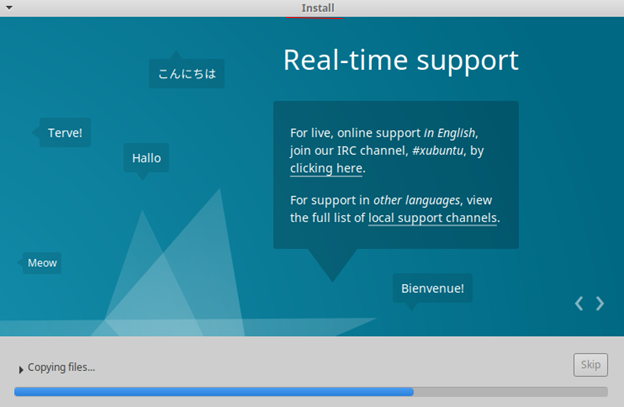
As you continue the process, here you will encounter the Xubuntu Welcome page and the installation process will begin:
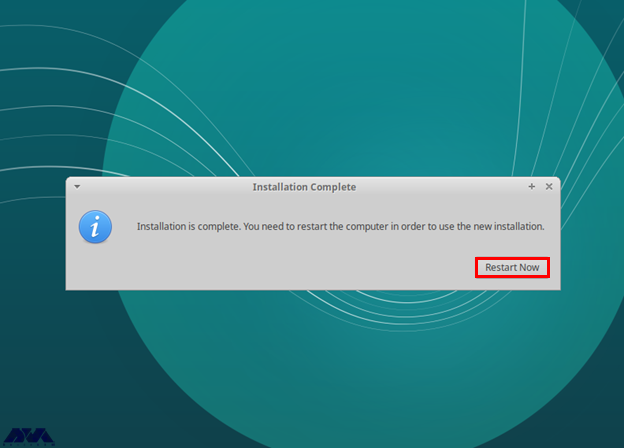
Well done. The following image shows that you successfully finished the installation part. You will restart the system to confirm the changes:
As a result, you have Xubuntu on your VirtualBox. Enjoy using this applicable operating system.
Conclusion
Xubuntu is an operating system, based on Ubuntu and if you decided to use it on your system, you should use a virtual machine. Also, as we mentioned in this article, you should download the iso file. We tried to guide you to install Xubuntu on Windows using a VirtualBox and hope it was helpful for you. If you have any questions, leave a comment.
FAQ
Is Xubuntu a stable version?
In fact, Xubuntu is the LTS version which means it has been supported for a long time. LTS versions are also provided as stable.
How much RAM is needed for Xubuntu?
As a minimum, you should allocate 512 MB RAM for Xubuntu but the recommended amount is 2 GB.
This tutorial proposes to give a complete guide for whom needs to know to troubleshoot WampServer problems on Windows 10. These problems may occur during the working process or running this server on your system. Read this article, if you have any problems on WampServer and solve them yourself.
How toTroubleshoot WampServer on Windows 10
It is possible that you will encounter problems during various stages such as the installation, startup, or working process of WampServer on Windows VPS or Windows 10. So, we will deal with some of these problems and show how to solve them in this section.
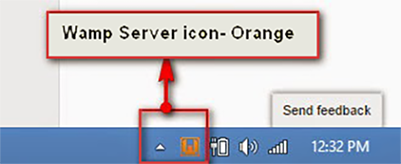
Problem 1. Why WampServer Icon Is Not Turning Green?
As you have installed WampServer, you will see the Icon in the trey. In a normal process, this icon goes red, then orange, and after that green. But it may stuck on orange. So you can not enter the MySQL console. As a result, you can not go to the phpMyAdmin site too:
One of the solutions is to right-click on the WampServer icon in the tray and select Restart All Services to be sure that all of the services are running in the right way:
Another reason may be that the Apache service doesn’t start. So, click on the icon and select Apache. Then choose service administration ‘wampapache64’ and Install service:
Then you will see the command prompt. Close it and go through the same pass to press the start/resume service. Now it will turn green.
If non of the solutions worked for you. Then, you should check the error log in the logs folder of the WampServer installation part, to find the exact problem.
Problem 2. Why WampServer is not Working Well?
One of the reasons for this problem can be insufficient system resources. These resources can be your computer’s memory, CPU, and so on. If you have enough resources then Wampserver will run smoothly. So, if your system is working slowly, it will affect your server’s performance.
Problem 3. How to Solve Port 80 problem?
If localhost/PHPMyAdmin is not accessible in the browser, it means that it is in use by another service and requires Apache to function. Apache is set on port 80. So, the solution is to change the port number instead of disabling or removing any other service. Go through this way:
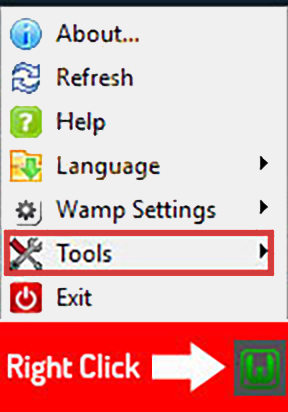
– Right-click on the wamp icon and select on Tools option. So, you will be able to change the port number:
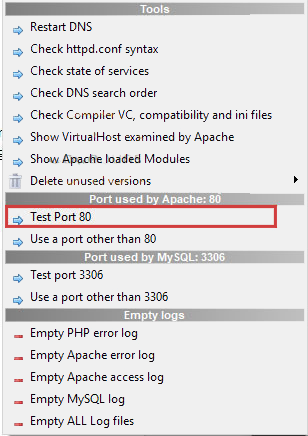
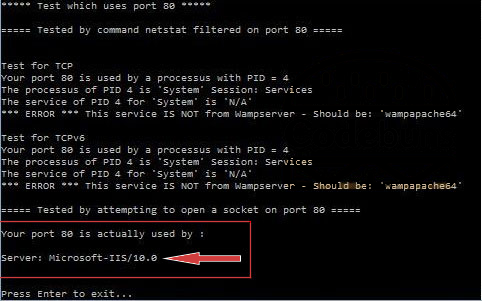
– Now, choose Test Port 80 option for Apache:
– Here, you will see the command prompt. It will show which program is using the port:
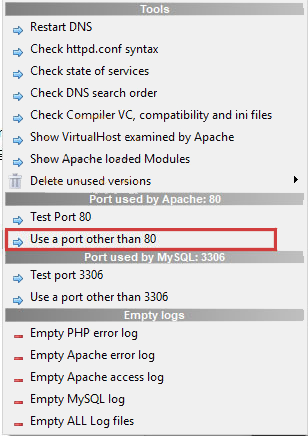
– Then, go to the option again and choose the Use a port other than 80 option:
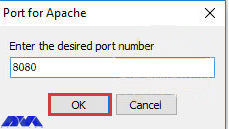
Here, enter the desired port for Apache. E.g. 8080:
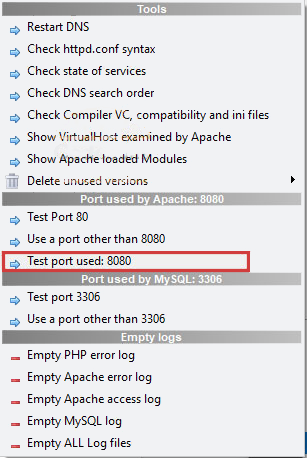
In the end, test the port to confirm that Apache is using it:
Problem 4. Why the WampServer Is Blocked?
There may be a verification problem with the firewall section. A firewall or antivirus may block WampServer for security issues. So, you should disable them for a short period and see if your problem is solved. If the problem is with the firewall, then add rules and exceptions to let the WampServer through the firewall or antivirus.
Conclusion
Here, we tried to focus on some common Wampserver problems on Windows 10. Also, we analyzed the issues and give some solutions for these problems. So, it can be a helpful guide for you. If you encounter any other issues or have any questions about WampServer, please share in a comment.